Manage API collections & Version Control through Postman

Tarun Kumar Chatterjee
 
Net – Technology Specialist
August 19, 2020
 
Rate this article
 
Views
2165

There is one recent requirement in my project to find out a way to manage postman PAI collections & keep it up to date by individual team members after every sprint delivery. First, I thought to keep the API collections in GIT repository but later found that Postman itself provide us options to manage the API versions controls & can be shared with team by creating a team workspace. So, I thought to share the detail steps we followed as it may be a common API requirement to many of us.

Let’s first create team workspace named as: Test_API_Collections in Postman

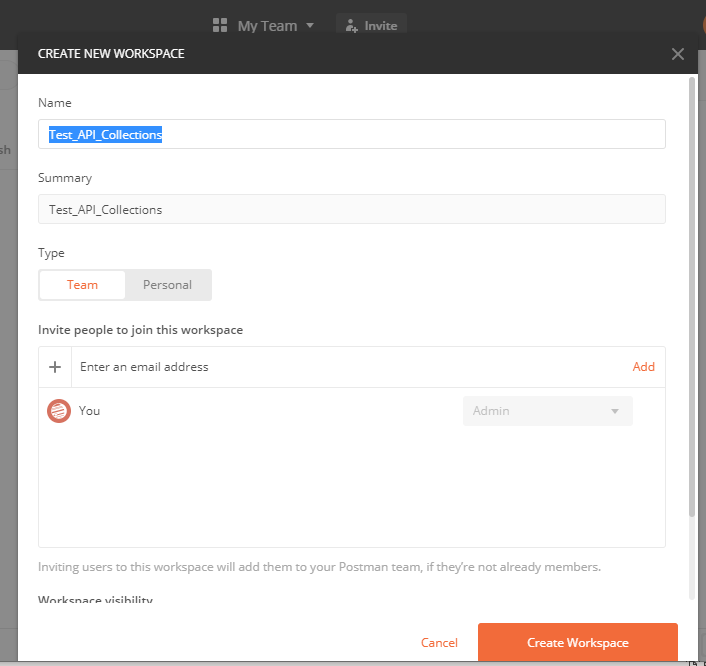
Select Teamwork space we just created & invite team members, we can also drag and drop a .csv or .txt file to bulk invite people. We can specify role so that everyone in team can view and join this workspace as Admin or Collaborator. However, post invitation team members will be able to access the same workspace.

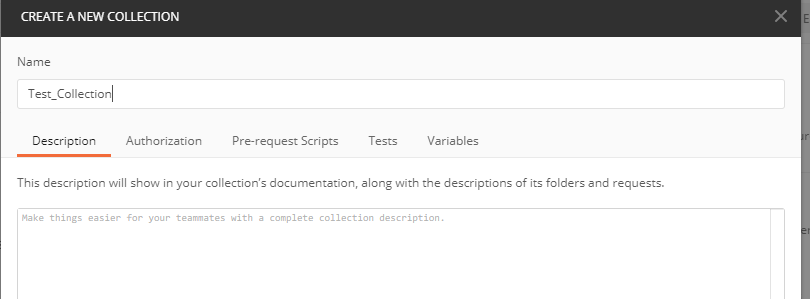
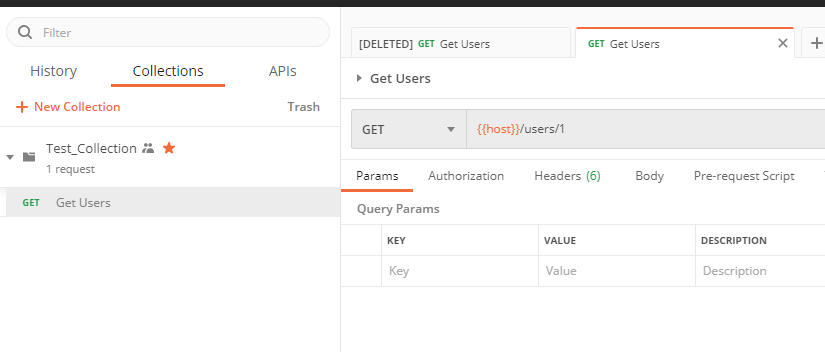
Now, we will create an API Collection & one Get request within it:

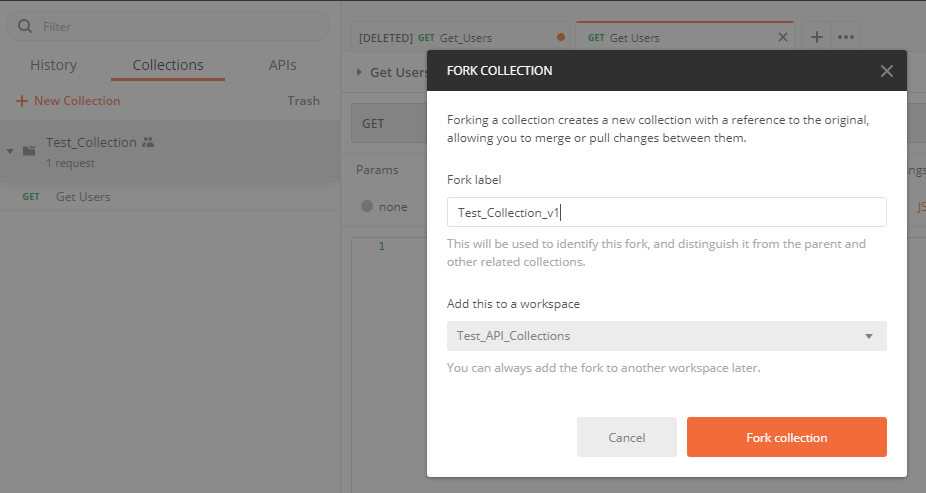
Let’s break down version control using the Postman fork and merge feature. In Postman, we can create forks, track and verify changes, be notified of and resolve conflicts, and merge changes. The fork and merge capability simplify version control so we can collaborate and work on different versions of our Postman Collections simultaneously.

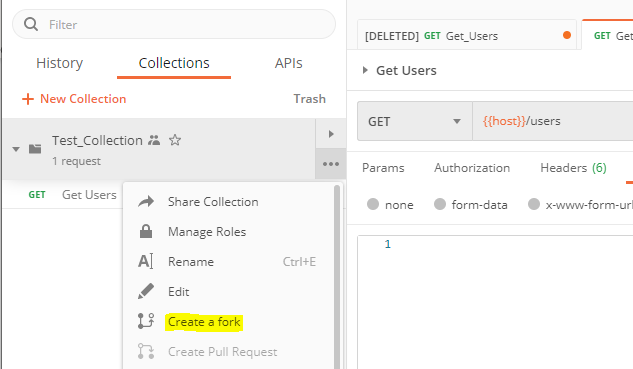
Go to parent collection and click the ellipsis (…) and click Create a fork.

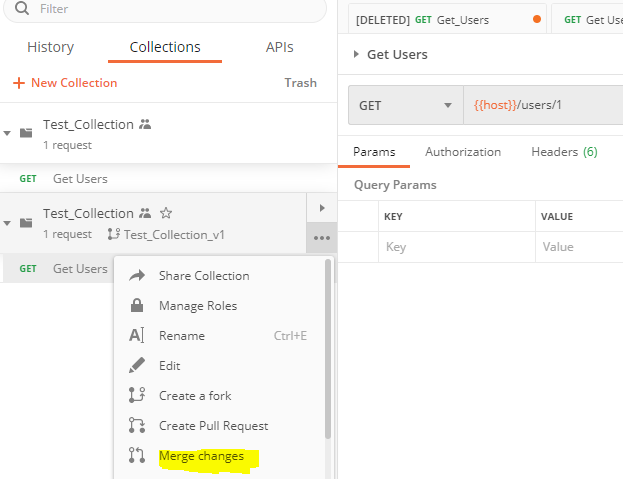
Testing purpose, we have changed request URL & added User Id as parameter to v1 branch.

Before merge, need to test v1 collection to make sure that the changes are working as expected. Once, we are ready then merge the changes to parent collection by following steps.

Go to forked collection and click the ellipsis (…) and click Merge changes.

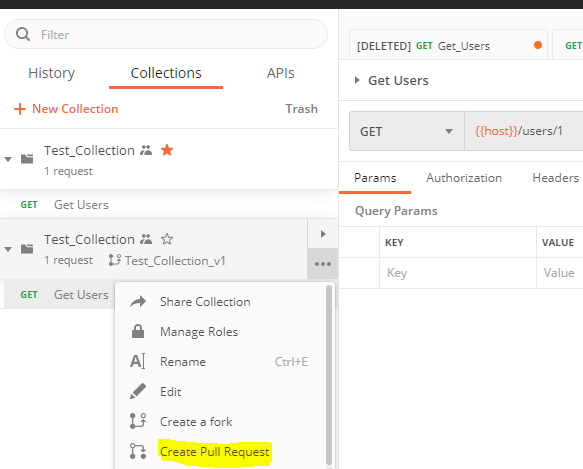
If multiple forked collections are being worked on simultaneously and a teammate updates the parent collection, then forked collection and the parent collection will be out of sync. In that case if when will go to Merge, it will throw a message: “The original collection has been modified since you last updated the fork. We’d recommend pulling changes before continuing”. Hence, it is always better need to start with a Pull request while going to Merge.

In my case, I changed original master collection & added a parameter 2: So requested URL is looking like:
{{host}}/users/2 to make sure we have conflict.

Go to forked collection and click the ellipsis (…) and click Create Pull Request.

It will redirect us to a web browser & if we check the changes then we can see that it is asking us to resolve the conflict first.

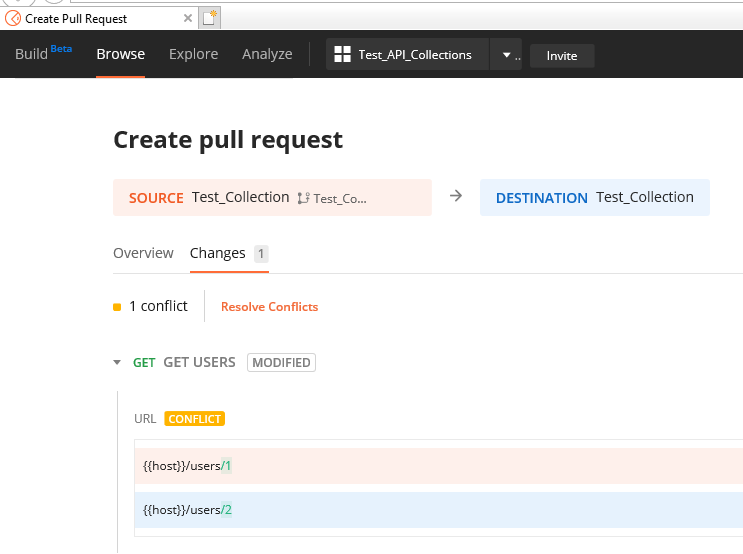
Go to Resolve Conflicts

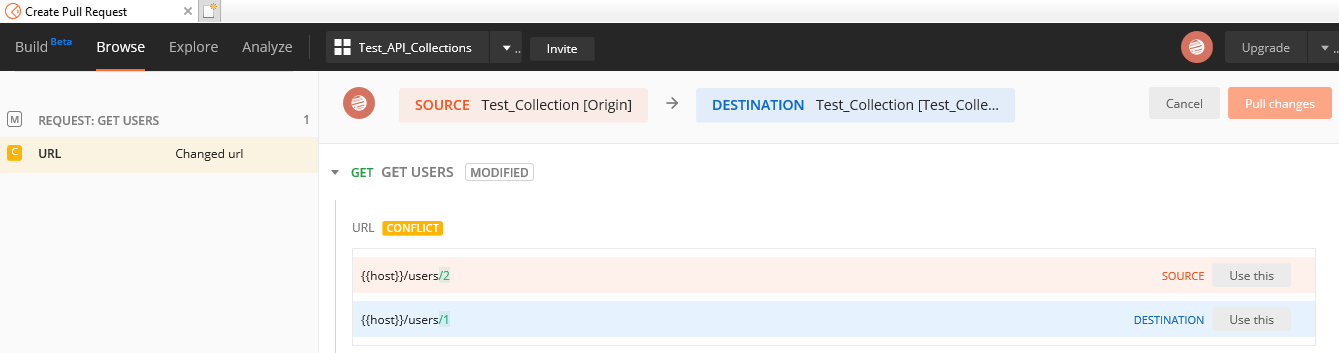
Select the changes we would like to keep & click on Pull Changes

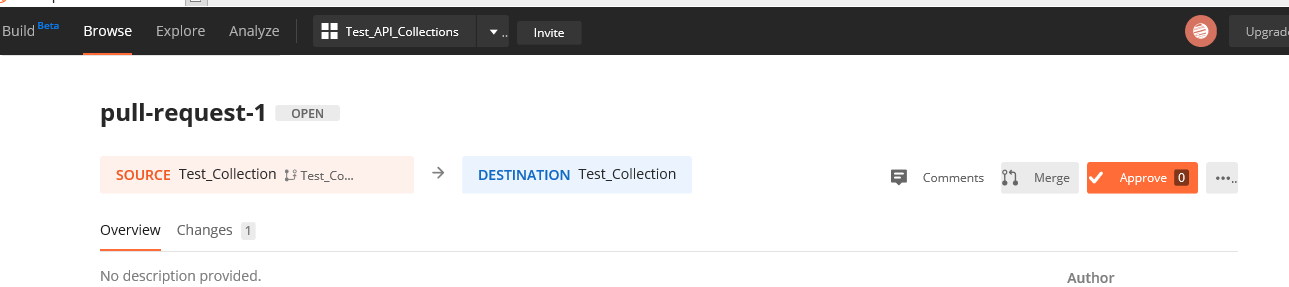
Provide a pull request change Title as: pull-request-1 & add the Reviewers if we want the change-set to approve before Merge.

Now we can go Merge the changes to Parent branch.

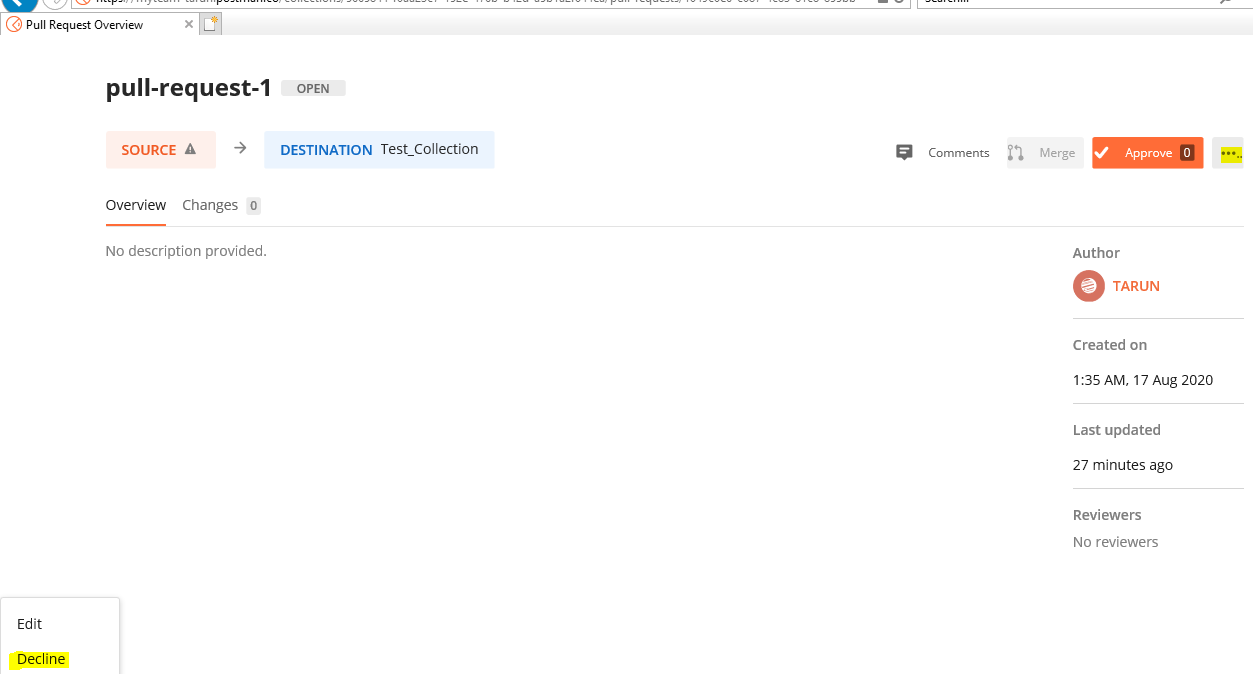
If we would like to decline pull request — > Go to create Pull Request — > Click On Destination — > Go to pull-request-1 — > Click on ellipsis (…) which is very right side of Approve button — > Click on Decline which is left bottom corner of the page — > Click on Decline Request

Postman provides us 3 options to choose from when merging with destination.

  • Merge changes – The destination (in this case, the parent collection) will be updated with the changes from the source (in this case, the forked collection) and the forked collection will remain as it is.
  • Merge changes and update source – Both the source and destination will be updated (they’ll be identical).
  • Merge changes and delete source – The destination (in this case parent collection) will be updated and the source (the forked collection) will be deleted.

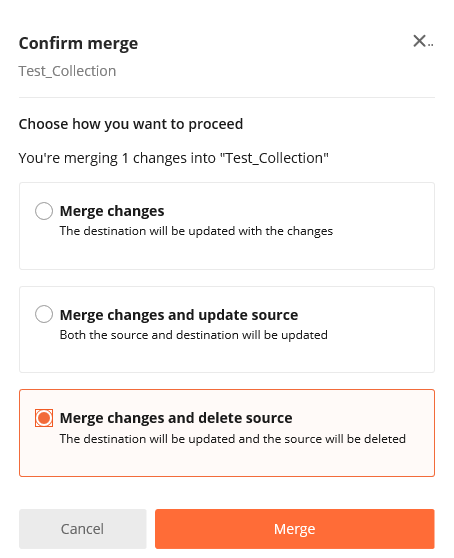
In my case I selected very last option & clicked on Merge

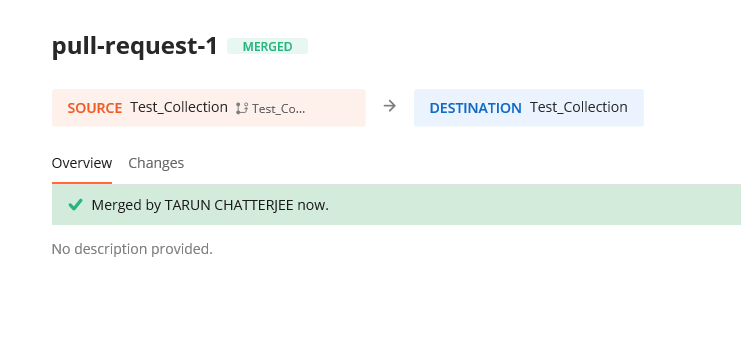
In Postman I can see the v1 branch got merged to parent & finally deleted.

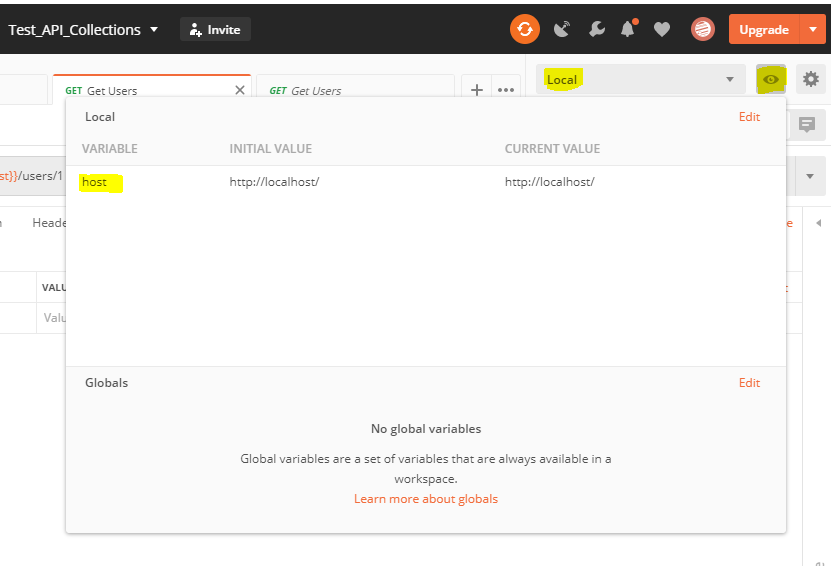
We can specify Environment variables to current workspace. In our case we added an Environment named as: Local & a variable name as: {{host}} within it. This can be shared to multiple work-spaces & also we can manage the team role as Editor/Viewer.

Hope this article is helpful.

Happy coding!
Tarun Kumar Chatterjee

Author Info

Tarun Kumar Chatterjee
 
Net – Technology Specialist
 
Rate this article
 
Tarun has been working in IT Industry for over 12+ years. He holds a B-tech degree. He is passionate about learning and sharing the tricks and tips in Azure, .Net ...read more
 

Nintex Workflow – How to handle the JSON Response from REST API

Sathish Nadarajan
 
Solution Architect
April 10, 2019
 
Rate this article
 
Views
4288

Recently, I met with an interesting scenario that, from a Nintex Workflow, I am making a REST API, which returns a JSON object and the API is capable to return only JSON. I need to process result from my Workflow. When I was searching for a JSON Parser action in the Nintex, Unfortunately, there is no action like that in Nintex. And this has been raised in the Nintex User Voice as well. Hence, they may include this action in the upcoming releases I guess.

But, we must find a work around for that and the workaround is also very simple. We have a Data Type called Collection and Dictionary on the Nintex. By that, we can easily process the JSON. But, we have to use the foreach at least once, to actual processing.

The Set Workflow Variable Action configuration is like below.

Always the APIResonse will be Text and we need to create a Collection Variable and assign the Text to the Collection. Then the collection can be manipulated.

The Sample JSON Object, which I am getting from the API is as follows.

 {
   "Entry": [
     {
       "Employee_ID": "10001",
       "LeaveDetails": [
         {
           "LeaveType": "Casual",
           "Date": "2016-11-05",
           "ApprovedDate": "2018-10-31T22:15:44.112-07:00",
           "Unit": "Days",
           "Units": "1"
         },
         {
           "LeaveType": "Casual",
           "Date": "2016-11-05",
           "ApprovedDate": "2018-10-31T22:15:44.112-07:00",
           "Unit": "Days",
           "Units": "1"
         },
  {
           "LeaveType": "Casual",
           "Date": "2016-11-05",
           "ApprovedDate": "2018-10-31T22:15:44.112-07:00",
           "Unit": "Days",
           "Units": "1"
          
       ],
       "Employee Name": "Sathish Nadarajan"
     }
   ]
 }
 

I have a parent entry called “Entry” which has the childs, EmpID, EmployeeName, LeaveDetails. The Leave Details is again an Array. Hence, that can be treated as a Dictionary. The EmpID, we need to get the “Entry” Collection.

Save that on the Output Variable “ReportEntry” as Collection.

From the “ReportEntry”, Now, let us get the “LeaveDetails” collection.

Now, we can do the ForEach loop and manipulate the details.

The Output Value TimeOffDetail is nothing but a Dictionary Variable. From that dictionary, we can access the appropriate variable like Date, Units etc.,

We can manipulate any tags by giving the appropriate index and tag names as below.

By this way, we can manipulate the JSON objects in the Nintex Workflows.


Happy Coding,

Sathish Nadarajan.

Category : Nintex, RestAPI

Author Info

Sathish Nadarajan
 
Solution Architect
 
Rate this article
 
Sathish is a Microsoft MVP for SharePoint (Office Servers and Services) having 15+ years of experience in Microsoft Technologies. He holds a Masters Degree in Computer Aided Design and Business ...read more
 

How To Make An API Call When End Of The Page Reached In React And Re-Render Components – Using API Pagination

Ahamed Fazil Buhari
 
Senior Developer
December 20, 2018
 
Rate this article
 
Views
2757

Hello everyone,

In this article we will see how to call an event from React compoenent when we reach end of the page. This functionality is useful when we have to make API calls based on pageIndex and pageSize. For example, if there are millions of data return by your API and you don’t want to show all the result in one single API call instead if you make call by pageIndex, pageSize (if your API permits) then when end of the page is scrolled, we can make API call to the server which return few more data and so on. Well, there many custom components available in github and this approach is more like FlatList in React Native.

Let’s say I have component called SearchResult and this will make API call and returns the result. The result will be loaded into other component which will loop through all the items, once the user reach end of the page then it will automatically make an API call with increased pageIndex and pageSize, because my API accepts pagination and payload. Main thing we need to notice here is how we handle event trigger when user reaches end of the page.

Well I am using typescript and office ui fabric for design, so my component looks more like below

 interface ISearchResultProps {
   searchInfo: any;
 }
 
 interface ISearchResultState {
   resultAll: any;
   isFetched: boolean;
   isError: boolean;
   isLoadingMore: boolean;
   loadMoreError: any;
   isEnd: boolean;
   error: any;
 }
 
 export default class SearchResult extends React.Component<
   ISearchResultProps,
   ISearchResultState
 > {
   constructor(props: ISearchResultProps) {
     super(props);
     this.state = {
       resultAll: {},
       isFetched: false,
       isError: false,
       isLoadingMore: false,
       isEnd: false,
       loadMoreError: "",
       error: ""
     };
     this.handleScroll = this.handleScroll.bind(this);
   }
 
   public async componentDidMount() {
     // EventListener for scroll
     window.addEventListener("scroll", this.handleScroll);
     // First API call
     let resultAll: any = await getResultsFromAPI(this.props.searchInfo);
     if (resultAll) {
       this.setState({
         resultAll: resultAll,
         isFetched: true
       });
     } else {
       this.setState({
         isFetched: true,
         isError: true
       });
     }
   }
 
   // this function will be called when user scrolling
   private handleScroll() {
     // condition to check, End of the page reached?
     if (window.innerHeight + window.scrollY >= document.body.offsetHeight) {
       const resultAll = this.state.resultAll;
       let searchQ = this.props.searchInfo;
       // Condition to avoid multiple API call when user reach end of Page before previous call is over
       if (resultAll.Common && !this.state.isLoadingMore && !this.state.isEnd) {
         this.setState(
           {
             isLoadingMore: true
           },
           async () => {
             try {
               searchQ.pageIndex = searchQ.pageSize;
               searchQ.pageSize = searchQ.pageSize + 20;
               searchQ.PollURL = resultAll.Common.PollURL;
               const newResult: any = await getResultsFromAPI(searchQ);
               if (newResult && newResult.Results.length > 0) {
                 // pushing values to existing state by using immutable-helper
                 // https://www.npmjs.com/package/immutability-helper
                 const immutableResult = update(this.state.resultAll, {
                   Results: { $push: newResult.Results }
                 });
                 this.setState({
                   resultAll: immutableResult,
                   isLoadingMore: false
                 });
               } else {
                 this.setState({
                   isEnd: true
                 });
               }
             } catch {
               this.setState({
                 loadMoreError: "Error while getting more data from the server.",
                 isLoadingMore: false
               });
             }
           }
         );
       }
     }
   }
 
   public render(): JSX.Element {
     return (
       <div>
         {!this.state.isFetched ? (
           <Spinner
             className="spinner-style"
             size={SpinnerSize.large}
             label="Getting, result..."
           />
         ) : this.state.isError ? (
           <MessageBar
             title={`Error while getting data from server. - ${
               this.state.error
             }`}
           />
         ) : this.state.resultAll.Results ? (
           this.state.resultAll.Results.map((result: any, key: number) => {
             return (
               <div key={key}>
                 <Results resultInfo={result} />
               </div>
             );
           })
         ) : (
           <MessageBar title="Something went wrong" />
         )}
         {this.state.resultAll && this.state.resultAll.length <= 0 && (
           <MessageBar title="No result found." />
         )}
         {this.state.loadMoreError && (
           <MessageBar title="Something went wrong" />
         )}
         {this.state.isLoadingMore && !this.state.isEnd && (
           <Spinner size={SpinnerSize.large} label="Loading, more results..." />
         )}
         {this.state.isEnd && <MessageBar title="End of search result" />}
       </div>
     );
   }
 }


Happy Coding

Ahamed

Category : React

Author Info

Ahamed Fazil Buhari
 
Senior Developer
 
Rate this article
 
Ahamed is a Senior Developer and he has very good experience in the field of Microsoft Technologies, especially SharePoint, Azure, M365, SPFx, .NET and client side scripting - JavaScript, TypeScript, ...read more
 

User Profile properties with REST API–SharePoint Office 365

Sriram
 
Technology Specialist
July 19, 2018
 
Rate this article
 
Views
26960


In this post lets have a look at how to get SharePoint user profile properties using the REST API.

Here is a quick reference for the REST API endpoints.

1) Get all properties of current user:

http://siteurl/_api/SP.UserProfiles.PeopleManager/GetMyProperties

2) Get single property of current user:

http://siteurl/_api/SP.UserProfiles.PeopleManager/GetMyProperties/PictureUrl
OR
http://siteurl/_api/SP.UserProfiles.PeopleManager/GetMyProperties?$select=PictureUrl

3) Get Multiple Properties for the current user:

http://siteurl/_api/SP.UserProfiles.PeopleManager/GetMyProperties?$select=PictureUrl,AccountName

4) Get all properties of Specific User:

For Office 365/SharePoint Online:
http://siteurl/_api/SP.UserProfiles.PeopleManager/GetPropertiesFor(accountName=@v)?@v=’i:0%23.f|membership|vardhaman@siteurl.onmicrosoft.com’
For SharePoint 2013 On-Premise:
http://siteurl/_api/SP.UserProfiles.PeopleManager/GetPropertiesFor(accountName=@v)?@v=’domain\username’

5) Get Specific UserProfile Property of Specific User:

For Office 365/SharePoint Online:
http://siteurl/_api/SP.UserProfiles.PeopleManager/GetUserProfilePropertyFor(accountName=@v,propertyName=’LastName’)?@v=’i:0%23.f|membership|vardhaman@siteurl.onmicrosoft.com’
For SharePoint 2013 On-Premise:
http://siteurl/_api/SP.UserProfiles.PeopleManager/GetUserProfilePropertyFor(accountName=@v,propertyName=’LastName’)?@v=’domain\username’


Below is the function to get user profile details for the particular user.

 function gettingUserProfileByAccountName(accountName) {
 
 $.ajax({
 
 url: _spPageContextInfo.webAbsoluteUrl + "/_api/SP.UserProfiles.PeopleManager/GetPropertiesFor(accountName=@v)?@v='"+accountName+"'",
 
 headers: {
 
 "Accept": "application/json; odata=verbose"
 
 },
 
 async: false,
 
 contentType: "application/json; odata=verbose",
 
 success: function (data) {
 
 var results;
 
 if (data.d) {
 
 results = data.d.UserProfileProperties.results;
 
 for (i = 0; i < results.length; i++) {
 
 if (results[i].Key == "WorkEmail") {
 
 $('input[title="Requestor Email"]').val(results[i].Value);
 
 }
 
 if (results[i].Key == "WorkPhone") {
 
 $('input[title="Requestor Phone"]').val(results[i].Value);
 
 }
 
 }
 
 }
 
 }
 
 });
 
 }
 

Author Info

Sriram
 
Technology Specialist
 
Rate this article
 
Sriram T has been working in IT industry for over 6 years He holds Bachelor's degree in Computer Science Engineering. Sriram write articles and blogs related to SharePoint 2013, SharePoint ...read more
 

Step by Step Procedure to Call SharePoint Office 365 REST API from Microsoft Flow

Sathish Nadarajan
 
Solution Architect
March 28, 2018
 
Rate this article
 
Views
18921

In the earlier articles, we saw various implementations in Microsoft Flow. Now, let us see how to Consume a SharePoint REST API call from Microsoft Flow.

As all of us understood, that there are a lot of Out of the Box SharePoint Actions (functionalities) are available in Microsoft Flow. But not all. Many times, we want to use REST API Calls to GET/POST data from and to SharePoint Office 365. In that case, we have an action called HTTP in Microsoft Flow. But it is not straight forward. We need to implement some sort of Authentication and Authorization techniques, so that the Flow can access the SharePoint Data Seamlessly.

Objective:

We are going to create a Flow, which will call the SharePoint REST API to get the Users within a SharePoint User Group.

Steps at High Level:

1. Create an APP in SharePoint Office 365 tenant.

2. Using the Client ID and the Client Secret ID, Get the Authentication (Access Token) from Azure Active Directory.

3. Using that Access Token, make a HTTP GET call to Get the Users on the specified Group

4. Send mail to the Admin or the requestor.

Section 1 – Create an APP in SharePoint Office 365 tenant

1. Login to the Office 365 Site Collection.

clip_image002

2. Register an APP by going to _layouts/15/appregnew.aspx.

clip_image004

3. Generate a Client ID and the Client Secret ID. Give a name for your App. Here, I have given it as “Flow2”. The App Domain and “localhost” and the Request URI as https://localhost. Though we don’t have a IIS Server setup, we can just use localhost, since we are not going to launch this app anywhere. We are going to Use this app to get the Access Token alone.

4. Go to the _layouts/15/appinv.aspx page and by using the Client ID on the above step, lookup the APP.

clip_image006

On the Permission Request XML field, paste the below XML.

<AppPermissionRequests AllowAppOnlyPolicy=”true”>

<AppPermissionRequest Scope=”http://sharepoint/content/sitecollection” Right=”FullControl” />

</AppPermissionRequests>

5. Once, the registration is completed, then by going to _layouts/15/appprincipals.aspx page, we can verify the APP with the Client ID and the Tenant ID.

clip_image008

6. With this, we are done with the APP Registration Portion.

Section 2 – Using the Client ID and Client Secret ID, get the Access token from the Flow.

1. Login to the https://flow.microsoft.com with valid credentials.

2. Click on My Flows. Create a Flow from a blank template.

clip_image010

3. Add a trigger “Manually trigger a flow” and enter the Input as GroupName and the default Value as MyGroup. (Here, you can give any value like “Enter a Group Name to fetch the Users on the group etc., ) We will be using the value to fetch the members on this group.

clip_image012

4. Add an action HTTP and Rename it as “Get Access Token”. This name is for our understanding and clarity only. We can give any name for the action. The action will be as below.

clip_image014

The Values of the Action are,

MethodPOST
Urihttps://accounts.accesscontrol.windows.net/<<TENANTID>>/tokens/oauth/2

The TenantID should be replaced with our actual tenant ID

HeadersContent-Type : application/x-www-form-urlencoded
BodyGrant_type=client_credentials&client_id=<<ClientID>>@<<TenantID>>&client_secret=<<ClientSecretID>>&resource=00000003-0000-0ff1-ce00-000000000000/<<TenantName>>.sharepoint.com@<<TenantID>>

5. Save the Flow by giving appropriate Name. In this case, I have given it as “Flow Demo”

6. Run the Flow and make sure that, we get the access token in the Body of the Output.

Section 3 – Using the Access token and make the second HTTP Call for the actual GET API call.

1. The Output of the previous action will be some thing like,

{
“token_type”: “Bearer”,
“expires_in”: “3599”,
“not_before”: “1522214470”,
“expires_on”: “1522218370”,
“resource”: “00000003-0000-0ff1-ce00-000000000000/sppalsmvp.sharepoint.com@*****TENANTID********”,
“access_token”: “*******ACCESS TOKEN*****”
}


2. This JSON object needs to be parsed to get the actual value – access_token.

3. For that, we are going to add another action called JSON PARSE.

clip_image016

4. The Content is the Output Body from the previous action and the Schema, is the one, which we are going to define. We require two parameters from the previous output.

a. Token_type – The value is going to be Bearer. We can hard code this on our upcoming action. But, since, this is coming as an output parameter, we are going to use this, instead of hard coding.

b. Access_token – This is the primary output expected from the previous action.

5. The schema should be,


{

“type”: “object”,

“properties”: {

                         “token_type”: {

                                                        “type”: “string”

                                                 },

                           “access_token”: {

                                                      “type”: “string”

                                                }

                     }

}


6. Now, let us add the actual HTTP action and we can also rename this. In this demo, I have not renamed. Kept as it is as HTTP.

clip_image018

7. The parameters are as below.

MethodGET
UriThe REST API URI. In my case, as we are going to get the users, the value is something like, https://SITEJNAME/_api/23b/sitegroups/getbyName(‘MyGroup’)/users?$select=Title
HeadersAuthorization : Bearer : ACCESSTOKEN

Accept : application/json;odata=verbose

8. Save the Flow and Execute it. On the output, we can see the various Users Title.

{
“d”: {
“results”: [
      {
“__metadata”: {
“id”: “https://sppalsmvp.sharepoint.com/sites/TeamSite/_api/Web/GetUserById(10)”,
“uri”: “https://sppalsmvp.sharepoint.com/sites/TeamSite/_api/Web/GetUserById(10)”,
“type”: “SP.User”
        },
“Title”: “Sathish Nadarajan”
      },
      {
“__metadata”: {
“id”: “https://sppalsmvp.sharepoint.com/sites/TeamSite/_api/Web/GetUserById(14)”,
“uri”: “https://sppalsmvp.sharepoint.com/sites/TeamSite/_api/Web/GetUserById(14)”,
“type”: “SP.User”
        },
“Title”: “User1”
      },
      {
“__metadata”: {
“id”: “https://sppalsmvp.sharepoint.com/sites/TeamSite/_api/Web/GetUserById(15)”,
“uri”: “https://sppalsmvp.sharepoint.com/sites/TeamSite/_api/Web/GetUserById(15)”,
“type”: “SP.User”
        },
“Title”: “User2”
      }
    ]
  }
}

9. On this JSON, we can do the parsing and get the Title of the users and send mail to the requestor or we can do the rest of the jobs.

10. The overall flow will look like below.

clip_image020

Hope this helps to understand about calling the SharePoint REST APIs from the Flow.

Happy Coding,

Sathish Nadarajan.

Author Info

Sathish Nadarajan
 
Solution Architect
 
Rate this article
 
Sathish is a Microsoft MVP for SharePoint (Office Servers and Services) having 15+ years of experience in Microsoft Technologies. He holds a Masters Degree in Computer Aided Design and Business ...read more
 

Swagger – To Explore The Schema Specification Of The REST API Service

Krishna KV
 
Team Leader, Aspire Systems
January 1, 2017
 
Rate this article
 
Views
9367

Swagger is a simple and powerful  option for defining the interface of a REST web service. Swashbuckle combined with the API Explorer and Swagger UI provides a rich discovery, documentation and playground for the API consumers. This article provides details on how to use Swagger with REST API

1. Create a new project in Web API Project Template in Visual Studio

2. Search Swagger in Nuget package manager and install the swashbuckler

After the package is installed, it will create a new file (SwaggerConfig.cs) under the APP_Start folder. This file is the swagger configuration.

3. Create the Web API service with necessary services.

4. Run the project

5. http://localhost:62862/swagger

It will lists all the Rest API Service available

clip_image002

We can test the service in the swagger directly.

clip_image004

 /// <summary>
 /// To get a specific customer value
 /// </summary>
 /// <param name="id">Input the Customer ID </param>
 /// <returns>It will return the customer id,name and address</returns>
 public Customer Get(int id)
 {
 	return new Customer { Id = 1001, Address = "dfs", Name = "Test" };
 }

Include the API Comments in the swagger help documentation

· Include the xml documentation in the file system of the project build folder.

clip_image006

Include the code in swaggerconfig.cs

 private static string GetXmlCommentsPath()
         {
             return string.Format(@"{0}binswagger.xml", System.AppDomain.CurrentDomain.BaseDirectory);
         }
         public static void Register()
         {
             var thisAssembly = typeof(SwaggerConfig).Assembly;
 
             GlobalConfiguration.Configuration 
                 .EnableSwagger(c =>
                     {
                         c.IncludeXmlComments(GetXmlCommentsPath());
 ....

clip_image008

Customize swagger ui using the stylesheet and Javascript

· Include the custom CSS and javascript file in the project and embedded the file to project.

· Select the css and javascript goto the properties

clip_image010

clip_image012

Swagger-cus.css

 .swagger-section #header {
     background-color: #c3d9ec;
   }
 

Swagger-cus.js

 $(document).ready(function () {
     var logo = $('#logo .logo__img');
     logo[0].src = '/content/logo.png';
     $('#logo .logo__title').text('API Explorer');
 });

clip_image014

Author Info

Krishna KV
 
Team Leader, Aspire Systems
 
Rate this article
 
Krishna K.V has been working in IT Industry for over 7+ years. He holds a Master Degree in Information Technology. He is more interested to learn and share new technologies, ...read more
 

How to call a Search API using REST using JavaScript from SharePoint Hosted App in SharePoint 2013

Sathish Nadarajan
 
Solution Architect
April 15, 2015
 
Rate this article
 
Views
22412

In this article, let us see, how to create a simple SharePoint Hosted Application and make a REST API call using the JavaScript in SharePoint 2013.

Let us go with a step by step procedures.

1. Open the Visual Studio with “Run as Administrator”

image

2. On the New Project, Select “App for SharePoint 2013”

3. Give a Site Collection on which we want to deploy our App. I would suggest, for the development purpose, Give any of the “Developer Site” template.

image

4. Select the “SharePoint Hosted” on the dropdown and select “Finish”.

5. The solution will looks like as below.

image

6. Our App is going to get launched with this Default.aspx. If you closely look at that page, there is a reference for a file called “App.Js”. Actually this is the file which we are going to do most of our Activities.

7. As all of us know, that the SharePoint Hosted App cannot use any Server Side Coding. Hence, all the coding needs to be done by using JavaScript CSOM only.

8. That’s the reason, this App.Js is getting more importance.

9. Let us open App.Js and you can find the document.ready Event readily available for us.

10. There are certain functionalities by default written to show a sample for us.

11. We are not going to use them.

12. The App.Js looks like

 'use strict';
 
 var context = SP.ClientContext.get_current();
 var user = context.get_web().get_currentUser();
 
 // This code runs when the DOM is ready and creates a context object which is needed to use the SharePoint object model
 $(document).ready(function () {
     getUserName();
 });
 
 // This function prepares, loads, and then executes a SharePoint query to get the current users information
 function getUserName() {
     context.load(user);
     context.executeQueryAsync(onGetUserNameSuccess, onGetUserNameFail);
 }
 
 // This function is executed if the above call is successful
 // It replaces the contents of the 'message' element with the user name
 function onGetUserNameSuccess() {
     $('#message').text('Hello ' + user.get_title());
 }
 
 // This function is executed if the above call fails
 function onGetUserNameFail(sender, args) {
     alert('Failed to get user name. Error:' + args.get_message());
 }
 

13. Now let me modify this App.Js as below. The Javascripts are self-explanatory.

 'use strict';
 
 var context = SP.ClientContext.get_current();
 var user = context.get_web().get_currentUser();
 var Results;
 
 // This code runs when the DOM is ready and creates a context object which is needed to use the SharePoint object model
 $(document).ready(function () {
     //getUserName();
     showToolbar();
 });
 
 function showToolbar()
 {
     $("toolbarDiv").show();
 }
 
 function executeQuery(queryTerms)
 {
     Results = {
         element: '',
         url: '',
         init: function (element) {
             Results.element = element;
             Results.url = _spPageContextInfo.webAbsoluteUrl + "/_api/search/query?querytext='" + queryTerms + "'";
         },
         load: function () {
             $.ajax({
                 url:Results.url,
                 method: "GET",
                 headers: { "ACCEPT": "application/json;odata=verbose" },
                 success: Results.onSuccess,
                 error : Results.onError
             });
         },
         onError: function (error) {
             alert(JSON.stringify(error));
         },
         onSuccess: function (data) {
 
             var results = data.d.query.PrimaryQueryResult.RelevantResults.Table.Rows.results;
 
             $("#resultsDiv").append('<table>');
 
             $.each(results, function () {
                 $("#resultsDiv").append('<tr>');
                 $.each(this.Cells.results, function () {
                     $("#resultsDiv").append('<td>' + this.Value + '</td>');
                 });
                 $("#resultsDiv").append('</tr>');
             });
 
             $("#resultsDiv").append('</table>');


         }
     }
 
     Results.init($("resultsDiv"));
     Results.load();
 }
 
 // This function prepares, loads, and then executes a SharePoint query to get the current users information
 function getUserName() {
     context.load(user);
     context.executeQueryAsync(onGetUserNameSuccess, onGetUserNameFail);
 }
 
 // This function is executed if the above call is successful
 // It replaces the contents of the 'message' element with the user name
 function onGetUserNameSuccess() {
     $('#message').text('Hello ' + user.get_title());
 }
 
 // This function is executed if the above call fails
 function onGetUserNameFail(sender, args) {
     alert('Failed to get user name. Error:' + args.get_message());
 }
 

14. And the Default.aspx will be like

 <%-- The following 4 lines are ASP.NET directives needed when using SharePoint components --%>
 
 <%@ Page Inherits="Microsoft.SharePoint.WebPartPages.WebPartPage, Microsoft.SharePoint, Version=15.0.0.0, Culture=neutral, PublicKeyToken=71e9bce111e9429c" MasterPageFile="~masterurl/default.master" Language="C#" %>
 
 <%@ Register TagPrefix="Utilities" Namespace="Microsoft.SharePoint.Utilities" Assembly="Microsoft.SharePoint, Version=15.0.0.0, Culture=neutral, PublicKeyToken=71e9bce111e9429c" %>
 <%@ Register TagPrefix="WebPartPages" Namespace="Microsoft.SharePoint.WebPartPages" Assembly="Microsoft.SharePoint, Version=15.0.0.0, Culture=neutral, PublicKeyToken=71e9bce111e9429c" %>
 <%@ Register TagPrefix="SharePoint" Namespace="Microsoft.SharePoint.WebControls" Assembly="Microsoft.SharePoint, Version=15.0.0.0, Culture=neutral, PublicKeyToken=71e9bce111e9429c" %>
 
 <%-- The markup and script in the following Content element will be placed in the <head> of the page --%>
 <asp:Content ContentPlaceHolderID="PlaceHolderAdditionalPageHead" runat="server">
     <script type="text/javascript" src="../Scripts/jquery-1.7.1.min.js"></script>
     <script type="text/javascript" src="/_layouts/15/sp.runtime.js"></script>
     <script type="text/javascript" src="/_layouts/15/sp.js"></script>
 
     <!-- Add your CSS styles to the following file -->
     <link rel="Stylesheet" type="text/css" href="../Content/App.css" />
 
     <!-- Add your JavaScript to the following file -->
     <script type="text/javascript" src="../Scripts/App.js"></script>
 </asp:Content>
 
 <%-- The markup in the following Content element will be placed in the TitleArea of the page --%>
 <asp:Content ContentPlaceHolderID="PlaceHolderPageTitleInTitleArea" runat="server">
     Page Title
 </asp:Content>
 
 <%-- The markup and script in the following Content element will be placed in the <body> of the page --%>
 <asp:Content ContentPlaceHolderID="PlaceHolderMain" runat="server">
 
     <div>
         <p id="message">
             <!-- The following content will be replaced with the user name when you run the app - see App.js -->
             initializing...
         </p>
     </div>
 
     <div id="toolbarDiv" >
         <input type="text" style="width:200px" id="queryTerms" />
         <button onclick="executeQuery($get('queryTerms').value);return false;">Search</button>
     </div>
     <div id="resultsDiv">
 
     </div>
 </asp:Content>
 

15. With this we are ready to deployment. But before the deployment, make sure that our APP has appropriate permission to do a search. For that, on the AppManifest.xml file, the following permission level should be given.

image

DOWNLOAD THE SOURCE HERE

Happy Coding.

Sathish Nadarajan.

Author Info

Sathish Nadarajan
 
Solution Architect
 
Rate this article
 
Sathish is a Microsoft MVP for SharePoint (Office Servers and Services) having 15+ years of experience in Microsoft Technologies. He holds a Masters Degree in Computer Aided Design and Business ...read more
 

Leave a comment