How to Add Video Embed Webpart on SharePoint Office 365 Modern pages using C# CSOM Programmatically

Sathish Nadarajan
 
Solution Architect
January 8, 2019
 
Rate this article
 
Views
3542

In this article, let us see how to add a Video Embed Webpart Programmatically using C# in Office 365 Modern Pages.

1. Add the Video to the Video APP.


2. Upload the Videos.

3. Get the URL of the Videos

4. Execute the below Piece of code.

 public static void AddVideoEmbedWebPartToModernPage()
         {
             try
             {
                 OfficeDevPnP.Core.AuthenticationManager authMgr = new OfficeDevPnP.Core.AuthenticationManager();
 
                 using (var ctx = authMgr.GetSharePointOnlineAuthenticatedContextTenant(siteUrl, userName, password))
                 {
                     var page2 = ctx.Web.AddClientSidePage("PageWithSections.aspx", true);
                     page2.AddSection(CanvasSectionTemplate.ThreeColumn, 5);
                     page2.Save();
 
 
                     ClientSideWebPart videoEmbedWp = page2.InstantiateDefaultWebPart(DefaultClientSideWebParts.VideoEmbed);
 
                     videoEmbedWp.Properties["videoSource"] = "https://sppalsmvp.sharepoint.com/portals/hub/_layouts/15/PointPublishing.aspx?app=video&p=p&chid=****&vid=*******";
                     videoEmbedWp.Properties["captionText"] = "video";
                     videoEmbedWp.Properties["showInfo"] = false;
                     //videoEmbedWp.Properties["embedCode"] = "<iframe width=853 height=480 src='https://sppalsmvp.sharepoint.com/portals/hub/_layouts/15/PointPublishing.aspx?app=video&p=p&chid=******&vid=*********&width=853&height=480&autoPlay=false&showInfo=true' allowfullscreen></iframe>";
                     videoEmbedWp.Title = "Associated video";
 
                     CanvasSection section = page2.Sections[0];
                     page2.AddControl(videoEmbedWp, section.Columns[1], 0);
                     page2.Save();
                 }
             }
             catch (Exception ex)
             {
                 System.Console.WriteLine("Exception occurred : " + ex.Message);
                 System.Console.ReadLine();
             }
         }
 

Happy Coding,

Sathish Nadarajan.

Category : Office 365

Author Info

Sathish Nadarajan
 
Solution Architect
 
Rate this article
 
Sathish is a Microsoft MVP for SharePoint (Office Servers and Services) having 15+ years of experience in Microsoft Technologies. He holds a Masters Degree in Computer Aided Design and Business ...read more
 

Step by Step Procedure to Add a JS file to all pages in a SPFx Modern Pages using SharePoint Framework Extension

Sathish Nadarajan
 
Solution Architect
May 12, 2018
 
Rate this article
 
Views
24510

There are a lot of purpose for the SharePoint Framework Extension. One among them is to add a JS file on the Modern Pages. Since the modern team site and the communication does not allow us to edit the master pages (at least by the time, I write this article), it is very tough to add a custom JS to the Pages.

In the below example, let us see how to create an extension and add a JS file to the page.

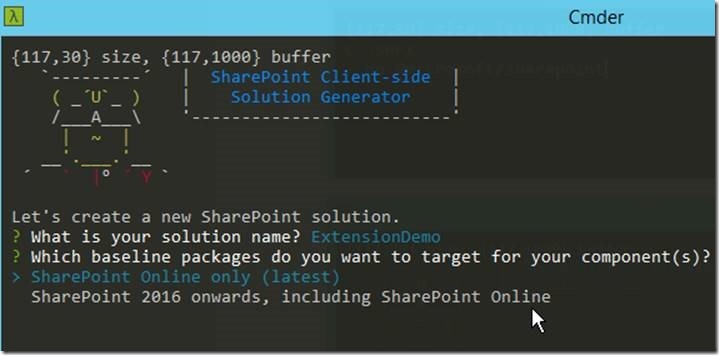
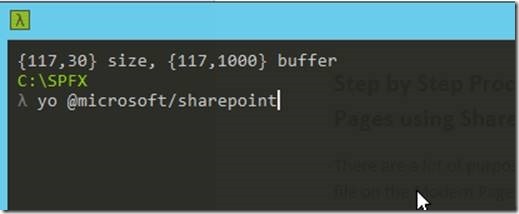
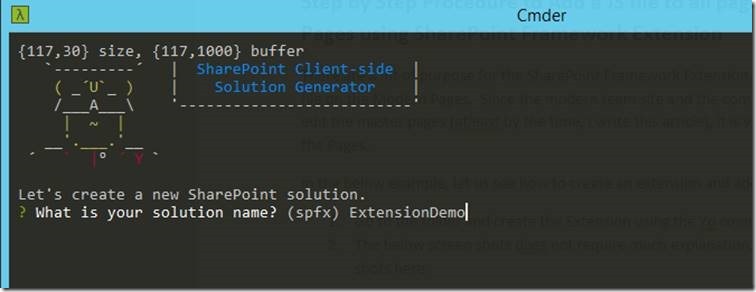
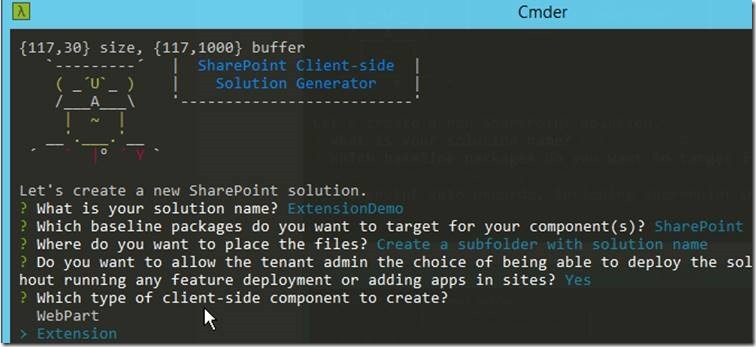
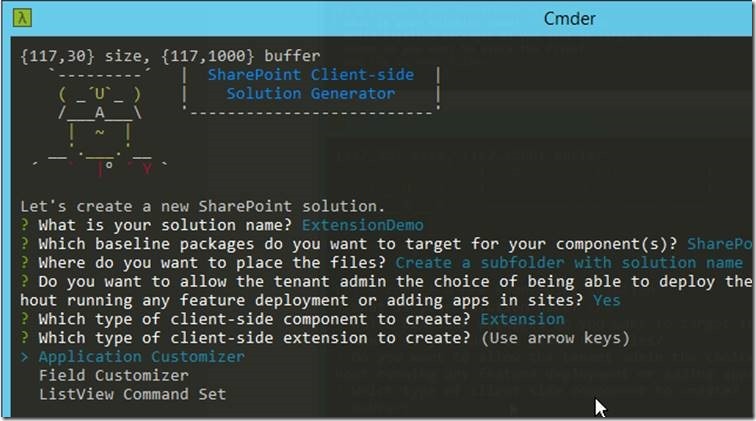
1. Go to the folder and create the Extension using the Yo commands.

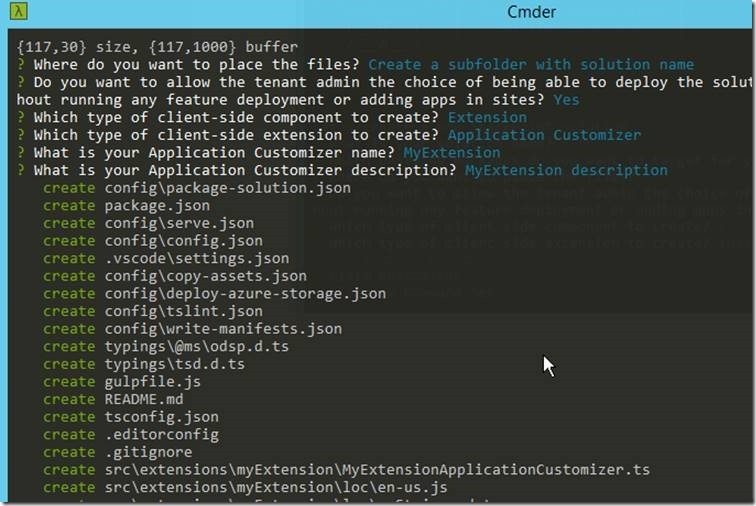
2. The below screen shots does not require much explanation. Hence, keeping only the screen shots here.
clip_image002

clip_image004

clip_image006

clip_image008

clip_image010

clip_image012

clip_image014

3. Once the extension created, the solution will be as below.
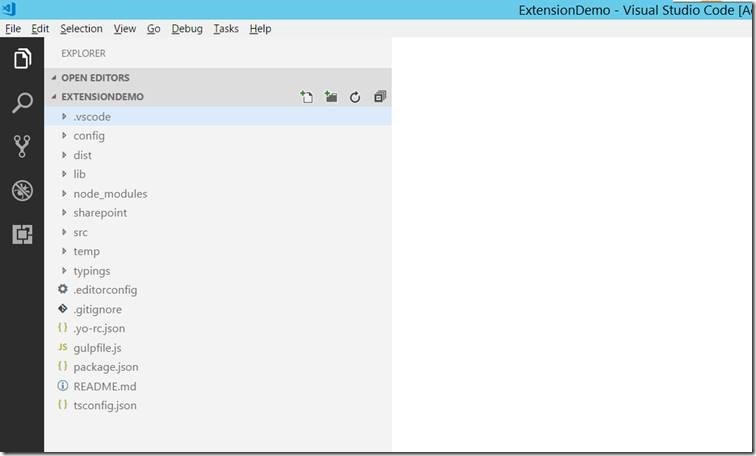
clip_image016

4. Open the Package-solution.json file and add a feature. The complete code will be as below.

 {
   "$schema": "https://dev.office.com/json-schemas/spfx-build/package-solution.schema.json",
   "solution": {
     "name": "extension-demo-client-side-solution",
     "id": "63fc1117-3fc1-45b4-abf6-453240fd78d1",
     "version": "1.0.0.0",
     "includeClientSideAssets": true,
     "features": [
       {
         "title": "MyExtension - Add JS Files.",
         "description": "Deploys a custom action with ClientSideComponentId association",
         "id": "c9fab333-d9e3-402b-aa7f-99d83a898a15",
         "version": "1.0.0.0",
         "assets": {
           "elementManifests": [
             "elements.xml"
           ]
         }
       }
     ]
   },
   "paths": {
     "zippedPackage": "solution/extension-demo.sppkg"
   }
 }
 

5. On the Write-Manifest.json, give the URL of the SharePoint CDN.

 {
   "$schema": "https://dev.office.com/json-schemas/spfx-build/write-manifests.schema.json",
   "cdnBasePath": "/sites/CommunicationSiteTopic/SiteAssets/ExtensionFiles"
 }
 

6. In the SharePoint folder, create a subfolder called assets and create an element.xml

7. The file content will be,

 <?xml version="1.0" encoding="utf-8"?>
 <Elements xmlns="http://schemas.microsoft.com/sharepoint/">
     <CustomAction
         Title="AddJsFilesApplicationCustomizer"
         Location="ClientSideExtension.ApplicationCustomizer"
         ClientSideComponentId="1707ef82-309e-40b7-9748-7a8e3d04a2c9">
     </CustomAction>
 </Elements>
 

8. The ClientsideComponentID is the one which we need to copy from the Extension Manifest.json.

 {
   "$schema": "https://dev.office.com/json-schemas/spfx/client-side-extension-manifest.schema.json",
 
   "id": "1707ef82-309e-40b7-9748-7a8e3d04a2c9",
   "alias": "MyExtensionApplicationCustomizer",
   "componentType": "Extension",
   "extensionType": "ApplicationCustomizer",
 
   // The "*" signifies that the version should be taken from the package.json
   "version": "*",
   "manifestVersion": 2,
 
   // If true, the component can only be installed on sites where Custom Script is allowed.
   // Components that allow authors to embed arbitrary script code should set this to true.
   // https://support.office.com/en-us/article/Turn-scripting-capabilities-on-or-off-1f2c515f-5d7e-448a-9fd7-835da935584f
   "requiresCustomScript": false
 }


9. Edit the MyExtensionApplicationCustomizer.ts file as below.

 import { override } from '@microsoft/decorators';
 import { Log } from '@microsoft/sp-core-library';
 import {
   BaseApplicationCustomizer
 } from '@microsoft/sp-application-base';
 import { Dialog } from '@microsoft/sp-dialog';
 
 import * as strings from 'MyExtensionApplicationCustomizerStrings';
 
 const LOG_SOURCE: string = 'MyExtensionApplicationCustomizer';
 
 /**
  * If your command set uses the ClientSideComponentProperties JSON input,
  * it will be deserialized into the BaseExtension.properties object.
  * You can define an interface to describe it.
  */
 export interface IMyExtensionApplicationCustomizerProperties {
   // This is an example; replace with your own property
   testMessage: string;
 }
 
 /** A Custom Action which can be run during execution of a Client Side Application */
 export default class MyExtensionApplicationCustomizer
   extends BaseApplicationCustomizer<IMyExtensionApplicationCustomizerProperties> {
 
     private _JS: string = "https://*******.sharepoint.com/sites/CommunicationSiteTopic/Shared%20Documents/MyScript.js";
   @override
   public onInit(): Promise<void> {
     
     let articleRedirectScriptTag: HTMLScriptElement = document.createElement("script");
       articleRedirectScriptTag.src = this._JS;
       articleRedirectScriptTag.type = "text/javascript";
       document.body.appendChild(articleRedirectScriptTag);
 
       return Promise.resolve();
   }
 }
 

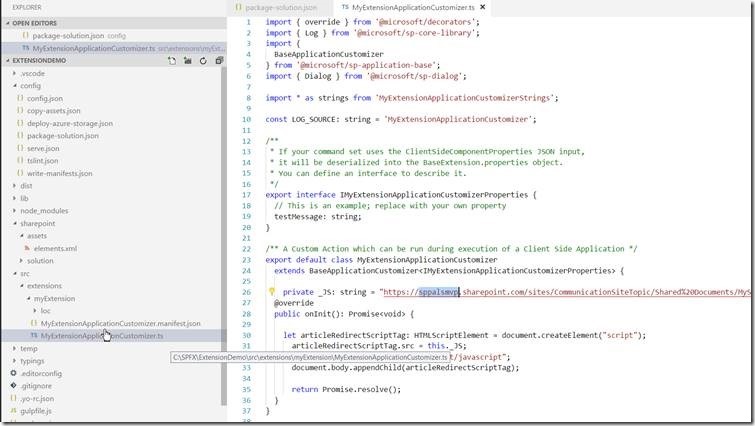
10. The file will look like below.
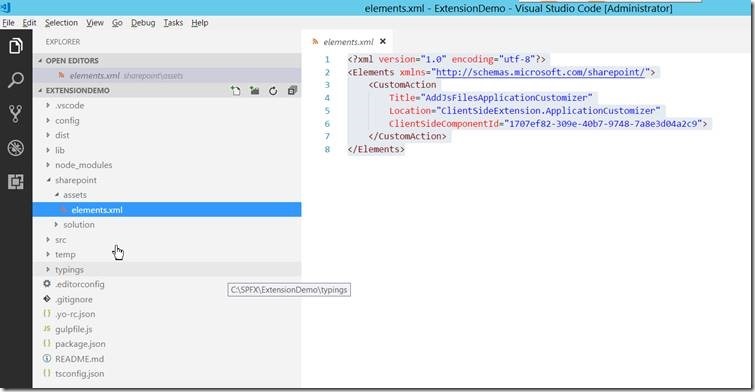
clip_image018

clip_image020

11. With these changes, let us build the solution and bundle, package, deploy the solution.

12. The commands used are,

a. Gulp build

b. Gulp bundle –ship

c. Gulp package-solution –ship

13. Now, copy the contents inside the temp\deploy folder to the CDN path.

14. Upload the SPPKG file to the Appcatalog site.

15. Come back to the site, which we want to deploy the APP and add the app.

16. clip_image022
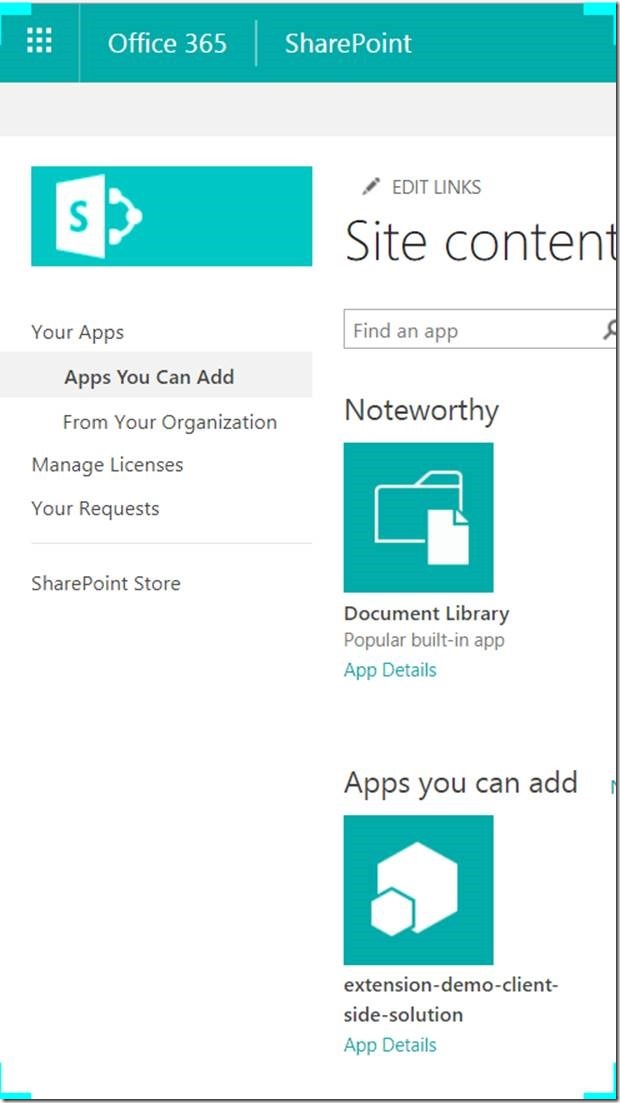
17. It will take few seconds to get added.

18. Once, it got deployed, the MyScript.JS has been added on all the pages.

19. I have written only the alert on the JS file. Hence, when I refresh any page, I will get the alert loaded on the page.

clip_image024

20. The same TS file can be altered to load the JS files only on few pages like below.

 if((document.location.href).toLowerCase().indexOf("home.aspx") >= 0)
     {
 //Add the piece of code to add the HTMLScriptElement to the DOM Element
 }
 

A very straight forward method to add a Custom JS on the page in Modern pages.

DOWNLOAD SOURCE HERE

Happy Coding,

Sathish Nadarajan.

Category : Office 365, SharePoint, SPFx

Author Info

Sathish Nadarajan
 
Solution Architect
 
Rate this article
 
Sathish is a Microsoft MVP for SharePoint (Office Servers and Services) having 15+ years of experience in Microsoft Technologies. He holds a Masters Degree in Computer Aided Design and Business ...read more
 

Is it possible to create a modern SPFx web part as a control in Page Layout (Template)?

Manimekalai
 
Technology Specialist
April 1, 2018
 
Rate this article
 
Views
2929

There are many question whether it is possible to create a modern SPFx web part as a control in Page Layout (Template).

Yes, there is a workaround which is far from ideal but works:

· Export your SPFx webpart from the browser (.webpart file).

· Upload the .webpart file to the webpart gallery.

· Open SharePoint designer

· Navigate to page layouts folder from your SharePoint designer

· Right click on your page layouts

· Open the page layouts (ie: .aspx) as preview in browser

· Manually edit the aspx file in browser by clicking on edit button or by navigating using the URL “?ToolPaneView=2&pagemode=edit”

· Add the required SPFx webpart from the “Add Webpart” section.

· Save the aspx and when you create a page using the page layout, your SPFx webpart should be there.

Note: Please ignore the error while saving the .aspx page from browser. Just refresh your page then webpart will get added automatically.

Here you go!

Your page layout is ready with SPFx webpart.

Category : Office 365, SharePoint, SPFx

Author Info

Manimekalai
 
Technology Specialist
 
Rate this article
 
Having 6 years of experience in design and development of SharePoint applications, Mani has expertise in developing applications using Office 365, SharePoint 2013 & 2010, SPFX, SP Designer Workflows, Visual ...read more
 

How to Add WebPart to a Page in SharePoint Office 365 Programmatically using C# Client Side Object Model (CSOM)

Sathish Nadarajan
 
Solution Architect
April 4, 2017
 
Rate this article
 
Views
6494

Sometime back in an article, we saw how to create pages programmatically in SharePoint Office 365. Now, as an extend, after creating the Page, we need to Add WebParts to the pages. That can be either the OOB webpart, or the custom webpart. Let us see, how to create them step by step. In the below sample, let us see how to Add a Content Editor Webpart to the Page Programmatically.

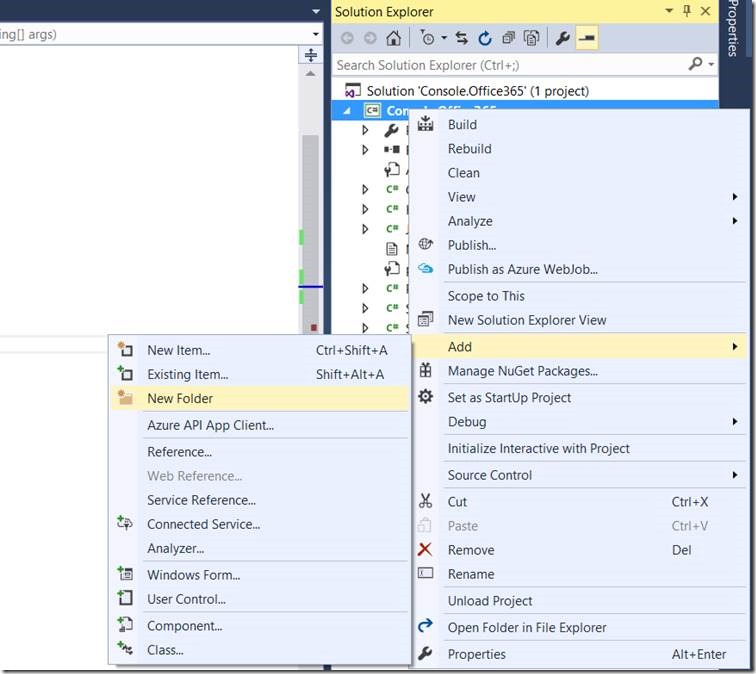
1. In our Solution Add a Folder.

clip_image002

2. Add the below XML under the Folder WebParts.

 <?xml version="1.0" encoding="utf-8"?>
 <WebPart xmlns:xsd="http://www.w3.org/2001/XMLSchema" xmlns:xsi="http://www.w3.org/2001/XMLSchema-instance" xmlns="http://schemas.microsoft.com/WebPart/v2">
   <Title>CSOM Content Editor</Title>
   <FrameType>None</FrameType>
   <Description>Allows authors to enter rich text content.</Description>
   <IsIncluded>true</IsIncluded>
   <ZoneID>Header</ZoneID>
   <PartOrder>0</PartOrder>
   <FrameState>Normal</FrameState>
   <Height />
   <Width />
   <AllowRemove>true</AllowRemove>
   <AllowZoneChange>true</AllowZoneChange>
   <AllowMinimize>true</AllowMinimize>
   <AllowConnect>true</AllowConnect>
   <AllowEdit>true</AllowEdit>
   <AllowHide>true</AllowHide>
   <IsVisible>true</IsVisible>
   <DetailLink />
   <HelpLink />
   <HelpMode>Modeless</HelpMode>
   <Dir>Default</Dir>
   <PartImageSmall />
   <MissingAssembly>Cannot import this Web Part.</MissingAssembly>
   <PartImageLarge>/_layouts/15/images/mscontl.gif</PartImageLarge>
   <IsIncludedFilter />
   <Assembly>Microsoft.SharePoint, Version=16.0.0.0, Culture=neutral, PublicKeyToken=71e9bce111e9429c</Assembly>
   <TypeName>Microsoft.SharePoint.WebPartPages.ContentEditorWebPart</TypeName>
   <ContentLink xmlns="http://schemas.microsoft.com/WebPart/v2/ContentEditor"></ContentLink>>
   <Content xmlns="http://schemas.microsoft.com/WebPart/v2/ContentEditor">
     <![CDATA[
    <div id='MyDiv'> Test WebPart
   </div>
   <script src='https://sppalsmvp.sharepoint.com/sites/AssetSiteCollection/SiteAssets/JS/MyJS.js'></script>
     
   
 ]]>
   </Content>
   <PartStorage xmlns="http://schemas.microsoft.com/WebPart/v2/ContentEditor" />
 </WebPart>
 

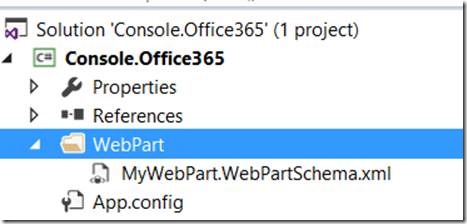
3. The solution will looks like below.

clip_image004

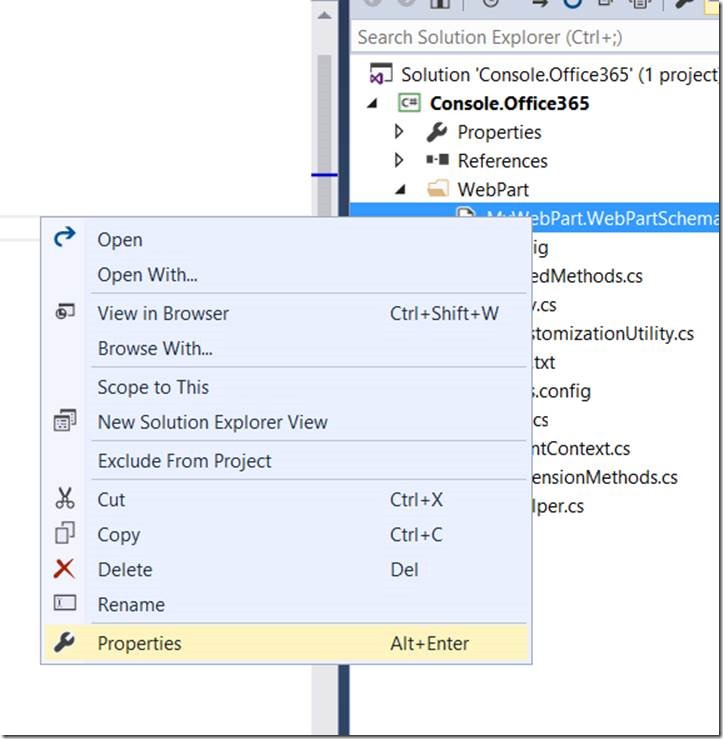
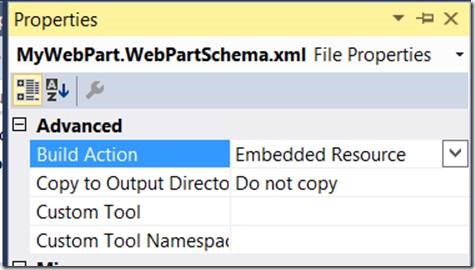
4. Select the XML and Click on Properties.

clip_image006

5. Make the Build Action as Embedded Resource.

clip_image008

6. Now, let us come back to our Method.

 namespace Console.Office365
 {
     using Microsoft.SharePoint.Client;
     using Microsoft.SharePoint.Client.Taxonomy;
     using Newtonsoft.Json.Linq;
     using OfficeDevPnP.Core.Entities;
     using System;
     using System.Collections.Generic;
     using System.IO;
     using System.Linq;
     using System.Reflection;
     using System.Threading.Tasks;
 
     class Program
     {
         static void Main(string[] args)
         {
             AddWebParts();
            
         }
 
         public static void AddWebParts()
         {
             OfficeDevPnP.Core.AuthenticationManager authMgr = new OfficeDevPnP.Core.AuthenticationManager();
 
             string siteUrl = "https://******.sharepoint.com/sites/communitysite";
             string userName = "Sathish@*********.onmicrosoft.com";
             string password = "*************";
 
 
             using (var clientContext = authMgr.GetSharePointOnlineAuthenticatedContextTenant(siteUrl, userName, password))
             {
                 Web web = clientContext.Web;
                 clientContext.Load(web);
                 clientContext.Load(web.AllProperties);
                 clientContext.ExecuteQueryRetry();
 
                 WebPartEntity myWebPart = new WebPartEntity();
 
                 myWebPart = new WebPartEntity { WebPartXml = MyWebPart_O365_WebPartSchemaXML };
 
                 myWebPart.WebPartTitle = "My WebPart";
                 myWebPart.WebPartIndex = 2;
 
                 clientContext.Web.AddWebPartToWikiPage("/sites/CommunitySite/SitePages/WikiPage1.aspx", myWebPart, 1, 1, false);
 
                 clientContext.ExecuteQuery();
             }
         }
 
         private static string myWebPart_O365_WebPartSchemaXML = string.Empty;
         public static string MyWebPart_O365_WebPartSchemaXML
         {
             get
             {
                 if (string.IsNullOrEmpty(myWebPart_O365_WebPartSchemaXML))
                 {
                     using (var stream = Assembly.GetAssembly(typeof(Program)).GetManifestResourceStream("Console.Office365.WebPart.MyWebPart.WebPartSchema.xml"))
                     {
                         using (var reader = new StreamReader(stream))
                         {
                             myWebPart_O365_WebPartSchemaXML = reader.ReadToEnd();
                         }
                     }
                 }
 
                 return myWebPart_O365_WebPartSchemaXML;
             }
         }
     }
 }
 

7. Now, after executing this code, let us come back to the screen and refresh.

8. We should be able to see the Content Editor Webpart on the page.

clip_image010

Happy Coding,

Sathish Nadarajan.
Author Info

Sathish Nadarajan
 
Solution Architect
 
Rate this article
 
Sathish is a Microsoft MVP for SharePoint (Office Servers and Services) having 15+ years of experience in Microsoft Technologies. He holds a Masters Degree in Computer Aided Design and Business ...read more
 

How to Add / Remove Site Collection Administrator in SharePoint Office 365 Programmatically using C# Client Site Object Model (CSOM)

Sathish Nadarajan
 
Solution Architect
March 30, 2017
 
Rate this article
 
Views
8390

In the previous article, we saw how to add a User as Site Collection administrator in SharePoint Office 365. But, it requires a Tenant Admin User Credentials. But, most of the cases, we may not get that for all the customers. Hence, thought of coming up with an approach with Site Collection Permission itself. The below code is self-explanatory.

To Add the Site Collection Administrator

 namespace Console.Office365
 {
     using OfficeDevPnP.Core;
     using OfficeDevPnP.Core.Entities;
     using System;
     using System.Collections.Generic;
     using System.Linq;
     using System.Text;
     class Program
     {
         static void Main(string[] args)
         {
             AuthenticationManager authManager = new AuthenticationManager();
             var clientContext = authManager.GetSharePointOnlineAuthenticatedContextTenant("https://********.sharepoint.com/sites/CommunitySite/", "Sathish@*****.com", "**********");
             
             clientContext.Load(clientContext.Web);
             clientContext.Load(clientContext.Site);
             clientContext.Load(clientContext.Site.RootWeb);
             clientContext.ExecuteQuery();
 
             List<string> lstTargetGroups = new List<string>();
             lstTargetGroups.Add("User1@********.com"); // Add the Users here.
 
             List<UserEntity> admins = new List<UserEntity>();
             foreach (var targetGroup in lstTargetGroups)
             {
                 UserEntity adminUserEntity = new UserEntity();
                 adminUserEntity.LoginName = targetGroup;
                 admins.Add(adminUserEntity);
             }
 
             if (admins.Count > 0)
             {
                 clientContext.Site.RootWeb.AddAdministrators(admins, true);
             }
         }
     }
 }

The above piece of code will add all the Users added on the List lstTargetGroups.

Now, let us see how to remove the site collection administrators.

 namespace Console.Office365
 {
     using OfficeDevPnP.Core;
     using System;
     class Program
     {
         static void Main(string[] args)
         {
             AuthenticationManager authManager = new AuthenticationManager();
             var clientContext = authManager.GetSharePointOnlineAuthenticatedContextTenant("https://*****.sharepoint.com/sites/CommunitySite/", "Sathish@*******.com", "******");
 
             clientContext.Load(clientContext.Web);
             clientContext.Load(clientContext.Site);
             clientContext.Load(clientContext.Site.RootWeb);
             clientContext.ExecuteQuery();


             var users = clientContext.Site.RootWeb.SiteUsers;
             clientContext.Load(users);
             clientContext.ExecuteQuery();
 
 
             foreach (var user in users)
             {
                 System.Console.ForegroundColor = ConsoleColor.White;
                 System.Console.WriteLine("Removing the User - " + user.Title.ToLower());
                 user.IsSiteAdmin = false;
                 user.Update();
                 clientContext.Load(user);
                 clientContext.ExecuteQuery();
 
             }
         }
     }
 }

The above Methods does not require the tenant Level Permission. The User Name and Password is at the Site Collection Level itself. Hope this helps.

Happy Coding,

Sathish Nadarajan.
Author Info

Sathish Nadarajan
 
Solution Architect
 
Rate this article
 
Sathish is a Microsoft MVP for SharePoint (Office Servers and Services) having 15+ years of experience in Microsoft Technologies. He holds a Masters Degree in Computer Aided Design and Business ...read more
 

How to Add Quick Launch As a Child in SharePoint Office 365 Programmatically using CSOM C#

Sathish Nadarajan
 
Solution Architect
January 29, 2017
 
Rate this article
 
Views
3729

In this article, we will be seeing how to Add Quick Launch as a Child in SharePoint Office 365 Programmatically using CSOM C#

 namespace Console.Office365
 {
     using Microsoft.SharePoint.Client;
     using Microsoft.SharePoint.Client.Taxonomy;
     using Newtonsoft.Json.Linq;
     using System;
     using System.Collections.Generic;
     using System.IO;
     using System.Linq;
     using System.Threading.Tasks;
 
     class Program
     {
         static void Main(string[] args)
         {
             AddQuickLaunchAsChild();
         }
 
         public static void AddQuickLaunchAsChild()
         {
             OfficeDevPnP.Core.AuthenticationManager authMgr = new OfficeDevPnP.Core.AuthenticationManager();
 
             string siteUrl = "https://****.sharepoint.com/sites/communitysite/";
             string userName = "Sathish@******.onmicrosoft.com";
             string password = "************";
 
             using (var ctx = authMgr.GetSharePointOnlineAuthenticatedContextTenant(siteUrl, userName, password))
             {
                 Web web = ctx.Web;
                 ctx.Load(web);
 
                 NavigationNodeCollection quickLaunchCollection = web.Navigation.QuickLaunch;
                 ctx.Load(quickLaunchCollection);
                 ctx.ExecuteQueryRetry();
 
                 NavigationNode parentNode = quickLaunchCollection.Where(n => n.Title == "Heading3").FirstOrDefault();
 
                 NavigationNodeCreationInformation nodeCreationInformation = new NavigationNodeCreationInformation();
 
                 nodeCreationInformation.Title = "Heading3.1";
                 nodeCreationInformation.Url = "https://google.com";
 
                 parentNode.Children.Add(nodeCreationInformation);
                 parentNode.Update();
 
                 ctx.ExecuteQueryRetry();
             }
         }
     }
 }


Happy Coding,

Sathish Nadarajan.
Author Info

Sathish Nadarajan
 
Solution Architect
 
Rate this article
 
Sathish is a Microsoft MVP for SharePoint (Office Servers and Services) having 15+ years of experience in Microsoft Technologies. He holds a Masters Degree in Computer Aided Design and Business ...read more
 

How to Add Quick Launch to a Web Site in SharePoint Office 365 Programmatically using CSOM C#

Sathish Nadarajan
 
Solution Architect
 
Rate this article
 
Views
2617

In this article, we will be seeing how to Add Quick Launch to a Web in SharePoint Office 365 Programmatically using CSOM C#

 namespace Console.Office365
 {
     using Microsoft.SharePoint.Client;
     using Microsoft.SharePoint.Client.Taxonomy;
     using Newtonsoft.Json.Linq;
     using System;
     using System.Collections.Generic;
     using System.IO;
     using System.Linq;
     using System.Threading.Tasks;
 
     class Program
     {
         static void Main(string[] args)
         {
             AddQuickLaunch();
         }
 
         public static void AddQuickLaunch()
         {
             OfficeDevPnP.Core.AuthenticationManager authMgr = new OfficeDevPnP.Core.AuthenticationManager();
 
             string siteUrl = "https://*****.sharepoint.com/sites/communitysite/";
             string userName = "Sathish@*****.onmicrosoft.com";
             string password = "*******";
 
             using (var ctx = authMgr.GetSharePointOnlineAuthenticatedContextTenant(siteUrl, userName, password))
             {
                 Web web = ctx.Web;
                 ctx.Load(web);
 
                 NavigationNodeCollection quickLaunchCollection = web.Navigation.QuickLaunch;
                 ctx.Load(quickLaunchCollection);
                 ctx.ExecuteQueryRetry();
 
                 NavigationNodeCreationInformation nodeCreationInformation = new NavigationNodeCreationInformation();
 
                 nodeCreationInformation.Title = "Heading1";
                 nodeCreationInformation.Url = "https://google.com";
                 nodeCreationInformation.AsLastNode = true;
                 quickLaunchCollection.Add(nodeCreationInformation);
 
                 ctx.ExecuteQueryRetry();
             }
         }
     }
 }
 

Happy Coding,

Sathish Nadarajan.

Author Info

Sathish Nadarajan
 
Solution Architect
 
Rate this article
 
Sathish is a Microsoft MVP for SharePoint (Office Servers and Services) having 15+ years of experience in Microsoft Technologies. He holds a Masters Degree in Computer Aided Design and Business ...read more
 

How to Add/Remove User Custom Actions (in Site Actions Menu) Programmatically using CSOM PNP in SharePoint Office 365

Sathish Nadarajan
 
Solution Architect
October 23, 2016
 
Rate this article
 
Views
11474

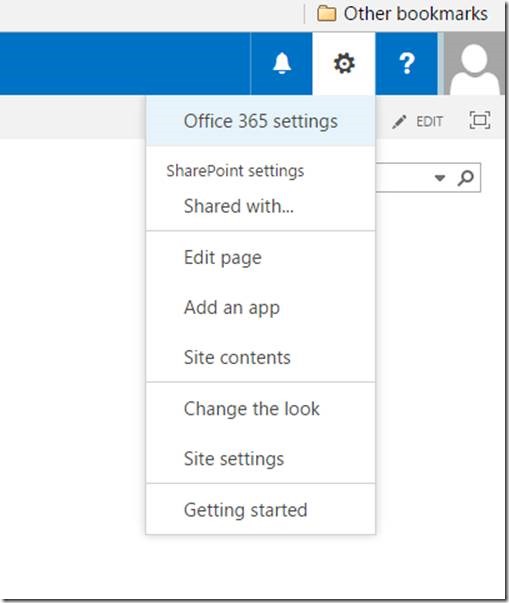
In some of the requirements, we might be creating the custom components, pages, links to external applications, APPs (Add-in), which require some link from the home page. Either we can provide a hyperlinks on the Screens or we can attach those links on the Site Actions Menu. Obviously, adding to the Site Actions menu, is purely discrete to the customer’s wish. But, even then, let us see how to Create the Menu Items, programmatically. This will be useful, during the time of deployment.

In the Site Actions Menu, the default items will be listed as below.

clip_image002

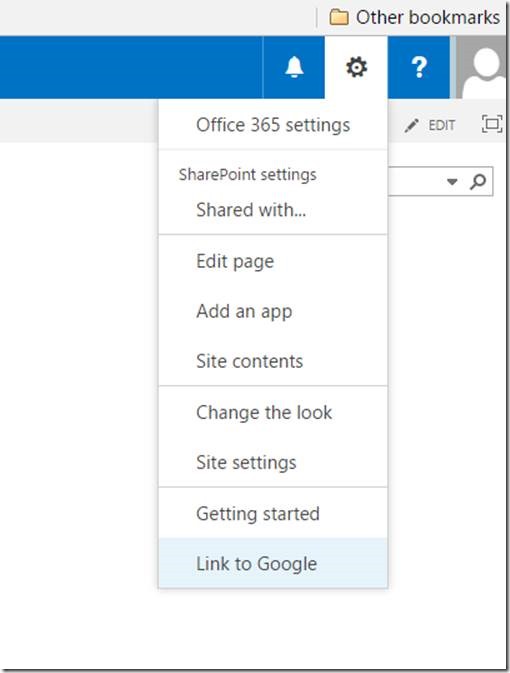
Now, we are going to add a link at the bottom as below.

clip_image004

The piece of code to Add and Remove is as follows.

 namespace Console.Office365
 {
     using Microsoft.SharePoint.Client;
     using Newtonsoft.Json.Linq;
     using System;
     using System.Collections.Generic;
     using System.IO;
     using System.Linq;
 
     class Program
     {
         static void Main(string[] args)
         {
 		RemoveLinkOnCustomAction();
             AddLinkOnCustomAction();
         }


         public static void RemoveLinkOnCustomAction()
         {
             OfficeDevPnP.Core.AuthenticationManager authMgr = new OfficeDevPnP.Core.AuthenticationManager();
 
             string siteUrl = "http:// **********.sharepoint.com/sites/communitysite";
             string userName = "Sathish@**********.onmicrosoft.com";
             string password = "**********";
 
             using (var ctx = authMgr.GetSharePointOnlineAuthenticatedContextTenant(siteUrl, userName, password))
             {
                 Web web = ctx.Web;
                 ctx.Load(web);
                 ctx.Load(web.UserCustomActions);
                 ctx.ExecuteQueryRetry();
                 foreach (var customAction in web.UserCustomActions)
                 {
                     if (customAction.Name == "Test Action")
                     {
                         customAction.DeleteObject();
                         break;
                     }
                 }
                 ctx.Web.Update();
                 ctx.Web.UserCustomActions.RefreshLoad();
                 ctx.ExecuteQueryRetry();
             }
         }
 
         public static void AddLinkOnCustomAction()
         {
             OfficeDevPnP.Core.AuthenticationManager authMgr = new OfficeDevPnP.Core.AuthenticationManager();
 
             string siteUrl = "https:// **********.sharepoint.com/sites/communitysite";
             string userName = "Sathish@**********.onmicrosoft.com";
             string password = "******";
 
             using (var ctx = authMgr.GetSharePointOnlineAuthenticatedContextTenant(siteUrl, userName, password))
             {
                 Web web = ctx.Web;
                 ctx.Load(web);
                 ctx.Load(web.UserCustomActions);
                 ctx.ExecuteQueryRetry();
 
                 BasePermissions permission = new BasePermissions();
                 permission.Set(PermissionKind.ManageWeb);
 
                 UserCustomAction siteAction = ctx.Web.UserCustomActions.Add();
 
                 siteAction.Group = "SiteActions";
                 siteAction.Location = "Microsoft.SharePoint.StandardMenu";
                 siteAction.Name = "Test Action";
                 siteAction.Sequence = 1000;
                 siteAction.Rights = permission;
 
                 siteAction.Url = "www.google.com";
                 siteAction.Title = "Link to Google";
                 siteAction.Update();
 
                 ctx.ExecuteQueryRetry();
             }
         }
 
 
     }
 
 }
 

Happy Coding,

Sathish Nadarajan.

Author Info

Sathish Nadarajan
 
Solution Architect
 
Rate this article
 
Sathish is a Microsoft MVP for SharePoint (Office Servers and Services) having 15+ years of experience in Microsoft Technologies. He holds a Masters Degree in Computer Aided Design and Business ...read more
 

How to Add Site Collection Administrator Programmatically to Office 365 Site Collection using Client Side Object Model (CSOM) PNP in SharePoint Office 365

Sathish Nadarajan
 
Solution Architect
August 13, 2016
 
Rate this article
 
Views
8524

In the previous article, we saw, how to create/provision a site collection in O365 programmatically. In this article, as a continuation, let us see how to Add Site Collection Administrators to the created site programmatically.

Again, the Console Application does not require further explanation I guess.

 using System;
 using System.Collections.Generic;
 using System.Linq;
 using System.Text;
 using System.Threading.Tasks;
 
 using Microsoft.SharePoint.Client;
 using System.Security;
 using Microsoft.Online.SharePoint.TenantAdministration;
 
 namespace Console.Office365
 {
     class Program
     {
         static void Main(string[] args)
         {
             AddSiteCollectionAdministrator();
         }
 
 
         public static void AddSiteCollectionAdministrator()
         {
             string TenantURL = "https://sppalsmvp-admin.sharepoint.com/";
             string Url = "https://********.sharepoint.com/sites/AASathish3";
             string UserName = "Sathish@******.onmicrosoft.com";
             string Password = "*******";
 
             using (ClientContext clientContext = new ClientContext(TenantURL))
             {
                 //Credentials
                 var passWord = new SecureString();
                 foreach (char c in Password.ToCharArray()) passWord.AppendChar(c);
                 clientContext.Credentials = new SharePointOnlineCredentials(UserName, passWord);
 
                 var tenant = new Tenant(clientContext);
 
                 //Get login name of the current user
                 var currentUser = clientContext.Web.CurrentUser;
                 clientContext.Load(currentUser, u => u.LoginName);
 
                 int startIndex = 0;
                 SPOSitePropertiesEnumerable siteProperties;
 
                 do
                 {
                     //Get urls of site collections in the tenant in batches of 300 (Does not include the OneDrive for Business sites)
                     siteProperties = tenant.GetSiteProperties(startIndex, false);
                     clientContext.Load(siteProperties, siteProps => siteProps.Include(site => site.Url));
                     clientContext.ExecuteQuery();
 
                     //Iterate the site collectio urls
                     foreach (var siteProperty in siteProperties)
                     {
                         try
                         {
                             if (siteProperty.Url == Url)
                             {
                                 //assign the specified user (current user in this case) as the site collection admin. 
                                 tenant.SetSiteAdmin(siteProperty.Url, "user1@*********.onmicrosoft.com", true);
                                 //tenant.SetSiteAdmin(siteProperty.Url, "Usre2@******", true);
                                 //Set the last parameter to false if you want to remove the user from the site collection admins
 
                                 clientContext.ExecuteQuery();
 
                                 System.Console.WriteLine(siteProperty.Url);
                             }
                         }
                         catch (Exception ex)
                         {
                             System.Console.WriteLine("Error on: " + siteProperty.Url + " " + ex.Message);
                         }
                     }
 
                     startIndex += 300;
 
                 } while (siteProperties.Count >= 300);
             }
         }
     }
 }
 

Happy Coding,

Sathish Nadarajan.
Author Info

Sathish Nadarajan
 
Solution Architect
 
Rate this article
 
Sathish is a Microsoft MVP for SharePoint (Office Servers and Services) having 15+ years of experience in Microsoft Technologies. He holds a Masters Degree in Computer Aided Design and Business ...read more
 

PowerShell Script – To Add Content Types to a List/Library in SharePoint 2013

Sathish Nadarajan
 
Solution Architect
February 12, 2015
 
Rate this article
 
Views
26677

In this article, let us see, how to add Content Types to a List/Library using PowerShell in SharePoint. The script is very simple and straight forward.

 $LogTime = Get-Date -Format yyyy-MM-dd_hh-mm
 $LogFile = ".9.AddContentTypesToPagesLibrary-$LogTime.rtf"
 
 
 cls
 
 
 ##================================================================================================
 ## Description	: Add Content Types to Pages Library in Authoring Site Collection
 ## Author		: Sathish Nadarajan
 ## Date			:  
 ##================================================================================================


 $Host.UI.RawUI.WindowTitle = "-- Add Content Types --"
 
 $StartDate = Get-Date
 Write-Host -ForegroundColor White "------------------------------------"
 Write-Host -ForegroundColor White "| Add Content Types To Pages Library |"
 Write-Host -ForegroundColor White "| Started on: $StartDate |"
 Write-Host -ForegroundColor White "------------------------------------"
 
 ########################################################### Set the Exxecution Path #########################################
 
 $scriptBase = split-path $SCRIPT:MyInvocation.MyCommand.Path -parent
 Set-Location $scriptBase
 
 #start-transcript $logfile
 
 $ErrorActionPreference = "Continue"


 $siteCollectionURL = "http://mysitecollection.com"


 $siteCollection = Get-SPSite $siteCollectionURL
 $webRoot = $siteCollection.RootWeb


 #$webRoot.ContentTypes


 $siteCollection | Get-SPWeb -limit all | ForEach-Object{
         $web=Get-SPWeb $_.Url
 
         Write-Host $web.Title


             $customContentTypes = "CT1, CT2, CT3"
          
 
         Write-Host "Content Types are " $customContentTypes
 
         
         $docLib = $web.Lists["Pages"]
         write-host "Pages Document Library Name : " $docLib.Title


         $docLib.ContentTypesEnabled = $true
 
         $docLib.update();
 
         $customContentTypeArray = $customContentTypes.Split(",")
         write-host $customContentTypeArray
 
         foreach($customContentType in $customContentTypeArray)
         {
          
             
             write-host "adding Content Type " $customContentType
         #Write-Host $siteCollection.ContentTypes[$customContentType];
             $customCT = $webRoot.ContentTypes[$customContentType]
             #write-host $customCT;
             $docLib.ContentTypes.Add($customCT)
         }
         $docLib.update()
         
 }
 

DOWNLOAD HERE


Happy Coding.

Sathish Nadarajan.
Author Info

Sathish Nadarajan
 
Solution Architect
 
Rate this article
 
Sathish is a Microsoft MVP for SharePoint (Office Servers and Services) having 15+ years of experience in Microsoft Technologies. He holds a Masters Degree in Computer Aided Design and Business ...read more
 

Leave a comment