How to Attach Event Receivers to a Web in SharePoint Office 365 Programmatically using CSOM C#

Sathish Nadarajan
 
Solution Architect
January 24, 2017
 
Rate this article
 
Views
4353

In this article, we will be seeing how to add the Event Receiver to a Web in SharePoint Office 365 Programmatically using CSOM C#


 namespace Console.Office365
 {
     using Microsoft.SharePoint.Client;
     using Microsoft.SharePoint.Client.Taxonomy;
     using Newtonsoft.Json.Linq;
     using System;
     using System.Collections.Generic;
     using System.IO;
     using System.Linq;
     using System.Threading.Tasks;
 
     class Program
     {
         static void Main(string[] args)
         {
             AttachEventReceivers();
         }
 
 
         public static void AttachEventReceivers()
         {
             OfficeDevPnP.Core.AuthenticationManager authMgr = new OfficeDevPnP.Core.AuthenticationManager();
 
             string siteUrl = "https://*********.sharepoint.com/sites/CommunitySite/";
             string userName = "Sathish@*****.onmicrosoft.com";
             string password = "*********";


             using (var ctx = authMgr.GetSharePointOnlineAuthenticatedContextTenant(siteUrl, userName, password))
             {
                 Web web = ctx.Web;
                 ctx.Load(web);
                 ctx.Load(web.EventReceivers);
                 ctx.ExecuteQueryRetry();
 
                 #region Attach Document List Created Event Receiver
 
                 var receiver = new EventReceiverDefinitionCreationInformation();
 
                 receiver.EventType = EventReceiverType.ListAdded;
                 receiver.ReceiverUrl = new Uri("https://<<RemoteEventReceiverSite.com/Services/Process.svc>>").AbsoluteUri;
                 receiver.ReceiverName = "<<Receiver Name>>";
                 receiver.Synchronization = EventReceiverSynchronization.Asynchronous;
 
                 web.EventReceivers.Add(receiver);
 
                 ctx.ExecuteQueryRetry();
 
                 #endregion
 
                 System.Console.ReadLine();
             }
         }
 
 
     }
 
 }
 

Happy Coding,

Sathish Nadarajan.

Author Info

Sathish Nadarajan
 
Solution Architect
 
Rate this article
 
Sathish is a Microsoft MVP for SharePoint (Office Servers and Services) having 15+ years of experience in Microsoft Technologies. He holds a Masters Degree in Computer Aided Design and Business ...read more
 

How to Attach Database and Grant Access to SSAS Service Account in SQL Server 2012

Ahamed Fazil Buhari
 
Senior Developer
November 18, 2016
 
Rate this article
 
Views
4706

Consider that we have a Database and we need to attach that in our SharePoint Database engine and in addition to that we need to grant access to that database to the Service Account which has been used to install SQL Server Analysis Service (SSAS).

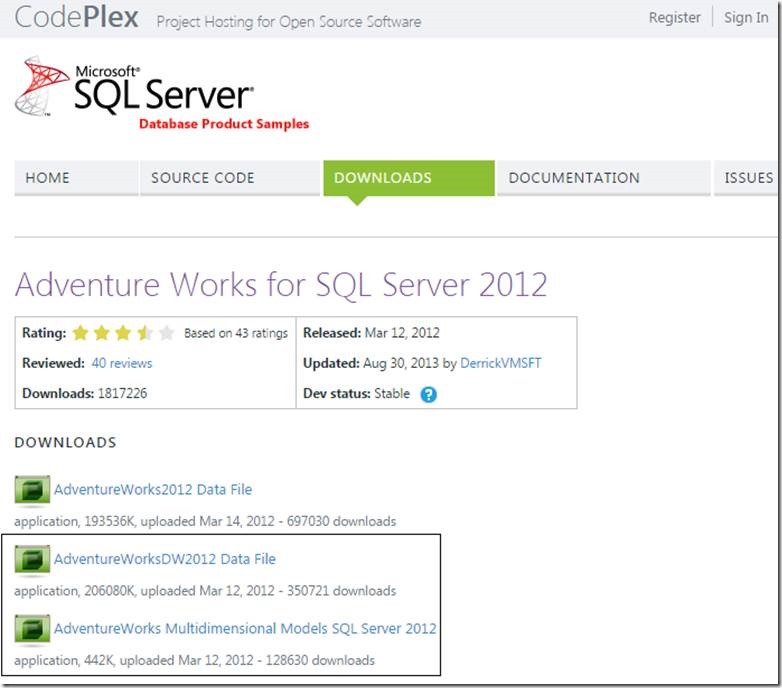
Here, I’ve couple of sample databases downloaded from CodePlex. AdventureWorksDW2012 Data File and AdventureWorks Multidimensional Models SQL Server 2012.

clip_image002

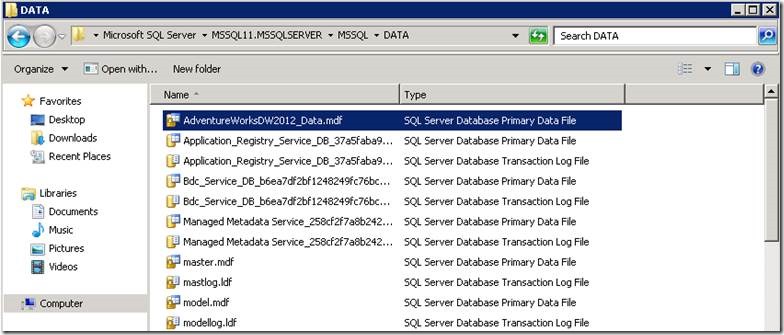
Let’s open the File Explorer and paste the AdventureWorksDW2012_Data.mdf File in the following location, C:\Program Files\Microsoft SQL Server\MSSQL11.MSSQLSERVER\MSSQL\DATA\

clip_image004


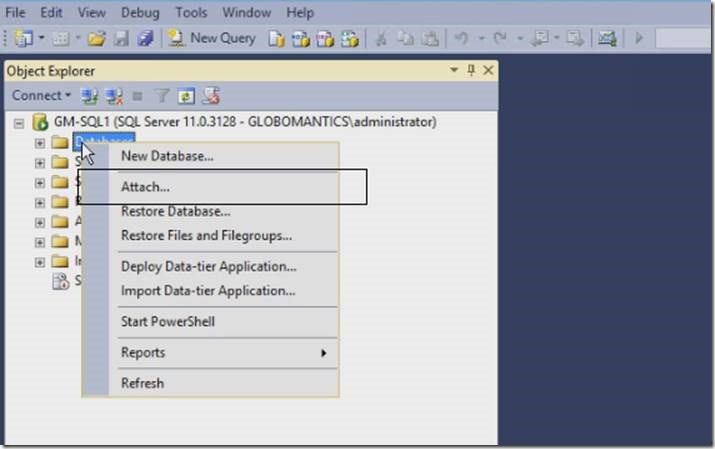
Now open up the SQL Server 2012 Management Studio to connect to our Database Engine,

1. Right click on the Server and choose Attach.

clip_image006

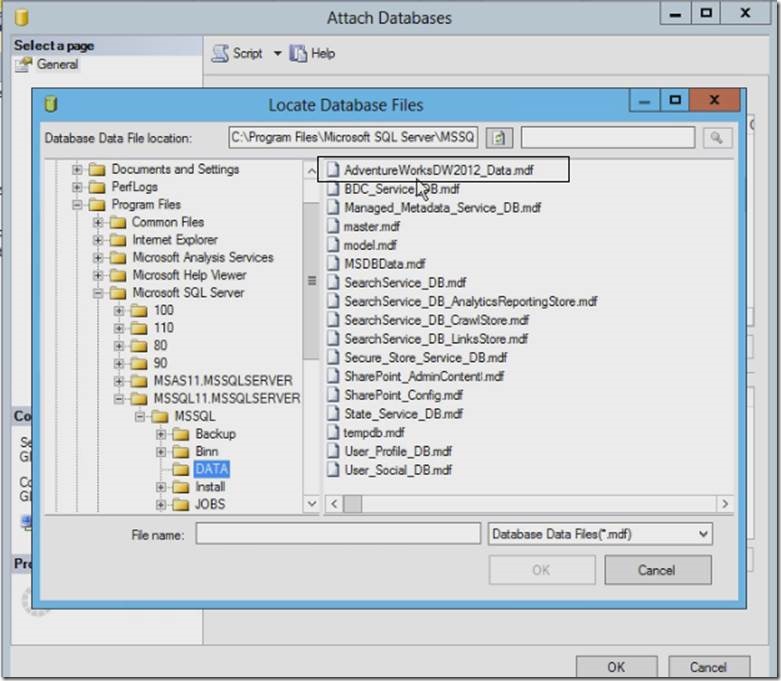
2. In Attach Database window, click on ‘Add’ button and select the database that needs to be attached and click on OK.

clip_image008

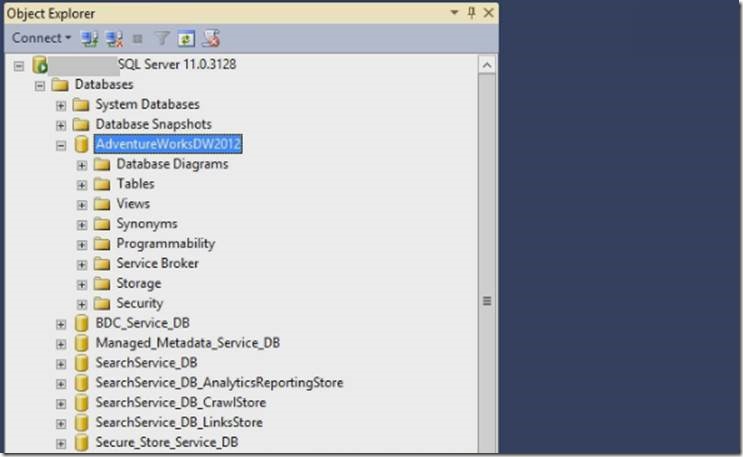
3. After attach, we can see that database in our server,

clip_image010

Now we need to grant access to our SSAS service account for the attached Database.

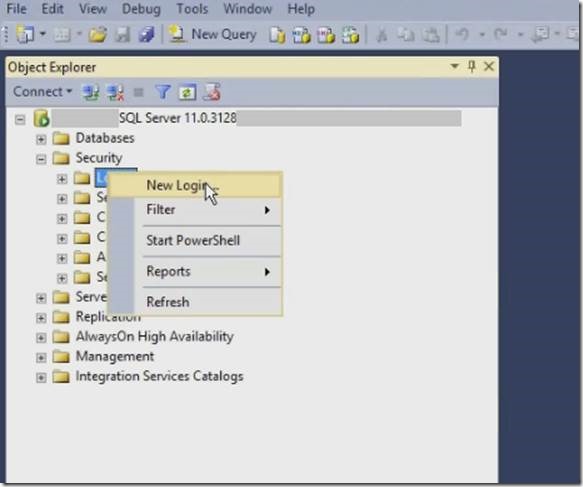
1. Go to Security -> Login -> New Login

clip_image012

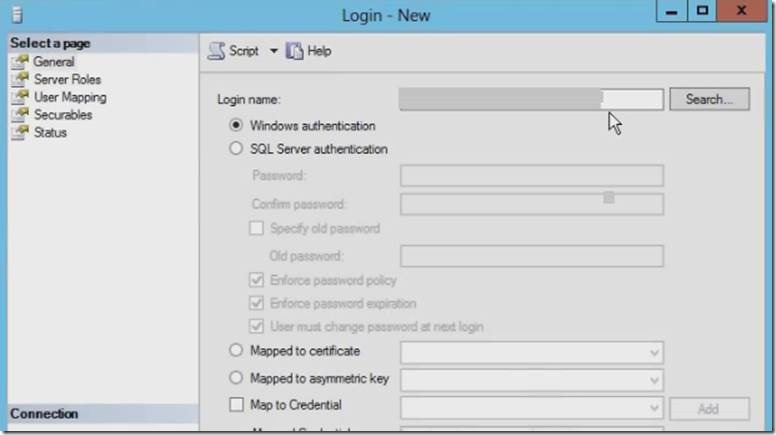
2. We need to add a login for the Service Account that we use for our SQL Server Analysis Service

clip_image014

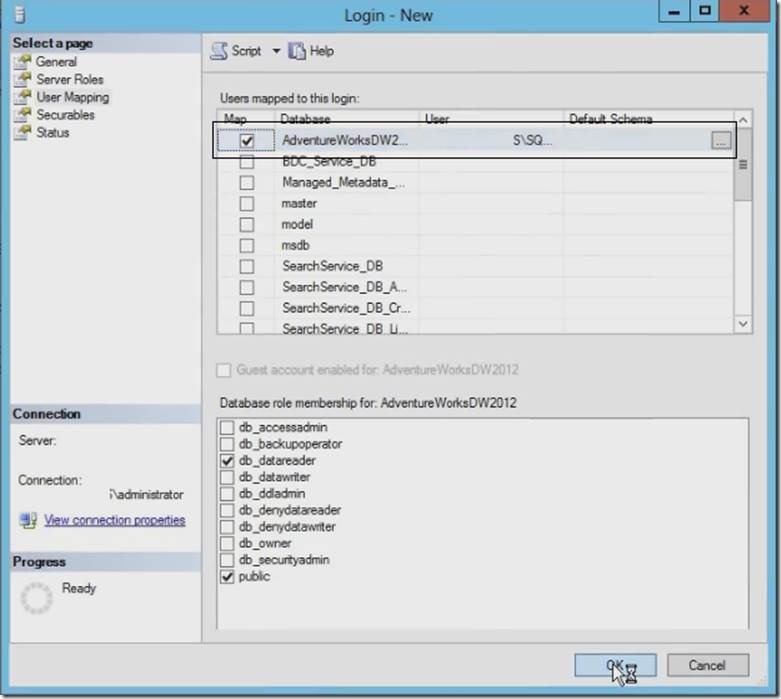
3. Now go ahead and click on User Mapping in side navigation, select the database and provide the role membership for that selected db.

clip_image016


In the next article, we will go ahead and add the Multidimensional Cube to Analysis Service.


Happy Coding

Ahamed

Category : SQL

Author Info

Ahamed Fazil Buhari
 
Senior Developer
 
Rate this article
 
Ahamed is a Senior Developer and he has very good experience in the field of Microsoft Technologies, especially SharePoint, Azure, M365, SPFx, .NET and client side scripting - JavaScript, TypeScript, ...read more
 

How to Attach Multiple Files into SharePoint List Item Using SPServices and Also Validating on File Size and Format

Ahamed Fazil Buhari
 
Senior Developer
June 20, 2016
 
Rate this article
 
Views
23768

I had a requirement to upload Multiple Files into the SharePoint list item. I need to implement this using Jquery, SPServices and the html tag <input type="file"/>.And we need to allow only the file formats namely – (pdf, jpeg, doc, docx, excel, xlsm, xls, xlsx, .ods,.zip, .rar) and restrict all other formats, also the upload maximum size will be 5 MB not more than that for each file.

I come up with the below step by step approach to achieve this requirement.

Step 1: Creation of Browse Button Using <input type=’file’ /> Tag.

Below is the HTML tag, I’ve used to create the browse button and some more buttons for additional functionality. Please concentrate and look only at <input type=’file’ /> tag

 <td id="fileAttachTD">
         <span id="attach">
             <input type="file" id="attach1" name="FileUpload" />br />
             <input type="file" id="attach2" name="FileUpload" /><input type="button" id="btnRemove2" /><br />
             <input type="file" id="attach3" name="FileUpload" /><input type="button" id="btnRemove3" /><br />
         </span>
         <br />
         <span id="AddRemoveBtn">
             <input type="button" id="btnAdd" value="Add New Attachment" /><br />
             <p id="lblAttchInfo">
                 Maximum 10 attachments, allowed formats (pdf, jpeg, doc, docx, excel, xlsm, xls,xlsx,.ods, .zip, .rar) - Maximum file size allowed for per attachment 5MB</p>
         </span>
     </td>
 

The output for the above tag will be shown as below,

clip_image002

Step 2: Read the Uploaded Multiple files and keeping it in an Array using Jquery

Here the ‘input:file’ event function is called based on the <td> id fileAttachTD, so that this event will get triggered when any browse button is clicked under this <td>.

The Script itself has all the required comments. I don’t have much to explain about the script.

 var maxFileSize = 5000000; //Set maximum file size value into a variable. 5 MB in bytes var fileName = []; // To keep track of uploaded file names
 var fileData = []; // Create an array to hold all the files
 var fileCount = 0; // To keep track on number of files uploaded into an array
 
 $('#fileAttachTD').on('change', 'input:file', function (event) {       
 
     //Getting the Target file
     var files = event.target.files;
     var file = files[0];
     if (files && file) {
         //Creating FileReader obj to read the uploaded file
         var reader = new FileReader();
 
         //Getting the File name
         fileName[fileCount] = file.name;
         reader.filename = file.name;
 
         //Getting the extention of the file
         var ext = file.name.match(/.([^.]+)$/)[1];
 
         //Getting the file size
         var fileSize = file.size;
 
         if (fileSize > maxFileSize)
             ext = 'sizeExceed';
         //var fileID = $(this).attr('id');
 
         //This is where the uploaded file will be read by 
         reader.onload = function () {
             //Validating the uploaded file Format
             switch (ext) {
                 case 'jpg':
                 case 'png':
                 case 'pdf':
                 case 'jpeg':
                 case 'docx':
                 case 'doc':
                 case 'excel':
                 case 'xlsm':
                 case 'xls':
                 case 'xlsx':
                 case 'ods':
                 case 'zip':
                 case 'rar':
                     //Put the file data into an array 
                     fileData[fileCount] = this.result;
                     var n = fileData[fileCount].indexOf(";base64,") + 8;
 
 //To Get the base64 bytes, remove the first part of the dataurl and //this we need to feed to SharePoint
                     fileData[fileCount] = fileData[fileCount].substring(n);
                     fileCount++;
                     break;
                 case 'sizeExceed':
                     fileData[fileCount] = '';
                     fileName[fileCount] = '';                    
                     alert('File size exceeded');
                     break;
                 default:
                     fileData[fileCount] = '';
                     fileName[fileCount] = '';                    
                     alert('Invalid format');
             }
         };
 
         reader.onabort = function () {
             alert("The upload was aborted.");
         };
 
         reader.onerror = function () {
             alert("An error occured while reading the file.");
         };
         reader.readAsDataURL(file);
     }
 });
 

Step 3: Adding Attachments to the List Item using SPServices

Finally, uploading all the files into the list item using SPServices.

If the uploading of attachment needs to be done for the New List Item, then the below function should be called after the List Item is successfully created and then that Item ID should be passed as a parameter.

 //Function to Upload the Attachment, 
 //Parameter - itemID, List Item ID where the attachment needs to be uploaded
 function AddAttachments(itemID) {
 //Retrieving all the files which are available in an Array, Created this Array in //the above step(Step 2)
     for (var i = 0; i < fileCount; i++) {
         if (fileData[i] != '')
             $().SPServices({
                 operation: 'AddAttachment',
                 async: false,
                 listName: 'Name of the List',
                 listItemID: itemID,
                 fileName: fileName[i],
                 attachment: fileData[i],
                 completefunc: function (xData, Status) {
                 }
             });
     }
 }
 

Happy Coding,

Ahamed Buhari
Author Info

Ahamed Fazil Buhari
 
Senior Developer
 
Rate this article
 
Ahamed is a Senior Developer and he has very good experience in the field of Microsoft Technologies, especially SharePoint, Azure, M365, SPFx, .NET and client side scripting - JavaScript, TypeScript, ...read more
 

How to Attach an Event Receiver to a SharePoint List on Feature Activation

Sathish Nadarajan
 
Solution Architect
December 14, 2015
 
Rate this article
 
Views
12385

For a very long time, I have been thinking to write this particular function. Here, there are two methods we can use. Either the Elements.xml or with the CS. I always believe in C Sharp, rather than the Elements File. Hence, I have come up with a Generic Method which will delete the event receiver and attach the event receiver to the List.

The Code snippet is self-explanatory and does not require much explanation.

 private static void AttachEventReceiver(SPWeb web,string listName,string eventClassName,string eventName,int sequenceNumber,string eventReceiverType)
         {
             SPList list = web.Lists[listName];
             if (list != null)
             {
                 SPEventReceiverDefinition eventReceiverDefinitionToDelete = null;
 
                 foreach (SPEventReceiverDefinition eventReceiverDefinition in list.EventReceivers)
                 {
                     if (eventReceiverDefinition.Class == eventClassName)
                     {
                         eventReceiverDefinitionToDelete = eventReceiverDefinition;
                         break;
                     }
                 }
 
                 if (eventReceiverDefinitionToDelete != null)
                 {
                     eventReceiverDefinitionToDelete.Delete();
                     list.Update();
                 }
 
                 SPEventReceiverDefinition workflowStatusUpdatedEventDefinition = list.EventReceivers.Add();
                 workflowStatusUpdatedEventDefinition.Assembly = System.Reflection.Assembly.GetExecutingAssembly().FullName;
                 workflowStatusUpdatedEventDefinition.Class = eventClassName;
                 workflowStatusUpdatedEventDefinition.SequenceNumber = sequenceNumber;
                 workflowStatusUpdatedEventDefinition.Name = eventName;
                 switch (eventReceiverType)
                 {
                     case "ItemUpdated":
                         workflowStatusUpdatedEventDefinition.Type = SPEventReceiverType.ItemUpdated ;
                         break;
                     case "CheckIn":
                         workflowStatusUpdatedEventDefinition.Type = SPEventReceiverType.ItemCheckedIn;
                         break;
                     case "ItemDeleting":
                         workflowStatusUpdatedEventDefinition.Type = SPEventReceiverType.ItemDeleting;
                         break;
                     default:
                         break;
                 }
                 
                 workflowStatusUpdatedEventDefinition.HostId = list.ID;
                 workflowStatusUpdatedEventDefinition.HostType = SPEventHostType.List;
                 workflowStatusUpdatedEventDefinition.Update();
                 list.Update();
 
             }
         }
 
 private static void DeleteEventReceiver(SPWeb web,string listName, string eventClassName)
         {
             SPList pagesList = web.Lists[listName];
 
             if (pagesList != null)
             {
                 SPEventReceiverDefinition eventReceiverDefinitionToDelete = null;
 
                 foreach (SPEventReceiverDefinition er in pagesList.EventReceivers)
                 {
                     if (er.Class == eventClassName)
                     {
                         eventReceiverDefinitionToDelete = er;
                         break;
                     }
                 }
 
                 if (eventReceiverDefinitionToDelete != null)
                 {
                     eventReceiverDefinitionToDelete.Delete();
                     pagesList.Update();
                 }
             }
         }
 

And the Sample Call to these methods are as follows.

 public override void FeatureActivated(SPFeatureReceiverProperties properties)
         {
             
             SPSite site = (SPSite)properties.Feature.Parent;
             SPWeb web = site.RootWeb;
             SPWeb confidentialWeb = site.AllWebs[SiteVariables.SITE_CONFIDENTIAL];
             AttachEventReceiver(web, "Pages", "EventReceiver Assembly Name", "Event Name", 1000, "CheckIn");
             
         }
 public override void FeatureDeactivating(SPFeatureReceiverProperties properties)
         {
 
             SPSite site = (SPSite)properties.Feature.Parent;
             SPWeb web = site.RootWeb;
             SPWeb confidentialWeb = site.AllWebs[SiteVariables.SITE_CONFIDENTIAL];
             DeleteEventReceiver(web,"Pages"," EventReceiver Assembly Name ");
  
         }
 

Hope this snippet is useful.

Happy Coding,

Sathish Nadarajan.

Author Info

Sathish Nadarajan
 
Solution Architect
 
Rate this article
 
Sathish is a Microsoft MVP for SharePoint (Office Servers and Services) having 15+ years of experience in Microsoft Technologies. He holds a Masters Degree in Computer Aided Design and Business ...read more
 

Leave a comment