How to Change the Select Element Dropdown Arrow Direction using simple CSS

Ahamed Fazil Buhari
 
Senior Developer
September 5, 2016
 
Rate this article
 
Views
17440

In some cases you would be having your dropdown element at the end of your page and if the user clicks on that dropdown and if there’s no right amount of space is available below the dropdown it will show the options in upward direction. Well, this seems fine but the arrow shown in your dropdown doesn’t seems to be in right direction.

clip_image002

In the above image, you can find that the direction of the dropdown pointing in down direction. To have that in upward direction, then we might need to do something tricky.

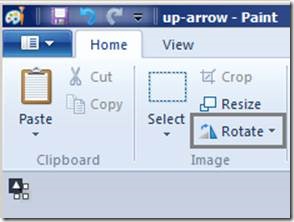
Consider that I want the same arrow with same background color but in upward direction. So, I opened my Snipping Tool to capture that image and pasted in Paint to rotate it to 180 degree and then saved this png in my local drive.

clip_image004

Apply the below CSS to your Dropdown or Select element

 .select_customarrow
     {
 -webkit-appearance:none;  /* for chrome & safari */
 -moz-appearance: none; /* for mozilla */
  background-image:url("../../../_layouts/images/up-arrow.png"); 
  width: 115%; /* To hide the orginal dropdown arrow in IE */
  background-repeat: no-repeat; 
  background-position:97% center; 
     }
 

clip_image006

Yeah it is as simple as that, but when it comes to IE then there will be a problem to hide the dropdown arrow,

clip_image008

To overcome with this issue, we need to add a parent div for our select element and apply the styling as follows,

 <div id="arrowhideDiv" style="overflow:hidden; width:267px">	
 <select style="width:300px" class=“select_customarrow”>
 //options goes here
 </select>
 </div>
 

Make sure that the width of the div should be lesser than the width of select element and change the background-position value accordingly based upon your requirement.

Happy Coding

Ahamed

Category : Office 365, SharePoint

Author Info

Ahamed Fazil Buhari
 
Senior Developer
 
Rate this article
 
Ahamed is a Senior Developer and he has very good experience in the field of Microsoft Technologies, especially SharePoint, Azure, M365, SPFx, .NET and client side scripting - JavaScript, TypeScript, ...read more
 

How to Upload the CSS into SharePoint 2013 Using PowerShell

Sathish Nadarajan
 
Solution Architect
October 14, 2015
 
Rate this article
 
Views
8420

As I said in the earlier article, the script to upload the CSS is as follows. I hope it does not require much explanations.

 ##================================================================================================
 ## Description	: To do the below two items.
     #1. Upload the CSS into Site Collection
 ## Author		: Sathish Nadarajan
 ## Date			: 07-Oct-2015
 ##================================================================================================
 
 ##============================================ Setup Input Paths ===========================================================
 
 cls
  
 $Host.UI.RawUI.WindowTitle = "-- Upload the CSS into Site Collection --"
 
 $StartDate = Get-Date
 Write-Host -ForegroundColor White "------------------------------------"
 Write-Host -ForegroundColor White "| Upload the CSS into Site Collection |"
 Write-Host -ForegroundColor White "| Started on: $StartDate |"
 Write-Host -ForegroundColor White "------------------------------------"
 
 $LogTime = Get-Date -Format yyyy-MM-dd_hh-mm
 $LogFile = ".UploadCSS-$LogTime.rtf"
 
 #start-transcript $logfile
 
 $scriptBase = split-path $SCRIPT:MyInvocation.MyCommand.Path -parent
 Set-Location $scriptBase
 
 $ErrorActionPreference = "Stop"
 
 function AddPowerShellSnapin()
 {
     try
     {
         Write-Host "Adding PowerShell Snap-in" -ForegroundColor Green
         # Try to get the PowerShell Snappin.  If not, then adding the PowerShell snappin on the Catch Block
         Get-PSSnapin "Microsoft.SharePoint.PowerShell" 
     }
     catch
     {
         if($Error[0].Exception.Message.Contains("No Windows PowerShell snap-ins matching the pattern 'Microsoft.SharePoint.PowerShell' were found"))
         {
             Add-PSSnapin "Microsoft.SharePoint.PowerShell"
         }
     }
     Write-Host "Finished Adding PowerShell Snap-in" -ForegroundColor Green
 
 }


 function UploadDisplayTemplates([string]$siteUrl)
 {
     $spsite = Get-SPSite $siteUrl
     $web = $spsite.RootWeb
     $contentWebPartsDisplayTemplatesFolder = ($web).GetFolder("Style Library")
     $displayTemplatesDirectory = $scriptBase + "CSSs"
     $web.AllowUnsafeUpdates=$true;
 
     #For upload all files in document library from file system
     foreach ($file in Get-ChildItem $displayTemplatesDirectory)
     {
          try
          {
                  $stream = [IO.File]::OpenRead($file.fullname)
                  $destUrl = $web.Url + "/Style Library/css/" + $file.Name;
                  $displayTemplateFile = $web.GetFile($destUrl)
                   
                  if($displayTemplateFile.CheckOutStatus -ne "None")
                  {
                      $contentWebPartsDisplayTemplatesFolder.files.Add($destUrl,$stream,$true)
                      $stream.close() 
                           
                      $displayTemplateFile.CheckIn("CheckIn by PowerShell");                         
                      $displayTemplateFile.Publish("Publish by PowerShell");                         
                       
                      $displayTemplateFile.Update();        
                      $web.Update();
                      
                      Write-Host $file.Name " CSS uploaded on $web site" -ForegroundColor Green  
                       
                  }
                  else
                  {
                      $displayTemplateFile.CheckOut();
                      try
                      {
                         $contentWebPartsDisplayTemplatesFolder.Files.Add($destUrl,$stream,$true)
                      }
                      catch
                      {
                         Write-Host $_
                      }
                      $stream.close()                             
                      $displayTemplateFile.CheckIn("CheckIn by PowerShell");                         
                      $displayTemplateFile.Publish("Publish by PowerShell");                         
                       
                      $displayTemplateFile.Update();        
                      $web.Update();
                      
                       
                      Write-Host $file.Name " CSS uploaded on $web site" -ForegroundColor Green  
                       
                  }
          }
          catch
          {
              Write-Host $_  
          }    
      }
   
   $web.AllowUnsafeUpdates  = $false;
 
  $web.dispose();
  $spsite.dispose();
 }
 
 try
 {
     [void][System.Reflection.Assembly]::LoadWithPartialName("Microsoft.Sharepoint")
     [void][System.Reflection.Assembly]::LoadWithPartialName("Microsoft.Sharepoint.Administration")
     AddPowerShellSnapin
     UploadDisplayTemplates "http://SiteCollection" # SiteCollection URL
 }
 catch
 {
     Write-Host "Custom Exception Happened on Main : " + $Error[0].Exception.Message -ForegroundColor Red  
 }
 
 
  #stop-transcript 
 

This PowerShell script will Add the File for the first time, and from, the second time onwards, it will check out and check in the files. Hence, we will not lose our versioning as well.

Let us see the other artifacts in the upcoming articles.


Happy Coding,

Sathish Nadarajan.

Author Info

Sathish Nadarajan
 
Solution Architect
 
Rate this article
 
Sathish is a Microsoft MVP for SharePoint (Office Servers and Services) having 15+ years of experience in Microsoft Technologies. He holds a Masters Degree in Computer Aided Design and Business ...read more
 

Leave a comment