How to Increase the file upload size in SharePoint 2013 using PowerShell and Central Administration

Sathish Nadarajan
 
Solution Architect
October 17, 2015
 
Rate this article
 
Views
13712

In this article, let us see how to modify the maximum file upload size in SharePoint 2013 using PowerShell and Central Administration. Especially, this will be very useful, when we are using the SharePoint Client Object Model. (CSOM). Usually CSOM restricts to 3 MB by default. If we want to upload a larger file using CSOM, sharepoint does not allow that.

First let us see how to do that using PowerShell.

Open the PowerShell Console with Admin credentials and execute the below script.

 $ws = [Microsoft.SharePoint.Administration.SPWebService]::ContentService
 $ws.ClientRequestServiceSettings.MaxReceivedMessageSize = 5242880
 $ws.ClientRequestServiceSettings.MaxParseMessageSize  = 5242880
 $ws.Update()
 

The above will increase the file size to 512 MB.

Now, let us see the same thing in Central Admin.

1. Go to Central Admin

2. Go to Manage Web Applications

3. Select the WebApplication

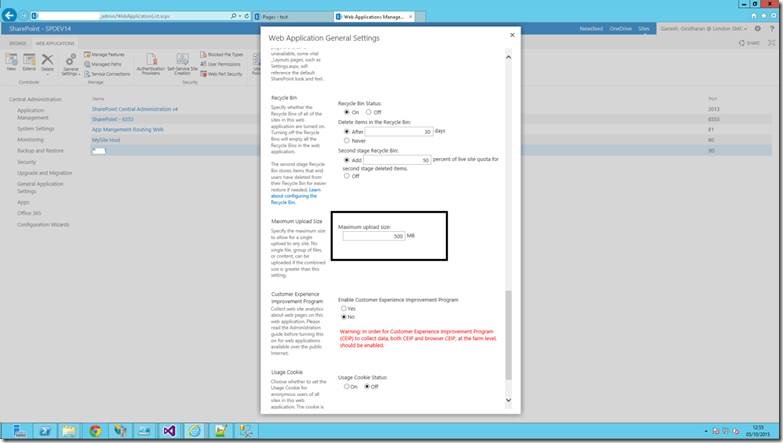
4. Click on the General Settings.

5. Modify the Maximum Upload Size on the popup.


clip_image002


Happy Coding,

Sathish Nadarajan.

Author Info

Sathish Nadarajan
 
Solution Architect
 
Rate this article
 
Sathish is a Microsoft MVP for SharePoint (Office Servers and Services) having 15+ years of experience in Microsoft Technologies. He holds a Masters Degree in Computer Aided Design and Business ...read more
 

How to create Content Databases from the Central Admin And Create Site Collections on that DB itself in SharePoint 2013.

Sathish Nadarajan
 
Solution Architect
August 23, 2015
 
Rate this article
 
Views
13123

In some scenarios, we may require to Create our Site Collection in a separate content DataBase. SharePoint does not allow us to do this directly. Because, the Content DataBases are created at the time of creating the WebApplications. i.e., When we create the web application, at that time, we are having an option to create the Content DB. But when we create some site Collections, then the Sites will get created on the Same Content DB, based on our Threshold limit of the DB.

But in certain cases, we may require to have a separate Content DB to take the backup and restore easily. In that case, let us how to do that step by step.

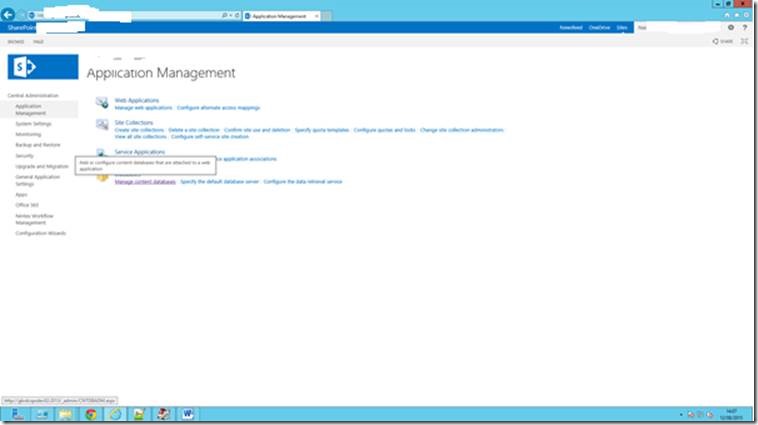
1. Go to Central Administration.

2. Click on Application Management.

clip_image002

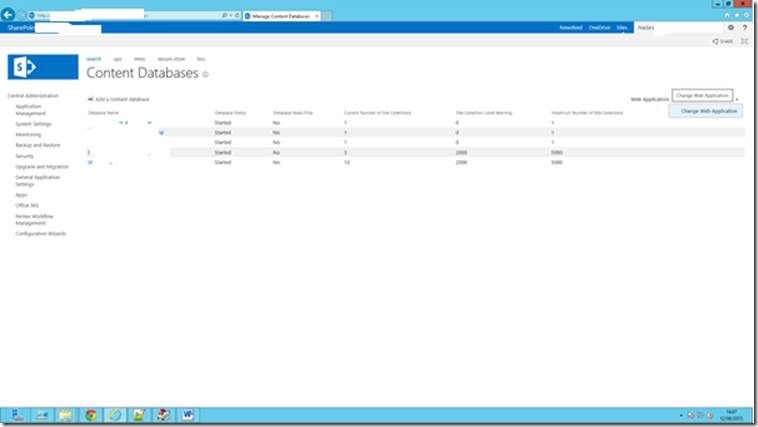
3. Click on the “Manage Content Databases”

clip_image004

4. On the screen, change the WebAppliaction pointing to our Web Application.

5. Click on the Add a Content Database.

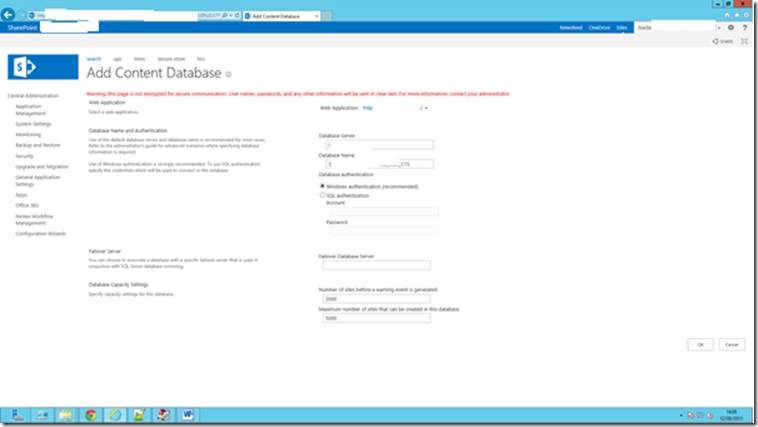
6. Enter the values as shown below.

clip_image006

7. Click on the OK.

8. We will be able to see the Content Databases.

Now, the next step is to create the Site Collection. But during the creation of site collection, we don’t have an option to choose the Content DB. To achieve this, what we can do is,

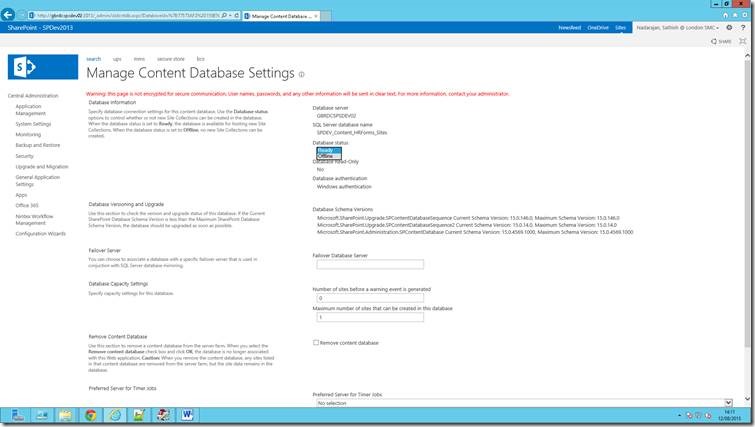
1. Click on the other Content Databases.

clip_image008

2. Make them as Offline on the Status.

3. Keep only our Content DB as Ready State.

4. Now, create the Site Collection. Obviously as the only DB is in Ready State, SharePoint will create the Site Collection in that DB.

Note:

Don’t Forget to make the other DB States as Ready again. If we forget, the other site collections will not work properly.


Happy Coding,

Sathish Nadarajan.

Category : SharePoint

Author Info

Sathish Nadarajan
 
Solution Architect
 
Rate this article
 
Sathish is a Microsoft MVP for SharePoint (Office Servers and Services) having 15+ years of experience in Microsoft Technologies. He holds a Masters Degree in Computer Aided Design and Business ...read more
 

Configure Information Rights Management – SharePoint 2013 Central Administration

Sathish Nadarajan
 
Solution Architect
April 18, 2015
 
Rate this article
 
Views
12542

In this article, let us see how to configure the Information Rights Management in Central Administration of SharePoint 2013.

As usual, let us go by step by step procedures.

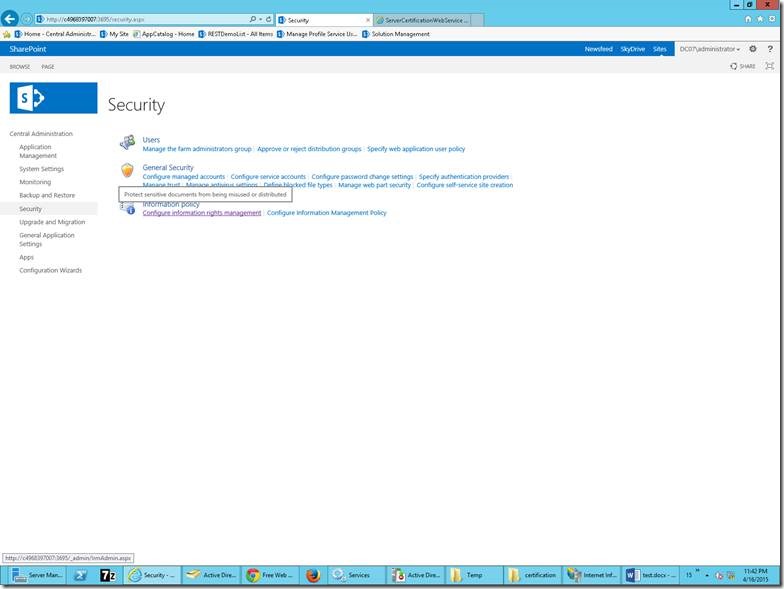
1. Go to Central Administration.

clip_image002

2. On the Security Tab, Click on the “Configure Information Rights Management”

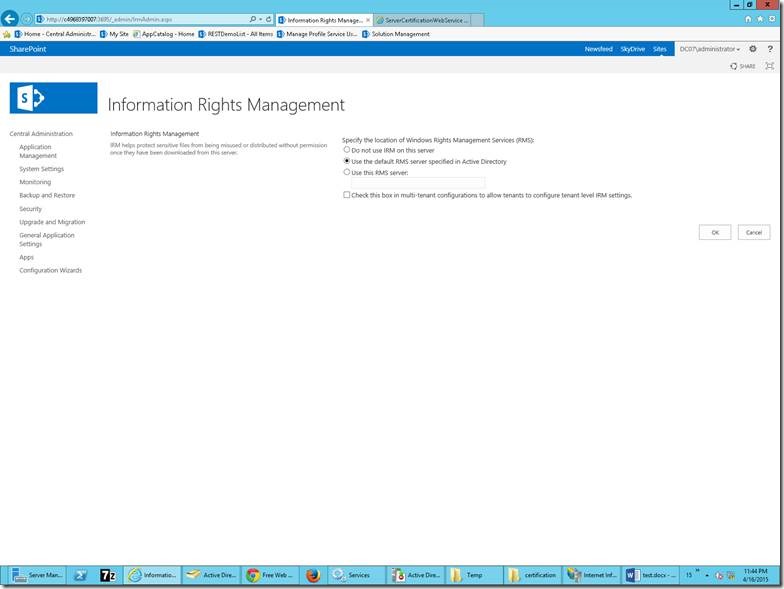
3. On the screen, select your appropriate option.

clip_image004

4. Click OK.

Happy Coding,

Sathish Nadarajan.

Author Info

Sathish Nadarajan
 
Solution Architect
 
Rate this article
 
Sathish is a Microsoft MVP for SharePoint (Office Servers and Services) having 15+ years of experience in Microsoft Technologies. He holds a Masters Degree in Computer Aided Design and Business ...read more
 

How to Create a Blank Site Collection and a Blank Sub Site on SharePoint 2013

Sathish Nadarajan
 
Solution Architect
April 22, 2014
 
Rate this article
 
Views
36585

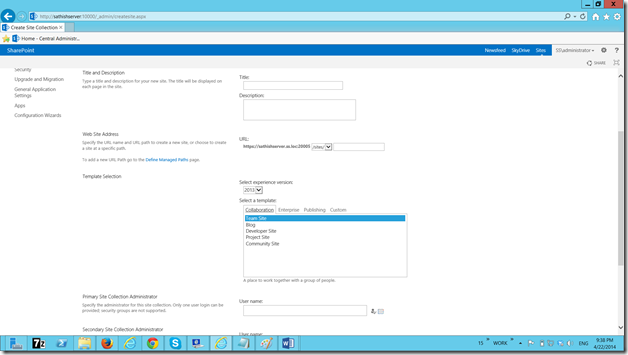
For one of the reason, I was trying to create a Blank Site Collection on SharePoint 2013. To do that, let us go to the Central Administration -> Create Site Collections.

But I could not see any of the template called a Blank Site Collection was listed on the Create Site Collection Page.

image

Then later Identified that the Blank Site Collection template, by default will not be listed here. To make it listed, we need to do the following steps.

1. Go to the following location.

a. C:\Program Files\Common Files\Microsoft Shared\Web Server Extensions\15\TEMPLATE\1033\XML

2. Open the WebTemp.xml.

3. Identify the below tag.

a. <Configuration ID="1" Title="Blank Site" Hidden="TRUE" ImageUrl="/_layouts/15/images/stbs.png?rev=23" Description="A blank site for you to customize based on your requirements." DisplayCategory="Collaboration" AllowGlobalFeatureAssociations="False" > </Configuration>

4. Change the Hidden Attribute to False. i.e., the tag will be

a. <Configuration ID="1" Title="Blank Site" Hidden="FALSE" ImageUrl="/_layouts/15/images/stbs.png?rev=23" Description="A blank site for you to customize based on your requirements." DisplayCategory="Collaboration" AllowGlobalFeatureAssociations="False" > </Configuration>

b. Do an IISRESET

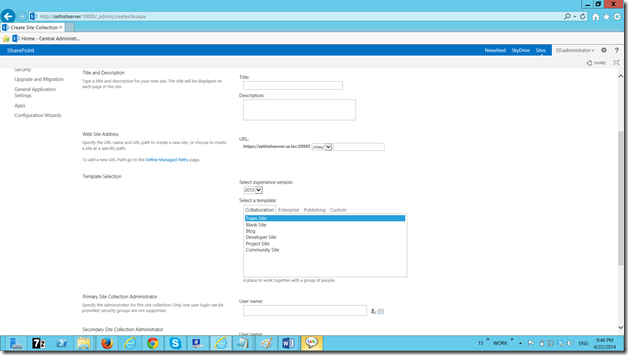
5. Now, come back to the Central Administration. Do a Refresh. You can see the Template.

image

If you don’t want to change the xml or don’t have access, then the only other way is to go with the powershell. The Script to get the available templates and create a site collection/subsite is as follows.

 Add-PSSnapin "Microsoft.SharePoint.PowerShell"
 Get-SPWebTemplate 
 

This will return all the available templates on your farm. From there, we can pick the BlankTemplate.

Hence, the complete script would be

 Add-PSSnapin "Microsoft.SharePoint.PowerShell"
 
 Get-SPWebTemplate
 
 $template = Get-SPWebTemplate "STS#1"
 
 New-SPSite -Url "https://SathishServer.ss.loc:20003/Sites/MyBlankSite" -OwnerAlias "SSAdministrator" -Template $template 
 

Happy Coding.

Sathish Nadarajan.

Author Info

Sathish Nadarajan
 
Solution Architect
 
Rate this article
 
Sathish is a Microsoft MVP for SharePoint (Office Servers and Services) having 15+ years of experience in Microsoft Technologies. He holds a Masters Degree in Computer Aided Design and Business ...read more
 

How to: Convert SharePoint standard license to Enterprise license in SharePoint 2010

Sarath Babu Koneti
 
SharePoint Consultant
January 9, 2014
 
Rate this article
 
Views
25189

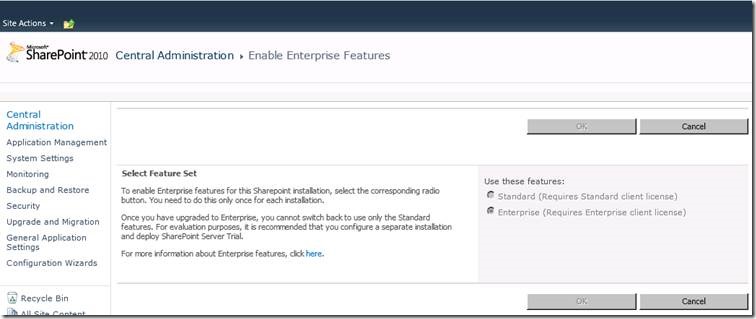
· Go to SharePoint central administration -> Upgrade & migration -> Enable enterprise features. -> Choose the second option(enterprise) & Click OK.

clip_image002

When I tried to convert SharePoint standard License type to SharePoint enterprise License I got this error stating

“The Execute method of job definition Microsoft.SharePoint.Portal.Administration.SkuUpgradeJob (ID 22600ed7-c733-488e-a09a-6a61776edc91) threw an exception. “

How to resolve it?

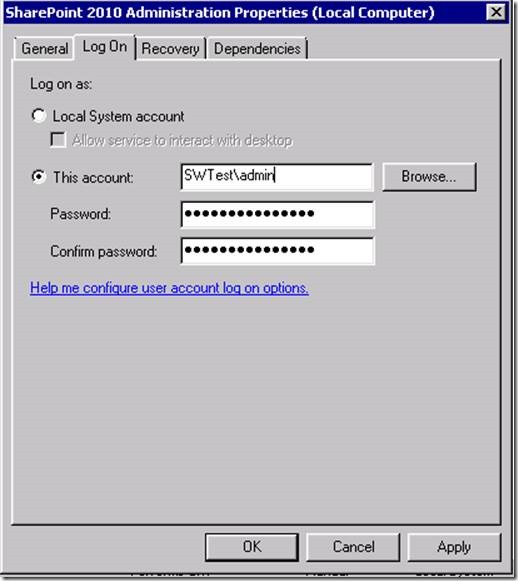
Go to Services.msc

Navigate to SharePoint administration service

clip_image004

It is running under local system account.

Ensure that the SharePoint 2010 administration service is running using a domain user account

clip_image006

Click OK

· Now again go to SharePoint central administration -> Upgrade & migration -> Enable enterprise features. Click OK.

And finally Success J

clip_image008

Happy Sharepointing!

Sarath Babu Koneti

Yes Labs Pty Ltd.

Category : SharePoint

Author Info

Sarath Babu Koneti
 
SharePoint Consultant
 
Rate this article
 
Working as a Sharepoint Consultant ~ Yes Labs Pty Ltd, Sydney ...read more
 

Infopath forms services not found in SharePoint 2010

Sarath Babu Koneti
 
SharePoint Consultant
January 5, 2014
 
Rate this article
 
Views
14482

When we tried to open InfoPath for forms creation we got this message.

clip_image002

When we tried to go to InfoPath forms services in Central administration we were not able to find it.

When we started to look at it, we were able to fix it up by the following ways.

Steps to replicate:

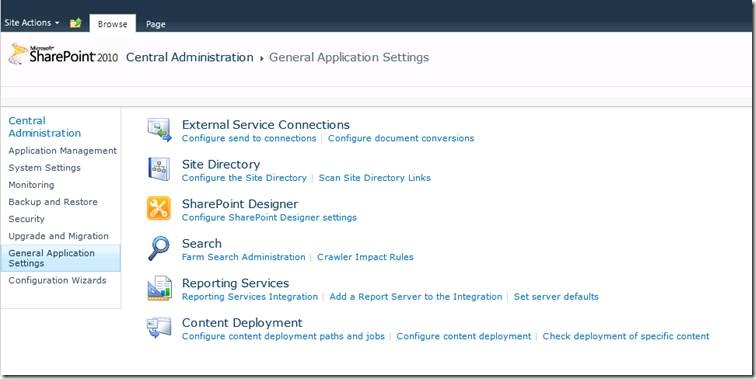
Navigate to SharePoint 2010 -> Central Administration -> General application settings

Not able to find Infopath forms services below as shown below.

clip_image004

To activate Infopath forms services, Open PowerShell with administrator privileges and run the below commands.

clip_image006

clip_image008

Also activate the web scoped feature.

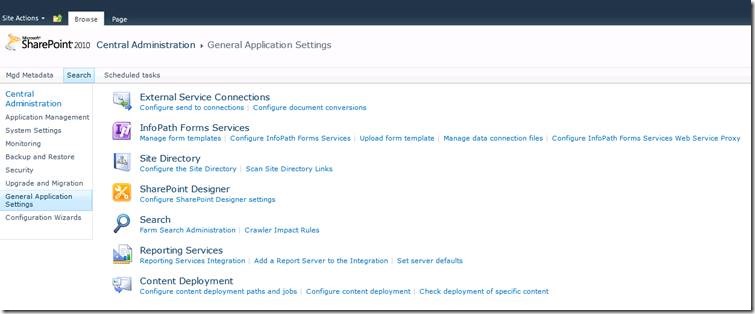
Now login to Central administration & click general application settings, we will be able to see Infopath forms services.

clip_image010

Happy SharePointing

Sarath Babu Koneti

Sharepoint Consultant

Yes Labs Pty Ltd.

Category : SharePoint

Author Info

Sarath Babu Koneti
 
SharePoint Consultant
 
Rate this article
 
Working as a Sharepoint Consultant ~ Yes Labs Pty Ltd, Sydney ...read more
 

Navigation – Using Managed Metadata Feature of SharePoint 2013

Mythili Ranganathan
 
SharePoint Architect
December 27, 2013
 
Rate this article
 
Views
24236

In this Post, let us see the Managed Metadata based navigation SharePoint 2013. It powers the navigation structure and automatically generates pages based on the taxonomy hierarchy. The new Term Store makes it easy and fast to create an intuitive site with user-friendly and search engine-friendly URLs. You can create; maintain the navigation for all sites in your farm.

Steps:

To achieve this, you need to work with the Central administration and Site settings.

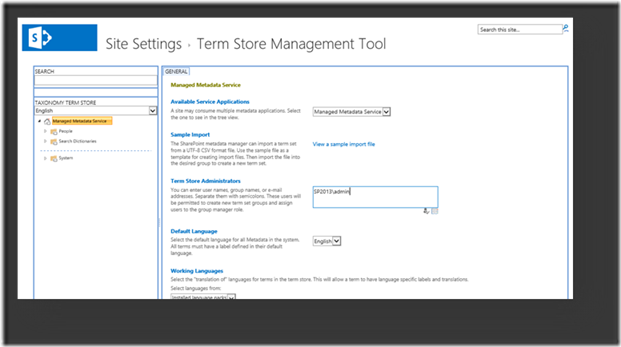
1. Open the Term Store Management Tool to define the Term sets and Terms by clicking on the Managed Metadata Service Application instance in Central Admin

clip_image002

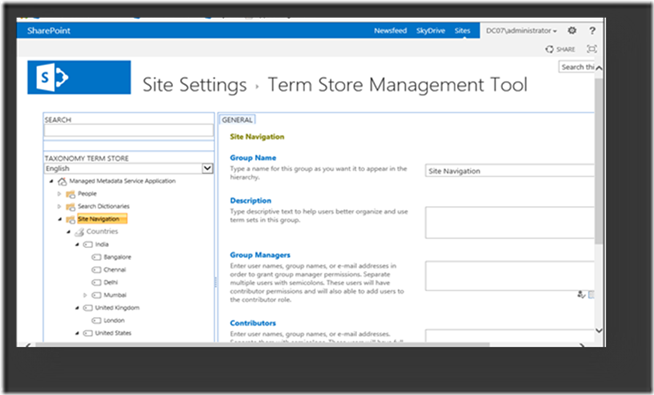
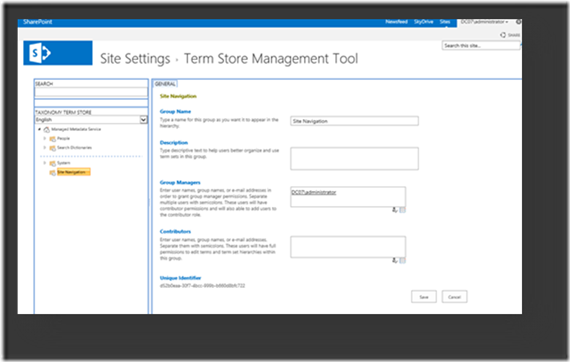
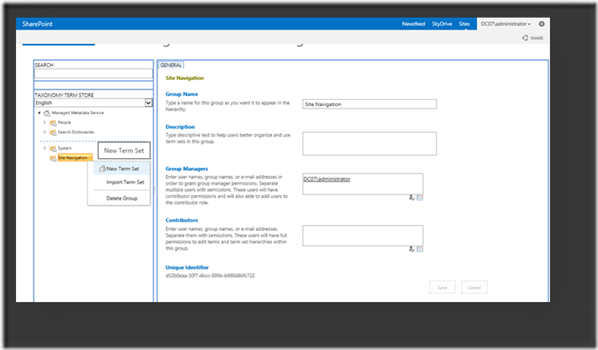
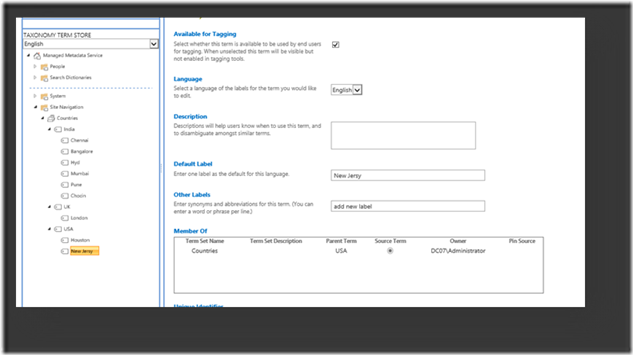
2. Define the Taxonomy for Navigation – Groups, Termsets and Terms for the Managed Metadata Service as mentioned in below Picture

clip_image004

clip_image006

clip_image008

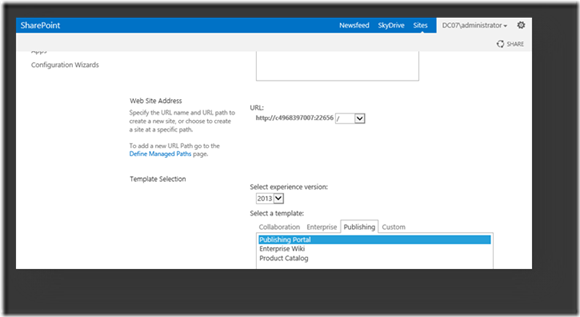
3. Create Publishing Web Application; you will have default “Structured Navigation” applicable for the Global and Current Navigation for the web application

clip_image010

4. Click on the Settings link and Go To “Site Settings” link

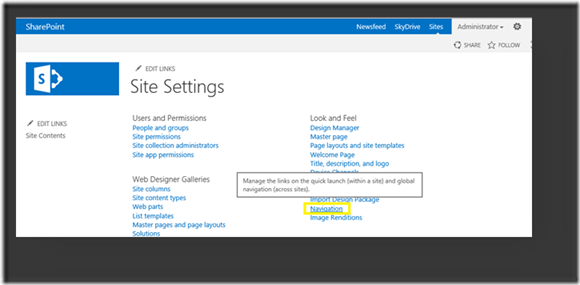
5. Click on the “Navigation” link from the “Look and Feel” section

clip_image012

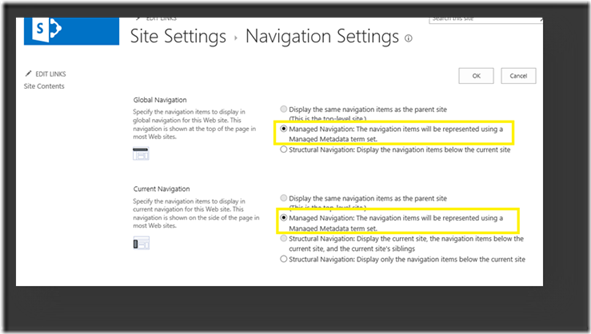
6. Check the Navigation Settings available for the Global Navigation be default:

7. Change the Global Navigation and Current Navigation to “Managed Navigation” instead of “Structured Navigation”

clip_image014

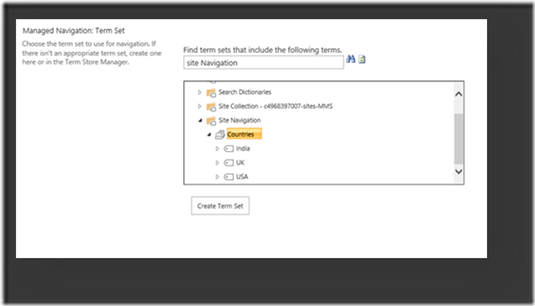
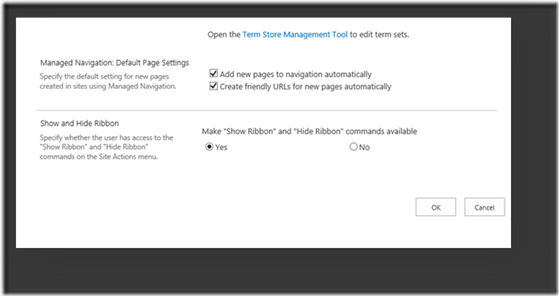
8. Select the “Countries” Term Set for Managed Navigation as shown below and Click on Ok button

clip_image016

clip_image018

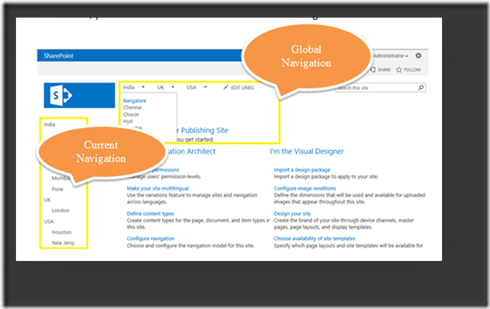
9. Navigate to Home Page and observe the changes in Navigations both Global and Current, you should be able to see the Countries as Navigational nodes.

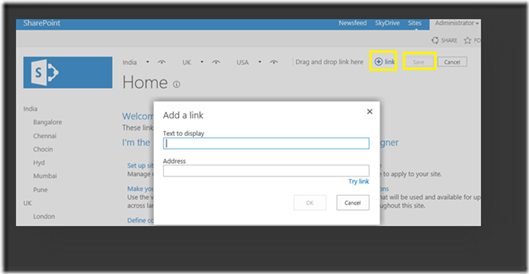
10. Click on the “Edit Links” link in Global Navigation and Click on Add Link button to add a new City in United States “New York”.

clip_image020

clip_image022

11. Drag and Drop the new link into “USA” menu properly and save it

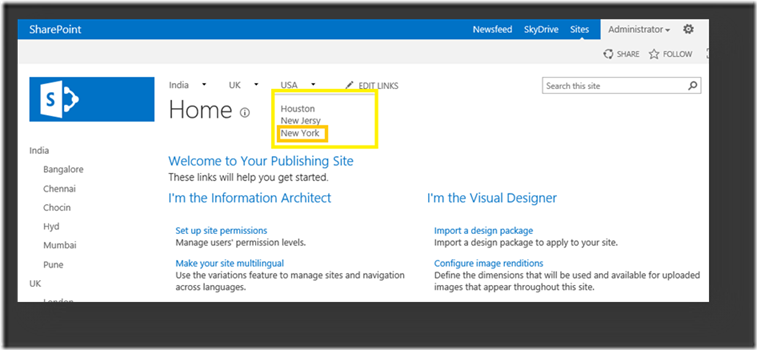
12. Refresh the Page and you should be able to see newly added link in both the Navigations

clip_image024

13. Go to Term Store Manager Tool from Site Settings and Observe the changes in the Termsets (look for the one that you have added new)

14. Repeat the same steps for Current Navigation and Add new link node for the “UK”

15. Hide the Cities for Mumbai from Global Navigation

16. Edit the Master Page and Allow Current Navigation’s for more than 2 levels so that you can View cities from Mumbai in Current Navigation


With this, we are done with the fundamentals of Navigation using the Managed Metadata Service Application. 


Happy SharePointing,

Mythili Ranganathan

Author Info

Mythili Ranganathan
 
SharePoint Architect
 
Rate this article
 
Mythili is a SharePoint Architect in a CMM Level 5 Company, with strong passion towards Microsoft Technologies (SharePoint, C# & ASP.Net) ...read more
 

Creating and Configuring Managed Metadata Service Application in SharePoint 2013

Mythili Ranganathan
 
SharePoint Architect
December 24, 2013
 
Rate this article
 
Views
45362

In this post, let us see the step by step procedure to create and configure Managed Metadata Service Application in SharePoint 2013.

Managed Metadata Service, allows to use Managed Metadata and share ContentTypes on SiteCollections and WebApplication level.

By Creating Managed Metadata Service Application, Managed Metadata Service will be automatically created. Service will identify the database to be served as term store and connection provides access to the service. All enterprise managed terms will be stored in the DB that is specified by managed metadata service. Whenever administrator creating connection to the service and publishing the managed metadata service, he need to know the URL of the service. We can also use managed metadata service to share content types.

To use managed metadata, a web application need to have connection to the managed metadata service. When managed metadata service is created, a connection will be created to the web application.

With this background information regarding MMSA, let us see the steps to create and configure the managed Metadata service in central administration.

Steps:

1. Go to Central Administration -> Application Management -> Manage Service applications
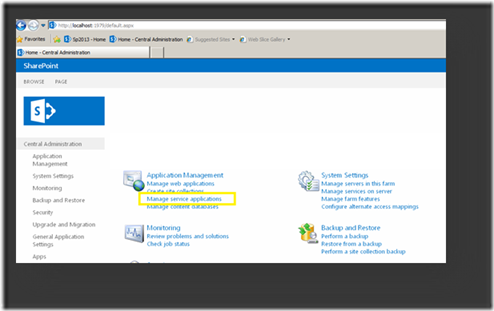
clip_image002

2. In Manage service applications, add new managed metadata service as shown in the screen below.
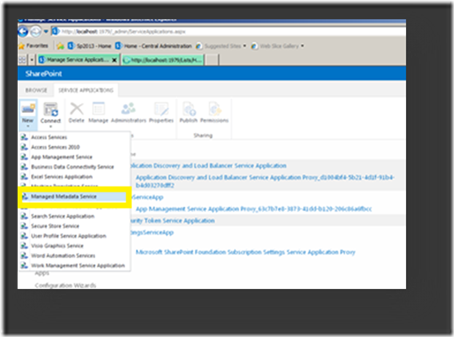
clip_image004

3. Add Name, Database name, Application pool name details in the popup as shown screen below.

· Service Name

· Database Name

· Application Pool to run the service, either you can use the existing app pool / create a new one by selecting the option available.
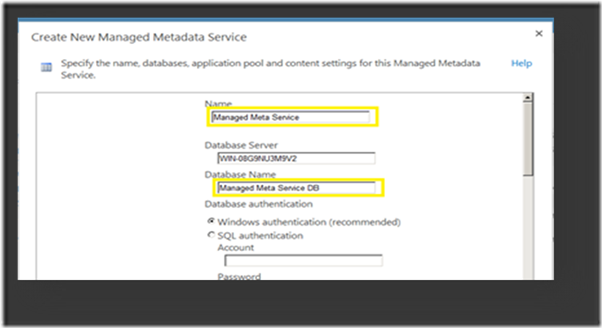
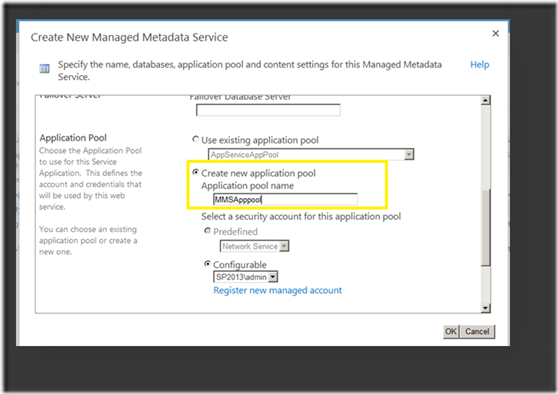
clip_image006

clip_image008

And now, the Managed Metadata service is configured.
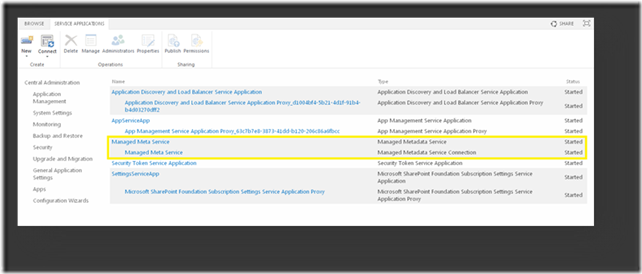
clip_image010

4. Check for Managed Metadata service Application.

Go to Central Admin -> Mange Services on Server
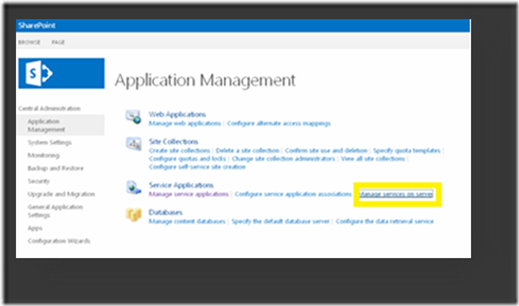
clip_image012
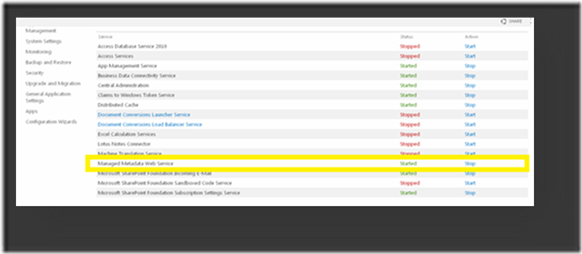
5. Start the Managed Metadata service. If you start this service, Managed Metadata creates the service applications.
clip_image014

clip_image016

clip_image018

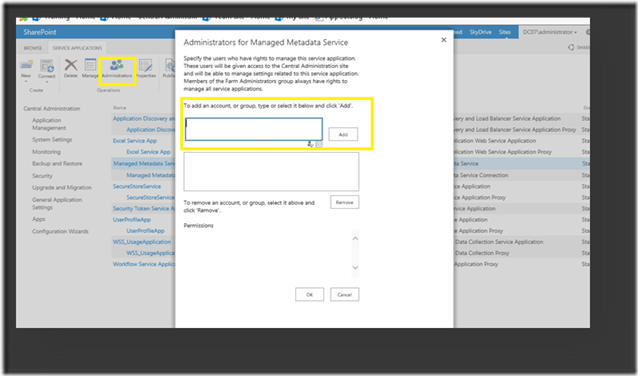
6. Once the Managed Metadata service is created, on the Administrators group add appropriate users and give permissions accordingly.
 

clip_image020


With this, we are done with Creating the Managed Metadata Service Application.  On the Next post, let us discuss about using the Managed Metadata Service for the Navigation on the Site Collection Level.


Happy SharePointing.

Mythili Ranganathan.
Author Info

Mythili Ranganathan
 
SharePoint Architect
 
Rate this article
 
Mythili is a SharePoint Architect in a CMM Level 5 Company, with strong passion towards Microsoft Technologies (SharePoint, C# & ASP.Net) ...read more
 

How To: Make your SharePoint 2010 site collection read-only, restrict delete

Sarath Babu Koneti
 
SharePoint Consultant
December 19, 2013
 
Rate this article
 
Views
26372

There are a couple of ways in doing this.

1. Out of the box way – Central Administration > Site Collections > Configure Quotas and Locks > Site Lock Information

2. Set SharePoint Content Database in Read-Only Mode, SQL Server Management Studio. Right-click on the database -> Options -> Make database read only -> True

3. Using PowerShell

The sample explained is by using PowerShell

Before locking we will be having the options like below, New document/Upload document enabled.

clip_image002

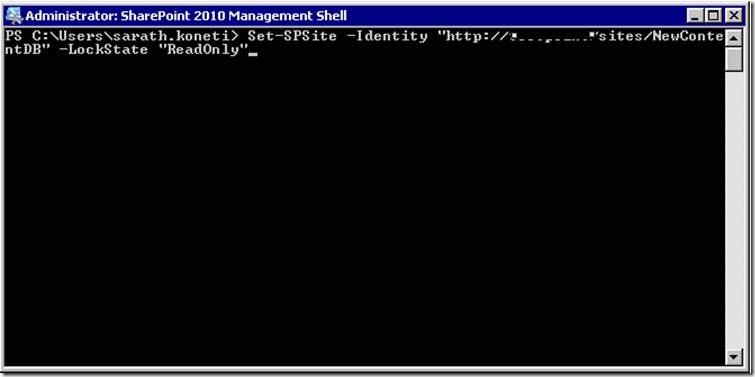
Go to SharePoint 2010 Management Shell execute the following command

 Set-SPSite -Identity "http://spsite/sites/NewContentDB" -LockState "ReadOnly"

clip_image004

After locking, new document and upload document controls are disabled. The controls are greyed out.

clip_image006

We will not be able to upload new documents. Also we will not be able to delete any existing documents.

clip_image008

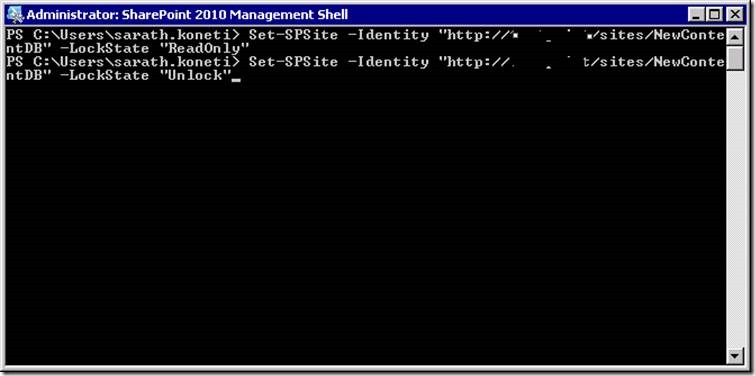
To make the site accessible again, run the unlock command as shown below.

 Set-SPSite -Identity "http://spsite/sites/NewContentDB" -LockState "ReadOnly"

clip_image010

Click enter

Go and refresh the page

clip_image012

clip_image014

Now the controls are enabled. Site can be accessed normally.

Happy Sharepointing!

Sarath Babu Koneti

Sharepoint Consultant

Yes Labs Pty Ltd

Category : SharePoint

Author Info

Sarath Babu Koneti
 
SharePoint Consultant
 
Rate this article
 
Working as a Sharepoint Consultant ~ Yes Labs Pty Ltd, Sydney ...read more
 

How to resolve Error Value does not fall within the expected range with Exception Microsoft SharePoint SPFieldMap GetColumnNumber

Ashok Raja
 
Solutions Architect
July 3, 2013
 
Rate this article
 
Views
6724

This error System.ArgumentException: Value does not fall within the expected range with exception message Microsoft.SharePoint.SPFieldMap.GetColumnNumber(String strFieldName, Boolean bThrow)  is due to throttling limit set at List View Lookup Threshold settings in WebApplication.
To resolve this error, Open the SharePoint Central Administration site and click  “Manage Web Application” link located under Application Management Group. Select the web application that has the problem. Select the “Resource Throttling” link under the “General Settings

Navigate to List View Lookup Threshold section and change the value to a higher value depending on the count of Lookup, Person/Group, or workflow status field available in the list that caused the issue.

Category : Tips

Author Info

Ashok Raja
 
Solutions Architect
 
Rate this article
 
I am Ashok Raja, Share Point Consultant and Architect based out of Chennai, India. ...read more
 

Leave a comment