Use Certificate to connect to SharePoint from Azure DevOps Pipeline

Ahamed Fazil Buhari
 
Senior Developer
November 16, 2022
 
Rate this article
 
Views
1658

Authentication is important thing to consider when we think of automating deployment or any task that needs to access SharePoint from CI/CD pipeline. In this article we will see how we can authenticate to SharePoint using certificate through PnP PowerShell.

I already have an Azure App with necessary permission (in my case – SharePoint, Permission Name: AllSites.FullControl – Type: Application) to access my SharePoint sites.

We need a certificate that we can upload in our Azure App and .pfx file (personal exchange information) that needs to be uploaded to Azure DevOps which acts as a private key for the certificate.

Generate Certificate

PnP PowerShell provides a cmdlet that can generate both .pfx and .cer files, – https://pnp.github.io/powershell/cmdlets/New-PnPAzureCertificate.html

New-PnPAzureCertificate


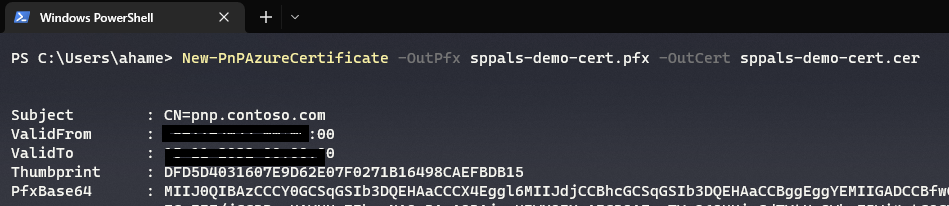
With the above commands it generated two files – .cer and .pfx. We need both the files, where .cer file should be uploaded to Azure App and .pfx file should be added to Azure DevOps secure file,  and its explained in detail as follows,

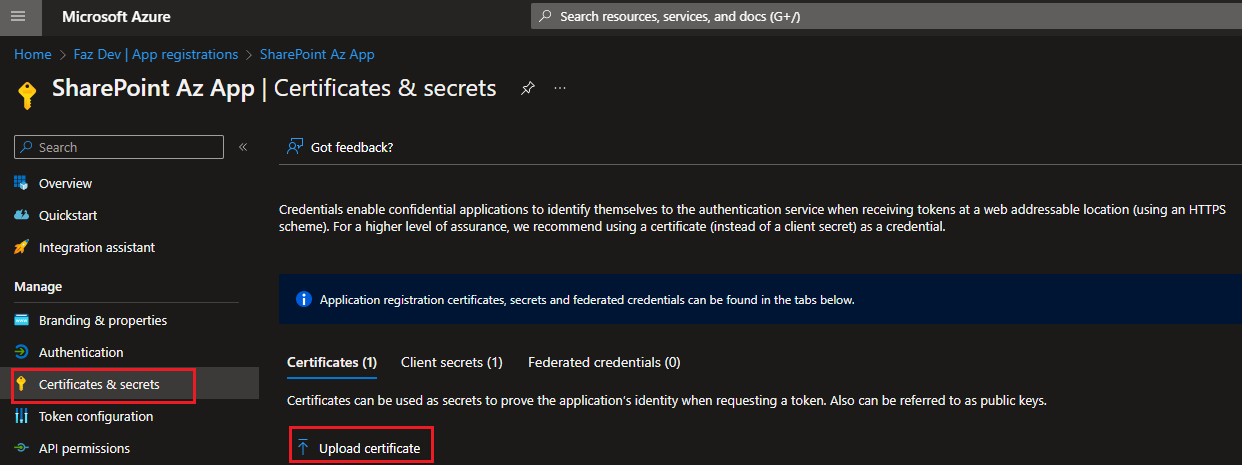
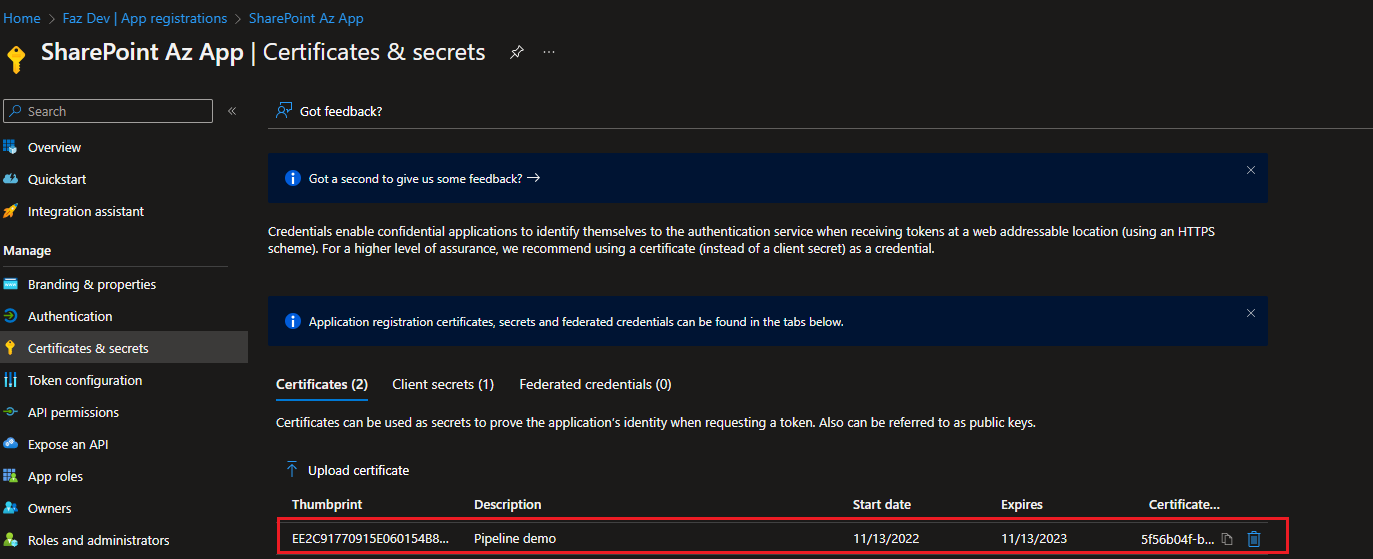
Upload .cer file to Azure App and .pfx file to Azure DevOps

In the above section we generated .cer file and the file needs to be uploaded into Azure App as shown in below screenshots


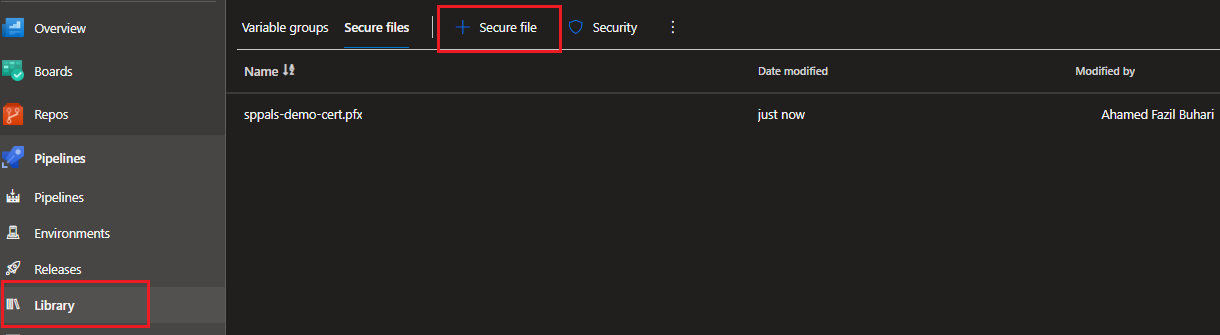
In Azure DevOps under Pipelines section, select Library. In the library we can have variable groups, and secure files. We need to keep our .pfx file some where secure in Azure DevOps, so we can upload it here.


Connect to SharePoint in Azure DevOps Release Pipeline

Here I am connecting to SharePoint from Release pipeline by having couple of tasks. We can use “Download secure file” task from Microsoft to download our .pfx file from library and then its followed by a PowerShell task where we can have PnP command to connect to SharePoint using certification path, as shown below.


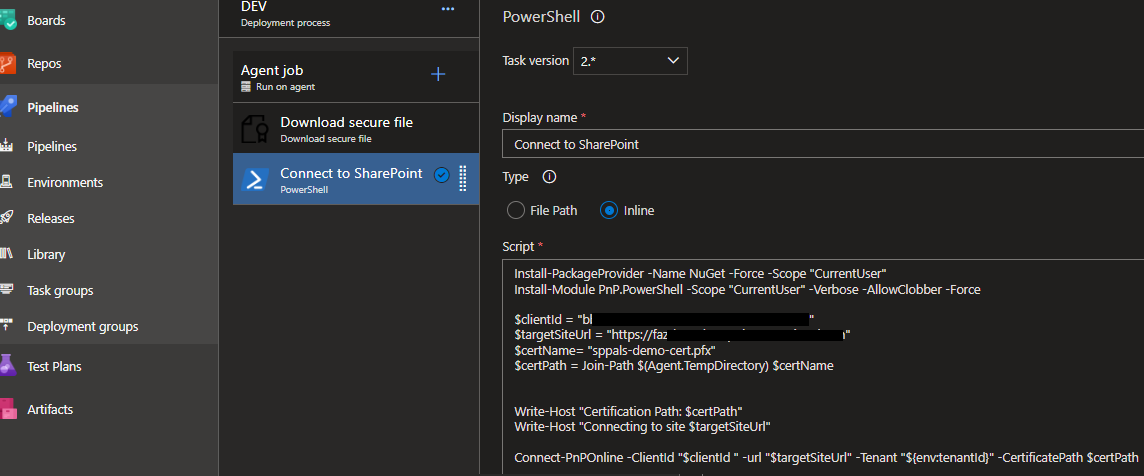
Connect-PnPOnline -ClientId "" -Url "" -Tenant "" -CertificationPath ""

In the PowerShell, we need to provide clientId (Azure App Id), SharePoint site URL, tenant Id and .pfx file path. Now you can access SharePoint by using certification in your pipeline 🙂


Happy Coding

Fazil

Author Info

Ahamed Fazil Buhari
 
Senior Developer
 
Rate this article
 
Ahamed is a Senior Developer and he has very good experience in the field of Microsoft Technologies, especially SharePoint, Azure, M365, SPFx, .NET and client side scripting - JavaScript, TypeScript, ...read more
 

Error: The revocation function was unable to check revocation because the revocation server was offline. 0x80092013 (-2146885613)

Sathish Nadarajan
 
Solution Architect
October 28, 2014
 
Rate this article
 
Views
35747

I was on the process of installing and configuring my Own Certificate Authority by installing the Active Directory Certificate Services. The installations were completed successfully. I tried to create a Certificate from the IIS I was facing an Exception like “Error: The revocation function was unable to check revocation because the revocation server was offline. 0x80092013 (-2146885613)”

On the Server Manager, we can see the exception as below.

clip_image002

I was not able to Create a certificate as well as the Renewal also not be done.

Then after googling for a while, found a useful tip regarding this. Thought of sharing this to the SharePoint Community.

Executing a simple command solves this problem.

· Open the Command Prompt as Administrator on the CA Server.

· Execute the following command.

 certutil –setreg caCRLFlags +CRLF_REVCHECK_IGNORE_OFFLINE

· Restart the Server.

· Try creating/Renewal the certificate.

· It should create/Renew without any issue.

Then, if you want to roll back to the previous setting,

 certutil –setreg caCRLFlags -CRLF_REVCHECK_IGNORE_OFFLINE.

The execution of the above command will gives the following output.

 Old Value:
 CRLFlags REG_DWORD = 2
 CRLF_DELETE_EXPIRED_CRLS -- 2
 New Value:
 CRLFlags REG_DWORD = a (10)
 CRLF_DELETE_EXPIRED_CRLS -- 2
 CRLF_REVCHECK_IGNORE_OFFLINE -- 8
 CertUtil: -setreg command completed successfully.
 

Happy Coding.

Sathish Nadarajan.

Category : Windows

Author Info

Sathish Nadarajan
 
Solution Architect
 
Rate this article
 
Sathish is a Microsoft MVP for SharePoint (Office Servers and Services) having 15+ years of experience in Microsoft Technologies. He holds a Masters Degree in Computer Aided Design and Business ...read more
 

How to Create HTTPS/SSL enabled WebApplication with HostHeader in SharePoint 2013 Using PowerShell

Sathish Nadarajan
 
Solution Architect
January 9, 2014
 
Rate this article
 
Views
34336

In some old articles, we saw about creating various types of WebApplications. Hope we are familiar with creating various web applications. Here, I faced another challenge. Thought of sharing that to the Community.

The requirement was something like, I want a web application, whose URL should be like https://MYDevelopmentSite.ss.loc:1000/Sites/MyDeveloperSite instead of https://Servername:1000/Sites/MyDeveloperSite. We may think, that, this is very simple. Even I thought the same thing. That is, this is going to be a straight forward one. But, the problem here is the site is SSL Enabled one.

Let us see, how to create the web application using power shell and discuss about the problem and the error faced later.

 $ap = New-SPAuthenticationProvider
 
 New-SPWebApplication -Name "MyDevelopmentSite" -DatabaseName "WSS_Content_MyDevelopmentSite" -HostHeader "MyDevelopmentSite.DC07.Loc" -Port 4001 -ApplicationPool "MyDevelopmentSite" -ApplicationPoolAccount "DC07SPFarm" -URL "https://MyDevelopmentSite.DC07.Loc" -AuthenticationProvider $ap –SecureSocketsLayer
 

This will create the WebApplication with a host header. And the URL of the WebApplication would be https://MyDevelopmentSite.dc07.loc:4001/

Let us go to the Central Administration to confirm whether the web app has been created or not.

image

Yes, it got Created.

Now, let us create a Sitecollection on this web application with the below script.

 $template = Get-SPWebTemplate "PRODUCTCATALOG#0"
 
 #$template
 
 New-SPSite -Url "https://MyDevelopmentSite.DC07.Loc:4001/sites/ProductCatalogTestSite" -OwnerAlias "Administrator@dc07.loc" -Template $template -Name "Product Catalog Test Site" 
 

The Site Collection has been created. Now, try accessing the Site Collection by the URL specified above.

image

When try accessing this URL, We can see the below error message.

image

“The Webpage is not available” is a very weird exception. I know, everyone will get angry by seeing this exception. But once, we faced this, then this is a very simple exception.

The reason for this one is, this is SSL enabled. But till now, we haven’t binded any certificate for this web application. Let us do that by going to the IIS. The steps are as follows.

1. Open the inetmgr.

2. Create a SSL. To create, have a look on this article.

3. Bind the Certificate to the WebApplication Created. Refer here to do that.

Once, we done with the binding and try opening the page, again, we may not have smile on our face. The below page will be thrown on our screen.

You attempted to reach mydevelopmentsite.dc07.loc, but instead you actually reached a server identifying itself as C4968397007.DC07.Loc. This may be caused by a misconfiguration on the server or by something more serious. An attacker on your network could be trying to get you to visit a fake (and potentially harmful) version of mydevelopmentsite.dc07.loc.

The screen would be something like

image

When we see this kind of exception, the immediate action item would regarding the Certificate. The Certificate, which we created from our IIS (Self-Signed Certificate) is the one which causes this exception. If you have a look at the Certificate, the “Issued To” would be the Machine Name.

image

Now, we need to change the “Issued To” field. That we cannot do for a self-signed certificate. At that, time, there is no other go, that we need to create a Domain-Certificate. For that, we require the Domain Certificate Authority. We had already seen enough information about the Certificate Authority and the Domain Certificates in the previous posts.

For reference, I am giving the links here.

https://www.sharepointpals.com/post/Installing-Certificate-Authority-by-Active-Directory-Certificate-Services-on-Windows-Server-2008-R2

https://www.sharepointpals.com/post/Creating-a-Domain-Certificate-from-Certificate-Authority-through-IIS-Server

https://www.sharepointpals.com/post/Creating-a-Domain-Certificate-from-Certificate-Authority-through-MMC

Let us Assume that, we are creating the Domain Certificate from IIS itself. Since that is the easiest approach. The important thing we need to note down is the “Common Name”

image

This should match the host header. This is the actual problem.

Then the created certificate would be

image

Now, map this certificate to the web application, which we created and try login.

Thus we created a web application with a host header and mapped that to a Domain Certificate.

image

In the next posts, we will see some more interesting requirements which I faced.

Happy Coding.

Sathish Nadarajan.

Author Info

Sathish Nadarajan
 
Solution Architect
 
Rate this article
 
Sathish is a Microsoft MVP for SharePoint (Office Servers and Services) having 15+ years of experience in Microsoft Technologies. He holds a Masters Degree in Computer Aided Design and Business ...read more
 

Creating a Domain Certificate from Certificate Authority through MMC

Sathish Nadarajan
 
Solution Architect
January 6, 2014
 
Rate this article
 
Views
18396

In the previous article, we saw how to Create Domain Certificate by using IIS server. Now, let us see, how to create the same Domain Certificate from MMC Console. Because, even if there is no IIS got installed, definitely MMC will be there on any machine. That’s the reason, we need to look into this also.

Though it is easy to create using IIS, we need to know this way also. Sometime it will definitely help.

The steps are as follows.

1. Go Run and type MMC.

image

2. On the Snapin, select “Add/Remove Snap-in”

image


3. Select the “Certificate Authority”

image

4. Certificate Authority will be loaded as shown below

image

5. Now, again go back to Add/Remove Snap-in and Select Certificates

image

6. Select the Radio Button appropriately. In my case, am selecting the Computer.

image

7. Select Local computer. Since am in the CA Server only.

image

8. Now the console will looks like

image

9. Select Personal -> All Tasks->Request New Certificate

image

10. Follow the screen shots.

image

image


image

Select the template

To add more templates to here, we need to add the Templates from the CA. We will see that as Appendix. Now proceed with Enroll.

We will get the Certificate. To confirm that, we can go to IIS-Server Certificates. The created certificate will be listed there also. On the issued certificate section also, we can see the certificate.

Appendix A:

Here let us see, how to add a new template.

image

We need to select an existing template. New certificates can be inherited from the existing certificate template only.

image

Now, we are done with the creation.

Happy Coding.

Sathish Nadarajan.

Category : Configuration, Windows

Author Info

Sathish Nadarajan
 
Solution Architect
 
Rate this article
 
Sathish is a Microsoft MVP for SharePoint (Office Servers and Services) having 15+ years of experience in Microsoft Technologies. He holds a Masters Degree in Computer Aided Design and Business ...read more
 

Creating a Domain Certificate from Certificate Authority through IIS Server

Sathish Nadarajan
 
Solution Architect
January 3, 2014
 
Rate this article
 
Views
49291

In the previous article, we saw how to install ADCS and convert our Windows Server 2008 R2 into a Certification Authority Server. In this post, let us see, how to use that CA to issue certificate for us.

There are 2 ways to create the certificate using CA. In this article, let us see one through IIS Server.

Approach I – Through IIS:

In this Approach, the same as that of creating a Self-Signed Certificate, we can also create a Domain Certificate as well. Only thing is, Active Directory Certificate services should be installed on the Domain. If it is not properly installed, then we cannot create a Domain Certificate. Though we are able to see the link to Create Domain Certificate from the IIS, we cannot create. Let us see, how we cannot Create first.

Let us go to the IIS Server.

image

On the Right Pane, we can see the option to Create Domain Certificate. Click that one.

image

We need to give all the necessary information. Then only Next Button will get enabled.

For documentation purpose, am giving test in all the fields.

image

When I press Next, the next screen would be


image

Since, there is no CA installed, we cannot proceed further.

Let us see, if the CA is installed, (the screen shots were taken from a different environment. Hence the name of the servers will not match with the previous ones)

Now, the Certification Authority Selection Button will be enabled.

image

Select the CA which we installed already.

image

Give a Friendly Name and click Finish

image

The certificate got Created.

image

The major difference, which I thought of explaining is, the “Issued To” field. This field is coming from the Common Name which we gave on the First Screen. For reference, the same is pasted here.

image

Hence, if we want a certificate against any specific machine, then we need to give the machine name or the full name of the machine (along with the domain) on the Common Name Field. The other fields, doesn’t have much impact.

And much more important difference is renewal.

On the below screen shot,

image

Only the “Test” is domain Certificate. The remaining 2 are Self-Signed Certificate. To identify them, select and Right click on the Certificate. You cannot find an option for renew. Only Domain Certificates can be renewed. Self-Signed Certificates cannot be renewed.

image

image

As I mentioned, there are 2 ways to Create a domain Certificate. In this post, we saw one of the approach. The second approach, we will see in the upcoming posts. Thanks.

Happy Coding.

Sathish Nadarajan.

Category : Configuration, IIS, Windows

Author Info

Sathish Nadarajan
 
Solution Architect
 
Rate this article
 
Sathish is a Microsoft MVP for SharePoint (Office Servers and Services) having 15+ years of experience in Microsoft Technologies. He holds a Masters Degree in Computer Aided Design and Business ...read more
 

Installing Certificate Authority by Active Directory Certificate Services on Windows Server 2008 R2

Sathish Nadarajan
 
Solution Architect
 
Rate this article
 
Views
20979

All of us know the importance of Certificate while in development environment as well in the customer’s environment. Being a developer, we don’t bother about the customer environment’s Certificates. But, while developing itself, we will be required to deal with the certificates frequently. For Example, even for creating a HTTPS site, we require certificates.

Regarding this, we had already seen, how to create a self-signed certificate from IIS in this post. But, the problem which we faced here is, the validity of the Certificate. The default validity of the self-signed certificates are one year. After one year, there is no option to renew or extend the validity. Even I couldn’t see any option for the AutoCertificateRollover also. (We can discuss about them in some other posts.)

At the same time, for the development, we cannot buy any certificate for cost also. At this scenario, if we have a Windows Server 2008 R2 machine (or any other Server OS can help. Since, I used Windows Server 2008 R2, I am explaining about that), we can convert our server into a Certificate Authority Server, and get certificates from that itself. We can renew, and we can choose any templates etc., There are much more options are there.

Let us see how to install the Active Directory Certificate Services first. As usual, the step by step procedure are as follows.

1. Open the Server Manager

image

2. Select the Roles. And Add Roles.

image

3. Select the Active Directory Certificate Services

image

4. The installation Wizard will begin

image

5. Select the Services. The basic things we require for our need is, Certificate Authority and Certification Authority Web enrollment

image

6. To install, the Web Enrollment Service, there are certain IIS related Services needs to be installed. Click on Add Required Role Services.

image

7. Now, go to the next screen

image

8. Select the Enterprise, since we are going to use the existing Active Directory

image

9. Select the Root CA. This Certification Authority is going to be the Root for any other sub Certification Authority in future. As for as concerning the development machine, we don’t need to worry about this. We can proceed with Root CA

image

10. Select the New Private Key

image

11. The encryption methods. Leave as by default. The only thing to be noted here is the Key Character Length. For a safer side, always keep the length not less than 2048.

image

12. Give the name of the CA and the Certificate prefixes etc., Mostly keep as it as default.

image

13. Validity of the Certificate. Give as you require. Even, if you give a lesser value, we can renew the certificate.

image

14. Location of the database files.

image

15. Confirm and proceed with installation.

image

image

image


image


image


Verifying the Installation.


Once the installation got succeed, we need to verify. To verify that, we can go to Server manager again and see the Roles has been added.


image

To verify against the Certification Authority, the following steps will help us.

1. Go to Run and type MMC

image

2. Management Console will open. On that, Add Snapin.

image

3. Add Certification Authority and select Local.

image

image 

4. It will get added.

image

5. Now, you can see the entire certificates which were issued, pending requests, Certificate templates etc.,

image

We can see, how to create a certificate using this Certification Authority in the consecutive posts.

Happy Coding.

Sathish Nadarajan.

Author Info

Sathish Nadarajan
 
Solution Architect
 
Rate this article
 
Sathish is a Microsoft MVP for SharePoint (Office Servers and Services) having 15+ years of experience in Microsoft Technologies. He holds a Masters Degree in Computer Aided Design and Business ...read more
 

Leave a comment