Editing a Page does not asking for Page Layout or Single URL Option – SharePoint 2013

Sathish Nadarajan
 
Solution Architect
December 14, 2015
 
Rate this article
 
Views
7254

This issue will be faced by almost everyone who has implemented the Cross Site Publishing in SharePoint 2013. Let me again explain the Problem statement once again, so that it will be a bit clear. (I know, the title is not clear J)

Let us assume the following scenario.

1. I have a page layout

2. Have created some pages based on the page layout

3. Using the Term Based Navigation and the terms are pointing to different pages which we created just now.

4. E.g., The Term1 – Navigation Page would be Page1.aspx which is created based on the PageLayout1

5. The Term2 – Navigation Page would be Page2.aspx which is created based on the PageLayout1. (The same layout which the Page1.aspx is using)

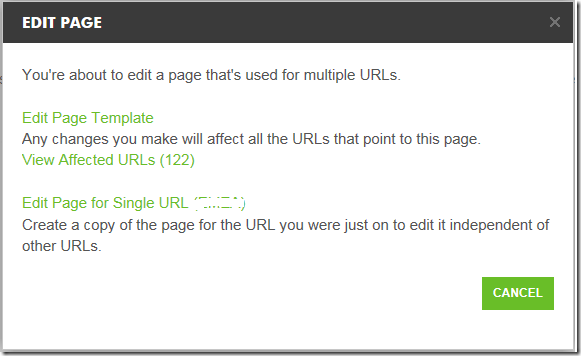
6. Now, when the User comes and Edit the Page1.aspx, SharePoint will be asking for an Option, either you want to edit the Page1.aspx as an individual URL or you want to Edit the PageLayout itself.

image

7. In one of the environment which I was working, this popup was not coming.

8. Then I found that SharePoint is clever enough to display this warning message, if there is one or more terms using the same page and one or more pages has been created based on this layout. If there is only one page created with this Layout, then there is no need of asking this confirmation.

9. Though this looks very simple, I spent some considerable amount of time to understand this and the intelligence of SharePoint. Thought of sharing this to the community as well.

Happy Coding,

Sathish Nadarajan.

Author Info

Sathish Nadarajan
 
Solution Architect
 
Rate this article
 
Sathish is a Microsoft MVP for SharePoint (Office Servers and Services) having 15+ years of experience in Microsoft Technologies. He holds a Masters Degree in Computer Aided Design and Business ...read more
 

Cross Site Publishing – Custom Content Search WebParts – Publishing Site – Part 9

Sathish Nadarajan
 
Solution Architect
March 15, 2015
 
Rate this article
 
Views
11461

Custom WebParts Creation – Object Model

In this section, let us focus on the Visual Studio WebParts. As of now, we were gone through the step by step procedures to establish the Cross Site Publishing. Anyhow, we want to showcase these Pages written on the Authoring to the Publishing Site using WebParts. The webPart display templates, I am not focusing. That will deviate from our objective. Hence, now the focus would be two webparts. One is the Landing Page WebPart which is nothing but a Category WebPart and another one is Content Page WebPart which is nothing but an Item WebPart.

Basically on the Landing Page, we need to show what are the pages related to the Current Navigation Term with an extra filter based on the Content Type. As we have one Content Type (DemoPage), I want to filter based on that as well.

Now, the steps are as below.

1. Open the Visual Studio as “Run as Administrator”.
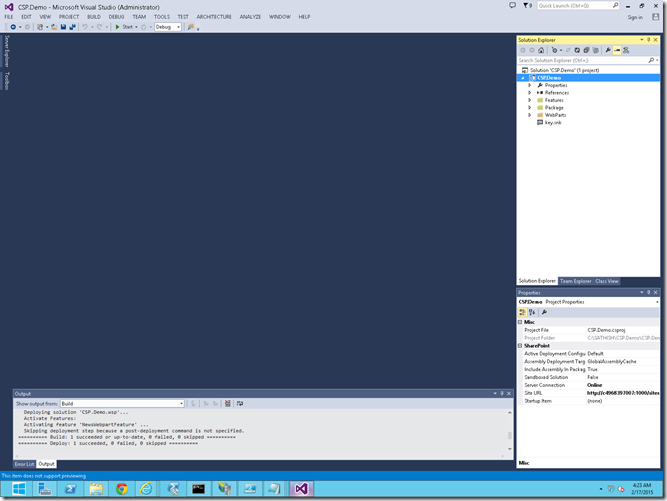
image

2. Add 2 WebParts. Both of them would be a Visual WebPart.
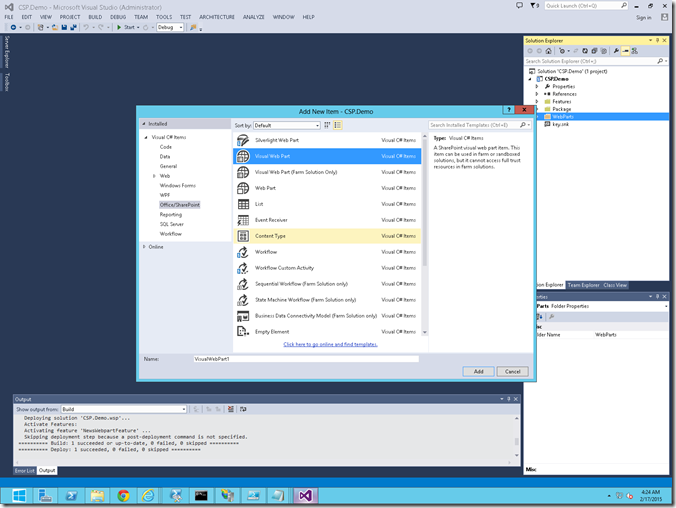
image

3. Let me name them as DemoWebPart and ContentWebPart.
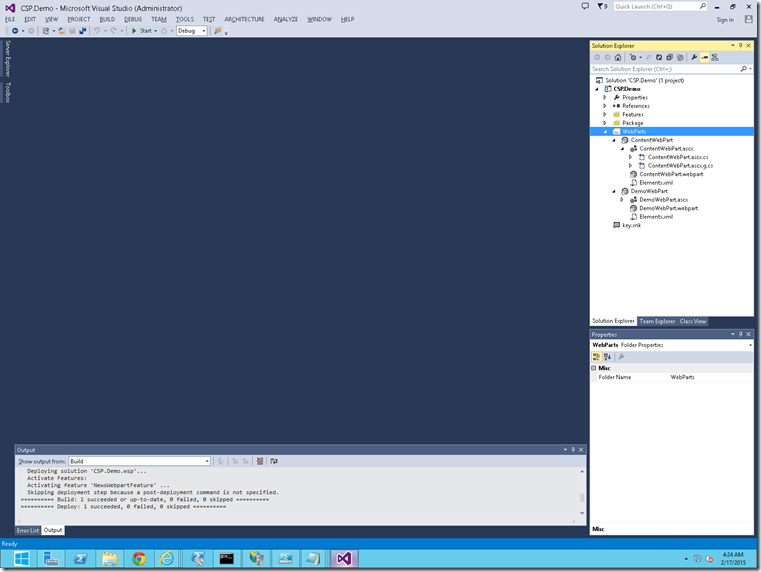
image

4. On the DemoWebPart – That is going to be our Landing (Category WebPart), Based on the Current Term, the pages needs to be retrieved and displayed. In addition to that, I am adding a filter for the Content Type as well.

5. This can be accomplished by the OOB webpart itself. But, if we require further filtering, OOB webpart customization cannot help us.

6. For that, I am inheriting the ContentBySearchWebPart class and create our own Content Search Webpart.

7. On the ASCX file, I am not doing any customization. As this is going to be Content Search WebPart, the customizations needs to be done on the Display Templates. I am not focusing that. As of now, we will be using the default Display Templates.

8. Hence, the ASCX file will looks like

 
 <%@ Assembly Name="$SharePoint.Project.AssemblyFullName$" %>
 <%@ Assembly Name="Microsoft.Web.CommandUI, Version=15.0.0.0, Culture=neutral, PublicKeyToken=71e9bce111e9429c" %> 
 <%@ Register Tagprefix="SharePoint" Namespace="Microsoft.SharePoint.WebControls" Assembly="Microsoft.SharePoint, Version=15.0.0.0, Culture=neutral, PublicKeyToken=71e9bce111e9429c" %> 
 <%@ Register Tagprefix="Utilities" Namespace="Microsoft.SharePoint.Utilities" Assembly="Microsoft.SharePoint, Version=15.0.0.0, Culture=neutral, PublicKeyToken=71e9bce111e9429c" %>
 <%@ Register Tagprefix="asp" Namespace="System.Web.UI" Assembly="System.Web.Extensions, Version=4.0.0.0, Culture=neutral, PublicKeyToken=31bf3856ad364e35" %>
 <%@ Import Namespace="Microsoft.SharePoint" %> 
 <%@ Register Tagprefix="WebPartPages" Namespace="Microsoft.SharePoint.WebPartPages" Assembly="Microsoft.SharePoint, Version=15.0.0.0, Culture=neutral, PublicKeyToken=71e9bce111e9429c" %>
 <%@ Control Language="C#" AutoEventWireup="true" CodeBehind="DemoWebPart.ascx.cs" Inherits="CSP.Demo.WebParts.DemoWebPart.DemoWebPart" %>


9. On the ASCX.CS file, let us frame our Query, Result Source and other properties as well.

 using Microsoft.Office.Server.Search.WebControls;
 using System;
 using System.ComponentModel;
 using System.Web.UI.WebControls.WebParts;
 
 namespace CSP.Demo.WebParts.DemoWebPart
 {
     [ToolboxItemAttribute(false)]
     public partial class DemoWebPart : ContentBySearchWebPart
     {
         // Uncomment the following SecurityPermission attribute only when doing Performance Profiling on a farm solution
         // using the Instrumentation method, and then remove the SecurityPermission attribute when the code is ready
         // for production. Because the SecurityPermission attribute bypasses the security check for callers of
         // your constructor, it's not recommended for production purposes.
         // [System.Security.Permissions.SecurityPermission(System.Security.Permissions.SecurityAction.Assert, UnmanagedCode = true)]
         //public DemoWebPart()
         //{
         //}
 
         //protected override void OnInit(EventArgs e)
         //{
         //    base.OnInit(e);
         //    InitializeControl();
         //}
 
         protected override void OnLoad(EventArgs e)
         {
             this.ChromeType = PartChromeType.None;
             if (this.AppManager != null)
             {
                 if (this.AppManager.QueryGroups.ContainsKey(this.QueryGroupName) && this.AppManager.QueryGroups[this.QueryGroupName].DataProvider != null)
                 {
                     this.AppManager.QueryGroups[this.QueryGroupName].DataProvider.BeforeSerializeToClient += new
                         BeforeSerializeToClientEventHandler(AddNewsProperties);
                 }
             }
             base.OnLoad(e);
 
         }
 
         private void AddNewsProperties(object sender, BeforeSerializeToClientEventArgs e)
         {
             string queryPublishing = string.Empty;
             string queryPreview = string.Empty;


             DataProviderScriptWebPart dp_news = sender as DataProviderScriptWebPart;
             //dp_news.SourceID = "5ae5c0e5-b90a-45d8-9fdf-c7915e9f3ccc";
             this.ResultsPerPage = 5;
 
 
             queryPublishing = " " + "((ContentType:'" + "DemoPage" + "'))" + " AND " + "(owstaxIdDemoTag:{Term.IdWithChildren})";
 
 
             dp_news.QueryTemplate = queryPublishing;
 
         }
         protected void Page_Load(object sender, EventArgs e)
         {
         }
     }
 }


10. Now, let us deploy the Solution. The Feature creation and making the feature activate and all, all of us would be familiar with.

11. Now, on the Screen, let me add the WebPart to the LandingPage.aspx.
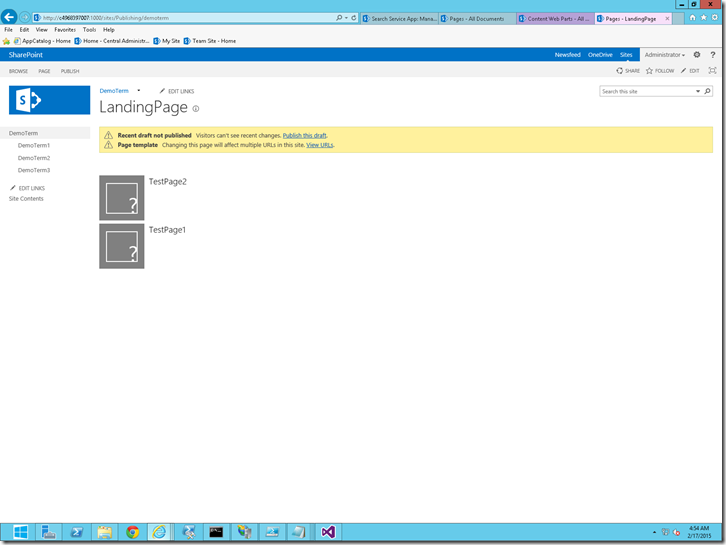
image

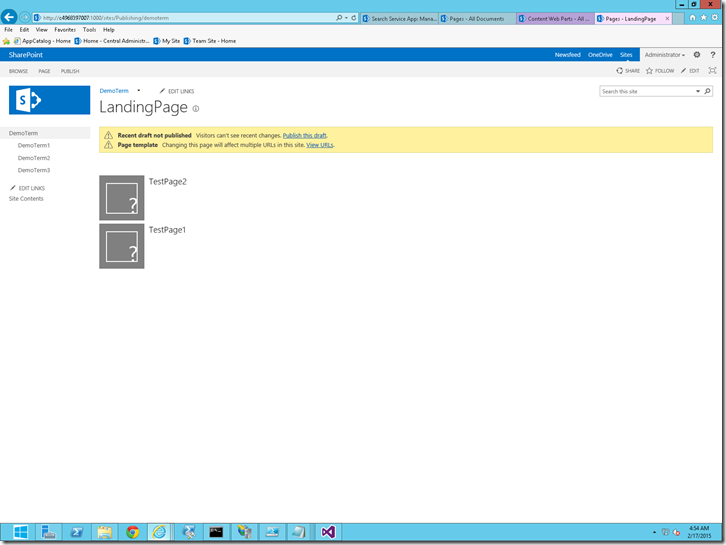
12. If we closely look into the URL, http://c4968397007:1000/sites/Publishing/demoterm, the WebPart will retrieve all the pages which has the term demoterm and its child terms.

13. On the Authoring Page, I have 2 Pages. TestPage 1 and TestPage2.
image

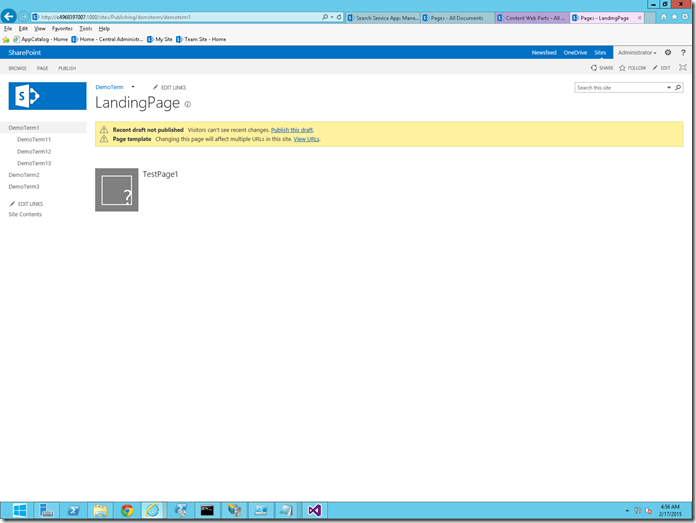
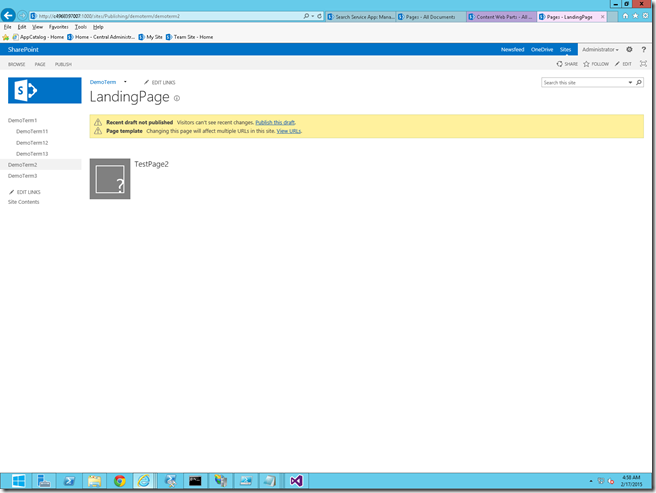
14. Both the pages are having the terms DemoTerm1, DemoTerm2 respectively. Hence, when we land on the DemoTerm, both the pages are getting retrieved.

15. When I navigate to DemoTerm1, http://c4968397007:1000/sites/Publishing/demoterm/demoterm1 then the screen would be like
image

16. When I navigate to DemoTerm2, http://c4968397007:1000/sites/Publishing/demoterm/demoterm2 the screen looks like
image

17. Now, coming to the ContentPage Webpart. This webpart will be placed on the ContentPage.aspx. This webpart is the one which is going to render our content from the Authoring Site on the Publishing Site.

18. This we will be creating using the Visual WebPart itself. This, does not need to be a Content Search WEbpart. This we will retrieve based on the ID.

19. On the ASCX file, I am going to place a Literal Control

 <%@ Assembly Name="$SharePoint.Project.AssemblyFullName$" %>
 <%@ Assembly Name="Microsoft.Web.CommandUI, Version=15.0.0.0, Culture=neutral, PublicKeyToken=71e9bce111e9429c" %> 
 <%@ Register Tagprefix="SharePoint" Namespace="Microsoft.SharePoint.WebControls" Assembly="Microsoft.SharePoint, Version=15.0.0.0, Culture=neutral, PublicKeyToken=71e9bce111e9429c" %> 
 <%@ Register Tagprefix="Utilities" Namespace="Microsoft.SharePoint.Utilities" Assembly="Microsoft.SharePoint, Version=15.0.0.0, Culture=neutral, PublicKeyToken=71e9bce111e9429c" %>
 <%@ Register Tagprefix="asp" Namespace="System.Web.UI" Assembly="System.Web.Extensions, Version=4.0.0.0, Culture=neutral, PublicKeyToken=31bf3856ad364e35" %>
 <%@ Import Namespace="Microsoft.SharePoint" %> 
 <%@ Register Tagprefix="WebPartPages" Namespace="Microsoft.SharePoint.WebPartPages" Assembly="Microsoft.SharePoint, Version=15.0.0.0, Culture=neutral, PublicKeyToken=71e9bce111e9429c" %>
 <%@ Control Language="C#" AutoEventWireup="true" CodeBehind="ContentWebPart.ascx.cs" Inherits="CSP.Demo.WebParts.ContentWebPart.ContentWebPart" %>
 
 <script src="/_layouts/15/sp.runtime.js" type="text/javascript"></script>
 <script src="/_layouts/15/sp.js" type="text/javascript"></script>
 <script src="/_layouts/15/sp.search.js" type="text/javascript"></script> 


 <div class="content_contentpage fix-url ms-rtestate-field" id="divContent" runat="server">  
     
 </div>
 
 <div id="Hidden Debugger" style="display: none">
     <asp:Literal runat="server" ID="Debugger" />
 </div>


20. On the ASCX.CS file, the code will looks like below.


 using System;
 using System.ComponentModel;
 using System.Web.UI.WebControls.WebParts;
 
 using System.Web;
 using System.Web.UI;
 using System.Collections.Generic;
 using Microsoft.Office.Server;
 using Microsoft.Office.Server.Search.Query;
 using Microsoft.Office.Server.Search.Administration;
 using System.Data;
 using Microsoft.SharePoint;
 using System.Linq;
 using System.Xml;
 using System.Xml.Linq;
 
 namespace CSP.Demo.WebParts.ContentWebPart
 {
     [ToolboxItemAttribute(false)]
     public partial class ContentWebPart : WebPart
     {
         // Uncomment the following SecurityPermission attribute only when doing Performance Profiling on a farm solution
         // using the Instrumentation method, and then remove the SecurityPermission attribute when the code is ready
         // for production. Because the SecurityPermission attribute bypasses the security check for callers of
         // your constructor, it's not recommended for production purposes.
         // [System.Security.Permissions.SecurityPermission(System.Security.Permissions.SecurityAction.Assert, UnmanagedCode = true)]
         protected override void OnInit(EventArgs e)
         {
             base.OnInit(e);
             InitializeControl();
             this.ChromeType = PartChromeType.None;
         }
         private void WriteToDebugger(string message)
         {
             this.Debugger.Text += message + "<br/><br/>";
         }
         protected void Page_Load(object sender, EventArgs e)
         {
             LoadContent();
 
         }
 
         public void LoadContent()
         {
             string strContentVal = string.Empty;
             try
             {
                 string title = string.Empty;
                 string itemId = string.Empty;
                 string strSearchQuery = string.Empty;
                 string strUrlQuery = string.Empty;
                 string urlSuffix = string.Empty;
 
                 string MP_PUBLISHINGCONTENT = "PublishingPageContentOWSHTML";
                 string MP_PAGETITLE = "Title";
                 string MP_LISTITEMID = "ListItemID";
                 DateTime Todaydate = DateTime.Now;
                 Dictionary<string, Query> Dqueries = new Dictionary<string, Query>();
                 Dictionary<string, ResultTableCollection> Dresult;
 
                 string strPageUrl = HttpContext.Current.Request.Url.PathAndQuery;
                 if (strPageUrl != null)
                     strUrlQuery = strPageUrl.Split('?')[1];
 
                 if (strUrlQuery != null)
                 {
                     string strTemp = strUrlQuery.Split('&')[3];
                     if (strTemp != null)
                         urlSuffix = strTemp.Split('=')[1];
                     if (urlSuffix != null)
                     {
                         title = urlSuffix.Split('/')[2];
                         itemId = urlSuffix.Split('/')[1];
                     }
                 }


                 SearchServiceApplicationProxy searchProxy = (SearchServiceApplicationProxy)SearchServiceApplicationProxy.GetProxy(SPServiceContext.GetContext(SPContext.Current.Site));
                 KeywordQuery keywordQuery = new KeywordQuery(searchProxy);
                 strSearchQuery = "(SecondaryFileExtension='aspx') AND " + MP_PAGETITLE + ":" + title + " AND " + MP_LISTITEMID + ":" + itemId;
                 this.WriteToDebugger("Search query:" + strSearchQuery);
 
                 keywordQuery.SelectProperties.Add(MP_PUBLISHINGCONTENT);
                 keywordQuery.SelectProperties.Add(MP_PAGETITLE);
 
                 keywordQuery.QueryText = strSearchQuery;
                 Dqueries.Add("First", keywordQuery);
 
                 SearchExecutor ss = new SearchExecutor();
                 Dresult = ss.ExecuteQueries(Dqueries, true);
                 foreach (KeyValuePair<string, ResultTableCollection> result in Dresult)
                 {
                     if (result.Value.Count > 0 && result.Value.QueryErrors == null)
                     {
                         var resultTable = result.Value.Filter("TableType", KnownTableTypes.RelevantResults);
                         if (resultTable != null && resultTable.Count() == 1)
                         {
                             DataTable tableResults = new DataTable();
                             tableResults.Load(resultTable.First(), LoadOption.OverwriteChanges);
 
                             string[] selectedColumns = new[] { MP_PAGETITLE, MP_PUBLISHINGCONTENT };
 
                             if (tableResults.Rows.Count > 0)
                             {
                                 DataTable dt = new DataView(tableResults).ToTable(false, selectedColumns);
 
                                 foreach (DataRow dtrow in dt.Rows)
                                 {
                                     strContentVal = Convert.ToString(dtrow[MP_PUBLISHINGCONTENT]);
                                     string pageTitle = Convert.ToString(dtrow[MP_PAGETITLE]);
 
 
                                     string[] documentURLs = new string[] { };
 
                                     strContentVal = strContentVal.Replace("<br>", "<br/>").Replace("<br clear="all">", "<br clear="all"/>");
 
                                     divContent.Controls.Add(new LiteralControl("<h2>" + pageTitle + "</h2>"));
                                     divContent.Controls.Add(new LiteralControl("<div>" + strContentVal + "</div>"));
 
                                     this.WriteToDebugger("Successfully processed the content");
                                 }
                             }
                         }
                     }
                 }
             }
             catch (Exception ex)
             {
 
 
                 divContent.Controls.Add(new LiteralControl("<div>" + strContentVal + "</div>"));
                 this.WriteToDebugger("Exception in Load Page content : Message :: " + ex.Message + " ::StackTrace:: " + ex.StackTrace);
             }
         }
     }
 }
 

21. On the above piece of code, I am trying to retrieve the PublishingPage Content from the Authoring and render them on the Literal control. A very straight forward approach.

22. The only thing here is, from the URL we need to get the Title and the ID. Usually the URL would be a friendly one. As we set them while establishing a connection. Hence, the URL would be something like,

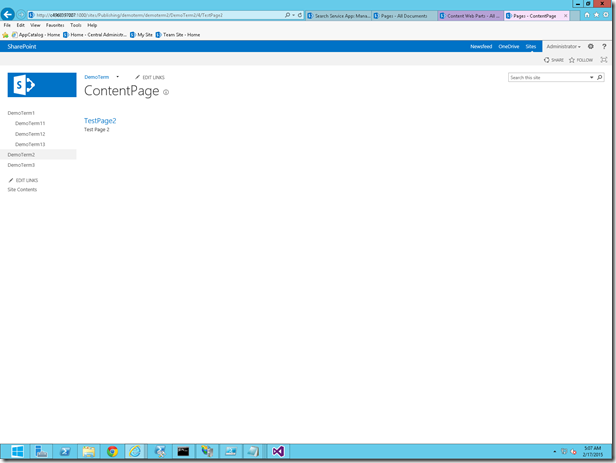
http://c4968397007:1000/sites/Publishing/demoterm/demoterm2/DemoTerm2/4/TestPage2

23. From that, using the below line, we are extracting the required parameters.

 string strPageUrl = HttpContext.Current.Request.Url.PathAndQuery;
                 if (strPageUrl != null)
                     strUrlQuery = strPageUrl.Split('?')[1];
 
                 if (strUrlQuery != null)
                 {
                     string strTemp = strUrlQuery.Split('&')[3];
                     if (strTemp != null)
                         urlSuffix = strTemp.Split('=')[1];
                     if (urlSuffix != null)
                     {
                         title = urlSuffix.Split('/')[2];
                         itemId = urlSuffix.Split('/')[1];
                     }
                 }
 

24. After adding the webpart to the ContentPage, the page will be looking like
 

image


With this, we are done with the End to End implementation of Cross Site Publishing.

Thanks for the patience to read all the 9 Parts.

Download the Source HERE

Happy Coding.

Sathish Nadarajan.
Author Info

Sathish Nadarajan
 
Solution Architect
 
Rate this article
 
Sathish is a Microsoft MVP for SharePoint (Office Servers and Services) having 15+ years of experience in Microsoft Technologies. He holds a Masters Degree in Computer Aided Design and Business ...read more
 

Cross Site Publishing – Connect to Catalog – Publishing Site – Part 8

Sathish Nadarajan
 
Solution Architect
March 11, 2015
 
Rate this article
 
Views
9921

Publishing Site – Connect to Catalog

With the Previous section, we have completed the Navigation as well. Now, we are in the last stage. That is, now we are going to establish a connection to an existing catalog.

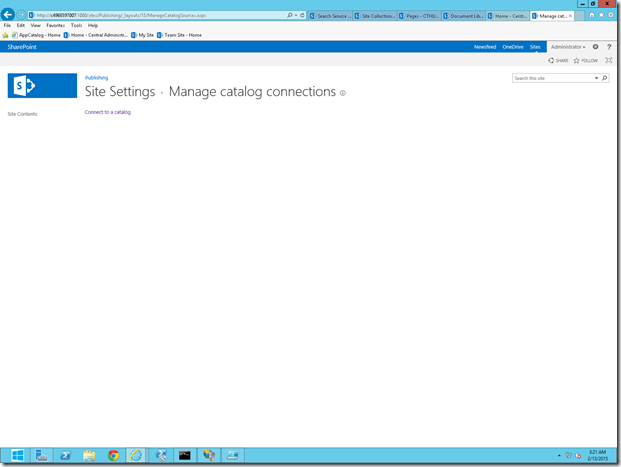
1. Go to Publishing – Site Setting -> Manage Catalog Connections

image

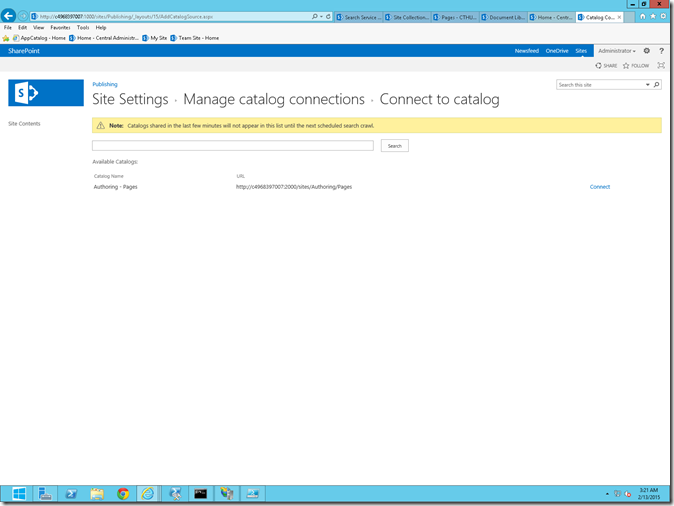
2. Click on Connect to Catalog

image

3. Click on Connect – “Authoring – Pages”

image

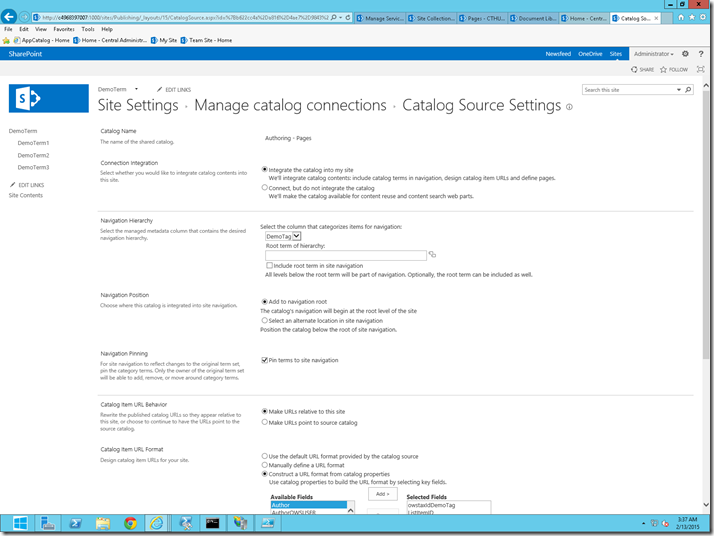
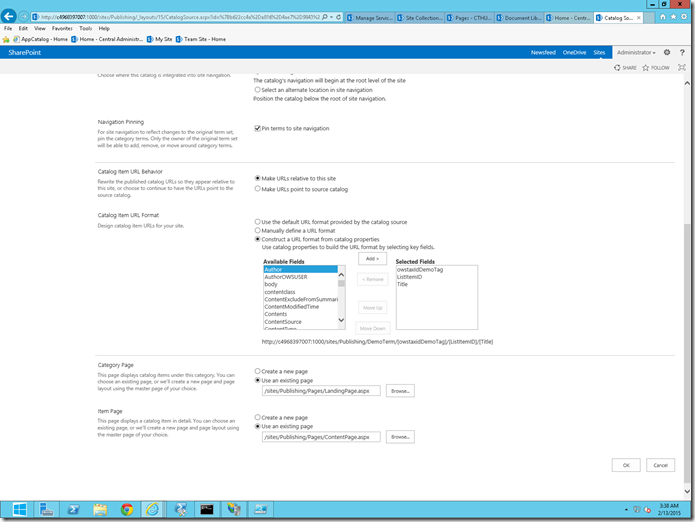
4. Select the Options as above.

a. Connection Integration – Integrate the Catalog into my site

b. Navigation Hierarchy – DemoTag

c. Root term of hierarchy – select the termset

d. Catalog Item URL Behaviour – Make URLs relative to this site

e. Catalog Item URL format – Construct a URL format from catalog Properties.

f. Category Page – LandingPage.aspx

g. Item Page – ContentPage.aspx

image

With this, we are done with the Settings portion. Many of these settings can also be done using PowerShell. But I am not concentrating on them. Let us focus on the WebPart creation on the consecutive sections.

Let us see about the WebPart Creation using Visual Studio in Part9

Happy Coding.

Sathish Nadarajan.

Author Info

Sathish Nadarajan
 
Solution Architect
 
Rate this article
 
Sathish is a Microsoft MVP for SharePoint (Office Servers and Services) having 15+ years of experience in Microsoft Technologies. He holds a Masters Degree in Computer Aided Design and Business ...read more
 

Cross Site Publishing – Navigation Settings – Publishing Site – Part 7

Sathish Nadarajan
 
Solution Architect
March 8, 2015
 
Rate this article
 
Views
2585

Publishing Site – Navigation Settings.

Now, we have completed the Authoring Site as well. The only pending thing is, connect to the Enabled Catalog from the Publishing Site. Before doing that, as all of us are aware that our entire exercise revolves around the Search and Managed Metadata Service Applications, we need to make sure that the Publishing site is navigated by means of the Metadata navigation. Because from that only we can retrieve the contents related to that particular Term.

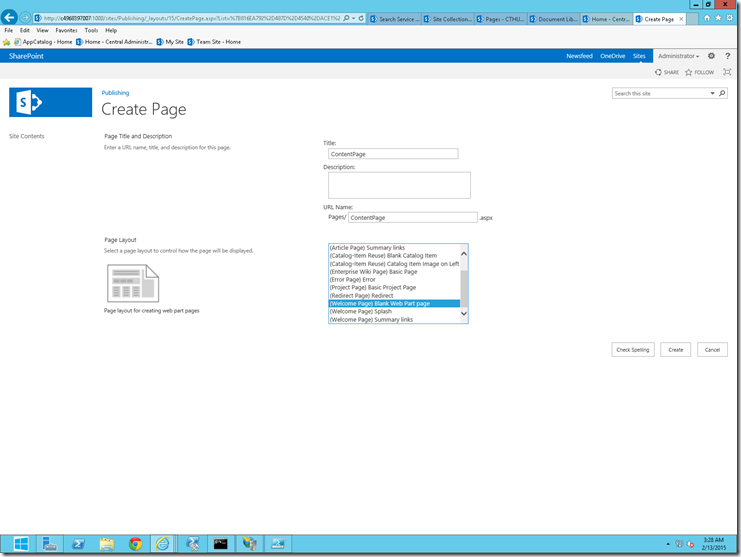
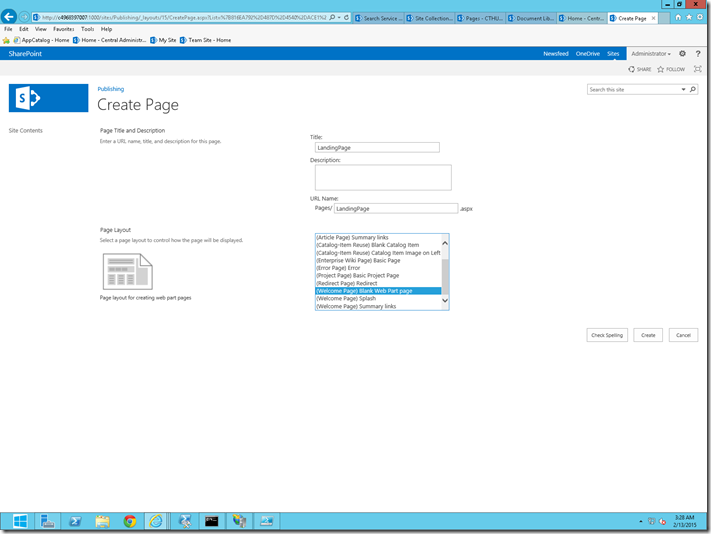
1. To do the Navigation properly, let us create 2 pages called LandingPage.aspx and ContentPage.aspx on the Publishing Site. The purpose of these Pages, we will see later in this section. So as of now, I request to proceed with creating these 2 pages.

image


image 

2. Go to Site Settings -> Navigation Settings.

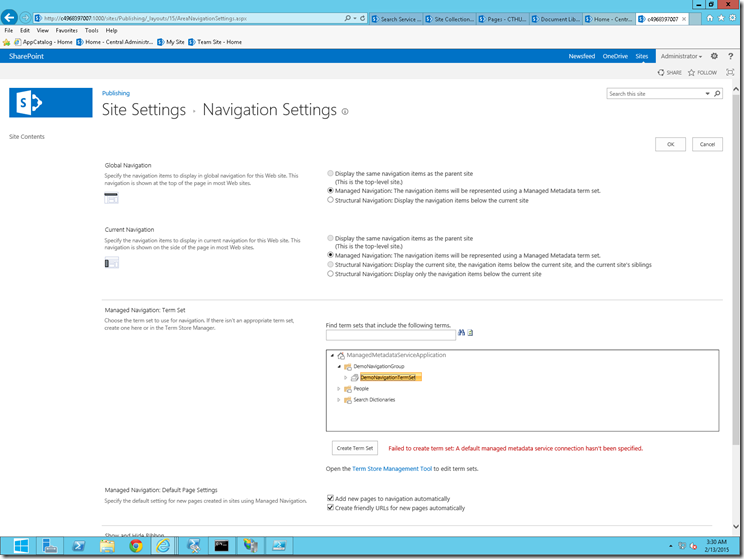
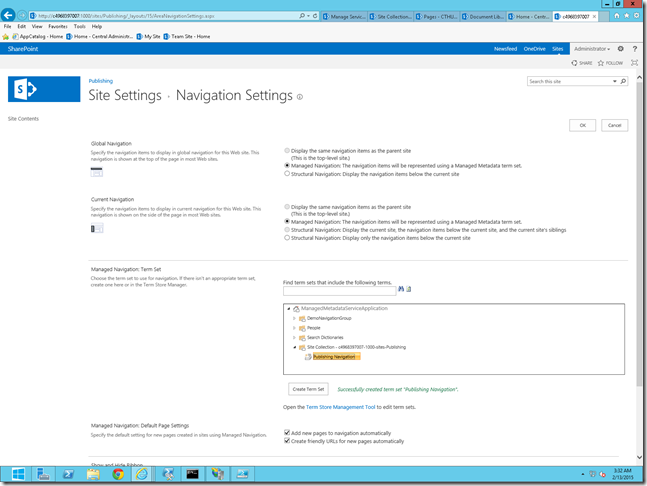
3. Select the Managed Navigation and click the Create Term Set. This will create a local term group which will be the Pivot for the navigation for this site collection alone.

4. As soon as you click on the Create Term Set, we will be getting the below exception. “Failed to create term set: A default managed metadata service connection hasn’t been specified”

image

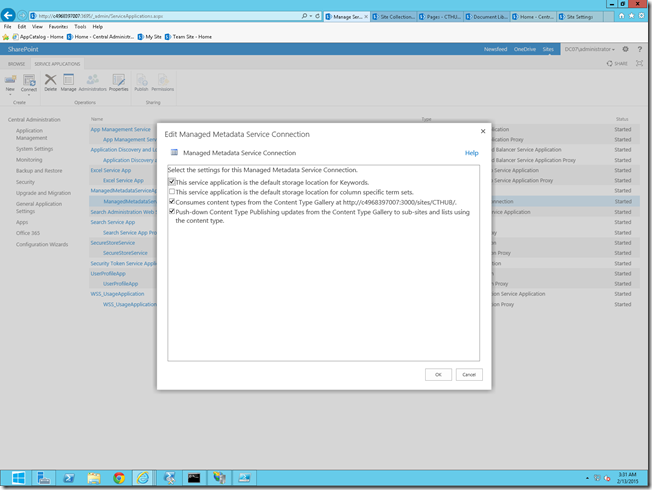
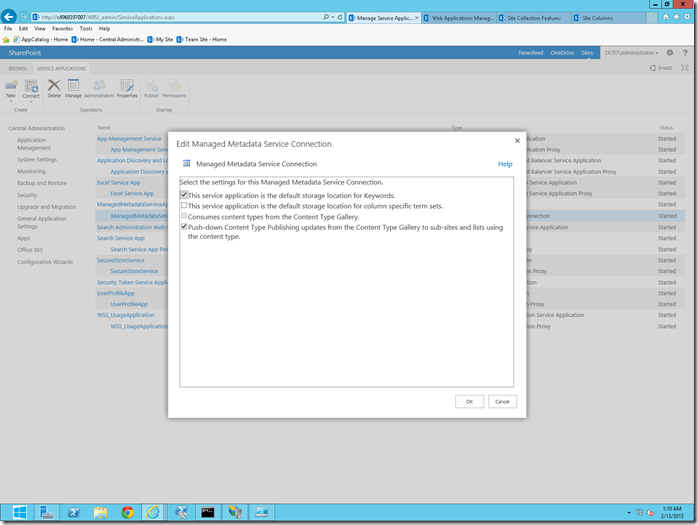
5. The reason for this is, as soon as we created the Managed Metadata Service Application, in the Proxy Properties, the “The Service Application is the default store location for column specific term sets” is not checked by default.

image

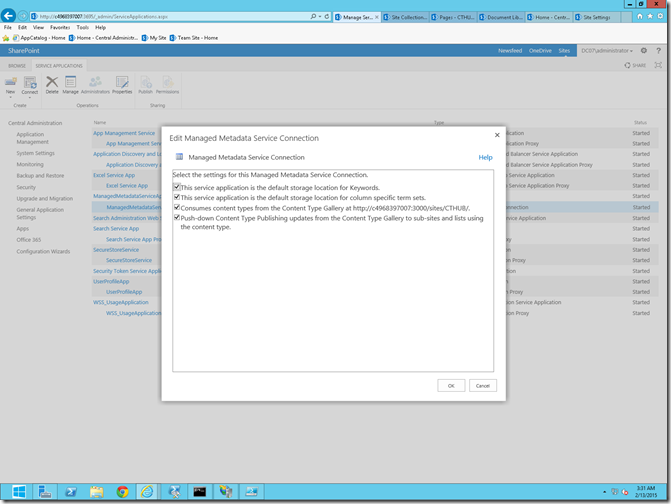
6. Now, we need to check that one and click on OK.

image

7. Now, come back to the Site Settings and try “Create TermSets”

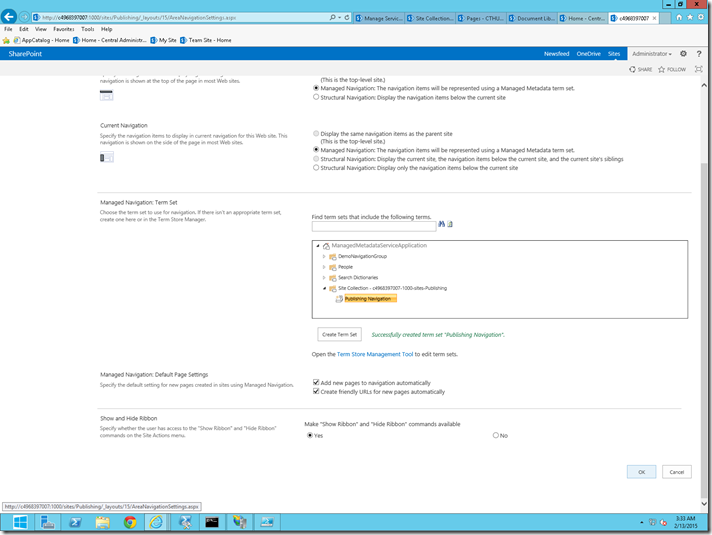
8. Term Sets will be created as shown in the below figure.

image

9. Select the newly created TermSet as the Navigation source and click OK.

image

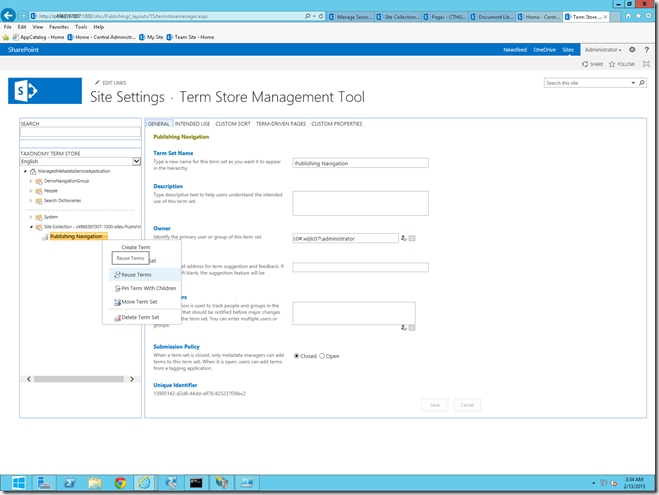
10. Now, let us come back to the Central Administration again and Select “Reuse Terms”

image

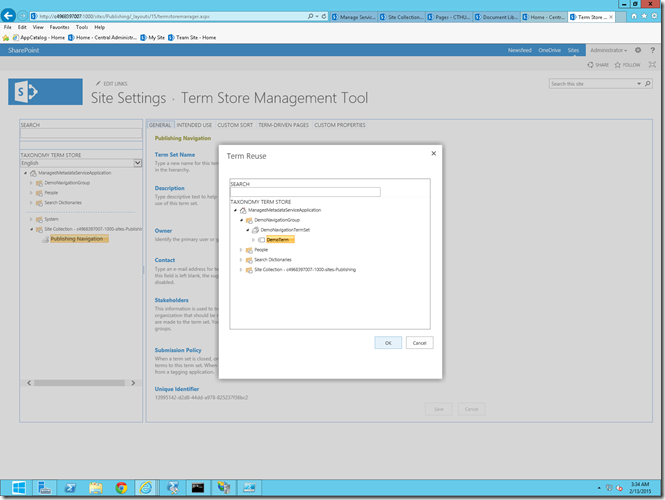
11. Select the Actual Terms which we created in previous sections.

image

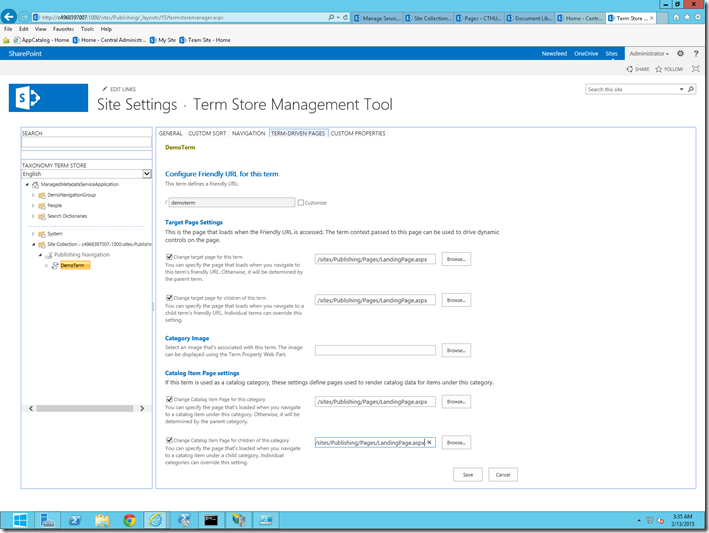
12. This activity, why we are doing is, we do want to reuse the common terms. But not the properties. To be more precise, we will be modifying the “Term-Driven Pages” properties. If we modify the overall term, then the other site collections will also be affected. That’s the reason, we are creating a new Site Collection Level Term Set and reusing the existing terms and making use of it.

13. Now, we need to modify the Properties, “Term-Driven Pages” as shown in the below image.

image

14. If you are not able to see these tabs, make sure that the Intended Use of this term group is set as Site Navigation.

Let us see about the Connect to a Catalog in Part8

Happy Coding.

Sathish Nadarajan.

Author Info

Sathish Nadarajan
 
Solution Architect
 
Rate this article
 
Sathish is a Microsoft MVP for SharePoint (Office Servers and Services) having 15+ years of experience in Microsoft Technologies. He holds a Masters Degree in Computer Aided Design and Business ...read more
 

Cross Site Publishing – Enable as a Catalog – Authoring Site – Part 6

Sathish Nadarajan
 
Solution Architect
 
Rate this article
 
Views
9097

Enable Library as a Catalog

Now, the Content Type Hub, Authoring Site, Managed Properties were ready. With this, I would say, we crossed 80 % CSP implementation, though we have not entered in to CSP itself. The logic behind this is, implementing the CSP is only 20 %. But preparing the environment for the CSP plays a major role. That’s the reason; I tried to cover step by step as much as I can.

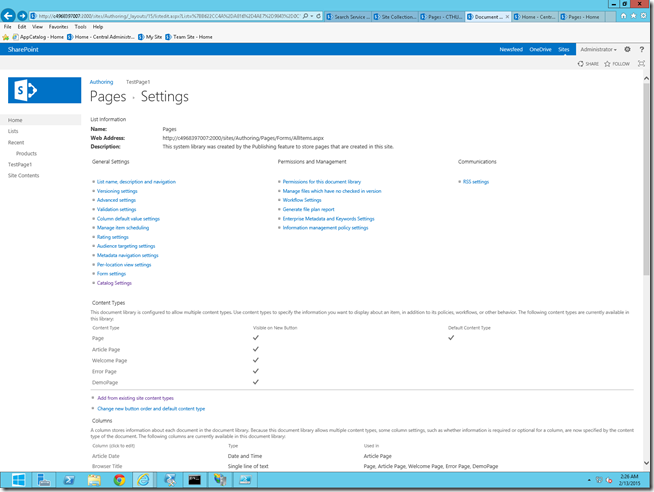
1. Now, we need to enable the “Authoring” Site Collections “Pages” Document Library as a Catalog. For that, we need to go to the Settings of the “Pages” Document Library.

image

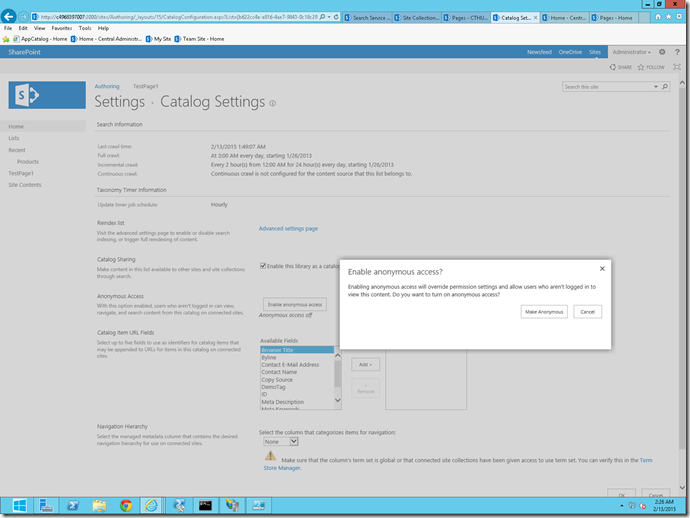
2. Click on the “Catalog Settings”. Check the box, “Enable this Library as a catalog”

3. Click on the “Enable Anonymous Access”. For some reason, as of now, I am making this as a Anonymous. But, if all the users do have the Read Access to the Authoring Site, then there is no need of this. I don’t want the end users to not even login to the Authoring Site. But they should be able to see the crawled content from this site collection. For that, let us make this as Anonymous Access.

image

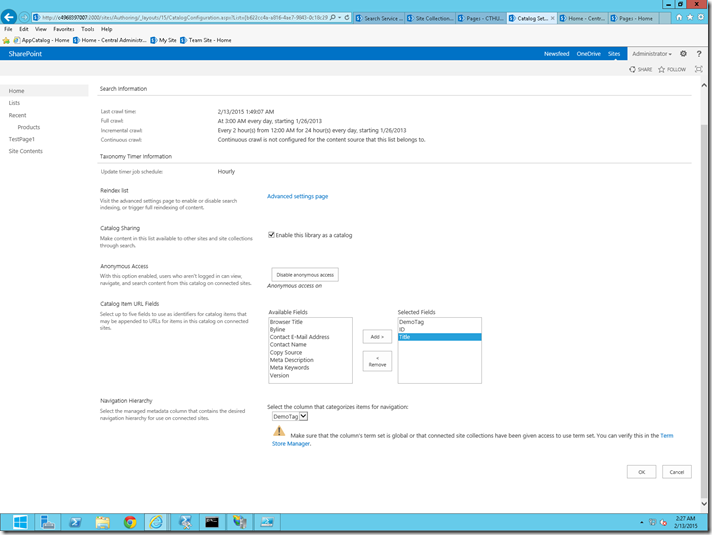
4. On the “Catalog Item URL Fields” section, let me select the three columns, DemoTag, ID and the Title and Select the “DemoTag” column as the Navigation Hierarchy. Note that this “DemoTag” Column should be a Single Value, Mandatory column,. Then only it can be used here. If the choice is multi, then we cannot use that as Navigation hierarchy.

image

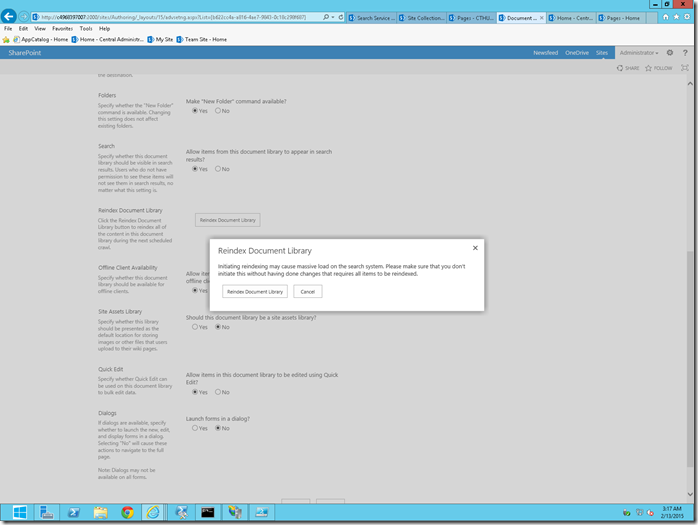
5. Then on the “Advanced Settings” section, let me reindex the Document Library once. Though it is not necessary, let us do this as a double check.

image

6. Now again do a full crawl.

Let us see about the Navigation Settings in Part7

Happy Coding.

Sathish Nadarajan.

Author Info

Sathish Nadarajan
 
Solution Architect
 
Rate this article
 
Sathish is a Microsoft MVP for SharePoint (Office Servers and Services) having 15+ years of experience in Microsoft Technologies. He holds a Masters Degree in Computer Aided Design and Business ...read more
 

Cross Site Publishing – Managed Property and Crawled Property – Part 5

Sathish Nadarajan
 
Solution Architect
March 2, 2015
 
Rate this article
 
Views
15127

Managed Property and Crawled Property

Before diving deep into this, let us try to understand what these properties are at a high level. This will definitely help us for a better understanding.

A crawled property is content and metadata that is extracted from an item, such as a document or a URL, during a crawl. In simple, a crawled property is nothing but a metadata for a SiteColumn. It may not be handled by the developers, but with the help of a Managed Property, we can extract the metadata from Crawled Property. We cannot create the Crawled Property on our own. SharePoint will create the Crawled Property. We can create the Managed Property and Map the Managed Property to the Crawled Property. So that these Managed Properties will be used by the search queries, webparts etc.,

Now, coming to the step by step approach.

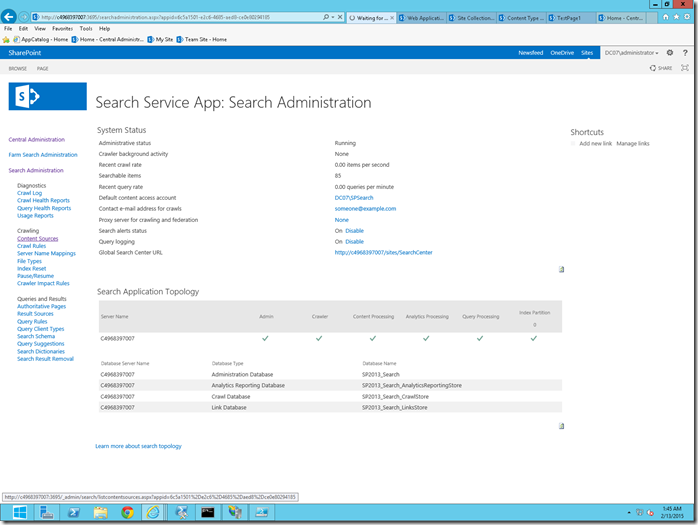
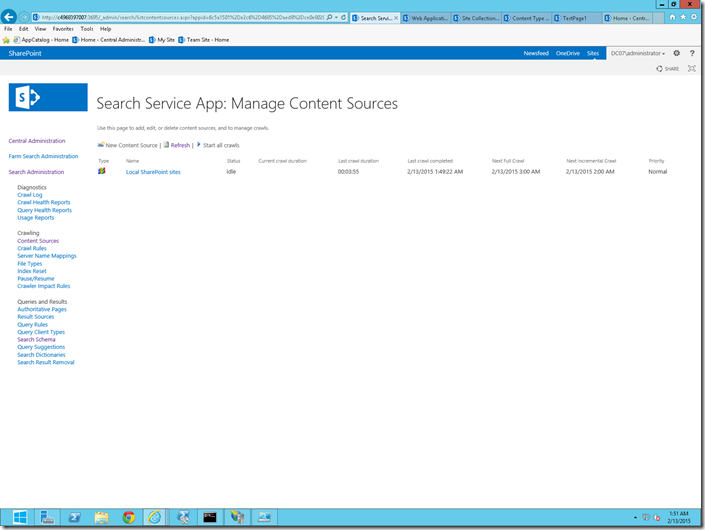
1. Let us do a Full Crawl. To do a full crawl, let me login to the Central Admin -> Search Service Application.

image

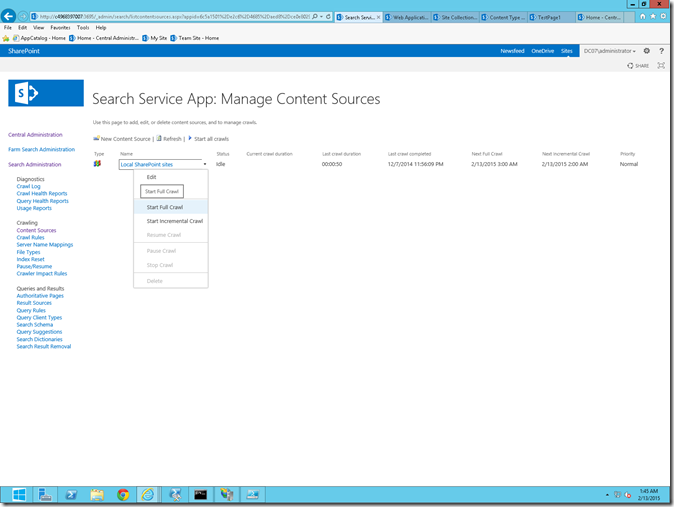
2. Click on the Content Sources. Select the Content Source and from the Context Menu, Select the “Start Full Crawl”

image

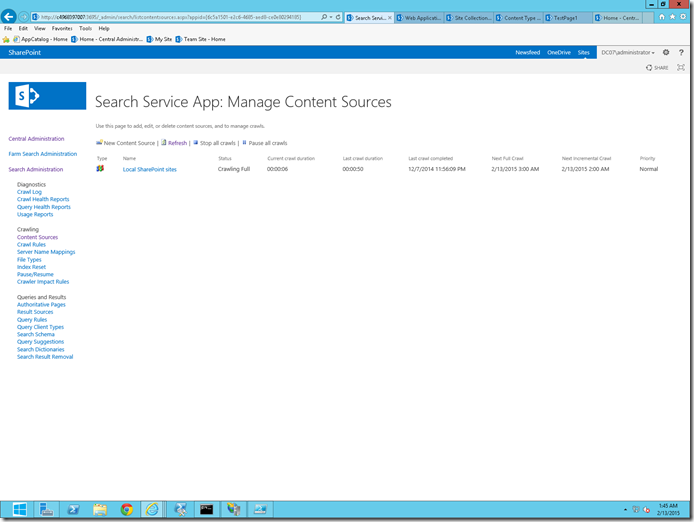
3. During the Crawl, the status will be “Crawling Full”

image

4. Wait until the Status becomes “Idle”. This means the Crawl Completed. View the logs for verification. If any error happened during the Crawl, it would have been captured on the Crawl Logs. But as of now, as we don’t have much on our farm, there is no error.

image

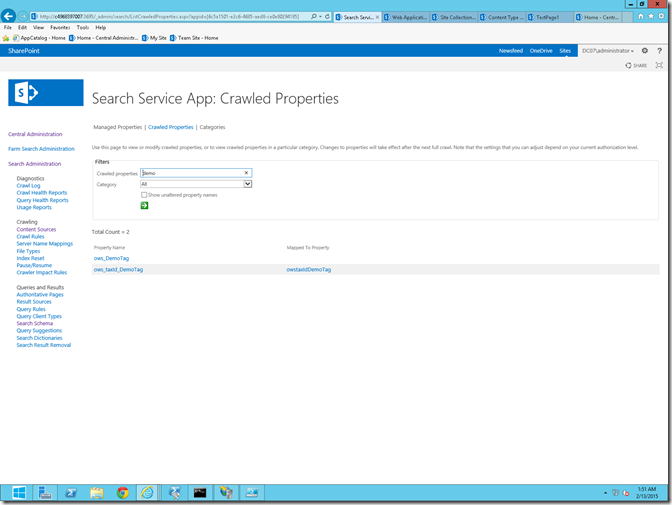
5. Once, the crawl completed, make sure the Crawled Property got created. For that, let us go to Central Admin -> Search Service Application-> Search Schema. Select the Crawled Property Link.

6. Search for a keyword called “Demo”. We will be able to see the following property.

image

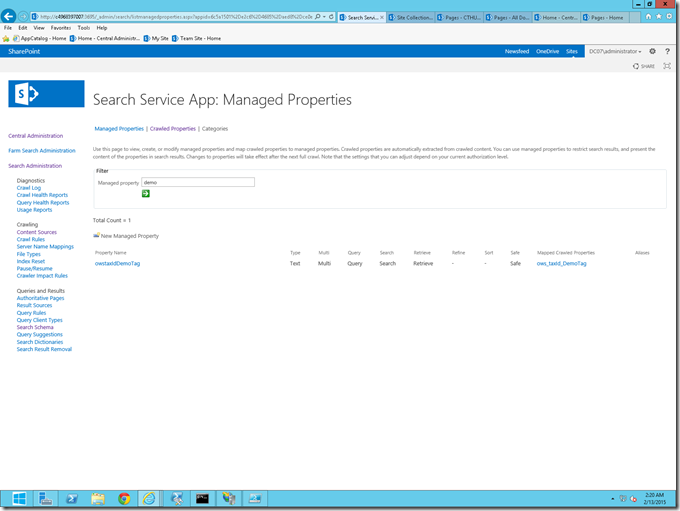
7. Make sure that Managed Properties got created.

image

8. With this, our Managed Properties and Crawled Properties got created and mapped Properly. If the Managed Property does not created by default, then we need to create it manually using PowerShell Scripts.

9. We can use the below script to create the Managed Property.

#Get the Search SErvice Application

$cat = Get-SPEnterpriseSearchMetadataCategory –SearchApplication $searchapp –Identity $_.Category

#Get the Crawled Property First

$cp = Get-SPEnterpriseSearchMetadataCrawledProperty -SearchApplication $searchapp -name $_.CrawledPropertyName -Category $cat -ea silentlycontinue

#If the Crawled Property is not null, then go inside

if ($cp)

{

# Check whether Managed Property already exists

$property = Get-SPEnterpriseSearchMetadataManagedProperty -SearchApplication $searchapp -Identity $_.ManagedPropertyName -ea silentlycontinue

if ($property)

{

Write-Host -f yellow "Cannot create managed property" $_.ManagedPropertyName "because it already exists"

$ExistingManagedProp = "Cannot create managed property " + $_.ManagedPropertyName + " because it already exists" | out-file "$path\ExistingManagedProp.txt" -append

}

else

{

# If already not there, then create Managed Property

New-SPEnterpriseSearchMetadataManagedProperty -Name $_.ManagedPropertyName -SearchApplication $searchapp -Type $_.Type -Description $_.Description

#Get the managed Property which Just now, we created

$mp = Get-SPEnterpriseSearchMetadataManagedProperty -SearchApplication $searchapp -Identity $_.ManagedPropertyName

#Map the Managed Property with the Corresponding Crawled Property

New-SPEnterpriseSearchMetadataMapping -SearchApplication $searchapp -ManagedProperty $mp –CrawledProperty $cp

}

}

else

{

Write-Host -f Yellow "The specified crawled property " $_.CrawledPropertyName " does not exists… Please check whether you have given valid crawled property name"

$a = "The specified crawled property " + $_.CrawledPropertyName + " does not exists… Please check whether you have given valid crawled property name"| out-file "$path\CrawledPropErrorLogs.txt" -append

}

10. The Managed Property should be Retrievable, Searchable, Queryable, Refinable etc., For that, we can execute the below script.

$searchapp = Get-SPEnterpriseSearchServiceApplication

$ManagedProperty = Get-SPEnterpriseSearchMetadataManagedProperty -SearchApplication $searchapp -Identity $_.ManagedPropertyName -ea silentlycontinue

if($ManagedProperty)

{

$ManagedProperty.Searchable = $true

$ManagedProperty.Queryable = $true

$ManagedProperty.Sortable = $true

$ManagedProperty.Retrievable = $true

$ManagedProperty.Refinable = $true

$ManagedProperty.SafeForAnonymous = $true

$ManagedProperty.update()

write-host "The searchable, queryable, Sortable, Retrievable and Refinable for the managed property" $_.ManagedPropertyName "has been enabled successfully …… Done !" -fore green

}

else

{

Write-Host -f Yellow "The specified managed property " $_.ManagedPropertyName " does not exists… Please check whether you have given valid managed property name"

$a = "The specified managed property " + $_.ManagedPropertyName + " does not exists… Please check whether you have given valid crawled property name"| out-file $OutputPath -append

}

Let us see about the Enable Library as a Catalog in Part6

Happy Coding.

Sathish Nadarajan.
Author Info

Sathish Nadarajan
 
Solution Architect
 
Rate this article
 
Sathish is a Microsoft MVP for SharePoint (Office Servers and Services) having 15+ years of experience in Microsoft Technologies. He holds a Masters Degree in Computer Aided Design and Business ...read more
 

Cross Site Publishing – Content Type Creation Creation – Part 4

Sathish Nadarajan
 
Solution Architect
 
Rate this article
 
Views
13861

Content Type Hub – Creation.

In this section, we will see how to create a Content Type Hub and make the content type available to the other site collections. Hope we remember, our CTHUB site is http://c4968397007:3000/sites/CTHUB

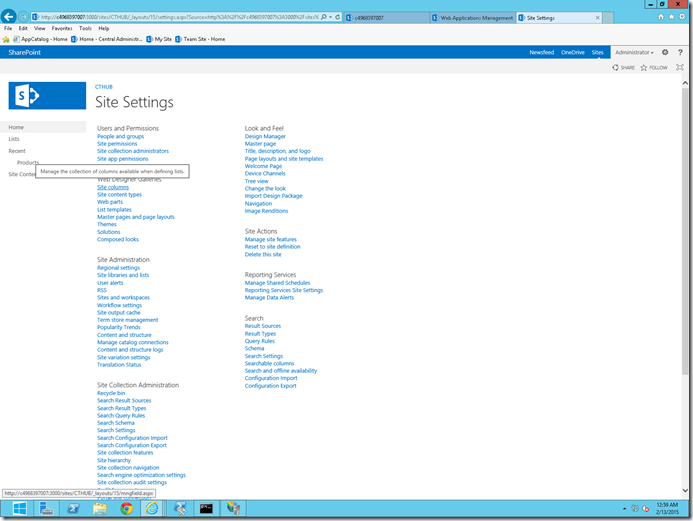
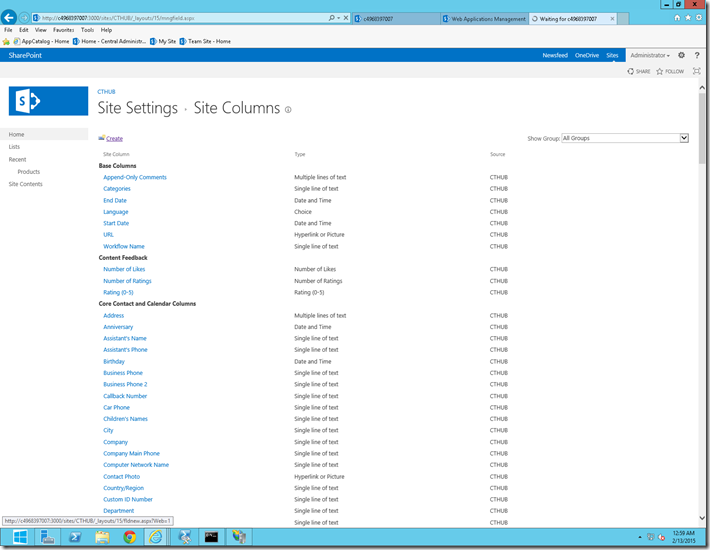
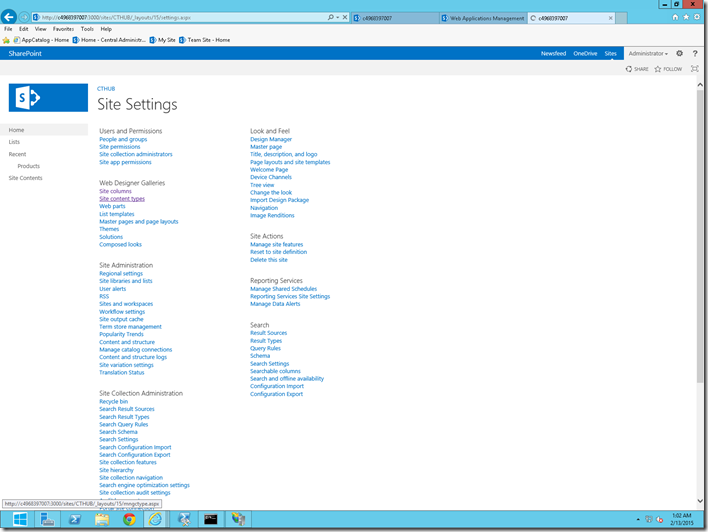
1. Login to the CTHUB Site. Navigate to Site Settings.

image

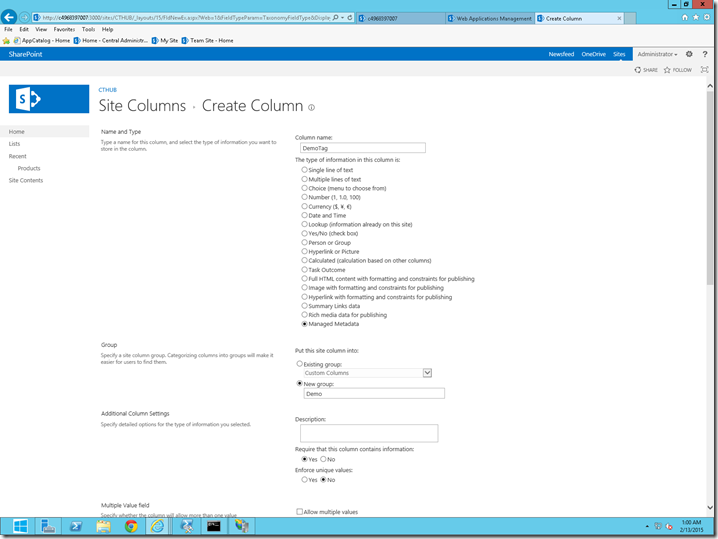
2. On the Site Columns, Create a Managed Metadata Column which is going to be our Navigation Term.

image

3. Let me name the Column as “DemoTag”

image

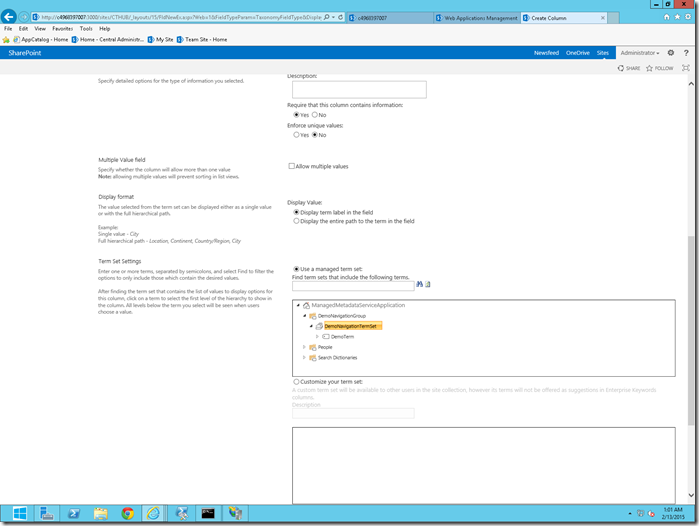
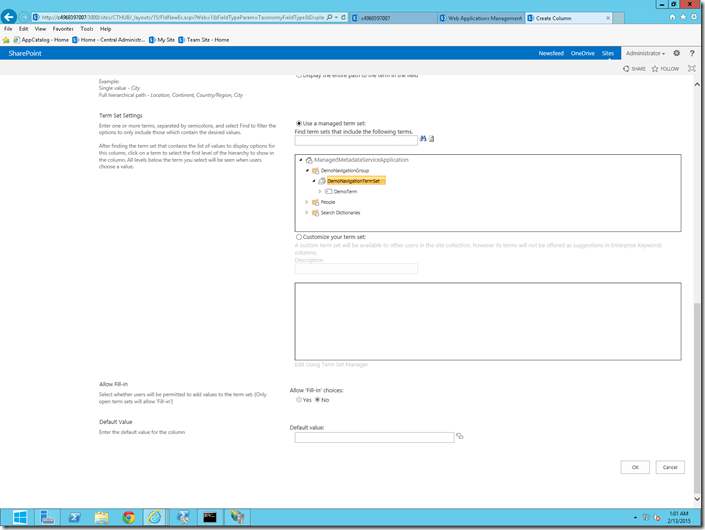
4. Select the Newly Created TermSet for that Column.

image

image 

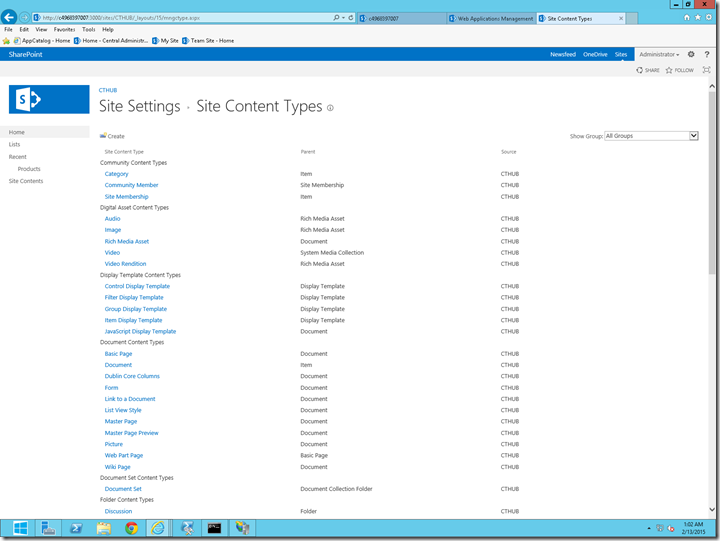
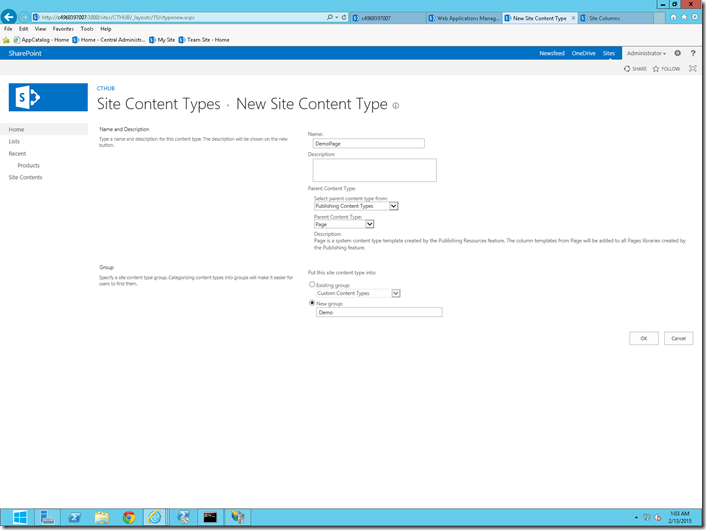
5. In the same manner, let me create a Content Type as well.

image

image


6. Let me name that as “DemoPage” and the Parent Content Type is “Pages” under the Publishing Content Type Category. I am doing this, because we are going to attach this content type to the “Pages” document Library on the Authoring Site Collection. We will see that later.

image

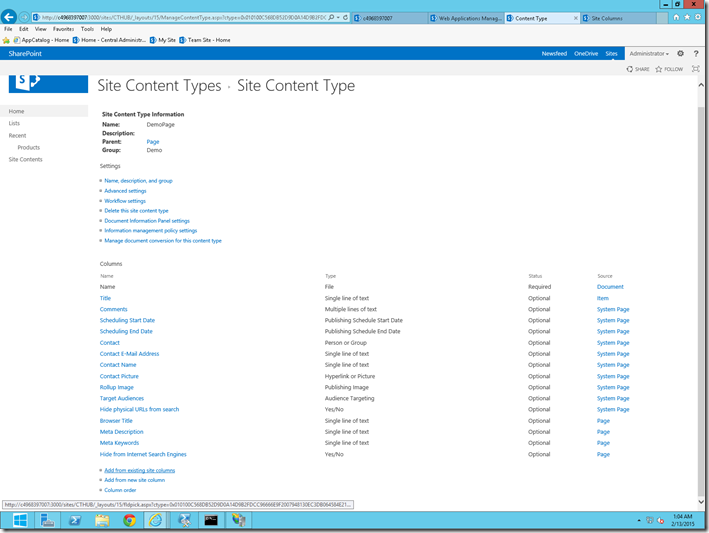
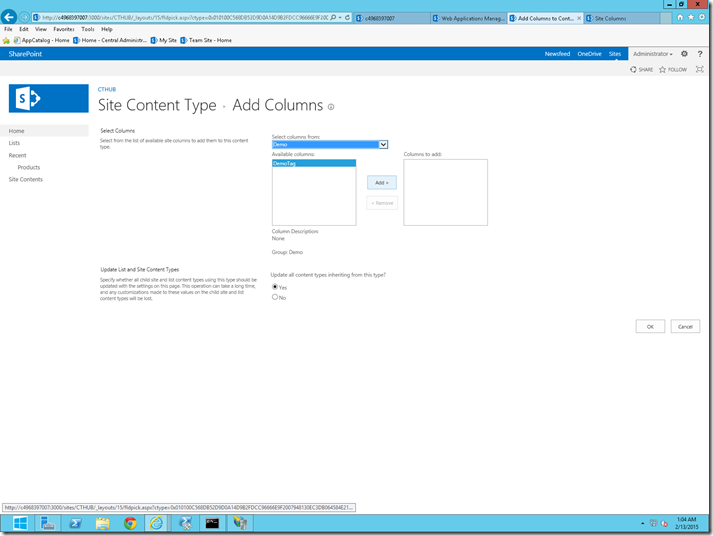
7. Once, the content type got created, add the newly created column to this content type.

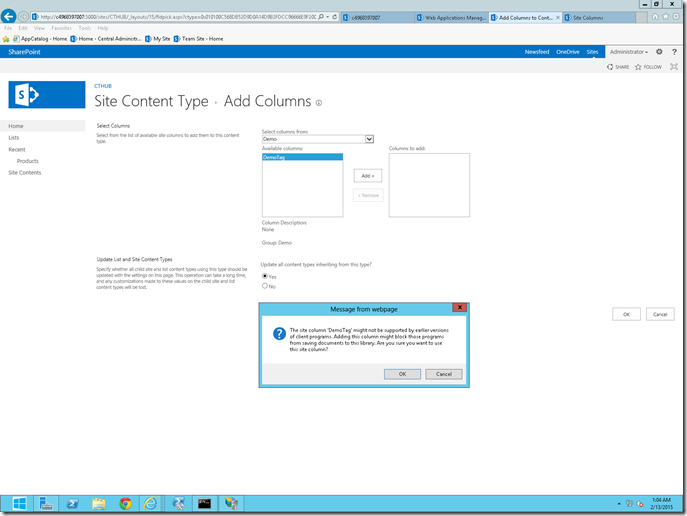
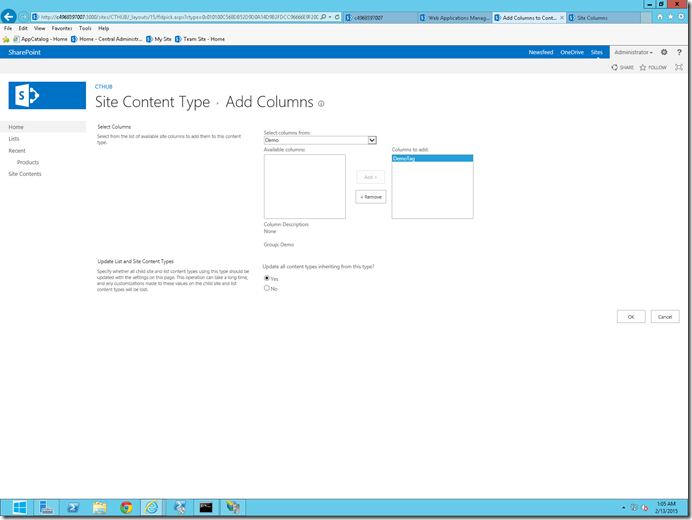
image

image


image


image

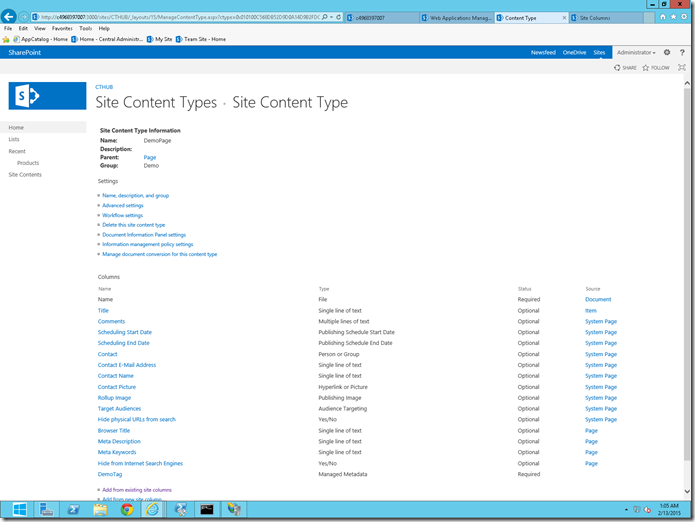
8. Now, the Content Type and the Site Column is ready.

image

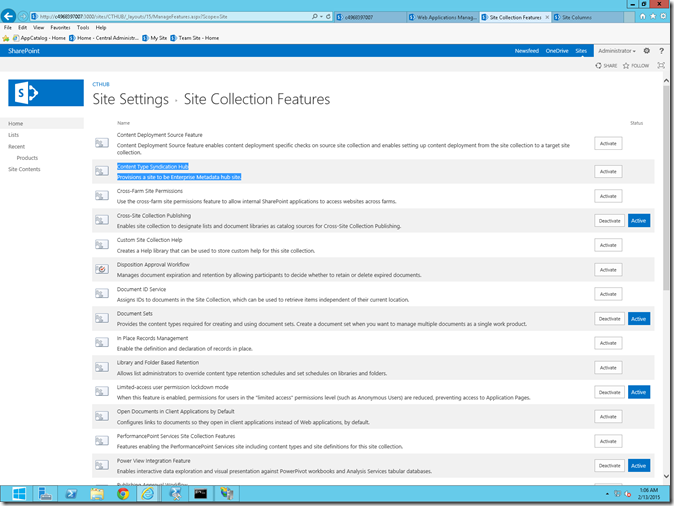
9. Go to the Site Settings -> Manage Site Collection Features of the CTHUB Site Collection. Activate the feature “Content Type Syndication Hub”.

image

10. After that, we need to inform the Managed Metadata Service Application, that this is the Site, which we are going to Use as a Content Type Hub throughout this Farm. An important thing to be noticed here is, at any point of time, only one site collection can be treated as a Content Type Hub for one Farm.

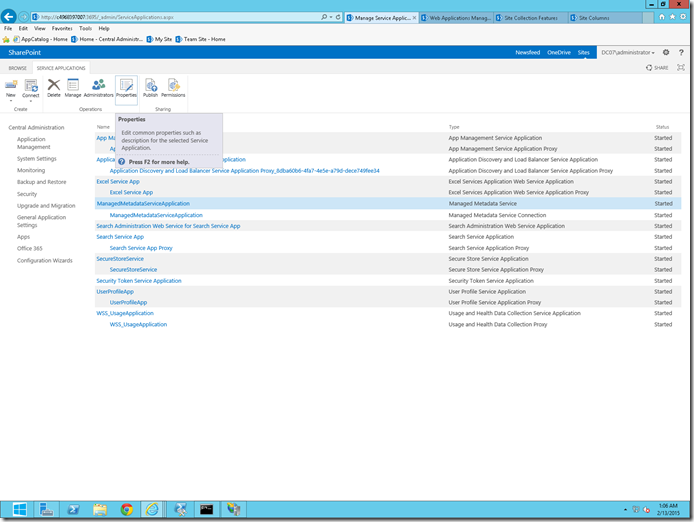
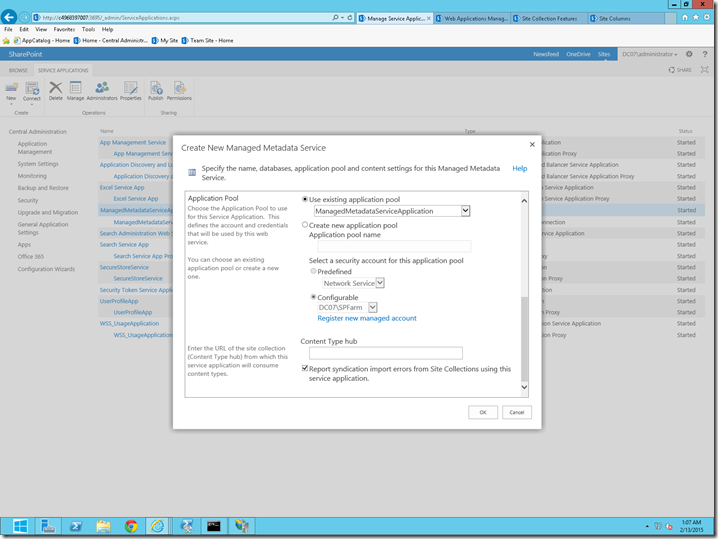
11. To verify that, go to the Property of the “Managed Metadata Service Application” as well as the Proxy. Both of them will be as below.

image

image

image  

12. Now, open the Powershell IDE and execute the below script.

Add-PSSnapin "Microsoft.SharePoint.PowerShell"

$mms = Get-SPServiceApplication -Name "ManagedMetadataServiceApplication"

Set-SPMetadataServiceApplication -Identity $mms -HubUri "http://c4968397007:3000/sites/CTHUB/"

Write-Host "Done" -ForegroundColor Green

$mmsp = Get-SPServiceApplicationProxy | ? {$_.DisplayName -eq "ManagedMetadataServiceApplication"}

Set-SPMetadataServiceApplicationProxy -Identity $mmsp -ContentTypeSyndicationEnabled -ContentTypePushdownEnabled -Confirm:$false

Write-Host "Done" -ForegroundColor Green

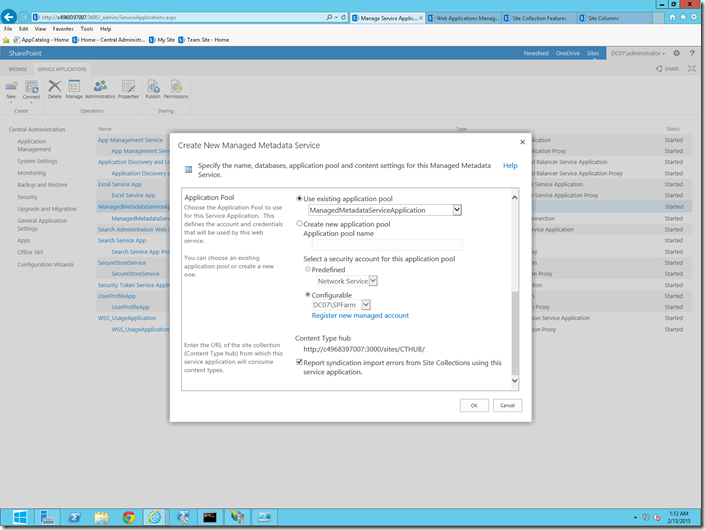
13. After the successful execution of the script, let us come back and again see the properties. It should be as below. i.e., the “Content Type Hub” URL will be added. Again an important thing here is, if you added once, then this property cannot be modified using the User Interface. We need to use the above script to update the “Content Type Hub” property of the Managed Metadata Service Application. There is no other option using the browser.

image

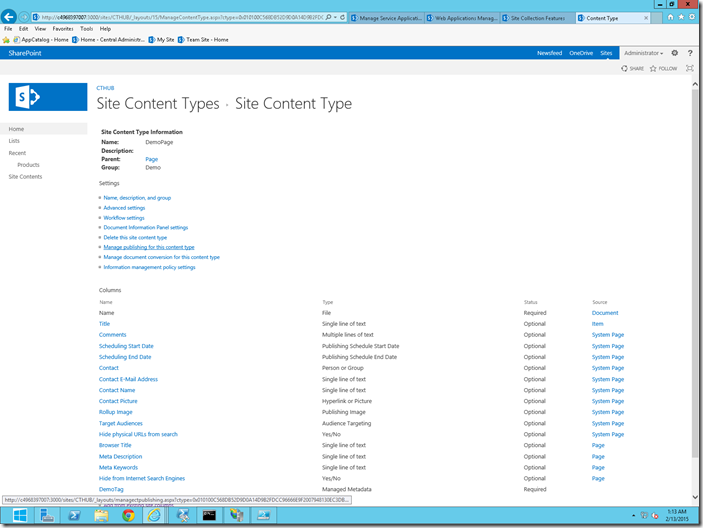
14. Now, coming to the CTHUB -> Site Content Types, Select the newly created “DemoPage” Content Type.

15. Click on the “Manage Publishing for this Content Type” link.

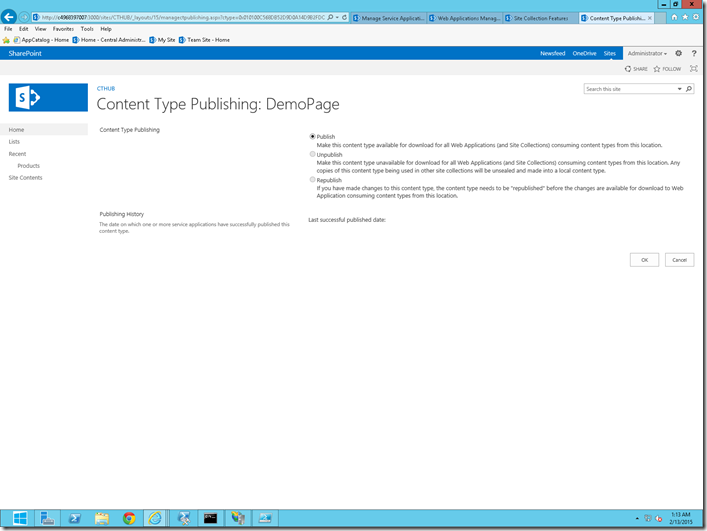
image

16. Select Publish and click OK. In case, if you have already published, then select “RePublish” and click OK.

image

17. Now, let us see how to make use of this content type from the “Authoring” Site Collection.

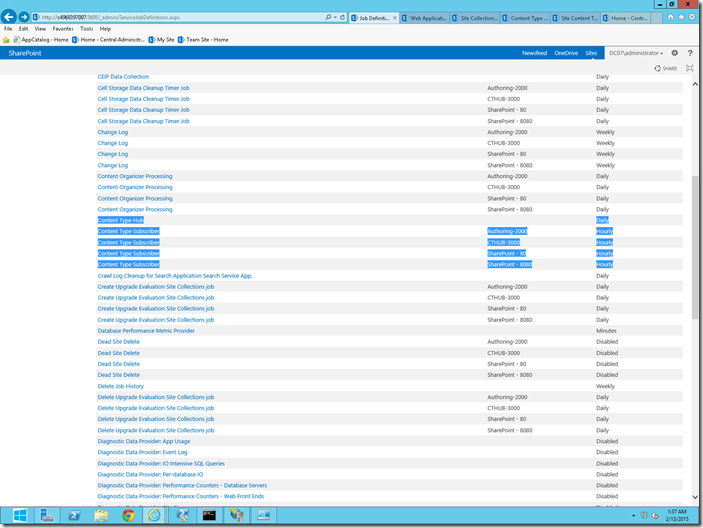
18. To see that immediately, we need to execute 2 timer Jobs from the Central Administration.

image

19. Make sure those timer jobs were executed without any issues.

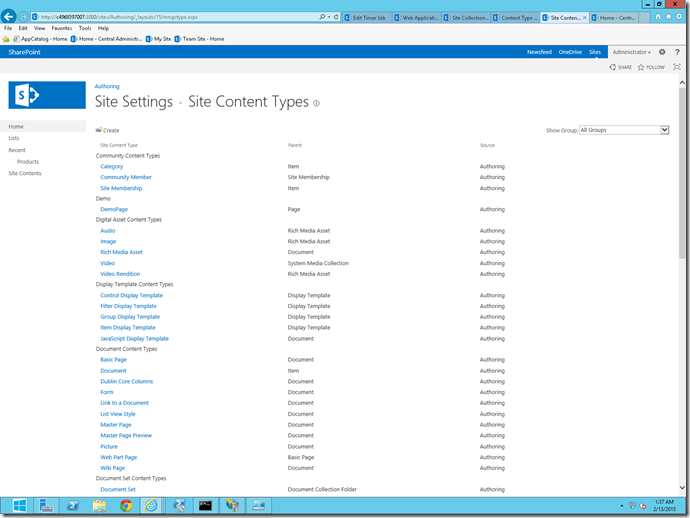
20. Now, on the Authoring Site Content Types, we will be able to see the Content Type which we created on the CTHUB Site.

image

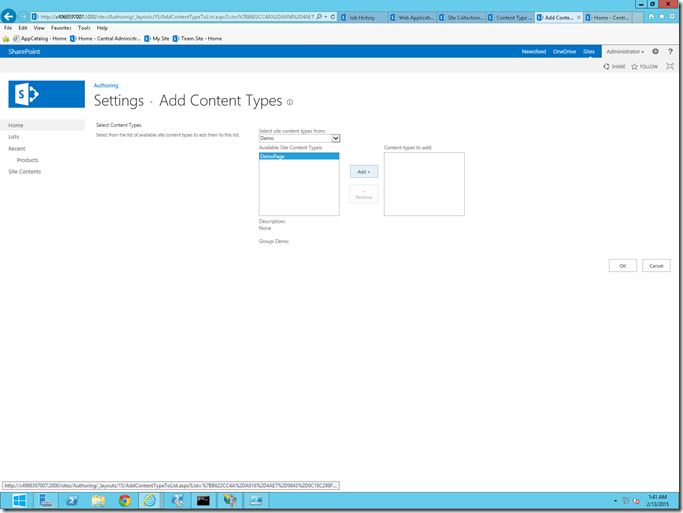
21. Let us add this “DemoPage” Content Type to the “Pages” Document Library.

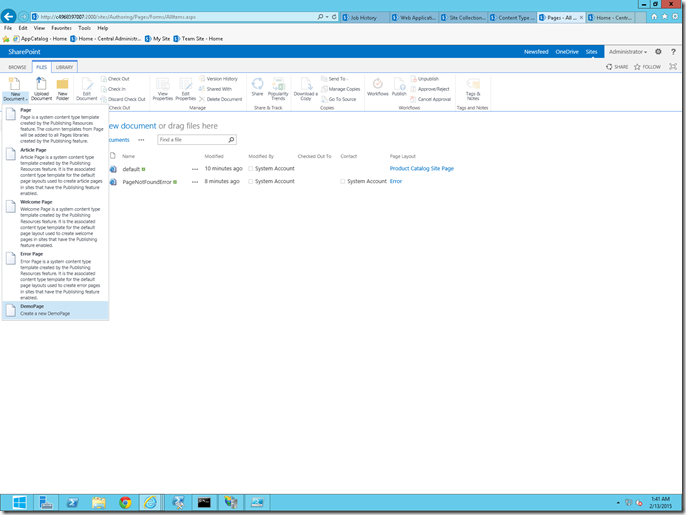
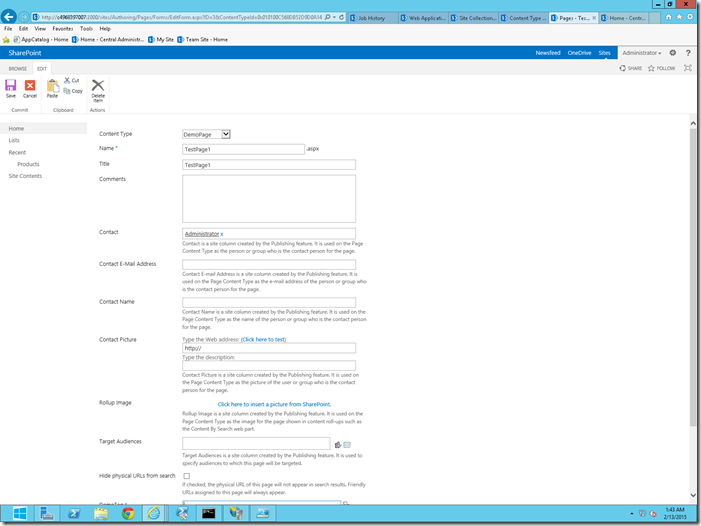
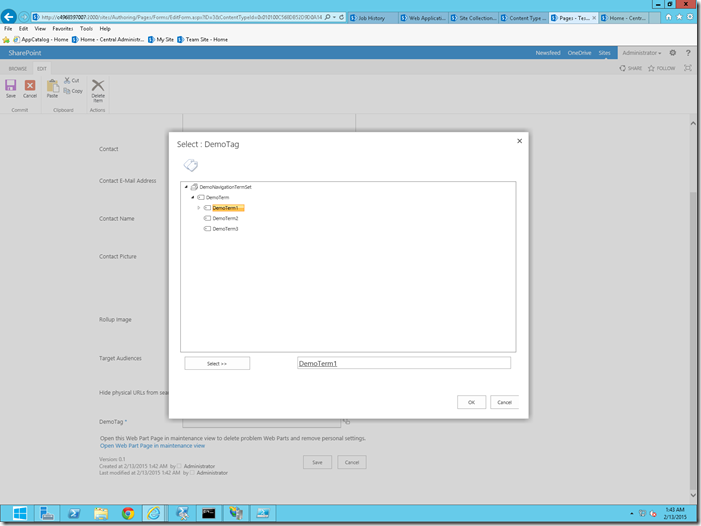
image

22. Make sure that you are able to create a Page using this newly added Content Type on the Authoring Site Collection.

image

image

image  

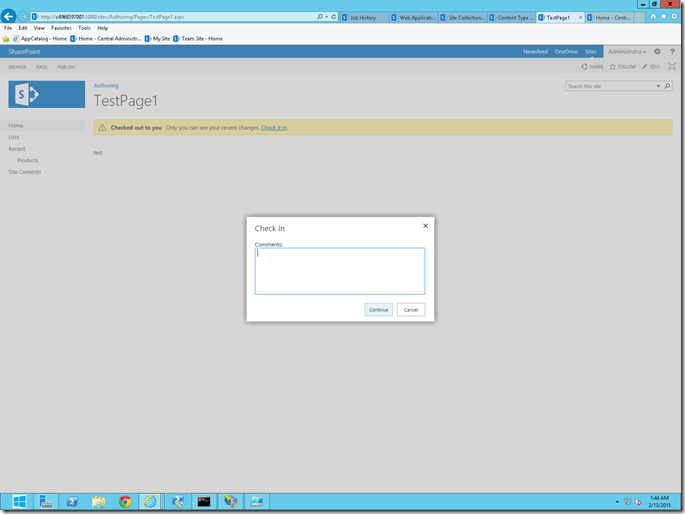
23. Yes, now I am able to successfully create Page and able to checkin, publish.

image


24. Do a Full Crawl.

Let us see about the Managed and Crawled Properties in Part5

Happy Coding.

Sathish Nadarajan.
Author Info

Sathish Nadarajan
 
Solution Architect
 
Rate this article
 
Sathish is a Microsoft MVP for SharePoint (Office Servers and Services) having 15+ years of experience in Microsoft Technologies. He holds a Masters Degree in Computer Aided Design and Business ...read more
 

Cross Site Publishing – Managed Metadata Service Application Creation – Part 3

Sathish Nadarajan
 
Solution Architect
February 23, 2015
 
Rate this article
 
Views
9974

Create Managed Metadata Service Application.

Follow the Steps to create the Managed Metadata Service Application.

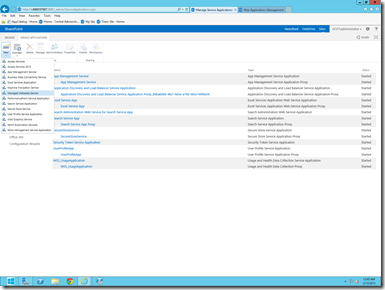
1. Go to Central Admin->Manage Service Applications

2. Click on New and Select Managed Metadata Service

image

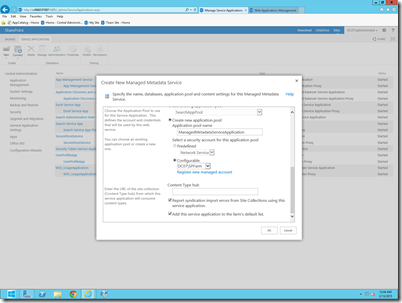
3. Key in the Name as “ManagedMetadataServiceApplication” and the necessary information as below.

image

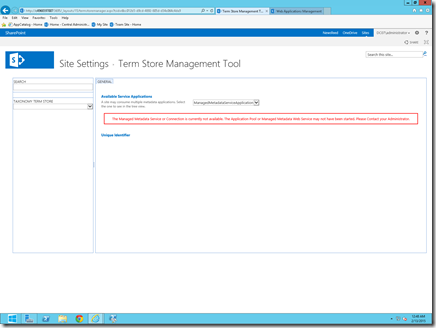
4. As soon as it got created, if we try to open, we may get the below error page.

image

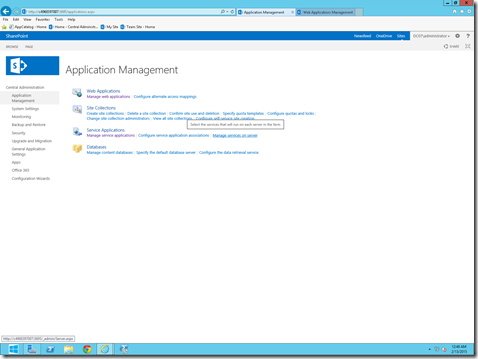
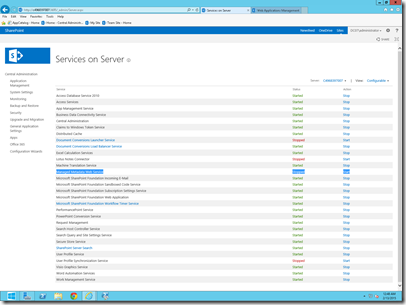
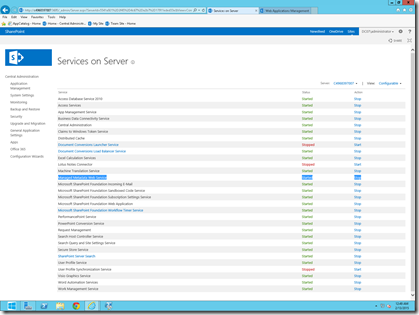
5. For this make sure that the “Managed Metadata Web Service” has been started. To do that, follow the screen shots.

image


image

image


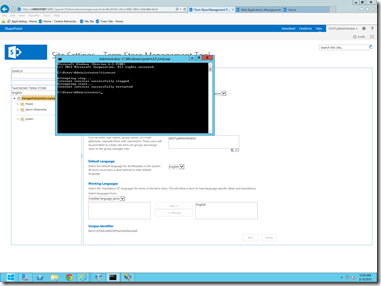
6. Then do an IISRESET

image

7. Now go back to Managed Metadata Service Application. We will be able to see the default term sets.

image

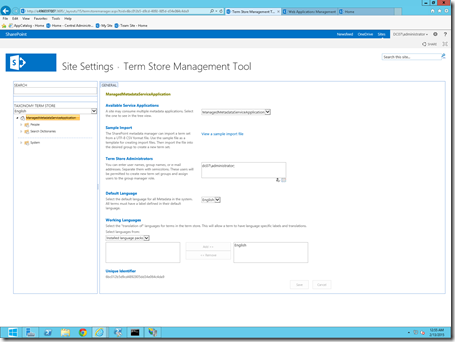
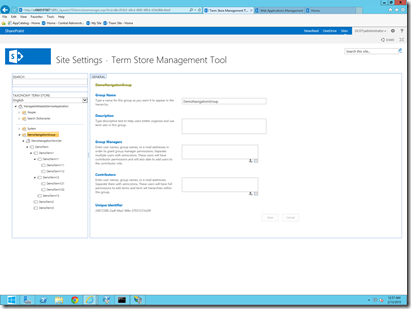
8. On that, let me create a Term group called – DemoNavigationTermGroup and create the terms as shown in the below figure.

image

Let us see about the Content Type Creations in Part4

Happy Coding.

Sathish Nadarajan.
Author Info

Sathish Nadarajan
 
Solution Architect
 
Rate this article
 
Sathish is a Microsoft MVP for SharePoint (Office Servers and Services) having 15+ years of experience in Microsoft Technologies. He holds a Masters Degree in Computer Aided Design and Business ...read more
 

Cross Site Publishing – Site Structures – Part 2

Sathish Nadarajan
 
Solution Architect
 
Rate this article
 
Views
8340

In this section, let us see, how to implement the Cross Site Publishing in a Plain Vennila Farm step by step. Assuming that in my farm, I don’t have any other web application apart from the Central Admin and the Search Service Application is configured.

Site Structure

To implement CSP, I am taking the structure as below table. This can vary based on different business requirement. I am using the below straight forward structure for the easy understanding of the readers.

TitleWebApplicationSiteCollectionPurpose
Publishinghttp://c4968397007:1000/ http://c4968397007:1000/sites/Publishing – Publishing Site TemplatePublic facing site where all the users will be having read permission
Authoringhttp://c4968397007:2000/ http://c4968397007:2000/sites/Authoring – Product Catalog Site TemplateAuthoring Site, where the authors will be writing their content.
Content Type Hubhttp://c4968397007:3000/ http://c4968397007:3000/sites/CTHUB – Product Catalog Site TemplateContent Type Hub Site, from which the Content Types will be reused by all other Site Collections.

As I said earlier, I took a plain vennila environment. Hence, there will not be any web Applications, site collections etc.,

Create Web Applications/Site Collections.

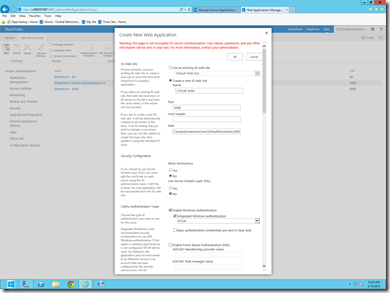
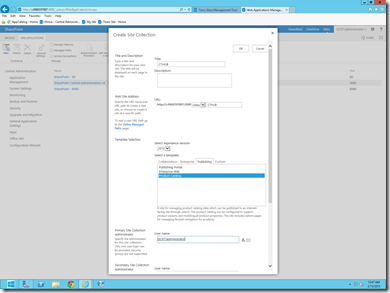
From the Central Administration Site, Create New Web Application screen, I am creating three web applications and the corresponding site collections.

a. http://c4968397007:1000/http://c4968397007:1000/sites/Publishing – Publishing

b. http://c4968397007:2000/http://c4968397007:2000/sites/Authoring – Product Catalog

c. http://c4968397007:3000/http://c4968397007:3000/sites/CTHUB – Product Catalog


image

image


Let us see about the Managed Metadata Service Applications in Part3

Happy Coding.

Sathish Nadarajan.
Author Info

Sathish Nadarajan
 
Solution Architect
 
Rate this article
 
Sathish is a Microsoft MVP for SharePoint (Office Servers and Services) having 15+ years of experience in Microsoft Technologies. He holds a Masters Degree in Computer Aided Design and Business ...read more
 

Cross Site Publishing – End to End Implementation with Steps – Part 0

Sathish Nadarajan
 
Solution Architect
February 21, 2015
 
Rate this article
 
Views
9578

Cross Site Publishing – an important effective feature introduced by Microsoft in SharePoint 2013. I thought of sharing some interesting procedures to implement this in our business requirements. But explaining them all in a single article, it is not practically feasible. Hence, I am planning to write this as a series. The overall steps are as follows.

1. Introduction to Cross Site Publishing

2. Site Structures

3. Managed Metadata Service Application Creation

4. Content Type Hub Creation

5. Managed Property and Crawled Property

6. Authoring Site – Enable Library as a Catalog

7. Publishing Site – Navigation Settings

8. Publishing Site – Connect to a Catalog

9. Custom WebParts Creation – Object Model


To create this series, I took a blank environment. That’s the reason, I am documenting each and every step for a better understanding. Though many of us would have come across, many of these steps during our development phase, I am explaining these things once again for a better understanding.

Let us proceed with the Part1

Happy Coding.

Sathish Nadarajan.
Author Info

Sathish Nadarajan
 
Solution Architect
 
Rate this article
 
Sathish is a Microsoft MVP for SharePoint (Office Servers and Services) having 15+ years of experience in Microsoft Technologies. He holds a Masters Degree in Computer Aided Design and Business ...read more
 

Leave a comment