How to check Database Table already exists in SQL DB and How to create new Database Table using C# programmatically

Ahamed Fazil Buhari
 
Senior Developer
September 11, 2017
 
Rate this article
 
Views
6047

Hello everyone, in this article we will see how to check if particular Database Table is available in the SQL and if it does not exists then we can create New Database Table. Use the below function to check Database Table name is available or not and it return Boolean value, True if Table available and False if Table not available.

 //Getting Connection String from App.config file
 string conString = ConfigurationManager.ConnectionStrings["CS"].ConnectionString.ToString();
 using (SqlConnection sqlCon = new SqlConnection(conString))
 {
 bool fixTableExists = CheckSQLTable(sqlCon, "MyTable");
        //Create New Table If table is not available
        if (!fixTableExists)
        	FixedTableCreation(sqlCon, fixedTable);
 }
  //Method used to check SQL Database Table availability
  public static bool CheckSQLTable(SqlConnection sqlCon, string tableName)
         {
             bool checkTable;
             string sqlCmdExTableCheck = @"SELECT count(*) as IsExists FROM dbo.sysobjects where id = object_id('[dbo].[" + tableName + "]')";
 
             using (SqlCommand sqlCmd = new SqlCommand(sqlCmdExTableCheck, sqlCon))
             {
                 sqlCon.Open();
                 try
                 {
                     checkTable = ((int)sqlCmd.ExecuteScalar() == 1);
                     {
                         sqlCon.Close();
                         return checkTable;
                     }
                 }
                 catch
                 {
                     checkTable = false;
                     sqlCon.Close();
                     return checkTable;
                 }
             }
         }
 
         //Method used to create Database Table
         public static void TableCreation(SqlConnection sqlCon, string tableName)
         {
             string myQuery = "IF OBJECT_ID('" + tableName + "', 'U') IS NULL ";
             myQuery += "BEGIN ";
             myQuery += "CREATE TABLE " + tableName + "(";
             myQuery += "Name VARCHAR(50),";
             myQuery += "ID [int],";         
             myQuery += "DOB [DATE]";
             myQuery += ")";
             myQuery += " END";
 
             using (SqlCommand sqlCmd = new SqlCommand(myQuery, sqlCon))
             {
                 sqlCon.Open();
                 sqlCmd.ExecuteNonQuery();
                 sqlCon.Close();
             }
         }
 

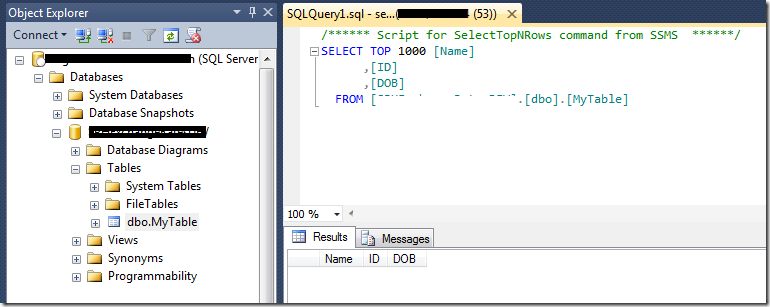
The below Table has been created created using TableCreation(SqlConnection sqlCon, string tableName) function.

clip_image001

Happy Coding

Ahamed

Author Info

Ahamed Fazil Buhari
 
Senior Developer
 
Rate this article
 
Ahamed is a Senior Developer and he has very good experience in the field of Microsoft Technologies, especially SharePoint, Azure, M365, SPFx, .NET and client side scripting - JavaScript, TypeScript, ...read more
 

How to Attach Database and Grant Access to SSAS Service Account in SQL Server 2012

Ahamed Fazil Buhari
 
Senior Developer
November 18, 2016
 
Rate this article
 
Views
4706

Consider that we have a Database and we need to attach that in our SharePoint Database engine and in addition to that we need to grant access to that database to the Service Account which has been used to install SQL Server Analysis Service (SSAS).

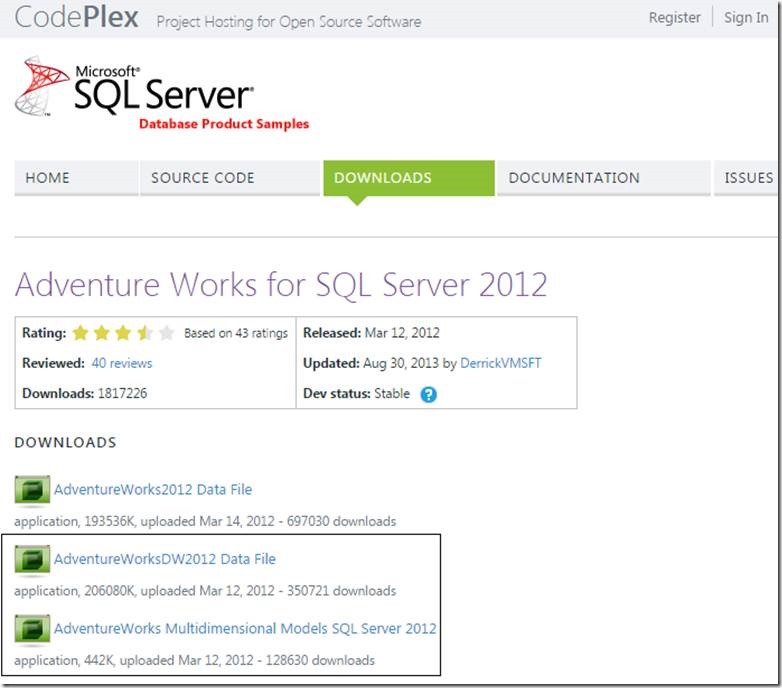
Here, I’ve couple of sample databases downloaded from CodePlex. AdventureWorksDW2012 Data File and AdventureWorks Multidimensional Models SQL Server 2012.

clip_image002

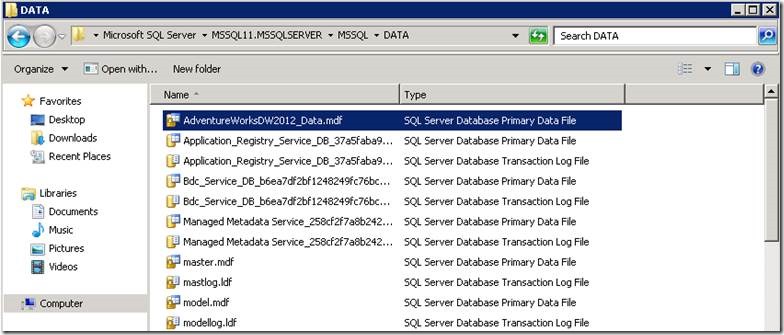
Let’s open the File Explorer and paste the AdventureWorksDW2012_Data.mdf File in the following location, C:\Program Files\Microsoft SQL Server\MSSQL11.MSSQLSERVER\MSSQL\DATA\

clip_image004


Now open up the SQL Server 2012 Management Studio to connect to our Database Engine,

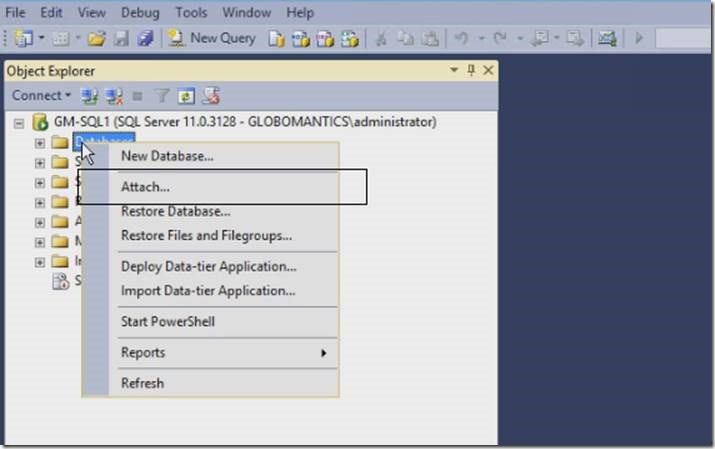
1. Right click on the Server and choose Attach.

clip_image006

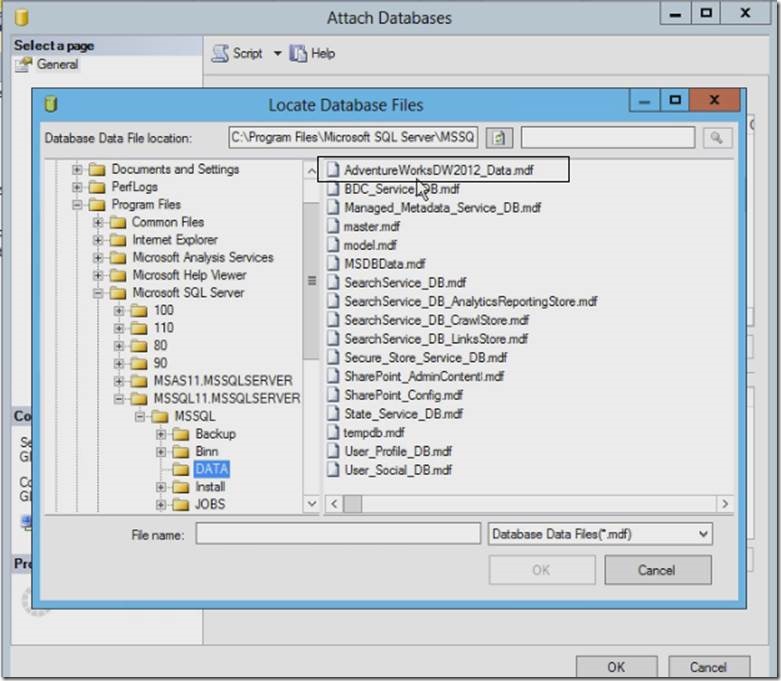
2. In Attach Database window, click on ‘Add’ button and select the database that needs to be attached and click on OK.

clip_image008

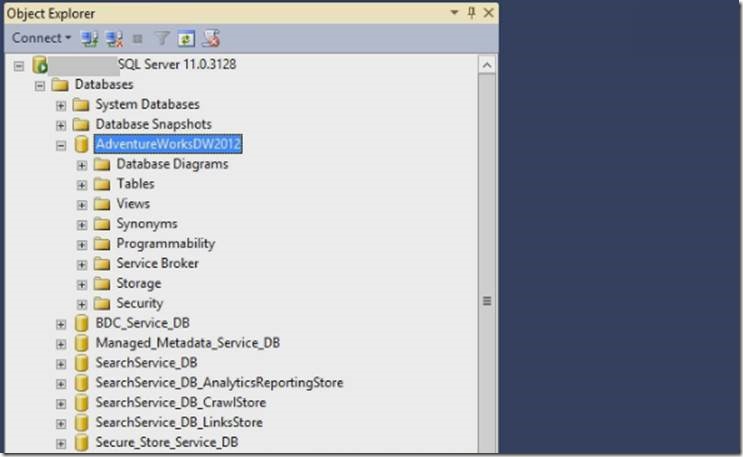
3. After attach, we can see that database in our server,

clip_image010

Now we need to grant access to our SSAS service account for the attached Database.

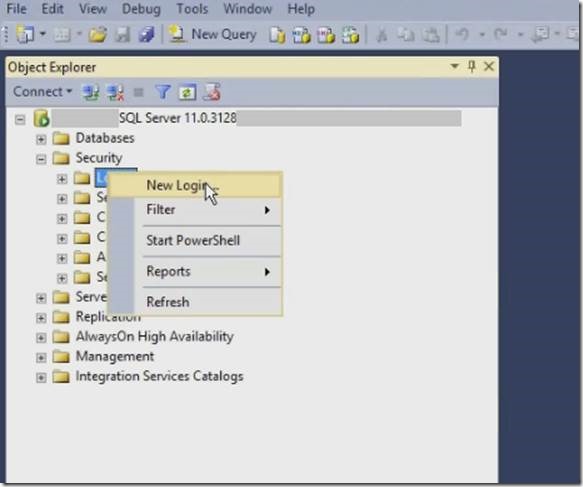
1. Go to Security -> Login -> New Login

clip_image012

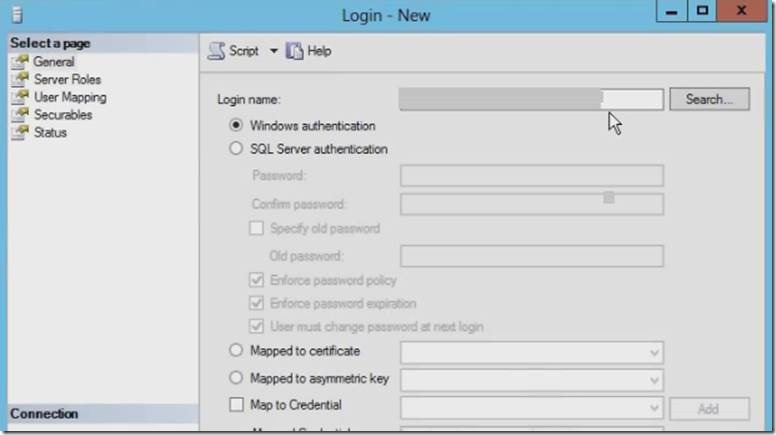
2. We need to add a login for the Service Account that we use for our SQL Server Analysis Service

clip_image014

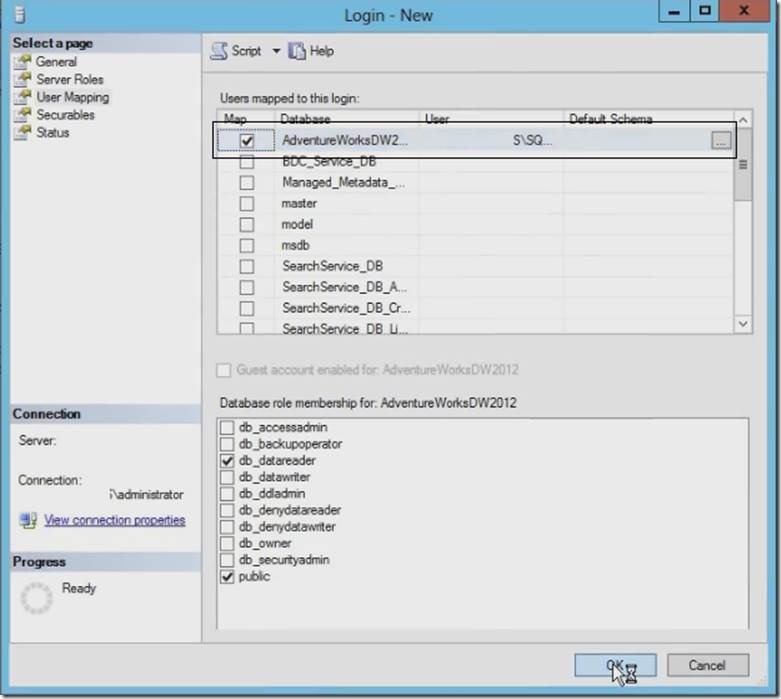
3. Now go ahead and click on User Mapping in side navigation, select the database and provide the role membership for that selected db.

clip_image016


In the next article, we will go ahead and add the Multidimensional Cube to Analysis Service.


Happy Coding

Ahamed

Category : SQL

Author Info

Ahamed Fazil Buhari
 
Senior Developer
 
Rate this article
 
Ahamed is a Senior Developer and he has very good experience in the field of Microsoft Technologies, especially SharePoint, Azure, M365, SPFx, .NET and client side scripting - JavaScript, TypeScript, ...read more
 

How to restore SharePoint mysites from database backup

Tarun Kumar Chatterjee
 
Net – Technology Specialist
June 9, 2016
 
Rate this article
 
Views
8437

In one of our project suddenly Active directory was messed up because of some network issue and SharePoint user profile synch service was not able reach to Active Directory. All the users got the email notification that within 14 days all the mysites will be deleted. It became nightmare to us as it was supported by our team only & we could not say to take the manual backup individually as because user used to keep their personal information like mail backup (PST) etc. in their own mysite & so the size was also huge. It happened because of my site clean-up timer job deleting the profile if it does not find in active directory.  While deleting the profile it will also delete the manual entered personal information like note, photo and links etc. Though the active directory was available after 2 hrs but my site clean-up timer job marked all the mysites deleted flag as true, so there were no option we found to avoid the mysites deletion, even disable clean-up timer job also not worked.

After a very hard try we found an ultimate solution i.e. to take the database backup and restore the mysites after 14 days of mysites deletion. Thought of sharing with you with the details if it helps anyone. Let see the steps we followed

We can verify restorable count by running the query in sharepoint database

select * from SharePoint_Content_MySites.dbo.SiteDeletion where Restorable = 1

Before the clean-up timer job automatically delete all the mysites ,we took the below database backup and restore in a test environment rather in production environment, as because we should not touch the live box SharePoint database.

· SharePoint_SA_User_Profiles

· SharePoint_SA_User_Profiles_Sync

· SharePoint_SA_Social_Data

· SharePoint_Content_MySites

After 14 days while all the mysites are deleted we did follow the below steps

· On the Start screen, click SharePoint 2013 Central Administration.

· If SharePoint 2013 Central Administration is not on the Start screen:

Right-click Computer, clicks all apps, and then clicks SharePoint 2013 Central Administration.

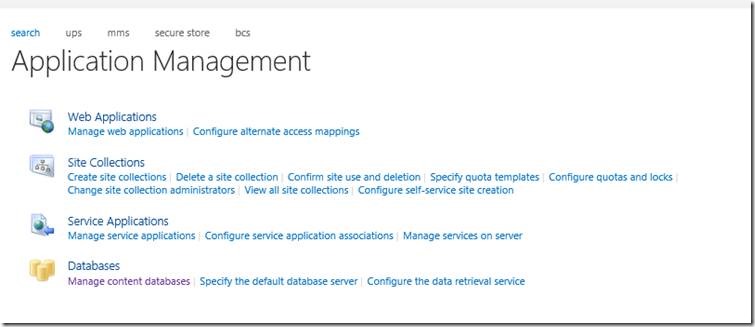
· Go to Application Management and Manage Content Database

clip_image002

· Change the Webapplication where we have the Mysites

clip_image004

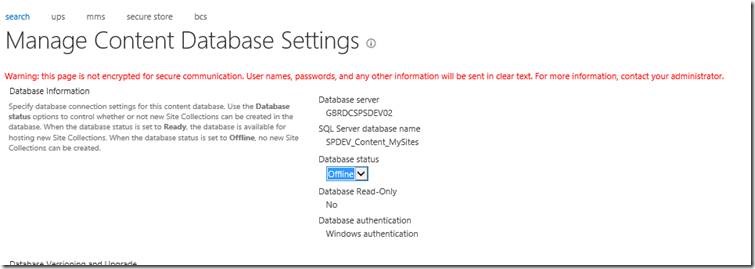
· Make the existing pointed database as Offline

clip_image006

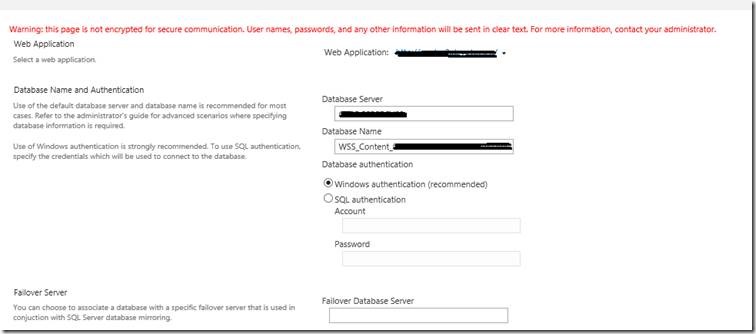
· Now Click on Add Content Database

clip_image008

· Point the restored SharePoint_Content_MySites database and Click on ok.

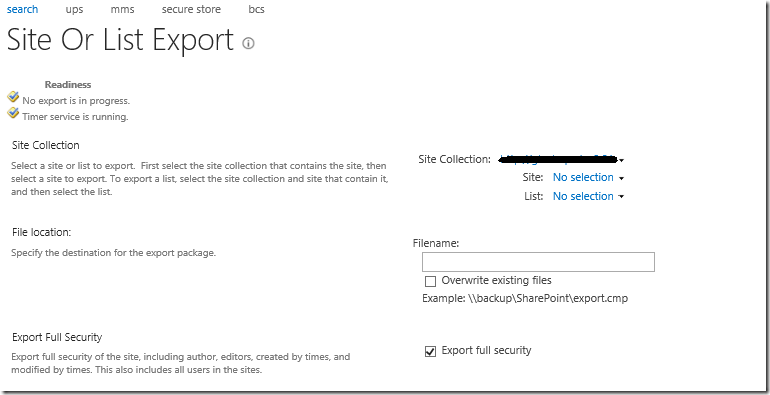
· Go to Backup and Restore, click on Export to Site or List

clip_image010

· Change the Site Collection, select the mysite under the Site section, provide the Exported shared file path ( The file name should have cmp extension) & then click on Start Export

clip_image011

It will take some times to create the backup, will get the notfication as soon as the backup is being completed. It will generate a cmp backup file as well as a log file.

We can also export the cmp file by using the below powershell commands

 Export-SPWeb http://sharepoint.com/mysites/personal/tkumarch1 –Path "C:Mysites_exporttkumarch1_export.cmp"
 Export-SPWeb http://sharepoint.com/mysites/personal/tkumarch2 –Path "C:Mysites_exporttkumarch2_export.cmp"
 

To restore the backup we need to run the below powershell commands in production enviornment

 import-SPWeb http://sharepoint.com/mysites/personal/tkumarch1 –Path "C:Mysites_exporttkumarch1_export.cmp"
 import-SPWeb http://sharepoint.com/mysites/personal/tkumarch2 –Path "C:Mysites_exporttkumarch2_export.cmp"
 

We need to repeat the export and import for all the individual mysites which are deleted.

After all the imports are done we need to make the current content database as offline and previous pointed content database as online in test environment. That’s all, we are all set, cheers!!!

Happy coding

Tarun Kumar Chatterjee

Category : SharePoint

Author Info

Tarun Kumar Chatterjee
 
Net – Technology Specialist
 
Rate this article
 
Tarun has been working in IT Industry for over 12+ years. He holds a B-tech degree. He is passionate about learning and sharing the tricks and tips in Azure, .Net ...read more
 

Entity Framework Database first approach to Read/Insert/Update/Delete the database data in Asp.Net MVC & C#

Tarun Kumar Chatterjee
 
Net – Technology Specialist
May 16, 2016
 
Rate this article
 
Views
8833

We use Entity Framework designer which is in built feature of Visual Studio for automatically generate a data model with classes and properties of existing database tables and columns. The information about your database structure (store schema), your data model (conceptual model) and the mapping between them is stored in XML in an .edmx file. Entity Framework designer provides a graphical interface for display and edit the .edmx file.

Let’s first create a database with tables & procedures. Execute the below script to create tables & procedures within the MyEmployeeDB database

 USE [MyEmployeeDB]
 GO
 /****** Object:  StoredProcedure [dbo].[GetEmployeeByEmployeeId]    Script Date: 1/28/2016 5:17:52 PM ******/
 SET ANSI_NULLS ON
 GO
 SET QUOTED_IDENTIFIER ON
 GO
 CREATE PROCEDURE [dbo].[GetEmployeeByEmployeeId]
     -- Add the parameters for the stored procedure here
     @EmployeeId int = null
 AS
 BEGIN
     -- SET NOCOUNT ON added to prevent extra result sets from
     -- interfering with SELECT statements.
     SET NOCOUNT ON;
 
     -- Insert statements for procedure here
 SELECT [Id]
       ,[Name]
       ,[Address]
       ,[DOB]
   FROM [dbo].[Employees]
 WHERE [Id] = @EmployeeId
 END
 GO
 /****** Object:  StoredProcedure [dbo].[sp_DeleteEmployee]    Script Date: 1/28/2016 5:17:52 PM ******/
 SET ANSI_NULLS ON
 GO
 SET QUOTED_IDENTIFIER ON
 GO
 CREATE PROCEDURE [dbo].[sp_DeleteEmployee]
     -- Add the parameters for the stored procedure here
     @Id int
 AS
 BEGIN
     -- SET NOCOUNT ON added to prevent extra result sets from
     -- interfering with SELECT statements.
     SET NOCOUNT ON;
 
     DELETE FROM [dbo].[Employees]
     WHERE [Id] = @Id;
 
 END
 GO
 /****** Object:  StoredProcedure [dbo].[sp_InsertEmployee]    Script Date: 1/28/2016 5:17:52 PM ******/
 SET ANSI_NULLS ON
 GO
 SET QUOTED_IDENTIFIER ON
 GO
 CREATE PROCEDURE [dbo].[sp_InsertEmployee]
     -- Add the parameters for the stored procedure here
     @Name NVARCHAR(MAX),
 	@Address NVARCHAR(MAX),
     @DOB NVARCHAR(MAX)
 AS
 BEGIN
     -- SET NOCOUNT ON added to prevent extra result sets from
     -- interfering with SELECT statements.
     SET NOCOUNT ON;
 
         INSERT INTO [dbo].[Employees]([Name],[Address],[DOB])
         VALUES(@Name, @Address,@DOB)
 
     SELECT SCOPE_IDENTITY() AS Id
 
 END
 GO
 /****** Object:  StoredProcedure [dbo].[sp_UpdateEmployee]    Script Date: 1/28/2016 5:17:52 PM ******/
 SET ANSI_NULLS ON
 GO
 SET QUOTED_IDENTIFIER ON
 GO
 CREATE PROCEDURE [dbo].[sp_UpdateEmployee]
     -- Add the parameters for the stored procedure here
     @Id int,
     @Name NVARCHAR(MAX),
 	@Address NVARCHAR(MAX),
     @DOB NVARCHAR(MAX)
 AS
 BEGIN
     -- SET NOCOUNT ON added to prevent extra result sets from
     -- interfering with SELECT statements.
     SET NOCOUNT ON;
 
     UPDATE [dbo].[Employees]
     SET [Name] = @Name,[Address] = @Address, [DOB] = @DOB
     WHERE [Id] = @Id;
 
 END
 GO
 /****** Object:  Table [dbo].[Employees]    Script Date: 1/28/2016 5:17:52 PM ******/
 SET ANSI_NULLS ON
 GO
 SET QUOTED_IDENTIFIER ON
 GO
 CREATE TABLE [dbo].[Employees](
 	[Id] [int] IDENTITY(1,1) NOT NULL,
 	[Name] [nvarchar](max) NOT NULL,
 	[Address] [nvarchar](max) NOT NULL,
 	[DOB] [nvarchar](max) NOT NULL,
  CONSTRAINT [PK_Employees] PRIMARY KEY CLUSTERED 
 (
 	[Id] ASC
 )WITH (PAD_INDEX = OFF, STATISTICS_NORECOMPUTE = OFF, IGNORE_DUP_KEY = OFF, ALLOW_ROW_LOCKS = ON, ALLOW_PAGE_LOCKS = ON) ON [PRIMARY]
 ) ON [PRIMARY] TEXTIMAGE_ON [PRIMARY]
 
 GO
 SET IDENTITY_INSERT [dbo].[Employees] ON 
 
 INSERT [dbo].[Employees] ([Id], [Name], [Address], [DOB]) VALUES (1, N'Tarun1', N'Kolkata1', N'2016-01-01')
 INSERT [dbo].[Employees] ([Id], [Name], [Address], [DOB]) VALUES (3, N'Tarun3', N'Kolkata3', N'2016-01-01')
 INSERT [dbo].[Employees] ([Id], [Name], [Address], [DOB]) VALUES (4, N'Tarun4', N'Kolkata4', N'2016-01-03')
 INSERT [dbo].[Employees] ([Id], [Name], [Address], [DOB]) VALUES (1002, N'Tarun8', N'Kolkata8', N'2016-01-01')
 SET IDENTITY_INSERT [dbo].[Employees] OFF
 

Now, we will be creating the models in Visual studio from the database

Open Visual Studio 2013 and click on New Project.

Select the MVC Project Template and click on OK.

In this section, we will add the ADO.NET Entity Data Model to the application. We will create the generate from database model in here. Use the following procedure.

In the Solution Explorer, right-click on the Models folder and click on ADO.NET Entity Data Model.
clip_image002

Click on Next & then new connection

Select the server name & database name where we have created all the tables & procedures.

clip_image004

Click on Ok & then Next

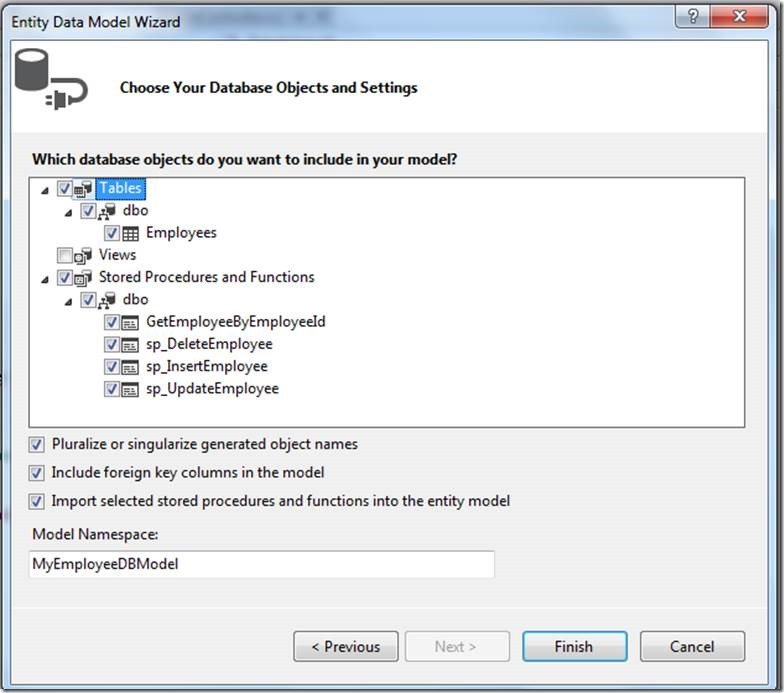
Select the tables and procedures you wanted to include into the model


clip_image006

Click on Finish

It will take some times to create the entity model under the solution

Below is the code generated automatically in EmployeeModel.Context.cs

 
 //------------------------------------------------------------------------------
 // <auto-generated>
 //    This code was generated from a template.
 //
 //    Manual changes to this file may cause unexpected behavior in your application.
 //    Manual changes to this file will be overwritten if the code is regenerated.
 // </auto-generated>
 //------------------------------------------------------------------------------
 
 namespace EntityFrameworkDemo.Models
 {
     using System;
     using System.Data.Entity;
     using System.Data.Entity.Infrastructure;
     using System.Data.Entity.Core.Objects;
     using System.Linq;
     
     public partial class MyEmployeeDBEntities : DbContext
     {
         public MyEmployeeDBEntities()
             : base("name=MyEmployeeDBEntities")
         {
         }
     
         protected override void OnModelCreating(DbModelBuilder modelBuilder)
         {
             throw new UnintentionalCodeFirstException();
         }
     
         public DbSet<Employee> Employees { get; set; }
     
         public virtual ObjectResult<GetEmployeeByEmployeeId_Result> GetEmployeeByEmployeeId(Nullable<int> employeeId)
         {
             var employeeIdParameter = employeeId.HasValue ?
                 new ObjectParameter("EmployeeId", employeeId) :
                 new ObjectParameter("EmployeeId", typeof(int));
     
             return ((IObjectContextAdapter)this).ObjectContext.ExecuteFunction<GetEmployeeByEmployeeId_Result>("GetEmployeeByEmployeeId", employeeIdParameter);
         }
     
         public virtual int sp_DeleteEmployee(Nullable<int> id)
         {
             var idParameter = id.HasValue ?
                 new ObjectParameter("Id", id) :
                 new ObjectParameter("Id", typeof(int));
     
             return ((IObjectContextAdapter)this).ObjectContext.ExecuteFunction("sp_DeleteEmployee", idParameter);
         }
     
         public virtual ObjectResult<Nullable<decimal>> sp_InsertEmployee(string name, string address, string dOB)
         {
             var nameParameter = name != null ?
                 new ObjectParameter("Name", name) :
                 new ObjectParameter("Name", typeof(string));
     
             var addressParameter = address != null ?
                 new ObjectParameter("Address", address) :
                 new ObjectParameter("Address", typeof(string));
     
             var dOBParameter = dOB != null ?
                 new ObjectParameter("DOB", dOB) :
                 new ObjectParameter("DOB", typeof(string));
     
             return ((IObjectContextAdapter)this).ObjectContext.ExecuteFunction<Nullable<decimal>>("sp_InsertEmployee", nameParameter, addressParameter, dOBParameter);
         }
     
         public virtual int sp_UpdateEmployee(Nullable<int> id, string name, string address, string dOB)
         {
             var idParameter = id.HasValue ?
                 new ObjectParameter("Id", id) :
                 new ObjectParameter("Id", typeof(int));
     
             var nameParameter = name != null ?
                 new ObjectParameter("Name", name) :
                 new ObjectParameter("Name", typeof(string));
     
             var addressParameter = address != null ?
                 new ObjectParameter("Address", address) :
                 new ObjectParameter("Address", typeof(string));
     
             var dOBParameter = dOB != null ?
                 new ObjectParameter("DOB", dOB) :
                 new ObjectParameter("DOB", typeof(string));
     
             return ((IObjectContextAdapter)this).ObjectContext.ExecuteFunction("sp_UpdateEmployee", idParameter, nameParameter, addressParameter, dOBParameter);
         }
     }
 }
 
 Now, within the Models folder we will be creating a custom business class named as EmployeeBusinessLayer
 public class EmployeeBusinessLayer
     {
         int num = 0;
         public int EditEmployee(Employee emp)
         {
             MyEmployeeDBEntities empDal = new MyEmployeeDBEntities();
             num = empDal.sp_UpdateEmployee(emp.Id, emp.Name, emp.Address, emp.DOB);
             return num;
         }
         public ObjectResult<Nullable<decimal>> InsertEmployee(Employee emp)
         {
             ObjectResult<Nullable<decimal>> objResult = null;
             MyEmployeeDBEntities empDal = new MyEmployeeDBEntities();
             objResult = empDal.sp_InsertEmployee(emp.Name, emp.Address, emp.DOB);
             return objResult;
         }
         public int DeleteEmployee(int empID)
         {
             MyEmployeeDBEntities empDal = new MyEmployeeDBEntities();
             num = empDal.sp_DeleteEmployee(empID);
             return num;
         }
         public List<Employee> GetEmployee()
         {
             MyEmployeeDBEntities empDal = new MyEmployeeDBEntities();
             return empDal.Employees.ToList();            
         }
         public ObjectResult<GetEmployeeByEmployeeId_Result> GetEmployeeByEmployeeID(int empID)
         {
             MyEmployeeDBEntities empDal = new MyEmployeeDBEntities();
             return empDal.GetEmployeeByEmployeeId(empID);
         }
     }
 Next we will be modifying the Controller 
 public class HomeController : Controller
     {
         EmployeeBusinessLayer db = new EmployeeBusinessLayer();
         
         public ActionResult Index()
         {
             return View(db.GetEmployee());
         }
 
         public ActionResult Create()
         {
             return View();
         }        
 
         [HttpPost]
         public ActionResult Create(Employee emp)
         {
             try
             {
                 db.InsertEmployee(emp);                
                 return RedirectToAction("Index");
             }
             catch
             {
                 return View();
             }
         }
 
         public ActionResult Edit(int id)
         {
             Employee emp = new Employee();
             List<GetEmployeeByEmployeeId_Result> result = db.GetEmployeeByEmployeeID(id).ToList();
             emp.Id = result[0].Id;
             emp.Name = result[0].Name;
             emp.Address = result[0].Address;
             emp.DOB = result[0].DOB;
             return View(emp);
         }
 
 
         [HttpPost]
         public ActionResult Edit(int id, Employee emp)
         {
             try
             {                
                 db.EditEmployee(emp);
                 return RedirectToAction("Index");
             }
             catch
             {
                 return View();
             }
         }
 
         public ActionResult Delete(int id)
         {
             Employee emp = new Employee();
             List<GetEmployeeByEmployeeId_Result> result = db.GetEmployeeByEmployeeID(id).ToList();
             emp.Id = result[0].Id;
             emp.Name = result[0].Name;
             emp.Address = result[0].Address;
             emp.DOB = result[0].DOB;
             return View(emp);
         }
 
 
         [HttpPost]
         public ActionResult Delete(int id, Employee emp)
         {
             try
             {                
                 db.DeleteEmployee(id);                
                 return RedirectToAction("Index");
             }
             catch
             {
                 return View();
             }
         }
     }
 Here are my Views code.
 Index View code: 
 @model IEnumerable<EntityFrameworkDemo.Models.Employee>
 @{
     ViewBag.Title = "Index";
 }
 
 <h2>Index</h2>
 <p>
     @Html.ActionLink("Create New", "Create")
 </p>
 <table border="1" width="50%">
     <tr>
         <th width="40%"></th>
         <th width="20%">
             Name
         </th>
         <th width="20%">
             Address
         </th>
         <th width="20%">
             DOB
         </th>
     </tr>
 
 @foreach (var item in Model) {
     <tr>
         <td>
             @Html.ActionLink("Edit", "Edit", new { id=item.Id }) |
             @Html.ActionLink("Delete", "Delete", new { id=item.Id })
         </td>
         <td>
             @item.Name
         </td>
         <td>
             @item.Address
         </td>
         <td>
             @item.DOB
         </td>
     </tr>
 }
 
 </table>
 
 
 Edit View code:
 @model EntityFrameworkDemo.Models.Employee
 
 @{
     ViewBag.Title = "Edit";
 }
 
 <h2>Edit</h2>
 
 <script src="@Url.Content("~/Scripts/jquery.validate.min.js")" type="text/javascript"></script>
 <script src="@Url.Content("~/Scripts/jquery.validate.unobtrusive.min.js")" type="text/javascript"></script>
 
 @using (Html.BeginForm()) {
     @Html.ValidationSummary(true)
     <fieldset>
         <legend>Employee</legend>
 
         @Html.HiddenFor(model => model.Id)
 
         <div class="editor-label">
             @Html.LabelFor(model => model.Name)
         </div>
         <div class="editor-field">
             @Html.EditorFor(model => model.Name)
             @Html.ValidationMessageFor(model => model.Name)
         </div>
         <div class="editor-label">
             @Html.LabelFor(model => model.Address)
         </div>
         <div class="editor-field">
             @Html.EditorFor(model => model.Address)
             @Html.ValidationMessageFor(model => model.Address)
         </div>
 
         <div class="editor-label">
             @Html.LabelFor(model => model.DOB)
         </div>
         <div class="editor-field">
             @Html.EditorFor(model => model.DOB)
             @Html.ValidationMessageFor(model => model.DOB)
         </div>
 
         <p>
             <input type="submit" value="Save" />
         </p>
     </fieldset>
 }
 
 <div>
     @Html.ActionLink("Back to List", "Index")
 </div>
 
 Delete View code: 
 @model EntityFrameworkDemo.Models.Employee
 
 @{
     ViewBag.Title = "Delete";
 }
 
 <h2>Delete</h2>
 <h3>Are you sure you want to delete this?</h3>
 <fieldset>
     <legend>Employee</legend>
 
     <div class="display-label">Name</div>
     <div class="display-field">@Model.Name</div>
 
     <div class="display-label">Address</div>
     <div class="display-field">@Model.Address</div>
 </fieldset>
 @using (Html.BeginForm()) {
     <p>
         <input type="submit" value="Delete" /> |
         @Html.ActionLink("Back to List", "Index")
     </p>
 }
 
 
 Create View code:
 @model EntityFrameworkDemo.Models.Employee
 
 @{
     ViewBag.Title = "Create";
 }
 
 
 <h2>Create</h2>
 <script src="~/Scripts/jquery-1.4.1.min.js"></script>
 <script src="@Url.Content("~/Scripts/jquery.validate.min.js")" type="text/javascript"></script>
 <script src="@Url.Content("~/Scripts/jquery.validate.unobtrusive.min.js")" type="text/javascript"></script>
 
 @using (Html.BeginForm()) {
     @Html.ValidationSummary(true)
     <fieldset>
         <legend>Employee</legend>
 
         <div class="editor-label">
             @Html.LabelFor(model => model.Name)
         </div>
         <div class="editor-field">
             @Html.EditorFor(model => model.Name)
             @Html.ValidationMessageFor(model => model.Name)
         </div>
         <div class="editor-label">
             @Html.LabelFor(model => model.Address)
         </div>
         <div class="editor-field">
             @Html.EditorFor(model => model.Address)
             @Html.ValidationMessageFor(model => model.Address)
         </div>
 
         <div class="editor-label">
             @Html.LabelFor(model => model.DOB)
         </div>
         <div class="editor-field">
             @Html.EditorFor(model => model.DOB)
             @Html.ValidationMessageFor(model => model.DOB)
         </div>
 
         <p>
             <input type="submit" value="Create" />
         </p>
     </fieldset>
 }
 
 <div>
     @Html.ActionLink("Back to List", "Index")
 </div>
 

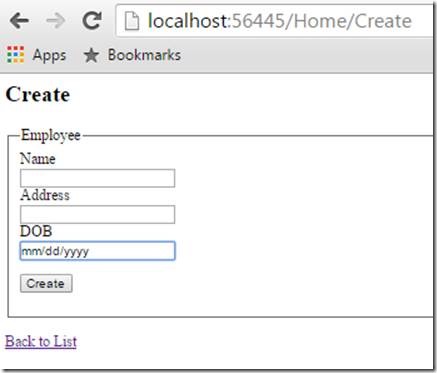
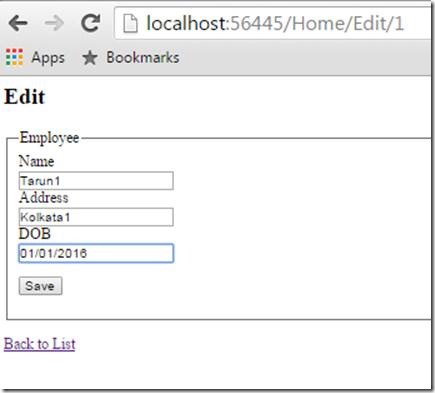
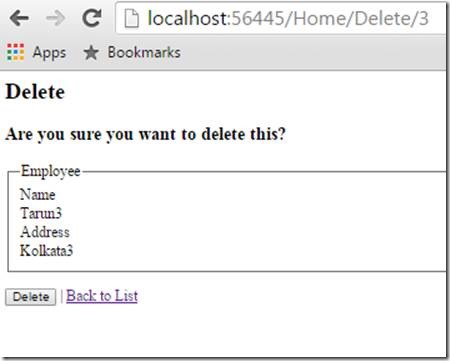
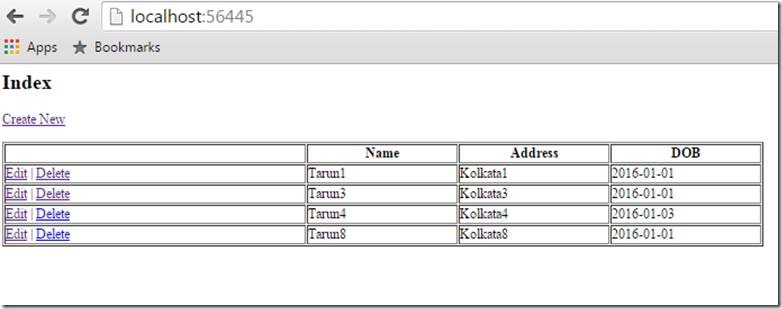
Build & run the solution, the output will be looking like:

clip_image008

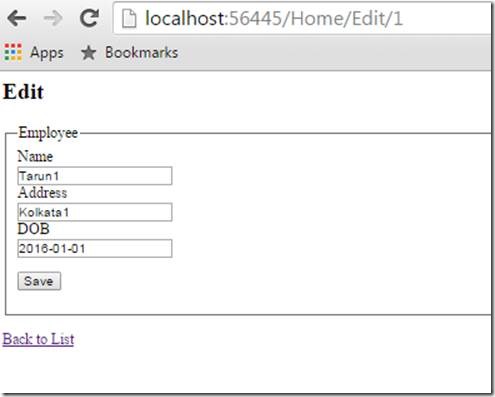
Edit View output:

clip_image010

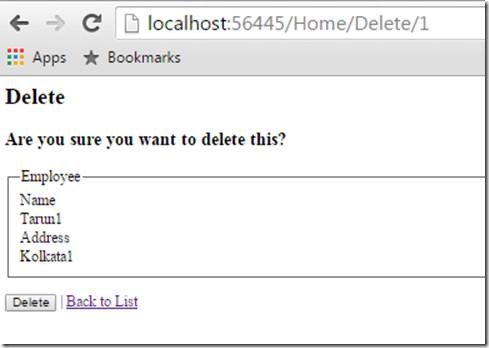
Delete View output:

clip_image012

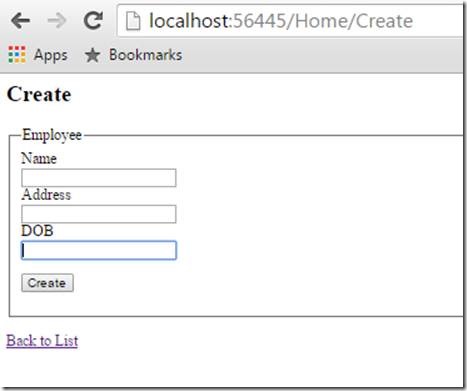
Create New View output:

clip_image014

Happy Coding

Tarun Kumar Chatterjee

Category : .Net, SQL

Author Info

Tarun Kumar Chatterjee
 
Net – Technology Specialist
 
Rate this article
 
Tarun has been working in IT Industry for over 12+ years. He holds a B-tech degree. He is passionate about learning and sharing the tricks and tips in Azure, .Net ...read more
 

Entity Framework Model first approach to Read/Insert/Update/Delete database data in Asp.Net MVC & C#

Tarun Kumar Chatterjee
 
Net – Technology Specialist
May 14, 2016
 
Rate this article
 
Views
11223

Open Visual Studio 2013 and click on New Project.

Select the MVC Project Template and click on OK.

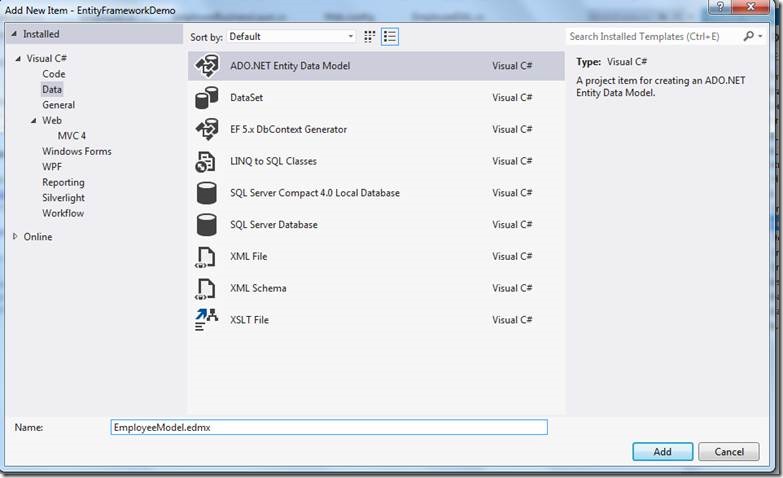
In this section, we will add the ADO.NET Entity Data Model to the application. We will create the empty model in here. Use the following procedure.

In the Solution Explorer, right-click on the Models folder and click on ADO.NET Entity Data Model.

clip_image002

Specify the model name as EmployeeModel.

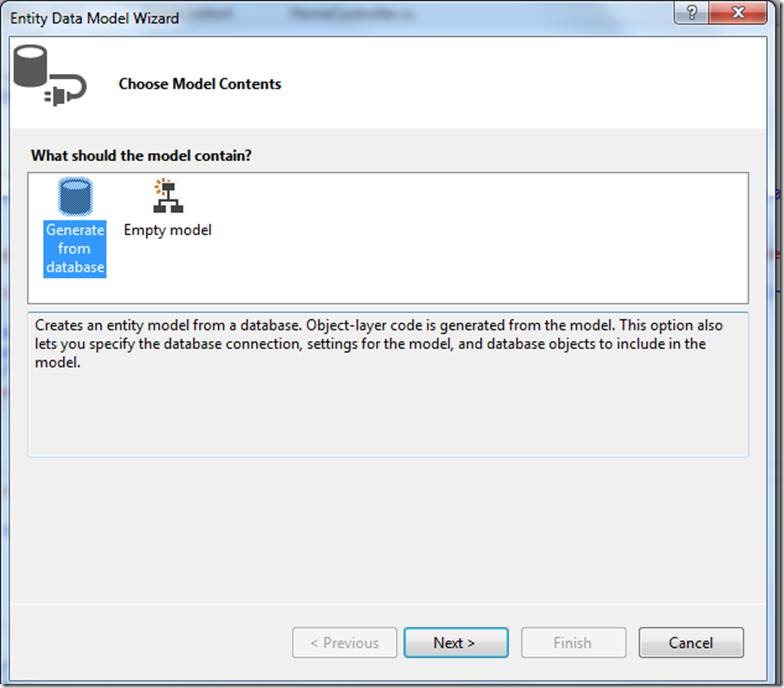
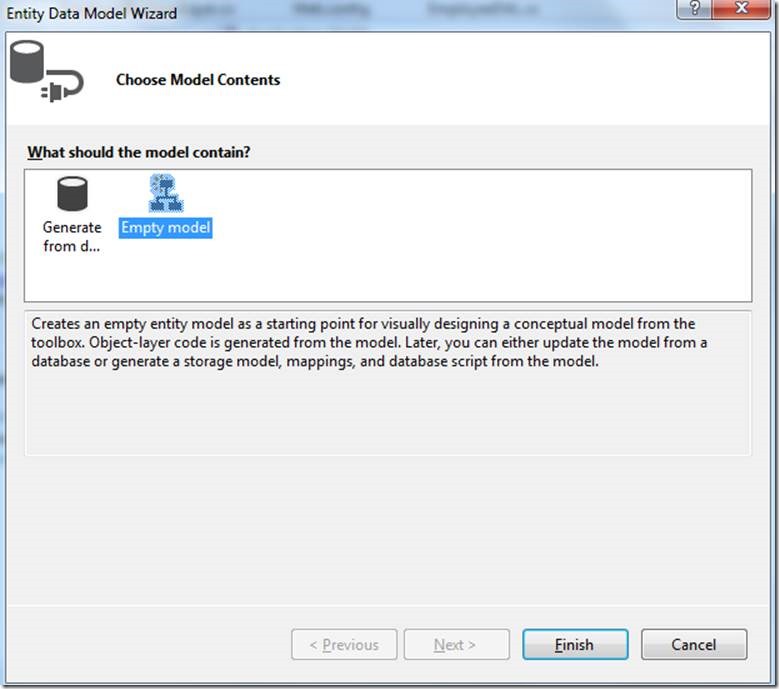
In the next Entity Data Model Wizard, select the Empty Model and click on "Finish".
clip_image004

Now you can see the Entity Data Model Designer.

Within the designer Right click — > Add new — > Entity

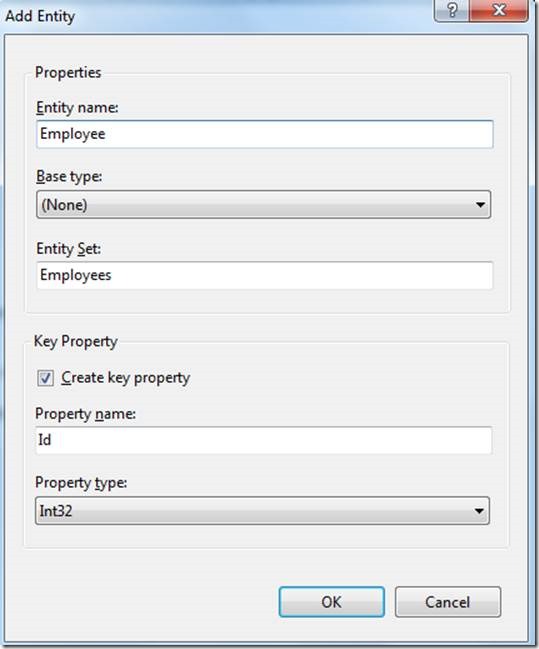
In the next Add Entity wizard, specify the entity name.
clip_image006

Now you can see that the entity is created. So, it is time to add a scalar property to the entity. Right-click on the entity and go to add new scalar property.
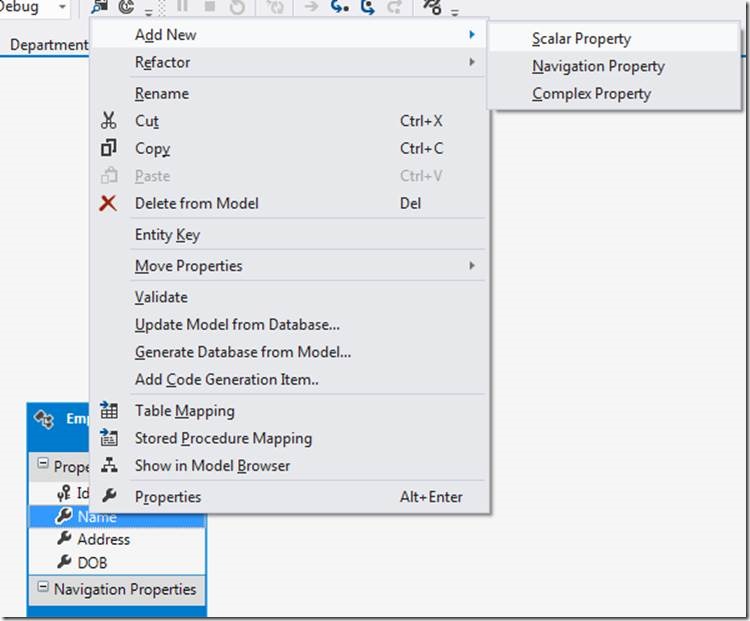
clip_image008

Now we have generated an entity model. You can also create more entity models in the Data Model Designer. We will now generate the database from the model. Use the following procedure.
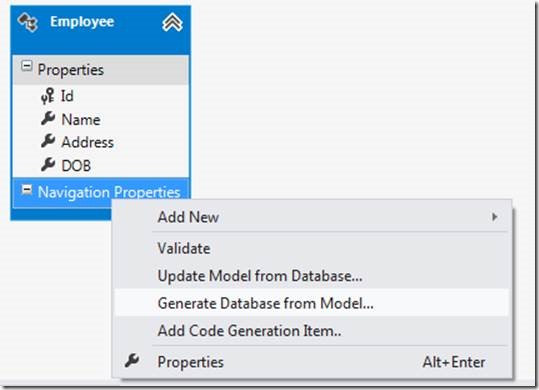
clip_image010

Now in the Generate Database Wizard, click on New Connection to connect with the database.
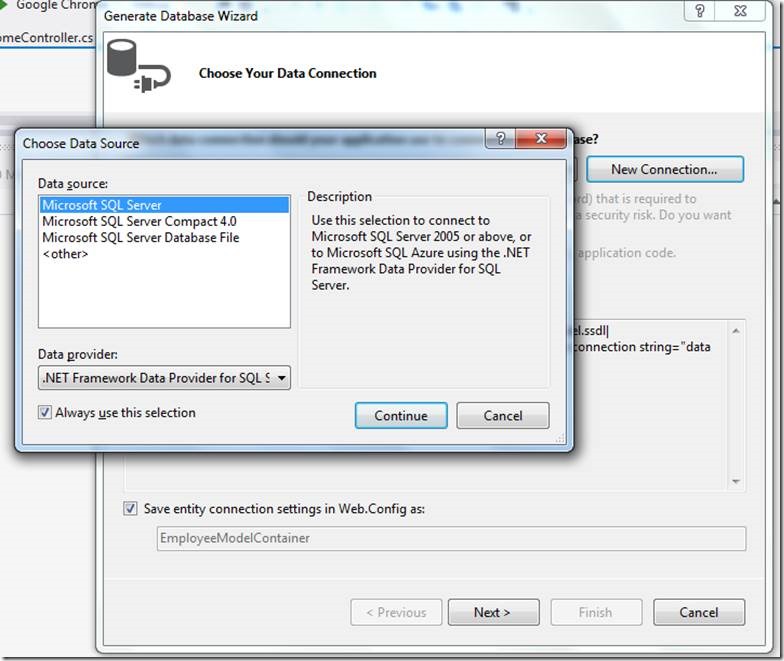
 

clip_image012

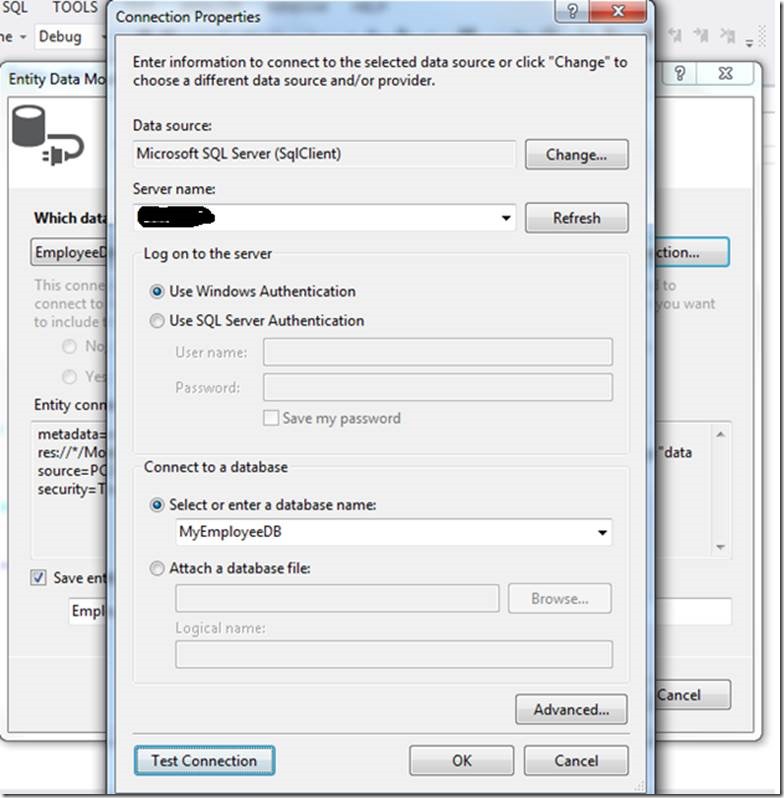
In the next Connection Properties wizard, specify the server name and the specify the database name.
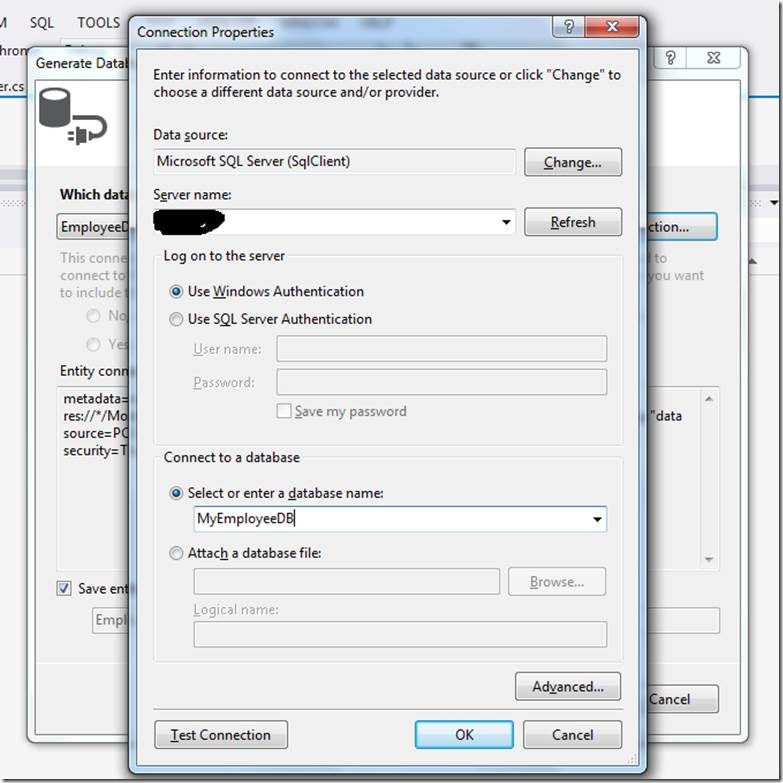
clip_image014


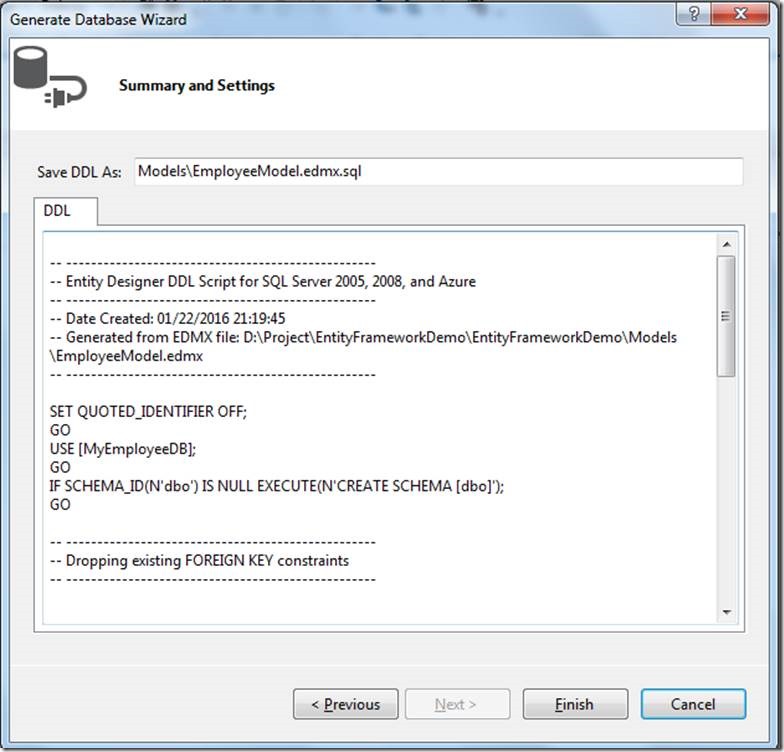
The database summary and script is generated and click on Finish.
clip_image016

It will generate the database & create EmployeeModel.edmx.sql with the following script

— ————————————————–

— Entity Designer DDL Script for SQL Server 2005, 2008, and Azure

— ————————————————–

— Date Created: 01/27/2016 18:41:19

— Generated from EDMX file: D:\Project\EntityFrameworkDemo\EntityFrameworkDemo\Models\EmployeeModel.edmx

— ————————————————–

SET QUOTED_IDENTIFIER OFF;

GO

USE [MyEmployeeDB];

GO

IF SCHEMA_ID(N’dbo’) IS NULL EXECUTE(N’CREATE SCHEMA [dbo]’);

GO

— ————————————————–

— Dropping existing FOREIGN KEY constraints

— ————————————————–

— ————————————————–

— Dropping existing tables

— ————————————————–

IF OBJECT_ID(N'[dbo].[Employees]’, ‘U’) IS NOT NULL

DROP TABLE [dbo].[Employees];

GO

— ————————————————–

— Creating all tables

— ————————————————–

— Creating table ‘Employees’

CREATE TABLE [dbo].[Employees] (

[Id] int IDENTITY(1,1) NOT NULL,

[Name] nvarchar(max) NOT NULL,

[Address] nvarchar(max) NOT NULL,

[DOB] nvarchar(max) NOT NULL

);

GO

— ————————————————–

— Creating all PRIMARY KEY constraints

— ————————————————–

— Creating primary key on [Id] in table ‘Employees’

ALTER TABLE [dbo].[Employees]

ADD CONSTRAINT [PK_Employees]

PRIMARY KEY CLUSTERED ([Id] ASC);

GO

— ————————————————–

— Creating all FOREIGN KEY constraints

— ————————————————–

— ————————————————–

— Script has ended

— ————————————————–


Now right-click on the script and click on Execute or directly we can go to database & execute the script.

The EmployeeModel.Context file generated from the first template contains the EmployeeModelContainer class shown here:

 public partial class EmployeeModelContainer : DbContext
     {
         public EmployeeModelContainer()
             : base("name=EmployeeModelContainer")
         {
         }
     
         protected override void OnModelCreating(DbModelBuilder modelBuilder)
         {
             throw new UnintentionalCodeFirstException();
         }
     
         public DbSet<Employee> Employees { get; set; }
     }
 

The Employee class is generated in the models folder. Edit the code with the following highlighted code. I have added the Data Annotation in which I am changing the display name of the property, date property initialized & validation attribute.

 public partial class Employee
     {
         public int Id { get; set; }
         [Required(ErrorMessage="Need to provide name")]
         public string Name { get; set; }
         public string Address { get; set; }
  [Display(Name = "DateOfBirth")]
         [DataType(DataType.Date)]
         public string DOB { get; set; 
       }
     }
 

In the code above, I’ve added the Data Annotation in which I am changing the display name of the property and date property initialized.

To enable the validation need to run the following command from package manager console

PM > Install-Package jQuery.Validation.Unobtrusive

Now we will be adding the Controller & Views to perform the CURD operations

Here is my Controller code:

 public class HomeController : Controller
     {
         EmployeeModelContainer db = new EmployeeModelContainer();
         
         public ActionResult Index()
         {
             return View(db.Employees);
         }
 
         public ActionResult Details(int id)
         {
             return View();
         }
 
         
         public ActionResult Create()
         {
             return View();
         }
 
         
         [HttpPost]
         public ActionResult Create(Employee emp)
         {
             try
             {
                 // TODO: Add insert logic here
                 db.Employees.Add(emp);
                 db.SaveChanges();
                 return RedirectToAction("Index");
             }
             catch
             {
                 return View();
             }
         }
 
         
         public ActionResult Edit(int id)
         {
             return View(db.Employees.Find(id));
         }
 
         [HttpPost]
         public ActionResult Edit(int id, Employee emp)
         {
             try
             {
                 // TODO: Add update logic here
                 db.Entry(emp).State = EntityState.Modified;
                 db.SaveChanges();
                 return RedirectToAction("Index");
             }
             catch
             {
                 return View();
             }
         }
 
         public ActionResult Delete(int id)
         {
             return View(db.Employees.Find(id));
         }
 
         [HttpPost]
         public ActionResult Delete(int id, Employee emp)
         {
             try
             {
                 // TODO: Add delete logic here
                 db.Entry(emp).State = EntityState.Deleted;
                 db.SaveChanges();
 
 
                 return RedirectToAction("Index");
             }
             catch
             {
                 return View();
             }
         }
     }
 

Index view code:

 @model IEnumerable<EntityFrameworkDemo.Models.Employee>
 @{
     ViewBag.Title = "Index";
 }
 
 <h2>Index</h2>
 <p>
     @Html.ActionLink("Create New", "Create")
 </p>
 <table border="1" width="50%">
     <tr>
         <th width="40%"></th>
         <th width="20%">
             Name
         </th>
         <th width="20%">
             Address
         </th>
         <th width="20%">
             DOB
         </th>
     </tr>
 
 @foreach (var item in Model) {
     <tr>
         <td>
             @Html.ActionLink("Edit", "Edit", new { id=item.Id }) |
             @Html.ActionLink("Delete", "Delete", new { id=item.Id })
         </td>
         <td>
             @item.Name
         </td>
         <td>
             @item.Address
         </td>
         <td>
             @item.DOB
         </td>
     </tr>
 }
 
 </table>
 
 
 Edit view code:
 @model EntityFrameworkDemo.Models.Employee
 
 @{
     ViewBag.Title = "Edit";
 }
 
 <h2>Edit</h2>
 
 <script src="@Url.Content("~/Scripts/jquery.validate.min.js")" type="text/javascript"></script>
 <script src="@Url.Content("~/Scripts/jquery.validate.unobtrusive.min.js")" type="text/javascript"></script>
 
 @using (Html.BeginForm()) {
     @Html.ValidationSummary(true)
     <fieldset>
         <legend>Employee</legend>
 
         @Html.HiddenFor(model => model.Id)
 
         <div class="editor-label">
             @Html.LabelFor(model => model.Name)
         </div>
         <div class="editor-field">
             @Html.EditorFor(model => model.Name)
             @Html.ValidationMessageFor(model => model.Name)
         </div>
         <div class="editor-label">
             @Html.LabelFor(model => model.Address)
         </div>
         <div class="editor-field">
             @Html.EditorFor(model => model.Address)
             @Html.ValidationMessageFor(model => model.Address)
         </div>
 
         <div class="editor-label">
             @Html.LabelFor(model => model.DOB)
         </div>
         <div class="editor-field">
             @Html.EditorFor(model => model.DOB)
             @Html.ValidationMessageFor(model => model.DOB)
         </div>
 
         <p>
             <input type="submit" value="Save" />
         </p>
     </fieldset>
 }
 
 <div>
     @Html.ActionLink("Back to List", "Index")
 </div>
 
 Delete view code: 
 @model EntityFrameworkDemo.Models.Employee
 
 @{
     ViewBag.Title = "Delete";
 }
 
 <h2>Delete</h2>
 <h3>Are you sure you want to delete this?</h3>
 <fieldset>
     <legend>Employee</legend>
 
     <div class="display-label">Name</div>
     <div class="display-field">@Model.Name</div>
 
     <div class="display-label">Address</div>
     <div class="display-field">@Model.Address</div>
 </fieldset>
 @using (Html.BeginForm()) {
     <p>
         <input type="submit" value="Delete" /> |
         @Html.ActionLink("Back to List", "Index")
     </p>
 }
 
 
 Create view code:
 @model EntityFrameworkDemo.Models.Employee
 
 @{
     ViewBag.Title = "Create";
 }
 
 
 <h2>Create</h2>
 <script src="~/Scripts/jquery-1.4.1.min.js"></script>
 <script src="@Url.Content("~/Scripts/jquery.validate.min.js")" type="text/javascript"></script>
 <script src="@Url.Content("~/Scripts/jquery.validate.unobtrusive.min.js")" type="text/javascript"></script>
 
 @using (Html.BeginForm()) {
     @Html.ValidationSummary(true)
     <fieldset>
         <legend>Employee</legend>
 
         <div class="editor-label">
             @Html.LabelFor(model => model.Name)
         </div>
         <div class="editor-field">
             @Html.EditorFor(model => model.Name)
             @Html.ValidationMessageFor(model => model.Name)
         </div>
         <div class="editor-label">
             @Html.LabelFor(model => model.Address)
         </div>
         <div class="editor-field">
             @Html.EditorFor(model => model.Address)
             @Html.ValidationMessageFor(model => model.Address)
         </div>
 
         <div class="editor-label">
             @Html.LabelFor(model => model.DOB)
         </div>
         <div class="editor-field">
             @Html.EditorFor(model => model.DOB)
             @Html.ValidationMessageFor(model => model.DOB)
         </div>
 
         <p>
             <input type="submit" value="Create" />
         </p>
     </fieldset>
 }
 
 <div>
     @Html.ActionLink("Back to List", "Index")
 </div>


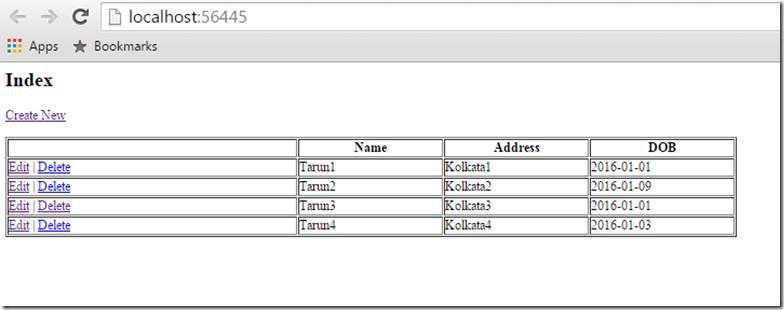
Build & run the solution, the output will be looking like:
clip_image018

Create view output:

clip_image020

Edit view output:

clip_image022

Delete view output:

clip_image024

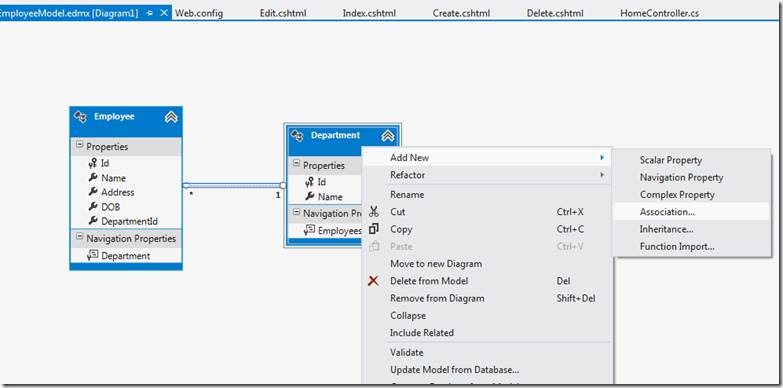
To add primary/foreign key association we need to delete the employee model and create it freshly & then add the association
clip_image026

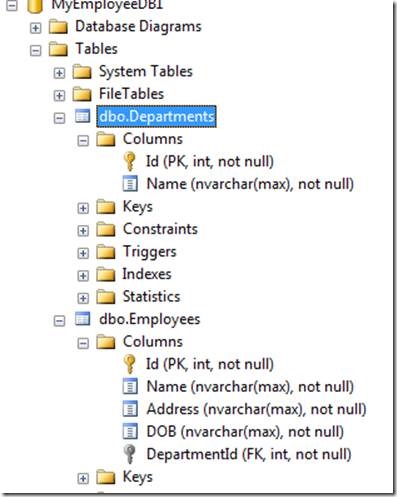
Right click on Department enitity & select the option : generate the datbase from model

It will generate the script & exeute the script in database, it will create both the tables with proper relationship
clip_image028

In my next article I will be explaining you the details implementation on Entity framework Database first approach.

Happy Coding

Tarun Kumar Chatterjee
Category : .Net

Author Info

Tarun Kumar Chatterjee
 
Net – Technology Specialist
 
Rate this article
 
Tarun has been working in IT Industry for over 12+ years. He holds a B-tech degree. He is passionate about learning and sharing the tricks and tips in Azure, .Net ...read more
 

Leave a comment