How to Update Navigation (Quick Launch and Top NavigationBar) URLs in SharePoint 2010 using PowerShell CSOM

Sathish Nadarajan
 
Solution Architect
December 28, 2017
 
Rate this article
 
Views
5606

During the Migration from SP2010 to SP2016, if the Quick Launch or the Top Navigation of the Source Sites were having the Full URL, (e.g., https://mySP2010Site.com/Sites/SiteCollection/MyList/Forms/AllItems.aspx), then any Migration tool will migrate the Navigation URLs as it is. Hence, in the Target, if we click on the Link, then it will go to the Source Link, not the Target Link. For that, before migrating the content, we can update the URLs with relating Path. i.e., /sites/sitecollection/MyList/Forms/AllItems.aspx. By doing this, when we migrate, the Target will also have the relative path which will be the corresponding target site collection’s path. Though this may not work for different web applications/different tenants, but somehow this will fix the initial problem statement.

Let us see the detailed script, which will update the Quick Launch and the Navigation Bars using PowerShell CSOM in SP2010 Environment. The below script, I wrote it for two levels only. We can make the update statement as a recursive method, so that it will update any level of the Links.

 # Update the Navigation (QuickLaunch and TopNavigationBar) URLs
 
 ##================================================================================================
 ## Description	: 
     #Update the Navigation (QuickLaunch and TopNavigationBar) URLs
  
 ## Author		: Sathish Nadarajan
 ## Date			: 
 ##================================================================================================
 
 # ============================================ Setup Input Paths ================================= 
 
 cls
 
  
 $Host.UI.RawUI.WindowTitle = "-- Update QuickLaunch and TopNavigationBar URLs--"
 
 $StartDate = Get-Date
 Write-Host -ForegroundColor White "------------------------------------"
 Write-Host -ForegroundColor White "| Update QuickLaunch and TopNavigationBar URLs |"
 Write-Host -ForegroundColor White "| Started on: $StartDate |"
 Write-Host -ForegroundColor White "------------------------------------"
 
 $LogTime = Get-Date -Format yyyy-MM-dd_hh-mm
 
 ################# Set the Current Path as Execution Path ####################
 
 $scriptBase = split-path $SCRIPT:MyInvocation.MyCommand.Path -parent
 Set-Location $scriptBase
 
 ############# set the Error Preference ################
 
 $ErrorActionPreference = "SilentlyContinue"
 
 # Create Log File Folder
 if(!(TEST-PATH ".Logs-$LogTime")) 
 {
    NEW-ITEM ".Logs-$LogTime" -type Directory
 }
 
 # Assign the Log and Progress Files
 $TranscriptFile = ".Logs-$LogTimeUpdateNavigationLinks.Transcript.rtf"
 
 try{
   stop-transcript|out-null
 }
 catch [System.InvalidOperationException]{}
 
 start-transcript $TranscriptFile
 
 
 function AddCSOM(){
      #Load SharePoint client dlls 
      $a = [System.Reflection.Assembly]::LoadFile(    "$scriptBaseClientLibrariesMicrosoft.SharePoint.Client.dll") 
      $ar = [System.Reflection.Assembly]::LoadFile(    "$scriptBaseClientLibrariesMicrosoft.SharePoint.Client.Runtime.dll") 
      
      if( !$a ){
          $a = [System.Reflection.Assembly]::LoadWithPartialName(        "Microsoft.SharePoint.Client")
      }
      if( !$ar ){
          $ar = [System.Reflection.Assembly]::LoadWithPartialName(        "Microsoft.SharePoint.Client.Runtime")
      }
      
      if( !$a -or !$ar ){
          throw         "Could not load Microsoft.SharePoint.Client.dll or Microsoft.SharePoint.Client.Runtime.dll"
      }
      
      
      #Add overload to the client context.
      #Define new load method without type argument
      $csharp =     "
       using Microsoft.SharePoint.Client;
       namespace SharepointClient
       {
           public class PSClientContext: ClientContext
           {
               public PSClientContext(string siteUrl)
                   : base(siteUrl)
               {
               }
               // need a plain Load method here, the base method is a generic method
               // which isn't supported in PowerShell.
               public void Load(ClientObject objectToLoad)
               {
                   base.Load(objectToLoad);
               }
           }
       }"
      
      $assemblies = @( $a.FullName, $ar.FullName,     "System.Core")
      #Add dynamic type to the PowerShell runspace
      Add-Type -TypeDefinition $csharp -ReferencedAssemblies $assemblies
 }
 
 
 AddCSOM
 
 $credentials = Get-Credential
 
 #Get inthe Input CSV File
 $SubSiteURLCSV = $scriptBase + "" + "SubSiteURLs.csv"


 cls
 
 $originalURL = " https://mySP2010Site.com/"
 
 #Read and Iterate through all the Sites Given in the SubSiteURLs.CSV
 import-csv $SubSiteURLCSV | where{
     Write-Host "Processing the Site : " $_.SubSiteURL -ForeGroundColor Green
                 
     $context = New-Object SharepointClient.PSClientContext($_.SubSiteURL)
     $totalDocLibSize =0
     
     $totalListSize=0
     $totalWebSize=0
      
     $context.Credentials = $credentials
     
     #Load the basic information about the web and site
     $context.Load($context.Web)
     $context.Load($context.Web.Navigation.QuickLaunch)
     $context.Load($context.Web.Navigation.TopNavigationBar)
     $context.Load($context.Site)
     $context.Load($context.Web.Lists)
     $context.ExecuteQuery()


     ############### BEGIN QUICK LAUNCH ################################
     Write-Host "Processing the Quick Launch (Left Navigation)"
     foreach($quickLaunch in $context.Web.Navigation.QuickLaunch)
     {
         $context.Load($quickLaunch)
         $context.Load($quickLaunch.Url)
         $context.Load($quickLaunch.Children)
         $context.ExecuteQuery()
         
         ############### PARENT LINKS #################################
         if($quickLaunch.Url -like  ('*'+$originalURL+'*'))
         {
             Write-Host "Updating the Link : " $quickLaunch.Title
             $temp = $quickLaunch.Url
             $temp = $temp.Replace($originalURL, "")
             
             $quickLaunch.Url = $temp
             $quickLaunch.Update()
             $context.Load($quickLaunch)
             $context.ExecuteQuery()
         }
         
         ########### FIRST LEVEL CHILD LINKS ##########################
         foreach($quickLink in $quickLaunch.Children)
         {
             $context.Load($quickLink)
             $context.Load($quickLink.Url)
             $context.ExecuteQuery()
         
             if($quickLink.Url -like ('*'+$originalURL+'*'))
             {
                 Write-Host "Updating the Child Link : " $quickLink.Title
                 $temp = $quickLink.Url
                 $temp = $temp.Replace($originalURL, "")
                 
                 $quickLink.Url = $temp
                 $quickLink.Update()
                 $context.Load($quickLink)
                 $context.ExecuteQuery()
             }
         }        
     }
     
     ############ END QUICK LAUNCH ####################################
     
     ############### BEGIN TOPNAVIGATIONBAR ################################
     Write-Host "Processing the NavigationBar (Top Navigation)"
     
     foreach($quickLaunch in $context.Web.Navigation.TopNavigationBar)
     {
         $context.Load($quickLaunch)
         $context.Load($quickLaunch.Url)
         $context.Load($quickLaunch.Children)
         $context.ExecuteQuery()
         
         ############### PARENT LINKS #################################
         if($quickLaunch.Url -like  ('*'+$originalURL+'*'))
         {
             Write-Host "Updating the Top Link : " $quickLaunch.Title
             $temp = $quickLaunch.Url
             $temp = $temp.Replace($originalURL, "")
             
             $quickLaunch.Url = $temp
             $quickLaunch.Update()
             $context.Load($quickLaunch)
             $context.ExecuteQuery()
         }
         
         ########### FIRST LEVEL CHILD LINKS ##########################
         foreach($quickLink in $quickLaunch.Children)
         {
             $context.Load($quickLink)
             $context.Load($quickLink.Url)
             $context.ExecuteQuery()
         
             if($quickLink.Url -like ('*'+$originalURL+'*'))
             {
                 Write-Host "Updating the top Child Link : " $quickLink.Title
                 $temp = $quickLink.Url
                 $temp = $temp.Replace($originalURL, "")
                 
                 $quickLink.Url = $temp
                 $quickLink.Update()
                 $context.Load($quickLink)
                 $context.ExecuteQuery()
             }
         }        
     }
     
     ############ END QUICK LAUNCH ####################################
      
 }
 
 Write-Host "Process Completed..  Press Enter to Exit" -ForeGroundColor Green
 
  try{
   stop-transcript|out-null
 }
 catch [System.InvalidOperationException]{}       
 

Happy Coding,

Sathish Nadarajan.
Category : CSOM, PowerShell, SharePoint

Author Info

Sathish Nadarajan
 
Solution Architect
 
Rate this article
 
Sathish is a Microsoft MVP for SharePoint (Office Servers and Services) having 15+ years of experience in Microsoft Technologies. He holds a Masters Degree in Computer Aided Design and Business ...read more
 

How to Create Navigation Links in SharePoint 2013 using PowerShell

Sathish Nadarajan
 
Solution Architect
November 15, 2015
 
Rate this article
 
Views
14551

Again one more snippet of PowerShell, which will be useful in terms of deployment. Creating the Navigation items, though many of us are using the Managed Navigation, even in some of the projects are following the structural Navigation.

In the same manner, I was met with a requirement to create the structural navigation with many Headings and Links and the Audience targeted. It’s a very simple, straight forward requirement. Let us have it here. Am reading the values from the Config XML file, so that it can be used as a reusable component.

 ##================================================================================================
 ## Description	: Create the Structural Navigation
 ## Author		: Sathish Nadarajan
 ## Date			: 19-Oct-2015
 ##================================================================================================
 
 # ============================================ Setup Input Paths ===========================================================
 
  
 $Host.UI.RawUI.WindowTitle = "-- Create Structural Navigation --"
 
 $StartDate = Get-Date
 Write-Host -ForegroundColor White "------------------------------------"
 Write-Host -ForegroundColor White "| Create Structural Navigation |"
 Write-Host -ForegroundColor White "| Started on: $StartDate |"
 Write-Host -ForegroundColor White "------------------------------------"
 
 $LogTime = Get-Date -Format yyyy-MM-dd_hh-mm
 $LogFile = ".CreateStructuralNavigation-$LogTime.rtf"
 
 #start-transcript $logfile
 
 $scriptBase = split-path $SCRIPT:MyInvocation.MyCommand.Path -parent
 Set-Location $scriptBase
 
 $ErrorActionPreference = "Stop"
 
 function AddPowerShellSnapin()
 {
     try
     {
         Write-Host "Adding PowerShell Snap-in" -ForegroundColor Green
         # Try to get the PowerShell Snappin.  If not, then adding the PowerShell snappin on the Catch Block
         Get-PSSnapin "Microsoft.SharePoint.PowerShell" 
     }
     catch
     {
         if($Error[0].Exception.Message.Contains("No Windows PowerShell snap-ins matching the pattern 'Microsoft.SharePoint.PowerShell' were found"))
         {
             Add-PSSnapin "Microsoft.SharePoint.PowerShell"
         }
     }
     Write-Host "Finished Adding PowerShell Snap-in" -ForegroundColor Green
 
 }
 
 
 function AddNavigationLinks
 {
     try 
     {     
         Write-Host "Entering into AddNavigationLinks Method" -ForegroundColor Green 
 
         # Get the SiteURL
         $SiteUrl = $SiteConfig.Config.SiteURL;
 
         # Get the WebURL
         $WebUrl = $SiteConfig.Config.WebURL;
         Write-Host "WebUrl : $WebUrl" -ForegroundColor Green 
 
         # Get the Error Message
         $ErrorMessage = $SiteConfig.Config.ErrorMessage;
 
         # Initialize the Site Object
         $Site = Get-SPSite $SiteUrl
         Write-Host "Site: $Site" -ForegroundColor Green
 
         # Get the Publishing Site based on the SPSite
         $PubSite = New-Object Microsoft.SharePoint.Publishing.PublishingSite($Site)
         Write-Host "Pubsite: $PubSite" -ForegroundColor Green
 
         # Get the SPWeb Object
         $Web = Get-SPWeb $WebUrl
          Write-Host "Web: $Web" -ForegroundColor Green
         
         # Initialize the PublishingWeb based on the SPWeb
         $PubWeb = [Microsoft.SharePoint.Publishing.PublishingWeb]::GetPublishingWeb($Web)
  
         foreach($Heading in $SiteConfig.Config.Headings.Heading)     
         {
             $CreateSPNavigationNode = [Microsoft.SharePoint.Publishing.Navigation.SPNavigationSiteMapNode]::CreateSPNavigationNode
             $headingNode = $CreateSPNavigationNode.Invoke($Heading.Title, $Heading.URL, [Microsoft.SharePoint.Publishing.NodeTypes]::Heading, $Web.Navigation.TopNavigationBar)
             $headingNode.Properties["Audience"] = $Heading.Audience
             $headingNode.Update()
 
             foreach($Link in $Heading.Links.Link)
             {
                 $qlNav1 = $Web.Navigation.TopNavigationBar
 
                 $qlNav1 | select Title, ID
 
                 $qlink = $qlNav1 | where {$_.Title -eq $Heading.Title}
 
                 $linkNode = New-Object Microsoft.SharePoint.Navigation.SPNavigationNode($Link.Title,$Link.URL,$true)
 
                 $qlink.Children.AddAsLast($linkNode)
 
                 $linkNode.Properties["Audience"] = $Link.Audience
 
                 $linkNode.Properties["Description"] = $Link.Description
                 $linkNode.update() 
  
                   
             }
         }
 
         $Web.Update()
     }
 
     catch 
     { 
         Write-Host "Custom Exception Happened : " + $Error[0].Exception.Message -ForegroundColor Red  
     } 
 
 }
 
 try
 {
     $ConfigXmlPath = $scriptBase + "CreateNavigationLinks.xml"
     Write-Host "Read the Config Values" -ForegroundColor Green 
 
     # Get the Content of the Config Xml
     [Xml]$SiteConfig = Get-Content $ConfigXmlPath  
 
     AddPowerShellSnapin
 
     AddNavigationLinks
 
     Write-Host "Script Execution Completed Successfully" -ForegroundColor Green 
 }
 catch
 {
     Write-Host "Custom Exception Happened on Main : " + $Error[0].Exception.Message -ForegroundColor Red  
 }
 

And the Config XML Looks like,

 <?xml version="1.0" encoding="utf-8"?>
 
 <Config>
 
   <WebApplicationURL>http://MyWebApplication/</WebApplicationURL>
 
   <SiteURL>http://MyWebApplication/sites/MyCustomSiteCollection/</SiteURL>
 
   <WebURL>http://MyWebApplication/sites/MyCustomSiteCollection</WebURL>
 
    <ErrorMessage>Some Exception Occured During the Navigation Creation Process</ErrorMessage>
    
   <Headings>
 
     <Heading>
       <Title>TestHeading</Title>
       <URL>Page1.aspx</URL>
 	  <Audience>;;;;PM,TL,IL,C</Audience>
       <Links>
 		<Link>
 			<Title>Link1</Title>
 			<URL>Page2.aspx</URL>
 			<Audience>;;;;PM,TL,IL,C</Audience>
 			<Description>Test Description</Description>
 		</Link>
 	  </Links>
 	  
     </Heading>
 
 	<Heading>
       <Title>TestHeading2</Title>
       <URL>Page3.aspx</URL>
       <Links>
 	  </Links>
     </Heading>
   </Headings>
   
 </Config>
 

Download the Source HERE


Happy Coding,

Sathish Nadarajan.
Author Info

Sathish Nadarajan
 
Solution Architect
 
Rate this article
 
Sathish is a Microsoft MVP for SharePoint (Office Servers and Services) having 15+ years of experience in Microsoft Technologies. He holds a Masters Degree in Computer Aided Design and Business ...read more
 

Cross Site Publishing – Navigation Settings – Publishing Site – Part 7

Sathish Nadarajan
 
Solution Architect
March 8, 2015
 
Rate this article
 
Views
2588

Publishing Site – Navigation Settings.

Now, we have completed the Authoring Site as well. The only pending thing is, connect to the Enabled Catalog from the Publishing Site. Before doing that, as all of us are aware that our entire exercise revolves around the Search and Managed Metadata Service Applications, we need to make sure that the Publishing site is navigated by means of the Metadata navigation. Because from that only we can retrieve the contents related to that particular Term.

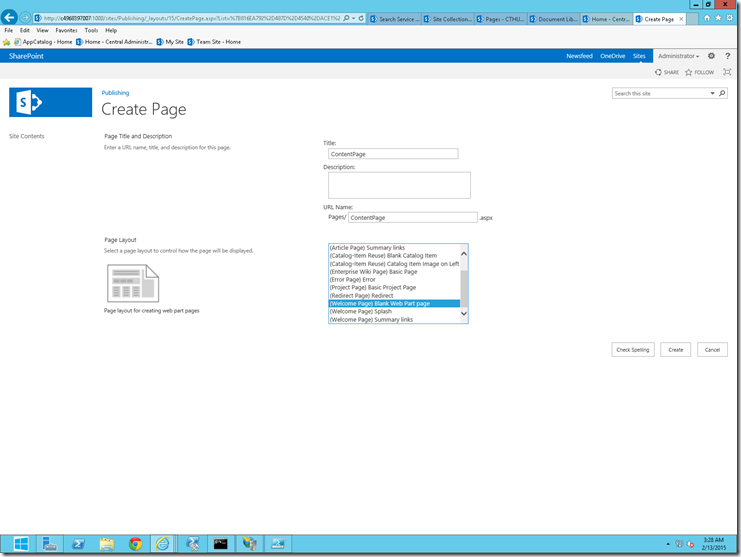
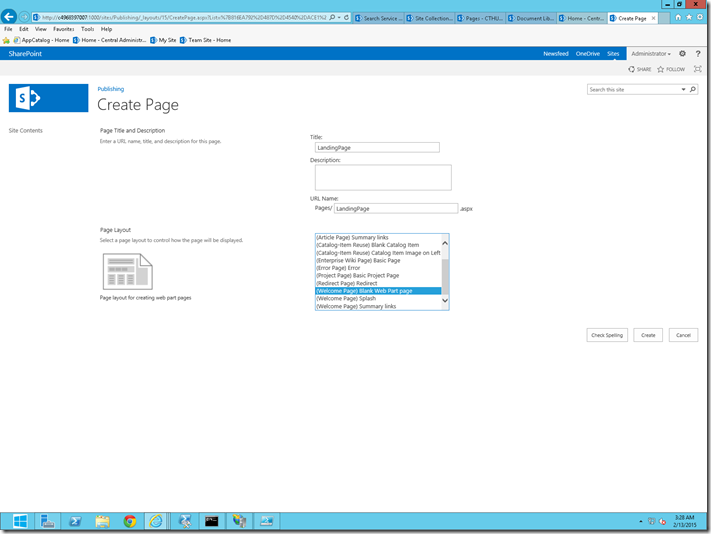
1. To do the Navigation properly, let us create 2 pages called LandingPage.aspx and ContentPage.aspx on the Publishing Site. The purpose of these Pages, we will see later in this section. So as of now, I request to proceed with creating these 2 pages.

image


image 

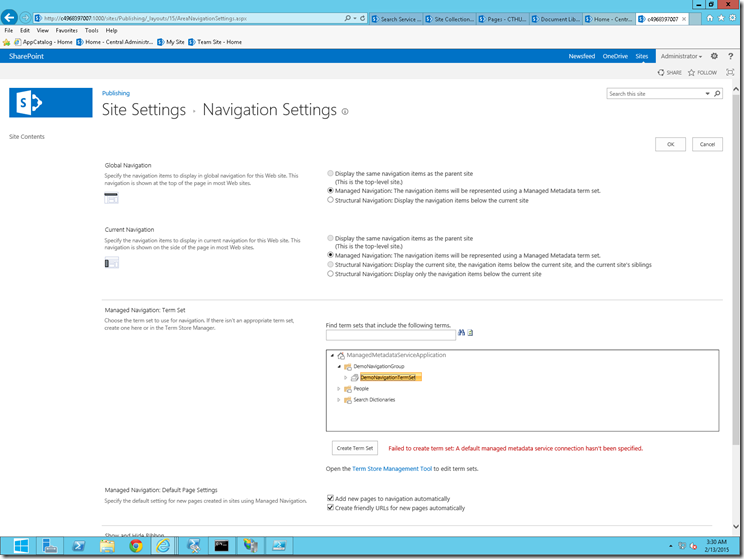
2. Go to Site Settings -> Navigation Settings.

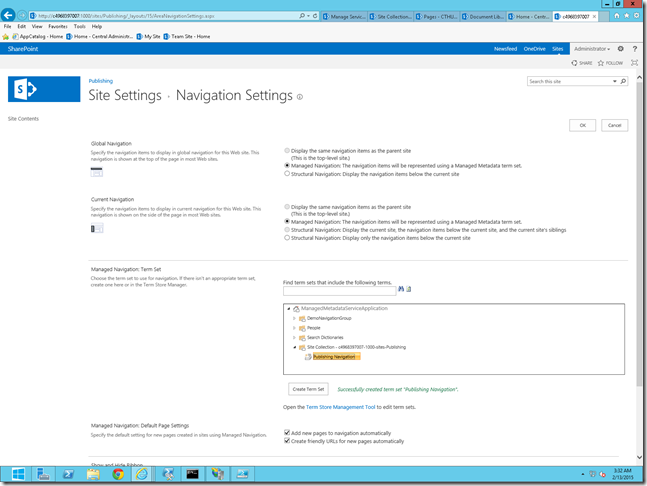
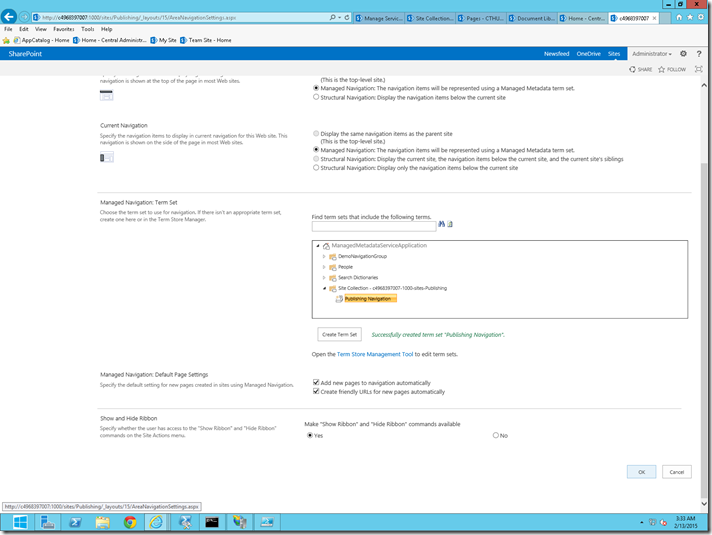
3. Select the Managed Navigation and click the Create Term Set. This will create a local term group which will be the Pivot for the navigation for this site collection alone.

4. As soon as you click on the Create Term Set, we will be getting the below exception. “Failed to create term set: A default managed metadata service connection hasn’t been specified”

image

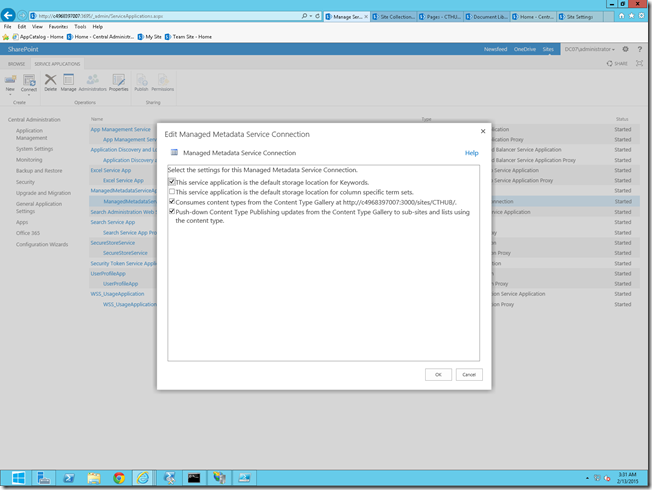
5. The reason for this is, as soon as we created the Managed Metadata Service Application, in the Proxy Properties, the “The Service Application is the default store location for column specific term sets” is not checked by default.

image

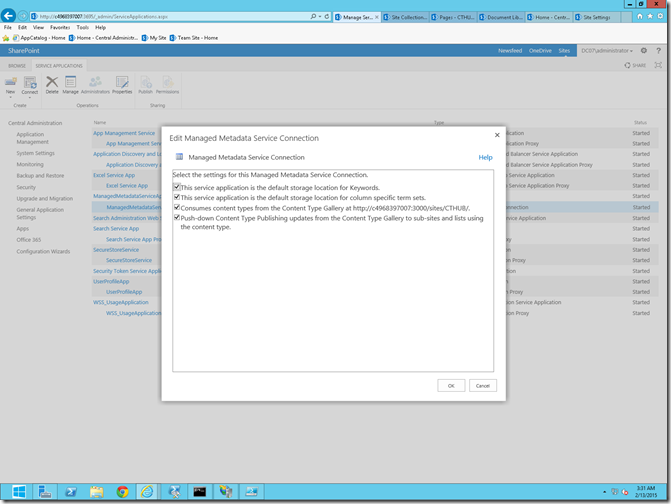
6. Now, we need to check that one and click on OK.

image

7. Now, come back to the Site Settings and try “Create TermSets”

8. Term Sets will be created as shown in the below figure.

image

9. Select the newly created TermSet as the Navigation source and click OK.

image

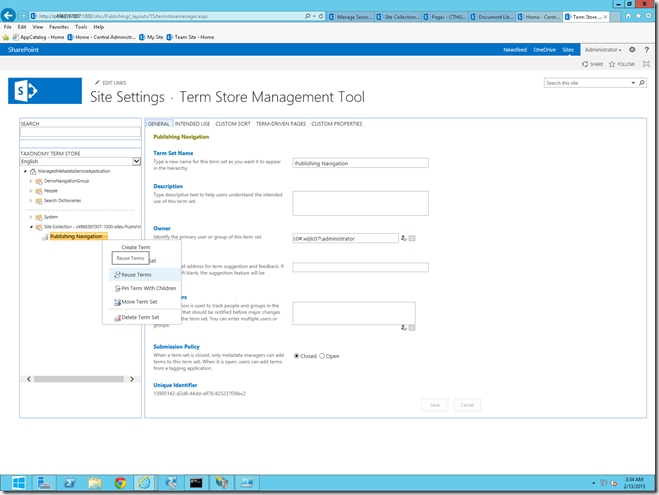
10. Now, let us come back to the Central Administration again and Select “Reuse Terms”

image

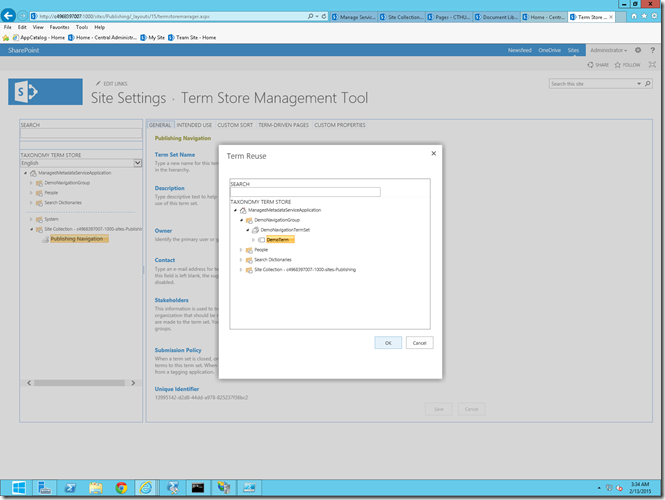
11. Select the Actual Terms which we created in previous sections.

image

12. This activity, why we are doing is, we do want to reuse the common terms. But not the properties. To be more precise, we will be modifying the “Term-Driven Pages” properties. If we modify the overall term, then the other site collections will also be affected. That’s the reason, we are creating a new Site Collection Level Term Set and reusing the existing terms and making use of it.

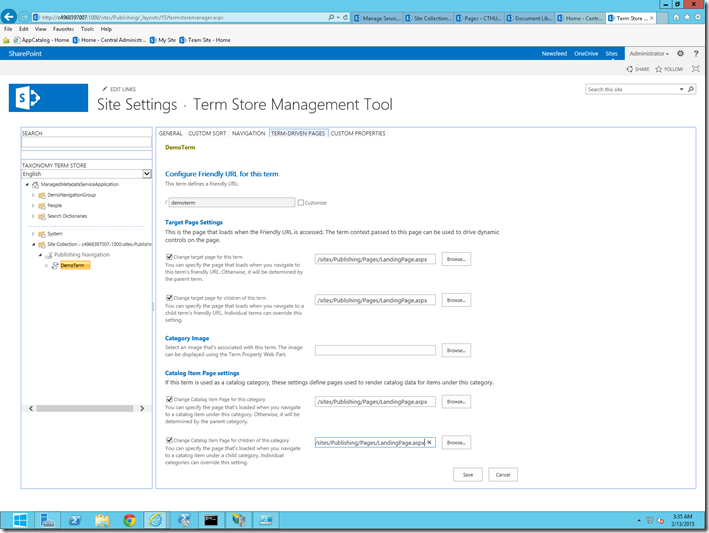
13. Now, we need to modify the Properties, “Term-Driven Pages” as shown in the below image.

image

14. If you are not able to see these tabs, make sure that the Intended Use of this term group is set as Site Navigation.

Let us see about the Connect to a Catalog in Part8

Happy Coding.

Sathish Nadarajan.
Author Info

Sathish Nadarajan
 
Solution Architect
 
Rate this article
 
Sathish is a Microsoft MVP for SharePoint (Office Servers and Services) having 15+ years of experience in Microsoft Technologies. He holds a Masters Degree in Computer Aided Design and Business ...read more
 

How to Map Page Layouts to Terms for Navigation in SharePoint 2013 using PowerShell

Sathish Nadarajan
 
Solution Architect
February 3, 2015
 
Rate this article
 
Views
10849

In this article, let us see how to Map the Page layouts for various Terms using Powershell in SharePoint 2013.

Before diving into the Script, let us see, how to do that using the User Interface.

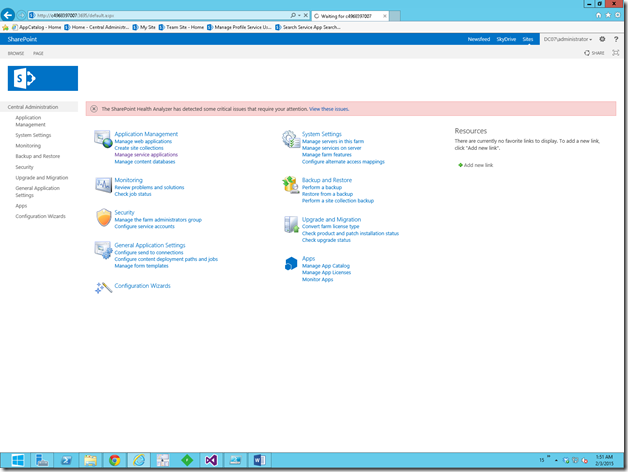
1. Go to Central Admin

image

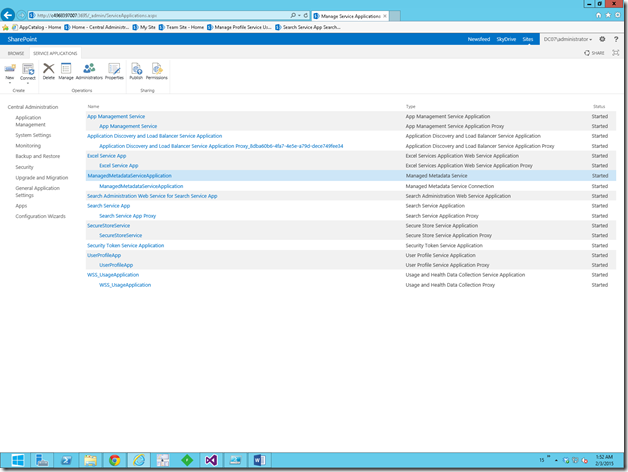
2. Go to Manage Service Applications

image

3. Select Managed Metadata Service Application.

image

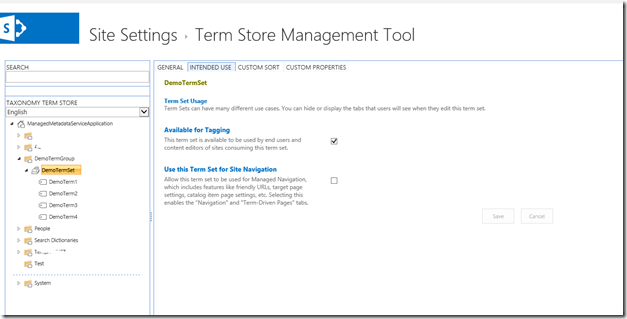
4. Select the TermSet and on the Intended Use Tab, Select the Check Box, “Use this Term Set for Site Navigation”

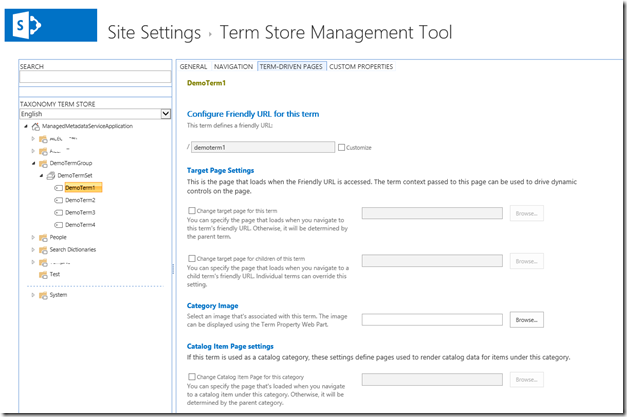
5. Now, select any of the Term and on the “Term Driven Pages” Tab select the check boxes and give the appropriate URLS.

image

Now, the same thing, let us see how to do that using PowerShell.

The script is as follows.

 $LogTime = Get-Date -Format yyyy-MM-dd_hh-mm
 $LogFile = ".UpdateTermSet-$LogTime.rtf"
 
 
 cls
 
 
 ##================================================================================================
 ## Description	: This script is used to Set the TermSet for the Navigation and Set the Catalog, Item Page URLs.
 ## Author		: Sathish Nadarajan
 ## Date			: 15-Dec-2014
 ##================================================================================================


 $Host.UI.RawUI.WindowTitle = "-- Set Term URLs --"
 
 $StartDate = Get-Date
 Write-Host -ForegroundColor White "------------------------------------"
 Write-Host -ForegroundColor White "| Update the Navigation Tag and Catalog, Item Page URLs |"
 Write-Host -ForegroundColor White "| Started on: $StartDate |"
 Write-Host -ForegroundColor White "------------------------------------"


 #start-transcript $logfile
 
 $ErrorActionPreference = "Stop"
 ######################### Add SharePoint PowerShell Snapin ###############################################
 
 if ( (Get-PSSnapin -Name Microsoft.SharePoint.PowerShell -ErrorAction SilentlyContinue) -eq $null ) 
 {
     Add-PSSnapin Microsoft.SharePoint.Powershell
 }
 
 ########################### End of Add SharePoint PowerShell Snapin ##################################
 
 ######################## Set Execution Path ################################################
 
 $scriptBase = split-path $SCRIPT:MyInvocation.MyCommand.Path -parent
 Set-Location $scriptBase
 
 
 function UpdateTerms([string] $caURL,[string] $groupName,[string] $termsetName,[string] $termGUID, [string] $ChangeCatalogTargetURL,[string] $ChangeCatalogTargetUrlForChildTerms,[string] $ChangeTargetURL,[string] $ChangeTargetUrlForChildTerms, [string] $CatalogTargetUrl, [string] $CatalogTargetUrlForChildTerms, [string] $TargetUrl, [string] $TargetUrlForChildTerms)
 {
 
     $caSite = Get-SPSite -Identity $caURL
 
     $taxonomySession = Get-SPTaxonomySession -Site $caSite
  
     $termStore = $taxonomySession.DefaultKeywordsTermStore
  
     $termStoreGroup = $termStore.Groups[$groupName]
  
     $termset = $termStoreGroup.TermSets[$termsetName]
  
     $termset.SetCustomProperty("_Sys_Nav_IsNavigationTermSet", "True")
 
     $term = $termset.GetTerm($termGUID)
  
     Write-Host "Going to Update the Term :- " $term.Name -ForegroundColor Yellow
 
     $term.SetLocalCustomProperty(“_Sys_Nav_CatalogTargetUrl”, $CatalogTargetUrl)
 
     if($ChangeCatalogTargetUrlForChildTerms -eq $true)
     {
         $term.SetLocalCustomProperty(“_Sys_Nav_CatalogTargetUrlForChildTerms”, $CatalogTargetUrlForChildTerms)
     }
  
     #$term.SetLocalCustomProperty(“_Sys_Nav_CategoryImageUrl”, “~sitecollection/Images/Test.png”)
  
     $term.SetLocalCustomProperty(“_Sys_Nav_TargetUrl”, $TargetUrl)
  
     if($ChangeTargetUrlForChildTerms -eq $true)
     {
         $term.SetLocalCustomProperty(“_Sys_Nav_TargetUrlForChildTerms”, $TargetUrlForChildTerms)
     }


     #$term.SetLocalCustomProperty(“_Sys_Nav_ExcludedProviders”, "false")
 
     #$term.LocalCustomProperties
 
     $termStore.CommitAll()
 
     Write-Host "Updated the Term :- " $term.Name -ForegroundColor Green
 }


 $UpdateTermsCSV = $scriptBase + "" + "MapPageLayoutsToTerms.csv"
 
 import-csv $UpdateTermsCSV | where {
     UpdateTerms $_.CentralAdminUrl $_.TermGroupName $_.TermSetName $_.TermGUID $_.ChangeCatalogTargetURL $_.ChangeCatalogTargetUrlForChildTerms $_.ChangeTargetURL $_.ChangeTargetUrlForChildTerms $_.CatalogTargetUrl $_.CatalogTargetUrlForChildTerms $_.TargetUrl $_.TargetUrlForChildTerms


 }
 

Download HERE

Happy Coding.

Sathish Nadarajan.
Author Info

Sathish Nadarajan
 
Solution Architect
 
Rate this article
 
Sathish is a Microsoft MVP for SharePoint (Office Servers and Services) having 15+ years of experience in Microsoft Technologies. He holds a Masters Degree in Computer Aided Design and Business ...read more
 

Navigation – Using Managed Metadata Feature of SharePoint 2013

Mythili Ranganathan
 
SharePoint Architect
December 27, 2013
 
Rate this article
 
Views
24236

In this Post, let us see the Managed Metadata based navigation SharePoint 2013. It powers the navigation structure and automatically generates pages based on the taxonomy hierarchy. The new Term Store makes it easy and fast to create an intuitive site with user-friendly and search engine-friendly URLs. You can create; maintain the navigation for all sites in your farm.

Steps:

To achieve this, you need to work with the Central administration and Site settings.

1. Open the Term Store Management Tool to define the Term sets and Terms by clicking on the Managed Metadata Service Application instance in Central Admin

clip_image002

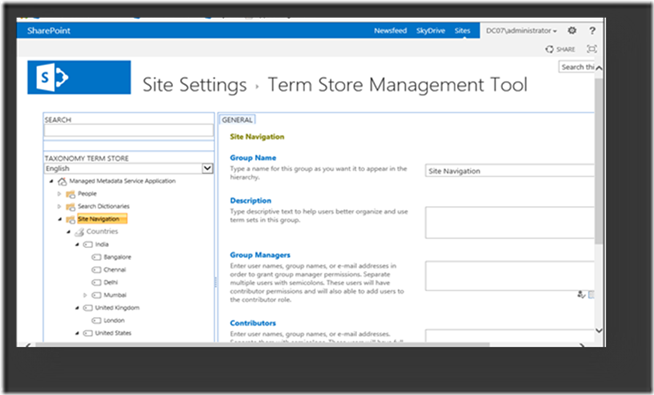
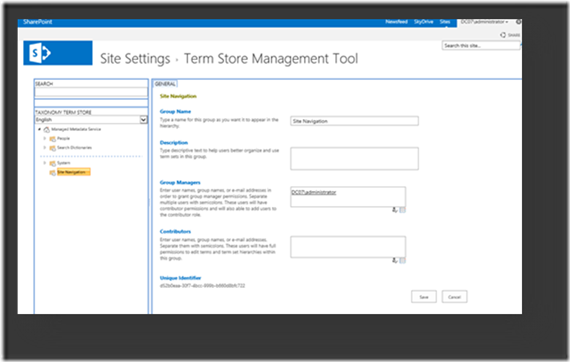
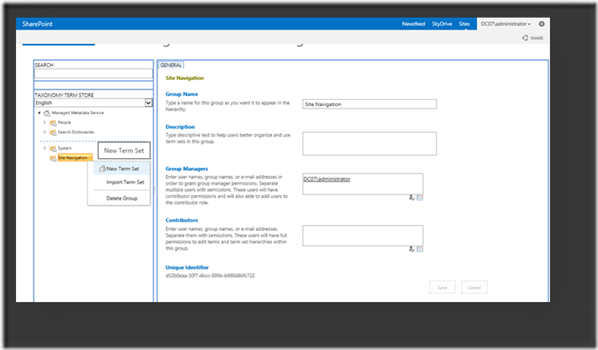
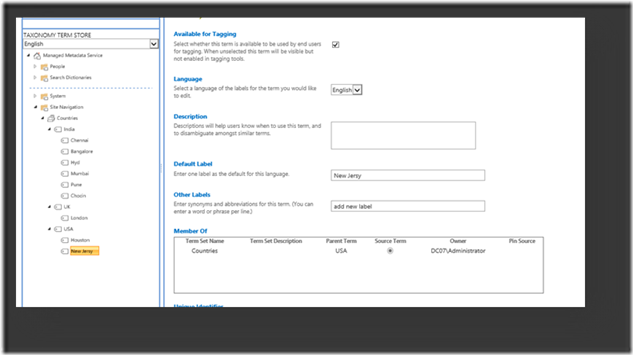
2. Define the Taxonomy for Navigation – Groups, Termsets and Terms for the Managed Metadata Service as mentioned in below Picture

clip_image004

clip_image006

clip_image008

3. Create Publishing Web Application; you will have default “Structured Navigation” applicable for the Global and Current Navigation for the web application

clip_image010

4. Click on the Settings link and Go To “Site Settings” link

5. Click on the “Navigation” link from the “Look and Feel” section

clip_image012

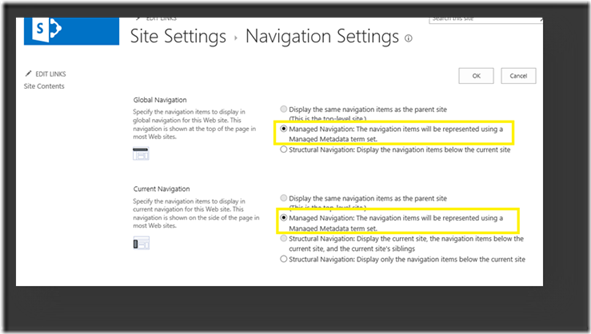
6. Check the Navigation Settings available for the Global Navigation be default:

7. Change the Global Navigation and Current Navigation to “Managed Navigation” instead of “Structured Navigation”

clip_image014

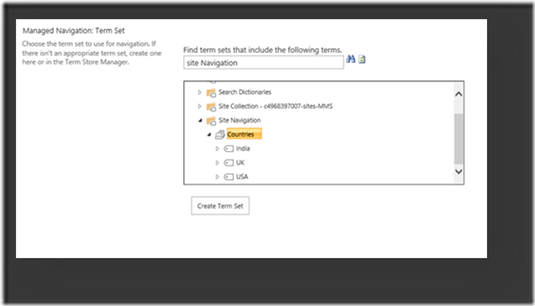
8. Select the “Countries” Term Set for Managed Navigation as shown below and Click on Ok button

clip_image016

clip_image018

9. Navigate to Home Page and observe the changes in Navigations both Global and Current, you should be able to see the Countries as Navigational nodes.

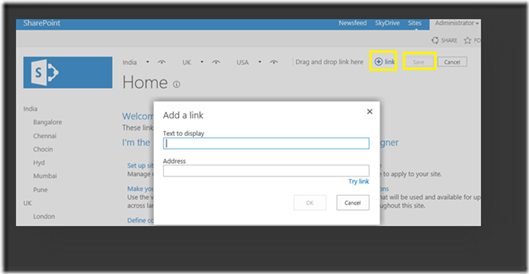
10. Click on the “Edit Links” link in Global Navigation and Click on Add Link button to add a new City in United States “New York”.

clip_image020

clip_image022

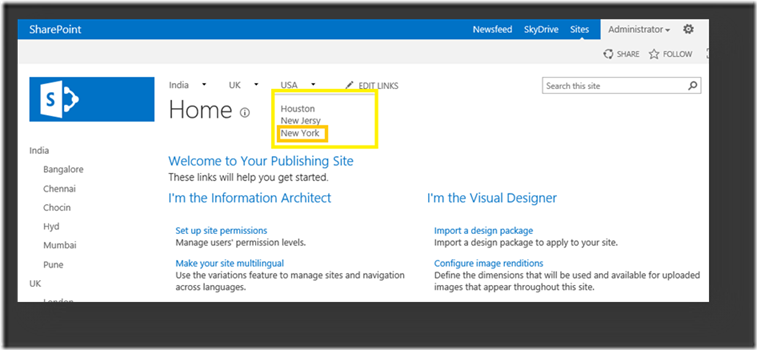
11. Drag and Drop the new link into “USA” menu properly and save it

12. Refresh the Page and you should be able to see newly added link in both the Navigations

clip_image024

13. Go to Term Store Manager Tool from Site Settings and Observe the changes in the Termsets (look for the one that you have added new)

14. Repeat the same steps for Current Navigation and Add new link node for the “UK”

15. Hide the Cities for Mumbai from Global Navigation

16. Edit the Master Page and Allow Current Navigation’s for more than 2 levels so that you can View cities from Mumbai in Current Navigation


With this, we are done with the fundamentals of Navigation using the Managed Metadata Service Application. 


Happy SharePointing,

Mythili Ranganathan

Author Info

Mythili Ranganathan
 
SharePoint Architect
 
Rate this article
 
Mythili is a SharePoint Architect in a CMM Level 5 Company, with strong passion towards Microsoft Technologies (SharePoint, C# & ASP.Net) ...read more
 

Leave a comment