.Net Core Console Application for SharePoint Online Using PNPCore Library Username and Password Login

Sathish Nadarajan
 
Solution Architect
November 23, 2021
 
Rate this article
 
Views
3331

In the earlier article,   we saw how to get the PNP Core Context through interactive login, similarly in this article, let us see to get the context by Providing the Username and Password.  Usually this could be the Service Account credentials.

using Microsoft.Extensions.Configuration;

using Microsoft.Extensions.DependencyInjection;
using Microsoft.Extensions.Hosting;
using Microsoft.Extensions.Logging;
using PnP.Core.Auth;
using PnP.Core.Services;
using System.Linq;
using System.Threading.Tasks;


namespace AZ.Help.Core
{
class Program
{
public static async Task Main(string[] args)
{

var host = Host.CreateDefaultBuilder()

.ConfigureLogging((hostingContext, logging) =>

{
logging.AddConsole();
})
.ConfigureServices((hostingContext, services) =>
{

var customSettings = new CustomSettings();
hostingContext.Configuration.Bind("CustomSettings", customSettings);

//Create an instance of the Authentication Provider that uses Credential Manager
var authenticationProvider = new UsernamePasswordAuthenticationProvider(
customSettings.ClientId,
customSettings.TenantId,
customSettings.UserPrincipalName,
customSettings.Password.ToSecureString());

services.AddPnPCore(options =>
{
options.DefaultAuthenticationProvider = authenticationProvider;
options.Sites.Add("DemoSite",
new PnP.Core.Services.Builder.Configuration.PnPCoreSiteOptions
{
SiteUrl = customSettings.DemoSiteUrl,
AuthenticationProvider = authenticationProvider
});
});
})

// Let the builder know we're running in a console
.UseConsoleLifetime()

// Add services to the container

.Build();

await host.StartAsync();

using (var scope = host.Services.CreateScope())
{
var pnpContextFactory = scope.ServiceProvider.GetRequiredService<IPnPContextFactory>();
using (var context = await pnpContextFactory.CreateAsync("DemoSite"))
{
var page = (await context.Web.GetPagesAsync("DemoPage")).FirstOrDefault();
await page.TranslatePagesAsync();
}
}
host.Dispose();
}
}

}


Happy Coding

Sathish Nadarajan

Author Info

Sathish Nadarajan
 
Solution Architect
 
Rate this article
 
Sathish is a Microsoft MVP for SharePoint (Office Servers and Services) having 15+ years of experience in Microsoft Technologies. He holds a Masters Degree in Computer Aided Design and Business ...read more
 

SharePoint Modern Site – Using Multiple Languages and Translate Page Programmatically using CSOM C# and PNP Core Context

Sathish Nadarajan
 
Solution Architect
November 22, 2021
 
Rate this article
 
Views
1358

I was trying to translate the pages created in one Site Collection to other languages and there is a simplest way of doing this using the PNP Core Context.  This is not available in the PNP Framework Context I hope.  (again, this is my opinion as I couldn’t find a way).

Basically, we need to enable the languages and even this can be done through programmatically while provisioning the sites.  But in my case, I have the site already.  Hence, I was about to do this manually through the site settings itself.

Go to the Site Settings and Language settings.  Select the Additional Languages and Click on Save.


Let me create a new page.

Created a page

Click on the Translation of the page.

On Click of the button, a new page will get created inside the es folder.


When we wanted to do this for a migrated site, which may have few thousands of pages, doing this is impossible and the migration tools will also not be able to do this.  In that case, writing a small utility to create the translation pages is very useful and effective.

As part of the earlier article, create the context.

Then, the below code will do the translation.

using (var scope = host.Services.CreateScope())

            {

                var pnpContextFactory = scope.ServiceProvider.GetRequiredService<IPnPContextFactory>();

                using (var context = await pnpContextFactory.CreateAsync("DemoSite"))

                {

                    var page = (await context.Web.GetPagesAsync("DemoPage")).FirstOrDefault();

                    await page.TranslatePagesAsync();

                }

            }

The above piece will do the same which we did manually earlier.  Hope this is simple and a good use case.


Happy Coding

Sathish Nadarajan

Author Info

Sathish Nadarajan
 
Solution Architect
 
Rate this article
 
Sathish is a Microsoft MVP for SharePoint (Office Servers and Services) having 15+ years of experience in Microsoft Technologies. He holds a Masters Degree in Computer Aided Design and Business ...read more
 

CSOM – Get the Pages modified after a time stamp by C# CSOM – SharePoint Online

Sathish Nadarajan
 
Solution Architect
October 7, 2021
 
Rate this article
 
Views
1305

In one of the requirements, got to retrieve the files which are modified after a specific time stamp. As part of that, created a CAML Query and thought of sharing with the community with the usecase.

One thing, just wanted to highlight is, the below code uses pnpFramework to get the context. As the earlier PNPCoreOnline is deprecated. Please search for pnpframework on the Nuget Manager.

public static void GetPagesByTimeStamp()
        {
            System.IO.File.AppendAllText(logFilePath, "Started.." + Environment.NewLine + Environment.NewLine);

            string siteUrl = ConfigurationManager.AppSettings["siteUrl"];
            string userName = ConfigurationManager.AppSettings["userName"];
            string password = ConfigurationManager.AppSettings["password"];
            string timestamp = ConfigurationManager.AppSettings["timestamp"];

            try
            {
                using (var ctx = new PnPClientContext(siteUrl))
                {
                    ctx.Credentials = new SharePointOnlineCredentials(userName, password.ToSecureString());
                    //Get the web from the current context
                    Web web = ctx.Web;
                    ctx.Load(web);
                    ctx.Load(web.Lists);
                    ctx.ExecuteQueryRetry();

                    //Get the Pages Library
                    var pages = ctx.Web.Lists.GetByTitle("Site Pages");
                    ctx.Load(pages);

                    //
                    
                    string datetime = Convert.ToDateTime(timestamp).ToString("yyyy-MM-ddTHH:mm:ssZ");
                    //Get all Items inside the Pages Library
                    CamlQuery camlQuery = new CamlQuery();
                    camlQuery.ViewXml = @"<View Scope='Recursive'>
                                             <Query>
                                                <Where>
                                                    <Gt>
                                                        <FieldRef Name='Modified'/>
                                                        <Value IncludeTimeValue='TRUE' Type='DateTime'>" + datetime + "</Value>" + 
                                                    @"</Gt>
                                                </Where>
                                                <OrderBy>
                                                    <FieldRef Name='Modified' Ascending = 'true' />
                                                </OrderBy>
                                            </Query>
                                         </View>";
                    ListItemCollection listItems = pages.GetItems(camlQuery);
                    ctx.Load(listItems);
                    ctx.ExecuteQuery();

                    List<Page> lstPages = new List<Page>();

                    foreach (var listItem in listItems)
                    {
                        System.Console.WriteLine(listItem["Title"]);
                        Page p = new Page();
                        p.Id = Convert.ToInt32(listItem["ID"]);
                        p.Name = Convert.ToString(listItem["Title"]);

                        lstPages.Add(p);


                    }


                    TextWriter txtWriter = new StreamWriter(ConfigurationManager.AppSettings["LogFilePath"] + "Pages.csv");

                    using (CsvWriter writer = new CsvWriter(txtWriter, new CsvHelper.Configuration.CsvConfiguration(System.Globalization.CultureInfo.InvariantCulture)))
                    {
                        writer.WriteRecords(lstPages);

                        writer.Flush();

                    }


                }
            }
            catch (Exception ex)
            {
                System.Console.WriteLine("Exception occurred : " + ex.Message);
                System.Console.ReadLine();
            }
        }

The above code is self explanatory and doesn’t require much explanation I guess.


Happy Coding
Sathish Nadarajan

Author Info

Sathish Nadarajan
 
Solution Architect
 
Rate this article
 
Sathish is a Microsoft MVP for SharePoint (Office Servers and Services) having 15+ years of experience in Microsoft Technologies. He holds a Masters Degree in Computer Aided Design and Business ...read more
 

SPFx – Check Whether File Exists Using PnP in SharePoint WebParts

Sathish Nadarajan
 
Solution Architect
August 4, 2021
 
Rate this article
 
Views
2139

Usually while uploading any image or file, there might be scenario, whether the file with the same name is already present or not. Unfortunately, there is no direct method like isExists() present.

Though we have an option to override the existing version etc., I don’t want to do any action if the file is already present. For that, the below snippet was useful. Thought of sharing with the community.

public createImage = async (filename: string, serverRelativeUrl: string): Promise<any> => {
    try {

      const fileExists = await sp.web
        .getFileByServerRelativeUrl(`${serverRelativeUrl}/ Images/${filename}.svg`)
        .select('Exists').get()
        .then((d) => d.Exists)
        .catch(() => false);

//Basically, the above line will tell you whether the file is present on the 
//Images folder or not

      if (!fileExists) {
        await sp.web.getFolderByServerRelativeUrl(`${serverRelativeUrl}/ Images/`)
.files.add(`${filename}.svg`, <<blobValuefortheimage>>, true);
      }

 
    }
    catch (error) {
       //Log
    }
  }

Happy Coding
Sathish Nadarajan

Author Info

Sathish Nadarajan
 
Solution Architect
 
Rate this article
 
Sathish is a Microsoft MVP for SharePoint (Office Servers and Services) having 15+ years of experience in Microsoft Technologies. He holds a Masters Degree in Computer Aided Design and Business ...read more
 

Setup Pipeline for SPFx library – PnP Search Extensibility Library

Ahamed Fazil Buhari
 
Senior Developer
April 27, 2021
 
Rate this article
 
Views
1490

If we want to deploy an SPFx webpart or extension which uses SPFx library components, then we need to handle this differently while we need to bundle and package our webpart or extension.

According to MS doc for SPFx Library component, if we want to use the library in other solution (webpart or extension) then we need to do npm link to the root directory of the library solution and run npm link <library-name> in the solution (webpart or extension) that will create symbolic link to the webpart. If we want to handle this build process in a pipeline with a symbolic link then you can refer below YML,

For this blog, let’s take PnP Modern Search v4 as an example. In v4 there is a possibility to make an extensibility library that is used for custom render.

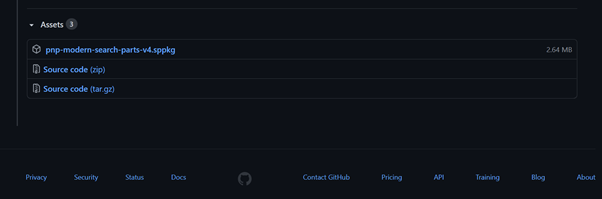
You can download latest PnP Moder Search sppkg from here, select latest release and at the bottom you can find files that contains .sppkg

pnp sppkg

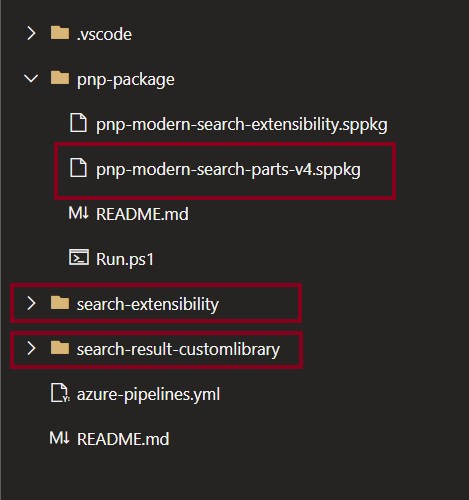
Below you can find the folder structure that’s used to deploy PnP Search Extensibility library in our site,

pnpcustomlibraryfolder

azure-pipeline.yml for the above solution,

trigger:
  branches:
    include:
      - master
      - develop
      - release/*
      - feature/*
steps:
  - checkout: self
  - task: NodeTool@0
    displayName: 'Use Node 10.x'
    inputs:
      versionSpec: 10.x
      checkLatest: true
  #region Install and bundle lib
  - task: Npm@1
    displayName: "npm install search-extensibility"
    inputs:
      command: "install"
      workingDir: "search-extensibility/"

  - task: Gulp@0
    displayName: "Bundle search-extensibility"
    inputs:
      gulpFile: search-extensibility/gulpfile.js
      targets: bundle
      arguments: "--ship"
      workingDirectory: "search-extensibility"

  - script: npm link
    displayName: "npm link"
    workingDirectory: "search-extensibility/"

  - task: Npm@1
    displayName: "npm install search-result-customlibrary"
    inputs:
      command: "install"
      workingDir: "search-result-customlibrary/"
    continueOnError: false

  - script: npm link @pnp/modern-search-extensibility
    displayName: "npm link @pnp/modern-search-extensibility"
    workingDirectory: "search-result-customlibrary/"

  - task: Gulp@0
    displayName: "Bundle project"
    inputs:
      gulpFile: search-result-customlibrary/gulpfile.js
      targets: bundle
      arguments: "--ship"
      workingDirectory: "search-result-customlibrary"

  - task: Gulp@0
    displayName: "Package Solution"
    inputs:
      gulpFile: search-result-customlibrary/gulpfile.js
      targets: "package-solution"
      arguments: "--ship"
      workingDirectory: "search-result-customlibrary"

  - task: CopyFiles@2
    displayName: "Copy Files to drop"
    inputs:
      Contents: |
        search-result-customlibrary/sharepoint/**/*.sppkg
      TargetFolder: "$(Build.ArtifactStagingDirectory)"

  - task: CopyFiles@2
    displayName: 'Copy PnP sppkg to drop'
    inputs:
      Contents: |
        pnp-package/*.sppkg
      TargetFolder: '$(Build.ArtifactStagingDirectory)/sharepoint'

  #endregion

  - task: PublishBuildArtifacts@1
    displayName: 'Publish Artifact: drop'

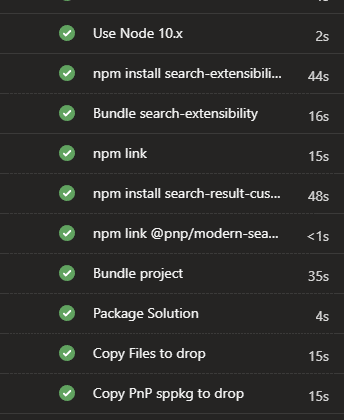
These are the tasks that will be executed if we run above yml,


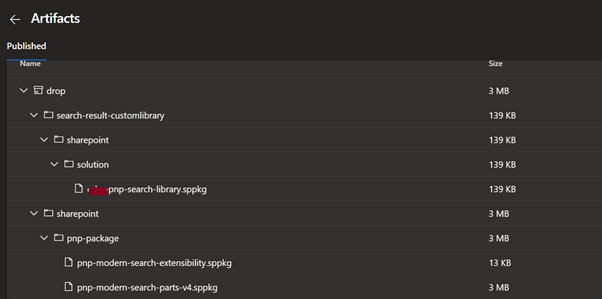
And the output of the published files looks from build pipeline will be like this,


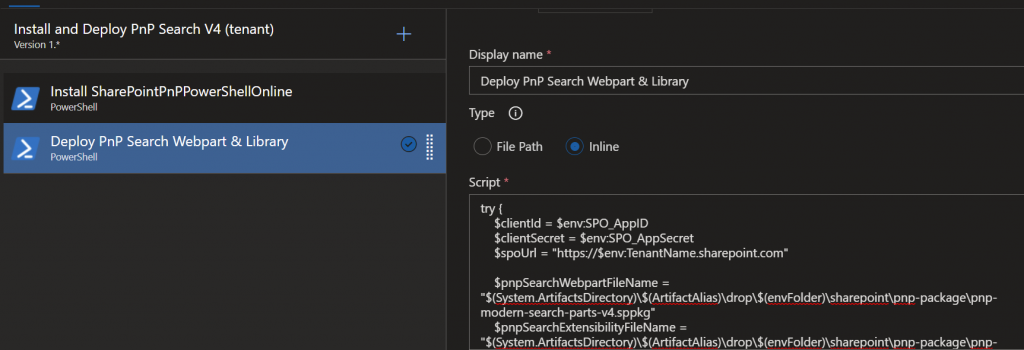
Now we successfully generated sppkg’s for our custom library through build pipeline, the next step is to deploy this in release pipeline. The below powershell can be helpful to deploy the solution (please ignore the $env variable and change those according to your need),

try {
    $clientId = $env:SPO_AppID
    $clientSecret = $env:SPO_AppSecret
    $spoUrl = "https://tenantName.sharepoint.com"

    $pnpSearchWebpartFileName = "$(System.ArtifactsDirectory)$(ArtifactAlias)dropsharepointpnp-packagepnp-modern-search-parts-v4.sppkg"
    $pnpSearchExtensibilityFileName = "$(System.ArtifactsDirectory)$(ArtifactAlias)dropsharepointpnp-packagepnp-modern-search-extensibility.sppkg"
    $customSearchLibraryFileName = Get-ChildItem -Path '$(System.ArtifactsDirectory)$(ArtifactAlias)dropsearch-result-customlibrarysharepointsolution' -Recurse | Where-Object { $_.PSIsContainer -eq $false -and $_.Extension -eq '.sppkg' }    

    Write-Host "PnP Connection to $spoUrl" -ForegroundColor Yellow
    Connect-PnPOnline -Url $spoUrl -ClientId $clientId -ClientSecret $clientSecret
    Write-Host "Successfully connected" -ForegroundColor Green

    #region Installing PnP Search WebPart
    Write-Host "Installing PnP Search WebPart" -ForegroundColor Green
    $appMetadata = Add-PnPApp $pnpSearchWebpartFileName -Overwrite -Publish
    $appId = $appMetadata.Id
    Write-Host "Package ID: $appId" 
    Write-Host "Added PnP Search WebPart - DONE" -ForegroundColor Green
    #endregion

    #region Installing PnP Search Extensibility
    Write-Host "Installing PnP Search Extensibility" -ForegroundColor Green
    $appMetadata = Add-PnPApp $pnpSearchExtensibilityFileName -Scope Tenant -Overwrite -Publish -SkipFeatureDeployment
    $appId = $appMetadata.Id
    Write-Host "Package ID: $appId" 
    Write-Host "Added PnP Search Extensibility - DONE" -ForegroundColor Green

    $existingApp = Get-PnPApp -Identity $appId -Scope Tenant
    if ($null -ne $existingApp) {
        write-host "Start: Update-PnPApp -Identity $appId"
        Update-PnPApp -Identity $appId -Scope Tenant
    }
    else {
        write-host "No installed app found"
        write-host "Start Install-PnPApp -Identity $appId"
        Install-PnPApp -Identity $appId -Scope Tenant
    }

    write-host "Publish-PnPApp -Identity $appId"
    Publish-PnPApp -Identity $appId -Scope Tenant
    Write-Host "Installing PnP Search Extensibility - DONE" -ForegroundColor Green
    #endregion

    #region Installing PnP Search Custom Library
    Write-Host "Installing PnP Search Custom Library" -ForegroundColor Green
    $appMetadata = Add-PnPApp $customSearchLibraryFileName.FullName -Scope Tenant -Overwrite -Publish -SkipFeatureDeployment
    $appId = $appMetadata.Id
    Write-Host "Package ID: $appId" 

    $existingApp = Get-PnPApp -Identity $appId -Scope Tenant
    if ($null -ne $existingApp) {
        write-host "Start: Update-PnPApp -Identity $appId -Scope Tenant"
        Update-PnPApp -Identity $appId -Scope Tenant
    }
    else {
        write-host "No installed app found"
        write-host "Start Install-PnPApp -Identity $appId -Scope Tenant"
        Install-PnPApp -Identity $appId -Scope Tenant
    }
    write-host "Publish-PnPApp -Identity $appId"
    Publish-PnPApp -Identity $appId -Scope Tenant
    Write-Host "Installing PnP Search Custom Library - DONE" -ForegroundColor Green
    #endregion
}
catch {
    Write-Host -f Red "Error while installing PnP search webpart & libraries! - " $_.Exception.Message
}

Below is the screenshot from release pipeline,

Happy Coding

Fazil

Author Info

Ahamed Fazil Buhari
 
Senior Developer
 
Rate this article
 
Ahamed is a Senior Developer and he has very good experience in the field of Microsoft Technologies, especially SharePoint, Azure, M365, SPFx, .NET and client side scripting - JavaScript, TypeScript, ...read more
 

CSOM – PowerShell Script – Import Nintex Workflows in SharePoint

Sathish Nadarajan
 
Solution Architect
February 10, 2021
 
Rate this article
 
Views
1004

In this article, let us see how to Import Nintex Workflows in SharePoint using CSOM PowerShell Script.
The code is self-explanatory.

01.ImprotNintexForms

function Import-NintexWorkflow {
<# .SYNOPSIS Imports a Nintex workflow .nwf file to a list. .DESCRIPTION Imports a Nintex workflow .nwf file to a list. #>
[CmdletBinding()]
param(
[string]$WebUrl = $(throw "Required parameter -WebUrl missing"),
[string]$listName = $(throw "Required parameter -ListName missing"),
[string[]]$workflowNames = $(throw "Required parameter -workflowNames missing"),
[string]$WorkflowFolderPath = $(throw "Required parameter -WorkflowFolderPath missing"),
[bool]$OverwriteExistingVersion = $false
)
begin {
if(!(Get-PnPConnection)) {
throw "There is no PnPConnection"
}
Write-Host "---- Importing Nintex workflow to '$($listName)' ----" -ForegroundColor Yellow
}
process {
$List = Get-PnPList -Identity $listName
$ListID = $List.Id.ToString()
$ListName = $List.Title
$webServiceUrl = "$WebUrl/_vti_bin/NintexWorkflow/Workflow.asmx"
$webServiceProxy = New-WebServiceProxy -Uri $webServiceUrl -UseDefaultCredential
$webServiceProxy.URL = $webServiceUrl

for ($i=0;$i -lt $workflowNames.Length; $i++) {
$WorkflowName = $workflowNames[$i] + "_6"
$WorkflowFilePath = $WorkflowFolderPath + "" + $workflowNames[$i] + ".nwf"

$nwfContent = Get-Content "$WorkflowFilePath"
$utf8 = New-Object System.Text.UTF8Encoding
[byte[]] $byteData = $utf8.GetBytes($nwfContent.ToString())
$hasWorkflowPublished = $webServiceProxy.WorkflowExists($WorkflowName,$ListID,"List")
Write-Host "Workflow exists status: '$hasWorkflowPublished'" -ForegroundColor Cyan
if($hasWorkflowPublished -eq "NameUsedInOtherList" -or $hasWorkflowPublished -eq "NameUsedInThisList") {
#May be delete it
Write-Host "Workflow already exists '$hasWorkflowPublished', if status is 'NameUsedInOtherList' no changes can be made. Please delete it." -ForegroundColor Cyan
}
if($hasWorkflowPublished -eq "NameNotUsed" -or ($hasWorkflowPublished -eq "NameUsedInThisList" -and $OverwriteExistingVersion -eq $true)){
$IsPublished = $webServiceProxy.PublishFromNWF($byteData, $ListName, $WorkflowName, $true)
if($IsPublished) {
Write-Host "Nintex Workflow '$WorkflowName' successfully published to list '$ListName'" -ForegroundColor Green
} else {
Write-Host "Nintex Workflow '$WorkflowName' could not be published to list '$ListName'" -ForegroundColor Yellow
}
}
}
}
end { }
}

Run.ps1

#=========================================== Description Start ========================================= #
# Deploy from a List

# Author : Sathish Nadarajan
# Date : 03-Feb-2021
#=========================================== Description End====================================== #

# ============================================ PreRequisites Start ================================= #

#Get-Module -Name *pnp*
#Pre Req - SharePoint PnP PowerShell Version 2.25.1804.1

#=============================================PreRequisites End =============================== #

#============================================= Initial Setup Start =============================== #

cls

$Host.UI.RawUI.WindowTitle = "-- Deploy Assets --"

$StartDate = Get-Date
Write-Host -ForegroundColor White "------------------------------------"
Write-Host -ForegroundColor White "| Deploy Assets |"
Write-Host -ForegroundColor White "| Started on: $StartDate |"
Write-Host -ForegroundColor White "------------------------------------"

#Add-PSSnapin Microsoft.SharePoint.PowerShell

$LogTime = Get-Date -Format yyyy-MM-dd_hh-mm-ss

$scriptBase = split-path $SCRIPT:MyInvocation.MyCommand.Path -parent
Set-Location $scriptBase

# Create Log File Folder3
if(!(TEST-PATH ".Logs-$LogTime")){
NEW-ITEM ".Logs-$LogTime" -type Directory
}

# Assign the Log and Progress Files
$TranscriptFile = ".Logs-$LogTimeDeploy.Transcript.rtf"
try{
stop-transcript|out-null
}
catch [System.InvalidOperationException]{}
start-transcript $TranscriptFile

#============================================= Initial Setup End =============================== #

# ============================================ Setup Input Paths Start ================================= #

#connect to the SharePoint list
$sourceWebUrl = 'http://andytest-sp:555/sites/newsite/'
$sourceListname = "AssetRegisterV2"

$outputFolderPath = ".Logs-$LogTime"

$targetWebUrl = 'http://andytest-sp:555/sites/newsite/'
$targetListname = "AssetRegister_Test"
$workflowNames = @('Send Notification When Child is Promoted as Parent','Send Notification When Asset is deleted')

# ============================================ Setup Input Paths End ================================= #

Import-Module ".4.ImportNintexWorkflows.ps1"

Write-Host "Begin to Execute.." -ForeGroundColor Yellow
"Begin to Execute..." | Out-File -FilePath $TranscriptFile -Append

Connect-PnPOnline -Url $sourceWebUrl -CurrentCredentials -ErrorAction Inquire

Import-NintexWorkflow $targetWebUrl $targetListname $workflowNames $outputFolderPath $true
Disconnect-PnPOnline

Write-Host "Update Completed.. Press Enter to Exit" -ForeGroundColor Green

try{
stop-transcript|out-null
}
catch [System.InvalidOperationException]{}


Happy Coding
Sathish Nadarajan

Author Info

Sathish Nadarajan
 
Solution Architect
 
Rate this article
 
Sathish is a Microsoft MVP for SharePoint (Office Servers and Services) having 15+ years of experience in Microsoft Technologies. He holds a Masters Degree in Computer Aided Design and Business ...read more
 

How to update SharePoint list item system value using PnP JS

Ahamed Fazil Buhari
 
Senior Developer
April 21, 2020
 
Rate this article
 
Views
4133

Updating SharePoint Created, Modified, Created By, Modified By field of list item is not straight forward and it can’t be done through simple list item update. To achieve this, we can make use of validateUpdateListItem from PnP js and make sure the user or the service account which runs the script has Full control of the list.

In the below function, we are updating Modified By, Modified (to yesterday date) and Created By value of the SharePoint list item, and it gets single param which is of type Item (@pnp/sp/items)

const updateSPItemSystemVal = async (item: Item) => {
    const userEmailToFormString = (userName: string): string => {
      return JSON.stringify([{ Key: userName }]);
    };

    const sysUpdateData = [
      { FieldName: 'Editor', FieldValue: userEmailToFormString("<emailaddress>") },
      { FieldName: 'Author', FieldValue: userEmailToFormString("<emailaddress>") }
    ];

    const result = await item.validateUpdateListItem(sysUpdateData);
    const errors = result.filter(field => field.ErrorMessage !== null);

    if (errors.length > 0) {
      throw new Error(JSON.stringify(errors));
    }
    return result;
  };

For more info please refer, pnp js doc

Happy Coding

Fazil

Category : JavaScript, PNP, SharePoint

Author Info

Ahamed Fazil Buhari
 
Senior Developer
 
Rate this article
 
Ahamed is a Senior Developer and he has very good experience in the field of Microsoft Technologies, especially SharePoint, Azure, M365, SPFx, .NET and client side scripting - JavaScript, TypeScript, ...read more
 

Add SharePoint List Items using Batching & SP Editor Chrome Extension

Ahamed Fazil Buhari
 
Senior Developer
April 19, 2020
 
Rate this article
 
Views
1828

When we want to fix something quickly then using SP Editor chrome extension gives an oppotunity to run JS script from your browser in Developer Tool.

speditor


paste the following script to add items to SharePoint list using batching and hit CTRL+D to run the script

import { sp } from "@pnp/sp/presets/all";
(async () => {
  console.clear();
  let list = sp.web.lists.getByTitle("Large");
  const entityTypeFullName = await list.getListItemEntityTypeFullName();
  let batch = sp.web.createBatch();

  const totalItems = 6000;
  for (var i = 1; i < totalItems; i++) {
    console.log(`Adding Batching for Item ${i}`);
    list.items.inBatch(batch).add({ Title: `Item ${i}` }, entityTypeFullName);

    if(i % 100 === 0) {
        console.log(`Executing Batch for 100 Items`);
        await batch.execute();
        batch = sp.web.createBatch();
    }
  }
})().catch(console.log)

logg

In the console window you can see the item being added using batching.

Happy Coding
Fazil

Author Info

Ahamed Fazil Buhari
 
Senior Developer
 
Rate this article
 
Ahamed is a Senior Developer and he has very good experience in the field of Microsoft Technologies, especially SharePoint, Azure, M365, SPFx, .NET and client side scripting - JavaScript, TypeScript, ...read more
 

How to get number of version in SharePoint list/library item using PNP powershell

Ahamed Fazil Buhari
 
Senior Developer
April 16, 2020
 
Rate this article
 
Views
3501

Getting insights on total number of version available for each SharePoint list/library item gives you an idea how often an item is getting updated and also helps to know how much space it took (because each version make new stroage space, example item with 4 MB attachment have 5 version then total size that item occupies is 5*4=20MB).

Here we provided site name and list/library names in a CSV file. list names are separated by #

sitelibcsv

The output will generate a CSV file with File path to SharePoint item and Version count.

function Get-VersionCount() {
    try {
        $fileLabel = Get-Date -format "yyyyMMdd-HHmm-ss"
        $fileLabel += "_VersionCount"
        $sitesLibs = Import-Csv -Path $PSScriptRootsiteLib.csv
        Add-Content -Path $PSScriptRoot$fileLabel.csv  -Value '"FilePath","VersionCount"'
        Write-Host $sitesLibs

        $sitesLibs | 
        ForEach-Object {
            $siteURL = $_.siteurl
            Write-Host "PNP Connection to " $siteURL -ForegroundColor Green

            Connect-PnPOnline -Url $siteURL -AppId $env:SPO_AppID -AppSecret $env:SPO_AppSecret
            Write-Host "`n"
            Write-Host "Executing for " $siteURL -ForegroundColor green "`n `n"

            # Loop through Libraries
            $libraryArray = $_.libraries.Split("#")

            $libraryArray | ForEach-Object {
                $verCountObj = @()
                $libraryName = $_                

                Write-Host "Checking Library - " $libraryName "`n" -ForegroundColor Green
                $query = "<View Scope='RecursiveAll'><RowLimit>5000</RowLimit></View>" 
                $listItems = Get-PnPListItem -List $libraryName -Query $query</pre>
                $ctx = Get-PnPContext
                foreach ($item in $listItems) {
                    $versionColl = $item.Versions
                    $ctx.Load($item)
                    $ctx.Load($versionColl)
                    $ctx.ExecuteQuery()

                    $versionsCount = $versionColl.Count
                    $filePath = $item["FileRef"]
                    Write-Host "File Name - $($filePath) "
                    Write-Host "File Path - " $filePath "Version Count - " $versionsCount -ForegroundColor Green
                    $verCountObj += "$filePath,$versionsCount"
                }

                $verCountObj += ""
                $verCountObj | ForEach-Object { Add-Content -Path $PSScriptRoot$fileLabel.csv -Value $_ }
            }
            Disconnect-PnPOnline
        }
    }
    catch {
        Disconnect-PnPOnline
        Write-Host "Exception Type: $($_.Exception.GetType().FullName)"
        Write-Host "Exception Message: $($_.Exception.Message)"
    }
}

Get-VersionCount

Happy Coding
Fazil

Category : PNP, PowerShell, SharePoint

Author Info

Ahamed Fazil Buhari
 
Senior Developer
 
Rate this article
 
Ahamed is a Senior Developer and he has very good experience in the field of Microsoft Technologies, especially SharePoint, Azure, M365, SPFx, .NET and client side scripting - JavaScript, TypeScript, ...read more
 

Get Current User Properties Using PNP Js

Vinodh
 
SharePoint MVP
August 29, 2019
 
Rate this article
 
Views
6419

In this article. I have explained how to get current user properties of the SharePoint user using pnp js.

Introduction To PNP Js

PNP means Patterns and Practices is a JavaScript library to accomplish SharePoint operations in more productive way for both SharePoint online and on-premise versions

In previous REST API Calls we fetch the current user properties using the below endpoint through AJAX


Endpoint:
http:///_api/web/currentuser

Method: GET

Now let see how to done the same using PNP JS in the simplest way.

Import the PNP library from node

import pnp from "@pnp/pnpjs";

pnp.sp.web.currentUser.get().then(f => {
console.log("user", f);
})

It will return the successful response like below in JSON format

you can also use same JavaScript library of PNP Js in your normal JavaScript projects like Content editor webparts like below snippet

$pnp.sp.web.currentUser.get().then(function(response){
console.log("user", response);
});

Download it form CDN.

In my upcoming blogs let discuss more operations using PNP JS

Happy SharePointing !…

Category : Office 365, OnPremise, PNP

Author Info

Vinodh
 
SharePoint MVP
 
Rate this article
 
Vinodh is a Microsoft MVP for SharePoint (Office Apps and Services) having 5+ years of experience in Microsoft Technologies. His interest and expertise includes SharePoint Online Development, PowerApps Development, Flows ...read more
 

Leave a comment