How To Check Existence Of A Subsite And Provision Subsite In SharePoint Online Using CSOM – C# Programmatically

Ahamed Fazil Buhari
 
Senior Developer
March 25, 2019
 
Rate this article
 
Views
3073

Hi,

In the below article we will see how to provision Sub Sites in SharePoint Online. As a first step, we need to check whether the subsite is already exists or not. If it doesn’t exits then we will provision the site using CSOM (Console Application).

I have the Site URL and Client ID values in app.config file. Please refer this article if you are not familiar with Token based authentication


The below code with comments explains everything.

 using Microsoft.SharePoint.Client;
 using System;
 
 namespace SpPals.TemplateProvision
 {
     public static class SPpals
     {
         public static void ProvisionFunction()
         {
             string topRootSite = "https://fazildev.sharepoint.com/sites/sppals/";
             var siteUri = new Uri(topRootSite);
             var realm = TokenHelper.GetRealmFromTargetUrl(siteUri);
             // Client ID and Secrent Key will be taken from App.config file
             var accessToken = TokenHelper.GetAppOnlyAccessToken(TokenHelper.SharePointPrincipal,
             siteUri.Authority, realm).AccessToken;
             using (var ctx = TokenHelper.GetClientContextWithAccessToken(siteUri.ToString(), accessToken))
             {
                 string subSite = "test2";
                 ProvisionSubSite(subSite, ctx);
             }
         }
 
         static void ProvisionSubSite(string subSite, ClientContext ctx)
         {
             try
             {
                 // If the site is subsite of a subsite, then use OpenWeb as show below in comment
                 // ctx.Site.OpenWeb("top-subsite-url-name").WebExists(subSite);
                 // Check If Subsite existing
                 if (ctx.Site.RootWeb.WebExists(subSite))
                 {
                     Console.WriteLine("Already Exists");
                 }
                 else
                 {
                     WebCreationInformation webCreationInformation = new WebCreationInformation()
                     {
                         // I create TeamSite as subsite - you can find different type of sites here
                         //  https://www.jasjitchopra.com/sharepoint-2013-site-templates-codes-for-powershell/
                         WebTemplate = "STS#0",
                         Title = subSite,
                         Url = subSite,
                         Language = 1033,
                         UseSamePermissionsAsParentSite = true
                     };
                     Web newWeb = ctx.Web.Webs.Add(webCreationInformation);
                     ctx.Load(newWeb);
                     ctx.ExecuteQuery();
                 }
             }
             catch (Exception ex)
             {
                 Console.WriteLine("Something went wrong. " + ex.Message);
             }
         }
     }
 }
 

Please make sure the following reference from Nuget package are already added in your project and include TokenHelper.cs file into your project for authentication.


Happy Coding

Ahamed

Category : Office 365, SharePoint

Author Info

Ahamed Fazil Buhari
 
Senior Developer
 
Rate this article
 
Ahamed is a Senior Developer and he has very good experience in the field of Microsoft Technologies, especially SharePoint, Azure, M365, SPFx, .NET and client side scripting - JavaScript, TypeScript, ...read more
 

Azure Search Service – Create an Azure Search Indexer programmatically – C# Programmatically

Sathish Nadarajan
 
Solution Architect
February 26, 2019
 
Rate this article
 
Views
1243

In the earlier article, we saw how to create a Search Index Programmatically. Now, as a continuation, let us see how to create an Indexer.

Creating an Indexer involves all the three prerequisites.

1. Skillset

2. DataSource – Refer Here

3. Index – Refer Here

Among the above three, we have seen how to create a data source and index in the earlier articles. But the skillset is not straight forward. The easiest approach which I would take up is, do the reverse engineering. By referring the earlier article, how to import data and create an indexer through the console and export the Indexer JSON and then by using that JSON, we can create our Indexer.

Because, the SkillSet is going to be an one time activity. We can create the SkillSet Manually.

The code to export the Indexer is using the REST API call.

 namespace CallRestAPI.Console
 {
     using RestSharp;
 
     class Program
     {
         static void Main(string[] args)
         {
 
             string str = System.DateTime.Today.AddDays(-1).ToString("ddMMM").ToLower();
             
             // Create a RestClient
             var client = new RestClient("https://SEARCHSERVICENAME.search.windows.net/indexers/INDEXERNAME?api-version=2017-11-11-Preview");
             // Define the HTTP Method
             var request = new RestRequest(Method.GET);
 
             //Add the headers
             request.AddHeader("api-key", "APPLICATIONKEY");
             request.AddHeader("Content-Type", "application/json");
             //Add the Body Parameter
             request.AddParameter("undefined", "BODY", ParameterType.RequestBody);
             
             //Execute the Call
             IRestResponse response = client.Execute(request);


         }
     }
 }
 

By updating the SearchServiceName, IndexerName and the Application Key, the response we will get as a JSON object.

The structure of the JSON object is referring to the Indexer which we created manually.

 {
   "@odata.context": "https://SEARCHSERVICE.search.windows.net/$metadata#indexers/$entity",
   "@odata.etag": ""0x8D63405849585AF"",
   "name": "INDEXERNAME",
   "description": "",
   "dataSourceName": "DATASOURCE",
   "skillsetName": "SKILLSETNAME",
   "targetIndexName": "INDEXNAME",
   "schedule": {
     "interval": "PT1H",
     "startTime": "0001-01-01T00:00:00Z"
   },
   "parameters": {
     "batchSize": null,
     "maxFailedItems": 500,
     "maxFailedItemsPerBatch": 500,
     "base64EncodeKeys": false,
     "configuration": {
       "dataToExtract": "contentAndMetadata",
       "imageAction": "generateNormalizedImages"
     }
   },
   "fieldMappings": [
     {
       "sourceFieldName": "metadata_storage_path",
       "targetFieldName": "metadata_storage_path",
       "mappingFunction": {
         "name": "base64Encode",
         "parameters": null
       }
     }
   ],
   "outputFieldMappings": [
     {
       "sourceFieldName": "/document/merged_content",
       "targetFieldName": "merged_content",
       "mappingFunction": null
     },
     {
       "sourceFieldName": "/document/normalized_images/*/imageTags/*/name",
       "targetFieldName": "imageTags",
       "mappingFunction": null
     },
     {
       "sourceFieldName": "/document/normalized_images/*/imageCaption",
       "targetFieldName": "imageCaption",
       "mappingFunction": null
     }
   ],
   "disabled": null
 }


The above JSON file is a sample file. By using this JSON file, and updating the parameters like, IndexerName, DataSourceName, we can create a new indexer. The piece of code to create that is as follows.

 string indexerName = “myindexer";
                     string indexerJsonPath = Path.Combine(Path.GetDirectoryName(Assembly.GetExecutingAssembly().Location), “indexer.json");
 
                     JObject o1 = JObject.Parse(System.IO.File.ReadAllText(indexerJsonPath));
 
                     o1.Root["name"] =  "indexer";
                     o1.Root["dataSourceName"] =  "datasource";
                     o1.Root["targetIndexName"] =  "index";
 
                     var client = new RestClient(string.Format("https://{0}.search.windows.net/indexers?api-version=2017-11-11-Preview", this.ClientConnection.ClientConnectionDefinition.SearchServiceName));
                     var request = new RestRequest(Method.POST);
                     request.AddHeader("api-key", “Applicationkey”);
                     request.AddHeader("Content-Type", "application/json");
                     request.AddParameter("undefined", o1, ParameterType.RequestBody);
                     IRestResponse response = client.Execute(request);


The above code is straight forward. We are reading the text from the JSON File, update the properties with appropriate name, then create the Indexer by calling the web API using RestSharp. To Use the RestSharp for the easy access to the web api, please refer here.

Happy Coding,

Sathish Nadarajan.

Category : Azure, Search

Author Info

Sathish Nadarajan
 
Solution Architect
 
Rate this article
 
Sathish is a Microsoft MVP for SharePoint (Office Servers and Services) having 15+ years of experience in Microsoft Technologies. He holds a Masters Degree in Computer Aided Design and Business ...read more
 

How to Get (Retrieve) the Files from Azure Blob Storage Programmatically using C#

Sathish Nadarajan
 
Solution Architect
November 16, 2018
 
Rate this article
 
Views
10646

In the earlier articles, we saw how to upload files to the Blob Storage. In this article, let us see how to retrieve the files from the blob storage programmatically using C#.

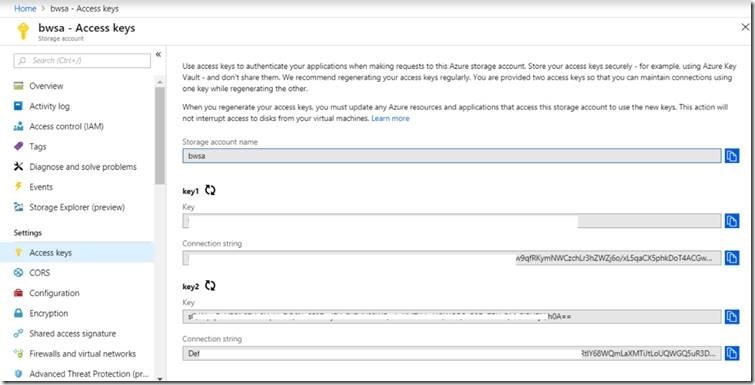
The method is straight forward and we need the Connection string which can be obtained from the portal as below.

clip_image002

Out of the Key1 and Key2, get any one of the connection string.

The below method will get the blobs from the container

 public static void GetFilesFromBlob()
 
 {
 
 string storageConnectionString = "*********";
 
 // Retrieve storage account from connection string.
 
 CloudStorageAccount storageAccount = CloudStorageAccount.Parse(storageConnectionString);
 
 // Create the blob client.
 
 CloudBlobClient blobClient = storageAccount.CreateCloudBlobClient();
 
 // Retrieve reference to a previously created container.
 
 CloudBlobContainer container = blobClient.GetContainerReference("ContainerName");
 
 CloudBlobDirectory dira = container.GetDirectoryReference("FolderName");
 
 //Gets List of Blobs
 
 var list = dira.ListBlobs();
 
 List<string> blobNames = list.OfType<CloudBlockBlob>().Select(b => b.Name).ToList();
 
 }
 

We can process this blobs based on our requirements.

Happy Coding,

Sathish Nadarajan.

Category : Azure, Storage

Author Info

Sathish Nadarajan
 
Solution Architect
 
Rate this article
 
Sathish is a Microsoft MVP for SharePoint (Office Servers and Services) having 15+ years of experience in Microsoft Technologies. He holds a Masters Degree in Computer Aided Design and Business ...read more
 

How to Create Discussions List Reply to a topic and Reply to a Reply Programmatically using C# Patterns and Practice (PNP)

Sathish Nadarajan
 
Solution Architect
November 13, 2018
 
Rate this article
 
Views
2870

Usually in the discussion list, we will start a topic and a lot of replies will be given by the users and sometimes, there could be a chance that a reply to reply also. In this article, let us see how to create

1. Reply to a Topic

2. Reply to a Reply.

The current scenario will be useful, while creating any sort of tools which will create a bunch of discussion items from the legacy application to the sharepoint.

Reply to a Topic

 public static void CreateReplyToATopic()
         {
             try
             {
                 OfficeDevPnP.Core.AuthenticationManager authMgr = new OfficeDevPnP.Core.AuthenticationManager();
 
                 using (var ctx = authMgr.GetSharePointOnlineAuthenticatedContextTenant(siteUrl, userName, password))
                 {
                     Web web = ctx.Web;
                     ctx.Load(web);
                     ctx.Load(web.Lists);
                     ctx.ExecuteQueryRetry();
                     List list = web.Lists.GetByTitle("Discussions List");
                     ctx.Load(list);
                     ctx.ExecuteQueryRetry();
                     ListItem topicItem = list.GetItemById(1);
                     ctx.Load(topicItem);
                     ctx.ExecuteQuery();
 
                     var replyItem = Microsoft.SharePoint.Client.Utilities.Utility.CreateNewDiscussionReply(ctx, topicItem);
                     replyItem.Update();
                     replyItem["Title"] = "Test Reply";
                     replyItem["Body"] = "Test body Content";
                     replyItem.Update();
                     ctx.ExecuteQuery();
                 }
             }
             catch (Exception ex)
             {
                 System.Console.WriteLine("Exception occurred : " + ex.Message);
                 System.Console.ReadLine();
             }
         }


Reply to a Reply

To Create a reply to a reply, the same above code will be fine. But, the only thing is, change the topicItem to replyItem of the appropriate reply.

 var replyItem = Microsoft.SharePoint.Client.Utilities.Utility.CreateNewDiscussionReply(ctx, topicItem);


Happy Coding,

Sathish Nadarajan.

Category : Office 365, SharePoint

Author Info

Sathish Nadarajan
 
Solution Architect
 
Rate this article
 
Sathish is a Microsoft MVP for SharePoint (Office Servers and Services) having 15+ years of experience in Microsoft Technologies. He holds a Masters Degree in Computer Aided Design and Business ...read more
 

How to Create Discussions List Topics Programmatically using C# Patterns and Practice (PNP)

Sathish Nadarajan
 
Solution Architect
November 9, 2018
 
Rate this article
 
Views
2117

In this article, let us see how to create the topics in a discussion list programmatically using C# Patterns and Practice.

By Using PNP, it is very simple and straight forward to create the discussion topic. The below code is self-explanatory.

 public static void CreateDiscussion()
         {
             try
             {
                 OfficeDevPnP.Core.AuthenticationManager authMgr = new OfficeDevPnP.Core.AuthenticationManager();
 
                 using (var ctx = authMgr.GetSharePointOnlineAuthenticatedContextTenant(siteUrl, userName, password))
                 {
                     Web web = ctx.Web;
                     ctx.Load(web);
                     ctx.Load(web.Lists);
                     ctx.ExecuteQueryRetry();
                     List list = web.Lists.GetByTitle("Discussions List");
                     ctx.Load(list);
                     ctx.ExecuteQueryRetry();
 
                     var topicItem = Microsoft.SharePoint.Client.Utilities.Utility.CreateNewDiscussion(ctx, list, "Test Discussion created by Code");
                     topicItem.Update();
 
                     ctx.ExecuteQuery();
                 }
             }
             catch (Exception ex)
             {
                 System.Console.WriteLine("Exception occurred : " + ex.Message);
                 System.Console.ReadLine();
             }
         }
 

The above code will create the topic as below.

clip_image002

We can later update the topic properties as such it is a simple list item.

Happy Coding,

Sathish Nadarajan.

Author Info

Sathish Nadarajan
 
Solution Architect
 
Rate this article
 
Sathish is a Microsoft MVP for SharePoint (Office Servers and Services) having 15+ years of experience in Microsoft Technologies. He holds a Masters Degree in Computer Aided Design and Business ...read more
 

How to Set the List View Experience Programmatically into Modern Classic (ListExperienceOptions) in SharePoint Office 365 Programmatically

Sathish Nadarajan
 
Solution Architect
August 26, 2018
 
Rate this article
 
Views
3030

With the introduction of the Modern UI Experience, some of the applications are still required to be opening the Lists default views into Classic Experience. But again, it totally depends up on the client’s requirements. The below code can be used as part of the Provisioning engine to make the views default one.

 var lists = clientContext.Web.Lists;
                 clientContext.Load(lists, col => col.Include(l => l.ListExperienceOptions));
                 clientContext.ExecuteQuery();
                 foreach (var list in lists)
                 {
                     if (list.ListExperienceOptions != ListExperience.ClassicExperience)
                    {
 
                        list.ListExperienceOptions = ListExperience.ClassicExperience;
                         // list.ListExperienceOptions = ListExperience.NewExperience; 
                        // list.ListExperienceOptions = ListExperience.Auto; 
                        list.Update();
                    }
                 }
                 clientContext.ExecuteQuery();
 

The simple property ListExperienceOptions provide the option to change the default options of a list.

Happy Coding,

Sathish Nadarajan.

Author Info

Sathish Nadarajan
 
Solution Architect
 
Rate this article
 
Sathish is a Microsoft MVP for SharePoint (Office Servers and Services) having 15+ years of experience in Microsoft Technologies. He holds a Masters Degree in Computer Aided Design and Business ...read more
 

How to Create a Modern Pages Programmatically in SharePoint Office 365 using Patterns and Practice (OfficeDevPNP)

Sathish Nadarajan
 
Solution Architect
May 2, 2018
 
Rate this article
 
Views
6985

In the earlier article, we saw how to create the modern site programmatically. As a follow up, we need to create the pages and add the desired webparts based on the requirement.

The below piece of code, will create the pages and add the default webparts on it.

 static void Main(string[] args)
         {
             string siteUrl = "https://*****.sharepoint.com/Sites/DemoCommunicationSite";
             string userName = "sathish@****.onmicrosoft.com";
             string password = "***";


             OfficeDevPnP.Core.AuthenticationManager authMgr = new OfficeDevPnP.Core.AuthenticationManager();
 
             #region O365
             using (var ctx = authMgr.GetSharePointOnlineAuthenticatedContextTenant(siteUrl, userName, password))
             {
                 Web web = ctx.Web;
                 ctx.Load(web.Lists);
                 ctx.Load(web, w => w.SupportedUILanguageIds);
                 ctx.Load(web);
 
                 ctx.ExecuteQueryRetry();
 //Create the Page
 var page2 = ctx.Web.AddClientSidePage("PageWithSections.aspx", true);
                 page2.AddSection(CanvasSectionTemplate.ThreeColumn, 5);
                 //page2.AddSection(CanvasSectionTemplate.TwoColumn, 10);
                 page2.Save();
 
 // Initialize the WEbpart
                 ClientSideWebPart videoEmbedWp = page2.InstantiateDefaultWebPart(DefaultClientSideWebParts.VideoEmbed);
 
 //The below are the sample video webpart properties which I have given.  We can add any OOB webpart like this.
                 videoEmbedWp.Properties["videoSource"] = "https://sppalsmvp.sharepoint.com/portals/hub/_layouts/15/PointPublishing.aspx?app=video&p=p&chid=d54ed63d-6577-4aa8-ab90-b07215dfa55b&vid=b60cb3f6-7873-4caa-a83b-ec035c472e74";
                 videoEmbedWp.Properties["captionText"] = "My video";
                 videoEmbedWp.Properties["showInfo"] = false;
                 videoEmbedWp.Properties["embedCode"] = "<iframe width=853 height=480 src='https://sppalsmvp.sharepoint.com/portals/hub/_layouts/15/PointPublishing.aspx?app=video&p=p&chid=d54ed63d-6577-4aa8-ab90-b07215dfa55b&vid=b60cb3f6-7873-4caa-a83b-ec035c472e74&width=853&height=480&autoPlay=false&showInfo=true' allowfullscreen></iframe>";
                 videoEmbedWp.Title = "Associated video";
 
 //Get the section
                 CanvasSection section = page2.Sections[1];
 //Add the webpart to the section
                 page2.AddControl(videoEmbedWp, section.Columns[1], 0);
                 page2.Save();
 }
 }
 

Happy Coding,

Sathish Nadarajan.

Category : Programmatically

Author Info

Sathish Nadarajan
 
Solution Architect
 
Rate this article
 
Sathish is a Microsoft MVP for SharePoint (Office Servers and Services) having 15+ years of experience in Microsoft Technologies. He holds a Masters Degree in Computer Aided Design and Business ...read more
 

How to Create a Modern Site Programmatically in SharePoint Office 365 using Patterns and Practice (OfficeDevPNP)

Sathish Nadarajan
 
Solution Architect
 
Rate this article
 
Views
5072

The article explains about how to create a modern site in SharePoint Office 365 Programmatically. This will be helpful, during the provisioning of the sites. There are a lot of difference between the modern and the classic sites. Already some time back, we have seen how to create the Classic Sites programmatically HERE. But, the modern sites cannot be created in that way. It requires a minor change and we can have a look on it in this article.

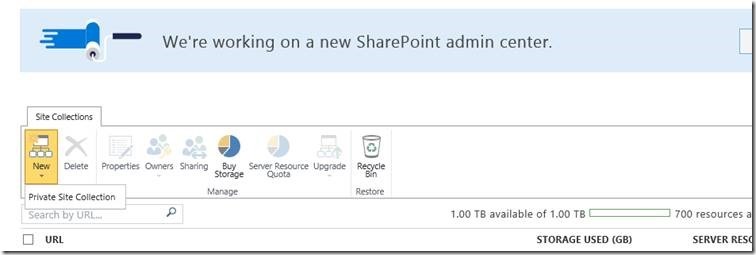
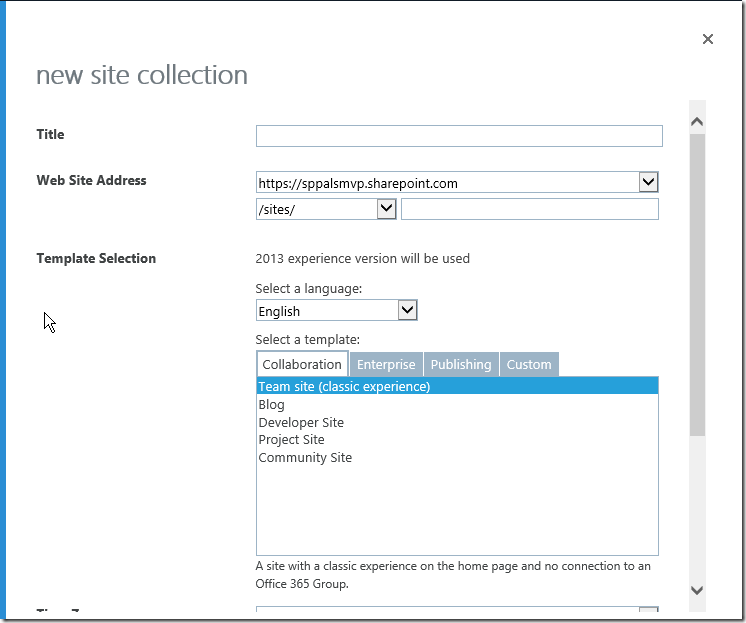
Usually, when we create a site by SharePoint Admin Portal, we cannot see the templates of the Modern sites.

clip_image002

clip_image003

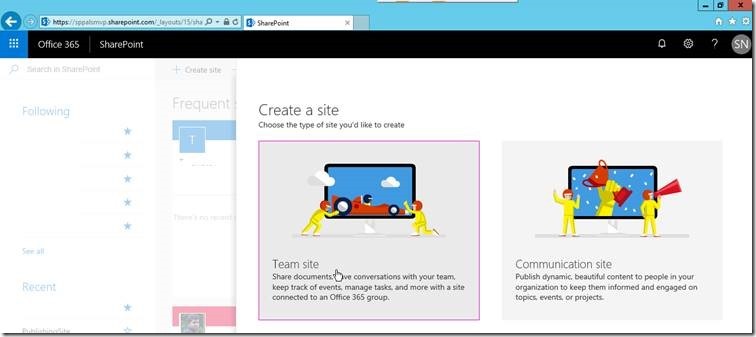
We cannot see the Modern site templates (Modern Team Site and Communication Site here). To do that, we need to go the below screen. https://<<TenantName>>.sharepoint.com/_layouts/15/sharepoint.aspx

clip_image005

This is a manual process and these sites will also be NOT listed on the site collections list.

https://<<Tenant>>-admin.sharepoint.com/_layouts/15/online/SiteCollections.aspx

clip_image007

We can see in the upcoming articles to get the list of Modern sites available in the tenant and how to delete them. As of now, let us see how to create the modern sites using C# CSOM PNP.

 public static async Task CreateCommunicationSite(string Password, string siteTitle)
         {
             string UserName = "sathish@*****.onmicrosoft.com";
             using (var clientContext = new ClientContext("https://********.sharepoint.com/"))
             {
                 SecureString passWord = new SecureString();
                 foreach (char c in Password.ToCharArray()) passWord.AppendChar(c);
                 clientContext.Credentials = new SharePointOnlineCredentials(UserName, passWord);
 
                 var commResults = await clientContext.CreateSiteAsync(new OfficeDevPnP.Core.Sites.CommunicationSiteCollectionCreationInformation()
                 {
                     Url = "https://*****.sharepoint.com/sites/" + siteTitle,
                     SiteDesign = OfficeDevPnP.Core.Sites.CommunicationSiteDesign.Topic,
                     Title = siteTitle,
                     Lcid = 1033
                 });
             }
         }


The above method will be called from the main method as below.

 SiteCollections.CreateCommunicationSite(password, "SiteTitle").Wait();

In the same manner, the Modern Team site can also be created.

This will be useful during the Provisioning exercise.

Happy Coding,

Sathish Nadarajan.

Author Info

Sathish Nadarajan
 
Solution Architect
 
Rate this article
 
Sathish is a Microsoft MVP for SharePoint (Office Servers and Services) having 15+ years of experience in Microsoft Technologies. He holds a Masters Degree in Computer Aided Design and Business ...read more
 

How to Break the Role Inheritance (Stop Inheriting Permissions) and assign with Unique Permissions for SharePoint list and Folders Programmatically C# CSOM

Sathish Nadarajan
 
Solution Architect
December 6, 2017
 
Rate this article
 
Views
8684

In this article, let us see, how to Break the Role Inheritance and Assign Permissions to the SharePoint Lists Programmatically using C# CSOM.

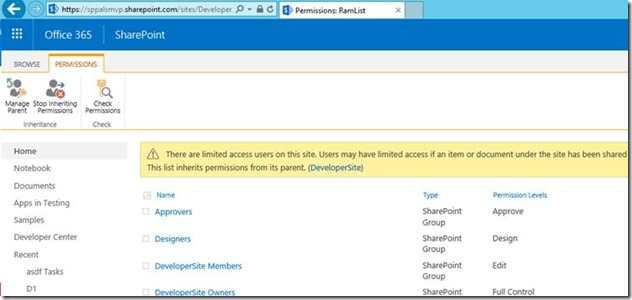
By Default, when I create a List, the permission will be inherited from the Parent Web.

clip_image002

We need to “Stop Inheriting Permissions” and give permissions only the required group or users.

Let us see, how to do that, programmatically.

 public static void BreakPermissions()
         {
             OfficeDevPnP.Core.AuthenticationManager authMgr = new OfficeDevPnP.Core.AuthenticationManager();
 
             string siteUrl = "https://******.sharepoint.com/sites/DeveloperSite/";
             string userName = "Sathish@********.onmicrosoft.com";
             string password = "**********";
 
             using (var ctx = authMgr.GetSharePointOnlineAuthenticatedContextTenant(siteUrl, userName, password))
             {
                 Web web = ctx.Web;
                 ctx.Load(web.Lists);
                 ctx.Load(web);
 
                 ctx.ExecuteQueryRetry();
 
                 List list = web.Lists.GetByTitle("MyList");
                 ctx.Load(list);
                 ctx.ExecuteQuery();
 
                 list.BreakRoleInheritance(false, true);
 
                 list.AddPermissionLevelToUser("User1@****.Onmicrosoft.com", "Read", false);
 
                 list.Update();
 
                 ctx.ExecuteQuery();
 
                 System.Console.WriteLine(Convert.ToString(list.HasUniqueRoleAssignments));
             }
         }
 

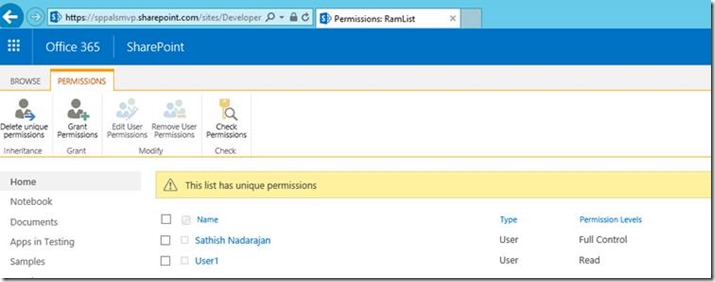
After the Code Execution, the permission screen looks like below.

clip_image004

The Same applies to the Folder as well.

 Folder projectFolder =
                             web.GetFolderByServerRelativeUrl(                                "/sites/MySite/MyList/MyFolder”);
 
 clientContext.Load(projectFolder);
                             clientContext.ExecuteQuery();
 
                             projectFolder.ListItemAllFields.BreakRoleInheritance(false, true);
 
 projectFolder. ListItemAllFields.AddPermissionLevelToUser("User1@****.Onmicrosoft.com", "Read", false);
 

In the same manner, we can add Permission Level the Groups as well.

 projectFolder.ListItemAllFields.AddPermissionLevelToGroup("MyGroup", "Read", false);

Note: There is no method available to break the permission and assign for Item Level in PNP. (At least by the time of writing this article). Probably, if it is released in the upcoming versions, we can update this section.

Happy Coding,

Sathish Nadarajan.

Author Info

Sathish Nadarajan
 
Solution Architect
 
Rate this article
 
Sathish is a Microsoft MVP for SharePoint (Office Servers and Services) having 15+ years of experience in Microsoft Technologies. He holds a Masters Degree in Computer Aided Design and Business ...read more
 

SharePoint Office 365 – How to Get the Lists with Unique Permissions – Programmatically C# CSOM

Sathish Nadarajan
 
Solution Architect
 
Rate this article
 
Views
4801

In one of a requirement, need to get the Lists, which has unique permission. The input will be a Site Collection or a collection of site collections, we need to iterate through the webs inside that, and each list and prepare a list of Lists which has unique permission. Hence, thought of coming up with a small method and sharing with the community.

 public static void HasUniquePermission()
         {
             OfficeDevPnP.Core.AuthenticationManager authMgr = new OfficeDevPnP.Core.AuthenticationManager();
 
             string siteUrl = "https://******.sharepoint.com/sites/DeveloperSite/";
             string userName = "Sathish@********.onmicrosoft.com";
             string password = "********";
 
             using (var ctx = authMgr.GetSharePointOnlineAuthenticatedContextTenant(siteUrl, userName, password))
             {
                 Web web = ctx.Web;
                 ctx.Load(web.Lists);
                 ctx.Load(web);
 
                 ctx.ExecuteQueryRetry();
 
                 List list = web.Lists.GetByTitle("D1");
                 ctx.Load(list);
                 ctx.Load(list, li => li.HasUniqueRoleAssignments);
                 ctx.ExecuteQuery();
 
                 System.Console.WriteLine(Convert.ToString(list.HasUniqueRoleAssignments));
             }
         }
 

The Property HasUniqueRoleAssignments gives back TRUE or FALSE.

Happy Coding,

Sathish Nadarajan.

Category : CSOM, Office 365, PNP, SharePoint

Author Info

Sathish Nadarajan
 
Solution Architect
 
Rate this article
 
Sathish is a Microsoft MVP for SharePoint (Office Servers and Services) having 15+ years of experience in Microsoft Technologies. He holds a Masters Degree in Computer Aided Design and Business ...read more
 

Leave a comment