Retrieving Various Field Types in SharePoint Custom Form using jQuery and SPServices

Ahamed Fazil Buhari
 
Senior Developer
July 5, 2016
 
Rate this article
 
Views
19093

Usage of having the custom form is that, we can do whatever we want i.e all the controls would be in our hand and we can easily modify the form, apply any conditions, and change the look and feel and many more.

First and foremost we need to know how to retrieve, populate and handle various field types available in the SharePoint list,

· Single Line of Text

· Multiple Line of Text

· Date

· People Picker

· Choice (Dropdown, Radio button, Checkbox)

· Lookup (Single and Multiple)

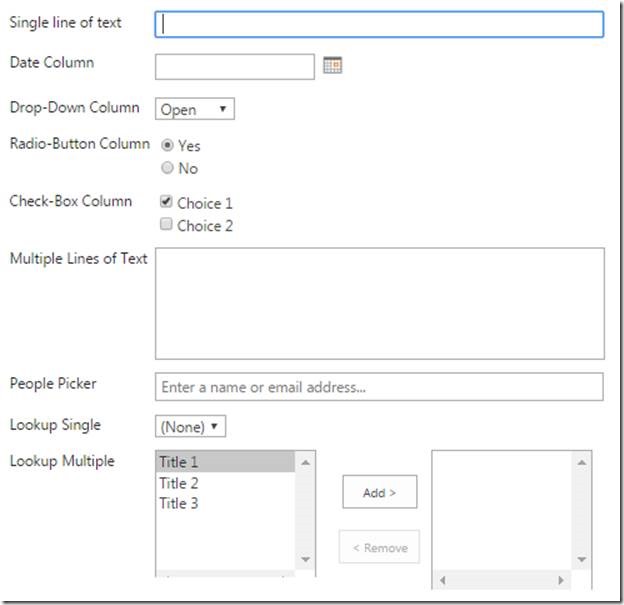
Let’s consider a List having all the types of columns which we mentioned above and the OOTB – New Form will be available as shown below,

clip_image002

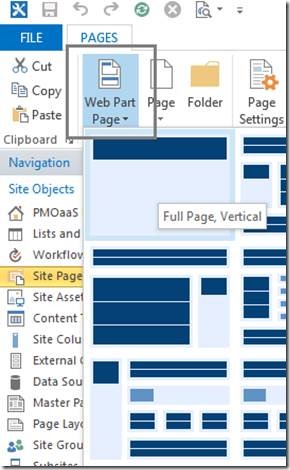
To create a custom form using jQuery and SPServices, we need to have an empty aspx page (Pages -> aspx) or Web Part Page. Here, I’ve created an empty web part page as shown below using SharePoint Designer,

clip_image004

After the page creation, all the contents should be applied inside the ‘PlaceHolderMain’

<asp:Content ID="Content1" ContentPlaceHolderId="PlaceHolderMain" runat="server">

All your content goes here…

</asp:Content>

For ‘Single line of Text’ we can make use of,

<input type="text" ID="txtSingleLine" />

And for ‘Multiple line of text’,

<textarea id="txtMulti" placeholder="Enter Description…">

The rest of the operations on ‘Single line of Text’ and ‘Multiple line of Text’, I am leaving to the readers.

Let’s look into the other field types.

Date Column:

· In aspx page –

<input id="txtDate" type="text" />

· In JS file.

$(document).ready(function () {

$("#txtDate").datepicker({

dateFormat: ‘dd-M-yy’,

showOn: "button",

beforeShowDay: $.datepicker.noWeekends,

buttonImage: "../SiteAssets/images/calendar_icon.png",

});

});

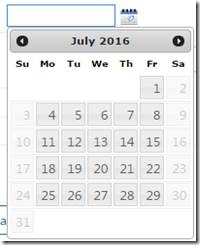
Output:

clip_image006

Here, I’ve used the calendar_icon.png for icon and removed the weekends ($.datepicker.noWeekends).

For various operations on Date field, please refer jQuery User Interface

· To get the Date field value and changing the date format to ISOString format, so that it can be saved in SharePoint.

var date = $("#txtDate").datepicker("getDate") || ”;

//Converting Date format from dd-MMM-yyyy to ISOString format save in list

if (date != ”) {

var inputDate = new Date(date).toDateString();

var getCurrentTime = new Date().toLocaleTimeString();

var newDateTime = inputDate + " " + getCurrentTime;

date = new Date(newDateTime).toISOString();

}

People Picker Column:

· In aspx page use the below tag,

<SharePoint:PeopleEditor ID="ppVal" runat="server" MultiSelect="False" __MarkupType="xmlmarkup" WebPart="true"></SharePoint:PeopleEditor>

Output:

clip_image008

· To get the people picker value, use the below script.

var peoplePicker = $("[id$=’ppVal_upLevelDiv’]>span>div").attr("key") || ”;

if (peoplePicker != ”)

peoplePicker = PPLvalue(peoplePicker);

function PPLvalue(ppName) {

var userID = ”;

$().SPServices({

operation: "GetUserInfo",

async: false,

userLoginName: ppName,

completefunc: function (xData, Status) {

$(xData.responseXML).find("User").each(function () {

userID = $(this).attr("ID");

});

}

});

return userID;

}

Choice Column – Dropdown, Radio Button, Check-Box

· In aspx page –

<select id="ddlDropDown" title="Drop Down"></select>

<div id="divRadio" title="Radio Button"></div>

<div id="divCheckBox" title="Check Box"></div>

· In JS file and the function BindData(xData, Status) should be defined outside the document.ready

$(document).ready(function () {

$().SPServices({

operation: "GetList",

listName: "<<List Name where these columns are available>>",

completefunc: function(xData, Status) {

BindData(xData, Status);

},

async: false

});

});


function BindData(xData, Status) {

if (Status == ‘success’) {

//Append the value for Drop Down

appendField = $("#ddlDropDown");

$(xData.responseXML).find("Field[DisplayName=’Drop-Down Column’] CHOICE").each(function () {

$(appendField).append("<option value=’" + $(this).text() + "’>" + $(this).text() + "</option>");

});

//Append value for Radio Button

var activeField = "";

$(xData.responseXML).find("Field[DisplayName=’Radio-Button Column’] CHOICE").each(function () {

activeField += "<input name=’RadioBtn’ type=’radio’ value=’" + $(this).text() + "’><label>" + $(this).text() + "</label>";

});

$("#divRadio").html(activeField);

//Append value for Check Box

appendField = $("#divCheckBox");

$(xData.responseXML).find("Field[DisplayName=’Check-Box Column’] CHOICE").each(function () {

$(appendField).append("<input type=’checkbox’ name=’CheckBox’ value=’" + $(this).text() + "’/>" + $(this).text() + "<br/>");

});

}

}


Lookup Column – Single, Multiple

· For Lookup Single, in aspx page –

<select id="ddlLookupSingle" title="Look up single"></select>

· For Lookup Multiple, in aspx page –

<select id="LookupMul" multiple="multiple" ondblclick="GetSelectValues();" style="overflow:auto; width:150px !important; min-height:120px"></select>

<input type="button" id="btnAdd" onclick="GetSelectValues();" title="Add" value="Add &gt;" name="Add" />

<br />

<input type="button" id="btnRemo" onclick="RemoveSelectValues();" title="Remove" value="Remove &lt;" name="Remove" />

<select id="LookupMulSelected" multiple="multiple" ondblclick="RemoveSelectValues();" style="overflow:auto; width:150px !important; min-height:120px"></select>

· Lookup Single, in JS file–

$(document).ready(function () {

$().SPServices({

operation: "GetListItems",

async: false,

listName: "<<Lookup list name>>",

CAMLViewFields: "<ViewFields><FieldRef Name=’Title’ /><FieldRef Name=’ID’ /></ViewFields>",

completefunc: function (xData, Status) {

if (Status == ‘success’) {

$(xData.responseXML).SPFilterNode("z:row").each(function () {

var title = $(this).attr("ows_Title");

var ID = $(this).attr("ows_ID"); $(‘#ddlLookupSingle’).append($(‘<option></option>’).val(ID).html(title));

})

}

}

});

});

· Lookup Multiple, in JS file and the function GetSelectValues() & RemoveSelectValues() should be defined outside the document.ready –

$(document).ready(function () {

$().SPServices({

operation: "GetListItems",

async: false,

listName: "<<Lookup list name>>",

CAMLViewFields: "<ViewFields><FieldRef Name=’Title’/><FieldRef Name=’ID’ /></ViewFields>",

completefunc: function (xData, Status) {

if (Status == ‘success’) {

$(xData.responseXML).SPFilterNode("z:row").each(function () {

var title = $(this).attr("ows_Title");

var ID = $(this).attr("ows_ID"); $(‘#LookupMul’).append($(‘<option></option>’).val(ID).html(title));

})

}

}

});

});

function GetSelectValues() {

$("#LookupMul option:selected").each(function () {

var $this = $(this);

if ($this.length) {

var selText = $this.text();

var selVal = $this.val();

$(‘#LookupMulSelected’).append($(‘<option></option>’).val(selVal).html(selText));

$("#LookupMul option[value=" + selVal + "]").remove();

}

});

}

function RemoveSelectValues() {

$("#LookupMulSelected option:selected").each(function () {

var $this = $(this);

if ($this.length) {

var selText = $this.text();

var selVal = $this.val();

$(‘#LookupMul’).append($(‘<option></option>’).val(selVal).html(selText));

$("#LookupMulSelected option[value=" + selVal + "]").remove();

}

});

}

Though this is very straight forward, this will save a lot of development effort for sure. To save the retrieved values into a SharePoint list using SPServices, please refer to my another article on CRUD Operation on various field Types in SharePoint List using SPServices


Happy Coding

Ahamed Buhari
Author Info

Ahamed Fazil Buhari
 
Senior Developer
 
Rate this article
 
Ahamed is a Senior Developer and he has very good experience in the field of Microsoft Technologies, especially SharePoint, Azure, M365, SPFx, .NET and client side scripting - JavaScript, TypeScript, ...read more
 

How to Attach Multiple Files into SharePoint List Item Using SPServices and Also Validating on File Size and Format

Ahamed Fazil Buhari
 
Senior Developer
June 20, 2016
 
Rate this article
 
Views
23768

I had a requirement to upload Multiple Files into the SharePoint list item. I need to implement this using Jquery, SPServices and the html tag <input type="file"/>.And we need to allow only the file formats namely – (pdf, jpeg, doc, docx, excel, xlsm, xls, xlsx, .ods,.zip, .rar) and restrict all other formats, also the upload maximum size will be 5 MB not more than that for each file.

I come up with the below step by step approach to achieve this requirement.

Step 1: Creation of Browse Button Using <input type=’file’ /> Tag.

Below is the HTML tag, I’ve used to create the browse button and some more buttons for additional functionality. Please concentrate and look only at <input type=’file’ /> tag

 <td id="fileAttachTD">
         <span id="attach">
             <input type="file" id="attach1" name="FileUpload" />br />
             <input type="file" id="attach2" name="FileUpload" /><input type="button" id="btnRemove2" /><br />
             <input type="file" id="attach3" name="FileUpload" /><input type="button" id="btnRemove3" /><br />
         </span>
         <br />
         <span id="AddRemoveBtn">
             <input type="button" id="btnAdd" value="Add New Attachment" /><br />
             <p id="lblAttchInfo">
                 Maximum 10 attachments, allowed formats (pdf, jpeg, doc, docx, excel, xlsm, xls,xlsx,.ods, .zip, .rar) - Maximum file size allowed for per attachment 5MB</p>
         </span>
     </td>
 

The output for the above tag will be shown as below,

clip_image002

Step 2: Read the Uploaded Multiple files and keeping it in an Array using Jquery

Here the ‘input:file’ event function is called based on the <td> id fileAttachTD, so that this event will get triggered when any browse button is clicked under this <td>.

The Script itself has all the required comments. I don’t have much to explain about the script.

 var maxFileSize = 5000000; //Set maximum file size value into a variable. 5 MB in bytes var fileName = []; // To keep track of uploaded file names
 var fileData = []; // Create an array to hold all the files
 var fileCount = 0; // To keep track on number of files uploaded into an array
 
 $('#fileAttachTD').on('change', 'input:file', function (event) {       
 
     //Getting the Target file
     var files = event.target.files;
     var file = files[0];
     if (files && file) {
         //Creating FileReader obj to read the uploaded file
         var reader = new FileReader();
 
         //Getting the File name
         fileName[fileCount] = file.name;
         reader.filename = file.name;
 
         //Getting the extention of the file
         var ext = file.name.match(/.([^.]+)$/)[1];
 
         //Getting the file size
         var fileSize = file.size;
 
         if (fileSize > maxFileSize)
             ext = 'sizeExceed';
         //var fileID = $(this).attr('id');
 
         //This is where the uploaded file will be read by 
         reader.onload = function () {
             //Validating the uploaded file Format
             switch (ext) {
                 case 'jpg':
                 case 'png':
                 case 'pdf':
                 case 'jpeg':
                 case 'docx':
                 case 'doc':
                 case 'excel':
                 case 'xlsm':
                 case 'xls':
                 case 'xlsx':
                 case 'ods':
                 case 'zip':
                 case 'rar':
                     //Put the file data into an array 
                     fileData[fileCount] = this.result;
                     var n = fileData[fileCount].indexOf(";base64,") + 8;
 
 //To Get the base64 bytes, remove the first part of the dataurl and //this we need to feed to SharePoint
                     fileData[fileCount] = fileData[fileCount].substring(n);
                     fileCount++;
                     break;
                 case 'sizeExceed':
                     fileData[fileCount] = '';
                     fileName[fileCount] = '';                    
                     alert('File size exceeded');
                     break;
                 default:
                     fileData[fileCount] = '';
                     fileName[fileCount] = '';                    
                     alert('Invalid format');
             }
         };
 
         reader.onabort = function () {
             alert("The upload was aborted.");
         };
 
         reader.onerror = function () {
             alert("An error occured while reading the file.");
         };
         reader.readAsDataURL(file);
     }
 });
 

Step 3: Adding Attachments to the List Item using SPServices

Finally, uploading all the files into the list item using SPServices.

If the uploading of attachment needs to be done for the New List Item, then the below function should be called after the List Item is successfully created and then that Item ID should be passed as a parameter.

 //Function to Upload the Attachment, 
 //Parameter - itemID, List Item ID where the attachment needs to be uploaded
 function AddAttachments(itemID) {
 //Retrieving all the files which are available in an Array, Created this Array in //the above step(Step 2)
     for (var i = 0; i < fileCount; i++) {
         if (fileData[i] != '')
             $().SPServices({
                 operation: 'AddAttachment',
                 async: false,
                 listName: 'Name of the List',
                 listItemID: itemID,
                 fileName: fileName[i],
                 attachment: fileData[i],
                 completefunc: function (xData, Status) {
                 }
             });
     }
 }
 

Happy Coding,

Ahamed Buhari

Author Info

Ahamed Fazil Buhari
 
Senior Developer
 
Rate this article
 
Ahamed is a Senior Developer and he has very good experience in the field of Microsoft Technologies, especially SharePoint, Azure, M365, SPFx, .NET and client side scripting - JavaScript, TypeScript, ...read more
 

CRUD Operation on various field Types in SharePoint List using SPServices – SharePoint 2013

Ahamed Fazil Buhari
 
Senior Developer
June 7, 2016
 
Rate this article
 
Views
10701

In this article, let us see some of the basic operations on various field types in SharePoint List using SPServices.

Before dealing with SPServices in SharePoint 2013, Let us go through the definitions of SPServices from MSDN

– SPServices is a jQuery library which abstracts SharePoint’s Web Services and makes them easier to use.

– It also includes functions which use the various Web Service operations to provide more useful (and cool) capabilities.

– It works entirely client side and requires no server install.

Here, you can find Create operation on different SharePoint field types namely –

· Single line of text

· Multiple line of text

· Date

· People picker

· Lookup (Single & Multiple)

· Choice.

In this article, let us have a look on the Item Creation: The rest of the operations, I am leaving to the readers.

 var valuePair = []; //Array variable to hold all the Field_Internal_Name and its value.
 valuePair.push(["Column_Text1_InternalName", colText1]); 
 //Single line of text field
 valuePair.push(["Lookup_single_InternalName", Lookup_FieldID +';#'+LookupText]); 
 //Lookup field
 // Lookup_FieldID -> ID of lookup list item which has been selected
 // LookupText -> Text of lookup list item which has been selected
 var isoDate = {extracted_Date}.toISOString(); //Date Field
 //convert the date value into ISOString() format which is understandable by SharePoint
 valuePair.push(["Date_InternalName", isoDate]);
 var peoplePicker = $("[id$='PeoplePicker_ID']>span>div").attr("key"); 
 // People picker field
 var userID = null;
 $().SPServices({
     operation: "GetUserInfo",
     async: false,
     userLoginName: peoplePicker,
     completefunc: function (xData, Status) {
         $(xData.responseXML).find("User").each(function() {
             userID = $(this).attr("ID");
         });
     }
 });
 valuePair.push(["Peoplepicker_InternalName, userID]);
 //SPServices accepts User ID for people picker field while creation of new item
 valuePair.push(["Lookup_multiple_InternalName", Lookup_FieldID1 +';#'+LookupText1 + ';#' + Lookup_FieldID2 + ';#' + LookupText1 ]);
 // LookupText -> ID of lookup list item which has been selected
 // LookupText -> Text of lookup list item which has been selected
 //To save multiple lookup field -> append ‘;#’ after every ID, text and next value
 
 //SPServices to Create an Item.
 $().SPServices({
     operation: "UpdateListItems",
     async: false,
     listName: "Name of the list",
     batchCmd: "New",
     valuepairs: valuePair,
     completefunc: function (xData, Status) {
         if (Status != "success" || $(xData.responseXML).find('ErrorCode').text() !== "0x00000000") {
             alert("Error in saving the item.");
         }
         else {
             if (Status == "success") {
                 alert("Item created successfully...");
             }
         }
     }
 });	
 

Though this is very straight forward, this will save a lot of development effort for sure.

Click HERE to download the SPService JQuery Plugin.

Happy Coding,

Ahamed Buhari

Author Info

Ahamed Fazil Buhari
 
Senior Developer
 
Rate this article
 
Ahamed is a Senior Developer and he has very good experience in the field of Microsoft Technologies, especially SharePoint, Azure, M365, SPFx, .NET and client side scripting - JavaScript, TypeScript, ...read more
 

Leave a comment