Step by Step Procedure to implement VSTS Continuous Integration on SharePoint Webparts Solution

Sriram
 
Technology Specialist
May 15, 2018
 
Rate this article
 
Views
3734

In this article, we will see how to automate the build process once the code got checked in into TFS.

Automating build process and deployment process have many advantages. In this article let’s see how to automate build process; in the next article we will cover the continuous deployment process.

What is Continuous Integration?

Continuous Integration (CI) is the process of automating the build and testing of code every time a team member commits changes to version control. CI encourages developers to share their code and unit tests by merging their changes into a shared version control repository after every small task completion. Committing code triggers an automated build system to grab the latest code from the shared repository and to build, test, and validate the full master branch (also known as the trunk or main).

Continuous Integration Benefits

Ø Improve Developer Productivity

Ø Continuous integration helps your team be more productive by freeing developers from manual tasks and encouraging behaviors that help reduce the number of errors and bugs released to customers.

Ø Find and Address Bugs Earlier and Quicker.

Ø With more frequent testing, your team can discover and address bugs earlier before they grow into larger problems later.

Ø Deliver updates faster

Ø Continuous integration delivers updates to their customers faster and more frequently.

Prerequisites:

1. Make sure the user account that you’re going to use has permission to register the agent. Should be added in Agent Pool Administrators and Agent Pool Service Accounts.

2. Install Visual Studio/MS Build in TFS server to build the code in TFS server.

3. Install Microsoft Office Developer tools which will add SharePoint related DLLs in Build server.

4. Agent Pool Configuration

· Log on to the TFS server using the account for which you’ve prepared permissions as explained above.

· In your web browser, sign on to TFS, and navigate to the Agent pools tab:

URL:

clip_image002

5. Click Download agent.

6. On the Get agent dialog box, click Windows.

7. Click the Download button.

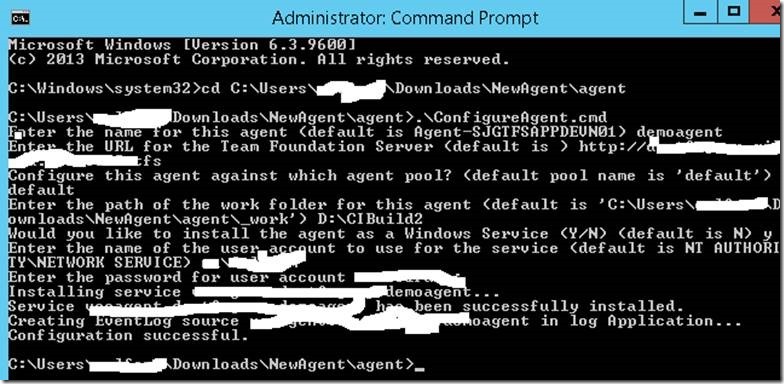
8. Extract the downloaded agent and run the Configure Agent in the command window by pointing to the extracted files location.

clip_image004

9. After agent pool creation, provide access to the required person by adding them in the Agent Pool Administrators and Agent Pool Service Accounts by selecting the Roles tab.

clip_image005

Create a Build Definition:

Below are the steps we need to follow to define the build.

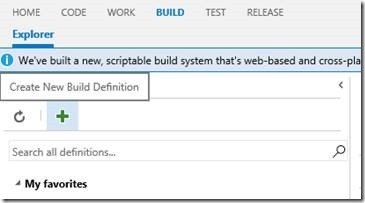
  1. Open TFS url and navigate to Build tab and click on Create New Build Definition icon.

clip_image007

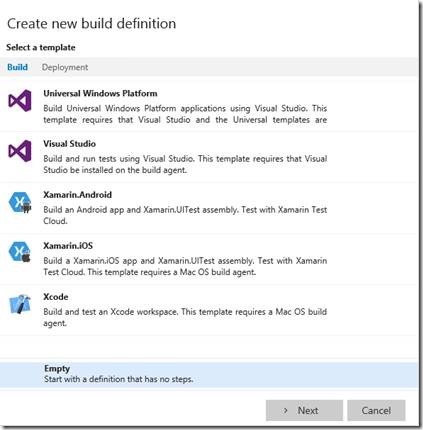
  1. Select Empty build definition in pop up.

clip_image009

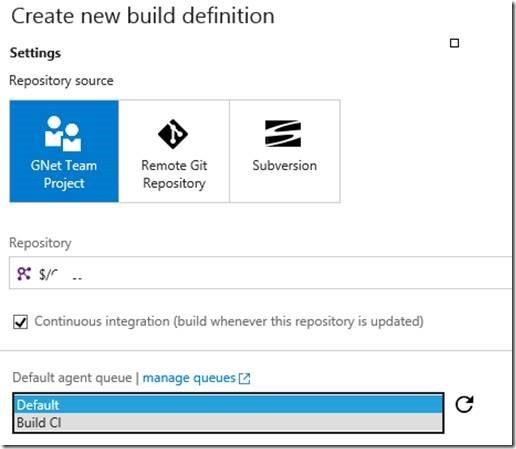
  1. Select the Continuous Integration Check Box and Choose the Repository and agent queue accordingly to create the build.

clip_image011

clip_image012
  1. In the Build Definition click on Add Build Step
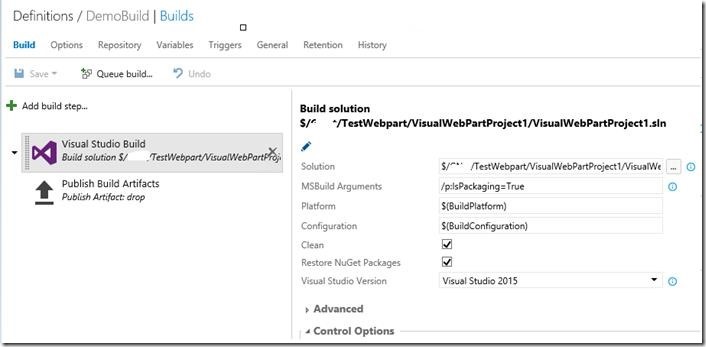
  2. Add the Visual Studio Build step and provide configuration values as mentioned below.

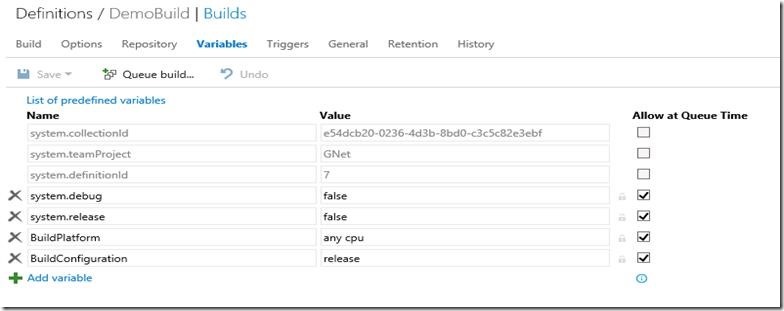
Here, provide TFS solution path in Solution option, values provided for Platform and Configuration are Variabile to which we will assign value on Variables tab. Clean option is to clean then solution then it will build it.

clip_image014

clip_image015
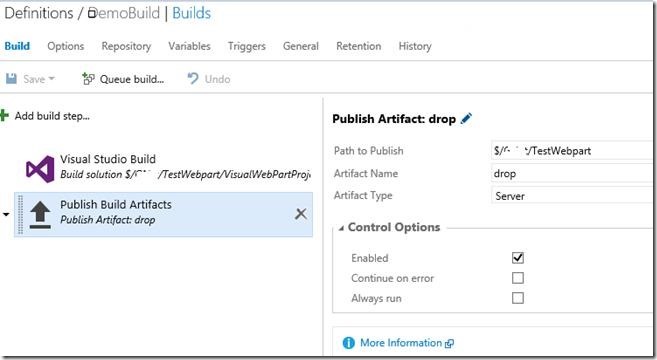
  1. Add Publish Build Artifacts and in that provide Drop folder location in which package will be captured. Publish Build Artifacts is to to publish the Artifacts in Drop folder which we will refere when deploying the solutin.

clip_image017

7. Under Repository tab, select true for Clean. This is to clean the repository before the build.

8. Set the variables as mentioned below.

clip_image019

clip_image020

9. Save the Build Definition

Build the solution

1. Check in your solution into TFS.

2. Go to TFS and click on Build Tab.

3. In the Left hand side select the Build Definition using which you want to run the solution.

4. In the build definition, in Visual Studio step make sure you have selected the solution which you want to run.

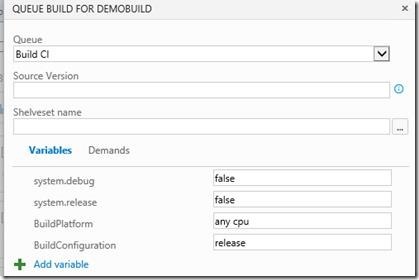
5. Click on Queue build and then in the pop up click on OK.

clip_image022

6. TFS will start building the solution; once it is done we will get the output screen as below.

clip_image024

Common Build Issues

1. If we run SharePoint Server object Model code or code which refers OfficeDevPnp we will get below build error.


Solution: As we don’t have SharePoint related DLLs in Build server we will get this error. To solve this issue create a folder in C Drive and place all the necessary files there. Open the solution in Visual Studio Unload the solution then in csproj file in that provide hint path for the dll to which it is throwing error.

clip_image026

2. If there is no Visual Studio or .Net framework in the TFS servere, we will get below error message.

clip_image028

Installing Visual Studio/Appropriate MSBuild version on TFS server will resolve this issue.

Author Info

Sriram
 
Technology Specialist
 
Rate this article
 
Sriram T has been working in IT industry for over 6 years He holds Bachelor's degree in Computer Science Engineering. Sriram write articles and blogs related to SharePoint 2013, SharePoint ...read more
 

How to Deploy a SharePoint 2013 Solution (WSP) in the Farm using PowerShell

Sathish Nadarajan
 
Solution Architect
December 28, 2013
 
Rate this article
 
Views
49820

All of us will be using Visual Studio as our Development IDE for our development purpose. Once our development completes, Visual Studio itself prepares the WSP for us. We are delivering the WSP as a deliverable. Later on moving the WSP to a Staging, we require some sort of deployment procedure. For that, I would say PowerShell is the best Option. Let us, how to write a PowerShell Snippet to Deploy our WSP in Farm level as well as Web Application Level.

First we will see, how to deploy our WSP against a particular Web Application. The script is self-explanatory and commented with the steps.

Before, seeing the script, let us see the sequence of the script.

1. Get the Site, WebApplication URL, Solution Name, Solution Location.

2. Check whether the Solution is already installed.

3. If installed, then find, whether it is deployed in any of the WebApplication.

4. If deployed, then retract from all the web applications already deployed.

5. Then un-install the wsp.

6. Add the WSP.

7. Install the WSP against the WebApplication, which we are specifying.

This gives a proper validation for the deployment script. Now, let us see the script.

 Add-PSSnapin "Microsoft.SharePoint.PowerShell" 
 
 function wait4timer($solutionName) 
 {    
     $solution = Get-SPSolution | where-object {$_.Name -eq $solutionName}    
     if ($solution -ne $null)     
     {        
         Write-Host "Waiting to finish soultion timer job" -ForegroundColor Green      
         while ($solution.JobExists -eq $true )          
         {               
             Write-Host "Please wait...Either a Retraction/Deployment is happening" -ForegroundColor DarkYellow           
             sleep 2            
         }                
 
         Write-Host "Finished the solution timer job" -ForegroundColor Green  
         
     }
 }  
 
       
     try
     {
         # Get the WebApplicationURL
         $MyWebApplicationUrl = "http://WEBAPPLICATIONURL";
         
         # Get the Solution Name
         $MywspName = "MySolution.WSP"
         
         # Get the Path of the Solution
         $MywspFullPath = "D:TestMySolution.WSP"
 
         # Try to get the Installed Solutions on the Farm.
         $MyInstalledSolution = Get-SPSolution | Where-Object Name -eq $MywspName
         
         # Verify whether the Solution is installed on the Target Web Application
         if($MyInstalledSolution -ne $null)
         {
             if($MyInstalledSolution.DeployedWebApplications.Count -gt 0)
             {
                 wait4timer($MywspName)  
 
                 # Solution is installed in atleast one WebApplication.  Hence, uninstall from all the web applications.
                 # We need to unInstall from all the WebApplicaiton.  If not, it will throw error while Removing the solution
                 Uninstall-SPSolution $MywspName  -AllWebApplications:$true -confirm:$false
 
                 # Wait till the Timer jobs to Complete
                 wait4timer($MywspName)   
 
                 Write-Host "Remove the Solution from the Farm" -ForegroundColor Green 
                 # Remove the Solution from the Farm
                 Remove-SPSolution $MywspName -Confirm:$false 
 
                 sleep 3
             }
             else
             {
                 wait4timer($MywspName) 
 
                 # Solution not deployed on any of the Web Application.  Go ahead and Remove the Solution from the Farm
                 Remove-SPSolution $MywspName -Confirm:$false 
 
                 sleep 3
             }
         }
 
         wait4timer($MywspName) 
 
         # Add Solution to the Farm
         Add-SPSolution -LiteralPath "$MywspFullPath"
     
         # Install Solution to the WebApplication
         install-spsolution -Identity $MywspName -WebApplication $MyWebApplicationUrl -FullTrustBinDeployment:$true -GACDeployment:$false -Force:$true
 
         # Let the Timer Jobs get finishes       
         wait4timer($MywspName)    
 
         Write-Host "Successfully Deployed to the WebApplication" -ForegroundColor Green 
         
     }
     catch
     {
         Write-Host "Exception Occuerd on DeployWSP : " $Error[0].Exception.Message -ForegroundColor Red  
     }
 

This will install against a particular WebApplication and the deployment is happening against the Bin Folder.

The Tags,

 -FullTrustBinDeployment:$true -GACDeployment:$false
 

Decides about the deployment type. If we want to do a GAC Deployment, then we need to give

 -FullTrustBinDeployment:$false -GACDeployment:$true

This will deploy against a particular Web Application. Some of the WSPs needs to be deployed globally. Let us see, how to do that and what are the tags required for them.

 install-spsolution -Identity $wsp –AllWebApplications:$true

This will deploy our WSP on all web applications.

Happy Coding.

Sathish Nadarajan.

Author Info

Sathish Nadarajan
 
Solution Architect
 
Rate this article
 
Sathish is a Microsoft MVP for SharePoint (Office Servers and Services) having 15+ years of experience in Microsoft Technologies. He holds a Masters Degree in Computer Aided Design and Business ...read more
 

Leave a comment