How to Upload documents to Azure Blob Storage Containers Programmatically using C#

Sathish Nadarajan
 
Solution Architect
October 23, 2018
 
Rate this article
 
Views
5126

In the earlier articles, we saw how to create the Blob Storage through the Azure Console and Programmatically. Now, let us see how to upload documents to the Containers programmatically.

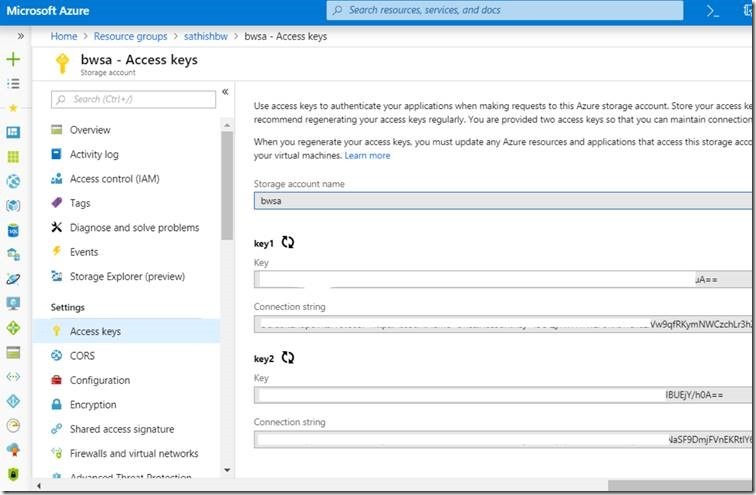
1. Login to the Azure Portal. Go to the Storage Account and select the Keys.

clip_image002

2. Among the two keys, make a note of any key. Both the Keys can be used for the Program. In this case, let me take the first Key’s Connection String.

3. The code is as below.

 public static void UploadFiles()
         {
             string storageConnectionString = "*****Value copied from the Console****";
 
             DirectoryInfo directoryInfo = new DirectoryInfo("D:\InputPath");
 
             var files = directoryInfo.EnumerateFiles();
 
             // Retrieve storage account from connection string.
             CloudStorageAccount storageAccount = CloudStorageAccount.Parse(storageConnectionString);
 
             // Create the blob client.
             CloudBlobClient blobClient = storageAccount.CreateCloudBlobClient();
 
             // Retrieve reference to a previously created container.
             CloudBlobContainer container = blobClient.GetContainerReference("<<Blob Container Name>>");
 
             foreach (FileInfo inputFile in files)
             {
                  
                 CloudBlockBlob blockBlob = container.GetBlockBlobReference("<<Folder(If required)>>\" + inputFile.Name);
 
                 blockBlob.UploadFromFile(inputFile.FullName);
             }
         }
 

Happy Coding,

Sathish Nadarajan.

Author Info

Sathish Nadarajan
 
Solution Architect
 
Rate this article
 
Sathish is a Microsoft MVP for SharePoint (Office Servers and Services) having 15+ years of experience in Microsoft Technologies. He holds a Masters Degree in Computer Aided Design and Business ...read more
 

Upload File to SharePoint Office 365 Programmatically using C# CSOM – PNP

Sathish Nadarajan
 
Solution Architect
September 23, 2018
 
Rate this article
 
Views
24482

In the earlier article, we saw how to upload the files using the httpclient and the RestAPI which involves a lot of coding. But in PNP (Patterns and practices), it is made very simple. The below code is very straight forward. The only restriction here is, the size cannot be more than 250 MB approx.. if we want to upload a bigger size files, then we have to discuss with the customer and find an alternate way only.

 namespace Office365.Console
 {
     using Microsoft.SharePoint.Client;
     using Newtonsoft.Json;
     using System;
     using System.Collections.Concurrent;
     using System.IO;
     using System.Net;
     using System.Net.Http;
 
     class Program
     {
         private static ConcurrentDictionary<Uri, RESTFormDigest> FormDigests { get; set; }
 
         static void Main(string[] args)
         {
             Uploadfiles();
             System.Console.WriteLine("Completed");
             System.Console.ReadLine();
         }
 
         static string siteUrl = "https://sppalsmvp.sharepoint.com/sites/DeveloperSite/";
         static string userName = "sathish@********.com";
         static string password = "**********";
 
         public async static void Uploadfiles()
         {
             try
             {
                 OfficeDevPnP.Core.AuthenticationManager authMgr = new OfficeDevPnP.Core.AuthenticationManager();
 
                 using (var ctx = authMgr.GetSharePointOnlineAuthenticatedContextTenant(siteUrl, userName, password))
                 {
                     Web web = ctx.Web;
                     ctx.Load(web);
                     ctx.Load(web.Lists);
                     ctx.ExecuteQueryRetry();
                     List list = web.Lists.GetByTitle("D1");
                     ctx.Load(list);
                     ctx.ExecuteQueryRetry();
                     Folder folder = list.RootFolder.EnsureFolder("Folder1");
                     ctx.Load(folder);
                     ctx.ExecuteQueryRetry();
 
                     Folder folderToUpload = web.GetFolderByServerRelativeUrl(folder.ServerRelativeUrl);
                     folderToUpload.UploadFile("LargeFile.txt", "D:\LargeFile.txt", true);
                     folderToUpload.Update();
                     ctx.Load(folder);
                     ctx.ExecuteQueryRetry();
                     folderToUpload.EnsureProperty(f => f.ServerRelativeUrl);
                     var serverRelativeUrl = folderToUpload.ServerRelativeUrl.TrimEnd('/') + '/' + "LargeFile.txt";


                 }
             }
             catch (Exception ex) {
                 System.Console.WriteLine("Exception occurred : " + ex.Message);
                 System.Console.ReadLine();
             }
         }


     }
 }


Happy Coding,

Sathish Nadarajan.

Author Info

Sathish Nadarajan
 
Solution Architect
 
Rate this article
 
Sathish is a Microsoft MVP for SharePoint (Office Servers and Services) having 15+ years of experience in Microsoft Technologies. He holds a Masters Degree in Computer Aided Design and Business ...read more
 

How to upload File to azure BLOB

Tarun Kumar Chatterjee
 
Net – Technology Specialist
May 12, 2018
 
Rate this article
 
Views
2518

I had a requirement to upload a file to BLOB. Below is the piece of code I had to write.

Here are the steps I had to follow:

Create a web application

Install Windows Azure Storage from nuget library by using the below command:

PM> Install-Package WindowsAzure.Storage

It will resolve the dependencies and we can see that below dll references will be added to the solution

· Microsoft.Azure.KeyVault.Core

· Microsoft.Data.Edm

· Microsoft.Data.OData

· Microsoft.Data.Services.Client

· Microsoft.WindowsAzure.Configuration

· Microsoft.WindowsAzure.Storage

· System.Spatial

Create a BLOBManager class will be responsible to upload the file stream to BLOB.

using Microsoft.WindowsAzure.Storage;

using Microsoft.WindowsAzure.Storage.Blob;

 using Microsoft.WindowsAzure.Storage;
 using Microsoft.WindowsAzure.Storage.Blob;
 using System;
 using System.Collections.Generic;
 using System.IO;
 using System.Linq;
 using System.Text;
 using System.Threading.Tasks;
 
 namespace UploadFileToBLOB
 {
     public class BlobManager
     {
         public static Uri StrorageUri { get; set; }
         private static CloudBlobContainer GetContainerRef(string containerName)
         {
             var storageAccount = CloudStorageAccount.Parse(Properties.Resources.BlobStorageConnection);
 
             var blobClient = storageAccount.CreateCloudBlobClient();
 
             var container = blobClient.GetContainerReference(containerName);
 
             container.CreateIfNotExists();
 
             container.SetPermissions(new BlobContainerPermissions { PublicAccess = BlobContainerPublicAccessType.Blob });
 
             return container;
         }
 
         public static void Upload(string containerName, string blobName, string blobType, Stream stream)
         {
             var container = GetContainerRef(containerName);
 
             if (blobType.ToUpper().Equals("BLOCK"))
             {
                 var blockBlob = container.GetBlockBlobReference(blobName);
                 blockBlob.UploadFromStream(stream);
             }
             else if (blobType.ToUpper().Equals("APPEND"))
             {
                 var appendBlob = container.GetAppendBlobReference(blobName);
                 appendBlob.UploadFromStream(stream);
             }
             else if (blobType.ToUpper().Equals("PAGE"))
             {
                 var pageBlob = container.GetPageBlobReference(blobName);
                 pageBlob.UploadFromStream(stream);
             }
         }
     }
 }


In the BLOBManager Class we are fetching the value of Properties.Resources.BlobStorageConnection from resource file.

The format of the BLOB connection string will be something like this:

DefaultEndpointsProtocol=https;AccountName=<<BLOB Name>>;AccountKey=<< PRIMARY ACCESS KEY >>

BLOB storage can be created from: https://manage.windowsazure.com.

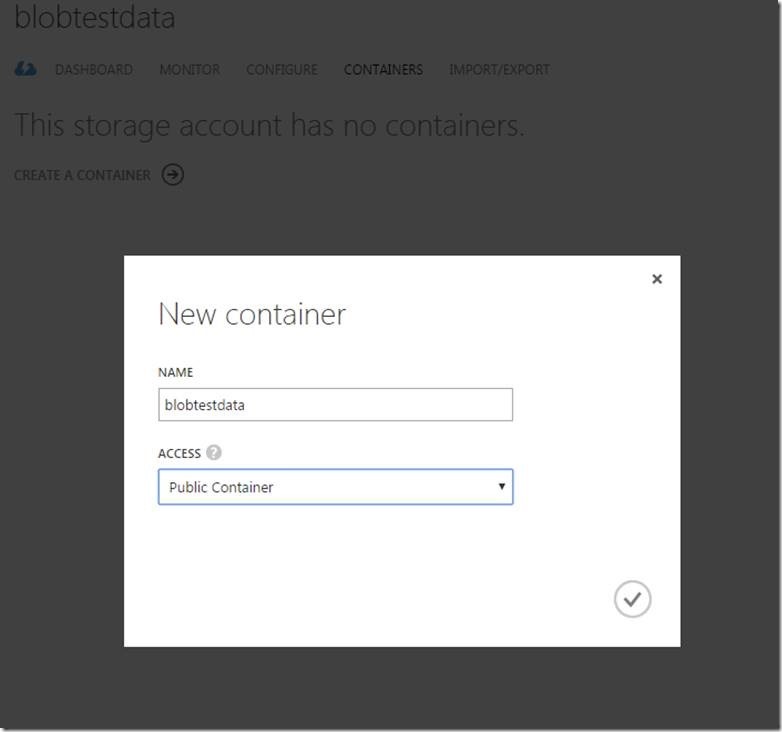
In below snapshot whatever we will be giving in the URL will be the BLOB name.

clip_image002

After BLOB created successfully, Click on MANAGE ACCESS KEY, it will give you the STORAGE ACCOUNT NAME and the PRIMARY ACCESS KEY. PRIMARY ACCESS KEY will be nothing but the AccountKey in BLOB connection string.

After BLOB created successfully we need to create Container where to store the file.

clip_image004

To upload the file we need to write the below piece of code

 using (var fStream = File.OpenRead(filePath))
  {
       BlobManager.Upload("blobcontainername", fileName.ToString(),"BLOCK", fStream);
  }


Hope it will give the basic idea about to create and upload file in Azure BLOB. Let me come up with more new future of Azure and the implementation in my future articles.

Happy Coding

Tarun Kumar Chatterjee

Author Info

Tarun Kumar Chatterjee
 
Net – Technology Specialist
 
Rate this article
 
Tarun has been working in IT Industry for over 12+ years. He holds a B-tech degree. He is passionate about learning and sharing the tricks and tips in Azure, .Net ...read more
 

Upload Multiple Attachments to SharePoint List using Angular

Ahamed Fazil Buhari
 
Senior Developer
December 5, 2017
 
Rate this article
 
Views
5070

Hello everyone,

In this article we will see how to upload multiple attachments in SharePoint List Item using Angular. This is the continuation of my previous article – Remove Attachments on SharePoint List Item using Angular.

Utilities.js

 (function () {
     'use strict';
     var serviceId = 'Utilities';
 
     var Utilities = function () {
 
         var service = this;
         service.spHostUrl = _spPageContextInfo.siteAbsoluteUrl + _spPageContextInfo.webServerRelativeUrl;
 
         return {
             getRequestHeader: getRequestHeader,
             updateRequestHeader: updateRequestHeader,
             deleteRequestHeader: deleteRequestHeader
         };
 
         function getRequestHeader() {
             var getHeader = {
                 'headers': {
                     'accept': 'application/json;odata=verbose'
                 }
             };
             return getHeader;
         }
 
         function updateRequestHeader() {
             var updateHeader = {
                 'headers': {
                     "X-RequestDigest": $("#__REQUESTDIGEST").val(),
                     'content-type': 'application/json;odata=verbose',
                     'accept': 'application/json;odata=verbose',
                     "IF-MATCH": "*",
                     "X-HTTP-Method": "MERGE"
                 }
             };
             return updateHeader;
         }
 
         function deleteRequestHeader() {
             var deleteHeader = {
                 'headers': {
                     "X-RequestDigest": $("#__REQUESTDIGEST").val(),
                     'content-type': 'application/json;odata=verbose',
                     "IF-MATCH": "*"
                 }
             };
             return deleteHeader;
         }
     }
     var module = angular.module("Mainapp");
     module.factory(serviceId, Utilities);
 }());
 

List_Context.js

 (function () {
     'use strict';
     var serviceId = 'List_Context';
 
     var List_Context = function ($http, $q, Utilities) {
 
         return {
             getListData: getListData,
             updateListData: updateListData,
             checkFileExistsAndRemove: checkFileExistsAndRemove,
             uploadFileSP: uploadFileSP,
             getFileBuffer: getFileBuffer,
             deleteFile: deleteFile
         };
 
         function getListData(urlValue) {
             var deferred = $q.defer();
             $http.get(urlValue, Utilities.getRequestHeader())
                         .then(function (response) {
                             deferred.resolve(response.data.d);
                         }, function (error) {
                             deferred.reject(error);
                         });
             return deferred.promise;
         };
 
         function updateListData(listId, itemId, itemData, listName) {
             var deferred = $q.defer();
             var updateURL = _spPageContextInfo.webAbsoluteUrl + "/_api/web/lists/GetById('" + listId + "')/Items" + '(' + itemId + ')';
             var entityFullName = getEntityTypeFullName(listName);
             var item = $.extend({
                 '__metadata': {
                     'type': entityFullName
                 }
             }, itemData);
             var jsonData = JSON.stringify(item);
 
             $http.post(updateURL, jsonData, Utilities.updateRequestHeader())
                         .then(function (response) {
                             deferred.resolve(response.data.d);
                         }, function (error) {
                             deferred.reject(error);
                         });
             return deferred.promise;
         };
 
         function checkFileExistsAndRemove(fileURL) {
             var deferred = $q.defer();
             var fullFileURL = _spPageContextInfo.webAbsoluteUrl + "/_api/web/getFileByServerRelativeUrl('" + fileURL + "')";
             $http.get(fullFileURL, Utilities.getRequestHeader())
                         .then(function (response) {
                             deleteFile(fullFileURL)
                             .then(function (response) {
                                 deferred.resolve(response);
                             });
                         }, function (error) {
                             console.log('File does not exist');
                             deferred.reject(error);
                         });
             return deferred.promise;
         }
 
         function uploadFileSP(listName, itemID, bufferVal, fileName) {
             var urlValue = _spPageContextInfo.webAbsoluteUrl + "/_api/web/lists/GetByTitle('" + listName + "')/items(" + itemID + ")/AttachmentFiles/add(FileName='" + fileName + "')";
 
             $.ajax({
                 url: urlValue,
                 type: "POST",
                 data: bufferVal,
                 async: false,
                 processData: false,
                 headers: {
                     "accept": "application/json;odata=verbose",
                     "X-RequestDigest": document.getElementById("__REQUESTDIGEST").value,
                     "Content-Type": undefined
                 },
                 success: fileSuccess,
                 error: fileError
             });
             function fileSuccess(data) {
                 console.log('File Added Successfully.');
             }
             function fileError(error) {
                 console.log(error.statusText + "nn" + error.responseText);
             }
         }
 
         function getFileBuffer(file) {
             var deferred = $.Deferred();
             var reader = new FileReader();
             reader.onloadend = function (e) {
                 deferred.resolve(e.target.result);
             }
             reader.onerror = function (e) {
                 deferred.reject(e.target.error);
             }
             reader.readAsArrayBuffer(file);
             return deferred.promise();
         }
 
         function deleteFile(fileURL) {
             var deferred = $q.defer();
             $http.delete(fileURL, Utilities.deleteRequestHeader())
                          .then(function (response) {
                              console.log('Deleted the attachment.');
                              deferred.resolve(response);
                          }, function (error) {
                              deferred.reject(error);
                          });
             return deferred.promise;
         }
     };
 
     //Supporting function 
     function getEntityTypeFullName(listName) {
         return "SP.Data." + listName.replace(' ', '_x0020_') + "ListItem";
     }
 
     var module = angular.module("Mainapp");
     module.factory(serviceId, ['$http', '$q', 'Utilities', List_Context])
 }());
 

Main.js

 (function () {
     'use strict';
 
     var controllerId = 'Mycontroller';
     var app = angular.module("Myapp", []);
 
     var Mycontroller = function ($scope, $q, List_Context, Utilities) {
         function SaveData() {
             var updatingVals = {};
             updatingVals['Title'] = "TEST Title";
             var filesAdd = {};
             //Please refer previous article to know how to get attachment value in attachedFile scope variable
             //https://www.sharepointpals.com/post/Get-all-attachments-from-SharePoint-List-Item-using-AngularJS
             filesAdd = $scope.attachedFile;
             var listID = "BF6BCA2E5-12B5-452F-8EA6-B6789AF4CDEB";
             var listItemID = 10;
             var listName = "MyList";
             SP_WaitScreen();
             var promises = [];
             List_Context.updateListData(listID, listItemID, updatingVals, listName)
                     .then(function (value) {
                         //Please refer previous article to see how to get removeFile values - 
                         //https://www.sharepointpals.com/post/How-to-handle-multiple-file-selection-and-validation-on-input-file-type-using-AngularJS
                         angular.forEach($scope.removeFile, function (filePath, key) {
                             promises.push(List_Context.checkFileExistsAndRemove(filePath));
                         });
                         var filesToAdd = {};
                         filesToAdd = $scope.attachedFile;
                         $q.all(promises)
                             .then(function (value) {
                                 AddingValidAttachments(filesToAdd, listName, listItemID);
                             }, function (reason) {
                                 SP_WaitScreen_Close();
                                 window.open(window.parent.location.reload(true), "_parent", "");
                             });
                     }, function (reason) {
                         SP_WaitScreen_Close();
                         window.open(window.parent.location.reload(true), "_parent", "");
                     });
         }
 
         function AddingValidAttachments(allFiles, listName, itemID) {
             var promises = [];
             var newlyAdded = {};
             newlyAdded = allFiles;
             if (newlyAdded.length > 0) {
                 for (var index = newlyAdded.length - 1; index >= 0; index--) {
                     if (newlyAdded[index]._file == undefined) {
                         newlyAdded.splice(index, 1);
                     }
                 }
                 if (newlyAdded.length > 0) {
                     var numberOfFiles = newlyAdded.length;
                     angular.forEach(newlyAdded, function (fileValues, key) {
                         if (numberOfFiles > 0)
                             List_Context.getFileBuffer(fileValues._file)
                                 .then(function (bufferVal) {
                                     List_Context.uploadFileSP(listName, itemID, bufferVal, fileValues._file.name);
                                     numberOfFiles--;
                                     if (numberOfFiles == 0) {
                                         window.open(window.parent.location.reload(true), "_parent", "");
                                     }
                                 });
                     });
                 }
                 else {
                     window.open(window.parent.location.reload(true), "_parent", "");
                 }
             }
             else {
                 window.open(window.parent.location.reload(true), "_parent", "");
             }
         }
 
         //OOTB Wait modal dailog
         function SP_WaitScreen() {
             SP.SOD.executeFunc('sp.js', 'SP.ClientContext', function () {
                 window.parent.eval("window.waitDialog = SP.UI.ModalDialog.showWaitScreenWithNoClose('Working on it...', '');");
             });
         }
         function SP_WaitScreen_Close() {
             if (window.frameElement != null) {
                 if (window.parent.waitDialog != null) {
                     window.parent.waitDialog.close();
                 }
             }
         }
     }
     app.controller(controllerId, Mycontroller);
     app.config(['$compileProvider', function ($compileProvider) {
         $compileProvider.aHrefSanitizationWhitelist(/^s*(https?|file|blob):/);
     }]);
 });
 
 <script type="text/javascript" src="../../../../SiteAssets/js/sppals/Controllers/Main.js"></script>
 
 <!--Services-->
 <script type="text/javascript" src="../../../../SiteAssets/js/sppals/Services/List_Context.js"></script>
 <script type="text/javascript" src="../../../../SiteAssets/js/sppals/Services/Utilities.js"></script>
 <div id="divNew" ng-app="Myapp">
     <ng-form id="EditForm" name="EditForm">
         <div ng-controller="Mycontroller">         
                                 <div>Attach Memo:</div>
                                 <div>
                                     <span id="attach">
                                         <input id="uploadFileID" type="file" ng-file-model="files" />
                                                                                 
                                         <p class="attach-Text" ng-repeat="file in attachedFile">
                                             <a target="_blank" href="{{file.ServerRelativeUrl}}" ng-href="{{file.ServerRelativeUrl}}">{{file.FileName}}</a>                                             
                                             <a title='Click to Remove' ng-click="removeFile(attachedFile, $index)">
                                                 <img class="deleteIcon" src='../../../../SiteAssets/img/Delete_icon.png' />
                                             </a>
                                         </p>                                        
                                     </span>                               
                                 </div>
             <input type="button" id="btnSave" ng-disabled="EditForm.$invalid || SaveButtonValid();" ng-click="SaveButtonClick()" title="Click to Save" value="Save" />
         </div>
     </ng-form>    
 </div>
 

Happy Coding

Ahamed
Author Info

Ahamed Fazil Buhari
 
Senior Developer
 
Rate this article
 
Ahamed is a Senior Developer and he has very good experience in the field of Microsoft Technologies, especially SharePoint, Azure, M365, SPFx, .NET and client side scripting - JavaScript, TypeScript, ...read more
 

Implementing Multi-Threading in SharePoint To Upload Files using CSOM C# – An Insight

Sathish Nadarajan
 
Solution Architect
November 21, 2016
 
Rate this article
 
Views
11221

Recently, I was involved in creation of a tool (EXE) which needs to upload a bunch of files to SharePoint Online Site Collection. Somehow, we can relate that as a kind of Migration. From the Physical drive, I need to upload to a Document Library.

In this requirement, the performance was the most critical factor. Hence, I thought of implementing the Multi-Threading using Client Side Object Model. And thought of sharing with the Community.

The piece of code is straight forward using the namespace System.Threading.Tasks

The below sample code will upload a set of files to SharePoint Document Library in Multi Threaded approach.

 namespace Console.Office365
 {
     using Microsoft.SharePoint.Client;
     using Newtonsoft.Json.Linq;
     using System;
     using System.Collections.Generic;
     using System.IO;
     using System.Linq;
     using System.Threading.Tasks;
 
     class Program
     {
         static void Main(string[] args)
         {
             UploadFilesMultiThread();
         }


         public static void UploadFilesMultiThread()
         {
             string[] filePaths = System.IO.Directory.GetFiles("D:\Temp\UploadFiles");
 
             OfficeDevPnP.Core.AuthenticationManager authMgr = new OfficeDevPnP.Core.AuthenticationManager();
 
             string siteUrl = "https://*********.sharepoint.com/sites/CommunitySite/";
             string userName = "Sathish@*****.onmicrosoft.com";
             string password = "*************";


             var tasks = new List<Task>();
 
             tasks.AddRange(filePaths.Select(filePath =>
             {
                 return Task.Factory.StartNew(() =>
                 {
                     try
                     {
                         using (var ctx = authMgr.GetSharePointOnlineAuthenticatedContextTenant(siteUrl, userName, password))
                         {
                             Web web = ctx.Web;
                             ctx.Load(web);
 
                             List list = web.Lists.GetByTitle("MyDocumentsLibrary");
                             ctx.Load(list);
                             ctx.Load(list.RootFolder);
 
                             ctx.ExecuteQueryRetry();
 
                             if (System.IO.File.Exists(filePath))
                             {
                                 System.Threading.Thread.Sleep(10000);
 
                                 System.Console.ForegroundColor = ConsoleColor.Green;
                                 System.Console.WriteLine("Entered into : " + Path.GetFileName(filePath));
 
 
                                 Folder folder = web.GetFolderByServerRelativeUrl(list.RootFolder.ServerRelativeUrl);
                                 folder.UploadFile(Path.GetFileName(filePath), filePath, true);
 
                                 folder.Update();
 
                                 ctx.Load(folder);
                                 ctx.ExecuteQueryRetry();
 
                             }
                         }
                     }
                     catch (Exception ex)
                     {
                         System.Console.ForegroundColor = ConsoleColor.Red;
                         System.Console.WriteLine(ex.Message);
                     }
                 }, TaskCreationOptions.LongRunning);
             }));
 
 
             Task.WaitAll(tasks.ToArray());
 
             System.Console.WriteLine("Process Completed");
             System.Console.ReadLine();
         }
     }
 
 }
 

Hope this helps.

Happy Coding,

Sathish Nadarajan.

Author Info

Sathish Nadarajan
 
Solution Architect
 
Rate this article
 
Sathish is a Microsoft MVP for SharePoint (Office Servers and Services) having 15+ years of experience in Microsoft Technologies. He holds a Masters Degree in Computer Aided Design and Business ...read more
 

How to Upload the Display Templates into SharePoint 2013 Using PowerShell

Sathish Nadarajan
 
Solution Architect
October 15, 2015
 
Rate this article
 
Views
9640

As I said in the earlier article, the script to upload the Display Templates is as follows. I hope it does not require much explanations.

 ##================================================================================================
 ## Description	: To do the below two items.
     #1. Upload the Display Templates into Site Collection
 ## Author		: Sathish Nadarajan
 ## Date			: 06-Oct-2015
 ##================================================================================================
 
 ##============================================ Setup Input Paths ===========================================================
 
 cls
  
 $Host.UI.RawUI.WindowTitle = "-- Upload the Display Templates into Site Collection --"
 
 $StartDate = Get-Date
 Write-Host -ForegroundColor White "------------------------------------"
 Write-Host -ForegroundColor White "| Upload the Display Templates into Site Collection |"
 Write-Host -ForegroundColor White "| Started on: $StartDate |"
 Write-Host -ForegroundColor White "------------------------------------"
 
 $LogTime = Get-Date -Format yyyy-MM-dd_hh-mm
 $LogFile = ".UploadDisplayTemplates-$LogTime.rtf"
 
 #start-transcript $logfile
 
 $scriptBase = split-path $SCRIPT:MyInvocation.MyCommand.Path -parent
 Set-Location $scriptBase
 
 $ErrorActionPreference = "Stop"
 
 function AddPowerShellSnapin()
 {
     try
     {
         Write-Host "Adding PowerShell Snap-in" -ForegroundColor Green
         # Try to get the PowerShell Snappin.  If not, then adding the PowerShell snappin on the Catch Block
         Get-PSSnapin "Microsoft.SharePoint.PowerShell" 
     }
     catch
     {
         if($Error[0].Exception.Message.Contains("No Windows PowerShell snap-ins matching the pattern 'Microsoft.SharePoint.PowerShell' were found"))
         {
             Add-PSSnapin "Microsoft.SharePoint.PowerShell"
         }
     }
     Write-Host "Finished Adding PowerShell Snap-in" -ForegroundColor Green
 
 }
 
 function UploadDisplayTemplates([string]$siteUrl)
 {
     $spsite = Get-SPSite $siteUrl
     $web = $spsite.RootWeb
     $contentWebPartsDisplayTemplatesFolder = ($web).GetFolder("Content Web Parts")
     $displayTemplatesDirectory = $scriptBase + "DisplayTemplates"
     $web.AllowUnsafeUpdates=$true;
 
     #For upload all files in document library from file system
     foreach ($file in Get-ChildItem $displayTemplatesDirectory)
     {
          try
          {
                  $stream = [IO.File]::OpenRead($file.fullname)
                  $destUrl = $web.Url + "/_catalogs/masterpage/Display Templates/Content Web Parts/" + $file.Name;
                  $displayTemplateFile = $web.GetFile($destUrl)
                   
                  if($displayTemplateFile.CheckOutStatus -ne "None")
                  {
                      $contentWebPartsDisplayTemplatesFolder.files.Add($destUrl,$stream,$true)
                      $stream.close() 
                      $displayTemplateFile.CheckOut();                      
                      $displayTemplateFile.CheckIn("CheckIn by PowerShell");                         
                      $displayTemplateFile.Publish("Publish by PowerShell");                         
                       
                      $displayTemplateFile.Update();        
                      $web.Update();
                      
                      Write-Host $file.Name " Display Template Page uploaded on $web site" -ForegroundColor Green  
                       
                  }
                  else
                  {
                      $displayTemplateFile.CheckOut();
                      try
                      {
                         $contentWebPartsDisplayTemplatesFolder.Files.Add($destUrl,$stream,$true)
                      }
                      catch
                      {
                         Write-Host $_
                      }
                      $stream.close()                             
                      $displayTemplateFile.CheckIn("CheckIn by PowerShell");                         
                      $displayTemplateFile.Publish("Publish by PowerShell");                         
                       
                      $displayTemplateFile.Update();        
                      $web.Update();
                      
                       
                      Write-Host $file.Name " Display Template Page uploaded on $web site" -ForegroundColor Green  
                       
                  }
          }
          catch
          {
              Write-Host $_  
          }    
      }
   
   $web.AllowUnsafeUpdates  = $false;
 
  $web.dispose();
  $spsite.dispose();
 }
 
 try
 {
     [void][System.Reflection.Assembly]::LoadWithPartialName("Microsoft.Sharepoint")
     [void][System.Reflection.Assembly]::LoadWithPartialName("Microsoft.Sharepoint.Administration")
 
     $ConfigXmlPath = $scriptBase + "Configuration.xml"
     Write-Host "Read the Config Values" -ForegroundColor Green 
     [Xml]$Config = Get-Content $ConfigXmlPath  
     
     AddPowerShellSnapin
     UploadDisplayTemplates $Config.Configuration.PublishingSite.URL # SiteCollection URL
     
 
 }
 catch
 {
     Write-Host "Custom Exception Happened on Main : " + $Error[0].Exception.Message -ForegroundColor Red  
 }
 
 
 #stop-transcript


This PowerShell script will Add the File for the first time, and from, the second time onwards, it will check out and check in the files. Hence, we will not lose our versioning as well.


Happy Coding,

Sathish Nadarajan.

Author Info

Sathish Nadarajan
 
Solution Architect
 
Rate this article
 
Sathish is a Microsoft MVP for SharePoint (Office Servers and Services) having 15+ years of experience in Microsoft Technologies. He holds a Masters Degree in Computer Aided Design and Business ...read more
 

How to Upload the Master Pages into SharePoint 2013 Using PowerShell

Sathish Nadarajan
 
Solution Architect
 
Rate this article
 
Views
9421

As I said in the earlier article, the script to upload the JS is as follows. I hope it does not require much explanations.

 ##================================================================================================
 ## Description	: To do the below two items.
     #1. Upload the MasterPage into GVI Site Collection
 ## Author		: Sathish Nadarajan
 ## Date			: 08-Oct-2015
 ##================================================================================================
 
 ##============================================ Setup Input Paths ===========================================================
 
 cls
  
 $Host.UI.RawUI.WindowTitle = "-- Upload the MasterPage into GVI Site Collection --"
 
 $StartDate = Get-Date
 Write-Host -ForegroundColor White "------------------------------------"
 Write-Host -ForegroundColor White "| Upload the MasterPage into GVI Site Collection |"
 Write-Host -ForegroundColor White "| Started on: $StartDate |"
 Write-Host -ForegroundColor White "------------------------------------"
 
 $LogTime = Get-Date -Format yyyy-MM-dd_hh-mm
 $LogFile = ".UploadCSS-$LogTime.rtf"
 
 #start-transcript $logfile
 
 $scriptBase = split-path $SCRIPT:MyInvocation.MyCommand.Path -parent
 Set-Location $scriptBase
 
 $ErrorActionPreference = "Stop"
 
 function AddPowerShellSnapin()
 {
     try
     {
         Write-Host "Adding PowerShell Snap-in" -ForegroundColor Green
         # Try to get the PowerShell Snappin.  If not, then adding the PowerShell snappin on the Catch Block
         Get-PSSnapin "Microsoft.SharePoint.PowerShell" 
     }
     catch
     {
         if($Error[0].Exception.Message.Contains("No Windows PowerShell snap-ins matching the pattern 'Microsoft.SharePoint.PowerShell' were found"))
         {
             Add-PSSnapin "Microsoft.SharePoint.PowerShell"
         }
     }
     Write-Host "Finished Adding PowerShell Snap-in" -ForegroundColor Green
 }
 
 #http://spdev5.dev.cbre.eu/services/GVI/Style%20Library/cbre/GVI.css
 
 function UploadDisplayTemplates([string]$siteUrl)
 {
     $spsite = Get-SPSite $siteUrl
     $web = $spsite.RootWeb
     $contentWebPartsDisplayTemplatesFolder = ($web).GetFolder("Master Page Gallery")
     $displayTemplatesDirectory = $scriptBase + "MasterPages"
     $web.AllowUnsafeUpdates=$true;
 
     #For upload all files in document library from file system
     foreach ($file in Get-ChildItem $displayTemplatesDirectory)
     {
          try
          {
                  $stream = [IO.File]::OpenRead($file.fullname)
                  $destUrl = $web.Url + "/_catalogs/masterpage/" + $file.Name;
                  $displayTemplateFile = $web.GetFile($destUrl)
                   
                  if($displayTemplateFile.CheckOutStatus -ne "None")
                  {
                      $contentWebPartsDisplayTemplatesFolder.files.Add($destUrl,$stream,$true)
                      $stream.close() 
                           
                      $displayTemplateFile.CheckIn("CheckIn by PowerShell");                         
                      $displayTemplateFile.Publish("Publish by PowerShell");                         
                       
                      $displayTemplateFile.Update();        
                      $web.Update();
                      
                      Write-Host $file.Name " Master Pages uploaded on $web site" -ForegroundColor Green  
                       
                  }
                  else
                  {
                      $displayTemplateFile.CheckOut();
                      try
                      {
                         $contentWebPartsDisplayTemplatesFolder.Files.Add($destUrl,$stream,$true)
                      }
                      catch
                      {
                         Write-Host $_
                      }
                      $stream.close()                             
                      $displayTemplateFile.CheckIn("CheckIn by PowerShell");                         
                      $displayTemplateFile.Publish("Publish by PowerShell");                         
                       
                      $displayTemplateFile.Update();        
                      $web.Update();
                      
                       
                      Write-Host $file.Name " Master Pages uploaded on $web site" -ForegroundColor Green  
                       
                  }
          }
          catch
          {
              Write-Host $_  
          }    
      }
   
   $web.AllowUnsafeUpdates  = $false;
 
  $web.dispose();
  $spsite.dispose();
 }
 
 try
 {
     [void][System.Reflection.Assembly]::LoadWithPartialName("Microsoft.Sharepoint")
     [void][System.Reflection.Assembly]::LoadWithPartialName("Microsoft.Sharepoint.Administration")
     AddPowerShellSnapin
     UploadDisplayTemplates "http://spdev5.dev.cbre.eu/services/GVI" # SiteCollection URL
 }
 catch
 {
     Write-Host "Custom Exception Happened on Main : " + $Error[0].Exception.Message -ForegroundColor Red  
 }
 

This PowerShell script will Add the File for the first time, and from, the second time onwards, it will check out and check in the files. Hence, we will not lose our versioning as well.

Happy Coding,

Sathish Nadarajan.

Author Info

Sathish Nadarajan
 
Solution Architect
 
Rate this article
 
Sathish is a Microsoft MVP for SharePoint (Office Servers and Services) having 15+ years of experience in Microsoft Technologies. He holds a Masters Degree in Computer Aided Design and Business ...read more
 

How to Upload the JavaScript Files into SharePoint 2013 Using PowerShell

Sathish Nadarajan
 
Solution Architect
October 14, 2015
 
Rate this article
 
Views
11071

As I said in the earlier article, the script to upload the JS is as follows. I hope it does not require much explanations.

 ##================================================================================================
 ## Description	: To do the below two items.
     #1. Upload the Javascript into GVI Site Collection
 ## Author		: Sathish Nadarajan
 ## Date			: 08-Oct-2015
 ##================================================================================================
 
 ##============================================ Setup Input Paths ===========================================================
 
 cls
  
 $Host.UI.RawUI.WindowTitle = "-- Upload the Javascript into Site Collection --"
 
 $StartDate = Get-Date
 Write-Host -ForegroundColor White "------------------------------------"
 Write-Host -ForegroundColor White "| Upload the Javascript into Site Collection |"
 Write-Host -ForegroundColor White "| Started on: $StartDate |"
 Write-Host -ForegroundColor White "------------------------------------"
 
 $LogTime = Get-Date -Format yyyy-MM-dd_hh-mm
 $LogFile = ".UploadCSS-$LogTime.rtf"
 
 #start-transcript $logfile
 
 $scriptBase = split-path $SCRIPT:MyInvocation.MyCommand.Path -parent
 Set-Location $scriptBase
 
 $ErrorActionPreference = "Stop"
 
 function AddPowerShellSnapin()
 {
     try
     {
         Write-Host "Adding PowerShell Snap-in" -ForegroundColor Green
         # Try to get the PowerShell Snappin.  If not, then adding the PowerShell snappin on the Catch Block
         Get-PSSnapin "Microsoft.SharePoint.PowerShell" 
     }
     catch
     {
         if($Error[0].Exception.Message.Contains("No Windows PowerShell snap-ins matching the pattern 'Microsoft.SharePoint.PowerShell' were found"))
         {
             Add-PSSnapin "Microsoft.SharePoint.PowerShell"
         }
     }
     Write-Host "Finished Adding PowerShell Snap-in" -ForegroundColor Green
 }
 
 
 function UploadDisplayTemplates([string]$siteUrl)
 {
     $spsite = Get-SPSite $siteUrl
     $web = $spsite.RootWeb
     $contentWebPartsDisplayTemplatesFolder = ($web).GetFolder("Style Library")
     $displayTemplatesDirectory = $scriptBase + "JavaScripts"
     $web.AllowUnsafeUpdates=$true;
 
     #For upload all files in document library from file system
     foreach ($file in Get-ChildItem $displayTemplatesDirectory)
     {
          try
          {
                  $stream = [IO.File]::OpenRead($file.fullname)
                  $destUrl = $web.Url + "/Style Library/js/" + $file.Name;
                  $displayTemplateFile = $web.GetFile($destUrl)
                   
                  if($displayTemplateFile.CheckOutStatus -ne "None")
                  {
                      $contentWebPartsDisplayTemplatesFolder.files.Add($destUrl,$stream,$true)
                      $stream.close() 
                           
                      $displayTemplateFile.CheckIn("CheckIn by PowerShell");                         
                      $displayTemplateFile.Publish("Publish by PowerShell");                         
                       
                      $displayTemplateFile.Update();        
                      $web.Update();
                      
                      Write-Host $file.Name " Javascript uploaded on $web site" -ForegroundColor Green  
                       
                  }
                  else
                  {
                      $displayTemplateFile.CheckOut();
                      try
                      {
                         $contentWebPartsDisplayTemplatesFolder.Files.Add($destUrl,$stream,$true)
                      }
                      catch
                      {
                         Write-Host $_
                      }
                      $stream.close()                             
                      $displayTemplateFile.CheckIn("CheckIn by PowerShell");                         
                      $displayTemplateFile.Publish("Publish by PowerShell");                         
                       
                      $displayTemplateFile.Update();        
                      $web.Update();
                      
                       
                      Write-Host $file.Name " Javascript uploaded on $web site" -ForegroundColor Green  
                       
                  }
          }
          catch
          {
              Write-Host $_  
          }    
      }
   
   $web.AllowUnsafeUpdates  = $false;
 
  $web.dispose();
  $spsite.dispose();
 }
 
 try
 {
     [void][System.Reflection.Assembly]::LoadWithPartialName("Microsoft.Sharepoint")
     [void][System.Reflection.Assembly]::LoadWithPartialName("Microsoft.Sharepoint.Administration")
     AddPowerShellSnapin
     UploadDisplayTemplates "http://SiteCollection" # SiteCollection URL
 }
 catch
 {
     Write-Host "Custom Exception Happened on Main : " + $Error[0].Exception.Message -ForegroundColor Red  
 }
 
  #stop-transcript 
 

This PowerShell script will Add the File for the first time, and from, the second time onwards, it will check out and check in the files. Hence, we will not lose our versioning as well.


Happy Coding,

Sathish Nadarajan.

Author Info

Sathish Nadarajan
 
Solution Architect
 
Rate this article
 
Sathish is a Microsoft MVP for SharePoint (Office Servers and Services) having 15+ years of experience in Microsoft Technologies. He holds a Masters Degree in Computer Aided Design and Business ...read more
 

How to Upload the CSS into SharePoint 2013 Using PowerShell

Sathish Nadarajan
 
Solution Architect
 
Rate this article
 
Views
8420

As I said in the earlier article, the script to upload the CSS is as follows. I hope it does not require much explanations.

 ##================================================================================================
 ## Description	: To do the below two items.
     #1. Upload the CSS into Site Collection
 ## Author		: Sathish Nadarajan
 ## Date			: 07-Oct-2015
 ##================================================================================================
 
 ##============================================ Setup Input Paths ===========================================================
 
 cls
  
 $Host.UI.RawUI.WindowTitle = "-- Upload the CSS into Site Collection --"
 
 $StartDate = Get-Date
 Write-Host -ForegroundColor White "------------------------------------"
 Write-Host -ForegroundColor White "| Upload the CSS into Site Collection |"
 Write-Host -ForegroundColor White "| Started on: $StartDate |"
 Write-Host -ForegroundColor White "------------------------------------"
 
 $LogTime = Get-Date -Format yyyy-MM-dd_hh-mm
 $LogFile = ".UploadCSS-$LogTime.rtf"
 
 #start-transcript $logfile
 
 $scriptBase = split-path $SCRIPT:MyInvocation.MyCommand.Path -parent
 Set-Location $scriptBase
 
 $ErrorActionPreference = "Stop"
 
 function AddPowerShellSnapin()
 {
     try
     {
         Write-Host "Adding PowerShell Snap-in" -ForegroundColor Green
         # Try to get the PowerShell Snappin.  If not, then adding the PowerShell snappin on the Catch Block
         Get-PSSnapin "Microsoft.SharePoint.PowerShell" 
     }
     catch
     {
         if($Error[0].Exception.Message.Contains("No Windows PowerShell snap-ins matching the pattern 'Microsoft.SharePoint.PowerShell' were found"))
         {
             Add-PSSnapin "Microsoft.SharePoint.PowerShell"
         }
     }
     Write-Host "Finished Adding PowerShell Snap-in" -ForegroundColor Green
 
 }


 function UploadDisplayTemplates([string]$siteUrl)
 {
     $spsite = Get-SPSite $siteUrl
     $web = $spsite.RootWeb
     $contentWebPartsDisplayTemplatesFolder = ($web).GetFolder("Style Library")
     $displayTemplatesDirectory = $scriptBase + "CSSs"
     $web.AllowUnsafeUpdates=$true;
 
     #For upload all files in document library from file system
     foreach ($file in Get-ChildItem $displayTemplatesDirectory)
     {
          try
          {
                  $stream = [IO.File]::OpenRead($file.fullname)
                  $destUrl = $web.Url + "/Style Library/css/" + $file.Name;
                  $displayTemplateFile = $web.GetFile($destUrl)
                   
                  if($displayTemplateFile.CheckOutStatus -ne "None")
                  {
                      $contentWebPartsDisplayTemplatesFolder.files.Add($destUrl,$stream,$true)
                      $stream.close() 
                           
                      $displayTemplateFile.CheckIn("CheckIn by PowerShell");                         
                      $displayTemplateFile.Publish("Publish by PowerShell");                         
                       
                      $displayTemplateFile.Update();        
                      $web.Update();
                      
                      Write-Host $file.Name " CSS uploaded on $web site" -ForegroundColor Green  
                       
                  }
                  else
                  {
                      $displayTemplateFile.CheckOut();
                      try
                      {
                         $contentWebPartsDisplayTemplatesFolder.Files.Add($destUrl,$stream,$true)
                      }
                      catch
                      {
                         Write-Host $_
                      }
                      $stream.close()                             
                      $displayTemplateFile.CheckIn("CheckIn by PowerShell");                         
                      $displayTemplateFile.Publish("Publish by PowerShell");                         
                       
                      $displayTemplateFile.Update();        
                      $web.Update();
                      
                       
                      Write-Host $file.Name " CSS uploaded on $web site" -ForegroundColor Green  
                       
                  }
          }
          catch
          {
              Write-Host $_  
          }    
      }
   
   $web.AllowUnsafeUpdates  = $false;
 
  $web.dispose();
  $spsite.dispose();
 }
 
 try
 {
     [void][System.Reflection.Assembly]::LoadWithPartialName("Microsoft.Sharepoint")
     [void][System.Reflection.Assembly]::LoadWithPartialName("Microsoft.Sharepoint.Administration")
     AddPowerShellSnapin
     UploadDisplayTemplates "http://SiteCollection" # SiteCollection URL
 }
 catch
 {
     Write-Host "Custom Exception Happened on Main : " + $Error[0].Exception.Message -ForegroundColor Red  
 }
 
 
  #stop-transcript 
 

This PowerShell script will Add the File for the first time, and from, the second time onwards, it will check out and check in the files. Hence, we will not lose our versioning as well.

Let us see the other artifacts in the upcoming articles.


Happy Coding,

Sathish Nadarajan.

Author Info

Sathish Nadarajan
 
Solution Architect
 
Rate this article
 
Sathish is a Microsoft MVP for SharePoint (Office Servers and Services) having 15+ years of experience in Microsoft Technologies. He holds a Masters Degree in Computer Aided Design and Business ...read more
 

How to Upload the Page Layouts into SharePoint 2013 Using PowerShell

Sathish Nadarajan
 
Solution Architect
October 12, 2015
 
Rate this article
 
Views
10365

Already in this article, we saw how to upload the master page and the display templates into sharepoint by using PowerShell. In the same manner, during our development, there are almost 5 artifacts which needs to be uploaded frequently. We cannot rely on the WSP every time, during our development phase. Hence, we require some sort of scripts to upload/publish the below artifacts frequently.

1. Display Templates

2. Master Pages

3. CSS files

4. Javascript Files

5. Page Layouts

Almost all the files will be uploaded in a similar manner, but the slight different is the path and the folder, where we are uploading them. Based on our requirement, this could be anywhere. Some people will keep their css, js files in style library, some could keep it somewhere else. Hence, I request you guys to modify the Paths accordingly. Let us see them one by one. In this article let us see how to upload the Page Layouts in to SharePoint 2013.

 ##================================================================================================
 ## Description	: To do the below two items.
     #1. Upload the Page Layouts into Site Collection
 ## Author		: Sathish Nadarajan
 ## Date			: 08-Oct-2015
 ##================================================================================================
 
 ##============================================ Setup Input Paths ===========================================================
 
 cls
  
 $Host.UI.RawUI.WindowTitle = "-- Upload the PageLayouts into Site Collection --"
 
 $StartDate = Get-Date
 Write-Host -ForegroundColor White "------------------------------------"
 Write-Host -ForegroundColor White "| Upload the PageLayouts into Site Collection |"
 Write-Host -ForegroundColor White "| Started on: $StartDate |"
 Write-Host -ForegroundColor White "------------------------------------"
 
 $LogTime = Get-Date -Format yyyy-MM-dd_hh-mm
 $LogFile = ".UploadPageLayouts-$LogTime.rtf"
 
 #start-transcript $logfile
 
 $scriptBase = split-path $SCRIPT:MyInvocation.MyCommand.Path -parent
 Set-Location $scriptBase
 
 $ErrorActionPreference = "Stop"
 
 function AddPowerShellSnapin()
 {
     try
     {
         Write-Host "Adding PowerShell Snap-in" -ForegroundColor Green
         # Try to get the PowerShell Snappin.  If not, then adding the PowerShell snappin on the Catch Block
         Get-PSSnapin "Microsoft.SharePoint.PowerShell" 
     }
     catch
     {
         if($Error[0].Exception.Message.Contains("No Windows PowerShell snap-ins matching the pattern 'Microsoft.SharePoint.PowerShell' were found"))
         {
             Add-PSSnapin "Microsoft.SharePoint.PowerShell"
         }
     }
     Write-Host "Finished Adding PowerShell Snap-in" -ForegroundColor Green
 }
  
 
 function UploadPageLayouts([string]$siteUrl)
 {
     $spsite = Get-SPSite $siteUrl
     $web = $spsite.RootWeb
     $contentWebPartsDisplayTemplatesFolder = ($web).GetFolder("Master Page Gallery")
     $displayTemplatesDirectory = $scriptBase + "PageLayouts"
     $web.AllowUnsafeUpdates=$true;
 
     #For upload all files in document library from file system
     foreach ($file in Get-ChildItem $displayTemplatesDirectory)
     {
          try
          {
                  $stream = [IO.File]::OpenRead($file.fullname)
                  $destUrl = $web.Url + "/_catalogs/masterpage/" + $file.Name;
                  $displayTemplateFile = $web.GetFile($destUrl)
                   
                  if($displayTemplateFile.CheckOutStatus -ne "None")
                  {
                      $contentWebPartsDisplayTemplatesFolder.files.Add($destUrl,$stream,$true)
                      $stream.close() 
                           
                      $displayTemplateFile.CheckIn("CheckIn by PowerShell");                         
                      $displayTemplateFile.Publish("Publish by PowerShell");                         
                       
                      $displayTemplateFile.Update();        
                      $web.Update();
                      
                      Write-Host $file.Name " Page Layouts uploaded on $web site" -ForegroundColor Green  
                       
                  }
                  else
                  {
                      $displayTemplateFile.CheckOut();
                      try
                      {
                         $contentWebPartsDisplayTemplatesFolder.Files.Add($destUrl,$stream,$true)
                      }
                      catch
                      {
                         Write-Host $_
                      }
                      $stream.close()                             
                      $displayTemplateFile.CheckIn("CheckIn by PowerShell");                         
                      $displayTemplateFile.Publish("Publish by PowerShell");                         
                       
                      $displayTemplateFile.Update();        
                      $web.Update();
                      
                       
                      Write-Host $file.Name " Page Layouts uploaded on $web site" -ForegroundColor Green  
                       
                  }
          }
          catch
          {
              Write-Host $_  
          }    
      }
   
   $web.AllowUnsafeUpdates  = $false;
 
  $web.dispose();
  $spsite.dispose();
 }
 
 try
 {
     [void][System.Reflection.Assembly]::LoadWithPartialName("Microsoft.Sharepoint")
     [void][System.Reflection.Assembly]::LoadWithPartialName("Microsoft.Sharepoint.Administration")
     AddPowerShellSnapin
     UploadPageLayouts "http://MySiteCollection" # SiteCollection URL
 }
 catch
 {
     Write-Host "Custom Exception Happened on Main : " + $Error[0].Exception.Message -ForegroundColor Red  
 }
 

This PowerShell script will Add the File for the first time, and from, the second time onwards, it will check out and check in the files. Hence, we will not lose our versioning as well.

Let us see the other artifacts in the upcoming articles.


Happy Coding,

Sathish Nadarajan.

Author Info

Sathish Nadarajan
 
Solution Architect
 
Rate this article
 
Sathish is a Microsoft MVP for SharePoint (Office Servers and Services) having 15+ years of experience in Microsoft Technologies. He holds a Masters Degree in Computer Aided Design and Business ...read more
 

Leave a comment