How to Provision Site Columns and Content Types using Provisioning Template by Patterns and Practices PNP in SharePoint Office 365

Sathish Nadarajan
 
Solution Architect
July 16, 2016
 
Rate this article
 
Views
15404

Patterns and Practices – a very powerful tool to provision the site templates, Create Sites, Site Columns, Content Types etc., Now, in this example, let us start with how to create the Site Column and Content Type using PNP Provisioning Template.

Let me use a console application for this demo.

Create the console application and add the NuGet Packages as shown here.

Add a new folder called Template and Add an XML File inside the template and name the XML as ProvisioningTemplate.xml. We can have the name as anything. In this case, I have taken it as ProvisioningTemplate.xml

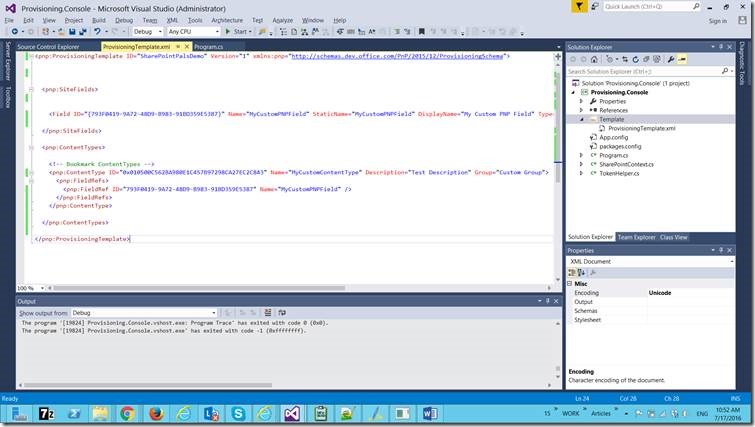
The Solution will look like below.

clip_image002

On the ProvisioningTemplate.xml, paste the content as below.

 <?xml version="1.0"?>
 <pnp:ProvisioningTemplate ID="SharePointPalsDemo" Version="1" xmlns:pnp="http://schemas.dev.office.com/PnP/2015/12/ProvisioningSchema">


   <pnp:SiteFields>
     
 
     <Field ID="{793F0419-9A72-48D9-B983-91BD359E5387}" Name="MyCustomPNPField" StaticName="MyCustomPNPField" DisplayName="My Custom PNP Field" Type="Note" Required="FALSE" RichText="FALSE" Group="My Custom PNP Fields" />
     
   </pnp:SiteFields>
 
   <pnp:ContentTypes>
 
     <!-- Bookmark ContentTypes -->
     <pnp:ContentType ID="0x010500C562BA980E1C457B97298CA27EC2C843" Name="MyCustomContentType" Description="Test Description" Group="Custom Group">
       <pnp:FieldRefs>
         <pnp:FieldRef ID="793F0419-9A72-48D9-B983-91BD359E5387" Name="MyCustomPNPField" />
       </pnp:FieldRefs>
     </pnp:ContentType>
 
   </pnp:ContentTypes>
   
 </pnp:ProvisioningTemplate>
 

Here, I am trying to Create a Site Column and a Content Type.

The below method will provision the site columns and content types mentioned in the XML.

 private static void ProvisioningDemo()
         {
             OfficeDevPnP.Core.AuthenticationManager authMgr = new OfficeDevPnP.Core.AuthenticationManager();
             string siteURL = "https://sppals.sharepoint.com/sites/VariationPublishingSite";
             string userName = "sathish@sppals.onmicrosoft.com";
             string password = "***********";
             string file = "ProvisioningTemplate.xml";
 
             string directory = "D:\PRACTICE SOURCE CODE\PNP\Provisioning.Console\Provisioning.Console\Template";
             var provisioningProvider = new XMLFileSystemTemplateProvider(directory, string.Empty);
             var provisioningTemplate = provisioningProvider.GetTemplate(file);
             provisioningTemplate.Connector.Parameters[FileConnectorBase.CONNECTIONSTRING] = directory;
 
             using (var ctx = authMgr.GetSharePointOnlineAuthenticatedContextTenant(siteURL, userName, password))
             {
                 ctx.Load(ctx.Web);
                 ctx.ExecuteQueryRetry();
                 ctx.Web.ApplyProvisioningTemplate(provisioningTemplate);
                 ctx.ExecuteQueryRetry();
             }
 
             System.Console.ReadLine();
         }
 

With the one line, the entire Site Columns can be provisioned to the Site specified. In the upcoming articles, let us have a look at how to create the entire components like provisioning master pages, site assets, etc., But one thing is sure like, by using PNP, we can provision the sites from the remove machine without even a single minute of down time.

Happy Coding,

Sathish Nadarajan.
Author Info

Sathish Nadarajan
 
Solution Architect
 
Rate this article
 
Sathish is a Microsoft MVP for SharePoint (Office Servers and Services) having 15+ years of experience in Microsoft Technologies. He holds a Masters Degree in Computer Aided Design and Business ...read more
 

How to Create XML Files as Output of PowerShell Execution – SharePoint 2013

Sathish Nadarajan
 
Solution Architect
May 11, 2016
 
Rate this article
 
Views
31065

Recently, I came up with a requirement of creating a XML file as output of PowerShell Execution. The PowerShell will gather some information from the SharePoint Farm and it needs to generate an XML file with the gathered information.

The required output is something like,

 <?xml version="1.0"?>
 <!--Get the Information about the web application-->
 <WebApplication>
   <SiteCollections>
     <SiteCollection Name="SiteCollectionTitle">
       <SubSites Count="45">
         <SubSite Title="Web title">
           <Lists>
             <List Title="ListTitle">
               <RootFolder>Root folder Title</RootFolder>
             </List>
           </Lists>
         </SubSite>
       </SubSites>
     </SiteCollection>
   </SiteCollections>
 </WebApplication>	
 

The script to create the above file is as follows,

Let us create the XML File first. To do that,

 # Assign the CSV and XML Output File Paths
     $XML_Path = "D:SathishArticleSample.xml"
     
     # Create the XML File Tags
     $xmlWriter = New-Object System.XMl.XmlTextWriter($XML_Path,$Null)
     $xmlWriter.Formatting = 'Indented'
     $xmlWriter.Indentation = 1
     $XmlWriter.IndentChar = "`t"
     $xmlWriter.WriteStartDocument()
     $xmlWriter.WriteComment('Get the Information about the web application')
     $xmlWriter.WriteStartElement('WebApplication')
     $xmlWriter.WriteEndElement()
     $xmlWriter.WriteEndDocument()
     $xmlWriter.Flush()
     $xmlWriter.Close()
     
     
     # Create the Initial  Node
     $xmlDoc = [System.Xml.XmlDocument](Get-Content $XML_Path);
     $siteCollectionNode = $xmlDoc.CreateElement("SiteCollections")
     $xmlDoc.SelectSingleNode("//WebApplication").AppendChild($siteCollectionNode)
     $xmlDoc.Save($XML_Path)
     
     $xmlDoc = [System.Xml.XmlDocument](Get-Content $XML_Path);
     $siteCollectionNode = $xmlDoc.CreateElement("SiteCollection")
     $xmlDoc.SelectSingleNode("//WebApplication/SiteCollections").AppendChild($siteCollectionNode)
     $siteCollectionNode.SetAttribute("Name", "SiteCollectionTitle")
     
     
     $subSitesNode = $siteCollectionNode.AppendChild($xmlDoc.CreateElement("SubSites"));
     $subSitesNode.SetAttribute("Count", "45")
     $xmlDoc.Save($XML_Path)
     
     $subSiteNameNode = $subSitesNode.AppendChild($xmlDoc.CreateElement("SubSite"));
     $subSiteNameNode.SetAttribute("Title", "Web title")
     
     $ListsElement = $subSiteNameNode.AppendChild($xmlDoc.CreateElement("Lists"));
     $ListElement = $ListsElement.AppendChild($xmlDoc.CreateElement("List"));
     $ListElement.SetAttribute("Title", "ListTitle")
     
     $RootFolderElement = $ListElement.AppendChild($xmlDoc.CreateElement("RootFolder"));
     $RootFolderTextNode = $RootFolderElement.AppendChild($xmlDoc.CreateTextNode("Root folder Title"));
     
     $xmlDoc.Save($XML_Path)
 

The Script seems to be very simple. It covers how to create the child element, how to set the attributes, etc.,

Happy Coding,

Sathish Nadarajan.
Author Info

Sathish Nadarajan
 
Solution Architect
 
Rate this article
 
Sathish is a Microsoft MVP for SharePoint (Office Servers and Services) having 15+ years of experience in Microsoft Technologies. He holds a Masters Degree in Computer Aided Design and Business ...read more
 

How to design a XSLT to transform XML to HTML/TEXT/CSV

Tarun Kumar Chatterjee
 
Net – Technology Specialist
January 3, 2016
 
Rate this article
 
Views
27672

XSLT can be designed to transform XML to different output formats. But before going into the actual implementation let me share you some advantages/disadvantages of using XSLT. After considering all the below points & depending on the actual scenarios, we should have to decide if XSLT can be used in live project.

Here are few more advantages of using XSLT.

1. Server-side XSLT is that the application is free of browser compatibility issues.

2. XSLT is used for user defined transformations to XML document and the output can be HTML, XML, or text. So it is easy to merge XML data into presentation.

3. XPath can be used by XSLT to locate elements/attribute within an XML document. So it is more convenient way to traverse an XML document rather than a traditional way, by using scripting language.

4. By separating data (XML document) from the presentation (XSLT), it is very easy to change the output format in any time easily without touching the code-behind.

5. Using XML and XSLT, the application UI script will look clean and will be easier to maintain

6. XSLT templates are based on XPath pattern which is very powerful in terms of performance to process the XML document

7. XML is platform independent.

Disadvantages:

1. It is difficult to implement complicate business rules in XSLT

2. Changing variable value in looping, is difficult in XSLT

3. Using XSLT have performance penalty in some cases as its engine don’t optimize code by using caching technique like traditional compiler.

Let see an implantation which simply transforms the XML file to output format as HTML using the XSLT.

First I have created a XML named as “Employees.xml”

 <?xml version="1.0" encoding="utf-8"?>
 <?xml-stylesheet href="Employees.xsl" type="text/xsl"?>
 <Employees>
   <Employee>
     <EmployeeID>1</EmployeeID>
     <EmpName>Tarun1 Chatterjee1</EmpName>
     <Department>IT1</Department>
     <PhNo>9111111111</PhNo>
     <Email>tarun1.chatterjee1@gmail.com</Email>
     <Salary>99999</Salary>
   </Employee>
   <Employee>
     <EmployeeID>2</EmployeeID>
     <EmpName>Tarun2 Chatterjee2</EmpName>
     <Department>IT2</Department>
     <PhNo>9222222222</PhNo>
     <Email>tarun2.chatterjee2@gmail.com</Email>
     <Salary>99999</Salary>
   </Employee>
   <Employee>
     <EmployeeID>3</EmployeeID>
     <EmpName>Tarun3 Chatterjee3</EmpName>
     <Department>IT3</Department>
     <PhNo>9333333333</PhNo>
     <Email>tarun3.chatterjee3@gmail.com</Email>
     <Salary>99999</Salary>
   </Employee>
   <Employee>
     <EmployeeID>4</EmployeeID>
     <EmpName>Tarun4 Chatterjee4</EmpName>
     <Department>IT4</Department>
     <PhNo>9444444444</PhNo>
     <Email>tarun4.chatterjee4@gmail.com</Email>
     <Salary>99999</Salary>
   </Employee>
 </Employees>
 

Now writing the below code in Employees.xslt file to display the output data as HTML format

 <?xml version="1.0" encoding="utf-8"?>
 <xsl:stylesheet version="1.0" xmlns:xsl="http://www.w3.org/1999/XSL/Transform"
     xmlns:msxsl="urn:schemas-microsoft-com:xslt" exclude-result-prefixes="msxsl">
 	<?xml-stylesheet href="Employees.xsl" type="text/xsl"?>
     <xsl:output method="html"/>
 
   
   <xsl:template match ="/">
     <html>
       <head> 
         <script language="javascript" type="text/javascript"></script>
       </head>
       <body>
         <h2> Employee Details</h2>
         <table border="1">
       <tr bgcolor="aqua">
         <th style="text-align:Left"> EmployeeId</th>
         <th style="text-align:Left"> Employee Name</th>
         <th style="text-align:Left"> Department</th>
         <th style="text-align:Left"> Phone No Name</th>
         <th style="text-align:Left"> Email ID</th>
         <th style="text-align:Left"> Salary</th>
       </tr>
       <xsl:for-each select="Employees/Employee">
         <tr>		
           <td>	          
             <xsl:value-of select="EmployeeID" />
           </td>		
           <td>            
             <xsl:value-of select="EmpName"/>
           </td>		
           <td>            
             <xsl:value-of select="Department"/>
           </td>		
           <td>            
             <xsl:value-of select="PhNo"/>
           </td>		
           <td>            
             <xsl:value-of select="Email"/>
           </td>		
             <td>              
               <xsl:value-of select="Salary"/>
             </td>  		
         </tr>
       </xsl:for-each>
     </table>
         <br/>
         <br/>
         <form id ="form" method="post" >        
         </form>
         </body>
     </html>
   </xsl:template>
 </xsl:stylesheet>
 

So, here <xsl:output method="html"/> is code of returning the output format as HTML.

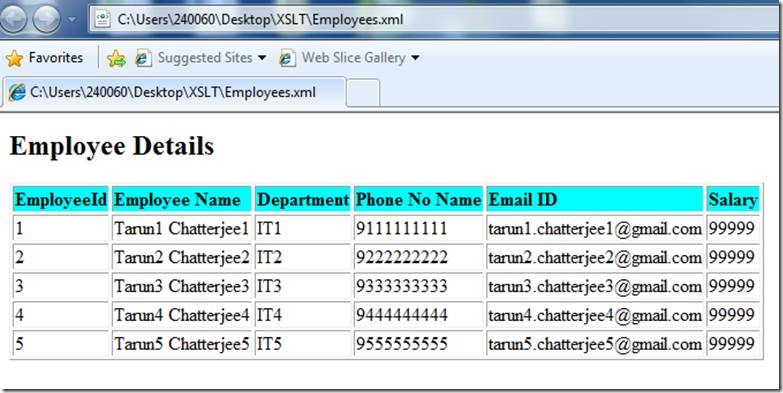
Now run the Employees.xml file in browser

clip_image002

In XSLT file, let me change the output format as “text” : <xsl:output method="text"/> & after running the same Employees.xml file in browser

clip_image004

So, depending on design of XSLT we can easily transform the XML to different output formats.

Now, let me try to modify the XSLT file so that the output will be looking like CSV.

 <?xml version="1.0" encoding="utf-8"?>
 <xsl:stylesheet version="1.0" xmlns:xsl="http://www.w3.org/1999/XSL/Transform"
     xmlns:msxsl="urn:schemas-microsoft-com:xslt" exclude-result-prefixes="msxsl">
 	<?xml-stylesheet href="Employees.xsl" type="text/xsl"?>
     <xsl:output method="text"/>
 <xsl:variable name="delimiter" select="','"/>
   
   <xsl:template match ="/">
     <html>
       <head> 
         <script language="javascript" type="text/javascript"></script>
       </head>
       <body>
         <table border="1">
         <tr bgcolor="aqua">
         <th style="text-align:Left"> EmployeeId</th>
 	      <xsl:value-of select="$delimiter"/>
         <th style="text-align:Left"> Employee Name</th>
 	      <xsl:value-of select="$delimiter"/>	
         <th style="text-align:Left"> Department</th>
 	      <xsl:value-of select="$delimiter"/>
         <th style="text-align:Left"> PhoneNumber</th>
 	      <xsl:value-of select="$delimiter"/>
         <th style="text-align:Left"> EmailID</th>
 	      <xsl:value-of select="$delimiter"/>
         <th style="text-align:Left"> Salary</th>
 	      <xsl:text>
</xsl:text>
       </tr>
       <xsl:for-each select="Employees/Employee">
         <tr>		
           <td>	          
             <xsl:value-of select="EmployeeID" />
 	    <xsl:value-of select="$delimiter"/>
           </td>		
           <td>            
             <xsl:value-of select="EmpName"/>
 	    <xsl:value-of select="$delimiter"/>
           </td>		
           <td>            
             <xsl:value-of select="Department"/>
 	    <xsl:value-of select="$delimiter"/>
           </td>		
           <td>            
             <xsl:value-of select="PhNo"/>
 	    <xsl:value-of select="$delimiter"/>
           </td>		
           <td>            
             <xsl:value-of select="Email"/>
 	    <xsl:value-of select="$delimiter"/>
           </td>		
             <td>              
               <xsl:value-of select="Salary"/>	    
             </td> 
 		  <xsl:text>
</xsl:text>
         </tr>
       </xsl:for-each>
     </table>
         <br/>
         <br/>
         <form id ="form" method="post" >        
         </form>
         </body>
     </html>
   </xsl:template>
 </xsl:stylesheet>


Here you can observe that I am using the below two lines of code to form the output display format like CSV.

<xsl:variable name="delimiter" select="’,’"/>

<xsl:value-of select="$delimiter"/>

Run the Employees.xml & the output:

clip_image006

Happy coding

Tarun Kumar Chatterjee

Category : .Net

Author Info

Tarun Kumar Chatterjee
 
Net – Technology Specialist
 
Rate this article
 
Tarun has been working in IT Industry for over 12+ years. He holds a B-tech degree. He is passionate about learning and sharing the tricks and tips in Azure, .Net ...read more
 

How to design a page & implement Create/Edit/Display data using XML, XQuery and XSLT

Tarun Kumar Chatterjee
 
Net – Technology Specialist
December 6, 2015
 
Rate this article
 
Views
5832

We can create interactive XSLT applications with the help of HTML or ASPX. With ASPX, XSLT is performed on the server side before the resulting HTML document is downloaded to the client. One of the advantages of client-side XSLT is that, once XML and XSLT files are downloaded, the application is relatively safe to server shutdown or network traffic jams.

Let me explain something more like advantages/disadvantages etc. of using XSLT in my next article.

Let see now an implantation to achieve Create/Edit/Display operations by using XML, XQuery and XSLT

First create an ASP.Net Empty web application project and add a XML named as “Employees.xml” within the project

 <?xml version="1.0" encoding="utf-8"?>
 <Employees>
   <Employee>
     <EmployeeID>1</EmployeeID>
     <EmpName>Tarun1 Chatterjee1</EmpName>
     <Department>IT1</Department>
     <PhNo>9111111111</PhNo>
     <Email>tarun1.chatterjee1@gmail.com</Email>
     <Salary>99999</Salary>
   </Employee>
   <Employee>
     <EmployeeID>2</EmployeeID>
     <EmpName>Tarun2 Chatterjee2</EmpName>
     <Department>IT2</Department>
     <PhNo>9222222222</PhNo>
     <Email>tarun2.chatterjee2@gmail.com</Email>
     <Salary>99999</Salary>
   </Employee>
   <Employee>
     <EmployeeID>3</EmployeeID>
     <EmpName>Tarun3 Chatterjee3</EmpName>
     <Department>IT3</Department>
     <PhNo>9333333333</PhNo>
     <Email>tarun3.chatterjee3@gmail.com</Email>
     <Salary>99999</Salary>
   </Employee>
   <Employee>
     <EmployeeID>4</EmployeeID>
     <EmpName>Tarun4 Chatterjee4</EmpName>
     <Department>IT4</Department>
     <PhNo>9444444444</PhNo>
     <Email>tarun4.chatterjee4@gmail.com</Email>
     <Salary>99999</Salary>
   </Employee>
 </Employees>
 

Add below Employees.xslt file within the same project. Most important part is here, within the xslt how we are storing the fields value into the variables and passing those assigned variables value to “OnEdit” function.

 ssing those assigned variables value to “OnEdit” function. 
 <?xml version="1.0" encoding="utf-8"?>
 <xsl:stylesheet version="1.0" xmlns:xsl="http://www.w3.org/1999/XSL/Transform"
     xmlns:msxsl="urn:schemas-microsoft-com:xslt" exclude-result-prefixes="msxsl">
   <?xml-stylesheet href="Employees.xsl" type="text/xsl"?>
   <xsl:output method="html"/>
   <xsl:template match ="/">
     <html>
       <head>        
       </head>
       <body>
         <h2> Employee Details</h2>
         <table border="1">
           <tr bgcolor="aqua">
             <th style="text-align:Left"> EmployeeId</th>
             <th style="text-align:Left"> Employee Name</th>
             <th style="text-align:Left"> Department</th>
             <th style="text-align:Left"> Phone No Name</th>
             <th style="text-align:Left"> Email ID</th>
             <th style="text-align:Left"> Salary</th>
           </tr>
           <xsl:for-each select="Employees/Employee">
             <tr>
               <td>   
                 <xsl:value-of select="EmployeeID"   />
               </td>
               <xsl:variable name="EmployeeID"  select="EmployeeID" />
               <td>                
                 <xsl:value-of select="EmpName"/>             
               </td>
                <xsl:variable name="EmpName" select="EmpName" />
               <td>                
                 <xsl:value-of select="Department"/>              
               </td>
               <xsl:variable name="Department" select="Department" />
               <td>                
                 <xsl:value-of select="PhNo"/>             
               </td>
                <xsl:variable name="PhNo" select="PhNo" />
               <td>                
                 <xsl:value-of select="Email"/>              
               </td>
               <xsl:variable name="Email" select="Email" />
               <td>                
                 <xsl:value-of select="Salary"/>              
               </td>
               <xsl:variable name="Salary" select="Salary" />
               <td>
                 <button id="btnEdit" type="button" onclick="OnEdit('{$EmployeeID}','{$EmpName}','{$Department}','{$PhNo}','{$Email}','{$Salary}' )" > Edit </button>
               </td>
             </tr>
           </xsl:for-each>
         </table>
         <br/>
         <br/>
         <form id ="form" method="post" action="action_page.php">         
         </form>
       </body>
     </html>
   </xsl:template>
 </xsl:stylesheet>
 

Now add XsltTest.aspx page with the following code

 <%@ Page Language="C#" AutoEventWireup="true" CodeBehind="XsltTest.aspx.cs" Inherits="XsltTest.XsltTest" %>
 
 <!DOCTYPE html>
 
 <html xmlns="http://www.w3.org/1999/xhtml">
 <head runat="server">
     <title></title>
       <script type="text/javascript">
 
           function OnEdit(empID, empName, dept, ph, email, sal) {
               document.getElementById('empid').value = empID;
               document.getElementById('empname').value = empName;
               document.getElementById('empdept').value = dept;
               document.getElementById('empphno').value = ph;
               document.getElementById('empemail').value = email;
               document.getElementById('empsalary').value = sal;
           }
 
         </script>
 </head>
 <body>
     <form id="form1" runat="server">
 
         <div>
             <table>
                 <tr>
                     <td>
                         <asp:HiddenField ID="empid" runat="server"></asp:HiddenField>
                         <asp:TextBox ID="txtSearch" runat="server"></asp:TextBox>                       
                         
                     </td>
                     <td>
                         <asp:Button ID="btnSearch" runat="server" Text="Search By Employee Name" OnClick="btnSearch_Click" />
                     </td>
                 
                  <td>
                       <asp:Button ID="btnUpdate" runat="server" Text="Update" onclick="btnUpdate_Click"> </asp:Button>
                       
                  </td>
                     <td>
                         <asp:Button ID="btnAddNew" Text="Add New Record" runat="server" onclick="btnAddNew_Click"> </asp:Button>
                     </td>
              </tr>
             </table>
         </div>
         <br />
     <div>
     
          <table>            
             <tr>
               <td> Name: </td>
               <td>
                 <input type="text" id="empname" runat="server"></input>
               </td>
             </tr>
             <tr>
               <td>Department: </td>
               <td>
                 <input type="text" id="empdept" runat="server"></input>
               </td>
             </tr>
             <tr>
               <td>Phone No: </td>
               <td>
                 <input type="text" id="empphno" runat="server"></input>
               </td>
             </tr>
             <tr>
               <td>Email: </td>
               <td>
                 <input type="text" id="empemail" runat="server"></input>
               </td>
             </tr>
             <tr>
               <td>Salary: </td>
               <td>
                 <input type="text" id="empsalary" runat="server"></input>
               </td>
             </tr>             
              <tr>
                <td></td>
                  <td>
                      <asp:Literal ID="ltlhtmloutput" runat="server" Visible="true"></asp:Literal>
                  </td>
                  
              </tr>
           </table>
 
     </div>
     </form>
 </body>
 </html>


We can easily keep the OnEdit JS function in XSLT file; it will catch all the fields value properly at row editing. We can also have the “Text”/”Button” fields in XSLT file, but to access the controls from aspx.cs page I am keeping all the fields in aspx page.

In XsltTest.aspx.cs page we will have to copy the following code

 using System;
 using System.Collections.Generic;
 using System.IO;
 using System.Linq;
 using System.Text;
 using System.Web;
 using System.Web.UI;
 using System.Web.UI.WebControls;
 using System.Xml;
 using System.Xml.XPath;
 using System.Xml.Xsl;
 
 namespace XsltTest
 {
     public partial class XsltTest : System.Web.UI.Page
     {
         protected void Page_Load(object sender, EventArgs e)
         {           
 
             if(!IsPostBack)
             {
                 XmlReader reader = XmlReader.Create(Server.MapPath("Employees.xml"));                
                 BindData(reader);
             }
            
         }
         private void BindData(XmlReader reader)
         {
             string strXSLTFile = Server.MapPath("Employees.xslt");
             
 
             // Creating XSLCompiled object    
             XslCompiledTransform objXSLTransform = new XslCompiledTransform();
             objXSLTransform.Load(strXSLTFile);
 
             // Creating StringBuilder object to hold html data and creates TextWriter object to hold data from XslCompiled.Transform method    
             StringBuilder htmlOutput = new StringBuilder();
             TextWriter htmlWriter = new StringWriter(htmlOutput);
 
             // Creating XmlReader object to read XML content    
             //XmlReader reader = XmlReader.Create(strXMLFile);
 
             // Call Transform() method to create html string and write in TextWriter object.    
             objXSLTransform.Transform(reader, null, htmlWriter);
             ltlhtmloutput.Text = htmlOutput.ToString();
 
             // Closing xmlreader object    
             reader.Close();
 
         }
 
         /// <summary>
         /// Search record 
         /// </summary>
         /// <param name="sender">button object</param>
         /// <param name="e">EventArgs object</param>
         protected void btnSearch_Click(object sender, EventArgs e)
         {
             if (txtSearch.Text.Trim() == "")
             {
                 string strXMLFile = Server.MapPath("Employees.xml");
                 XmlReader xReader = XmlReader.Create(strXMLFile);
                 BindData(xReader);
                 return;
             }
             string xpath = String.Format("/Employees/Employee[contains(translate(EmpName,'ABCDEFGHIJKLMNOPQRSTUVWXYZ', 'abcdefghijklmnopqrstuvwxyz'), '{0}')]", txtSearch.Text.ToLower());
             XmlDocument doc = new XmlDocument();
             doc.Load(Server.MapPath("Employees.xml"));
             XmlElement root = doc.DocumentElement;
             XmlNode node = root.SelectSingleNode(xpath); ;
             XmlNodeList nodeList = root.SelectNodes(xpath);
             string xmlData = string.Empty;
             if (nodeList != null & nodeList.Count > 0)
             {
                 foreach (XmlNode xNode in nodeList)
                 {
                     xmlData += xNode.OuterXml;
                 }
             }
             xmlData = @"<?xml version='1.0' encoding='utf-8'?>" + "<Employees>" + xmlData + "</Employees>";
             // Create the XmlReader object.
             XmlReader reader = ToXmlReader(xmlData);
             BindData(reader);
             
         }
         private XmlReader ToXmlReader(string value)
         {
             var settings = new XmlReaderSettings { ConformanceLevel = ConformanceLevel.Fragment, IgnoreWhitespace = true, IgnoreComments = true };
             var xmlReader = XmlReader.Create(new StringReader(value), settings);
             xmlReader.Read();
             return xmlReader;
         }
         public int Nodecount()
         {
             string xpath = String.Format("/Employees/Employee");
             XmlDocument doc = new XmlDocument();
             doc.Load(Server.MapPath("Employees.xml"));
             XmlElement root = doc.DocumentElement;
             XmlNode node = root.SelectSingleNode(xpath); ;
             XmlNodeList nodeList = root.SelectNodes(xpath);
             return nodeList.Count;
         }
         /// <summary>
         /// Add record
         /// </summary>
         /// <param name="sender">button object</param>
         /// <param name="e">EventArgs object</param>
         protected void btnAddNew_Click(object sender, EventArgs e)
         {
             int nodeCount = Nodecount();
             nodeCount = nodeCount + 1;
             XmlDocument xmlDoc = new XmlDocument();
             xmlDoc.Load(Server.MapPath("Employees.xml"));
             XmlDocumentFragment docFrag = xmlDoc.CreateDocumentFragment();
             string id = nodeCount.ToString();
             string name = empname.Value;
             string dept = empdept.Value;
             string phno = empphno.Value;
             string email = empemail.Value;
             string salary = empsalary.Value;
             docFrag.InnerXml =  "<Employee><EmployeeID>" + id + "</EmployeeID><EmpName>" + name + "</EmpName><Department>" + dept + "</Department><PhNo>" + phno +
                                 " </PhNo><Email>" + email + "</Email><Salary>" + salary + "</Salary> </Employee>";
             XmlNode childNode = xmlDoc.DocumentElement;
             childNode.InsertAfter(docFrag, childNode.LastChild);
             xmlDoc.Save(Server.MapPath("Employees.xml"));
             nodeCount = nodeCount + 1;
             Response.Write("Records Inserted");
             XmlReader reader = XmlReader.Create(Server.MapPath("Employees.xml"));
             BindData(reader);
         }
 
         /// <summary>
         /// Update record
         /// </summary>
         /// <param name="sender">button object</param>
         /// <param name="e">EventArgs object</param>
         protected void btnUpdate_Click(object sender, EventArgs e)
         {
 
             XmlDocument doc = new XmlDocument();
             doc.Load(Server.MapPath("Employees.xml"));
             XmlElement root = doc.DocumentElement;
             string x = root.FirstChild.FirstChild.InnerText;
             XmlElement firstchild = (XmlElement)root.FirstChild;
             var propcount = firstchild.ChildNodes.Count;
 
             int nodeCount = Nodecount();
           
             List<string> Employees = new List<string>();
             Employees.Add(empname.Value);
             Employees.Add(empdept.Value);
             Employees.Add(empphno.Value);
             Employees.Add(empemail.Value);
             Employees.Add(empsalary.Value);
 
             string[] s = Employees.ToArray();
             
             bool isMatch = false;
             string s1 = empid.Value.ToString();
             for (int i = 0; i < nodeCount; i++)
             {
                 for (int j = 0; j < propcount; j++)
                 {
                     if (propcount == j + 1)
                         break;
                     if (root.ChildNodes[i].ChildNodes[0].InnerText == s1)
                     {
                         root.ChildNodes[i].ChildNodes[j + 1].InnerText = s[j];
                         isMatch = true;
                     }
                 }
                 if (isMatch)
                     break;
 
             }
             doc.Save(Server.MapPath("Employees.xml"));
             XmlReader reader = XmlReader.Create(Server.MapPath("Employees.xml"));
             BindData(reader);
         }
     }
 }


Here for the Search functionality & NodeCount I am using XQuery to fetch the data from XML.

Now, rebuild the solution and run.

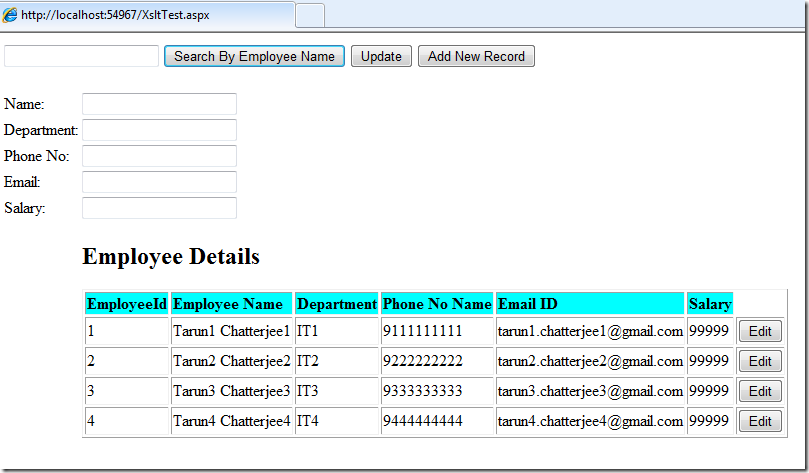
The output will be looking like:

clip_image001

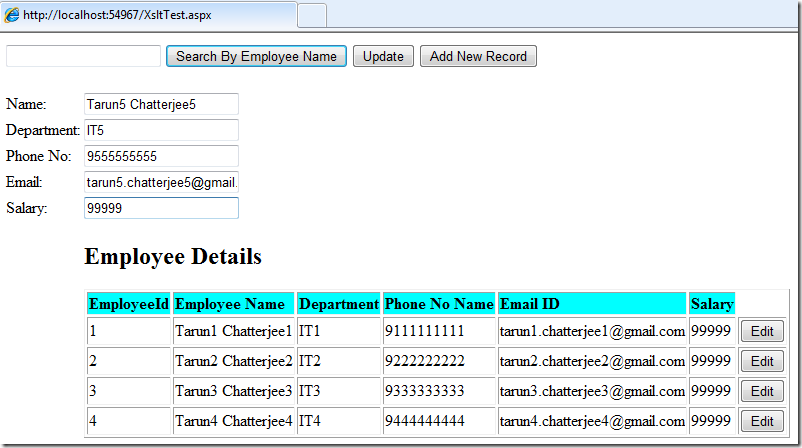
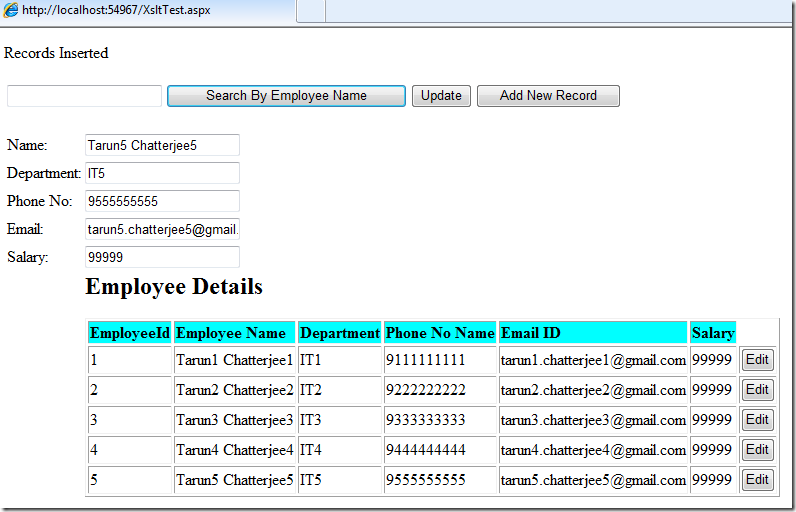
Trying to add a record

clip_image002

Press on “Add New Record” button

clip_image003

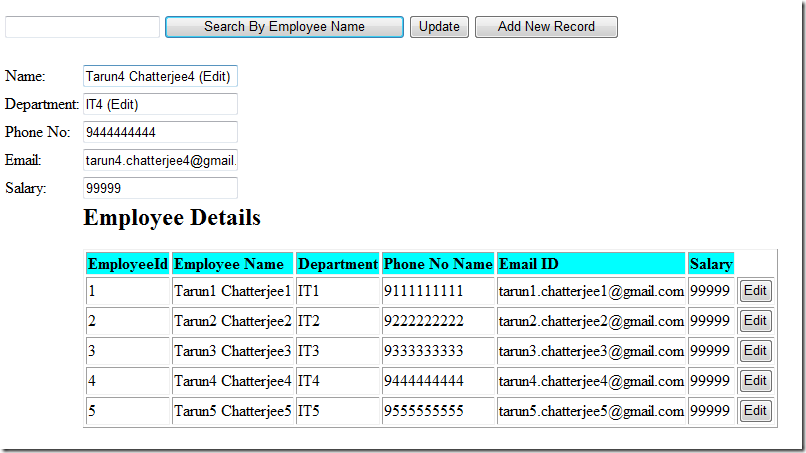
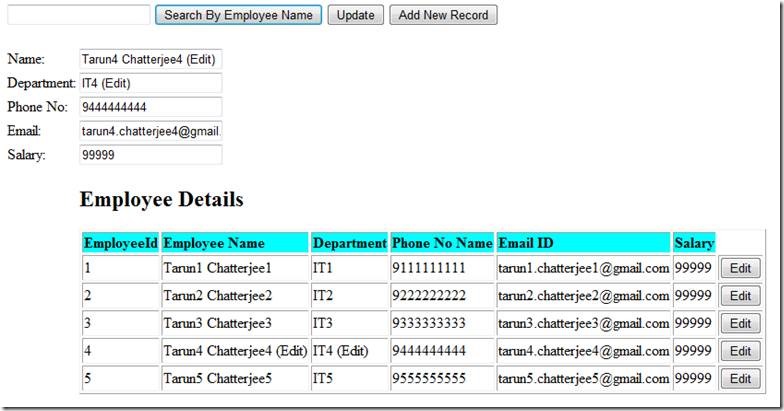
Now editing Name and Department of 4th record

clip_image004

After pressing the “Update” button

clip_image006

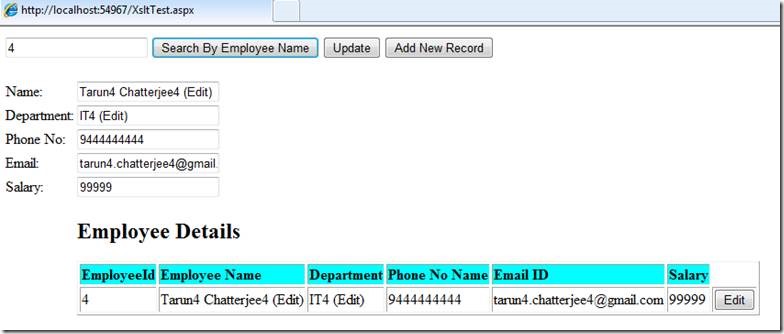
Now trying to search by a keyword “4” & then press on “Search by Employee Name” button

clip_image008

Hope this article helps you to get a basic idea to implement the XSLT in your project on need basis.

Happy coding

Tarun Kumar Chatterjee

Category : .Net

Author Info

Tarun Kumar Chatterjee
 
Net – Technology Specialist
 
Rate this article
 
Tarun has been working in IT Industry for over 12+ years. He holds a B-tech degree. He is passionate about learning and sharing the tricks and tips in Azure, .Net ...read more
 

How to handle input and output XML in SQL Server Stored Procedure

Tarun Kumar Chatterjee
 
Net – Technology Specialist
November 12, 2015
 
Rate this article
 
Views
22615

In this article let me show you how we can store the result set from a input XML to a Sql Server table and vice-versa.

First create a procedure I am passing a @InputXML as a input parameter

 CREATE PROCEDURE dbo.ParseXMLToTable
    @InputXML XML
 AS
 BEGIN
 
  	
   DECLARE @tblXMLResult TABLE
   (
 	Studentid INT,
 	Firstname VARCHAR(20),
 	Lastname VARCHAR(20),
 	Email VARCHAR(20)
   ) 
   INSERT @tblXMLResult
   (
 	Studentid,
 	Firstname ,
 	Lastname,
 	Email 
   ) 
   SELECT     
     Results.StudentList.value('Studentid[1]','int') AS Studentid,
     Results.StudentList.value('Firstname[1]','NVARCHAR(200)') AS Firstname,
     Results.StudentList.value('Lastname[1]','NVARCHAR(200)') AS Lastname,
     Results.StudentList.value('Email[1]','NVARCHAR(100)') AS Email
 
     FROM @InputXML.nodes('Results/StudentList') Results(StudentList)
 
 	SELECT * FROM @tblXMLResult
 
 END


The execute statement will be as follows:

 DECLARE @FileXML XML = '<?xml version="1.0"?>
 <Results>
   <StudentList>
     <Studentid>1</Studentid>
     <Firstname>Tarun1</Firstname>
     <Lastname>Chatterjee1</Lastname>
     <Email>tarun1@abc.com</Email>
   </StudentList>
   <StudentList>
     <Studentid>2</Studentid>
     <Firstname>Tarun2</Firstname>
     <Lastname>Chatterjee2</Lastname>
     <Email>tarun2@abc.com</Email>
   </StudentList>
   <StudentList>
     <Studentid>3</Studentid>
     <Firstname>Tarun3</Firstname>
     <Lastname>Chatterjee3</Lastname>
     <Email>tarun3@abc.com</Email>
   </StudentList>
 </Results>'
 
 EXEC dbo.ParseXMLToTable @FileXML;
 

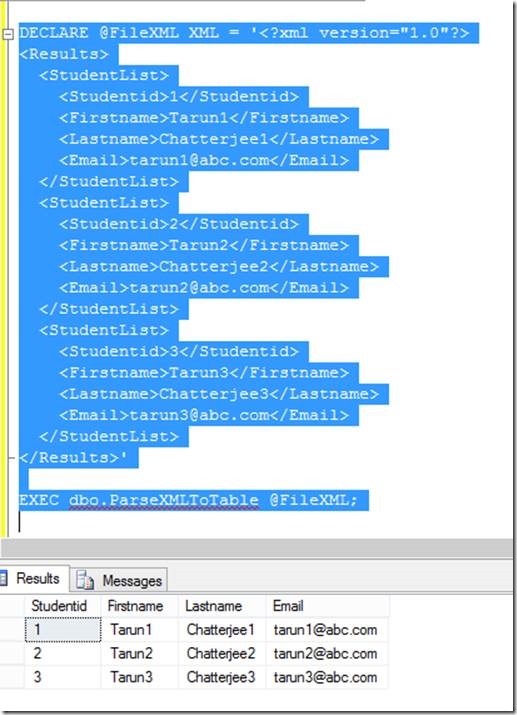
Now, the out put will be looking like:

clip_image002

Let me create another procedure which will parse a Sql Server table data to XML and moreover I am keeping the output in a OutPut parameter as because, this is the way if we want to store the output of this prcedure within a variable of a master procedure.

 CREATE PROCEDURE dbo.ParseTableToXML
    @OutputXML XML  = '' OUT
 AS
 BEGIN
 
 	DECLARE @tbl_Students TABLE
 	( 
 		[Studentid] [int] IDENTITY(1,1) NOT NULL, 
 		[Firstname] [nvarchar](200) , 
 		[Lastname] [nvarchar](200) , 
 		[Email] [nvarchar](100) 
 	)
 	INSERT  @tbl_students(Firstname,lastname,email) 
 	SELECT 'Tarun1','Chatterjee1','tarun1@abc.com' 
 	UNION ALL 
 	SELECT 'Tarun2','Chatterjee2','tarun2@abc.com' 
 	UNION ALL 
 	SELECT 'Tarun3','Chatterjee3','tarun3@abc.com' 
 	
 	SET @OutputXML = (
 						SELECT 
 						(
 							SELECT 
 								[Studentid],
 								[Firstname],
 								[Lastname],
 								[Email]
 							FROM
 								@tbl_students
 							FOR XML PATH ('StudentList'),TYPE
 						) FOR XML PATH(''), ROOT ('Results')
 					)
 
 END
 
 The execute statement will be as follows: 
 
 
 DECLARE  @Output_XML XML
 EXEC dbo.ParseTableToXML    @OutputXML = @Output_XML OUT
 SELECT @Output_XML
 
 Now, the out put will be looking like:


Now, the out put will be looking like:

clip_image003

Happy coding

Tarun Kumar Chatterjee

Category : .Net, SQL

Author Info

Tarun Kumar Chatterjee
 
Net – Technology Specialist
 
Rate this article
 
Tarun has been working in IT Industry for over 12+ years. He holds a B-tech degree. He is passionate about learning and sharing the tricks and tips in Azure, .Net ...read more
 

How to view output from SharePoint 2013 REST API as JSON instead of Atom XML

Ashok Raja
 
Solutions Architect
June 19, 2014
 
Rate this article
 
Views
7607

By default, SharePoint 2013 REST API returns output as Atom XML and there is no option to return data as JSON unless appropriate headers as passed with the request.

Usually, if you append your query with $format=json, the output would be converted into JSON in normal REST APIs. But this is not supported in SharePoint 2013 REST API and thus it rules out the possibility of viewing the data as JSON while you directly access the REST API in browser.

JQuery Ajax Request

The alternative would be perform an ajax request with passing “application/json” as “Accept” header. This would involve some JavaScript coding and jQuery request to perform the operation. Check out the “Knockout Js and (jQuery request)” topic in this blog post to learn more on how to perform this request. This article also discusses other possible options to perform the same operation with the help of jQuery

Rest Calls without jQuery

If you wish to just view the content as JSON from SharePoint REST API, then the easiest alternative would be to use Advanced REST Client Extension for Chrome. This extension allows you to perform all kinds of REST calls and also provided provision to and headers to REST Calls. To know more about other JSON tools for SharePoint, check this blog post

Download Advanced REST Client Application

Category : Share Point 2013

Author Info

Ashok Raja
 
Solutions Architect
 
Rate this article
 
I am Ashok Raja, Share Point Consultant and Architect based out of Chennai, India. ...read more
 

Leave a comment