How to Get All Items from SharePoint List and Display it in Custom HTML table with Sorting using AngularJS

Ahamed Fazil Buhari
 
Senior Developer
October 10, 2016
 
Rate this article
 
Views
18255

Hello everyone, in this article we will look into the approach on how to get all the SharePoint List Items and showing that in a Custom page using HTML table. Here we’re using two important things from AngularJS, one is $scope object and another one is $http service. To know more about $scope object and other basic stuffs in AngularJS, please refer my previous article – Basics of AngularJS in SharePoint

About $http service: HTTP is a service that Angular provides, and it is an object with methods we can use to make HTTP calls. The methods are named after the HTTP methods, so the methods on this object are GET, POST, PUT, and DELETE.

 var MainController = function ($scope, $http) {
     $scope.user = $http.get('url/users/547226'); //wrong way, bcz its async so we won’t get the result immediately.
 };


Making use of Promise

As the name implies, the promise object is an object that promises to give us some result in the future, and that output might be the data that we need, or the result might be an error if the server was unreachable or unavailable or some issue. We need to call a then method on my promise and pass the then method a function that will be called in the future.

 var MainController = function ($scope, $http) {
     var promise = $http.get('/users/547226'); 
 	promise.then(function(response){
 		$scope.user = response.data;
 });
 };
 OR
 var MainController = function ($scope, $http) {
     var onSuccess = function(response) {
 	$scope.user = response.data;
     };
     var onError = function(reason) {
 	$scope.error = “Something went wrong”;
     };
 
     $http.get('/users/547226')
 	.then(onSuccess, onError); 
 };
 

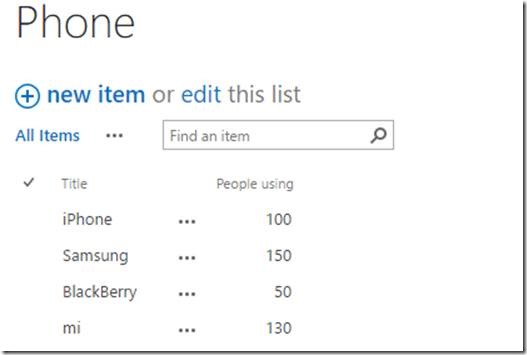
.then – This method is called when the function is ready. Let’s explain the $http service with an example. Consider that we have a SharePoint list as shown below,

clip_image002

Here, I’ve created custom page and added this below HTML element in it.

 <div id="appDiv" ng-app="myapp">
     <div id="controllerDiv" ng-controller="MyController">
         {{error}}
 	Order By:
         <select ng-model="customOrderBy">
             <option value="Title">Asc - Title</option>
             <option value="-Title">Desc - Title</option>
             <option value="People_x0020_using">Asc - Ppl using</option>
             <option value="-People_x0020_using">Desc - Ppl using</option>
         </select>
         <br />
         <table id="userDetails" border="1px solid">
             <thead>
                 <tr>
                     <th>Phone Title</th>
                     <th>No. of ppl using</th>
                 </tr>
             </thead>
             <tbody>
                 <tr ng-repeat="ppl in people | orderBy:customOrderBy">
                     <td>{{ppl.Title}}</td>
                     <td>{{ppl.People_x0020_using | number}}</td>
                 </tr>
             </tbody>
         </table>
     </div>
 </div>
 

In my previous article I’ve explained about some very common directives like ng-app, ng-controller, ng-model in AngularJS. Here we’ve another useful directives ng-repeat and filter.

ng-repeat: ng-repeat="ppl in people" , ng-repeat is a lot like foreach loop in C#.

filters: In addition to directives, Angular also has the concept of filters. A filter is something that we invoke and pipe data through, by using the symbol | and then the name of the filter (number, currency, lowercase, uppercase etc.)

Basic format: expression | filterName:parameter

Name 
currency{{amount | currency:”USD$”}}
date{{startDate | date:’short’}}
filterppl in people | filter:Title
json{{ ppl | json }}
limitToppl in people | limitTo:10
lowercase, uppercase{{ ppl.name || uppercase }}
number{{ count | number }}
orderByppl in people | filter: searchTerm| orderBy: ‘Title’

Added the below script in my JS file,

 (function () { //IIFE 
 
     //Creating a Module
     var app = angular.module("myapp", []);
 
     var MyController = function ($scope, $http) {
 
         var json_listdata = {};
 
         var onSuccess = function (response) {
             //this result will be in json format, so we are getting the 'value' from the 'response.data'
             var json_values = response.data.value;
      //we assign it simply like shown below
 	     $scope.people = json_values;
             /*or we can iterate through all the items and assign it to our own jsom obj
             $.each(json_values, function (key, val) {
                 var jsonObj_Values = {};
                 jsonObj_Values["Title"] = val.Title;
                 jsonObj_Values["People Using"] = val.People_x0020_using;
 
                 json_listdata[val.ID] = jsonObj_Values;
             });
             //assigning the value into angular $scope element 
             $scope.people = json_listdata;
      */
         };
 
         var onError = function (reason) {
             $scope.error = "Could not fetch, something went wrong";
         };
 
         function getSPListItems() {
             var getURLVal = _spPageContextInfo.webAbsoluteUrl + "/_api" + "/web/lists/getbytitle('Phone')/Items?$select=*";
             //getURLVal, this only tells from which list and what items under what condition it should be fetched
             //$http.get
             $http.get(getURLVal)
 	          .then(onSuccess, onError);
         }
 
         getSPListItems();
 
     };
 
     //Registering the controller in the module
     app.controller("MyController", MyController);
 
 }());
 

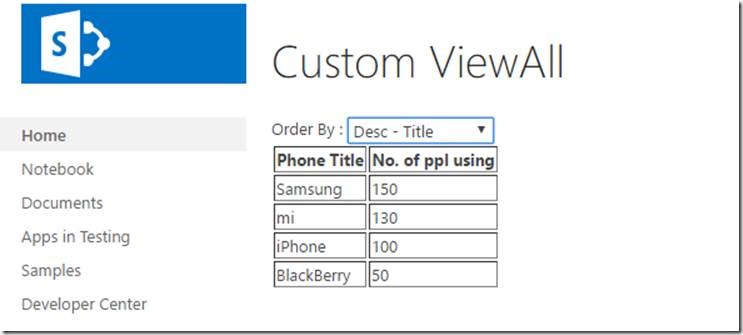
And the output will be shown as below,

clip_image004

Based upon the Order By: dropdown value, the ordering in the table will differ. I hope, you got some idea about $http service and ng-repeat from this article.

Happy Coding

Ahamed
Author Info

Ahamed Fazil Buhari
 
Senior Developer
 
Rate this article
 
Ahamed is a Senior Developer and he has very good experience in the field of Microsoft Technologies, especially SharePoint, Azure, M365, SPFx, .NET and client side scripting - JavaScript, TypeScript, ...read more
 

How to design a XSLT to transform XML to HTML/TEXT/CSV

Tarun Kumar Chatterjee
 
Net – Technology Specialist
January 3, 2016
 
Rate this article
 
Views
27673

XSLT can be designed to transform XML to different output formats. But before going into the actual implementation let me share you some advantages/disadvantages of using XSLT. After considering all the below points & depending on the actual scenarios, we should have to decide if XSLT can be used in live project.

Here are few more advantages of using XSLT.

1. Server-side XSLT is that the application is free of browser compatibility issues.

2. XSLT is used for user defined transformations to XML document and the output can be HTML, XML, or text. So it is easy to merge XML data into presentation.

3. XPath can be used by XSLT to locate elements/attribute within an XML document. So it is more convenient way to traverse an XML document rather than a traditional way, by using scripting language.

4. By separating data (XML document) from the presentation (XSLT), it is very easy to change the output format in any time easily without touching the code-behind.

5. Using XML and XSLT, the application UI script will look clean and will be easier to maintain

6. XSLT templates are based on XPath pattern which is very powerful in terms of performance to process the XML document

7. XML is platform independent.

Disadvantages:

1. It is difficult to implement complicate business rules in XSLT

2. Changing variable value in looping, is difficult in XSLT

3. Using XSLT have performance penalty in some cases as its engine don’t optimize code by using caching technique like traditional compiler.

Let see an implantation which simply transforms the XML file to output format as HTML using the XSLT.

First I have created a XML named as “Employees.xml”

 <?xml version="1.0" encoding="utf-8"?>
 <?xml-stylesheet href="Employees.xsl" type="text/xsl"?>
 <Employees>
   <Employee>
     <EmployeeID>1</EmployeeID>
     <EmpName>Tarun1 Chatterjee1</EmpName>
     <Department>IT1</Department>
     <PhNo>9111111111</PhNo>
     <Email>tarun1.chatterjee1@gmail.com</Email>
     <Salary>99999</Salary>
   </Employee>
   <Employee>
     <EmployeeID>2</EmployeeID>
     <EmpName>Tarun2 Chatterjee2</EmpName>
     <Department>IT2</Department>
     <PhNo>9222222222</PhNo>
     <Email>tarun2.chatterjee2@gmail.com</Email>
     <Salary>99999</Salary>
   </Employee>
   <Employee>
     <EmployeeID>3</EmployeeID>
     <EmpName>Tarun3 Chatterjee3</EmpName>
     <Department>IT3</Department>
     <PhNo>9333333333</PhNo>
     <Email>tarun3.chatterjee3@gmail.com</Email>
     <Salary>99999</Salary>
   </Employee>
   <Employee>
     <EmployeeID>4</EmployeeID>
     <EmpName>Tarun4 Chatterjee4</EmpName>
     <Department>IT4</Department>
     <PhNo>9444444444</PhNo>
     <Email>tarun4.chatterjee4@gmail.com</Email>
     <Salary>99999</Salary>
   </Employee>
 </Employees>
 

Now writing the below code in Employees.xslt file to display the output data as HTML format

 <?xml version="1.0" encoding="utf-8"?>
 <xsl:stylesheet version="1.0" xmlns:xsl="http://www.w3.org/1999/XSL/Transform"
     xmlns:msxsl="urn:schemas-microsoft-com:xslt" exclude-result-prefixes="msxsl">
 	<?xml-stylesheet href="Employees.xsl" type="text/xsl"?>
     <xsl:output method="html"/>
 
   
   <xsl:template match ="/">
     <html>
       <head> 
         <script language="javascript" type="text/javascript"></script>
       </head>
       <body>
         <h2> Employee Details</h2>
         <table border="1">
       <tr bgcolor="aqua">
         <th style="text-align:Left"> EmployeeId</th>
         <th style="text-align:Left"> Employee Name</th>
         <th style="text-align:Left"> Department</th>
         <th style="text-align:Left"> Phone No Name</th>
         <th style="text-align:Left"> Email ID</th>
         <th style="text-align:Left"> Salary</th>
       </tr>
       <xsl:for-each select="Employees/Employee">
         <tr>		
           <td>	          
             <xsl:value-of select="EmployeeID" />
           </td>		
           <td>            
             <xsl:value-of select="EmpName"/>
           </td>		
           <td>            
             <xsl:value-of select="Department"/>
           </td>		
           <td>            
             <xsl:value-of select="PhNo"/>
           </td>		
           <td>            
             <xsl:value-of select="Email"/>
           </td>		
             <td>              
               <xsl:value-of select="Salary"/>
             </td>  		
         </tr>
       </xsl:for-each>
     </table>
         <br/>
         <br/>
         <form id ="form" method="post" >        
         </form>
         </body>
     </html>
   </xsl:template>
 </xsl:stylesheet>
 

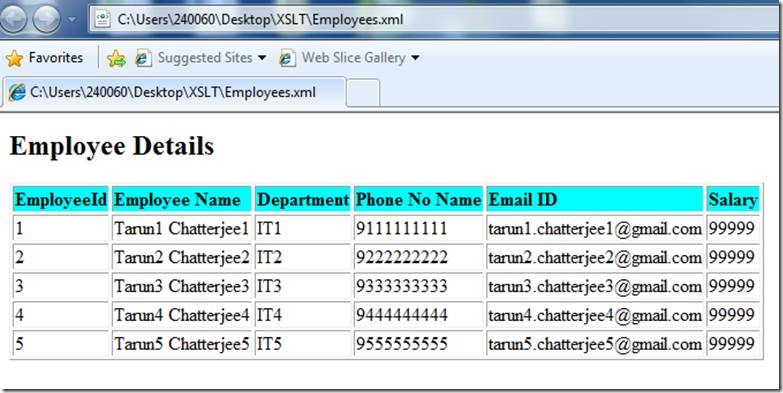
So, here <xsl:output method="html"/> is code of returning the output format as HTML.

Now run the Employees.xml file in browser

clip_image002

In XSLT file, let me change the output format as “text” : <xsl:output method="text"/> & after running the same Employees.xml file in browser

clip_image004

So, depending on design of XSLT we can easily transform the XML to different output formats.

Now, let me try to modify the XSLT file so that the output will be looking like CSV.

 <?xml version="1.0" encoding="utf-8"?>
 <xsl:stylesheet version="1.0" xmlns:xsl="http://www.w3.org/1999/XSL/Transform"
     xmlns:msxsl="urn:schemas-microsoft-com:xslt" exclude-result-prefixes="msxsl">
 	<?xml-stylesheet href="Employees.xsl" type="text/xsl"?>
     <xsl:output method="text"/>
 <xsl:variable name="delimiter" select="','"/>
   
   <xsl:template match ="/">
     <html>
       <head> 
         <script language="javascript" type="text/javascript"></script>
       </head>
       <body>
         <table border="1">
         <tr bgcolor="aqua">
         <th style="text-align:Left"> EmployeeId</th>
 	      <xsl:value-of select="$delimiter"/>
         <th style="text-align:Left"> Employee Name</th>
 	      <xsl:value-of select="$delimiter"/>	
         <th style="text-align:Left"> Department</th>
 	      <xsl:value-of select="$delimiter"/>
         <th style="text-align:Left"> PhoneNumber</th>
 	      <xsl:value-of select="$delimiter"/>
         <th style="text-align:Left"> EmailID</th>
 	      <xsl:value-of select="$delimiter"/>
         <th style="text-align:Left"> Salary</th>
 	      <xsl:text>
</xsl:text>
       </tr>
       <xsl:for-each select="Employees/Employee">
         <tr>		
           <td>	          
             <xsl:value-of select="EmployeeID" />
 	    <xsl:value-of select="$delimiter"/>
           </td>		
           <td>            
             <xsl:value-of select="EmpName"/>
 	    <xsl:value-of select="$delimiter"/>
           </td>		
           <td>            
             <xsl:value-of select="Department"/>
 	    <xsl:value-of select="$delimiter"/>
           </td>		
           <td>            
             <xsl:value-of select="PhNo"/>
 	    <xsl:value-of select="$delimiter"/>
           </td>		
           <td>            
             <xsl:value-of select="Email"/>
 	    <xsl:value-of select="$delimiter"/>
           </td>		
             <td>              
               <xsl:value-of select="Salary"/>	    
             </td> 
 		  <xsl:text>
</xsl:text>
         </tr>
       </xsl:for-each>
     </table>
         <br/>
         <br/>
         <form id ="form" method="post" >        
         </form>
         </body>
     </html>
   </xsl:template>
 </xsl:stylesheet>


Here you can observe that I am using the below two lines of code to form the output display format like CSV.

<xsl:variable name="delimiter" select="’,’"/>

<xsl:value-of select="$delimiter"/>

Run the Employees.xml & the output:

clip_image006

Happy coding

Tarun Kumar Chatterjee

Category : .Net

Author Info

Tarun Kumar Chatterjee
 
Net – Technology Specialist
 
Rate this article
 
Tarun has been working in IT Industry for over 12+ years. He holds a B-tech degree. He is passionate about learning and sharing the tricks and tips in Azure, .Net ...read more
 

HTML5 Video Tag – Strange Behavior of SharePoint 2013

Sathish Nadarajan
 
Solution Architect
October 17, 2015
 
Rate this article
 
Views
10194

In the recent requirement, I came across a strange behavior of SharePoint 2013 over the HTML5 Video Tag. Actually the requirement was like, I need to add a HTML Video Tag on my Content Site, Publishing Page, and when the crawl happens, and I tried to display it inside a Catalogue Item Reuse WebPart. At that time, what happens, the Video Tag Renders Properly. But with out the Controls Attribute.

The default syntax which I used to upload the video tag is as follows.

 <video width="400" controls>
   <source src="http://www.w3schools.com/html/mov_bbb.mp4" type="video/mp4">
    
   Your browser does not support HTML5 video.
 </video>
 

But actually when rendering in the Publishing Side, it renders like

 <video width="400" >
   <source src="http://www.w3schools.com/html/mov_bbb.mp4" type="video/mp4">
    
   Your browser does not support HTML5 video.
 </video>
 

The only difference is the controls attribute.

After some investigation I came up with a work around. Added a Script Editor WebPart on the Page and added the below script to that.

 <script>
 "use strict"; 
 
 $(document).ready(function(){
 
 var arraysOfIds = $('#MyDIV video').map(function () {
 
                 
 this.setAttribute("controls", "true");
 
             }).get();
    
    
 });
 
 </script>
 

Actually the implementation is like, I am allowing the SharePoint to render all its content and I am searching for the Video tag within myDiv and adding the Attribute Controls to that. Though it looks very small piece, but it consumed couple of hours for me to identify the solution/workaround. I would not say this as a complete solution. But hope this helps.


Happy Coding,

Sathish Nadarajan.

Author Info

Sathish Nadarajan
 
Solution Architect
 
Rate this article
 
Sathish is a Microsoft MVP for SharePoint (Office Servers and Services) having 15+ years of experience in Microsoft Technologies. He holds a Masters Degree in Computer Aided Design and Business ...read more
 

How to remove some elements within the Div using JQuery

Sathish Nadarajan
 
Solution Architect
August 17, 2015
 
Rate this article
 
Views
13330

In the previous article, we saw how to export the data into Excel using Javascript. At that time, I faced some issues like, while exporting, the HTML contains some unwanted Image Tags, Anchor Tags etc., So before writing them on the Excel, I need to remove all those elements.

This can be done in two ways. Either we can manipulate the HTML string and using some regex, we can remove the unwanted elements. Or else, we can go with JQuery to get the corresponding Elements and using the remove() method.

The syntax is very straight forward.

 $(‘#MyDiv img’).map(function(){
 $(this).remove();
 });
 

The above syntax will remove all the images within the Div “MyDiv”. In the same manner, we can remove all the unwanted Elements.

Though it looks very small, this will definitely save at least an hour of effort.


Happy Coding,

Sathish Nadarajan.

Author Info

Sathish Nadarajan
 
Solution Architect
 
Rate this article
 
Sathish is a Microsoft MVP for SharePoint (Office Servers and Services) having 15+ years of experience in Microsoft Technologies. He holds a Masters Degree in Computer Aided Design and Business ...read more
 

How to Export a HTML Table to Excel using Javascript

Sathish Nadarajan
 
Solution Architect
August 16, 2015
 
Rate this article
 
Views
41429

In the recent SharePoint development changes, I noticed that, most of the customers are moving towards the Client side development. Especially the CSOM and the JSOM. In the same manner, I met with an interesting requirement like, I need to export a HTML table like structure to Export using the Javascript. As I mentioned earlier, nobody wants C# to be written nowadays.

So let us see, how it is going to be.

I have a button like this.

 <button id="btnExport" onclick="fnExcelReport();"> EXPORT </button>

On Click of that button, let me call a method called fnExcelReport().

 function fnExcelReport()
         {
               var tab_text="<table border='2px'><tr bgcolor='#87AFC6'>";
               var textRange; var j=0;
               tab = document.getElementById('{818AAD80-3CAD-48C6-AABA-D0A225A4D08F}-{70352EC0-82B2-4175-98A2-84A9B95003BA}'); // id of table
 
               for(j = 0 ; j < tab.rows.length ; j++) 
               {     
                     tab_text=tab_text+tab.rows[j].innerHTML+"</tr>";
                     //tab_text=tab_text+"</tr>";
               }
 
               tab_text=tab_text+"</table>";
  
 
               var ua = window.navigator.userAgent;
               var msie = ua.indexOf("MSIE "); 
 
               if (msie > 0 || !!navigator.userAgent.match(/Trident.*rv:11./))      // If Internet Explorer
               {
                  txtArea1.document.open("txt/html","replace");
                  txtArea1.document.write(tab_text);
                  txtArea1.document.close();
                  txtArea1.focus(); 
                  sa=txtArea1.document.execCommand("SaveAs",true,"Global View Task.xls");
               }  
               else //other browser not tested on IE 11
                  sa = window.open('data:application/vnd.ms-excel,' + encodeURIComponent(tab_text));  
                 return (sa);
         }
 

Before that, I need to keep a hidden Iframe anywhere on the document. This requires only for the Internet Explorer. The other browsers don’t require this. Because, the lengthy content cannot be rendered in the IE.

The hidden Iframe is like

 <iframe id="txtArea1" style="display:none"></iframe>


Happy Coding,

Sathish Nadarajan.

Category : JavaScript, SharePoint

Author Info

Sathish Nadarajan
 
Solution Architect
 
Rate this article
 
Sathish is a Microsoft MVP for SharePoint (Office Servers and Services) having 15+ years of experience in Microsoft Technologies. He holds a Masters Degree in Computer Aided Design and Business ...read more
 

How to Create Master Page Using Design Manager in SharePoint 2013

Santhosh Babu
 
Technology Specialist
December 30, 2013
 
Rate this article
 
Views
35671

Design Manager is one of the new feature introduced in SharePoint 2013. Using Design Manager, the Branding and Customization can be done very easily in SharePoint 2013. Design Manager only available on publishing site template and the other default templates does not have this feature. Design Manager has a lot of features.  In this post I tried to give a broad idea about Design Manager by converting HTML file to Master page.

Before diving into design manager, First we need to create wireframe in HTML. The wireframe needs to contain HTML, CSS, images and other support files.

I have provided the sample files.

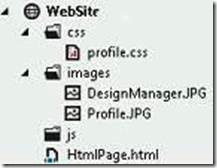
The following is a sample HTML wireframe source and structure.

Structure

clip_image002

Source

1) HTMLPage

 <html>
 <head>
     <title>My Blogs</title>
     <link href="css/profile.css" rel="stylesheet" />
 </head>
 <body>
 
     <div class="page_layout">
         <div class="profilepicture">
 <img class="imgsize" src="images/Profile.JPG" />
         </div>
         <div class="blogtitle">
             Create Master Page using design manager in SharePoint 2013
         </div>
         <div class="pervioustitle">
             <ul class="bloglist">
                 <li>Previous Blog one</li>
                 <li>Previous Blog two</li>
                 <li>Previous Blog three</li>
                 <li>Previous Blog four</li>
             </ul>
         </div>
         <div class="blogcontent">
             sample bolg content sample bolg content sample bolg content sample bolg content sample bolg content sample bolg content sample bolg content sample bolg content sample bolg content sample bolg content sample bolg content sample bolg content sample bolg content sample bolg content sample bolg content sample bolg content sample bolg content sample bolg content sample bolg content sample bolg content sample bolg content sample bolg content                         
             <img src="images/DesignManager.JPG" />
         </div>
     </div>
 
 </body>
 </html>
 

2) CSS

 body {
     font-family: Calibri;
     width: 98%;
 }
 
 div {
     word-wrap: break-word;
 }
 
 .page_layout {
     padding: 10px 0px 0px 0px;
 }
 
 .profilepicture {
     float: left;
     width: 20%;
     height: 200px;
     position: fixed;
 }
 .imgsize {
     width:100%;
     height:100%
 }
 .blogtitle {
     width: 78%;
     float: right;
     font-size: x-large;
     font-weight: bold;
     color: #0000FF;    
     text-decoration:underline;    
 }
 
 .pervioustitle {
     width: 20%;
     padding: 200px 10px 0px 0px;
     float: left;
     position: fixed;
 }
 
 ul.bloglist {
     list-style-type: circle;
     font-size: medium;
     font-weight: bold;
     font-style: italic;
     color: #000066;
 }
 
 .blogcontent {
     float: right;
     width: 78%;
     padding: 20px 5px 0px 5px;
     top: 20px;
 }
 

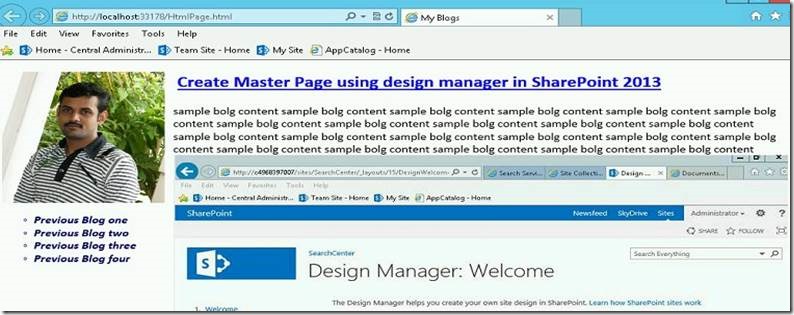
HTML Page View


clip_image004


The following is a step by step procedure for creating master page using design manager.

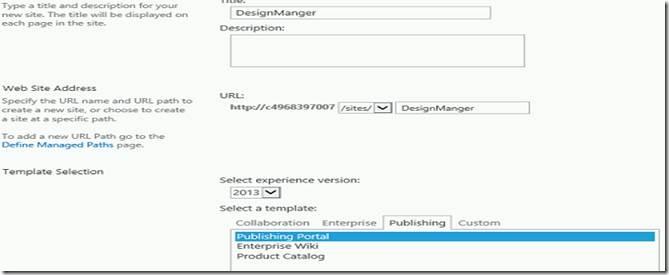
Step 1:

Create new publish portal site collection

clip_image006

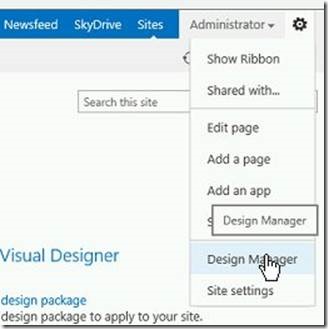
Step 2:

Open the site then click design manager link from right top corner "Settings" menu.

clip_image008

Step 3:

Click the upload design files for “Map the following location as a network drive so you can work easily with your design files: “

clip_image010


Click the URL and it will provide the network path then map the network drive

clip_image012

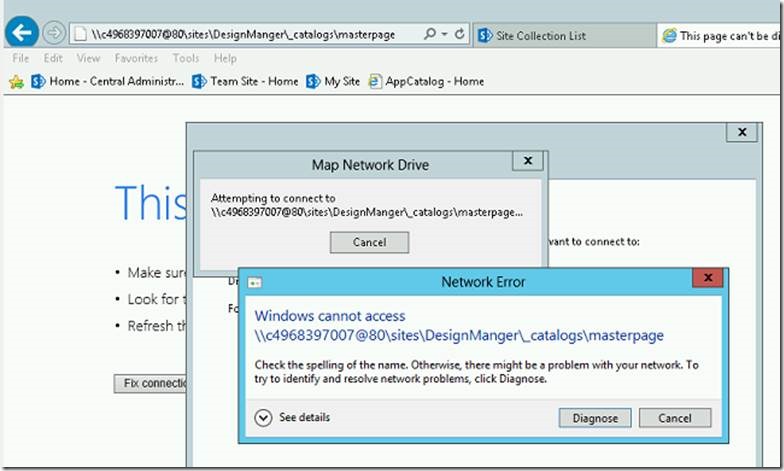
If you face the following error.clip_image014

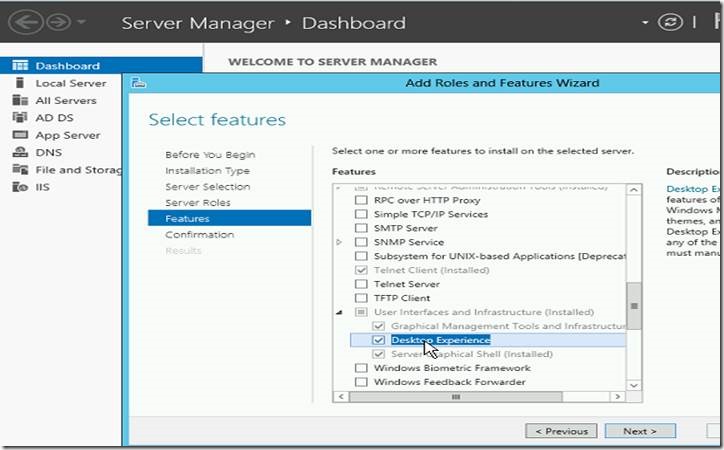
Then add the “Desktop Experience” feature to your server using Server Manager.


clip_image016


Once the feature activated then maps the network drive.


Step 4:

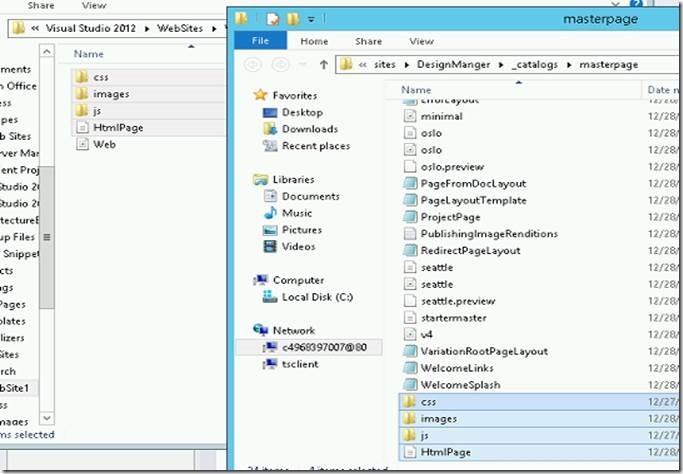
Open the source drive (HTML Wireframe path) and copy all the supported files then paste to destination drive (mapped path).

clip_image018


Step 5:

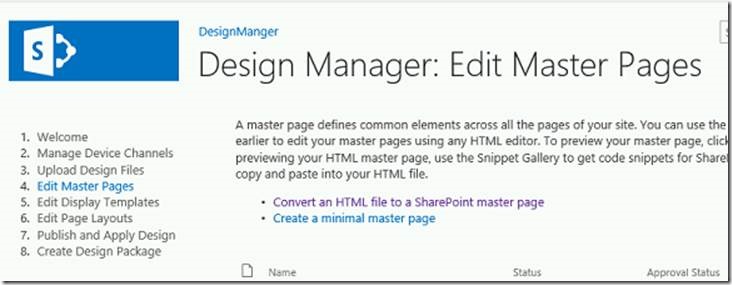
Again open the design manger then click Edit Master Pages and click “Convert HTML file to SharePoint Master Page”

clip_image020


Step 6:

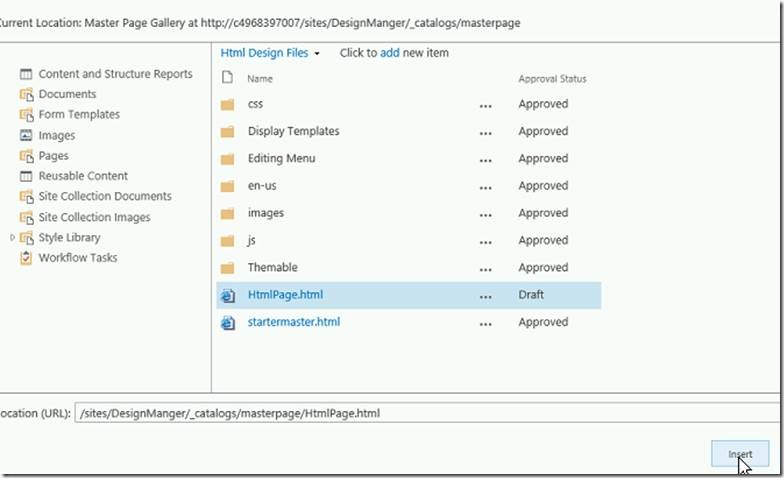
It will open a pop up window then select the htmlpage (which you have uploaded) then click insert

clip_image022

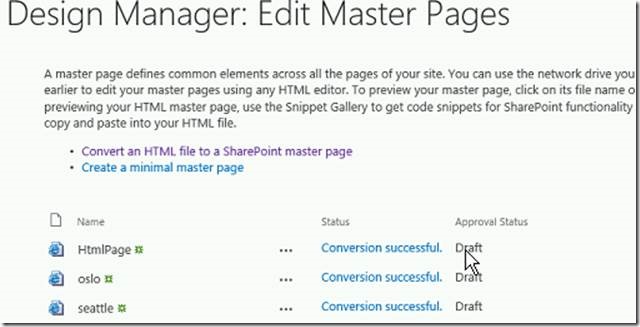
Automatically converted from HTML to SharePoint Master Page. The approval status is DRAFT.


clip_image024


Step 7:

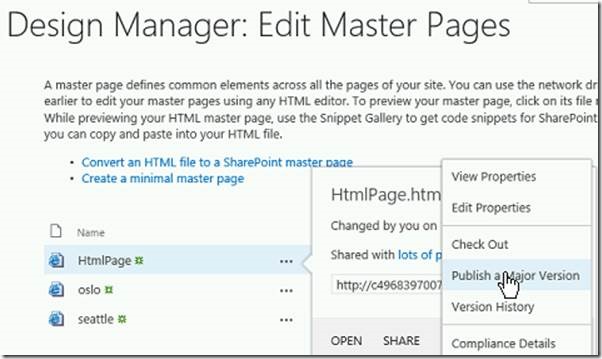
Once the conversion is completed click the Htmlpage.html check the preview and see the master page then back to the design manager and publish the page.


clip_image026


clip_image028


Step 8:

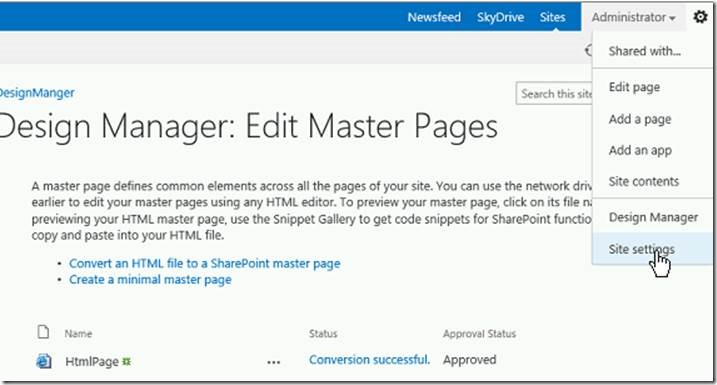
After publishing the page click setting menu and select “Site setting” link

clip_image030


Step 9:


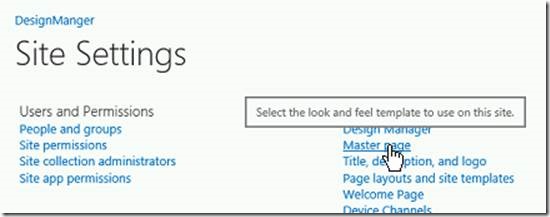
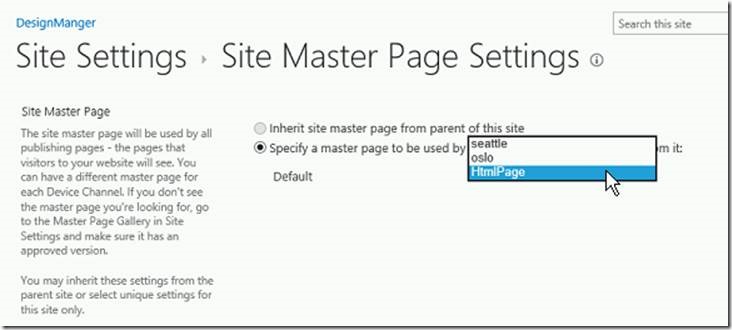
Click Master Page link and select the HTMLPage in site master page category drop down menu then click ok button.


clip_image032


clip_image034


Step 10:

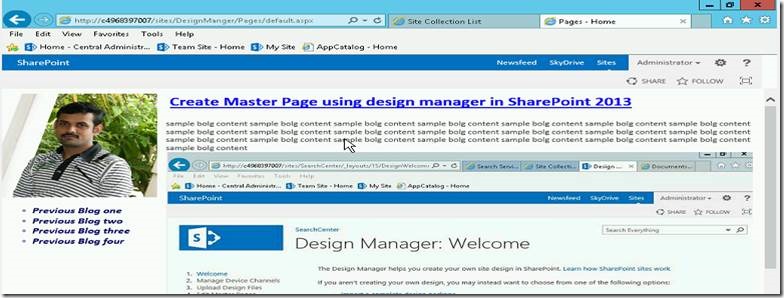
Click the home page the Htmlpage converted to SharePoint Master Page with default menus.

clip_image036


In next article, let us see the code snippet and create design manager master page package.


Happy Coding.

SanthoshBabu ManickaMohan

Category : SharePoint

Author Info

Santhosh Babu
 
Technology Specialist
 
Rate this article
 
Working as a Technology Specialist in SharePoint ~ Cognizant ...read more
 

Leave a comment