How to Insert Google Charts Image into PDF using iTextSharp in SharePoint

Ahamed Fazil Buhari
 
Senior Developer
August 28, 2016
 
Rate this article
 
Views
11020

Hello everyone, in this article we’re going to look step by step approach to insert Google Chart into PDF. Here, the idea is to get the ImageURI from the printed google chart using JavaScript and append that Image into our newly created PDF file.

You can refer these articles Generate PDF report using iTextSharp (.NET PDF library) in SharePoint Environment and Google Chart in SharePoint – to get an idea about Google Chart and iTextSharp dll to Generate PDF in SharePoint.

Google Chart provide the function getImageURI() and by using JavaScript we’ll get the PNG Image of a chart. Pass this image/png data into our server side code and convert this into Base64 format and finally we can easily convert this Base64 data into .NET Image object which can be later inserted into the PDF file using iTextSharp.

Note: getImageURI() function currently works for core charts and geocharts. You can refer Google Chart – official website to know more about Printing PNG Charts

Let me explain about the process in step by step procedure,

Step 1: Convert Google Chart into Image URI using chart.getImageURI();

Here, I’ve created the Visual Web Part and inside the ascx controller Pie Chart to show the data. I consider that you the knowledge to create the Google, so I show only the code that needs to be added for PNG Chart.

 <script type="text/javascript" language="javascript">
     // script to create Google Chart, leaving it to the reader
     var chart = new google.charts.Bar(document.getElementById("Piechart_Phone"));
     var imgURI_Phone = “”;
     // Wait for the chart to finish drawing before calling the getImageURI() method.
       google.visualization.events.addListener(chart, 'ready', function () {
         imgURI_Phone = chart.getImageURI();        
         document.getElementById('<%=hdImgSrcChart.ClientID %>').value = imgURI_Phone;
       });    
     
     chart.draw(data, options);    
   
 </script>
 
 <asp:HiddenField ID="hdImgSrcChart" runat="server" />
 <div id='chart_content_div' style='top: 0; left: 0; position: absolute; visibility: hidden;
     width: 100% !important; height: 100% !important;'>
     <div id='Piechart_Phone' style='width: 650px; height: 600px; top: 0; left: 0;'>
     </div>
 </div>
 

Once we get the PNG data from client side scripting, we are passing its value to server side code using HiddenField element as shown above. getImageURI will return the value something like this,

Step 2: Convert ImageURI to Base64 data and change it to .NET Image object

In the server side code, add the below code script inside your <WebPartController>.cs file.

 string imgSrc = this.hdImgSrcChart.Value;
        string base64Data = "";
        //Create .NET Image object, please make sure it is not iTextSharp Image object
        System.Drawing.Image chartImage = null;
 
        if ((!string.IsNullOrEmpty(imgSrc)) && (imgSrc != "undefined"))
        {
        	base64Data = Regex.Match(imgSrc, @"data:image/(?<type>.+?),(?<data>.+)").Groups["data"].Value;
               chartImage = Base64ToImage(base64Data);
        }
 
 
 //Function to Convert Base64 to Image obj
 public static System.Drawing.Image Base64ToImage(string base64String)
 {
 // Convert base 64 string to byte[]
        byte[] imageBytes = Convert.FromBase64String(base64String);
        // Convert byte[] to Image
        using (var ms = new MemoryStream(imageBytes, 0, imageBytes.Length))
        {
        	System.Drawing.Image image = System.Drawing.Image.FromStream(ms, true);
               return image;
  	}
 }
 

Step 3: Create an iTextSharp Image object

In Step 2, we generated the .NET Image object from base64 data. The below code snippet is continuation of the above step. In this we are adding the Image into PDF.

 if (chartImage != null)
      	{                        
 table = GetTables.GoogleChartInPDF(chartImage, 600, 350, "Chart:");
 //Add this table into main table, create new cell in the main table and add //chart image
        PdfPCell colMaintable = new PdfPCell(table);
               colMaintable.Border = Rectangle.NO_BORDER;
               colMaintable.BorderWidth = 0;
               allTable.AddCell(colMaintable);
        }
 
 //Function to Insert Google Chart Image into PDF
 public static PdfPTable GoogleChartInPDF(System.Drawing.Image GC_Image, float widthPixel, float heightPixel, string chartTitle)
         {
 	     // Create new PDF table for Google Chart
             PdfPTable table = new PdfPTable(1);
             table.DefaultCell.BorderWidth = 0;
             table.DefaultCell.PaddingTop = 15;
             table.DefaultCell.PaddingBottom = 15;            
 
             if (GC_Image != null)
             {
 		  //Insert the Image only if the GV_Image is available               
                 PdfPTable imgdataTable = new PdfPTable(1);
                 imgdataTable.TotalWidth = 100;
                 imgdataTable.PaddingTop = 15;
 			
 		  //Adding Title
                 PdfPCell ImgCol = new PdfPCell(new Phrase(chartTitle,14));
                 imgdataTable.AddCell(ImgCol);
 
 //Create iTextSharp.text.Image reference and assign .NET Image obj
              iTextSharp.text.Image orgChartImg = iTextSharp.text.Image.GetInstance(GC_Image, System.Drawing.Imaging.ImageFormat.Jpeg);
                 if (orgChartImg.Height > orgChartImg.Width)
                 {                    
                     float percentage = 0.0f;
                     percentage = heightPixel / orgChartImg.Height;
                     orgChartImg.ScalePercent(percentage * 100);
                 }
                 else
                 {                    
                     float percentage = 0.0f;
                     percentage = widthPixel / orgChartImg.Width;
                     orgChartImg.ScalePercent(percentage * 100);
                 }
                 
                 PdfPCell rowImgData = new PdfPCell(orgChartImg);                
                 rowImgData.BorderWidth = 0;
                 imgdataTable.AddCell(rowImgData);
 		  
 		  //Appending Data into Main Table
                 table.AddCell(imgdataTable);
             }
             return table;
         }
     }


The above code is self-explained through comments. Here I’ve show the approach to insert Google Chart Image to iTextSharp PDF Table. For creating PDF file from scratch and download that PDF into your local, please refer this Generate PDF report using iTextSharp (.NET PDF library) in SharePoint Environment.

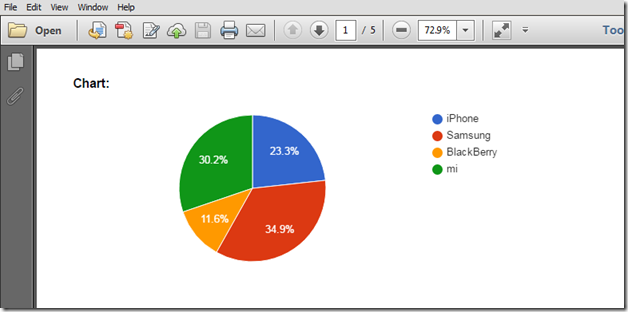
Output:


image

Happy Coding

Ahamed

Author Info

Ahamed Fazil Buhari
 
Senior Developer
 
Rate this article
 
Ahamed is a Senior Developer and he has very good experience in the field of Microsoft Technologies, especially SharePoint, Azure, M365, SPFx, .NET and client side scripting - JavaScript, TypeScript, ...read more
 

Generate PDF report using iTextSharp (.NET PDF library) in SharePoint Environment

Ahamed Fazil Buhari
 
Senior Developer
August 20, 2016
 
Rate this article
 
Views
12105

Hello Everyone, In this article we are going to look into step by step approach to pull the content from SharePoint and put into a new PDF file using iTextSharp. Consider that we need to show the SharePoint List data in a PDF file.

iTextSharp is a .NET PDF library which is mainly used to Create, Inspect and Maintain document in PDF. To know more about this library. Please refer here.

Download the iTextSharp library from the link given above. In this article we are using iTextSharp-5.5.9 version. Add the dll into your solution to make use of the functionalities available in iTextSharp.

Step 1: Create Solution in SharePoint 2010:

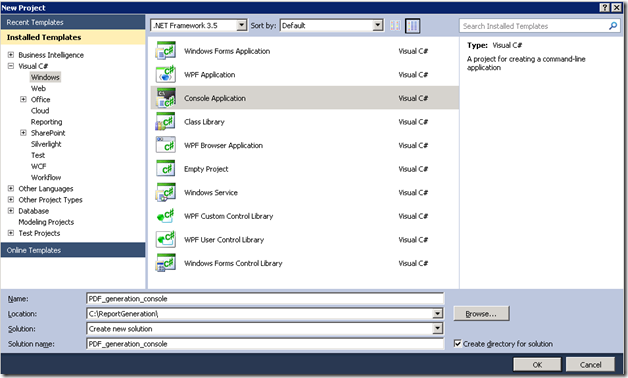
Here, I’ve create a Console Application and added the SharePoint dll’s just for making execution simple. New Project -> Windows (side navigation) -> Console Application.

image

Here I’m creating simple Console Application – (.NET 3.5) and changed the Platform Target to x64 in Solution -> Properties -> Build to retrieve the List values from SharePoint site and the solution is in the server where the SharePoint resides. Ignore this if you are not using Console Application.

Please note: We can use this iTextSharp dll in Sandbox or Farm solutions or any other solution which uses .Net environment. It not really relies on SharePoint.

Step 2: Add iTextShap .NET library dll into the Solution

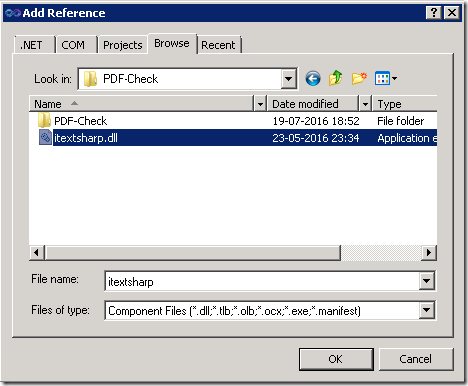
In the created Project, right click on the References folder -> Add Reference. In the Add Reference window chose the Browse tab and navigate to the folder where the iTextSharp dll is available. Select the itextsharp dll and click OK. As it is Console Application I need to add couple of SharePoint dll’s to access SharePoint resources.

image

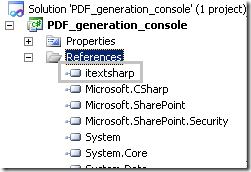
You can see the itextsharp references in your project.

image

Step 3: Retrieving SharePoint List Items and Embed the Content in PDF

image

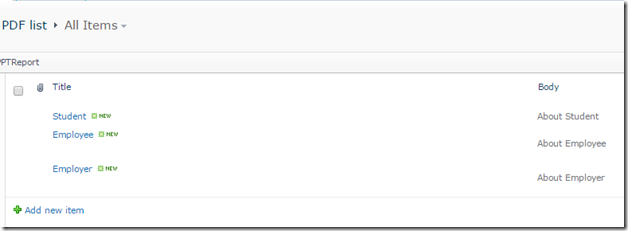
Let’s say we have a SharePoint List like shown below, and we need to put this List and its content into a PDF file.

The following code will generate a PDF file with the List Content,

 using System;
 using System.Collections.Generic;
 using System.Linq;
 using System.Text;
 using Microsoft.SharePoint;
 using Microsoft.SharePoint.Security;
 using Microsoft.SharePoint.Utilities;
 using System.IO;
 using iTextSharp.text;
 using iTextSharp.text.pdf;
 using iTextSharp.text.html.simpleparser;
 
 namespace PDF_generation_console
 {
     class Program
     {
         static void Main(string[] args)
         {
             Console.WriteLine("PDF Generating...");
             try
             {
                 Rectangle pageSize = PageSize.A4;
                 //Using the ItextSharp Document
                 //Document parameters -> pageSize, marginLeft, marginRight, marginTop, marginBottom
                 using (Document document = new Document(pageSize, 5f, 5f, 10f, 10f))
                 {
                     //Create PDF writer object to write content into the document                    
                     PdfWriter writer = PdfWriter.GetInstance(document, new FileStream(@"C:SharePoint_PDF_List.pdf", FileMode.Create));
 
                     document.Open();
 
                     //Creating variable for Font size and style
                     Font BOLD_10 = FontFactory.GetFont("Arial", 10f, iTextSharp.text.Font.BOLD);
                     Font BOLD_9 = FontFactory.GetFont("Arial", 9f, iTextSharp.text.Font.BOLD);
                     Font NORMAL_9 = FontFactory.GetFont("Arial", 9f, iTextSharp.text.Font.NORMAL);
 
                     //Add the Page
                     //pdfpTable parameters -> Number of columns in the table
                     PdfPTable table = new PdfPTable(2);
 
                     // Applying styling
                     table.DefaultCell.BorderWidth = 0;
                     table.DefaultCell.PaddingBottom = 15;
                     table.DefaultCell.Border = Rectangle.NO_BORDER;
                     table.DefaultCell.BorderWidth = 0;
                     table.TotalWidth = 100;
                     table.SetTotalWidth(new float[] { 15f, 60f });
 
                     //Row 1 for table without border and colspan=2 
                     //Create cell to insert into the Table
                     PdfPCell col1 = new PdfPCell(new Phrase("PDF list", BOLD_10));
 
                     //Styling and Positioning the cell
                     col1.PaddingTop = 10;
                     col1.PaddingBottom = 10;
                     col1.Colspan = 2;
                     col1.Border = Rectangle.NO_BORDER;
                     col1.BorderWidth = 0;
 
                     //Adding the cell into the table
                     table.AddCell(col1);
 
                     //Row 2 - 1st cell for the table with bold border
                     PdfPCell tableHeading = new PdfPCell(new Phrase("Title", BOLD_9));
                     tableHeading.Border = Rectangle.BOX;
                     tableHeading.BorderWidth = 1;
                     tableHeading.BackgroundColor = BaseColor.LIGHT_GRAY;
                     tableHeading.BorderColor = BaseColor.GRAY;
 
                     //Row 2 - 2nd cell for the table with bold border
                     PdfPCell tableHeading2 = new PdfPCell(new Phrase("Body", BOLD_9));
                     tableHeading2.Border = Rectangle.BOX;
                     tableHeading2.BorderWidth = 1;
                     tableHeading2.BackgroundColor = BaseColor.LIGHT_GRAY;
                     tableHeading2.BorderColor = BaseColor.GRAY;
 
                     table.AddCell(tableHeading);
                     table.AddCell(tableHeading2);
 
                     //Access the list and iterate throught all the items using SPSite -> SPWeb -> SPList -> ItemCollection -> Item
                     using (SPSite oSiteCollection = new SPSite(@"http://sharepointpalsdemo/sites/dev/"))
                     {
                         using (SPWeb spWeb = oSiteCollection.OpenWeb())
                         {
                             SPList spList = spWeb.Lists["PDF list"];
 
                             SPListItemCollection spListItemCol = spList.GetItems();
                             SPField sharePointField = null;
                             string getFieldValue = string.Empty;
 
                             foreach (SPListItem spListItem in spListItemCol)
                             {
                                 sharePointField = spListItem.Fields.GetField("Title");
                                 string title = sharePointField.GetFieldValueAsText(spListItem["Title"]);
 
                                 sharePointField = spListItem.Fields.GetField("Body");
                                 string body = sharePointField.GetFieldValueAsText(spListItem["Body"]);
 
                                 //Create new PDFCell to add the title content
                                 PdfPCell tableValue = new PdfPCell(new Phrase(title, NORMAL_9));
                                 tableValue.Border = Rectangle.BOX;
                                 tableValue.BorderWidth = 1;
 
                                 //Inserting html tags and applying inline css
                                 string bodyColumnValue = "<table height='15' width='100'><tr><td align='center' valign='middle' bgcolor="#07AF56"><font size='1' color="#FFF">" + body + "</font></td></tr></table>";
                                 iTextSharp.text.html.simpleparser.StyleSheet styles = new iTextSharp.text.html.simpleparser.StyleSheet();
                                 List<IElement> htmlarraylist = HTMLWorker.ParseToList(new StringReader(bodyColumnValue), styles);
 
                                 //Create new PDFCell to add the body content                                
                                 PdfPCell tableValue2 = new PdfPCell();
 
                                 for (int k = 0; k < htmlarraylist.Count; k++)
                                 {
                                     tableValue2.AddElement((IElement)htmlarraylist[k]);
                                 }
 
                                 //Apply border style                                
                                 tableValue2.Border = Rectangle.BOX;
                                 tableValue2.BorderWidth = 1;
 
                                 //Add the cells into the table
                                 table.AddCell(tableValue);
                                 table.AddCell(tableValue2);
                             }
                         }
                     }
 
                     //Add the table into the document
                     document.Add(table);
                     document.Close();
                 }
             }
 
             catch (Exception ex)
             {
                 Console.WriteLine("Error has occured " + ex.Message);
             }
         }
 
     }
 }
 

The code itself has all the required comments. I don’t have much to explain about the code.

And the output will be,


image


Happy Coding

Ahamed Buhari

Author Info

Ahamed Fazil Buhari
 
Senior Developer
 
Rate this article
 
Ahamed is a Senior Developer and he has very good experience in the field of Microsoft Technologies, especially SharePoint, Azure, M365, SPFx, .NET and client side scripting - JavaScript, TypeScript, ...read more
 

Leave a comment