How to Add / Remove Site Collection Administrator in SharePoint Office 365 Programmatically using C# Client Site Object Model (CSOM)

Sathish Nadarajan
 
Solution Architect
March 30, 2017
 
Rate this article
 
Views
8390

In the previous article, we saw how to add a User as Site Collection administrator in SharePoint Office 365. But, it requires a Tenant Admin User Credentials. But, most of the cases, we may not get that for all the customers. Hence, thought of coming up with an approach with Site Collection Permission itself. The below code is self-explanatory.

To Add the Site Collection Administrator

 namespace Console.Office365
 {
     using OfficeDevPnP.Core;
     using OfficeDevPnP.Core.Entities;
     using System;
     using System.Collections.Generic;
     using System.Linq;
     using System.Text;
     class Program
     {
         static void Main(string[] args)
         {
             AuthenticationManager authManager = new AuthenticationManager();
             var clientContext = authManager.GetSharePointOnlineAuthenticatedContextTenant("https://********.sharepoint.com/sites/CommunitySite/", "Sathish@*****.com", "**********");
             
             clientContext.Load(clientContext.Web);
             clientContext.Load(clientContext.Site);
             clientContext.Load(clientContext.Site.RootWeb);
             clientContext.ExecuteQuery();
 
             List<string> lstTargetGroups = new List<string>();
             lstTargetGroups.Add("User1@********.com"); // Add the Users here.
 
             List<UserEntity> admins = new List<UserEntity>();
             foreach (var targetGroup in lstTargetGroups)
             {
                 UserEntity adminUserEntity = new UserEntity();
                 adminUserEntity.LoginName = targetGroup;
                 admins.Add(adminUserEntity);
             }
 
             if (admins.Count > 0)
             {
                 clientContext.Site.RootWeb.AddAdministrators(admins, true);
             }
         }
     }
 }

The above piece of code will add all the Users added on the List lstTargetGroups.

Now, let us see how to remove the site collection administrators.

 namespace Console.Office365
 {
     using OfficeDevPnP.Core;
     using System;
     class Program
     {
         static void Main(string[] args)
         {
             AuthenticationManager authManager = new AuthenticationManager();
             var clientContext = authManager.GetSharePointOnlineAuthenticatedContextTenant("https://*****.sharepoint.com/sites/CommunitySite/", "Sathish@*******.com", "******");
 
             clientContext.Load(clientContext.Web);
             clientContext.Load(clientContext.Site);
             clientContext.Load(clientContext.Site.RootWeb);
             clientContext.ExecuteQuery();


             var users = clientContext.Site.RootWeb.SiteUsers;
             clientContext.Load(users);
             clientContext.ExecuteQuery();
 
 
             foreach (var user in users)
             {
                 System.Console.ForegroundColor = ConsoleColor.White;
                 System.Console.WriteLine("Removing the User - " + user.Title.ToLower());
                 user.IsSiteAdmin = false;
                 user.Update();
                 clientContext.Load(user);
                 clientContext.ExecuteQuery();
 
             }
         }
     }
 }

The above Methods does not require the tenant Level Permission. The User Name and Password is at the Site Collection Level itself. Hope this helps.

Happy Coding,

Sathish Nadarajan.
Author Info

Sathish Nadarajan
 
Solution Architect
 
Rate this article
 
Sathish is a Microsoft MVP for SharePoint (Office Servers and Services) having 15+ years of experience in Microsoft Technologies. He holds a Masters Degree in Computer Aided Design and Business ...read more
 

How to Add Site Collection Administrator Programmatically to Office 365 Site Collection using Client Side Object Model (CSOM) PNP in SharePoint Office 365

Sathish Nadarajan
 
Solution Architect
August 13, 2016
 
Rate this article
 
Views
8524

In the previous article, we saw, how to create/provision a site collection in O365 programmatically. In this article, as a continuation, let us see how to Add Site Collection Administrators to the created site programmatically.

Again, the Console Application does not require further explanation I guess.

 using System;
 using System.Collections.Generic;
 using System.Linq;
 using System.Text;
 using System.Threading.Tasks;
 
 using Microsoft.SharePoint.Client;
 using System.Security;
 using Microsoft.Online.SharePoint.TenantAdministration;
 
 namespace Console.Office365
 {
     class Program
     {
         static void Main(string[] args)
         {
             AddSiteCollectionAdministrator();
         }
 
 
         public static void AddSiteCollectionAdministrator()
         {
             string TenantURL = "https://sppalsmvp-admin.sharepoint.com/";
             string Url = "https://********.sharepoint.com/sites/AASathish3";
             string UserName = "Sathish@******.onmicrosoft.com";
             string Password = "*******";
 
             using (ClientContext clientContext = new ClientContext(TenantURL))
             {
                 //Credentials
                 var passWord = new SecureString();
                 foreach (char c in Password.ToCharArray()) passWord.AppendChar(c);
                 clientContext.Credentials = new SharePointOnlineCredentials(UserName, passWord);
 
                 var tenant = new Tenant(clientContext);
 
                 //Get login name of the current user
                 var currentUser = clientContext.Web.CurrentUser;
                 clientContext.Load(currentUser, u => u.LoginName);
 
                 int startIndex = 0;
                 SPOSitePropertiesEnumerable siteProperties;
 
                 do
                 {
                     //Get urls of site collections in the tenant in batches of 300 (Does not include the OneDrive for Business sites)
                     siteProperties = tenant.GetSiteProperties(startIndex, false);
                     clientContext.Load(siteProperties, siteProps => siteProps.Include(site => site.Url));
                     clientContext.ExecuteQuery();
 
                     //Iterate the site collectio urls
                     foreach (var siteProperty in siteProperties)
                     {
                         try
                         {
                             if (siteProperty.Url == Url)
                             {
                                 //assign the specified user (current user in this case) as the site collection admin. 
                                 tenant.SetSiteAdmin(siteProperty.Url, "user1@*********.onmicrosoft.com", true);
                                 //tenant.SetSiteAdmin(siteProperty.Url, "Usre2@******", true);
                                 //Set the last parameter to false if you want to remove the user from the site collection admins
 
                                 clientContext.ExecuteQuery();
 
                                 System.Console.WriteLine(siteProperty.Url);
                             }
                         }
                         catch (Exception ex)
                         {
                             System.Console.WriteLine("Error on: " + siteProperty.Url + " " + ex.Message);
                         }
                     }
 
                     startIndex += 300;
 
                 } while (siteProperties.Count >= 300);
             }
         }
     }
 }
 

Happy Coding,

Sathish Nadarajan.

Author Info

Sathish Nadarajan
 
Solution Architect
 
Rate this article
 
Sathish is a Microsoft MVP for SharePoint (Office Servers and Services) having 15+ years of experience in Microsoft Technologies. He holds a Masters Degree in Computer Aided Design and Business ...read more
 

How to Change the Trusted Installer in Windows Server 2012

Sathish Nadarajan
 
Solution Architect
December 11, 2013
 
Rate this article
 
Views
42724

Most of the times, being a SharePoint Developer, we will be modifying, deleting, renaming the system files for some reason. Even on the previous article, we saw that, we need to modify the config file of the powershell, which is placed under System32 folder. These folders, though you logged in as administrator, cannot modify the files. They only trust the TrustedInstaller Account. Thus, even before the Administrator Account got created, these folders and files would have been created. Hence, there is no other option other than, changing the Owner to some other account from the TrustedOwner. Before proceeding that, let us try to understand who is TrustedInstaller Account and What it can do.

TrustedInstaller is a built-in user account in Windows 8, Windows 7, and Windows Vista. This user account “owns” a variety of system files, including some files in your Program Files folder, your Windows folder, and even the Windows.old folder that is created after you upgrade from one version of Windows to another. To rename or delete these files, you’ll have to take ownership of them away from the TrustedInstaller user account.

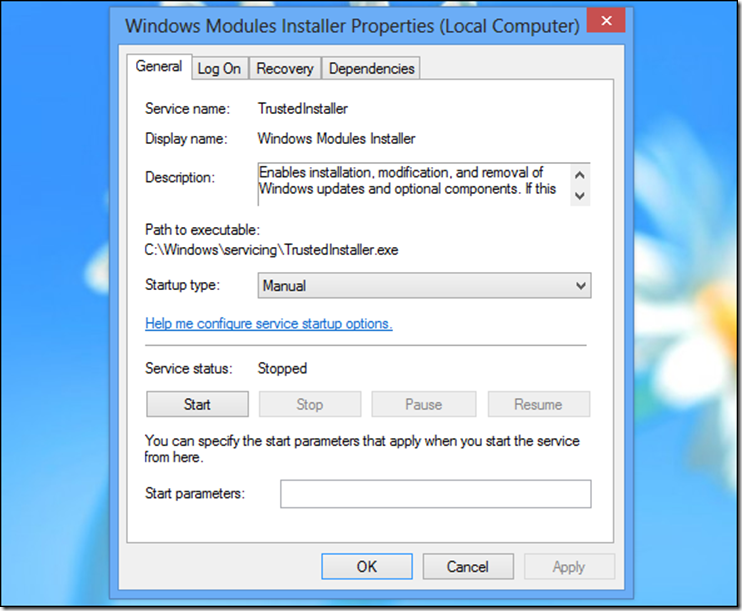
The TrustedInstaller user account is used by the Windows Modules Installer service included with Windows. This service is responsible for installing, modifying, and removing Windows updates and other optional Windows components, so it has the exclusive ability to modify them.

clip_image002

With this basic information, let us see how to modify the Owner of System32 folder.

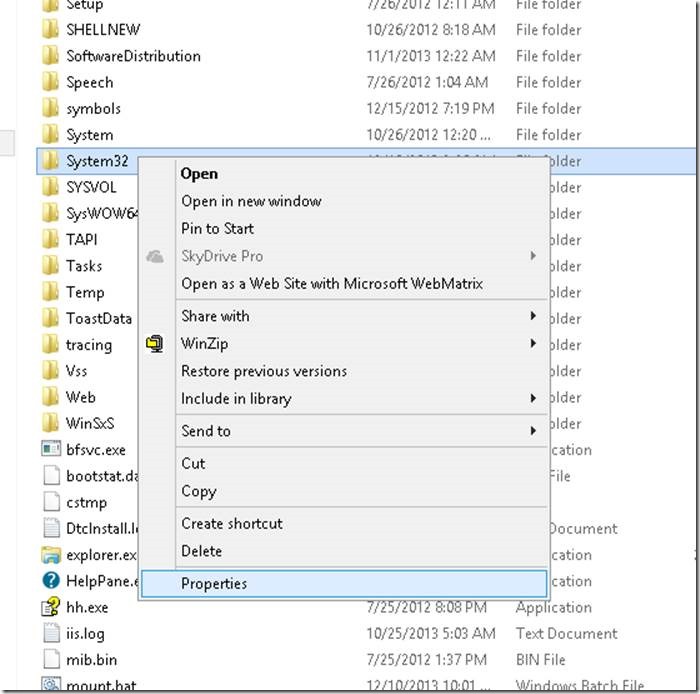
1. Go to the System32 folder. Right click.

clip_image004

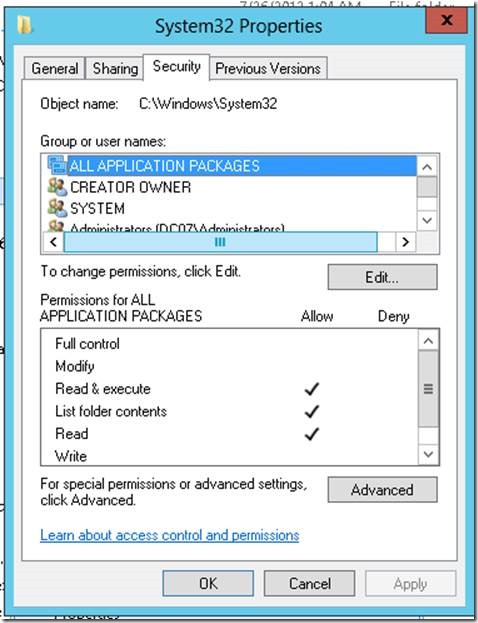
2. Select Properties. The properties window will be as follows.

clip_image006

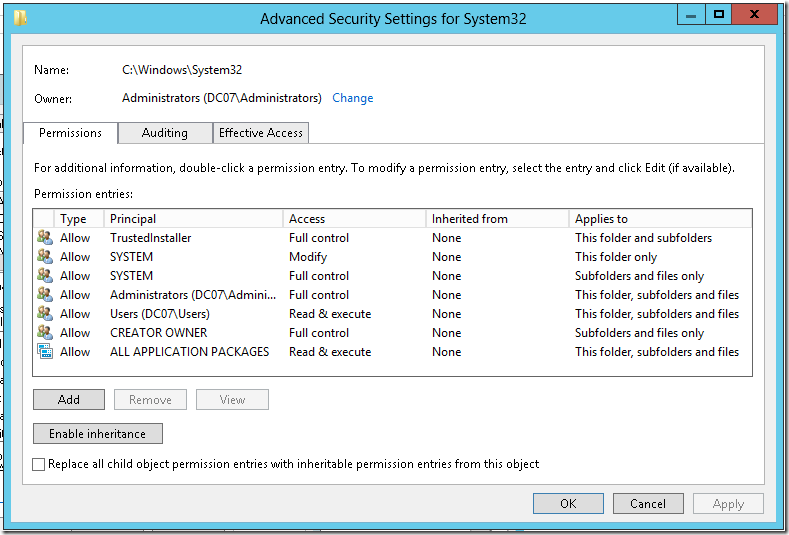
3. On the Security Tab, select the Advanced Button.

clip_image007

4. On the Owner: Click the Change hyperlink and modify the user from “TrustedInstaller” to some other user as I did.

5. Now, if we want to modify anything on the System32 folder, we can very well go ahead and modify them.

Happy Coding.

Sathish Nadarajan.

Category : SharePoint, Windows

Author Info

Sathish Nadarajan
 
Solution Architect
 
Rate this article
 
Sathish is a Microsoft MVP for SharePoint (Office Servers and Services) having 15+ years of experience in Microsoft Technologies. He holds a Masters Degree in Computer Aided Design and Business ...read more
 

Leave a comment