.Net Core Console Application for SharePoint Online Using PNPCore Library Username and Password Login

Sathish Nadarajan
 
Solution Architect
November 23, 2021
 
Rate this article
 
Views
3337

In the earlier article,   we saw how to get the PNP Core Context through interactive login, similarly in this article, let us see to get the context by Providing the Username and Password.  Usually this could be the Service Account credentials.

using Microsoft.Extensions.Configuration;

using Microsoft.Extensions.DependencyInjection;
using Microsoft.Extensions.Hosting;
using Microsoft.Extensions.Logging;
using PnP.Core.Auth;
using PnP.Core.Services;
using System.Linq;
using System.Threading.Tasks;


namespace AZ.Help.Core
{
class Program
{
public static async Task Main(string[] args)
{

var host = Host.CreateDefaultBuilder()

.ConfigureLogging((hostingContext, logging) =>

{
logging.AddConsole();
})
.ConfigureServices((hostingContext, services) =>
{

var customSettings = new CustomSettings();
hostingContext.Configuration.Bind("CustomSettings", customSettings);

//Create an instance of the Authentication Provider that uses Credential Manager
var authenticationProvider = new UsernamePasswordAuthenticationProvider(
customSettings.ClientId,
customSettings.TenantId,
customSettings.UserPrincipalName,
customSettings.Password.ToSecureString());

services.AddPnPCore(options =>
{
options.DefaultAuthenticationProvider = authenticationProvider;
options.Sites.Add("DemoSite",
new PnP.Core.Services.Builder.Configuration.PnPCoreSiteOptions
{
SiteUrl = customSettings.DemoSiteUrl,
AuthenticationProvider = authenticationProvider
});
});
})

// Let the builder know we're running in a console
.UseConsoleLifetime()

// Add services to the container

.Build();

await host.StartAsync();

using (var scope = host.Services.CreateScope())
{
var pnpContextFactory = scope.ServiceProvider.GetRequiredService<IPnPContextFactory>();
using (var context = await pnpContextFactory.CreateAsync("DemoSite"))
{
var page = (await context.Web.GetPagesAsync("DemoPage")).FirstOrDefault();
await page.TranslatePagesAsync();
}
}
host.Dispose();
}
}

}


Happy Coding

Sathish Nadarajan
Author Info

Sathish Nadarajan
 
Solution Architect
 
Rate this article
 
Sathish is a Microsoft MVP for SharePoint (Office Servers and Services) having 15+ years of experience in Microsoft Technologies. He holds a Masters Degree in Computer Aided Design and Business ...read more
 

Windows Task Scheduler – Environment.CurrentDirectory Issue – Simple Tip

Sathish Nadarajan
 
Solution Architect
February 13, 2019
 
Rate this article
 
Views
2987

I was writing a Console Application which targets against a SharePoint Online tenant which will do some sort of regular activity. Hence, we configured the Console Application on the Task Scheduler. (Though, there are lot other options, for our scenario, we went ahead with the Task Scheduler ). The Console Application uses a Configuration File, which I kept on the bin/debug folder during the development and from the Code, I consumed with Environment.CurrentDirectory property and it was working fine. But, when I configure the same EXE on the Task Scheduler, it was not working. Because, the reason is, the Task Scheduler triggers the EXE from the location C:\Windows\System32 folder. Either we need to paste the Config.XML file on the System32 folder or we need to change our code. The change is very simple. Instead of using the “Environment.Currentdirectory”, we can use the below code snippet.

Old Code Snippet

 var configFile = Path.Combine(Environment.CurrentDirectory, "Config.xml");
             System.Console.WriteLine(configFile);
             System.Console.WriteLine("Completed");
             System.Console.ReadLine();
 

Updated Code Snippet

 namespace Office365.Console
 {
     using System;
     using System.Collections.Concurrent;
     using System.IO;
     using System.Reflection;
 
     class Program
     {
         private static ConcurrentDictionary<Uri, RESTFormDigest> FormDigests { get; set; }
 
         static void Main(string[] args)
         {
             var configFile = Path.Combine(Path.GetDirectoryName(Assembly.GetExecutingAssembly().Location), "Config.xml");
             System.Console.WriteLine(configFile);
             System.Console.WriteLine("Completed");
             System.Console.ReadLine();
         }
     }
 } 
 

We need to use the System.Reflection namespace and the method “Assembly.GetExecutingAssembly()”. Thought it is very simple, it took few mins for me to identify on the production environment.

Happy Coding,

Sathish Nadarajan.

Author Info

Sathish Nadarajan
 
Solution Architect
 
Rate this article
 
Sathish is a Microsoft MVP for SharePoint (Office Servers and Services) having 15+ years of experience in Microsoft Technologies. He holds a Masters Degree in Computer Aided Design and Business ...read more
 

How to generate App ID & Secret key to access SharePoint online through console application using Access Token – Part 2

Ahamed Fazil Buhari
 
Senior Developer
August 27, 2018
 
Rate this article
 
Views
6204

Hello,

This is continuation article; in part 1 we have seen how to create App Id in SharePoint. In part 2 we will see how to access SharePoint Online site from Console Application using App Id and Secret key.

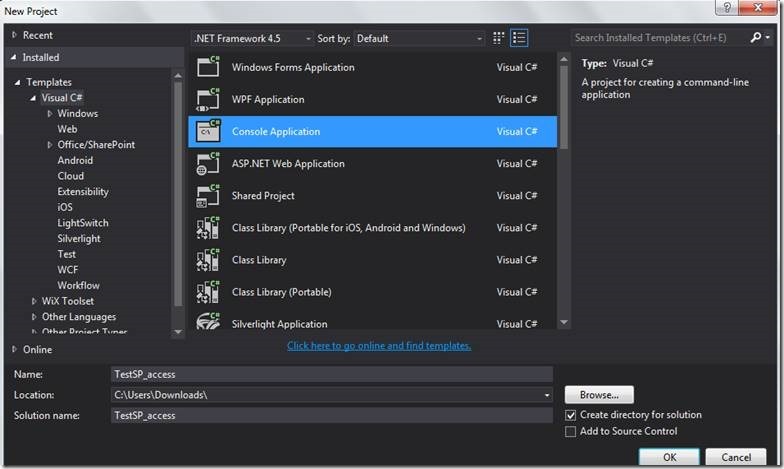
Creating new Console Application,

clip_image002

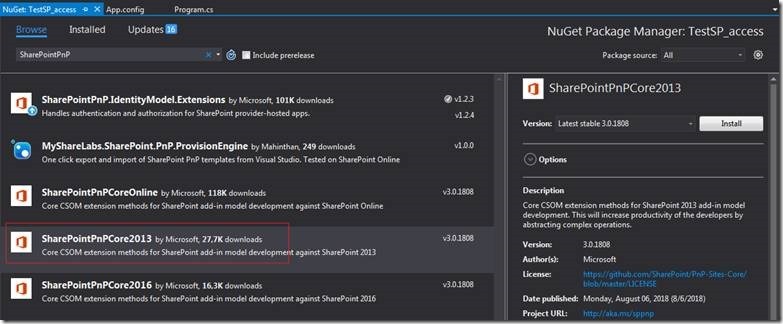
I need to add SharePointPnPCore2013 package from nuget package manager

clip_image004

And add the AppForSharePointOnlineWebToolkit package to have TokenHelper.cs file which have necessary function for authentication.

clip_image006

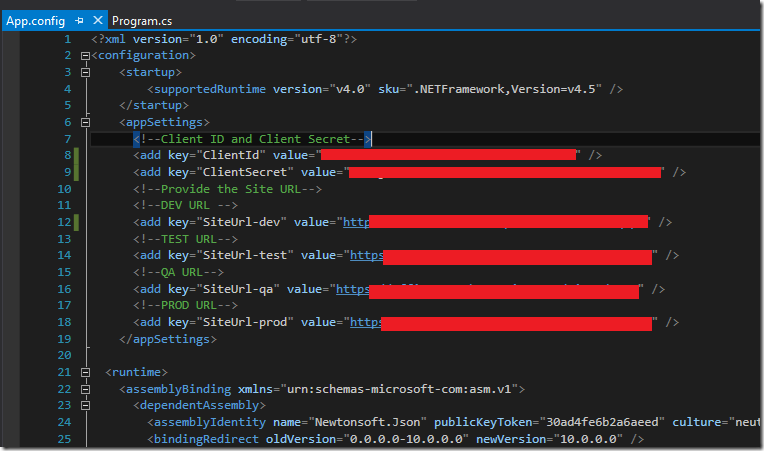
I have my site name, App Id and Secret key in App.config file so that it’s easy to access and update.

clip_image007

In Program.cs we requesting user to choose the environment based on the value we are taking URL from app.config file


 using System;
 using System.Configuration;
 using Microsoft.SharePoint.Client;
 
 namespace TestSP_access
 {
     class Program
     {
         static void Main(string[] args)
         {
             Console.WriteLine("nSelect The Environment to Provision- ");
             Console.WriteLine("nnote* - The Site URL and other properties will be taken from App.config file- n");
             Console.WriteLine("n'dev' or 'test' or 'qa' or 'prod'");
             Console.WriteLine("nEnter Your Choice : ");
 
             var envValue = Console.ReadLine();
             if (envValue != "dev" && envValue != "test" && envValue != "qa" && envValue != "prod")
             {
                 Console.WriteLine("nInvalid Environment value. Please select'dev' or 'test' or 'qa' or 'prod'");
             }
             else
             {
                 try
                 {
                     var siteUri = new Uri(ConfigurationManager.AppSettings["SiteUrl-" + envValue]);
                     var realm = TokenHelper.GetRealmFromTargetUrl(siteUri);
                     var accessToken = TokenHelper.GetAppOnlyAccessToken(TokenHelper.SharePointPrincipal,
                         siteUri.Authority, realm).AccessToken;
 
                     using (var ctx = TokenHelper.GetClientContextWithAccessToken(siteUri.ToString(), accessToken))
                     {
                         Console.WriteLine("nAccessing SP...");
                         ctx.Load(ctx.Web);
                         ctx.ExecuteQueryRetry();
                         Console.WriteLine("The site name is " + ctx.Web.Title);
                     }
                     Console.ReadLine();
                 }
                 catch (Exception ex)
                 {
                     Console.WriteLine("Something went wrong. " + ex.Message);
                     Console.ReadLine();
                 }
             }
         }
     }
 }


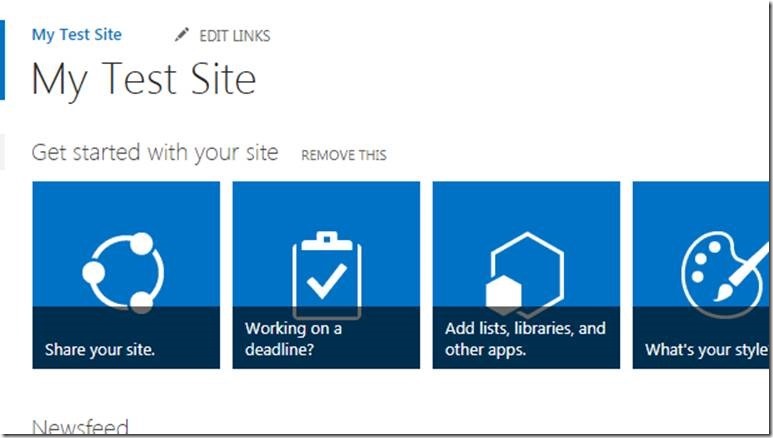
This is my test SharePoint site

clip_image009

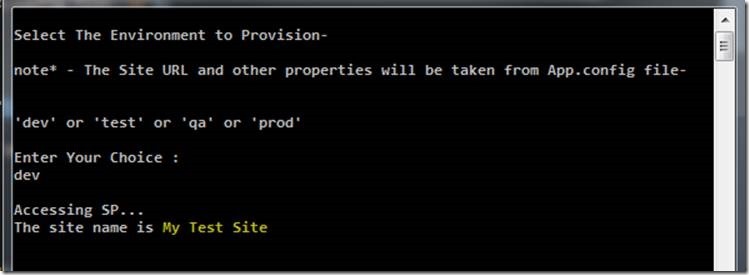
Now I can access SP online site from my console application using App Id Access Token

clip_image011


Happy Coding

Ahamed

Author Info

Ahamed Fazil Buhari
 
Senior Developer
 
Rate this article
 
Ahamed is a Senior Developer and he has very good experience in the field of Microsoft Technologies, especially SharePoint, Azure, M365, SPFx, .NET and client side scripting - JavaScript, TypeScript, ...read more
 

Console Application For Office 365 – SharePoint Online

Sathish Nadarajan
 
Solution Architect
July 9, 2016
 
Rate this article
 
Views
9112

In this article, let us see how to create a console application against an Office 365 in SharePoint.

The reason behind this is straight forward. I.e., we may need to create the client side object model against the Office 365. Hence, it will be very tedious to deploy many times on the O365 environment. During the development time, it will be easy for us, if we have a handy Console Application. On that, we will finish our functionality and copy the code, paste it in our actual Solution, then deploy the code.

With this brief introduction, let us proceed step by step.

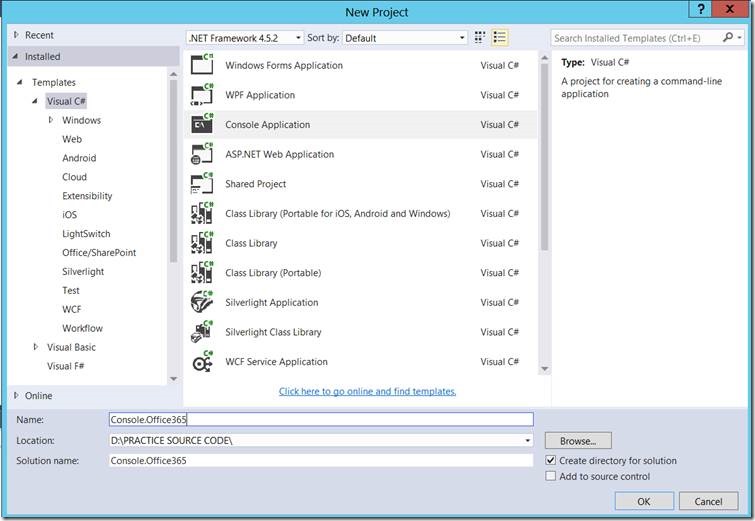
1. Open the Visual Studio. In my Case, I am using VS 2015.

clip_image002

2. Create a Console Application.

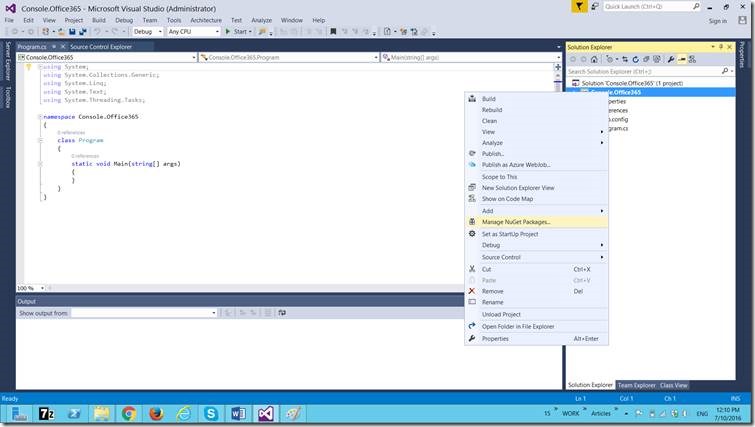
3. Add the NuGET Package. Refer HERE to have a detailed view about NuGET Packages

clip_image004

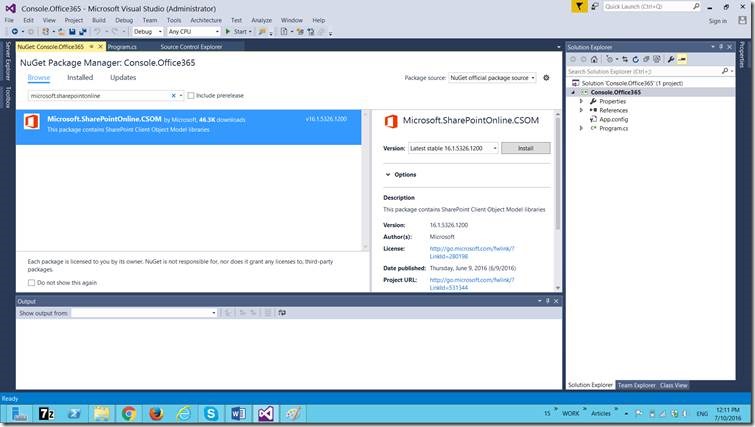
4. Install the below Package. “Microsoft.SharePointOnline.CSOM”

clip_image006

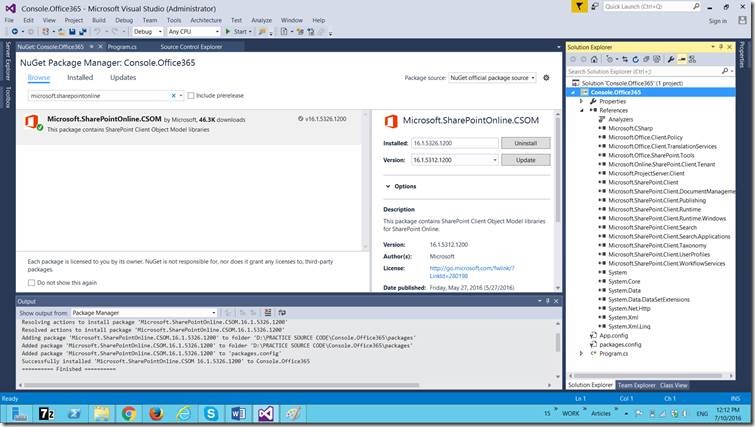
5. Once, it is installed, the following DLLs were added automatically.

clip_image008

6. Now, let us open the Program.cs. We have done with our basics.

7. Add the Namespace Microsoft.SharePoint.Client and System.Security.

8. Now, add the below lines of codes.

 using System;
 using System.Collections.Generic;
 using System.Linq;
 using System.Text;
 using System.Threading.Tasks;
 
 using Microsoft.SharePoint.Client;
 using System.Security;
 
 namespace Console.Office365
 {
     class Program
     {
         static void Main(string[] args)
         {
             string siteURL = "https://sppals.sharepoint.com/sites/VariationPublishingSite";
             string userName = "sathish@sppals.onmicrosoft.com";
             string password = "*************";
 
             var clientContext = GetClientContext(siteURL, userName, password);
 
             Web web = clientContext.Web;
 
             clientContext.Load(web);
             clientContext.ExecuteQuery();
 
             System.Console.WriteLine(web.Title);
             System.Console.ReadLine();
         }
 
         static ClientContext GetClientContext(string siteURL, string userName, string password)
         {
             var credentials = new SharePointOnlineCredentials(userName, ToSecureString(password));
             var context = new ClientContext(siteURL);
             context.Credentials = credentials;
 
             return context;
 
 
         }
 
         public static SecureString ToSecureString(string Source)
         {
             if (string.IsNullOrWhiteSpace(Source))
                 return null;
             else
             {
                 SecureString Result = new SecureString();
                 foreach (char c in Source.ToCharArray())
                     Result.AppendChar(c);
                 return Result;
             }
         }
     }
 }
 

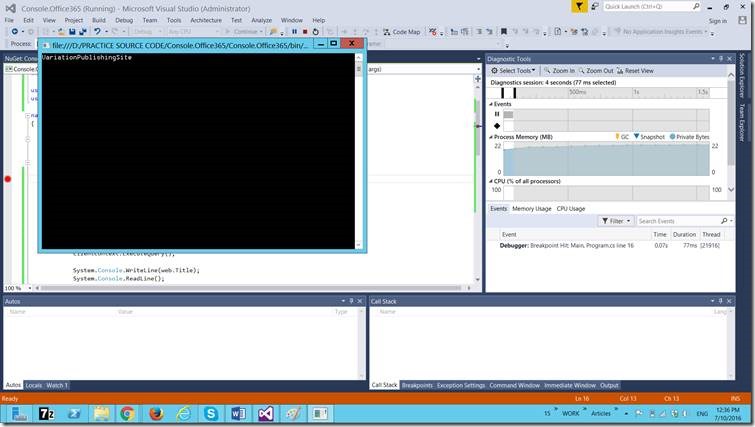
9. Press F5.

10. We will get the result as

clip_image010

11. Like this, we can do various activities and get the functionality implemented.

Happy Coding,

Sathish Nadarajan.

Author Info

Sathish Nadarajan
 
Solution Architect
 
Rate this article
 
Sathish is a Microsoft MVP for SharePoint (Office Servers and Services) having 15+ years of experience in Microsoft Technologies. He holds a Masters Degree in Computer Aided Design and Business ...read more
 

NuGet Manager Console – an Introduction

Sathish Nadarajan
 
Solution Architect
June 27, 2016
 
Rate this article
 
Views
4802

In recent days, we have been addicted to use the NuGet Packages and atleast hearing the word Import / Install NuGet Package. It applies to me as well, that simply go to the NuGet Manager Dialog and install the required / Suggested J Packages. Hardly, we would have gone to the NuGet manager Console and look at the various options over there. Today, I got a chance (probably a problem) to look on the Console. Hence, thought of sharing the same to the community.

Before Starting, let us have a small demo on what we have used till now using the Dialog Window.

1. Open the Visual Studio.

2. Create a Solution.

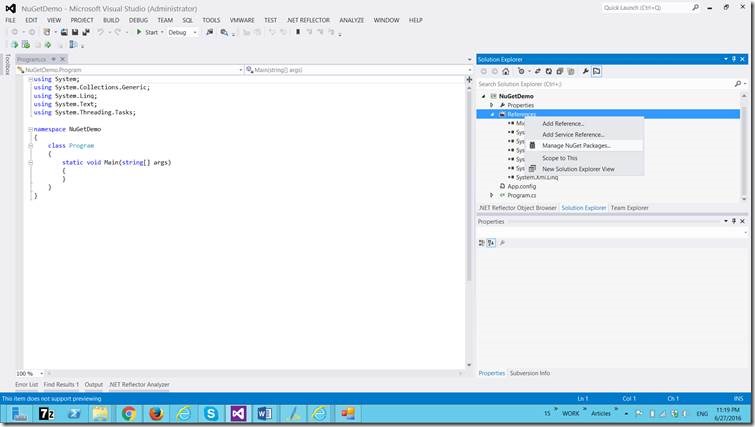
3. Right Click on the Reference, or even on the project file.

clip_image002

4. Click on the “Manage NuGet Packages”

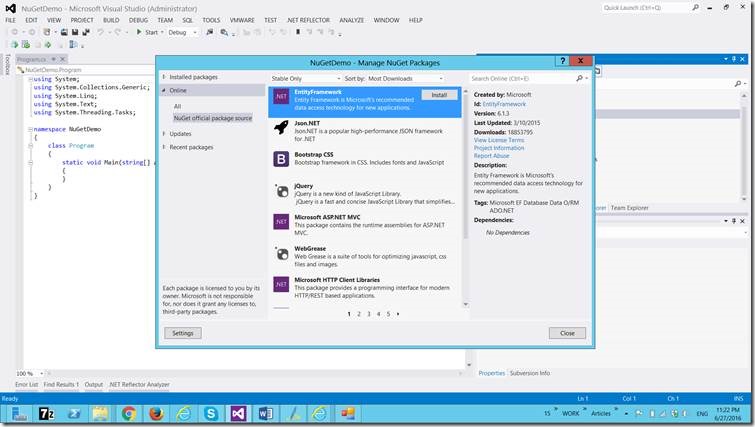
5. The below widget will be opening.

clip_image004

6. Usually, we will search for the package given on the solution and click on Install.

But, today I faced some sort of problems after Installing the Package. Then, I was suggested to do the UnInstall, Update the packages etc. to make my TFS code to work.

Hence, opened the Manager Console.

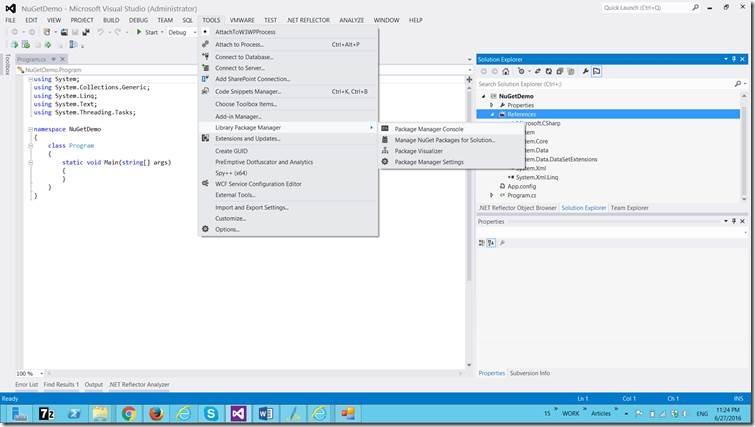
1. Go to Tools and Click on the Package Manager Console.

clip_image006

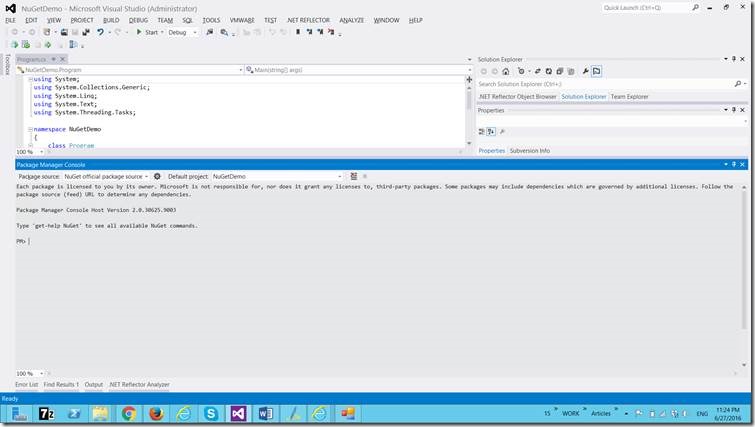
2. The below Window will be opening.

clip_image008

3. On the Console, type “Get-Help NuGet”

4. The available Commands for the NuGet Console will be appearing.

CmdletDescription
Get-PackageGets the set of packages available from the package source.
Install-PackageInstalls a package and its dependencies into the project.
Uninstall-PackageUninstalls a package. If other packages depend on this package, the command will fail unless the –Force option is specified.
Update-PackageUpdates a package and its dependencies to a newer version.
Add-BindingRedirectExamines all assemblies within the output path for a project
and adds binding redirects to the application (or web)
configuration file where necessary.
Get-ProjectReturns a reference to the DTE (Development Tools Environment)
for the specified project. If none is specifed, returns the
default project selected in the Package Manager Console.
Open-PackagePageOpen the browser pointing to ProjectUrl, LicenseUrl or
ReportAbuseUrl of the specified package.
Register-TabExpansionRegisters a tab expansion for the parameters of a command.

5. Now, let us execute each of the commands and have a look at the output.

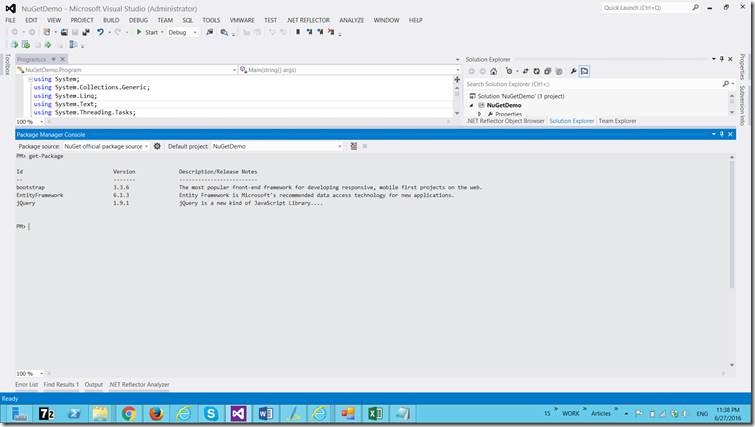
6. Get-Package – This will list all the packages installed.

clip_image010

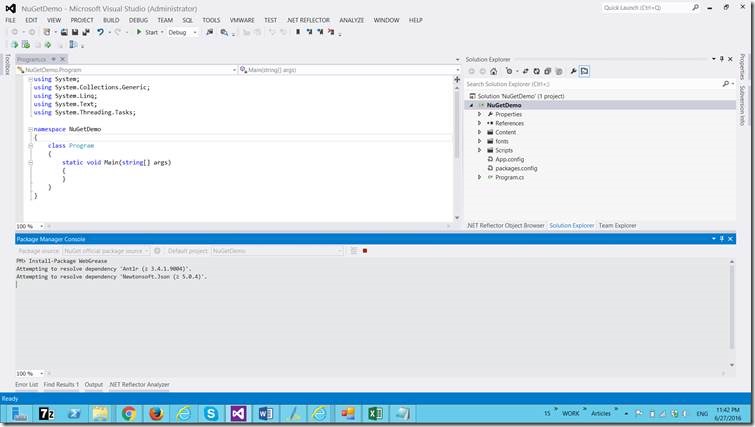
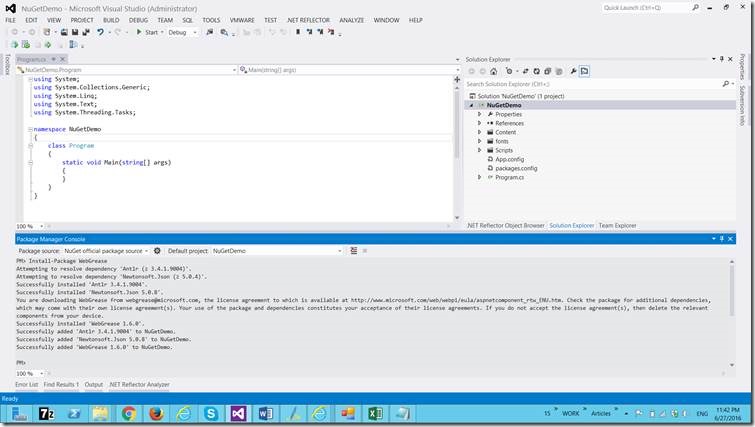
7. Install-Package “Package Name”

clip_image012

clip_image014

8. In the Same Manner unInstall-Package “Package Name”

clip_image016

9. The rest of the commands are straight forward and we can try them whenever we require.

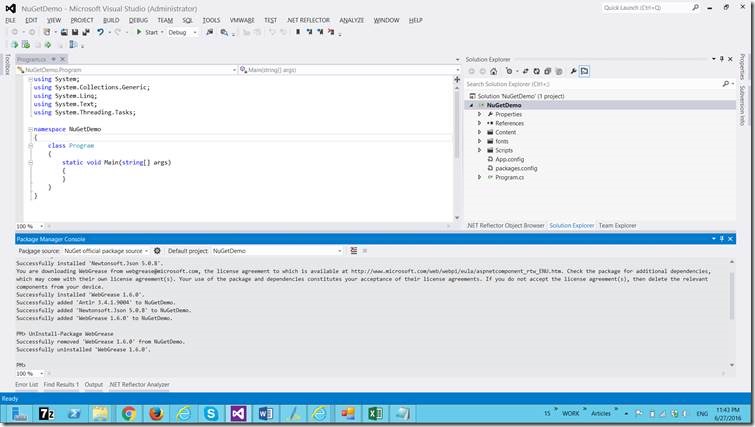
10. Once, the package has been installed, the necessary DLLs will be added with the Solution.

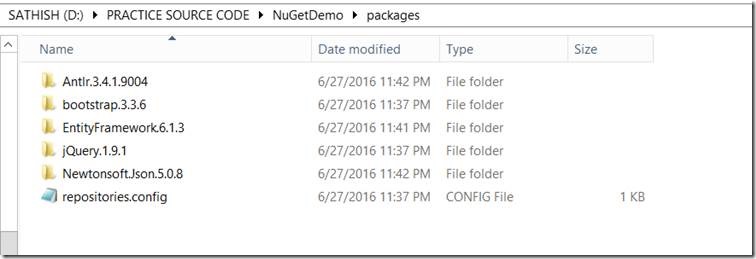
11. A new folder called “Packages” will be created in the Solution Folder. Note, this will not be the part of your solution. No need to Add this on the TFS. This is the mistake, which I did today.

12. clip_image018

13. We can see the installed packages inside the packages folder.

clip_image020


Let us catch up with some more interesting topics soon.

Happy Coding,

Sathish Nadarajan.

Category : Visual Studio

Author Info

Sathish Nadarajan
 
Solution Architect
 
Rate this article
 
Sathish is a Microsoft MVP for SharePoint (Office Servers and Services) having 15+ years of experience in Microsoft Technologies. He holds a Masters Degree in Computer Aided Design and Business ...read more
 

Leave a comment