How to Configure Secure Store Service in SharePoint 2013 and Generate Secure Store Key

Ahamed Fazil Buhari
 
Senior Developer
October 11, 2016
 
Rate this article
 
Views
5341

Hi, welcome to my article on ‘How to configure secure store service in SharePoint 2013’. I have series of articles like this to show how to configure and use all of the Business Intelligence feature that SharePoint offers. I have lots of great stuff to share you through this article, let’s get started.

Let us go through some useful information on Secure Store Service from MSDN – “The Secure Store Service replaces the Microsoft Office SharePoint Server 2007 Single Sign On feature. Secure Store Service is a shared service that provides storage and mapping of credentials such as account names and passwords. It enables you to securely store data that provides credentials required for connecting to external systems and associating those credentials to a specific identity or group of identities.”

The Secure Store is normally part of the standard installation for SharePoint 2013. It is very important, it’ll give us that unattended service account for things like PerformancePoint, Excel Services, Visio services and so on.

In the below content you can find step by step approach to configure secure store service,

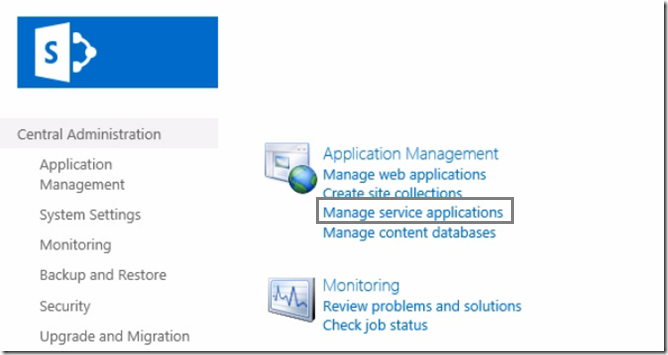
1. Go to Central Administration -> Manage service applications

clip_image001

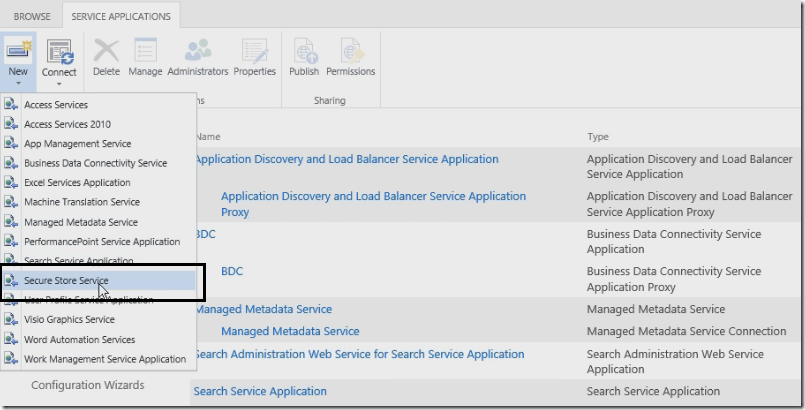
2. Here I do not have secure store service. So I’m going to create new one, by selecting New (in top ribbon) -> Secure Store Service.

clip_image002

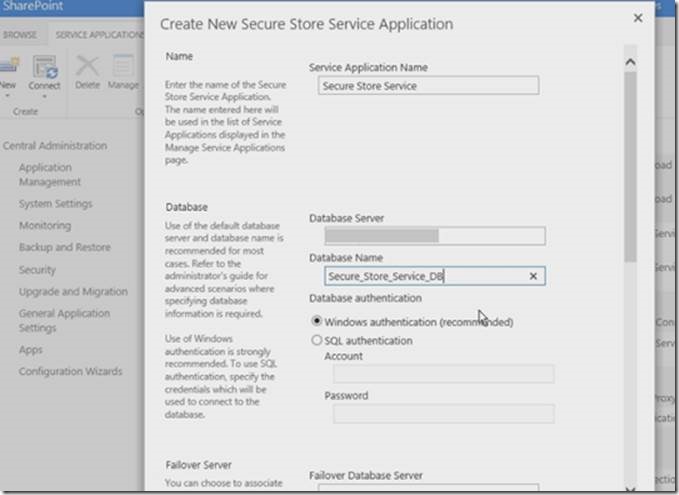
3. In Create New Secure Store Service Application window, give the service name, database server name and database name and I’m using Windows Authentication here,

clip_image004

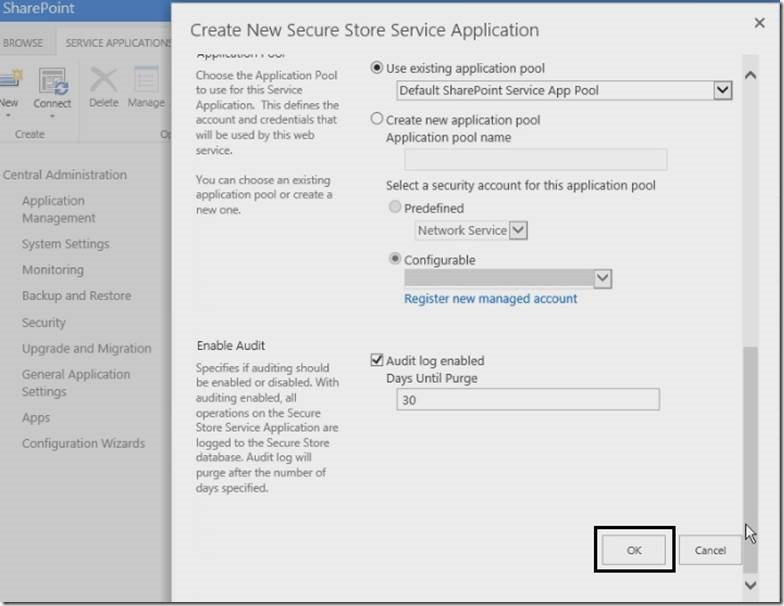
4. Now select the already existing application pool or create new application pool for this, to keep things simple I was using the same application pool for the most of the service applications. Give the service application pools and the accounts the proper permissions in SQL. Maybe in production environment you may prefer separate service application pool, for various reasons like performance, security and so on.

clip_image006

5. I’ve used already registered Managed account for this service application, you can use your own managed account and then click OK.

clip_image008

6. Secure Store Service has been created.

clip_image010

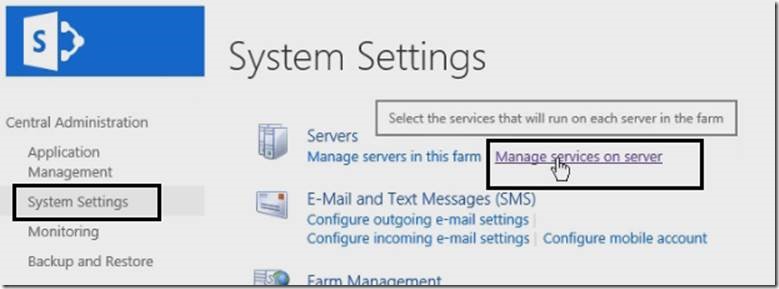
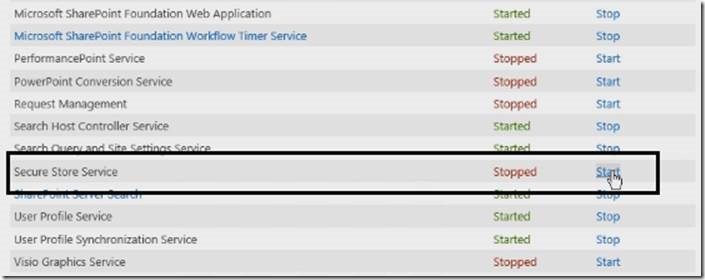
7. Now we need to start the Secure Store Service on the server. For that, go to Central Admin -> System Settings -> Manage services on server

clip_image012

8. Click on Start.

clip_image014

To use Secure Store Service, we must generate an encryption key. The key is used to encrypt and decrypt the credentials that are stored in the Secure Store Service database.

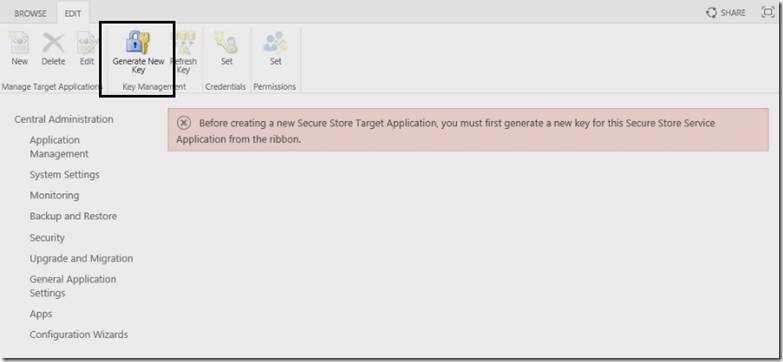
1. To generate the key, go to Application Management -> Manage service application and click on newly created Secure Store Service. And click on Generate New Key button from the ribbon.

clip_image016

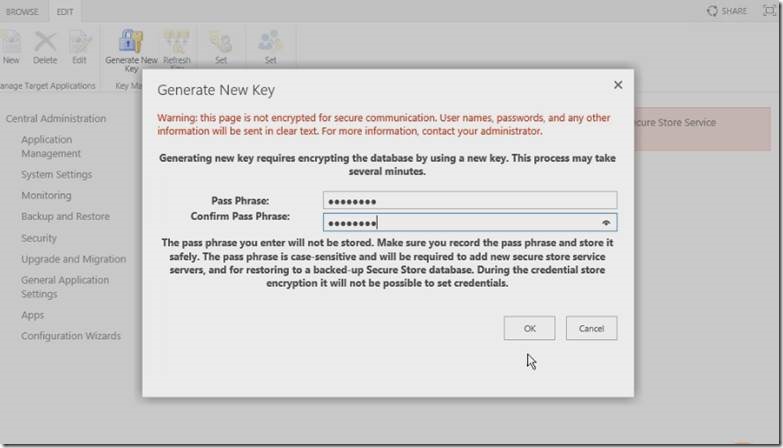
2. We need to create the pass phrase. The requirements for the key are that it must contain at least eight characters, in that eight characters it must contain at least three of the following four character groups -> uppercase alphabets, lowercase alphabets, numbers 0-9, and symbols (&, $, %, #, * and so on)

clip_image018

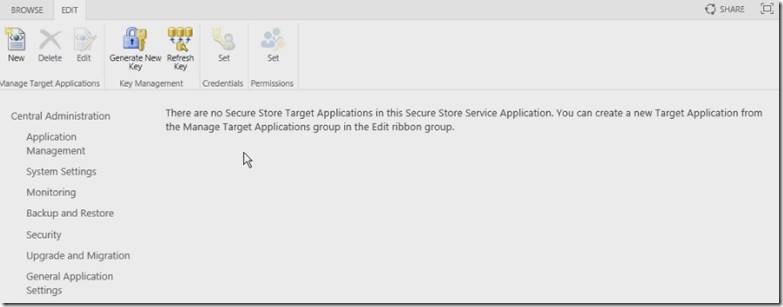
3. Red error has gone and it says there are no Secure Store Target Application

clip_image020

I’ll explain on how to create Target application and stuffs related to that in my upcoming articles.

Happy Coding

Ahamed
Category : SharePoint

Author Info

Ahamed Fazil Buhari
 
Senior Developer
 
Rate this article
 
Ahamed is a Senior Developer and he has very good experience in the field of Microsoft Technologies, especially SharePoint, Azure, M365, SPFx, .NET and client side scripting - JavaScript, TypeScript, ...read more
 

Generate PDF report using iTextSharp (.NET PDF library) in SharePoint Environment

Ahamed Fazil Buhari
 
Senior Developer
August 20, 2016
 
Rate this article
 
Views
12105

Hello Everyone, In this article we are going to look into step by step approach to pull the content from SharePoint and put into a new PDF file using iTextSharp. Consider that we need to show the SharePoint List data in a PDF file.

iTextSharp is a .NET PDF library which is mainly used to Create, Inspect and Maintain document in PDF. To know more about this library. Please refer here.

Download the iTextSharp library from the link given above. In this article we are using iTextSharp-5.5.9 version. Add the dll into your solution to make use of the functionalities available in iTextSharp.

Step 1: Create Solution in SharePoint 2010:

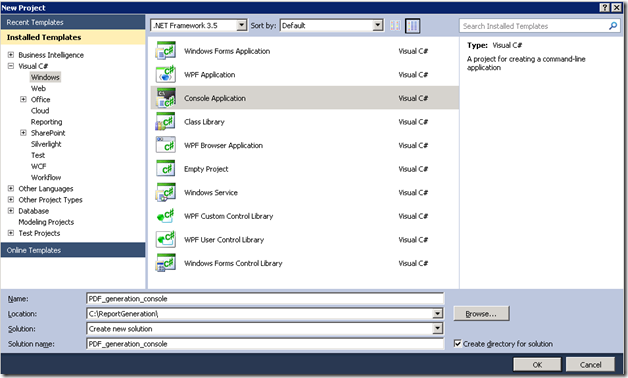
Here, I’ve create a Console Application and added the SharePoint dll’s just for making execution simple. New Project -> Windows (side navigation) -> Console Application.

image

Here I’m creating simple Console Application – (.NET 3.5) and changed the Platform Target to x64 in Solution -> Properties -> Build to retrieve the List values from SharePoint site and the solution is in the server where the SharePoint resides. Ignore this if you are not using Console Application.

Please note: We can use this iTextSharp dll in Sandbox or Farm solutions or any other solution which uses .Net environment. It not really relies on SharePoint.

Step 2: Add iTextShap .NET library dll into the Solution

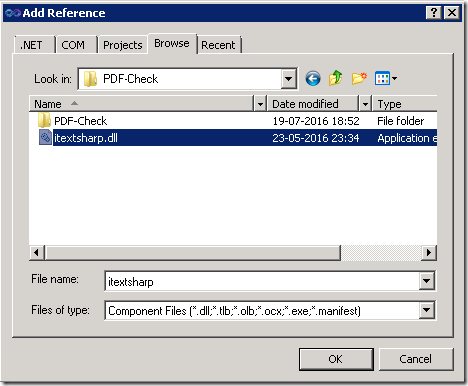
In the created Project, right click on the References folder -> Add Reference. In the Add Reference window chose the Browse tab and navigate to the folder where the iTextSharp dll is available. Select the itextsharp dll and click OK. As it is Console Application I need to add couple of SharePoint dll’s to access SharePoint resources.

image

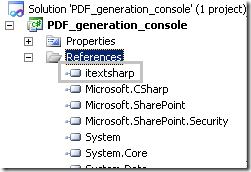
You can see the itextsharp references in your project.

image

Step 3: Retrieving SharePoint List Items and Embed the Content in PDF

image

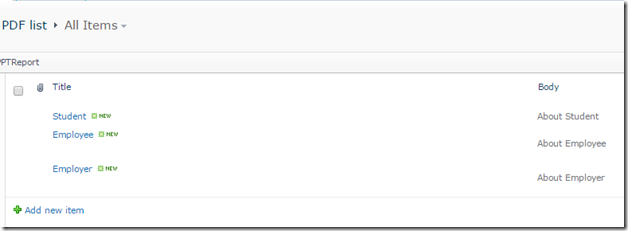
Let’s say we have a SharePoint List like shown below, and we need to put this List and its content into a PDF file.

The following code will generate a PDF file with the List Content,

 using System;
 using System.Collections.Generic;
 using System.Linq;
 using System.Text;
 using Microsoft.SharePoint;
 using Microsoft.SharePoint.Security;
 using Microsoft.SharePoint.Utilities;
 using System.IO;
 using iTextSharp.text;
 using iTextSharp.text.pdf;
 using iTextSharp.text.html.simpleparser;
 
 namespace PDF_generation_console
 {
     class Program
     {
         static void Main(string[] args)
         {
             Console.WriteLine("PDF Generating...");
             try
             {
                 Rectangle pageSize = PageSize.A4;
                 //Using the ItextSharp Document
                 //Document parameters -> pageSize, marginLeft, marginRight, marginTop, marginBottom
                 using (Document document = new Document(pageSize, 5f, 5f, 10f, 10f))
                 {
                     //Create PDF writer object to write content into the document                    
                     PdfWriter writer = PdfWriter.GetInstance(document, new FileStream(@"C:SharePoint_PDF_List.pdf", FileMode.Create));
 
                     document.Open();
 
                     //Creating variable for Font size and style
                     Font BOLD_10 = FontFactory.GetFont("Arial", 10f, iTextSharp.text.Font.BOLD);
                     Font BOLD_9 = FontFactory.GetFont("Arial", 9f, iTextSharp.text.Font.BOLD);
                     Font NORMAL_9 = FontFactory.GetFont("Arial", 9f, iTextSharp.text.Font.NORMAL);
 
                     //Add the Page
                     //pdfpTable parameters -> Number of columns in the table
                     PdfPTable table = new PdfPTable(2);
 
                     // Applying styling
                     table.DefaultCell.BorderWidth = 0;
                     table.DefaultCell.PaddingBottom = 15;
                     table.DefaultCell.Border = Rectangle.NO_BORDER;
                     table.DefaultCell.BorderWidth = 0;
                     table.TotalWidth = 100;
                     table.SetTotalWidth(new float[] { 15f, 60f });
 
                     //Row 1 for table without border and colspan=2 
                     //Create cell to insert into the Table
                     PdfPCell col1 = new PdfPCell(new Phrase("PDF list", BOLD_10));
 
                     //Styling and Positioning the cell
                     col1.PaddingTop = 10;
                     col1.PaddingBottom = 10;
                     col1.Colspan = 2;
                     col1.Border = Rectangle.NO_BORDER;
                     col1.BorderWidth = 0;
 
                     //Adding the cell into the table
                     table.AddCell(col1);
 
                     //Row 2 - 1st cell for the table with bold border
                     PdfPCell tableHeading = new PdfPCell(new Phrase("Title", BOLD_9));
                     tableHeading.Border = Rectangle.BOX;
                     tableHeading.BorderWidth = 1;
                     tableHeading.BackgroundColor = BaseColor.LIGHT_GRAY;
                     tableHeading.BorderColor = BaseColor.GRAY;
 
                     //Row 2 - 2nd cell for the table with bold border
                     PdfPCell tableHeading2 = new PdfPCell(new Phrase("Body", BOLD_9));
                     tableHeading2.Border = Rectangle.BOX;
                     tableHeading2.BorderWidth = 1;
                     tableHeading2.BackgroundColor = BaseColor.LIGHT_GRAY;
                     tableHeading2.BorderColor = BaseColor.GRAY;
 
                     table.AddCell(tableHeading);
                     table.AddCell(tableHeading2);
 
                     //Access the list and iterate throught all the items using SPSite -> SPWeb -> SPList -> ItemCollection -> Item
                     using (SPSite oSiteCollection = new SPSite(@"http://sharepointpalsdemo/sites/dev/"))
                     {
                         using (SPWeb spWeb = oSiteCollection.OpenWeb())
                         {
                             SPList spList = spWeb.Lists["PDF list"];
 
                             SPListItemCollection spListItemCol = spList.GetItems();
                             SPField sharePointField = null;
                             string getFieldValue = string.Empty;
 
                             foreach (SPListItem spListItem in spListItemCol)
                             {
                                 sharePointField = spListItem.Fields.GetField("Title");
                                 string title = sharePointField.GetFieldValueAsText(spListItem["Title"]);
 
                                 sharePointField = spListItem.Fields.GetField("Body");
                                 string body = sharePointField.GetFieldValueAsText(spListItem["Body"]);
 
                                 //Create new PDFCell to add the title content
                                 PdfPCell tableValue = new PdfPCell(new Phrase(title, NORMAL_9));
                                 tableValue.Border = Rectangle.BOX;
                                 tableValue.BorderWidth = 1;
 
                                 //Inserting html tags and applying inline css
                                 string bodyColumnValue = "<table height='15' width='100'><tr><td align='center' valign='middle' bgcolor="#07AF56"><font size='1' color="#FFF">" + body + "</font></td></tr></table>";
                                 iTextSharp.text.html.simpleparser.StyleSheet styles = new iTextSharp.text.html.simpleparser.StyleSheet();
                                 List<IElement> htmlarraylist = HTMLWorker.ParseToList(new StringReader(bodyColumnValue), styles);
 
                                 //Create new PDFCell to add the body content                                
                                 PdfPCell tableValue2 = new PdfPCell();
 
                                 for (int k = 0; k < htmlarraylist.Count; k++)
                                 {
                                     tableValue2.AddElement((IElement)htmlarraylist[k]);
                                 }
 
                                 //Apply border style                                
                                 tableValue2.Border = Rectangle.BOX;
                                 tableValue2.BorderWidth = 1;
 
                                 //Add the cells into the table
                                 table.AddCell(tableValue);
                                 table.AddCell(tableValue2);
                             }
                         }
                     }
 
                     //Add the table into the document
                     document.Add(table);
                     document.Close();
                 }
             }
 
             catch (Exception ex)
             {
                 Console.WriteLine("Error has occured " + ex.Message);
             }
         }
 
     }
 }
 

The code itself has all the required comments. I don’t have much to explain about the code.

And the output will be,


image


Happy Coding

Ahamed Buhari

Author Info

Ahamed Fazil Buhari
 
Senior Developer
 
Rate this article
 
Ahamed is a Senior Developer and he has very good experience in the field of Microsoft Technologies, especially SharePoint, Azure, M365, SPFx, .NET and client side scripting - JavaScript, TypeScript, ...read more
 

Leave a comment