It is a Microsoft platform for implementing distributed and interoperable applications. WCF is very useful for implementing services for different clients if they are using different type of application with different protocol and different messaging format. This article will help you to create a basic WCF which will display the data from the data and save the data in the database and host that WCF and asp.net client web application will consume the WCF.
1. Create a database and use it for that run the following commands.
create database DbEmployee
use DbEmployee
2. Create a table.
create table tblEmployee
(
EmployeeId int identity primary key,
Name varchar(50),
Salary int
)
3. Insert data into the table.
insert into tblEmployee values(‘Shikha’,1000)
insert into tblEmployee values(‘Tarun’,2000)
insert into tblEmployee values (‘Sathish’,3000)
4. Create a proc which retrives data based on the id
Create Proc getEmployeeByID
@Id int
as
begin
select EmployeeId,Name,Salary
from tblEmployee
where EmployeeId=@Id
end
5. If you want to execute the proc you can run
exec getEmployeeByID 1
6. Create a Proc which saves the employee data into EmployeeTable
Create proc SaveEmployee
@Name varchar(50),
@Sal varchar(50)
as
begin
insert tblEmployee(Name,Salary)
values(@Name,@Sal)
end
7. If you want to execute the proc you can run this will add a new row to your table.
exec SaveEmployee 4, ‘abc’, 10000
8. Open visual studio and create a class library with the name EmployeeClassLibraryService
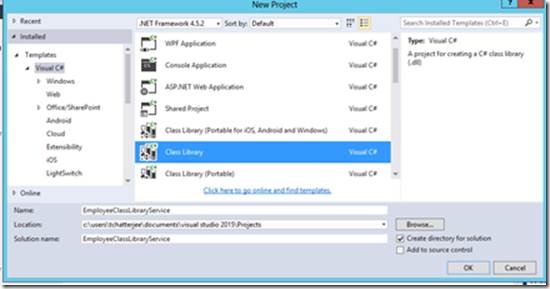
9. Rename the class 1 to Employee Class and paste the below code in Employee class.
public int EmployeeId { get; set; }
public string Name { get; set; }
public int Salary { get; set; }
10. Delete the existing app.config file and we are goin to add a new app.config file later in the host project.
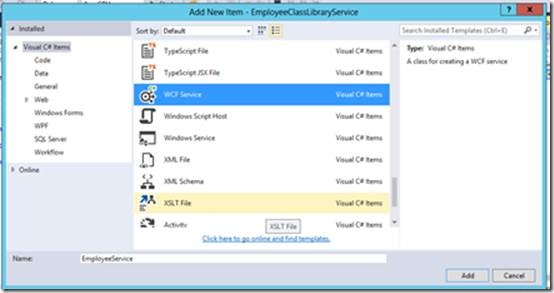
11. Add a WCF Service and name it as Employee Service.
Explanation:- This will add a Interface IEmployeeService.cs and a class EmployeeService.cs to the class library project. The Interface will be decorated with the service contract and this turns the interface to a WCF Service. The methods under this would be decorated with operation contract which makes the methods available as a part of service to the client. If we want to create a method under WCF service and don’t want it to make availalbe to the client then don’t decorated with operation contarct attribute.
12. Remove the existing operation contract and copy paste the following code in IEmployee Service interface.
Expalantion:- Here we are defining two methods first GetEmployee which will retrived the data from the database depending on the ID entered. Second method SaveEmployee will save the data inside the database and the id field will be automatically incremented depending on the last id generated. These methods will be implemeted by the EmployeeService class.
| [OperationContract] Employee GetEmployee(int id); [OperationContract] void SaveEmployee(Employee emp); |
13. First add the reference of System.Configuration file to the project.
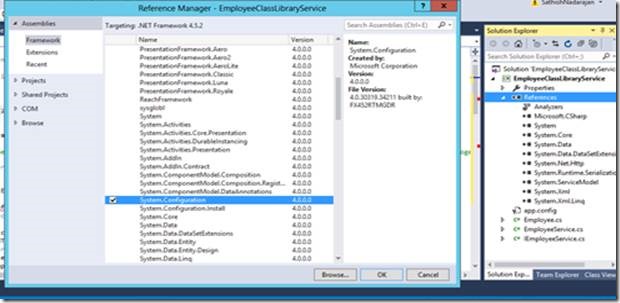
Go to EmployeeService.cs and add the following namespace.
using System.Data;
using System.Data.SqlClient;
using System.Configuration;
Implement the methods defined in the interface copy and paste following code inside them.
 public Employee GetEmployee(int id)
         {
             string cs = ConfigurationManager.ConnectionStrings["EmpCS"].ConnectionString;
             using (SqlConnection con = new SqlConnection(cs))
             {
                 SqlCommand cmd = new SqlCommand("getEmployeeByID", con);
                 cmd.CommandType = CommandType.StoredProcedure;
                 SqlParameter parameter = new SqlParameter("@Id", id);
                 cmd.Parameters.Add(parameter);
                 Employee emp = new Employee();
                 cmd.Connection = con;
                 con.Open();
                 SqlDataReader reader = cmd.ExecuteReader();
                 while (reader.Read())
                 {
                     emp.EmployeeId = Convert.ToInt32(reader["EmployeeId"]);
                     emp.Name = reader["Name"].ToString();
                     emp.Salary = Convert.ToInt32(reader["Salary"]);
                 }

                 return emp;
             }
         }

         public void SaveEmployee(Employee emp)
         {
             string cs = ConfigurationManager.ConnectionStrings["EmpCS"].ConnectionString;
             using (SqlConnection con = new SqlConnection(cs))
             {
                 SqlCommand cmd = new SqlCommand("SaveEmployee", con);
                 cmd.CommandType = CommandType.StoredProcedure;
                 SqlParameter parameterName = new SqlParameter
                 {
                     ParameterName = "@Name",
                     Value = emp.Name
                 };
                 cmd.Parameters.Add(parameterName);
                 SqlParameter parameterSal = new SqlParameter
                 {
                     ParameterName = "@Sal",
                     Value = emp.Salary
                 };
                 cmd.Parameters.Add(parameterSal);
                 con.Open();
                 cmd.ExecuteNonQuery();
             }

         }
*Note: This connection string ["EmpCS"] is not defined as of now and will be defined later in app.config file.
14. Now the WCF is created and we have to host this WCF service for that add a new console application to the solution and name it as EmployeeServiceHost
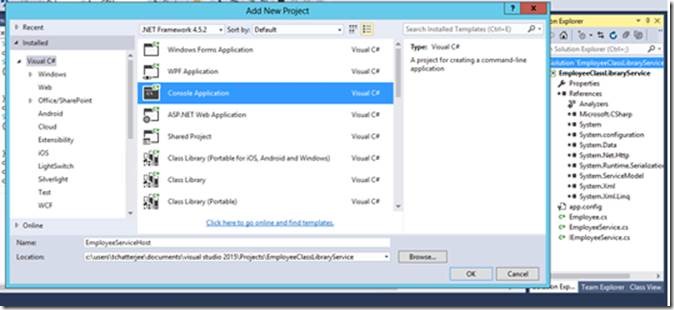
15. Add an Application configuration file in EmployeeServiceHost .
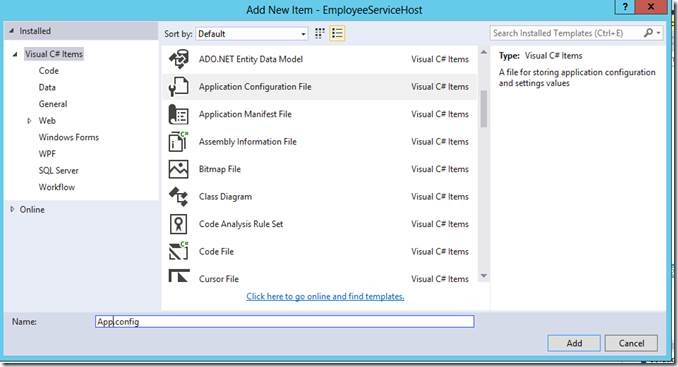
16. Remove the existing code from app.config file and copy and paste the following code in app.config file.
Expalnation:-
i. Connection string will connect this application to the database.
ii. Define the service name
iii. The endpoint is one of the main feature depending on the no of client we need to define that many endpoint. It has three things first is address specifies where your service is available and this is the relative address. Second is binding , there are lots of binding available in WCF but for now we are using basic HTTP binding and third is the contract is the service which tells the client what are the operations available in the service. In contract we add the namespace.interfacename.
iv. Base address which is available under host and this only contains the wsdl document which is created by the service. It will be used later in the client application to invoke the service.
v. Service behaviour which allows the service to exchange meta data and we have to make serviceMetadata httpGetEnabled="true" in order to allow it. This behaviour name should be define in service tag under behaviour configuration attribute.
vi.
 <?xml version="1.0" encoding="utf-8" ?>
 <configuration>
   <connectionStrings>
     <add name ="EmpCS" connectionString="Data Source=GBRDCSPSDEV05;Initial Catalog=DbEmployee;Integrated Security=True" providerName="System.Data.SqlClient" />
   </connectionStrings>
   <system.serviceModel>

     <services>
       <service name="EmployeeClassLibraryService.EmployeeService" behaviorConfiguration="mexBehavior">
         <endpoint address="EmployeeService" binding="basicHttpBinding" contract="EmployeeClassLibraryService.IEmployeeService"></endpoint>
         <host>
           <baseAddresses>
             <add baseAddress="http://localhost:8090"/>
           </baseAddresses>
         </host>
       </service>
     </services>
     <behaviors>
       <serviceBehaviors>
         <behavior name="mexBehavior">
           <serviceMetadata httpGetEnabled="true"/>
         </behavior>
       </serviceBehaviors>
     </behaviors>
   </system.serviceModel>
 </configuration>
17. In EmployeeServiceHost first we have to add two references one of EmployeeClassLibraryService and the other of System.ServiceModel assembly.
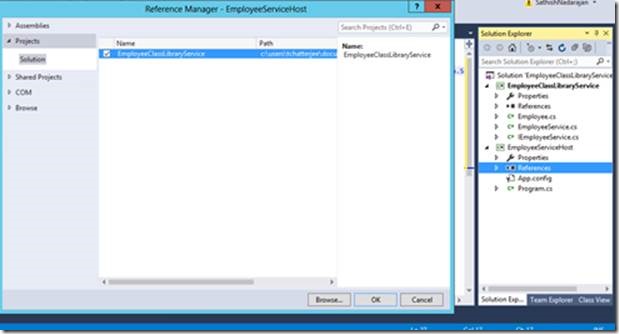
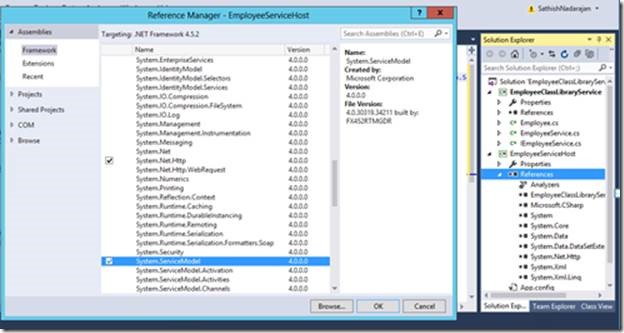
Include the following namespace in Program.cs file.
using System.ServiceModel;
Add the following code in main method of the program.cs file which will host the service.
 using (ServiceHost host = new ServiceHost(typeof(EmployeeClassLibraryService.EmployeeService)))
             {
                 host.Open();
                 Console.WriteLine("Host Started : " + DateTime.Now.ToString());
                 Console.ReadLine();
             }
18. Make the EmployeeServiceHost as the start up project and run the application and you would get the following screen.
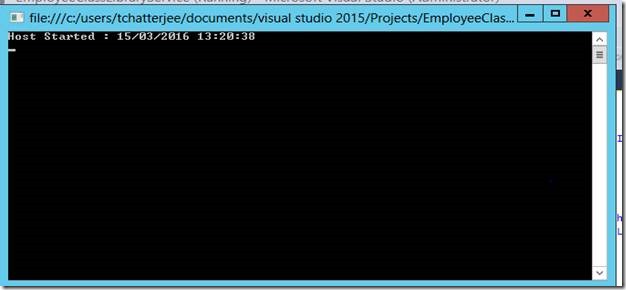
vii. So the host is created and if you want to see your wsdl document then click the link (http://localhost:8090/?wsdl) but make sure while viewing the wsdl your host should be running the only you can see your wsdl document.
Now the WCF and its hosting are done now we have to create a client application which will consume this WCF service. In our case the client is a Web Application.
1. Open another instance of visual studio and create an empty web application with the name EmployeeClient
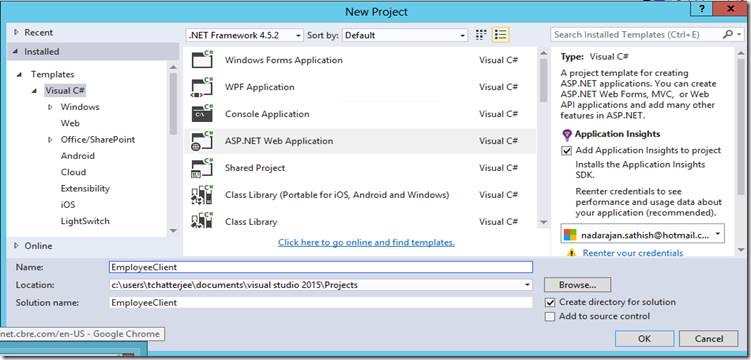
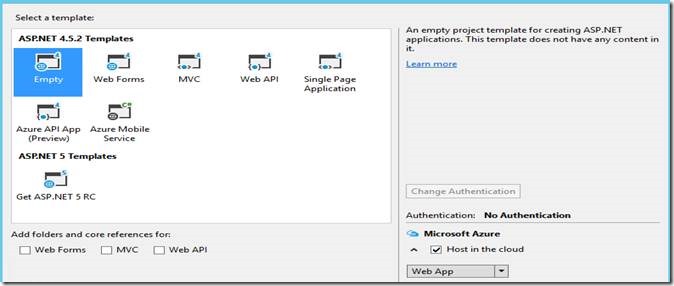
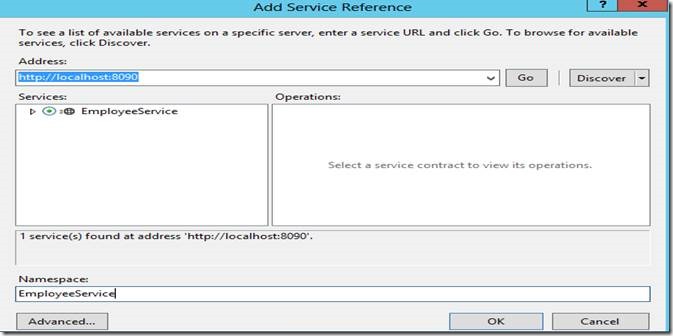
2. Add a Service Reference to the client application and specify the base url (http://localhost:8090) of your WCF Service and click go and you would see your service and give a proper namespace name as well. This will automatically add the binding configuration in the web.config file of client application.
3. Add a Web Form and name it EmployyeForm.aspx
4. Now we have to add the controls so copy and paste the following code for that or you can drag and drop the controls as well.
 <table class="auto-style1">
 <tr>
                 <td class="auto-style2">Name</td>
                 <td class="auto-style3">
                     <asp:TextBox ID="NameTxtBox" runat="server"></asp:TextBox>
                 </td>
             </tr>
             <tr>
                 <td class="auto-style2">Salary</td>
                 <td class="auto-style3">
                     <asp:TextBox ID="SalTxtBox" runat="server"></asp:TextBox>
                 </td>
             </tr>
             <tr>
                 <td colspan="2">
 asp:Button ID="SubmitBtn" runat="server" Text="Save Employee" OnClick="SubmitBtn_Click" />
                 </td>
             </tr>
             <tr>
                 <td class="auto-style3">
                     <asp:Button ID="GetBtn" runat="server" Text="Get Employee By ID" OnClick="GetBtn_Click" />
                 </td>
                 <td class="auto-style3">
                     ID: <asp:TextBox ID="IDTxtBox" runat="server"></asp:TextBox>
                      </td>
             </tr>
 </table>
 <p>
 <asp:Label ID="MsgLabel" runat="server" Font-Bold="True" Font-Size="XX-Large"></asp:Label>
 </p>
After copying the code or if you want to drag and drop the controls the screen should look like below:

5. Now copy the below code in SaveEmployee button click event which will take the values from the control and save it in the database.
 protected void SubmitBtn_Click(object sender, EventArgs e)
         {
             EmployeeService.EmployeeServiceClient client = new EmployeeService.EmployeeServiceClient();
             EmployeeService.Employee emp = new EmployeeService.Employee();
             emp.Name = NameTxtBox.Text;
             emp.Salary = Convert.ToInt32(SalTxtBox.Text);
             client.SaveEmployee(emp);
             MsgLabel.Text = "Employee Saved";
         }
6. Copy the below code in GetEmployeeById button click event which will take the id and depending on that it will display the value.
 protected void GetBtn_Click(object sender, EventArgs e)
         {
             EmployeeService.EmployeeServiceClient client = new EmployeeService.EmployeeServiceClient();
             EmployeeService.Employee emp = client.GetEmployee(Convert.ToInt32(IDTxtBox.Text));
             NameTxtBox.Text = emp.Name;
             SalTxtBox.Text = emp.Salary.ToString();
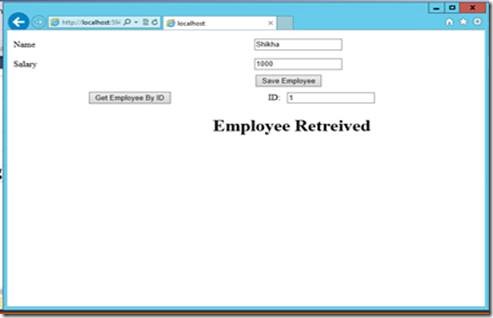
             MsgLabel.Text = "Employee Retreived";
         }
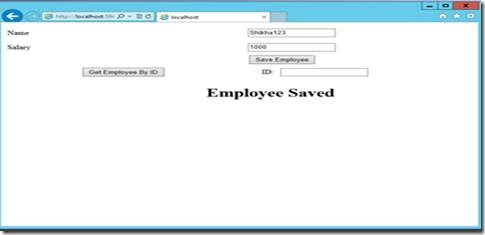
Now Run the client application and test both the functionality
Save Employee:
Get Employee:




Leave a comment