How to debug Windows Service after Installation of Service

Ahamed Fazil Buhari
 
Senior Developer
August 5, 2017
 
Rate this article
 
Views
9181

Hello everyone, in this article we will see how to debug Windows Service after installing that Service. Always debugging a Windows Service Project in Visual Studio is challenging task. Usually most people your logger to keep track on what’s going on inside the service. But still it won’t be that much effective as debugging. In my previous article I explained How to debug Windows Service without installing. Here we can see how to debug after installing. Let’s get started.

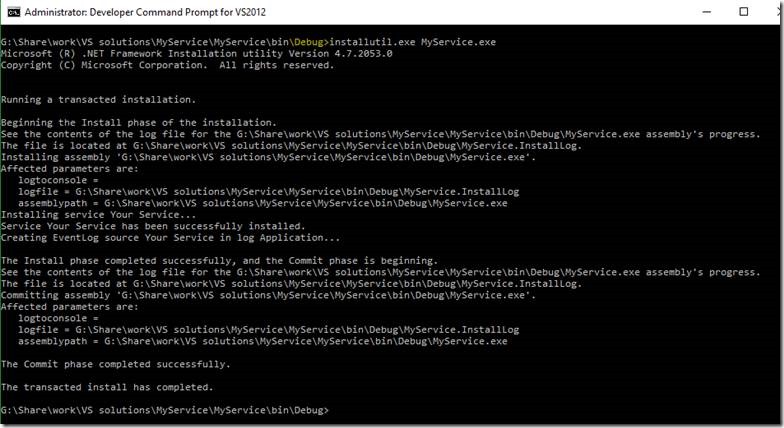
· Install your Windows Service by using below command and make sure you built this solution in Debug mode (not release mode) and install that service. To know more about Windows Service Installation please refer my other article “How to manually install Uninstall Windows Service”

clip_image002

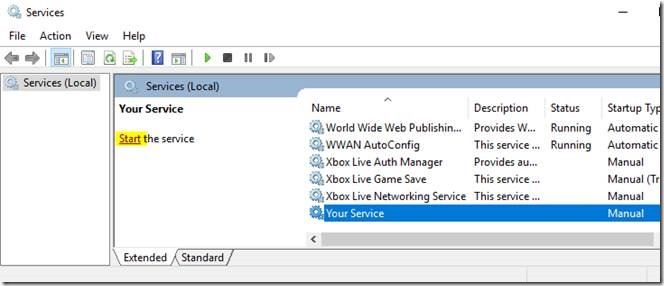
· Once the installation is successful you can find your service in ‘Service Control Manager’ and start your service.

clip_image004

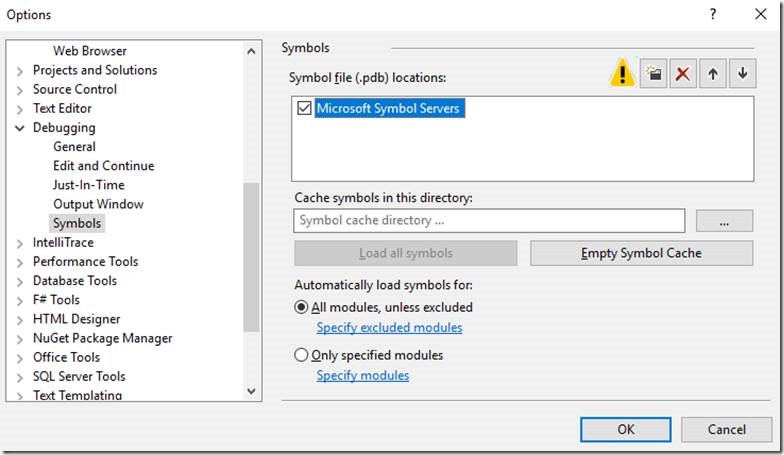
· Open Visual Studio(run as Administrator), then go to Tools -> Options -> Debugging -> Symbols and check Microsoft Symbol Servers (If we are debugging system process and we want to have symbols for system calls then we must add this Microsoft Symbol Servers).

clip_image006

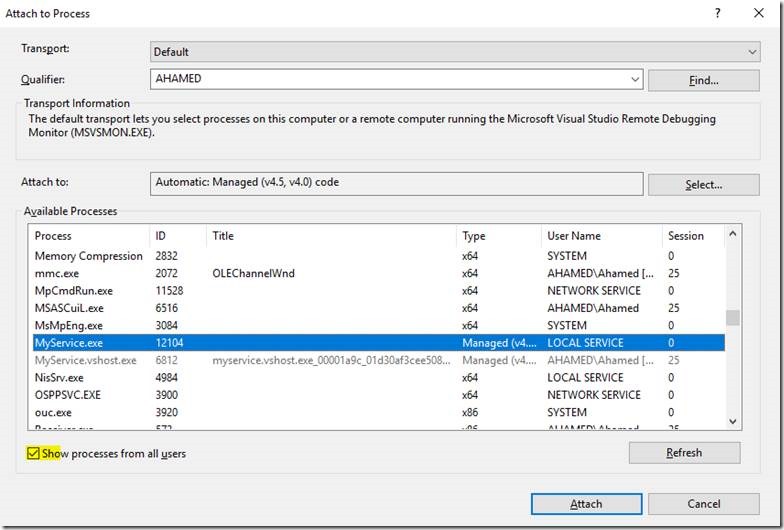
· Click on Ctrl+Alt+P or go to Tools -> Attach to Process… and attach the process (your service name in VS) that you want to debug. Make sure your service is started in Service Control Manager

clip_image008

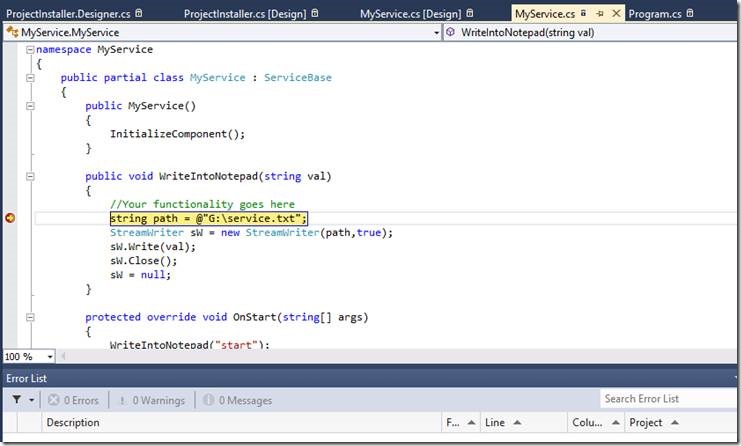
· Now you are in debug mode. You can debug just like other common visual studio project

clip_image010

Happy Coding

Ahamed

Category : Windows

Author Info

Ahamed Fazil Buhari
 
Senior Developer
 
Rate this article
 
Ahamed is a Senior Developer and he has very good experience in the field of Microsoft Technologies, especially SharePoint, Azure, M365, SPFx, .NET and client side scripting - JavaScript, TypeScript, ...read more
 

Windows communication foundation (WCF)

Shikha Gupta
 
SharePoint Developer
April 19, 2016
 
Rate this article
 
Views
5302

It is a Microsoft platform for implementing distributed and interoperable applications. WCF is very useful for implementing services for different clients if they are using different type of application with different protocol and different messaging format. This article will help you to create a basic WCF which will display the data from the data and save the data in the database and host that WCF and asp.net client web application will consume the WCF.

1. Create a database and use it for that run the following commands.

create database DbEmployee

use DbEmployee

2. Create a table.

create table tblEmployee

(

EmployeeId int identity primary key,

Name varchar(50),

Salary int

)

3. Insert data into the table.

insert into tblEmployee values(‘Shikha’,1000)

insert into tblEmployee values(‘Tarun’,2000)

insert into tblEmployee values (‘Sathish’,3000)

4. Create a proc which retrives data based on the id

Create Proc getEmployeeByID

@Id int

as

begin

select EmployeeId,Name,Salary

from tblEmployee

where EmployeeId=@Id

end

5. If you want to execute the proc you can run

exec getEmployeeByID 1

6. Create a Proc which saves the employee data into EmployeeTable

Create proc SaveEmployee

@Name varchar(50),

@Sal varchar(50)

as

begin

insert tblEmployee(Name,Salary)

values(@Name,@Sal)

end

7. If you want to execute the proc you can run this will add a new row to your table.

exec SaveEmployee 4, ‘abc’, 10000

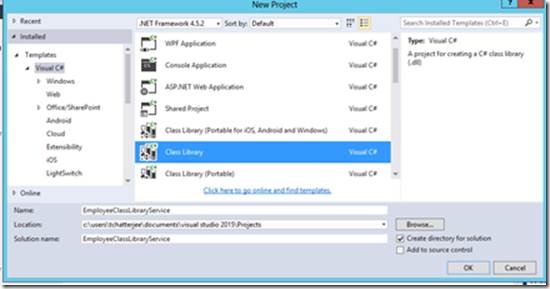
8. Open visual studio and create a class library with the name EmployeeClassLibraryService
clip_image002

9. Rename the class 1 to Employee Class and paste the below code in Employee class.

public int EmployeeId { get; set; }

public string Name { get; set; }

public int Salary { get; set; }

10. Delete the existing app.config file and we are goin to add a new app.config file later in the host project.

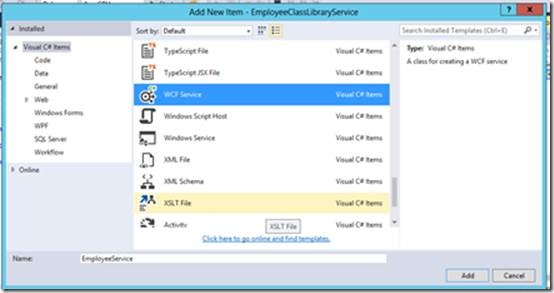
11. Add a WCF Service and name it as Employee Service.

Explanation:- This will add a Interface IEmployeeService.cs and a class EmployeeService.cs to the class library project. The Interface will be decorated with the service contract and this turns the interface to a WCF Service. The methods under this would be decorated with operation contract which makes the methods available as a part of service to the client. If we want to create a method under WCF service and don’t want it to make availalbe to the client then don’t decorated with operation contarct attribute.
clip_image004

12. Remove the existing operation contract and copy paste the following code in IEmployee Service interface.

Expalantion:- Here we are defining two methods first GetEmployee which will retrived the data from the database depending on the ID entered. Second method SaveEmployee will save the data inside the database and the id field will be automatically incremented depending on the last id generated. These methods will be implemeted by the EmployeeService class.

[OperationContract]

Employee GetEmployee(int id);

[OperationContract]

void SaveEmployee(Employee emp);

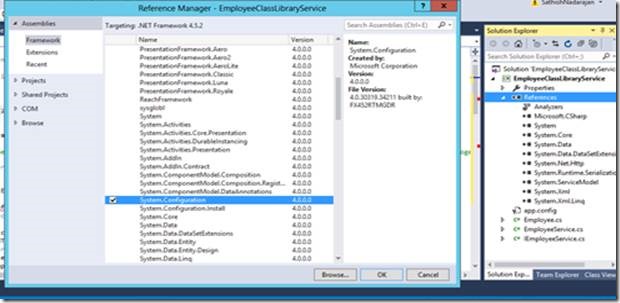
13. First add the reference of System.Configuration file to the project.
clip_image006

Go to EmployeeService.cs and add the following namespace.

using System.Data;

using System.Data.SqlClient;

using System.Configuration;

Implement the methods defined in the interface copy and paste following code inside them.

 public Employee GetEmployee(int id)
         {
             string cs = ConfigurationManager.ConnectionStrings["EmpCS"].ConnectionString;
             using (SqlConnection con = new SqlConnection(cs))
             {
                 SqlCommand cmd = new SqlCommand("getEmployeeByID", con);
                 cmd.CommandType = CommandType.StoredProcedure;
                 SqlParameter parameter = new SqlParameter("@Id", id);
                 cmd.Parameters.Add(parameter);
                 Employee emp = new Employee();
                 cmd.Connection = con;
                 con.Open();
                 SqlDataReader reader = cmd.ExecuteReader();
                 while (reader.Read())
                 {
                     emp.EmployeeId = Convert.ToInt32(reader["EmployeeId"]);
                     emp.Name = reader["Name"].ToString();
                     emp.Salary = Convert.ToInt32(reader["Salary"]);
                 }
 
                 return emp;
             }
         }
 
         public void SaveEmployee(Employee emp)
         {
             string cs = ConfigurationManager.ConnectionStrings["EmpCS"].ConnectionString;
             using (SqlConnection con = new SqlConnection(cs))
             {
                 SqlCommand cmd = new SqlCommand("SaveEmployee", con);
                 cmd.CommandType = CommandType.StoredProcedure;
                 SqlParameter parameterName = new SqlParameter
                 {
                     ParameterName = "@Name",
                     Value = emp.Name
                 };
                 cmd.Parameters.Add(parameterName);
                 SqlParameter parameterSal = new SqlParameter
                 {
                     ParameterName = "@Sal",
                     Value = emp.Salary
                 };
                 cmd.Parameters.Add(parameterSal);
                 con.Open();
                 cmd.ExecuteNonQuery();
             }
 
         }
 

*Note: This connection string ["EmpCS"] is not defined as of now and will be defined later in app.config file.

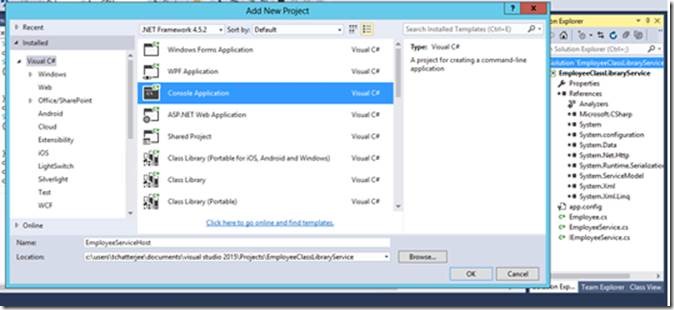
14. Now the WCF is created and we have to host this WCF service for that add a new console application to the solution and name it as EmployeeServiceHost
clip_image008

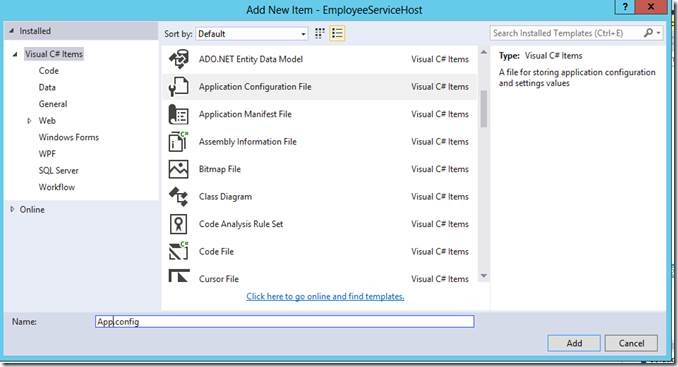
15. Add an Application configuration file in EmployeeServiceHost .
clip_image010

16. Remove the existing code from app.config file and copy and paste the following code in app.config file.

Expalnation:-

i. Connection string will connect this application to the database.

ii. Define the service name

iii. The endpoint is one of the main feature depending on the no of client we need to define that many endpoint. It has three things first is address specifies where your service is available and this is the relative address. Second is binding , there are lots of binding available in WCF but for now we are using basic HTTP binding and third is the contract is the service which tells the client what are the operations available in the service. In contract we add the namespace.interfacename.

iv. Base address which is available under host and this only contains the wsdl document which is created by the service. It will be used later in the client application to invoke the service.

v. Service behaviour which allows the service to exchange meta data and we have to make serviceMetadata httpGetEnabled="true" in order to allow it. This behaviour name should be define in service tag under behaviour configuration attribute.

vi.

 <?xml version="1.0" encoding="utf-8" ?>
 <configuration>
   <connectionStrings>
     <add name ="EmpCS" connectionString="Data Source=GBRDCSPSDEV05;Initial Catalog=DbEmployee;Integrated Security=True" providerName="System.Data.SqlClient" />
   </connectionStrings>
   <system.serviceModel>
 
     <services>
       <service name="EmployeeClassLibraryService.EmployeeService" behaviorConfiguration="mexBehavior">
         <endpoint address="EmployeeService" binding="basicHttpBinding" contract="EmployeeClassLibraryService.IEmployeeService"></endpoint>
         <host>
           <baseAddresses>
             <add baseAddress="http://localhost:8090"/>
           </baseAddresses>
         </host>
       </service>
     </services>
     <behaviors>
       <serviceBehaviors>
         <behavior name="mexBehavior">
           <serviceMetadata httpGetEnabled="true"/>
         </behavior>
       </serviceBehaviors>
     </behaviors>
   </system.serviceModel>
 </configuration>
 

17. In EmployeeServiceHost first we have to add two references one of EmployeeClassLibraryService and the other of System.ServiceModel assembly.
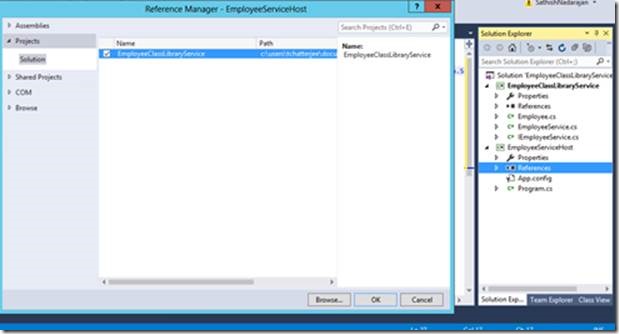
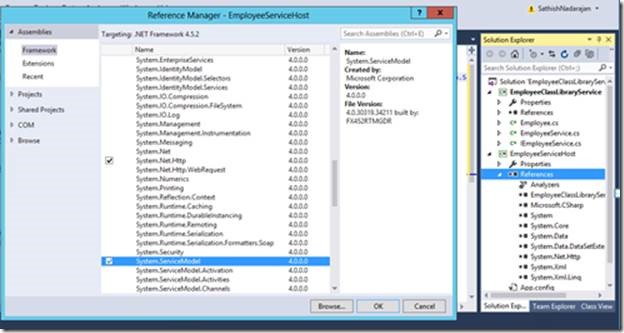
clip_image012

clip_image014

Include the following namespace in Program.cs file.

using System.ServiceModel;

Add the following code in main method of the program.cs file which will host the service.

 using (ServiceHost host = new ServiceHost(typeof(EmployeeClassLibraryService.EmployeeService)))
             {
                 host.Open();
                 Console.WriteLine("Host Started : " + DateTime.Now.ToString());
                 Console.ReadLine();
             }


18. Make the EmployeeServiceHost as the start up project and run the application and you would get the following screen.
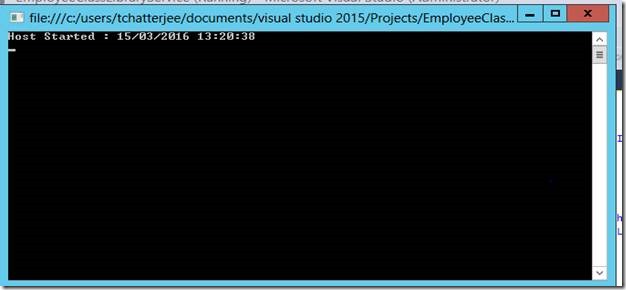
clip_image016

vii. So the host is created and if you want to see your wsdl document then click the link (http://localhost:8090/?wsdl) but make sure while viewing the wsdl your host should be running the only you can see your wsdl document.

Now the WCF and its hosting are done now we have to create a client application which will consume this WCF service. In our case the client is a Web Application.

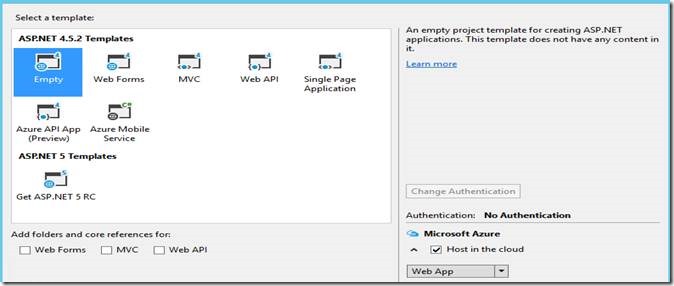
1. Open another instance of visual studio and create an empty web application with the name EmployeeClient
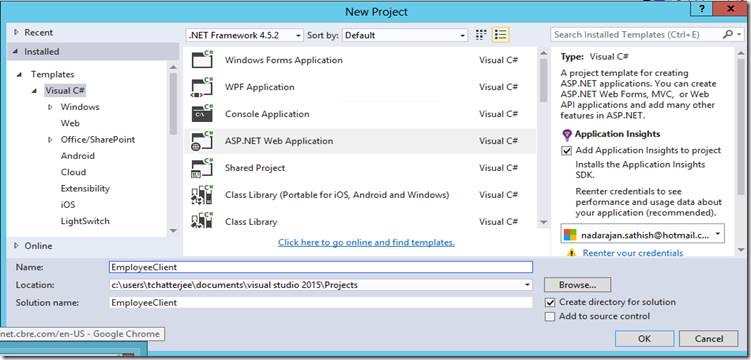
clip_image018

clip_image020

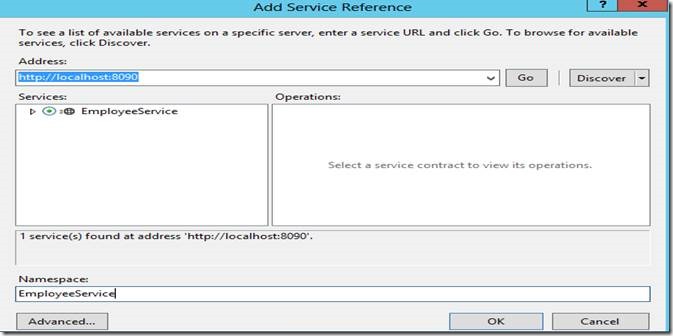
2. Add a Service Reference to the client application and specify the base url (http://localhost:8090) of your WCF Service and click go and you would see your service and give a proper namespace name as well. This will automatically add the binding configuration in the web.config file of client application.
clip_image022

3. Add a Web Form and name it EmployyeForm.aspx

4. Now we have to add the controls so copy and paste the following code for that or you can drag and drop the controls as well.

 <table class="auto-style1">
 <tr>
                 <td class="auto-style2">Name</td>
                 <td class="auto-style3">
                     <asp:TextBox ID="NameTxtBox" runat="server"></asp:TextBox>
                 </td>
             </tr>
             <tr>
                 <td class="auto-style2">Salary</td>
                 <td class="auto-style3">
                     <asp:TextBox ID="SalTxtBox" runat="server"></asp:TextBox>
                 </td>
             </tr>
             <tr>
                 <td colspan="2">
 asp:Button ID="SubmitBtn" runat="server" Text="Save Employee" OnClick="SubmitBtn_Click" />
                 </td>
             </tr>
             <tr>
                 <td class="auto-style3">
                     <asp:Button ID="GetBtn" runat="server" Text="Get Employee By ID" OnClick="GetBtn_Click" />
                 </td>
                 <td class="auto-style3">
                     ID: <asp:TextBox ID="IDTxtBox" runat="server"></asp:TextBox>
                      </td>
             </tr>
 </table>
 <p>
 <asp:Label ID="MsgLabel" runat="server" Font-Bold="True" Font-Size="XX-Large"></asp:Label>
 </p>
 

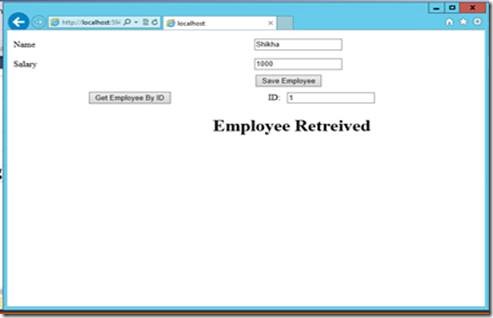
After copying the code or if you want to drag and drop the controls the screen should look like below:

clip_image024

5. Now copy the below code in SaveEmployee button click event which will take the values from the control and save it in the database.

 protected void SubmitBtn_Click(object sender, EventArgs e)
         {
             EmployeeService.EmployeeServiceClient client = new EmployeeService.EmployeeServiceClient();
             EmployeeService.Employee emp = new EmployeeService.Employee();
             emp.Name = NameTxtBox.Text;
             emp.Salary = Convert.ToInt32(SalTxtBox.Text);
             client.SaveEmployee(emp);
             MsgLabel.Text = "Employee Saved";
         }
 

6. Copy the below code in GetEmployeeById button click event which will take the id and depending on that it will display the value.

 protected void GetBtn_Click(object sender, EventArgs e)
         {
             EmployeeService.EmployeeServiceClient client = new EmployeeService.EmployeeServiceClient();
             EmployeeService.Employee emp = client.GetEmployee(Convert.ToInt32(IDTxtBox.Text));
             NameTxtBox.Text = emp.Name;
             SalTxtBox.Text = emp.Salary.ToString();
             MsgLabel.Text = "Employee Retreived";
         }
 

Now Run the client application and test both the functionality

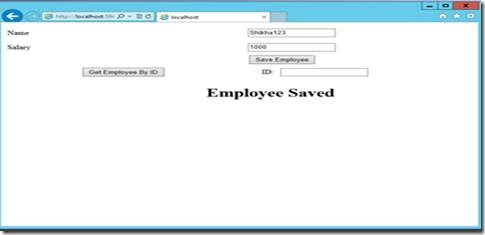
Save Employee:
clip_image026

Get Employee:
clip_image028

Category : Windows
Author Info

Shikha Gupta
 
SharePoint Developer
 
Rate this article
 
Sikha has been working in IT Industry for over 5 years. She holds a B-tech degree. She is passionate about learning and sharing the tricks and tips in .Net , ...read more
 

ID4223: The SamlSecurityToken is rejected because the SamlAssertion.NotOnOrAfter Condition is not satisfied

Sathish Nadarajan
 
Solution Architect
April 7, 2014
 
Rate this article
 
Views
26110

Today I was facing a strange issue when I opened my Development Site. Hence thought of sharing to the community.

The scenario here is, we are using 2 Servers for our development purpose. One is Windows Server 2012 on which the SharePoint 2013 has been installed. The other one is Windows Server 2008 R2, that we are using for the ADFS authentication.

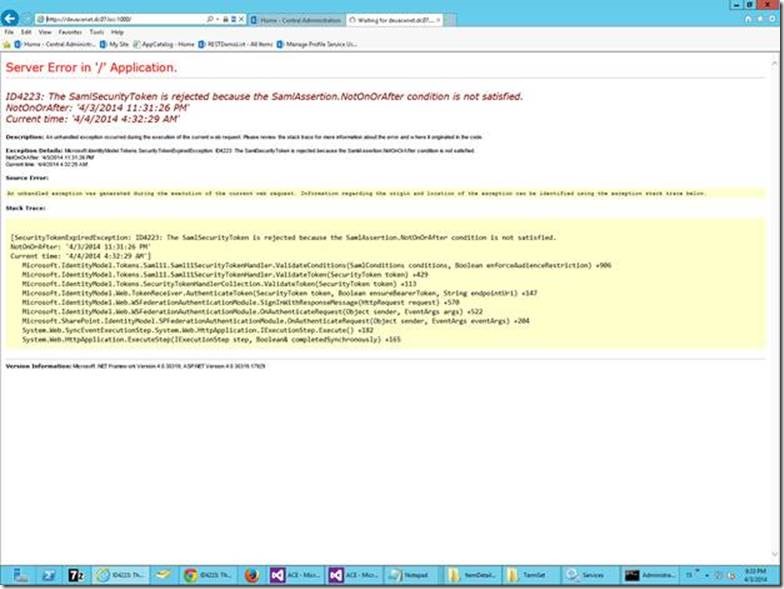
Somehow, the time on the Windows Server 2008 R2 has been modified. (Not sure how it happened and that’s not our problem also). I tried login to the SharePoint Dev Site and I was getting the strange exception as mentioned on the title of this article. The exact exception and the trace are as follows.

clip_image002

I was little bit worried about this. But the solution was so simple.

1. Go to the Services.msc on the ADFS Server on which the time was not correct.

2. Find the “Windows Time” Service.

3. Restart the Service.

4. Do an IISRESET on both the servers.

5. Refresh the Dev Site.

6. SURPRISE… It worked like charm.

(If required, open the command prompt and type w32tm /resync. But I didn’t do this.)

And one thing I noticed is, as soon as I restarted the service, the time on the ADFS Server corrected automatically.

Happy Coding.

Sathish Nadarajan.

Category : SharePoint

Author Info

Sathish Nadarajan
 
Solution Architect
 
Rate this article
 
Sathish is a Microsoft MVP for SharePoint (Office Servers and Services) having 15+ years of experience in Microsoft Technologies. He holds a Masters Degree in Computer Aided Design and Business ...read more
 

Creating and Configuring Managed Metadata Service Application in SharePoint 2013

Mythili Ranganathan
 
SharePoint Architect
December 24, 2013
 
Rate this article
 
Views
45358

In this post, let us see the step by step procedure to create and configure Managed Metadata Service Application in SharePoint 2013.

Managed Metadata Service, allows to use Managed Metadata and share ContentTypes on SiteCollections and WebApplication level.

By Creating Managed Metadata Service Application, Managed Metadata Service will be automatically created. Service will identify the database to be served as term store and connection provides access to the service. All enterprise managed terms will be stored in the DB that is specified by managed metadata service. Whenever administrator creating connection to the service and publishing the managed metadata service, he need to know the URL of the service. We can also use managed metadata service to share content types.

To use managed metadata, a web application need to have connection to the managed metadata service. When managed metadata service is created, a connection will be created to the web application.

With this background information regarding MMSA, let us see the steps to create and configure the managed Metadata service in central administration.

Steps:

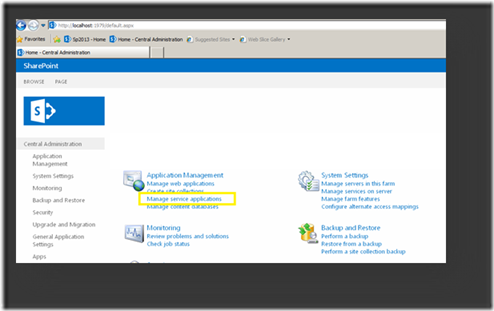
1. Go to Central Administration -> Application Management -> Manage Service applications

clip_image002

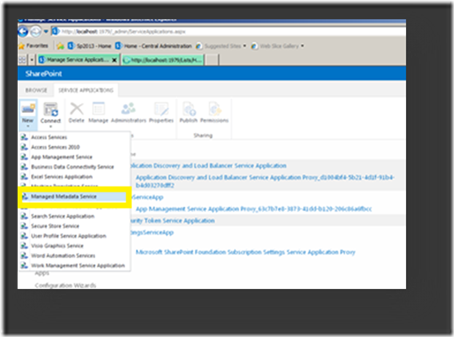
2. In Manage service applications, add new managed metadata service as shown in the screen below.

clip_image004

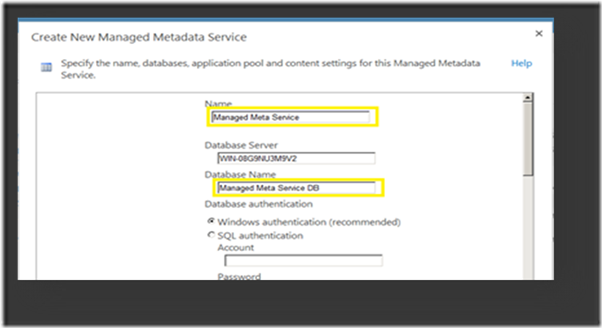
3. Add Name, Database name, Application pool name details in the popup as shown screen below.

· Service Name

· Database Name

· Application Pool to run the service, either you can use the existing app pool / create a new one by selecting the option available.

clip_image006

clip_image008

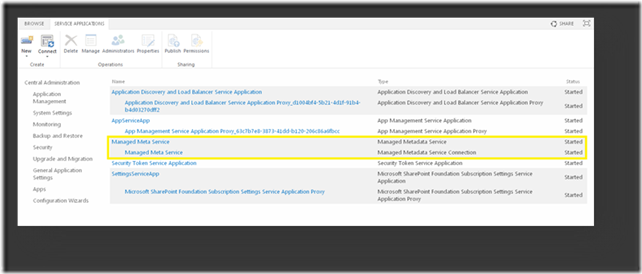
And now, the Managed Metadata service is configured.

clip_image010

4. Check for Managed Metadata service Application.

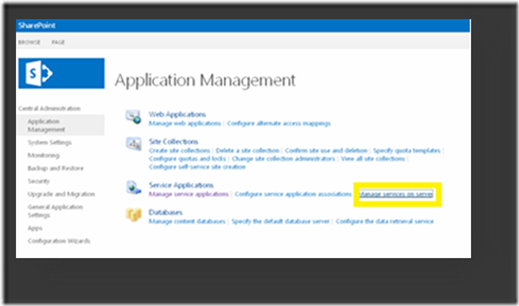
Go to Central Admin -> Mange Services on Server

clip_image012
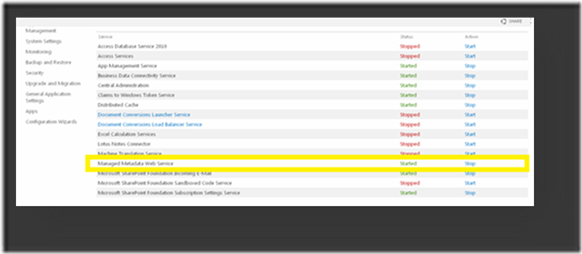
5. Start the Managed Metadata service. If you start this service, Managed Metadata creates the service applications.
clip_image014

clip_image016

clip_image018

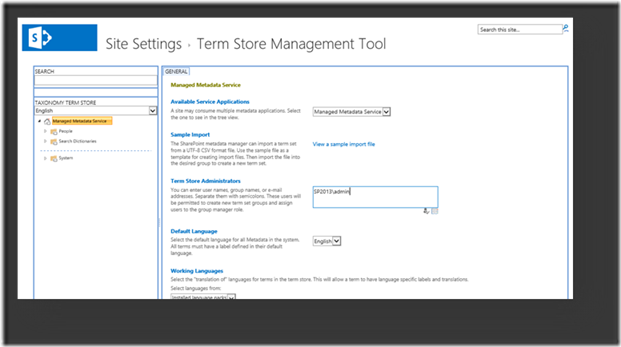
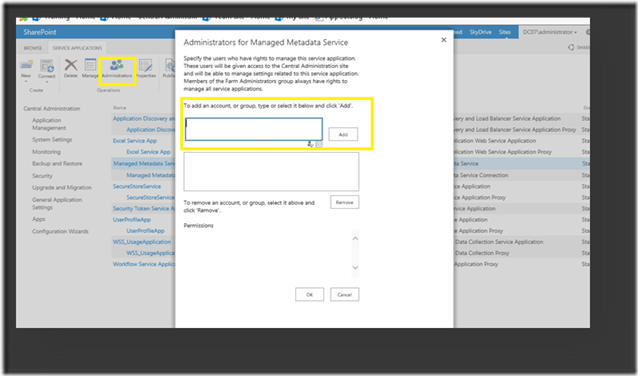
6. Once the Managed Metadata service is created, on the Administrators group add appropriate users and give permissions accordingly.


clip_image020


With this, we are done with Creating the Managed Metadata Service Application.  On the Next post, let us discuss about using the Managed Metadata Service for the Navigation on the Site Collection Level.


Happy SharePointing.

Mythili Ranganathan.

Author Info

Mythili Ranganathan
 
SharePoint Architect
 
Rate this article
 
Mythili is a SharePoint Architect in a CMM Level 5 Company, with strong passion towards Microsoft Technologies (SharePoint, C# & ASP.Net) ...read more
 

Preparing the SharePoint 2013 development environment for App Development (SharePoint Hosted App).

Sathish Nadarajan
 
Solution Architect
October 22, 2013
 
Rate this article
 
Views
18689

In this article, let us see, how to prepare the SharePoint 2013 development environment for the App Development with a sample of a SharePoint Hosted Application. Before creating a SharePoint hosted app, we need to make sure that certain activities are done. Let us see them step by step.

By this time, there are a lot of articles regarding the App development Model in SharePoint 2013. But even then, we will also discuss about them for our understanding and comfort.

As usual, let us go by the order in which the things needs to be done before open our visual studio for the first SharePoint Hosted App.

1. Make sure the Services are running.

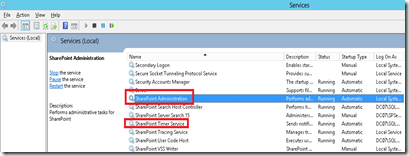
a. There are 2 services which needs to be ran for SharePoint Apps to get executed.

    • SharePoint Administration Service
    • SharePoint Timer Service

b. To verify them, we can go to the Services.msc.

image

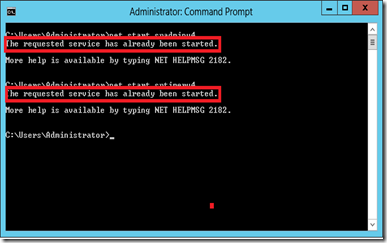
c. The same can be done by command prompt also. Open the command prompt as Administrator and type the following commands.

    • Net start spadminv4
    • Net start sptimerv4

image


2. Make sure the following Service Applications are running.

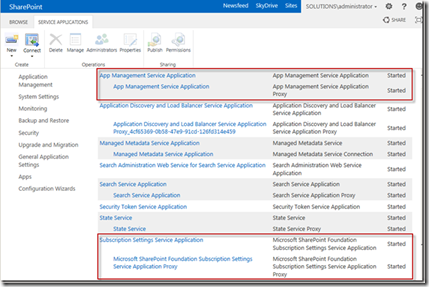
a. There are 2 service applications and the services on the SharePoint server needs to be ran.

i. App Management Service Application

ii. Subscription Settings Service Application

b. For that, we need to create Service Application for these 2. For App Management Service Application, we can go with the Central Administration. But considering the Subscription Settings, we need to go with only PowerShell. Hence, we will go with the PowerShell for both the option first. Follow the steps in the PowerShell IDE.

i. Create a Managed Account.

ii. Create an Application Pool, Database for the above mentioned 2 Service Application.

iii. Create the Service Application and Service Application Proxy.

iv. Make sure that these 2 service applications are running.

c. Let us see the steps with the power shell first.

  # Create a Managed Account
 
 $account = New-SPManagedAccount
 
  # Get the same Managed Account
 
 $account = Get-SPManagedAccount "domainuser" (ex : SS.LocAdministrator)
 
 # Create a App Pool or Subscription service
 
 $appPoolSubSvc = New-SPServiceApplicationPool -Name SettingsServiceAppPool -Account $account
 
 # Create a App Pool for App management Service
 
 $appPoolAppSvc = New-SPServiceApplicationPool -Name AppServiceAppPool -Account $account
 
 # Create a Service Applications
 
 $appSubSvc = New-SPSubscriptionSettingsServiceApplication –ApplicationPool $appPoolSubSvc –Name SettingsServiceApp –DatabaseName SettingsServiceDB 
 
 $proxySubSvc = New-SPSubscriptionSettingsServiceApplicationProxy –ServiceApplication $appSubSvc
 
 $appAppSvc = New-SPAppManagementServiceApplication -ApplicationPool $appPoolAppSvc -Name AppServiceApp -DatabaseName AppServiceDB
 
 $proxyAppSvc = New-SPAppManagementServiceApplicationProxy -ServiceApplication $appAppSvc

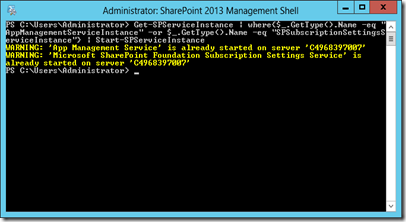
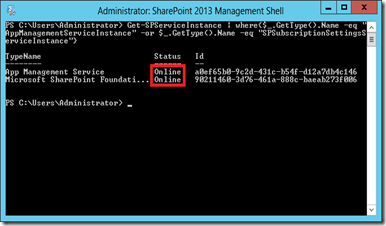
d. This will Create the Service Applications. To verify them, run the following commands.

 Get-SPServiceInstance | where{$_.GetType().Name -eq "AppManagementServiceInstance" -or $_.GetType().Name -eq "SPSubscriptionSettingsServiceInstance"} | Start-SPServiceInstance

image

 Get-SPServiceInstance | where{$_.GetType().Name -eq "AppManagementServiceInstance" -or $_.GetType().Name -eq "SPSubscriptionSettingsServiceInstance"}

image

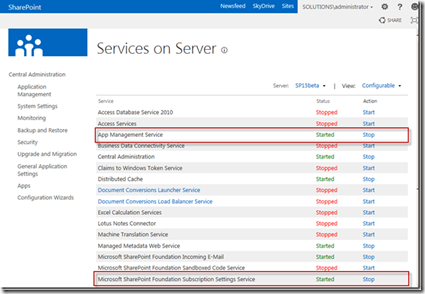
e. The same can be verified through the Central Administration also.

image

image

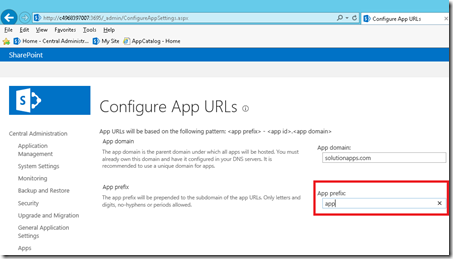
3. Create an App-Prefix.

a. PowerShell Script

 Set-SPAppSiteSubscriptionName -Name "app" -Confirm:$false

b. Central Administration

image

image


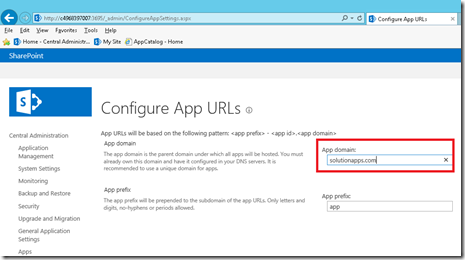
4. Setting the AppDomain for the SharePoint 2013 Apps.

Creating either a new subdomain or creating a CNAME alone will do this. There are already many articles related to this and even if it requires, we can go with a separate article for this. Because it will deviate from our main topic.

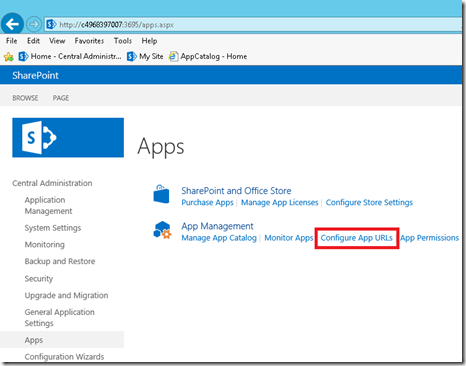
Once, the AppDomain is created, map it on the Central Administration.


image


With this, we are good to go with the SharePoint Hosted Apps. With the above mentioned settings, we can go with the App Development Model. Let us see, how to create a SharePoint Hosted Application in the coming articles. Thanks.


Regards,

Sathish Nadarajan.

Author Info

Sathish Nadarajan
 
Solution Architect
 
Rate this article
 
Sathish is a Microsoft MVP for SharePoint (Office Servers and Services) having 15+ years of experience in Microsoft Technologies. He holds a Masters Degree in Computer Aided Design and Business ...read more
 

Leave a comment