SharePoint Office 365 – Site Columns – Choice Field AllowFillIn Choice as TRUE – Programmatically C# CSOM

Sathish Nadarajan
 
Solution Architect
December 4, 2017
 
Rate this article
 
Views
2811

I was doing a Migration from SP2010 to SP2016 and met with a strange pre-requisite. The Choice Column got created in the Target but, the default setting is AllowFillInChoice as FALSE. Hence, if there are 5 choices in the Source, the corresponding Choices were not available while creating the column in the Target. Hence, as a prerequisite, we tried updating the Choice column property with a small piece of code, which will iterate through all the target sites and update the choice fields.

The piece of code is straight forward and I hope there is no explanation required for the scenario and the code.

 public static void AllowFillinChoiceASTRUE()
         {
             OfficeDevPnP.Core.AuthenticationManager authMgr = new OfficeDevPnP.Core.AuthenticationManager();
 
             string siteUrl = "https://*****.sharepoint.com/sites/developersite";
 
 
             // UserName 
             string userName = "sathish@**********.onmicrosoft.com";
 
             //Password
             string password = "**********";


             using (var clientContext = authMgr.GetSharePointOnlineAuthenticatedContextTenant(siteUrl, userName, password))
             {
                 try
                 {
                     Site site = clientContext.Site;
                     Web web = clientContext.Web;
 
                     clientContext.Load(web);
                     clientContext.Load(web.Lists);
                     clientContext.ExecuteQuery();
 
                     List list = web.GetListByTitle("D1");
                     clientContext.Load(list);
                     clientContext.Load(list.Fields);
                     clientContext.ExecuteQuery();
 
                     foreach (var field in list.Fields)
                     {
                         if (field.TypeAsString == "Choice")
                         {
 
                             System.Console.WriteLine(field.Title + " - " + field.TypeAsString);
                             var choiceField = clientContext.CastTo<FieldChoice>(field);
                             choiceField.FillInChoice = true;
                             choiceField.Update();
                              
 
                             clientContext.Load(field);
                             clientContext.ExecuteQuery();
                         }
                     } 
                 }
                 catch (Exception ex)
                 {
                     System.Console.WriteLine(ex.Message);
                 }
             }
 
             System.Console.WriteLine("Completed....");
             System.Console.WriteLine("Press Any Key to Exit ....");
             System.Console.ReadLine();
         }
     }
 

Happy Coding,

Sathish Nadarajan.

Author Info

Sathish Nadarajan
 
Solution Architect
 
Rate this article
 
Sathish is a Microsoft MVP for SharePoint (Office Servers and Services) having 15+ years of experience in Microsoft Technologies. He holds a Masters Degree in Computer Aided Design and Business ...read more
 

How to Provision Site Columns and Content Types using Provisioning Template by Patterns and Practices PNP in SharePoint Office 365

Sathish Nadarajan
 
Solution Architect
July 16, 2016
 
Rate this article
 
Views
15405

Patterns and Practices – a very powerful tool to provision the site templates, Create Sites, Site Columns, Content Types etc., Now, in this example, let us start with how to create the Site Column and Content Type using PNP Provisioning Template.

Let me use a console application for this demo.

Create the console application and add the NuGet Packages as shown here.

Add a new folder called Template and Add an XML File inside the template and name the XML as ProvisioningTemplate.xml. We can have the name as anything. In this case, I have taken it as ProvisioningTemplate.xml

The Solution will look like below.

clip_image002

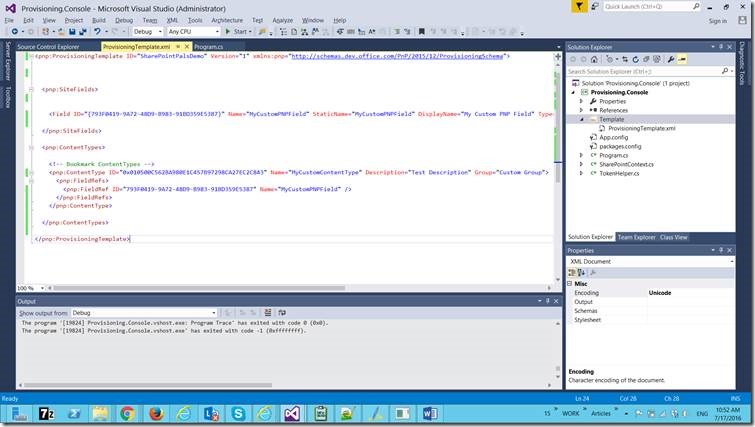
On the ProvisioningTemplate.xml, paste the content as below.

 <?xml version="1.0"?>
 <pnp:ProvisioningTemplate ID="SharePointPalsDemo" Version="1" xmlns:pnp="http://schemas.dev.office.com/PnP/2015/12/ProvisioningSchema">


   <pnp:SiteFields>
     
 
     <Field ID="{793F0419-9A72-48D9-B983-91BD359E5387}" Name="MyCustomPNPField" StaticName="MyCustomPNPField" DisplayName="My Custom PNP Field" Type="Note" Required="FALSE" RichText="FALSE" Group="My Custom PNP Fields" />
     
   </pnp:SiteFields>
 
   <pnp:ContentTypes>
 
     <!-- Bookmark ContentTypes -->
     <pnp:ContentType ID="0x010500C562BA980E1C457B97298CA27EC2C843" Name="MyCustomContentType" Description="Test Description" Group="Custom Group">
       <pnp:FieldRefs>
         <pnp:FieldRef ID="793F0419-9A72-48D9-B983-91BD359E5387" Name="MyCustomPNPField" />
       </pnp:FieldRefs>
     </pnp:ContentType>
 
   </pnp:ContentTypes>
   
 </pnp:ProvisioningTemplate>
 

Here, I am trying to Create a Site Column and a Content Type.

The below method will provision the site columns and content types mentioned in the XML.

 private static void ProvisioningDemo()
         {
             OfficeDevPnP.Core.AuthenticationManager authMgr = new OfficeDevPnP.Core.AuthenticationManager();
             string siteURL = "https://sppals.sharepoint.com/sites/VariationPublishingSite";
             string userName = "sathish@sppals.onmicrosoft.com";
             string password = "***********";
             string file = "ProvisioningTemplate.xml";
 
             string directory = "D:\PRACTICE SOURCE CODE\PNP\Provisioning.Console\Provisioning.Console\Template";
             var provisioningProvider = new XMLFileSystemTemplateProvider(directory, string.Empty);
             var provisioningTemplate = provisioningProvider.GetTemplate(file);
             provisioningTemplate.Connector.Parameters[FileConnectorBase.CONNECTIONSTRING] = directory;
 
             using (var ctx = authMgr.GetSharePointOnlineAuthenticatedContextTenant(siteURL, userName, password))
             {
                 ctx.Load(ctx.Web);
                 ctx.ExecuteQueryRetry();
                 ctx.Web.ApplyProvisioningTemplate(provisioningTemplate);
                 ctx.ExecuteQueryRetry();
             }
 
             System.Console.ReadLine();
         }
 

With the one line, the entire Site Columns can be provisioned to the Site specified. In the upcoming articles, let us have a look at how to create the entire components like provisioning master pages, site assets, etc., But one thing is sure like, by using PNP, we can provision the sites from the remove machine without even a single minute of down time.

Happy Coding,

Sathish Nadarajan.

Author Info

Sathish Nadarajan
 
Solution Architect
 
Rate this article
 
Sathish is a Microsoft MVP for SharePoint (Office Servers and Services) having 15+ years of experience in Microsoft Technologies. He holds a Masters Degree in Computer Aided Design and Business ...read more
 

How to Update a Site Column as Mandatory in SharePoint 2013 using PowerShell

Sathish Nadarajan
 
Solution Architect
March 31, 2015
 
Rate this article
 
Views
15697

In this article, let us see, how to make a Site Column as Mandatory in SharePoint 2013 using PowerShell.

The script is straight forward and the same has been uploaded in the below Download Link as well. Hence, there is nothing much to explain about the requirement / script.

 $LogTime = Get-Date -Format yyyy-MM-dd_hh-mm
 $LogFile = ".MakeContentAuthorOwnerMandatoryInProdKnowSheet-$LogTime.rtf"
 
 cls
 
 start-transcript $logfile
 
 # Add SharePoint PowerShell Snapin
 
 
 if ( (Get-PSSnapin -Name Microsoft.SharePoint.PowerShell -ErrorAction SilentlyContinue) -eq $null ) {
     Add-PSSnapin Microsoft.SharePoint.Powershell
 }
 
 $scriptBase = split-path $SCRIPT:MyInvocation.MyCommand.Path -parent
 Set-Location $scriptBase
 
 function MakeContentAuthorOwnerMandatoryInProdKnowSheet([string]$siteUrl, [string]$WebName, [string]$ListName, [string]$SiteColumnInternalName) {
   
     $site = Get-SPSite $siteUrl
 
     if($WebName -eq "")
     {
         $web = $site.RootWeb
     }
     else
     {
         $web = $site.AllWebs[$WebName]
     }
     
 
     $list = $web.Lists[$ListName]
 
     $field = $list.Fields.getFieldbyInternalName($SiteColumnInternalName)
     $field.Required = $true
     $field.Update()
     $list.Update()
     $web.Dispose()
     $site.Dispose()
     Write-Host "Updated the site column" $SiteColumnInternalName " as mandatory" -ForegroundColor Green
 }


 ##########################################################################################################################
 $csvfile = $scriptbase + "" + "01.Input.csv"
 
 import-csv $csvfile | where {
 MakeContentAuthorOwnerMandatoryInProdKnowSheet $_.SiteUrl $_.WebName $_.ListName $_.SiteColumnInternalName 
 
 
 }
 
 stop-transcript
 

DOWNLOAD SCRIPT HERE

Happy Coding.

Sathish Nadarajan.

Author Info

Sathish Nadarajan
 
Solution Architect
 
Rate this article
 
Sathish is a Microsoft MVP for SharePoint (Office Servers and Services) having 15+ years of experience in Microsoft Technologies. He holds a Masters Degree in Computer Aided Design and Business ...read more
 

Deleting SiteColumns and Remove From Content Types, Lists Using PowerShell in SharePoint 2013

Sathish Nadarajan
 
Solution Architect
December 23, 2014
 
Rate this article
 
Views
29517

We saw how to create the Site Columns in last post. Now, let us see, how to remove them from the site through PowerShell.

Again, this will also have the same CSVs and PS1 file.

SiteUrlSiteColumnInternalNameSiteColumnDisplayName
http://C4968397007:1001/sites/DemoAdminDemoTaxonomyFieldDemo Taxonomy Field
http://C4968397007:1001/sites/DemoAdminDemoTextFieldDemo TextField
http://C4968397007:1001/sites/DemoAdminDemoChoiceFieldDemo ChoiceField

This CSV will have the Site and the Internal Name of the Site Column.

SiteUrlSiteColumnInternalName
http://C4968397007:1001/sites/DemoAdminDemoTaxonomyField
http://C4968397007:1001/sites/DemoAdminDemoTextField
http://C4968397007:1001/sites/DemoAdminDemoChoiceField

Again, the above would be the input for the second portion. i.e., from the Content Types and the List, and from the Web Itself, the site column would be deleted.

The script as follows.

 $LogTime = Get-Date -Format yyyy-MM-dd_hh-mm
 $LogFile = ".RemoveSiteColumnReferencePatch-$LogTime.rtf"
 
 cls
 
 $ErrorActionPreference = "SilentlyContinue"
 
 #start-transcript $logfile
 
 # Add SharePoint PowerShell Snapin
 
 
 if ( (Get-PSSnapin -Name Microsoft.SharePoint.PowerShell -ErrorAction SilentlyContinue) -eq $null ) {
     Add-PSSnapin Microsoft.SharePoint.Powershell
 }
 
 $scriptBase = split-path $SCRIPT:MyInvocation.MyCommand.Path -parent
 Set-Location $scriptBase


 ######################Functions###################################################
 
 function RemoveSiteColumnReferenceInCT([string]$siteUrl, [string]$fieldName, [string]$SiteColumnDisplayName) 
 {
     Write-Host "Start removing field:" $fieldName -ForegroundColor DarkGreen
     $site = Get-SPSite $siteUrl
     $web = $site.RootWeb
 
     #Delete field from all content types
     foreach($ct in $web.ContentTypes) 
     {
         $fieldInUse = $ct.FieldLinks | Where {$_.Name -eq $fieldName }
         if($fieldInUse) 
         {
 	        write-host "The site column " $fieldname " is referenced in " $ct.name -fore yellow
             Write-Host "Remove Site column " $fieldname " which is referenced in CType: " $ct.Name -ForegroundColor DarkGreen
             $ct.FieldLinks.Delete($fieldName)
             $ct.Update()
 	        Write-Host "Site column " $fieldname " referenced in CType: " $ct.Name " is successfully removed............ Done !" -ForegroundColor Green
         }
     }
 
     $web.Dispose()
     $site.Dispose()
 }
 
 
 function RemoveSiteColumnListReference([string]$fieldName, [string]$SiteColumnInternalName) {
 
     get-spsite -limit all | Get-SPWeb -Limit all | ForEach-Object {
        
         $numberOfLists = $_.Lists.Count
         for($i=0; $i -lt $_.Lists.Count ; $i++) 
         {
             $list = $_.Lists[$i]
             
             if($list.Fields[$fieldName]) 
             {
                 $fieldInList = $list.Fields[$fieldName].InternalName
                 if($fieldInList -eq $SiteColumnInternalName) 
                 {
                     $_.URL + "," + $list.Fields[$fieldName] + "," + $fieldInList + "," + $list.Title | Out-File -Encoding Default -Append -FilePath $Output1;
                     Write-Host "Deleting Site column " $list.Fields[$fieldName] " from " $list.Title ” list on:” $_.URL -ForegroundColor cyan
 		            $fieldInList1 = $list.Fields.getfieldbyinternalname($SiteColumnInternalName)
                  
               		$fieldInList1.AllowDeletion = $true
                  
               		$fieldInList1.Delete()
 		            
                     Write-Host "Site column " $fieldName " referenced in list " $list.Title " is removed from " $_.URL " ........... Done ! "  -ForegroundColor Green
                  
               		$list.Update()
                 }
             }
         }
     }
     
 }


 function RemoveSiteColumn([string]$SiteUrl, [string]$fieldName)
 {
     $site = Get-SPSite $SiteUrl
 
     $web = $site.RootWeb
     $column = $web.Fields.getfieldbyinternalname($fieldName)
     if($Column)
     {
         write-host "Deleting site column " $fieldName " in site " $web.url -fore yellow
         $Column.Delete()
         write-host "site column " $column.Title " deleted successfully from the site " $web.url ".......... Done !" -fore blue
     }
 }


 ######################End of Functions###################################################
 
 
 ######################Calling Functions###################################################
 
 $SiteColumnDetails = $scriptBase + "" + "01.SiteColumnDetails.csv"
 $RemoveSiteColumns = $scriptBase + "" + "02.RemoveSiteColumns.csv"


 ##################Remove site column reference in content type############################
 
 import-csv $SiteColumnDetails | where {
     RemoveSiteColumnReferenceInCT $_.SiteUrl $_.SiteColumnInternalName $_.SiteColumnDisplayName
 }


 ##################Remove site column reference in List####################################
 
 import-csv $SiteColumnDetails | where {
     RemoveSiteColumnListReference $_.SiteColumnDisplayName $_.SiteColumnInternalName
     sleep(2)
 }
 
 
 ##################Remove site column#######################################################
 
 import-csv $RemoveSiteColumns | where {
     sleep(10)
     RemoveSiteColumn $_.SiteUrl $_.SiteColumnInternalName
 }
 
  
 #stop-transcript 
 
 
Download Script HERE 

Happy Coding.

Sathish Nadarajan.

Author Info

Sathish Nadarajan
 
Solution Architect
 
Rate this article
 
Sathish is a Microsoft MVP for SharePoint (Office Servers and Services) having 15+ years of experience in Microsoft Technologies. He holds a Masters Degree in Computer Aided Design and Business ...read more
 

How to create SiteColumns and Add them to Content Types Using PowerShell in SharePoint 2013

Sathish Nadarajan
 
Solution Architect
 
Rate this article
 
Views
26185

In Many situations, we would have faced this problem. i.e., the Schema definition for our Project. The SiteColumns and the Content Types. If we freeze these two things, then our project execution will become smooth. The struggle people face on this is like, we will be creating the site columns and the content types through Element.xml and on the Feature activation, and we will provision these site columns and the content types. Later when we need to add some more columns or modifying any existing columns, the Feature which we already created may not be helpful, as it will not retract all the site columns already created unless we had a separate feature receiver for this cleanup activity. And moreover when we do a cleanup, the data loss would happen.

To avoid this, and make this process a little bit easier, creating the PowerShell can be done using PowerShell. In this article, let us how to do that.

In this demo, let me create 3 site columns. One with the Taxonomy field, because this column requires a Mapping of term, second one is a simple Text field and a choice field. As these are the columns which we will using frequently, I am taking this.

Let us have these things as a CSV.

Please refer the attached CSV.

The Script is self-explanatory

 $LogTime = Get-Date -Format yyyy-MM-dd_hh-mm
 
 $LogFile = ".CreateSiteColumnReferencePatch-$LogTime.rtf"
 
 cls
 
 #start-transcript $logfile
 
 ######################### Add SharePoint PowerShell Snapin ###############################################
 
 if ( (Get-PSSnapin -Name Microsoft.SharePoint.PowerShell -ErrorAction SilentlyContinue) -eq $null ) 
 
 {
 
 Add-PSSnapin Microsoft.SharePoint.Powershell
 
 }
 
 ########################### End of Add SharePoint PowerShell Snapin ##################################
 
 ######################## Set Execution Path ################################################
 
 $scriptBase = split-path $SCRIPT:MyInvocation.MyCommand.Path -parent
 
 Set-Location $scriptBase
 
 ################################# End of Set Execution Path #################################
 
 ################################# Functions #####################################################
 
 Function CreateField ([string]$siteUrl, [string]$fieldXML, [string] $centralADminURL,[string] $TermStoreName, [string] $TermGroupName, [string] $TermSetName,[string] $FieldinternalName,[string] $Type) 
 
 {
 
 $site = Get-SPSite -Identity $siteUrl
 
 $web = $site.RootWeb 
 
 write-host "Creting Site Column with following details " $fieldXML -fore yellow
 
 $web.Fields.AddFieldAsXml($fieldXML) 
 
 write-host "Site Column with details " $fieldXML " created successfully ........... Done !" -fore green
 
 if($Type -eq "TaxonomyFieldType")
 
 {
 
 [System.Reflection.Assembly]::LoadWithPartialName("Microsoft.SharePoint.Taxonomy")
 
 $site = Get-SPSite $centralADminURL
 
 $session = New-Object Microsoft.SharePoint.Taxonomy.TaxonomySession($site)
 
 $termStore = $session.TermStores[$TermStoreName]
 
 $group = $termStore.Groups[$TermGroupName]
 
 $termSet = $group.TermSets[$TermSetName]
 
 $column = $web.fields.getfieldbyinternalname($FieldinternalName)
 
 if($Column)
 
 {
 
 $column.sspid = $termstore.id
 
 $column.termsetid = $termSet.id
 
 $column.update($true);
 
 }
 
 }
 
 $web.Dispose()
 
 $site.Dispose()
 
 }
 
 function AddSiteColumnsToContentTypes([string]$siteUrl, [string]$fieldName, [string]$contentTypeName) 
 
 {
 
 $site = Get-SPSite $siteUrl
 
 $web = $site.RootWeb
 
 $field = $web.Fields.getfieldbyinternalname($fieldName)
 
 $ct = $web.ContentTypes[$contentTypeName]
 
 $link = new-object Microsoft.SharePoint.SPFieldLink $field
 
 write-host "Adding site column " $fieldName " to content type " $ct.name -fore yellow
 
 $ct.FieldLinks.Add($link)
 
 write-host "Site column " $fieldName " is added to content type " $ct.name " Successfully ...... Done !"-fore green
 
 $ct.Update($true)
 
 }
 
 ################### End of Functions ###############################################
 
 #################Creating Site columns##########################################################
 
 $SiteColumnCreationDetailsCSV = $scriptBase + "" + "05.SiteColumnCreationDetails.csv"
 
 import-csv $SiteColumnCreationDetailsCSV | where {
 
 CreateField $_.siteurl $_.FieldXML $_.centralADminURL $_.TermStoreName $_.TermGroupName $_.TermSetName $_.FieldinternalName $_.Type
 
 }
 
 #################Adding site column to content type#############################################
 
 $SiteColumnReferencedContentTypesCSV = $scriptBase + "" + "06.SiteColumnReferencedContentTypes.csv"
 
 import-csv $SiteColumnReferencedContentTypesCSV | where {
 
 AddSiteColumnsToContentTypes $_.SiteURL $_.FieldName $_.ContentTypeName
 
 }
 
 #stop-transcript 
 

On the CSV File, we have a column called FieldXML. People may think, how to get that XML. Even that also made easy, if we use the SharePoint Manager.

The simple idea is, create a test column on the Site Manually. Using the SharePoint Manager, get the Schea XML. Replace on the CSV file. Execute the PS1. Very simple right. Hope this will be helpful for many developers, admins to eliminate the problems with the Schema.


Download Script HERE


Happy Coding.

Sathish Nadarajan.

Author Info

Sathish Nadarajan
 
Solution Architect
 
Rate this article
 
Sathish is a Microsoft MVP for SharePoint (Office Servers and Services) having 15+ years of experience in Microsoft Technologies. He holds a Masters Degree in Computer Aided Design and Business ...read more
 

How to Create a Page Layout (PageLayout) with ContentType in SharePoint 2013

Sathish Nadarajan
 
Solution Architect
October 29, 2013
 
Rate this article
 
Views
89575

Creating a PageLayout on a publishing portal is a common requirement through which all of us would have come across. Here let us discuss how to do that on SharePoint 2013 with ContentTypes attached to the PageLayout, using Visual Studio, SharePoint Designer and Design Manager.

Before creating, the PageLayout, we need to create the required site columns and ContentTypes. To do that, let us follow the steps.

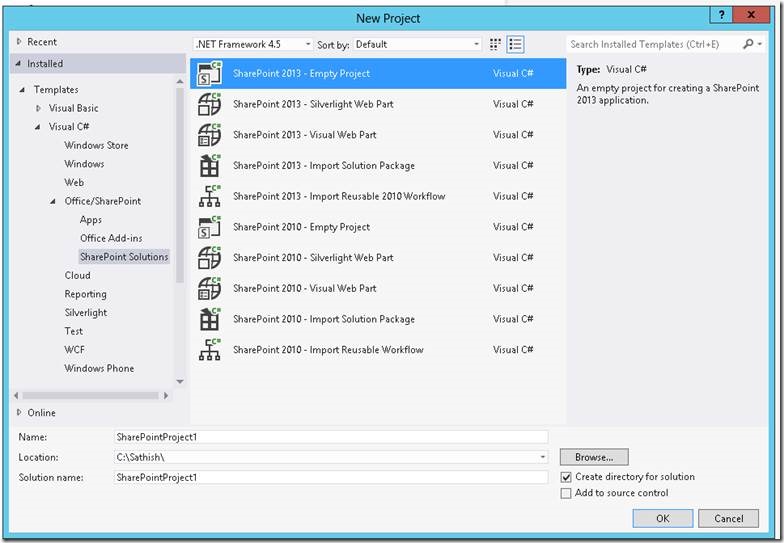
1. Open the Visual Studio for a New Empty SharePoint Project.
clip_image002

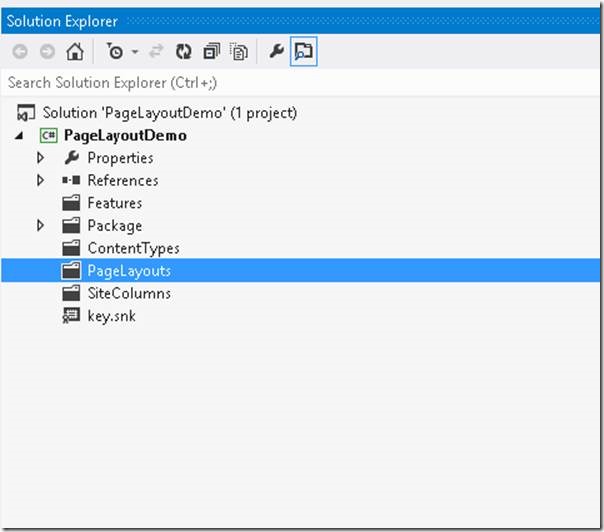
2. Add separate folders for ContentTypes, Site Columns and PageLayouts. The solution would be like this.
clip_image004

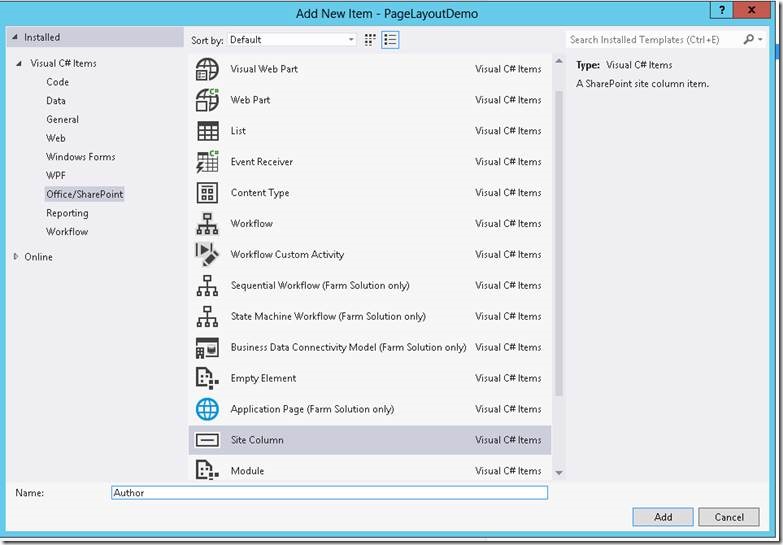
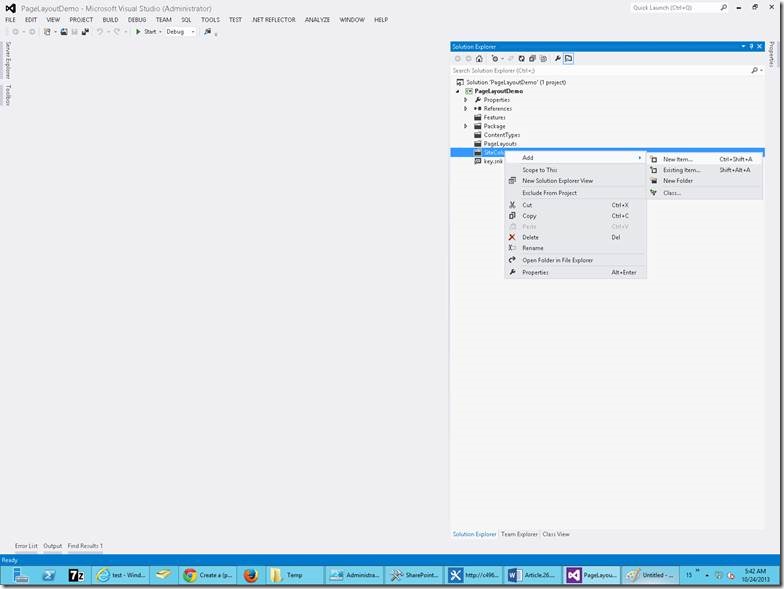
3. Now, add the sitecolumns in the SiteColumns folder.
clip_image006

clip_image008

4. In the same manner, create 2 more site column as Body and Tags. Hence, the 3 site columns will looks like,

 <?xml version="1.0" encoding="utf-8"?>
 <Elements xmlns="http://schemas.microsoft.com/sharepoint/">  
   <Field
        ID="{5511034a-38c6-4861-9d00-1633cc111ca3}"
        Name="ArticleAuthor"
        DisplayName="ArticleAuthor"
        Type="Text"
        Required="FALSE"
        Group="PageLayoutDemo">
   </Field>
 </Elements>
 
 <?xml version="1.0" encoding="utf-8"?>
 <Elements xmlns="http://schemas.microsoft.com/sharepoint/">  
   <Field
        ID="{93bb1031-87a2-4f84-bddb-3a9d94d197d1}"
        Name="Body"
        DisplayName="Body"
        Type="Note"
        Required="FALSE"
        RichText="TRUE"
        RichTextMode="FullHtml"
        Group="PageLayoutDemo">
   </Field>
 </Elements>
 
 <?xml version="1.0" encoding="utf-8"?>
 <Elements xmlns="http://schemas.microsoft.com/sharepoint/">  
   <Field
        ID="{9736f0e4-9c76-4ff7-bf33-1547ac53553c}"
        Name="Tags"
        DisplayName="Tags"
        Type="MultiChoice"
        Required="FALSE"
       Group="PageLayoutDemo">
     <CHOICES>
       <CHOICE>SharePoint 2013</CHOICE>
       <CHOICE>ADFS</CHOICE>
       <CHOICE>SharePoint</CHOICE>
       <CHOICE>PageLayoutSample</CHOICE>
       <CHOICE>Visual Studio</CHOICE>
     </CHOICES>
   </Field>
 </Elements>
 

Here I am referring 3 different data types. You can see the difference on the Type attribute.

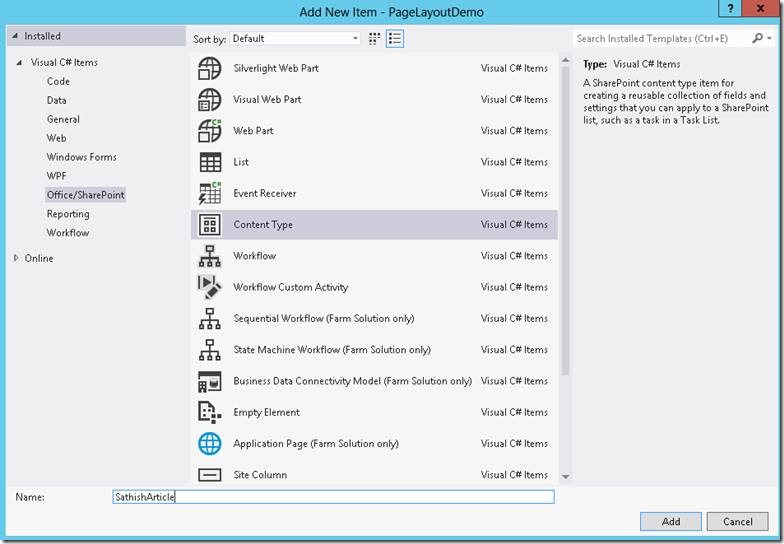
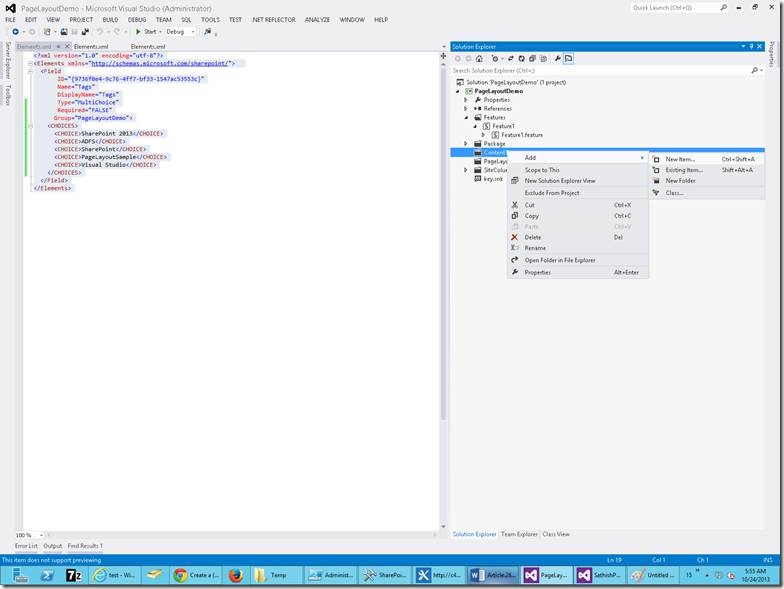
5. Now, let us come to the Content Type creation.
clip_image010

clip_image012

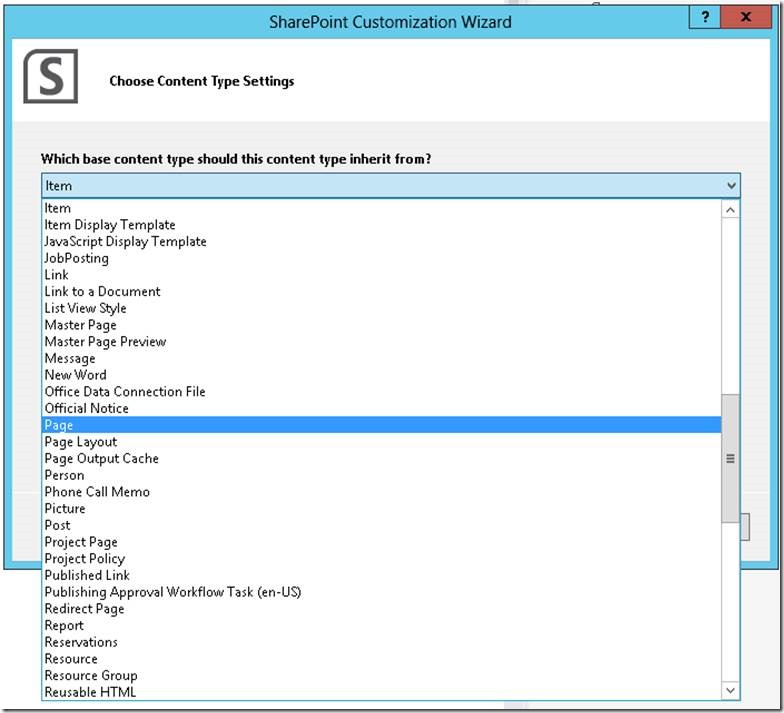
On the next screen, choose the page in the drop down and click Finish.
clip_image014

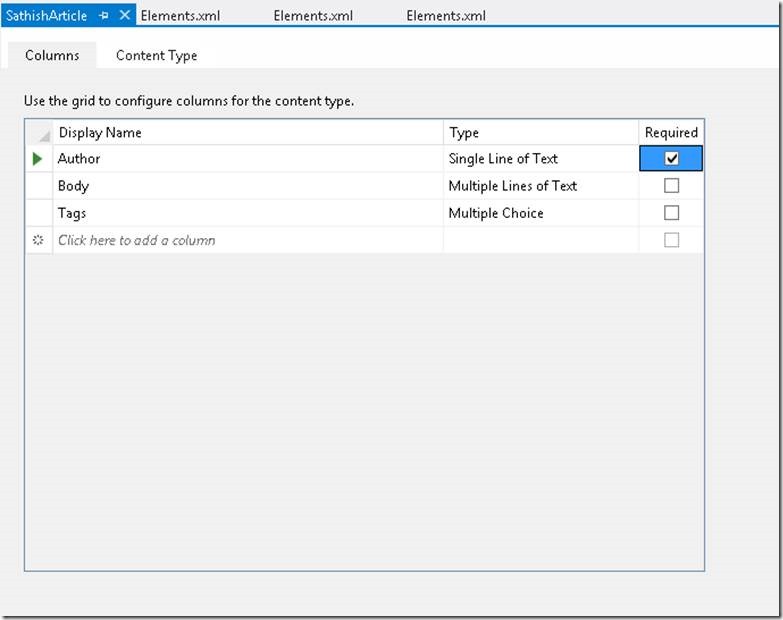
6. Now, the content type got created. We need to add the Site Columns to the Content Type.
clip_image016

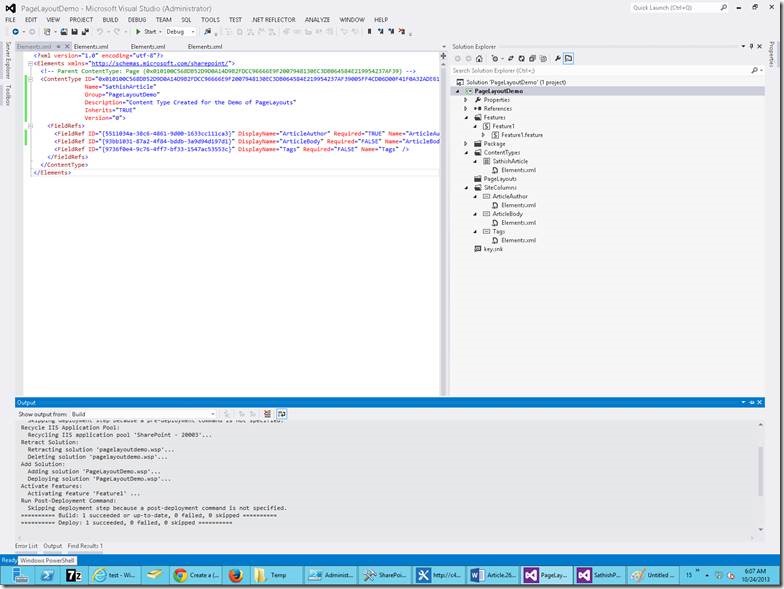
7. Now, let us do a deployment and confirm our site columns and Content Types are deployed correctly.
clip_image018

8. Let us see them on the screen.

9. Go to System Settings -> Site Columns (under Web Designer Galleries)

clip_image020

10. In the same manner, go to the Content Types and confirm.

clip_image022

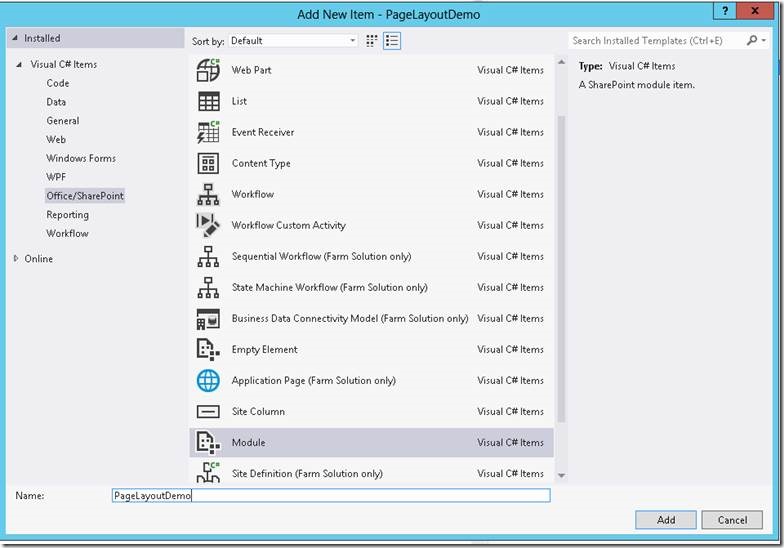
11. Now, let us go back to our Visual Studio and start creating the PageLayout. In the PageLayouts Folder, create a Module.
clip_image024

12. We can see a file called Sample.txt.
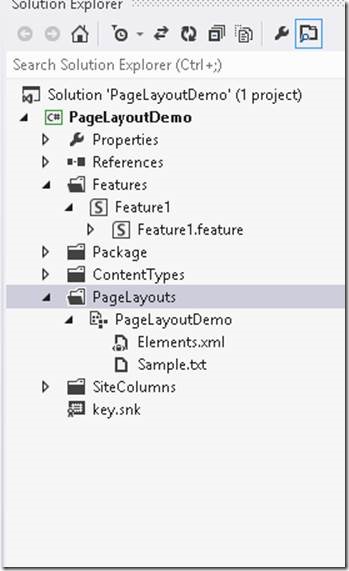
clip_image026

13. Rename it into PageLayoutsDemo.aspx
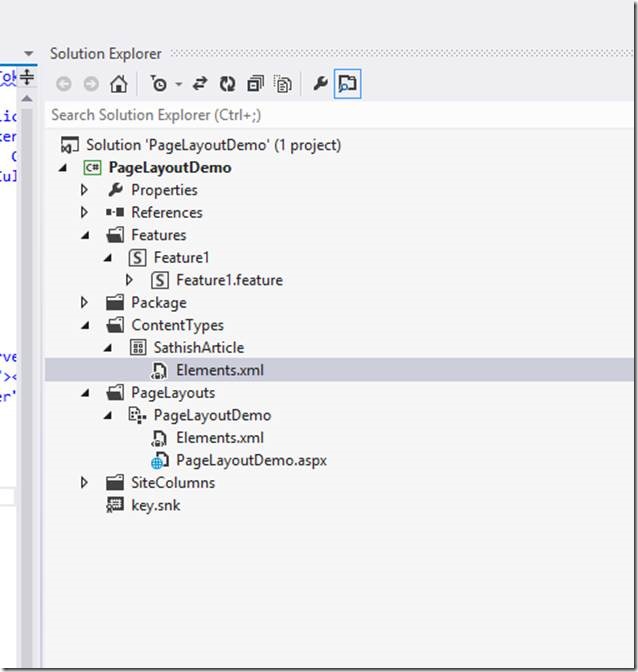
clip_image028

14. Now, on the aspx page, paste the code below.

 <%@ Page language="C#"   Inherits="Microsoft.SharePoint.Publishing.PublishingLayoutPage,Microsoft.SharePoint.Publishing,Version=15.0.0.0,Culture=neutral,PublicKeyToken=71e9bce111e9429c" %>
 
 <%@ Register Tagprefix="SharePointWebControls" Namespace="Microsoft.SharePoint.WebControls" Assembly="Microsoft.SharePoint, Version=15.0.0.0, Culture=neutral, PublicKeyToken=71e9bce111e9429c" %> 
 <%@ Register Tagprefix="WebPartPages" Namespace="Microsoft.SharePoint.WebPartPages" Assembly="Microsoft.SharePoint, Version=15.0.0.0, Culture=neutral, PublicKeyToken=71e9bce111e9429c" %> 
 <%@ Register Tagprefix="PublishingWebControls" Namespace="Microsoft.SharePoint.Publishing.WebControls" Assembly="Microsoft.SharePoint.Publishing, Version=15.0.0.0, Culture=neutral, PublicKeyToken=71e9bce111e9429c" %> 
 <%@ Register Tagprefix="PublishingNavigation" Namespace="Microsoft.SharePoint.Publishing.Navigation" Assembly="Microsoft.SharePoint.Publishing, Version=15.0.0.0, Culture=neutral, PublicKeyToken=71e9bce111e9429c" %>
 
 <asp:Content ContentPlaceholderID="PlaceHolderPageTitle" runat="server">
 	<SharePointWebControls:FieldValue id="PageTitle" FieldName="Title" runat="server"/>
 </asp:Content>
 <asp:Content ContentPlaceholderID="PlaceHolderMain" runat="server">
 
 <ui>
     
 <li ><span style="color:red" >Article Author : </span></li><SharePointWebControls:TextField ID="Author" FieldName="5511034a-38c6-4861-9d00-1633cc111ca3" runat="server"></SharePointWebControls:TextField>
 <li ><span style="color:red" >Article Body : </span></li><SharePointWebControls:NoteField ID="Body" FieldName="93bb1031-87a2-4f84-bddb-3a9d94d197d1" runat="server"></SharePointWebControls:NoteField>
 <li ><span style="color:red" >Tags : </span></li><SharePointWebControls:CheckBoxChoiceField ID="Tags" FieldName="9736f0e4-9c76-4ff7-bf33-1547ac53553c" runat="server"></SharePointWebControls:CheckBoxChoiceField>
 
 </ui>
 
 </asp:Content>
 

15. We will see, what is the above code snippet and how we got this on the next post.

16. Now, coming to the element.xml file, by default, the aspx file would have created an entry. But apart from that entry, we need to specify some of the properties for that file. These property will make this aspx as a page layout. Otherwise, this aspx will be deployed. But will not be listed on the Pages Layout listbox on the create page.

 
 <?xml version="1.0" encoding="utf-8"?>
 <Elements xmlns="http://schemas.microsoft.com/sharepoint/">
   <Module Name="PageLayoutDemo" Url="_catalogs/masterpage" List="116" RootWebOnly="TRUE">
     
     <File Path="PageLayoutDemoPageLayoutDemo.aspx" Url="PageLayoutDemo/PageLayoutDemo.aspx" Type="GhostableInLibrary" ReplaceContent="TRUE" Level="Published" >
       <Property Name="Title" Value="Page Layout Demo Title"></Property>
       <Property Name="FileLeafRef" Value="PageLayoutDemo.aspx" />
       <Property Name="MasterPageDescription" Value="Page Layout Demo Description"></Property>
       <Property Name="Page Layout Demo Title" Value="PageLayoutDemo" />
       <Property Name="UIVersion" Value="15" />
       <Property Name="PublishingHidden" Value="FALSE" />
       <Property Name="PublishingAssociatedContentType" Value=";#SathishArticle;#0x010100C568DB52D9D0A14D9B2FDCC96666E9F2007948130EC3DB064584E219954237AF39005FF4CD06D00F41F0A32ADE6126A4F9DE;#"></Property>
      <Property Name="HtmlDesignAssociated" Value="FALSE" />
       <Property Name="ContentType" Value="Page Layout" />
       <Property Name="_ModerationStatus" Value="3" />
       <Property Name="FileDirRef" Value="_catalogs/masterpage" />
       <Property Name="FSObjType" Value="0" />
 
     </File>
   </Module>
 </Elements>
 

17. The important points to be noted here are

 Url="_catalogs/masterpage"
 

– This describes that our file will be deployed under this folder.

 <Property Name="PublishingAssociatedContentType" Value=";#SathishArticle;#0x010100C568DB52D9D0A14D9B2FDCC96666E9F2007948130EC3DB064584E219954237AF39005FF4CD06D00F41F0A32ADE6126A4F9DE;#"></Property>

– Name of the Content type and the ID of the Content Type

18. With this, let us deploy and verify the same.

19. To verify, go to the Pages folder from the Site Contents.
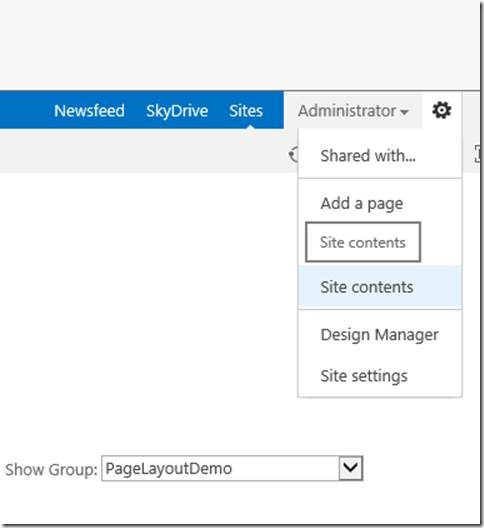
clip_image030

clip_image032

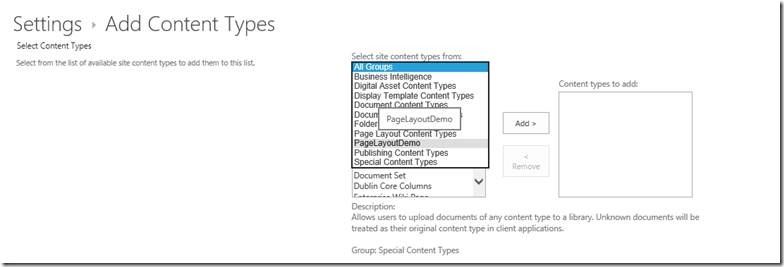
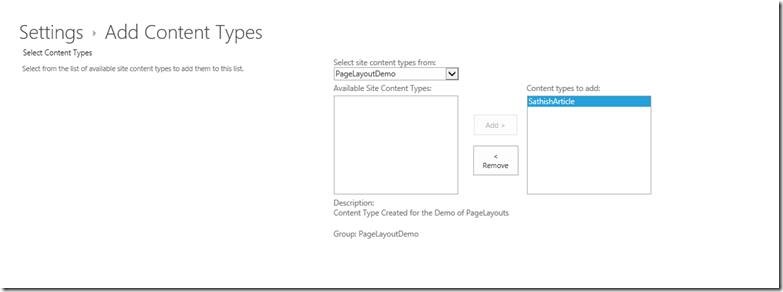
20. After this, we need to add the content type to the Pages List. Then only the content type will be listed under New Document

21. clip_image034
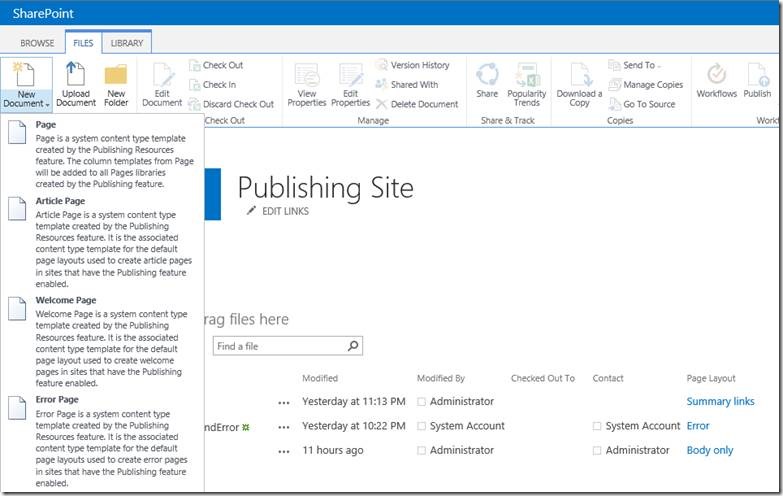
22. To add that, follow the screen shots.

clip_image036

clip_image038

clip_image040

clip_image042

23. Now, if we come back to pages and click the New Document.
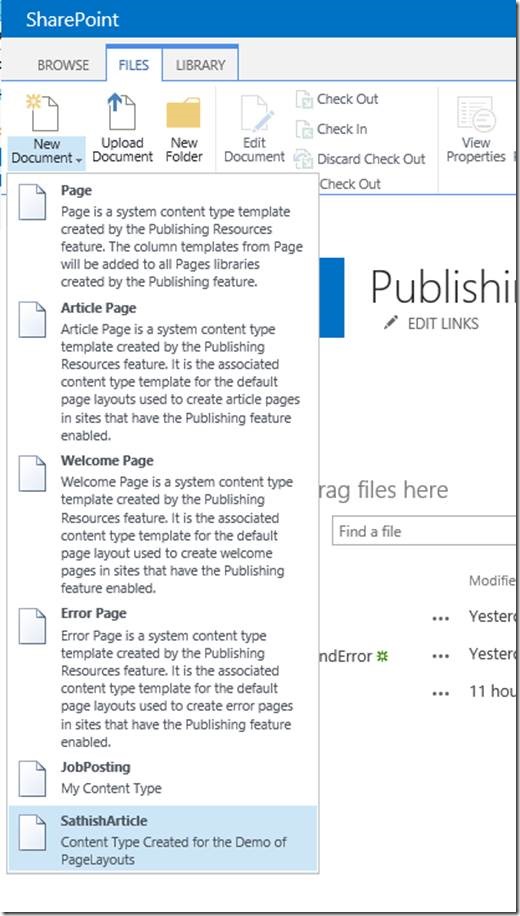
clip_image044

Out Content Type will be listed.

24. Click on it to create a new document.
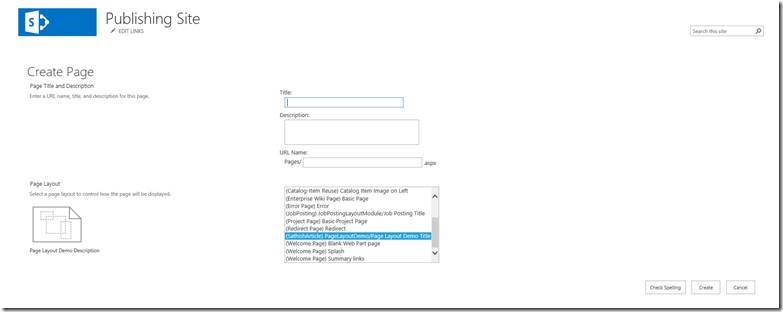
clip_image046

25. Wow… Our PageLayout will be listed on the Listbox. Select that and by giving a title, description, url, click create. In my case, I am giving as Article.

26. Article page will be listed as follows.
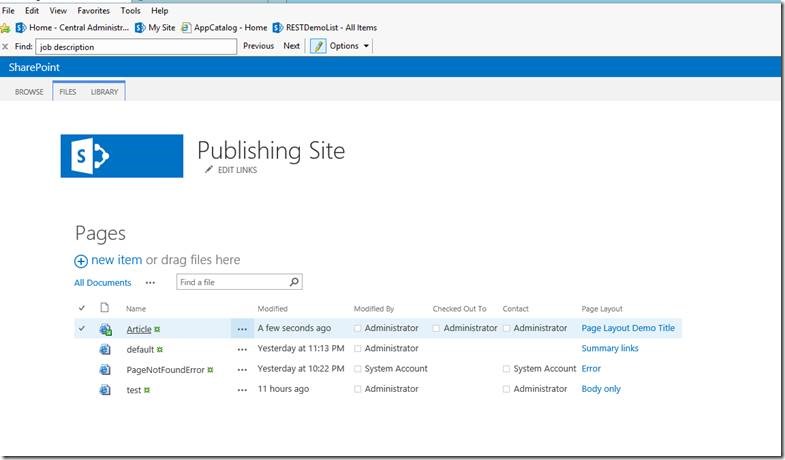
clip_image048

27. After that, we need to Check in and Publish the page. Then only this page will be visible to other users. Until then, this will only be visible to the user who created this.
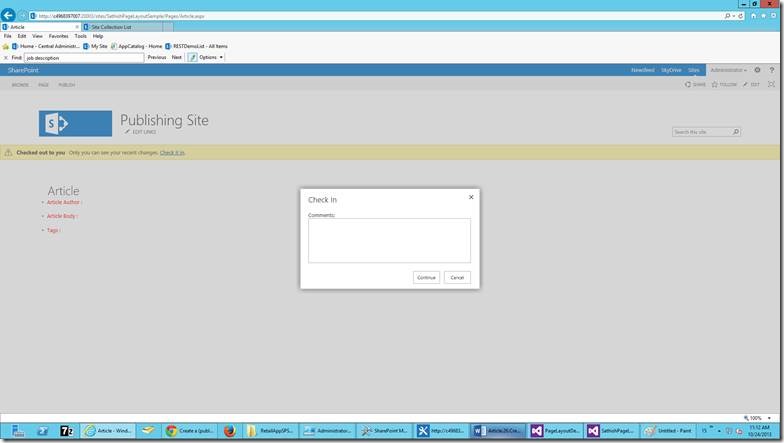
clip_image050

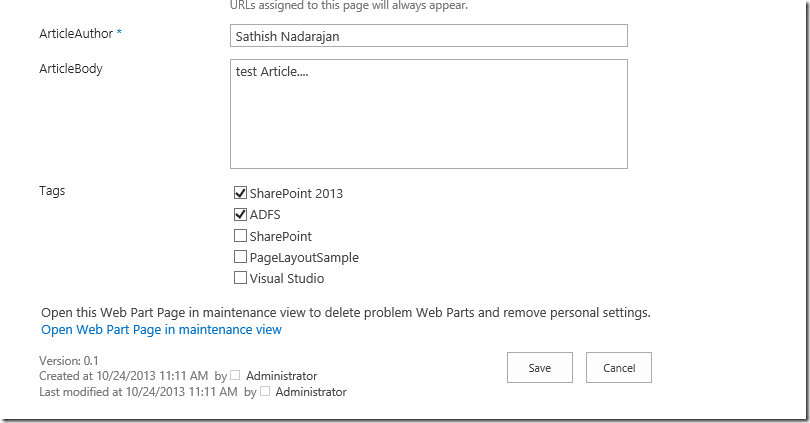
While checkin, it will prompt us to fill the mandatory fields. Since, we gave the ArticleAuthor field as a mandatory one, we need to fill those details.

Let me fill all the three fields, which we gave.
clip_image051

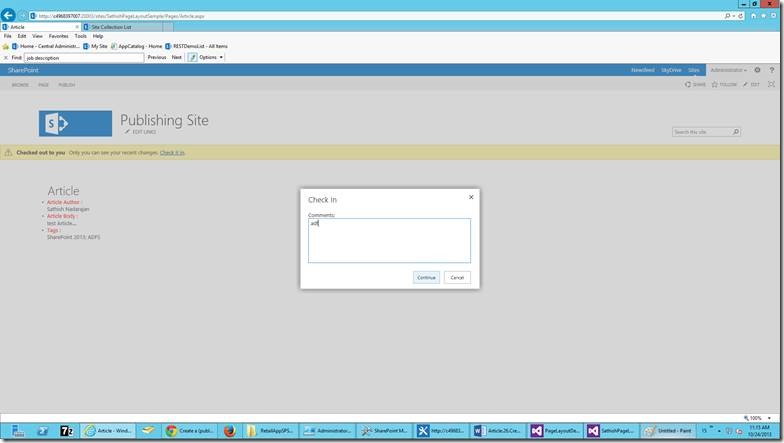
After giving those details, click Save.

Now, the system will allow us to checkin.
clip_image053

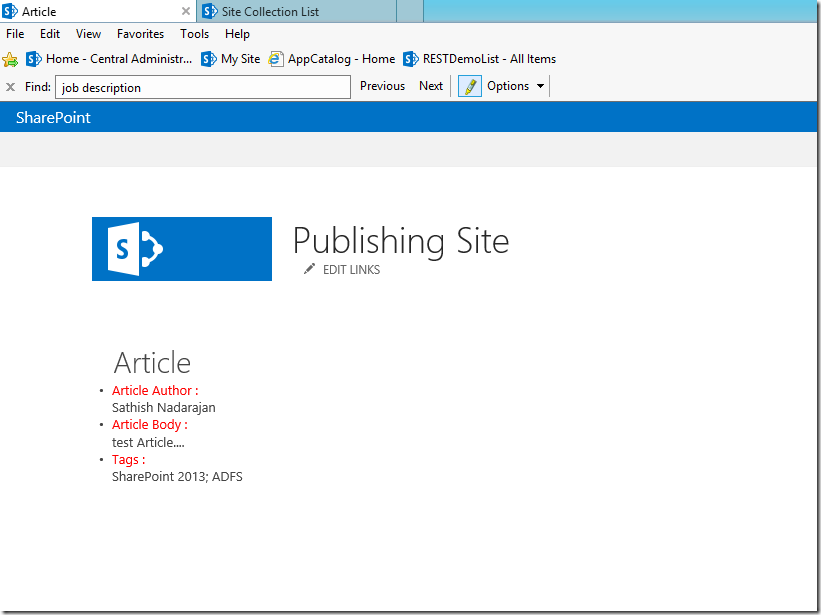
After checkin the page will looks like as below.
clip_image054

Here is our Page based on our custom Page Layout is ready.

Thought of explaining the pagelayout.aspx here. But since, it is becoming too lengthy, am planning to describe them on the next article.

Happy Coding.

Sathish Nadarajan.
Author Info

Sathish Nadarajan
 
Solution Architect
 
Rate this article
 
Sathish is a Microsoft MVP for SharePoint (Office Servers and Services) having 15+ years of experience in Microsoft Technologies. He holds a Masters Degree in Computer Aided Design and Business ...read more
 

Declaratively Create Look up Field Site Column in SharePoint Content Type

Ashok Raja
 
Solutions Architect
January 1, 2013
 
Rate this article
 
Views
236

Consider the below points to create a look up field as a site column and attach it to a content type in SharePoint 2010 or SharePoint 2013

1. Ensure that OverWrite attribute is set to true in Field Element

2. Ensure that List attribute is set to List ID or List URL

Find below the sample code for a content type and a site column referred in that content type.

 <?xml version="1.0" encoding="utf-8"?>
 <Elements xmlns="http://schemas.microsoft.com/sharepoint/">
     <Field ID="{083AF243-688D-431A-8393-420FF838DF73}" Name="DemoColumn1" Group="Demo Group" DisplayName="Demo Column1" Type ="Text" />
     <Field ID="{0ACFBEC9-BC13-48F3-90B7-BA0600808118}" Name="DemoColumn2" DisplayName="Demo Column2" Group="Demo Group" Type ="Lookup" Mult="FALSE" Overwrite="TRUE" ShowField="Title" List="Lists/Category" />
     <!-- Parent ContentType: Item (0x01) -->
     <ContentType ID="0x0100e52212c906c741e19aa4bf85158533df"
                  Name="SFS.Tutorials.Basics - SFS Demo Content Type"
                  Group="Demo Content Types"
                  Description="Demo Content Type for Blog"
                  Inherits="TRUE"
                  Version="0">
         <FieldRefs>
             <FieldRef ID="{083AF243-688D-431A-8393-420FF838DF73}"  Name="DemoColumn1"    DisplayName="Demo Column 1"  />
             <FieldRef ID="{0ACFBEC9-BC13-48F3-90B7-BA0600808118}" Name="DemoColumn2"  DisplayName="Demo Column 2"  />
         </FieldRefs>
     </ContentType>
 </Elements>
Category : SharePoint

Author Info

Ashok Raja
 
Solutions Architect
 
Rate this article
 
I am Ashok Raja, Share Point Consultant and Architect based out of Chennai, India. ...read more
 

Leave a comment