Step by step procedure to deploy WSP solution using TFS Continuous Delivery process

Sriram
 
Technology Specialist
May 30, 2018
 
Rate this article
 
Views
5087

In our previous article, we have seen how to build the SharePoint solution from TFS.

In this article, we will see how to automate the deployment once the build is successful.

What is Continuous Delivery?

Continuous Deployment (CD) is the process to build, test, configure and deploy from a build to a production environment. Multiple testing or staging environments create a Release Pipeline to automate the creation of infrastructure and deployment of a new build. Successive environments support progressively longer-running activities of integration, load, and user acceptance testing. Continuous Integration starts the CD process and the pipeline stages each successive environment the next upon successful completion of tests.

Continuous Delivery may sequence multiple deployment “rings” for progressive exposure (also known as “controlling the blast radius”). Progressive exposure groups users who get to try new releases to monitor their experience in “rings.”  The first deployment ring is often a “canary” used to test new versions in production before a broader rollout. CD automates deployment from one ring to the next and may optionally depend on an approval step, in which a decision maker signs off on the changes electronically. CD may create an auditable record of the approval in order to satisfy regulatory procedures or other control objectives.

Deployment Process


Prerequisites

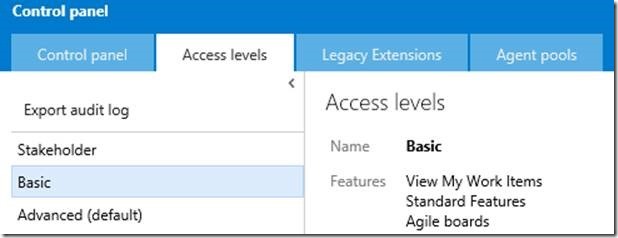
1. Make sure the user account that you’re going to use has permission to create Release Definition. User should be part of Basic or Advanced Group.

clip_image002

2. Enable PSRemoting – PSRemoting Configuration process

Enable PSRemoting will enable SharePoint servers to accept remote call from build servers.

Below are the steps we need to follow to enable PSRemoting.

On the SharePoint server:

    1. Open the SharePoint Management Shell with elevated administrative permission, by selecting ‘Run as administrator’
    2. Enable PowerShell remoting by running the following cmdlet: Enable-PSRemoting
    3. Enable the server to accept credentials using CredSSP: Enable-WSManCredSSP –Role Server
    4. Raise the PowerShell memory level to 1GB: Set-Item WSMan:\localhost\Shell\MaxMemoryPerShellMB 1024

On the TFS build agent server(s):

ü Open the Windows PowerShell prompt with elevated administrative permission by selecting ‘Run as administrator’

ü If not previously done on this server, set the PowerShell execution policy to allow scripts to be run – at a minimum, the policy must be RemoteSigned:
Set-ExecutionPolicy RemoteSigned

ü Enable the server to pass credentials using CredSSP – replace the sample name with the name of your SharePoint server:
Enable-WSManCredSSP -Role client -DelegateComputer “MySharePointServer”  – Note that other permissible values for the DelegateComputer parameter include “*.mydomain.com” and “*”. However, a security best practice would be to limit the credential delegation to as small a scope as possible

Test PowerShell remoting and CredSSP authentication:

    • On the TFS build agent server, test remoting by starting a remote session to the SharePoint server: Enter-PSSession -ComputerName “MySharePointServer”    A successful test is one where the command prompt location changes to [MySharePointServer]: PS C:\Users\<username>
    • Type exit to close the remote session
    • Also on the TFS build agent server, test CredSSP authentication with the following cmdlet: Enter-PSSession -ComputerName “MySharePointServer” -Authentication CredSSP –Credential Get-Credential – This will force an authentication prompt to enter a username and password – specify a domain account which has permissions to the SharePoint server. As before, a successful test is one where the location of the command prompt changes.

3. Create Release Definition

Below are the steps to create Release Definition:

1. After successful build, go to Release tab in TFS server and click on Create Release Definition.

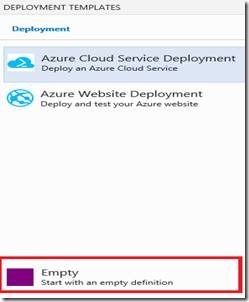
2. Select Empty Definition.

clip_image004

3. Provide Release Name.

4. Click on Link to Build Definition and select the latest build which you want to deploy.

5. We can add environments for Dev, Stg, Prod.

6. First let’s define task for the Dev environment then we can clone the definition to staging and production.

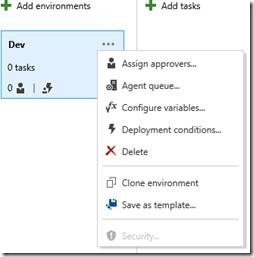
7. Click on (…) near the environment name and in the dropdown you can find below option.

clip_image006

8. Using the above option we can configure pre deployment and post deployment approvals and automate release once build successful.

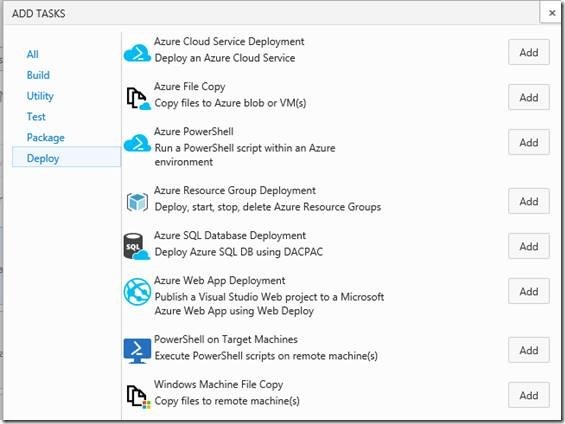
9. In the right side click on “Add Tasks” to define the action.

10. Select Windows Machine File Copy and PowerShell option to copy the Artifacts to Destination server. We will be having below Tasks in Release option.

clip_image008

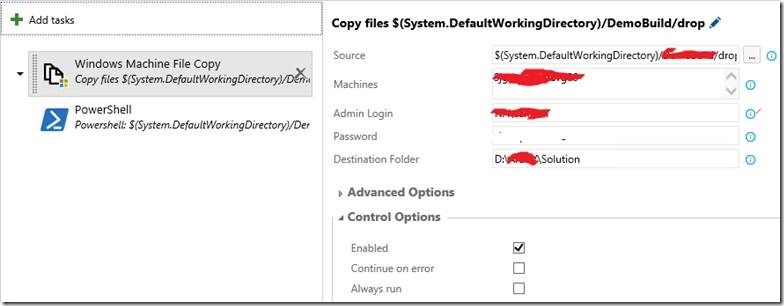
11. In Windows Machine File Copy option provide server details and destination details as mentioned below.

clip_image010

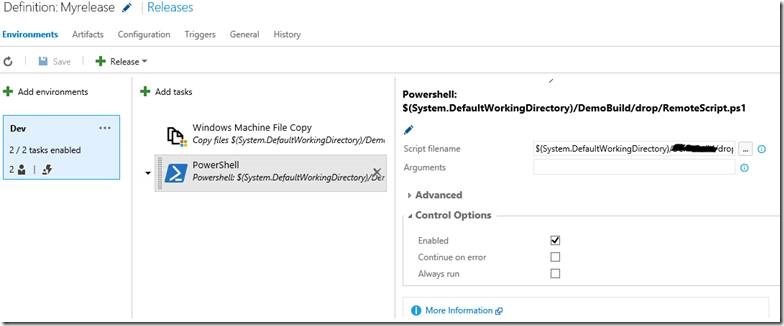
12. To Deploy WSP provide PowerShell script path from TFS in the PowerShell Tasks.

clip_image012

13. Clone the Dev environment and create staging and production and then do the necessary changes.

4. PowerShell scripts

We need two PowerShell script file in the solution folder

1. Scripts file to install/deploy solution in SharePoint. As we are going to run the PS script from windows PowerShell, add below line on top of the script.

if ( (Get-PSSnapin -Name Microsoft.Sharepoint.Powershell -ErrorAction SilentlyContinue) -eq $null )

{

Add-PsSnapin Microsoft.Sharepoint.Powershell

}

2. Scripts file to connect to SharePoint server remotely.

Sample:

New-PSSession -ComputerName “ServereName”;

Enter-PSSession -computername ” ServereName “;

Invoke-Command -computername ” ServereName ” -scriptblock{D: \Solution\WebDeploy.ps1 -solutionNames @(“parameter1”)};

Deployment

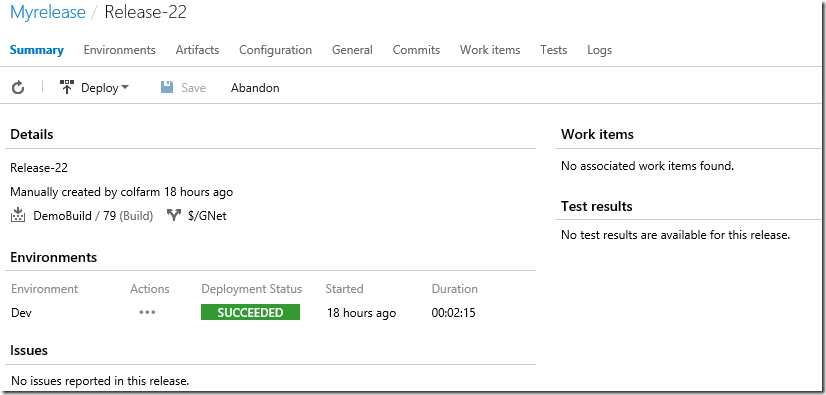
Now, when we run release, it will move all the necessary files to SharePoint server and then deploy the WSP. We will get status as below.

clip_image013

Common Deployment Issues

1. Error:

No artifacts are available in the build. Make sure that the build is publishing an artifact and try again.

Solution:

Need to provide /p:IsPackaging=True in MSBuild Arguments it will create Build Artificates fot the solution, if not solution will be built but it wont create packages

2. Error:

Windows PowerShell is in NonInteractive mode. Read and Prompt functionality is not available.

Solution:

When executing PowerShell script, if we need to remove existing wsp file, it will ask for confirmation, as Windows PowerShell is in NonInteractive mode it throws this error message. To avoid this error add -Confirm:$False; on that particular line.

Eg. Remove-SPSolution visualwebpartproject1.wsp -Confirm:$False;
Author Info

Sriram
 
Technology Specialist
 
Rate this article
 
Sriram T has been working in IT industry for over 6 years He holds Bachelor's degree in Computer Science Engineering. Sriram write articles and blogs related to SharePoint 2013, SharePoint ...read more
 

How to Get the List of WSPs (Solutions) Installed in a SharePoint Farm using PowerShell

Sathish Nadarajan
 
Solution Architect
May 16, 2016
 
Rate this article
 
Views
12474

As Part of an analysis, I wanted the List of WSPs installed in my SharePoint farm. To get that, I was about to write a small function in PowerShell Script. The function is as follows.

 #############  Get All The Solutions in the Farm and their deployed WebApplications ############ 
 
 function GetSolution()
 {
     $script:Progress = "1,Entered"
     Write-Host "Entered into GetSolution Method" -ForegroundColor Yellow 
     Add-Content "$ProgressFile" "Entered into GetSolution Method"
     
     # Assign the CSV and XML Output File Paths
     $Solution_XML_Path = $scriptBase + "Reports-$LogTimeAvailableSolutions.xml"
     
     # Create the XML File Tags
     $xmlWriter = New-Object System.XMl.XmlTextWriter($Solution_XML_Path,$Null)
     $xmlWriter.Formatting = 'Indented'
     $xmlWriter.Indentation = 1
     $XmlWriter.IndentChar = "`t"
     $xmlWriter.WriteStartDocument()
     $xmlWriter.WriteComment('Solutions List')
     $xmlWriter.WriteStartElement('Solutions')
     $xmlWriter.WriteEndElement()
     $xmlWriter.WriteEndDocument()
     $xmlWriter.Flush()
     $xmlWriter.Close()
  
     
     # Get All the Solutions
     Add-Content "$ProgressFile" "Gathering All the Solutions from the Farm"
     
     $SolutionCollection = $farm.Solutions
     
     Add-Content "$ProgressFile" "Gathered All the Solutions from the Farm"
     
     if($SolutionCollection.Count -gt 0)
     {
         # Iterate through all the Solutions
         foreach($Solution in $SolutionCollection)
         {
             $tempContent = "Collecting the Information about the Solution : " + $Solution.DisplayName
             Add-Content "$ProgressFile" $tempContent
             
             # Get the deployed web applications
             $SPDeployedWebApps = $Solution.DeployedWebApplications
             
             # Create the Initial Solution Node
             $xmlDoc = [System.Xml.XmlDocument](Get-Content $Solution_XML_Path);
             $solutionNode = $xmlDoc.CreateElement("Solution")
             $xmlDoc.SelectSingleNode("//Solutions").AppendChild($solutionNode)
             $solutionNode.SetAttribute("Name", $Solution.DisplayName)
             
             Add-Content "$ProgressFile" "Iterate through the Installed Web Applications"
             # Iterate through all the Deployed Web Applications
             foreach($WebApplication in $SPDeployedWebApps)
             {
                 # write the output on XML File
                 
                 $webAppNameNode = $solutionNode.AppendChild($xmlDoc.CreateElement("WebApplication"));
                 $webAppNameNode.SetAttribute("Name", $WebApplication.DisplayName)
                 
                 $webAppURLNode = $webAppNameNode.AppendChild($xmlDoc.CreateElement("URL"));
                 $webAppURLTextNode = $webAppURLNode.AppendChild($xmlDoc.CreateTextNode($WebApplication.Url));
                 
                 $webAppDeploymentStateNode = $webAppNameNode.AppendChild($xmlDoc.CreateElement("Deployed"));
                 $webAppDeploymentStateTextNode = $webAppDeploymentStateNode.AppendChild($xmlDoc.CreateTextNode($Solution.DeploymentState));
                 
                 $xmlDoc.Save($Solution_XML_Path) 
             }
         }
      }
      
      Write-Host "Completed GetSolution Method" -ForegroundColor Green 
      Add-Content "$ProgressFile" "Completed GetSolution Method"
      $script:Progress = "1:Success"
      
      Write-Host "Please Find the Output XML file in the Path :" $Solution_XML_Path  -ForegroundColor Green 
 }
 
 ########### End of Method #################
 

Happy Coding,

Sathish Nadarajan.

Category : PowerShell, SharePoint

Author Info

Sathish Nadarajan
 
Solution Architect
 
Rate this article
 
Sathish is a Microsoft MVP for SharePoint (Office Servers and Services) having 15+ years of experience in Microsoft Technologies. He holds a Masters Degree in Computer Aided Design and Business ...read more
 

How to Backup and Deploy the Farm Solutions in SharePoint 2013 Using PowerShell

Sathish Nadarajan
 
Solution Architect
December 1, 2015
 
Rate this article
 
Views
9631

In one of the Previous article, already we saw this snippet. But, I thought of refining it, much more a better version, so that it can be used on any project without any major modification. Conceptually, they are one and the same. The only thing, which I am adding here is,

1. Backup the WSPs before doing the deployment. If the WSP is going to be deployed for the first time, it will not stop our execution.

2. Write-the progress along with the seconds during the deployment and retraction.

3. Get the Environmental variables as an argument during the deployment.

4. Creating twoFolders WSPs and WSPBackups, so that more than one WSP can be deployed in a shot.

5. After deploying, clear the blob cache. That’s it.

The script looks like below.

 Add-PSSnapin "Microsoft.SharePoint.PowerShell"
 #Read arguement and store environment URL
 if($args[0] -eq 'DEV') {
 $WebApplicationUrl="https://DEVWebApplication/"
 }
 elseif ($args[0] -eq ‘UAT') {
 $WebApplicationUrl="https://UAT"
 }
 elseif ($args[0] -eq 'QA') {
 $WebApplicationUrl="https://QA/"
 }
  elseif ($args[0] -eq PROD) {
 $WebApplicationUrl="https://PROD/"
 }
 
 else {
 Write-Host -f Yellow "Environment not specified - please pass appropriate environment to deploy"
 exit
 }
 clear-host
  
 sleep 10
 
 $ErrorActionPreference = "Stop"
 $path = get-location
 $farm = Get-SPFarm
 
 #Define Path to New WSPs
 $wspfolderpath = "$pathWSPs"
 $WSPs = @()
 
 # Define Names of WSPs in Package
 foreach($filename in Get-ChildItem $wspFolderPath)
 {$script:WSPs += $filename}
 
 #Backup WSPs
 
 foreach ($WSPtoBackup in $WSPs) {
     try{
     $file = $farm.Solutions.Item("$WSPtoBackup").SolutionFile
     $file.SaveAs("$pathWSPBackups$WSPtoBackup")
     write-host "$WSPtoBackup has been backed up."
     }
     catch{
     write-host -f Red "The solution:"
     write-host "$WSPtoBackup"
     write-host -f Red "Cannot not be backed up. It is not installed or found in the farm."
     }
 }
 function wait4timer($solutionName) 
 {    
     $solution = Get-SPSolution | where-object {$_.Name -eq $solutionName}    
     if ($solution -ne $null)     
     {        
         $solutionseconds = 0
         #Write-Host "Waiting to finish soultion timer job" -ForegroundColor Green      
         while ($solution.JobExists -eq $true )          
         {               
             write-progress -activity "Waiting to finish timer job" -status "$solutionseconds Seconds Elapsed"          
             sleep 1
             $solutionseconds++            
         }                
         Write-Host "Finished the timer job in $solutionseconds seconds" -ForegroundColor Green  
             }
 } 
 
 function DeployWSP 
 {      
     try
     {
         Write-Host "WebApplication  URL : $WebApplicationUrl" -ForegroundColor Green 
 
         # Get the Solution Node
         foreach($Solution in $WSPs)     
         {
             $wspName = $Solution.Name
             Write-Host "Solution Name : $wspName" -ForegroundColor Green 
 
             # Get the Path of the Solution
             $wspfullpath = "$wspFolderPath$solution"
 
             Write-Host "Getting the Installed Solutions" -ForegroundColor Green 
             # Try to get the Installed Solutions on the Farm.
             $InstalledSolution = Get-SPSolution | Where-Object Name -eq $wspName
         
             # Verify whether the Solution is installed on the Target Web Application
             if($InstalledSolution -ne $null)
             {
                 if($InstalledSolution.Deployed)
                 {
                     Write-Host "Uninstall the Solution from All WebApplications" -ForegroundColor Green 
 
                     wait4timer($wspName)  
 
                     # Solution is installed in atleast one WebApplication


                     try{
                         Uninstall-SPSolution $wspName -AllWebApplications -confirm:$false
                     }
                     catch{
                         $ErrorMessage = $_.Exception.Message
                         if ($ErrorMessage.StartsWith("This solution contains no resources scoped for a Web application"))
                         {
                             Uninstall-SPSolution $wspName  -confirm:$false
                         }
                         else 
                         {
                             write-host "Failed to uninstall $wspname"
                             write-host $ErrorMessage
                         }
                     }


                     # Wait till the Timer jobs to Complete
                     wait4timer($wspName)   
 
                     Write-Host "Remove the Solution from the Farm" -ForegroundColor Green 
                     # Remove the Solution from the Farm
                    
                     Remove-SPSolution $wspName -Confirm:$false 
 
                     sleep 3
                 }
                 else
                 {
                     Write-Host "Remove the Solution from the Farm" -ForegroundColor Green 
 
                     wait4timer($wspName) 
 
                     # Solution not deployed on any of the Web Application.  Go ahead and Remove the Solution from the Farm
           
                     Remove-SPSolution $wspName -Confirm:$false 
 
                     sleep 3
                 }
             }
 
             wait4timer($wspName) 
 
             Write-Host "Add the Solution from the Farm" -ForegroundColor Green 
             # Add Solution to the Farm
          
             Add-SPSolution -LiteralPath "$wspFullPath"
             
             Write-Host "Deploy the Solution" -ForegroundColor Green 
             # Install Solution to the WebApplication
             try{
                 foreach($destwa in $WebApplicationUrl) 
                 {
                     install-spsolution -Identity $wspName -GACDeployment:$true -Force:$true -webapplication:$destwa
                     wait4timer($wspName)
                 }
             }
             catch{
                 $ErrorMessage = $_.Exception.Message
                 if ($ErrorMessage.StartsWith("This solution contains no resources scoped for a Web application"))
                 {
                   install-spsolution -Identity $wspName -GACDeployment:$true -Force:$true
                 }
                 else 
                 {
                   write-host "Failed to deploy $wspname"
                   write-host $ErrorMessage
                 }
             }
             
         
             # Let the Timer Jobs get finishes       
             wait4timer($wspName)    
 
             Write-Host "Successfully Deployed to the WebApplication" -ForegroundColor Green 
             #iisreset
         
         }
          
     }
     catch
     {
         Write-Host "Exception Occuerd on DeployWSP : " $Error[0].Exception.Message -ForegroundColor Red  
     }
 }
 
 
 try
 {
     DeployWSP
     iisreset
     foreach($WebApp in Get-spwebapplication)
     { 
     [Microsoft.SharePoint.Publishing.PublishingCache]::FlushBlobCache($webApp)
     Write-Host "Flushed the BLOB cache for:" $webApp
     }
     Write-Host "Script Execution Completed Successfully" -ForegroundColor Green 
 }
 catch
 {
     Write-Host "Custom Exception Happened on Main : " + $Error[0].Exception.Message -ForegroundColor Red  
 }


Happy Coding,

Sathish Nadarajan.

Author Info

Sathish Nadarajan
 
Solution Architect
 
Rate this article
 
Sathish is a Microsoft MVP for SharePoint (Office Servers and Services) having 15+ years of experience in Microsoft Technologies. He holds a Masters Degree in Computer Aided Design and Business ...read more
 

How to Deploy a SharePoint 2013 Solution (WSP) in the Farm using PowerShell

Sathish Nadarajan
 
Solution Architect
December 28, 2013
 
Rate this article
 
Views
49820

All of us will be using Visual Studio as our Development IDE for our development purpose. Once our development completes, Visual Studio itself prepares the WSP for us. We are delivering the WSP as a deliverable. Later on moving the WSP to a Staging, we require some sort of deployment procedure. For that, I would say PowerShell is the best Option. Let us, how to write a PowerShell Snippet to Deploy our WSP in Farm level as well as Web Application Level.

First we will see, how to deploy our WSP against a particular Web Application. The script is self-explanatory and commented with the steps.

Before, seeing the script, let us see the sequence of the script.

1. Get the Site, WebApplication URL, Solution Name, Solution Location.

2. Check whether the Solution is already installed.

3. If installed, then find, whether it is deployed in any of the WebApplication.

4. If deployed, then retract from all the web applications already deployed.

5. Then un-install the wsp.

6. Add the WSP.

7. Install the WSP against the WebApplication, which we are specifying.

This gives a proper validation for the deployment script. Now, let us see the script.

 Add-PSSnapin "Microsoft.SharePoint.PowerShell" 
 
 function wait4timer($solutionName) 
 {    
     $solution = Get-SPSolution | where-object {$_.Name -eq $solutionName}    
     if ($solution -ne $null)     
     {        
         Write-Host "Waiting to finish soultion timer job" -ForegroundColor Green      
         while ($solution.JobExists -eq $true )          
         {               
             Write-Host "Please wait...Either a Retraction/Deployment is happening" -ForegroundColor DarkYellow           
             sleep 2            
         }                
 
         Write-Host "Finished the solution timer job" -ForegroundColor Green  
         
     }
 }  
 
       
     try
     {
         # Get the WebApplicationURL
         $MyWebApplicationUrl = "http://WEBAPPLICATIONURL";
         
         # Get the Solution Name
         $MywspName = "MySolution.WSP"
         
         # Get the Path of the Solution
         $MywspFullPath = "D:TestMySolution.WSP"
 
         # Try to get the Installed Solutions on the Farm.
         $MyInstalledSolution = Get-SPSolution | Where-Object Name -eq $MywspName
         
         # Verify whether the Solution is installed on the Target Web Application
         if($MyInstalledSolution -ne $null)
         {
             if($MyInstalledSolution.DeployedWebApplications.Count -gt 0)
             {
                 wait4timer($MywspName)  
 
                 # Solution is installed in atleast one WebApplication.  Hence, uninstall from all the web applications.
                 # We need to unInstall from all the WebApplicaiton.  If not, it will throw error while Removing the solution
                 Uninstall-SPSolution $MywspName  -AllWebApplications:$true -confirm:$false
 
                 # Wait till the Timer jobs to Complete
                 wait4timer($MywspName)   
 
                 Write-Host "Remove the Solution from the Farm" -ForegroundColor Green 
                 # Remove the Solution from the Farm
                 Remove-SPSolution $MywspName -Confirm:$false 
 
                 sleep 3
             }
             else
             {
                 wait4timer($MywspName) 
 
                 # Solution not deployed on any of the Web Application.  Go ahead and Remove the Solution from the Farm
                 Remove-SPSolution $MywspName -Confirm:$false 
 
                 sleep 3
             }
         }
 
         wait4timer($MywspName) 
 
         # Add Solution to the Farm
         Add-SPSolution -LiteralPath "$MywspFullPath"
     
         # Install Solution to the WebApplication
         install-spsolution -Identity $MywspName -WebApplication $MyWebApplicationUrl -FullTrustBinDeployment:$true -GACDeployment:$false -Force:$true
 
         # Let the Timer Jobs get finishes       
         wait4timer($MywspName)    
 
         Write-Host "Successfully Deployed to the WebApplication" -ForegroundColor Green 
         
     }
     catch
     {
         Write-Host "Exception Occuerd on DeployWSP : " $Error[0].Exception.Message -ForegroundColor Red  
     }
 

This will install against a particular WebApplication and the deployment is happening against the Bin Folder.

The Tags,

 -FullTrustBinDeployment:$true -GACDeployment:$false
 

Decides about the deployment type. If we want to do a GAC Deployment, then we need to give

 -FullTrustBinDeployment:$false -GACDeployment:$true

This will deploy against a particular Web Application. Some of the WSPs needs to be deployed globally. Let us see, how to do that and what are the tags required for them.

 install-spsolution -Identity $wsp –AllWebApplications:$true

This will deploy our WSP on all web applications.

Happy Coding.

Sathish Nadarajan.

Author Info

Sathish Nadarajan
 
Solution Architect
 
Rate this article
 
Sathish is a Microsoft MVP for SharePoint (Office Servers and Services) having 15+ years of experience in Microsoft Technologies. He holds a Masters Degree in Computer Aided Design and Business ...read more
 

Error Failed to extract the cab file in the solution while deploying a WSP in SharePoint

Ashok Raja
 
Solutions Architect
October 29, 2013
 
Rate this article
 
Views
3175

This error, Failed to extract the cab file in the solution , will be thrown while deploying a WSP in SharePoint , if that WSP contains any files with special characters that are not accepted by SharePoint in its file name. This applies to sand box solution as well.

The only resolution would be to rename the file without any non acceptable special characters.

Category : Tips

Author Info

Ashok Raja
 
Solutions Architect
 
Rate this article
 
I am Ashok Raja, Share Point Consultant and Architect based out of Chennai, India. ...read more
 

How to download the deployed WSP solution from SharePoint Farm

Ashok Raja
 
Solutions Architect
December 7, 2012
 
Rate this article
 
Views
2636

This power shell script allows you to download the WSP that you have deployed in a SharePoint farm

$frm = Get-SPFarm
$file = $frm.Solutions.Item("sfs.intranet.artifacts.wsp").SolutionFile
$file.SaveAs("c:wspsfs.intranet.artifacts.wsp")

Category : Tips

Author Info

Ashok Raja
 
Solutions Architect
 
Rate this article
 
I am Ashok Raja, Share Point Consultant and Architect based out of Chennai, India. ...read more
 

Leave a comment