Build a simple client-side MVC app with RequireJS

Tarun Kumar Chatterjee
 
Net – Technology Specialist
June 26, 2017
 
Rate this article
 
Views
3201

RequireJS is an implementation of AMD (Asynchronous Module Definition), an API for declaring modules and loading them asynchronously on the fly when they’re needed.

We instantly have a problem, our custom jQuery plugins will not work, as jQuery itself has not be loaded yet. Sure we could move the jQuery script tag to be before the custom jQuery plugins, which would indeed fix the problem this once. This is however a very isolated small use case, which is not really the norm on large scale applications, where we may have many many related files which all have dependencies. This is where RequireJs can help.

Using RequireJs we are able to specify things like:

· Define a module

· Require a module 

· The modules dependencies (via a RequireJs config called  shim)

· The module paths 

require() vs. define():

We can use both require() and define() to load module dependencies. The require() function is used to run immediately, where as define() is used to define modules which may be used from multiple locations.

We can see that we are actually configuring RequireJs for certain things, such as:

· BaseUrl: Specifies the base path for all the scripts, you can still use RequireJs with relative paths, but this is its base path

· Paths : Is a map of named paths where we specify a well known name and a path

· Shim: Is a map of files, and their dependecies. What this does is that is gives a hint to RequireJs about the required module dependencies such that RequireJs will then know to load them in the correct order. Remember that RequireJs uses a technique which means modules are loaded asychronously. It can be seen from the example above that “jquery.appender” and “jquery.textReplacer” are dependent on jQuery. As such RequireJs will load that first.It may seem that we are just swapping the evils of having the correct javascript imports in the html in the correct order for this, but what we do get from RequireJs is that modules are loaded asychronously

Let me create a simple asp.net web application and implement the RequireJS and the details are as follows:

Download the Jquery and AngularJS from nuget by using the below commands

PM> Install-Package jQuery

PM> Install-Package angularjs

PM> Install-Package RequireJS

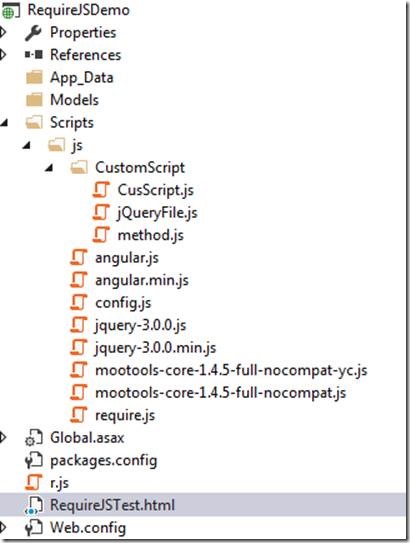
Now add some custom scripts, following are the Scripts hierarchy snapshots and codes:

clip_image002

Config.js code:

 requirejs.config({
     
     baseUrl: 'Scripts/js',
     paths: {
         angular: 'angular.min',
         jquery: 'jquery-3.0.0.min',
         mootools: 'mootools-core-1.4.5-full-nocompat',
         methods: 'CustomScript/method'
     }
     //,shim: {
     //        "angular": { deps: ["mootools"] }
     //}
 })
 

JQueryFile.js code:

 define( ['jquery', 'methods'], function ($, methods) {
     
     //$('body').html('Hello, from other side !!!!');
     $('#clickMe').click(function () {
         methods.changeHTML('Clicked');
         methods.showAlert('Clicked');
 
         require(['CustomScript/CusScript']);
     })
 });  
 

Method.js code:

 define(['jquery','angular'], function ($,angular) {
     var methods = {};
 
     methods.changeHTML = function(argument)
     {
         $('body').html(argument);
     }
     methods.showAlert = function (argument) {
         alert(argument);
     }
     return methods;
 }); 
 

CusScript.js code:

 define(['mootools'], function (mootools) {
 });
 

Next to create RequireJSTest.html to render the data

 <!DOCTYPE html>
 <html>
 <head>
     <title></title>
 	<meta charset="utf-8" />
     
 </head>
 <body>
    <button id="clickMe" >Asynchronous Module Defination</button>
     <script data-main="Scripts/js/config" src="Scripts/js/require.js"></script>
     <script>
         alert('before required keyword')
         require(['config'], function () {
             require(['CustomScript/jQueryFile']);
         });
     </script>
 </body>
 </html>
 

Now build the application and browse RequireJSTest.html page

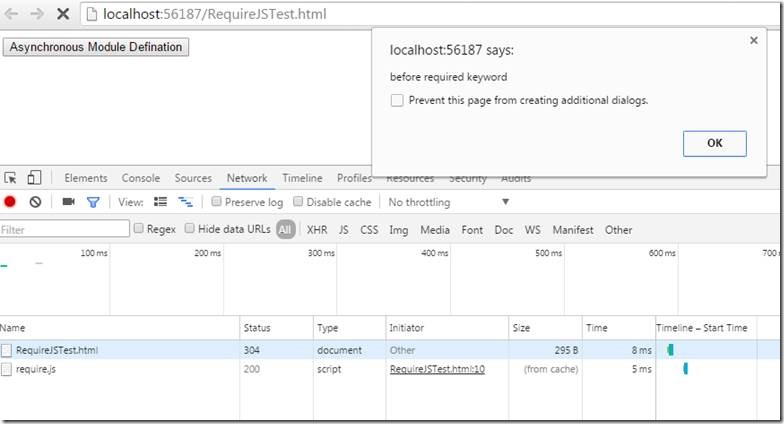
Before requirejs to load the config file

clip_image004

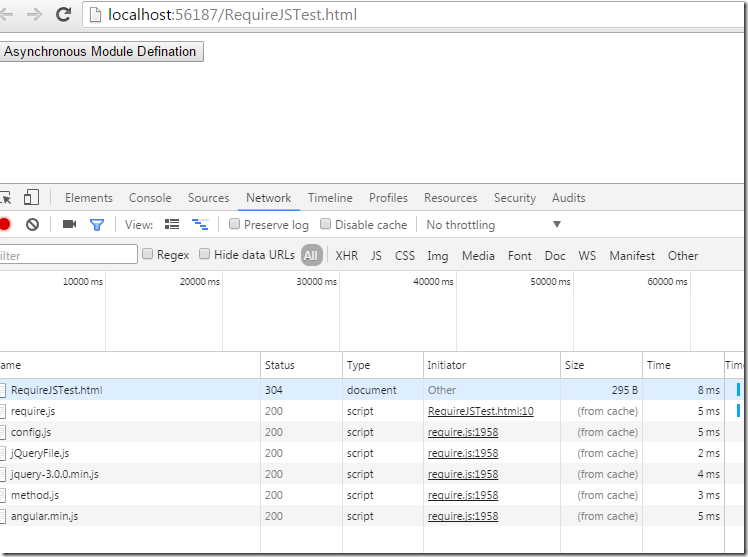
Click on Ok, it will go to load ‘config’ and ‘CustomScript/jQueryFile’. Within the ‘CustomScript/jQueryFile we have the reference of method.js. So, it was loaded.

But we can observe that ‘CustomScript/CusScript’ has not been loaded. Click on the “Asynchronous Module Definition” button will call require([‘CustomScript/CusScript’]); to load ‘CustomScript/CusScript’

clip_image005

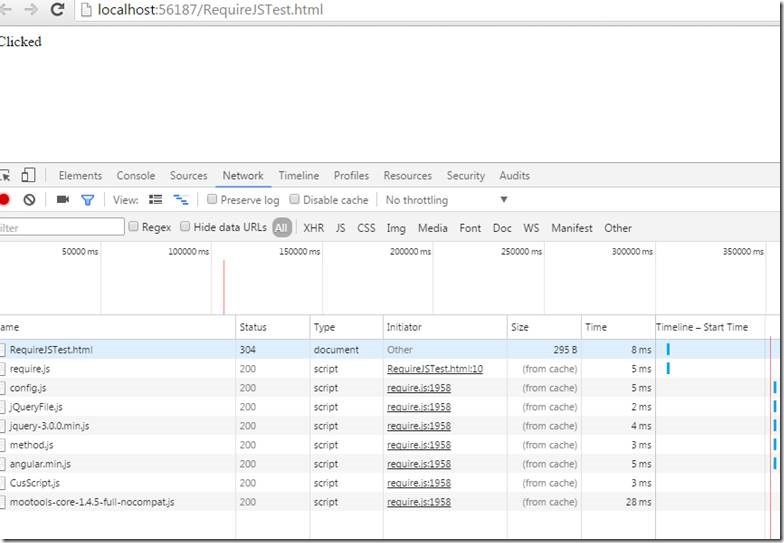
So, let’s click on the button, it will give you an alert. Click on OK, will load ‘CustomScript/CusScript’. As ‘CustomScript/CusScript’ has the reference of ‘mootools’, so it will also be loaded asynchronously.

clip_image007

Now let’s enable the dependency, considering “mootools” is having the dependency on “angular”. So, change the config.js file

 requirejs.config({
     
     baseUrl: 'Scripts/js',
     paths: {
         angular: 'angular.min',
         jquery: 'jquery-3.0.0.min',
         mootools: 'mootools-core-1.4.5-full-nocompat',
         methods: 'CustomScript/method'
     }
     ,shim: {
             "angular": { deps: ["mootools"] }
     }
 })
 

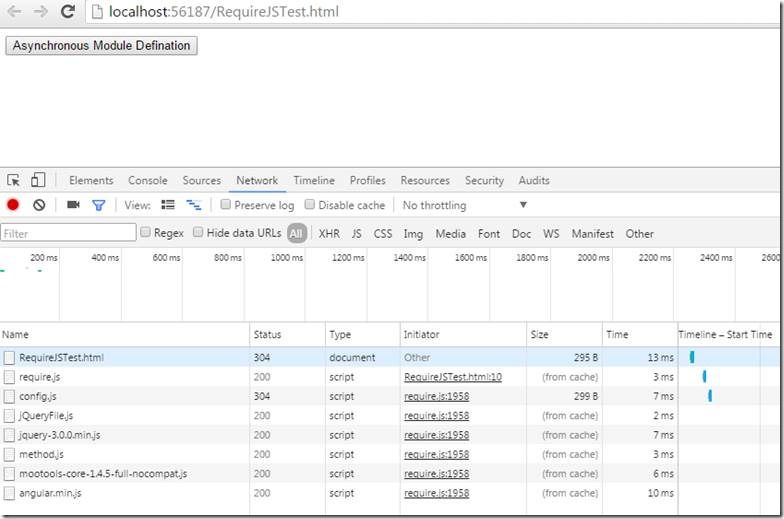
Now run the application again, we can see before clicking on “Asynchronous Module Definition” button mootools js has been loaded. As “mootools” has the dependency on “angular”, mootools” will be loaded first than “angular”. We can check the order of script in below snapshot.

clip_image009

Hope, this article help you to have some basic ideas on RequireJS and its implementation. In next article we will see how RequireJS can be used for Module Optimization.

Happy Coding

Tarun Kumar Chatterjee
Author Info

Tarun Kumar Chatterjee
 
Net – Technology Specialist
 
Rate this article
 
Tarun has been working in IT Industry for over 12+ years. He holds a B-tech degree. He is passionate about learning and sharing the tricks and tips in Azure, .Net ...read more
 

How to Deploy Provider Hosted Apps (Add-Ins) programmatically using CSOM in SharePoint Office 365 by Activating Developer Site Feature

Sathish Nadarajan
 
Solution Architect
October 11, 2016
 
Rate this article
 
Views
7302

ArticleEarlierIn the earlier Article, we saw how to install an APP by activating the Side Loading Feature. In the same manner, let us see how to deploy the app by activating the Developer Site Feature.

Usually, this method will not be accepted by most of the Clients, because activating the developer feature will not be suitable on the Production environment as most of the production environments will be of team, publishing, Community Sites.

But even, let us know, how the thing can be achieved. The code is very straight forward.

 namespace Console.Office365
 {
     using Microsoft.SharePoint.Client;
     using Newtonsoft.Json.Linq;
     using System;
     using System.Collections.Generic;
     using System.IO;
     using System.Linq;
 
     class Program
     {
         static void Main(string[] args)
         {
             DeployAPPDeveloperFeature();
         }
 
         public static void DeployAPPDeveloperFeature()
         {
             OfficeDevPnP.Core.AuthenticationManager authMgr = new OfficeDevPnP.Core.AuthenticationManager();
 
             string userName = "*******@*****.onmicrosoft.com";
             string password = "********";
             string siteUrl = "https://*******.sharepoint.com/sites/CommunitySite/";
 
             using (var clientContext = authMgr.GetSharePointOnlineAuthenticatedContextTenant(siteUrl, userName, password))
             {
                 Web web = clientContext.Web;
                 clientContext.Load(web);
                 clientContext.ExecuteQueryRetry();
 
                 var appInstance = Deploy(clientContext, "D:\PRACTICE SOURCE CODE\PNP\Office365.PHA.OnPrem.APP\Office365.PHA.OnPrem.APP\bin\Debug\app.publish\1.0.0.0\Office365.PHA.OnPrem.APP.app");
                 if (appInstance != null && appInstance.Status == AppInstanceStatus.Initialized)
                 {
                     System.Console.WriteLine("App was installed.");
                 }
             }
         }
 
         public static AppInstance Deploy(ClientContext context, string appFullPath)
         {
             EnsureDeveloperFeature(context);
             using (var packageStream = System.IO.File.OpenRead(appFullPath))
             {
                 var appInstance = context.Web.LoadAndInstallApp(packageStream);
                 context.Load(appInstance);
                 context.ExecuteQuery();
                 return appInstance;
             }
         }
 
 
         /// <summary>
         /// Ensure Developer Feature 
         /// </summary>
         /// <param name="ctx"></param>
         private static void EnsureDeveloperFeature(ClientContext ctx)
         {
             var result = ctx.LoadQuery(ctx.Site.Features.Where(f => f.DefinitionId == DeveloperFeatureId));
             ctx.ExecuteQuery();
             if (result.Any()) return;
             var feature = ctx.Site.Features.Add(DeveloperFeatureId, true, FeatureDefinitionScope.None);
             ctx.ExecuteQuery();
         }
 
 
         private static readonly Guid DeveloperFeatureId = new Guid("e374875e-06b6-11e0-b0fa-57f5dfd72085");
 
 
     }
 
 }


In this approach also, we will be facing the TRUST issue similar to the earlier post. But, even then, there is another alternative approach is there. “APP Stapling”. Let us see what is APP Stapling in the upcoming article.

Happy Coding,

Sathish Nadarajan.

Author Info

Sathish Nadarajan
 
Solution Architect
 
Rate this article
 
Sathish is a Microsoft MVP for SharePoint (Office Servers and Services) having 15+ years of experience in Microsoft Technologies. He holds a Masters Degree in Computer Aided Design and Business ...read more
 

How to use Geo Location Field in SharePoint Online with Bing Maps

Sriram Varadarajan
 
Solution Architect
June 4, 2016
 
Rate this article
 
Views
17692

It’s been a while since Microsoft introduced Geolocation location datatype in SQL but it’s wasn’t rolled out to SharePoint immediately. Microsoft has addressed this demand in SharePoint 2013 (though not that straight forward) but still you can use it.

What is Geolocation means to us

In columns of type Geolocation, you can enter location information as a pair of latitude and longitude coordinates and retrieve those co-ordinates and display it in a Bing Map (Or any equivalent API).

How to add a Geolocation Column: I’m pretty sure this would be the next question, how to add this column as you don’t find this column type either in site/list column.

The Geolocation column is not available in SharePoint lists for users, by default. To add the column to a SharePoint list, you need to write code.

Script:

 $WebUrl = "Site collection URL"
 $EmailAddress = "User ID"
 $Context = New-Object Microsoft.SharePoint.Client.ClientContext($WebUrl)
 $Credentials = Get-Credential -UserName $EmailAddress -Message "Please enter your Office 365 Password"
 $Context.Credentials = New-Object Microsoft.SharePoint.Client.SharePointOnlineCredentials($EmailAddress,$Credentials.Password)
 $List = $Context.Web.Lists.GetByTitle("List Name")
 $FieldXml = "<Field Type='Geolocation' DisplayName='Demo locatie'/>"
 $Option=[Microsoft.SharePoint.Client.AddFieldOptions]::AddFieldToDefaultView
 $List.Fields.AddFieldAsXml($fieldxml,$true,$option)
 $Context.Load($list)
 $Context.ExecuteQuery()
 $Context.Dispose() 
 

How to display this column in Bing Map

1. List Data in Bing Map is a SharePoint online app that is used for visualizing the data from SharePoint list and it’s a free APP

Follow the steps to add this APP to you site

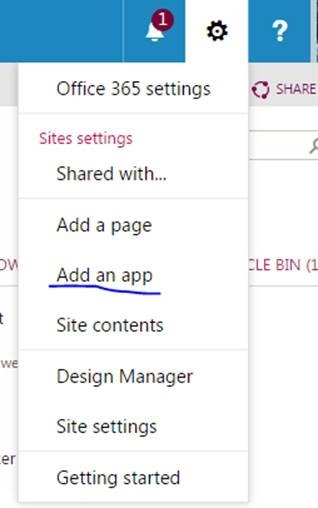
Navigate to your target site and select the gear in the top right corner: Please refer to this article to understand the access and permission required to perform the below activity

clip_image002

Select Add an APP from the list options.

a.

clip_image004

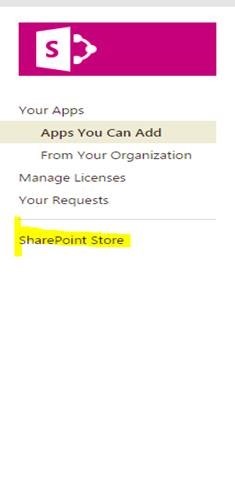
Select SharePoint Store from the list of options displayed on the left side of the page.

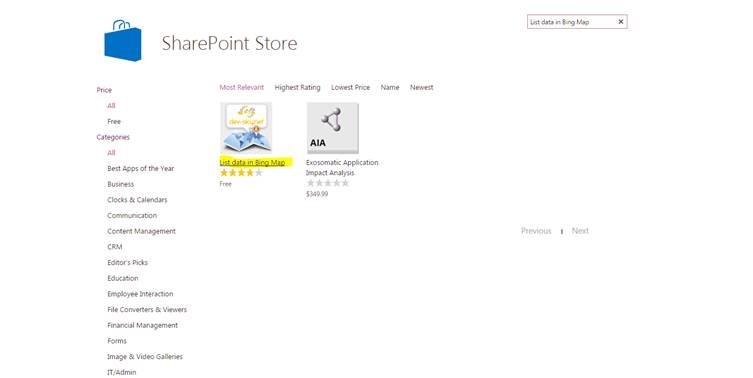
b. In the SharePoint Store site, search for the APP List data in Bing Map in the search BOX available in the top right corner.

clip_image006

clip_image008

c. Select the APP and Click REQUEST IT. (Since this APP needs high privilege this can’t be directly added to the site, this needs to be approved by the store admin to get this added to your site)

d. Once approved this APP would get added to your site.

Next step is to add this APP to your page

Please follow the below steps:

Step 1

clip_image009

clip_image011

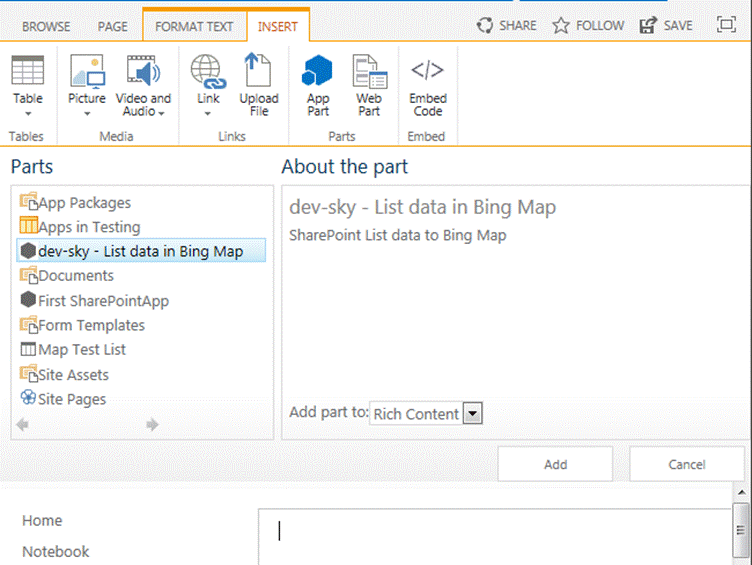
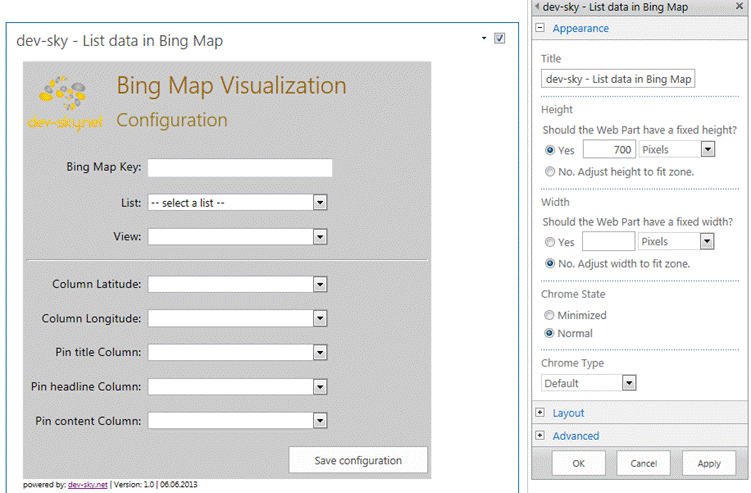
After successfully installing the Bing Map App, you may use it right away. The app is ideal for the visualization of SharePoint list data. You will need a SharePoint list with at least two data columns – latitude and longitude. To fully visualize all your contents, you will need additional columns containing more information. In addition, a valid Bing Map Key is required; without it you won’t be able to use the app. To embed the app part in a website, open the target website in its editing mode. Enable the tab "INSERT". In the ribbon, click the button "App Part" to view the available app parts in list form. Select the app part dev-sky – List data in Bing Map. Click ADD on the right to install the app part on the website. To configure the part and its user settings, set the app part to its editing mode (see left image). Open the context menu of the app part to enable the menu item EDIT WEB PART. Then configure the part itself following Step 2 below.

Step 2

clip_image013

Enter a valid Bing Map Key into the upper text field.

WARNING: You can not use this app without a valid key!

Select the SharePoint list containing the data for visualization from the selection window below. A new list will display all available list view settings. Select the desired view. The selection windows below will display all available columns in the selected view format. Select the columns according to their contents. After entering all information, click the lower button to save the settings. WARNING: Saving the web part settings only, will not save all configurations made.

Control behaviour via List settings

You might need to adjust the size of the map’s text fields according to their content length. To do so, the selected view setting must have the two fields: BingMapInfoHeight and BingMapInfoWidth. Both fields must be set to a NUMBER value. Here, you can enter the size for each text field. Leave blank, if the size of your text fields shall remain unchanged.

TIP: For these settings to be recognized, enable the option "Pop-up Dimensions" under Web Parts settings.

2. User should generate the Bing map key and add them to the configuration list on the same SharePoint site (one time activity)

a. Creating BING KEY

b. When you use any Bing Maps API with a Bing Maps Key (you must have a Bing Maps Account), transactions are recorded. Transactions track API usage and can be billable or non-billable.

c. The Bing Maps API usage tracking doesn’t save any of the site/user related information.

d. To understand more on billable and non-billable service, please refer to

With this we should able to see the Bing Map actually functioning.

Category : Office 365, SharePoint

Author Info

Sriram Varadarajan
 
Solution Architect
 
Rate this article
 
Sriram is a Technology Evangelist with 15+ years experience in Microsoft Technologies. He is an enterprise architect working for large pharmaceutical organization which has presence globally with largest Microsoft implementation ...read more
 

How to Add AppParts to Publishing Pages in SharePoint 2013 using PowerShell

Sathish Nadarajan
 
Solution Architect
October 18, 2015
 
Rate this article
 
Views
8430

In the previous articles, we saw how to add the Content Editor WebPart and Script Editor WebParts, even the custom WebParts as well. In the same manner, in this article, let us see how to add AppParts to Publishing Pages in SharePoint 2013 using PowerShell.

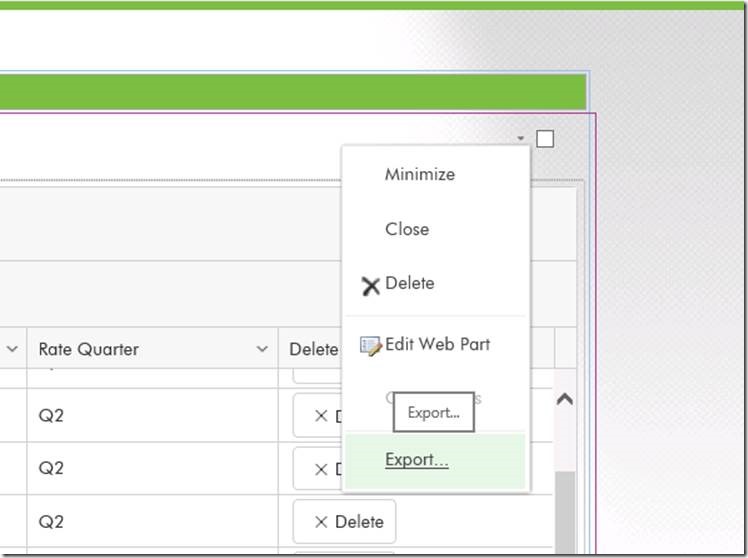
One thing, we need to remember is, we cannot directly exact the WebPart file from the .APP File. Hence, during the development time, before the deployment package, we need to add the AppParts manually to the screen. Then export the WebPart and save the AppParts as .WebPart Files.

clip_image002

Then the exported File with the extension of .WebPart will be packed along with your deployment package.

Now, let us see the below script.

 ##================================================================================================
 ## Description	: Create the publishing pages based onthe XML input 
 ## Author		: Sathish Nadarajan
 ## Date			: 07-Aug-2015
 ##================================================================================================
 
 # ============================================ Setup Input Paths ===========================================================
 
  
 $Host.UI.RawUI.WindowTitle = "-- Create Pages --"
 
 $StartDate = Get-Date
 Write-Host -ForegroundColor White "------------------------------------"
 Write-Host -ForegroundColor White "| Create Publishing Pages |"
 Write-Host -ForegroundColor White "| Started on: $StartDate |"
 Write-Host -ForegroundColor White "------------------------------------"
 
 $LogTime = Get-Date -Format yyyy-MM-dd_hh-mm
 $LogFile = ".CreatePage-$LogTime.rtf"
 
 #start-transcript $logfile
 
 $scriptBase = split-path $SCRIPT:MyInvocation.MyCommand.Path -parent
 Set-Location $scriptBase
 
 $ErrorActionPreference = "Stop"
 
 function AddPowerShellSnapin()
 {
     try
     {
         Write-Host "Adding PowerShell Snap-in" -ForegroundColor Green
         # Try to get the PowerShell Snappin.  If not, then adding the PowerShell snappin on the Catch Block
         Get-PSSnapin "Microsoft.SharePoint.PowerShell" 
     }
     catch
     {
         if($Error[0].Exception.Message.Contains("No Windows PowerShell snap-ins matching the pattern 'Microsoft.SharePoint.PowerShell' were found"))
         {
             Add-PSSnapin "Microsoft.SharePoint.PowerShell"
         }
     }
     Write-Host "Finished Adding PowerShell Snap-in" -ForegroundColor Green
 
 }


 function AddPage
 {
     try 
     {     
         Write-Host "Entering into AddPage Method" -ForegroundColor Green 
 
         # Get the SiteURL
         $SiteUrl = $SiteConfig.Config.SiteURL;
 
         # Get the WebURL
         $WebUrl = $SiteConfig.Config.WebURL;
         Write-Host "WebUrl : $WebUrl" -ForegroundColor Green 
 
         # Get the Error Message
         $ErrorMessage = $SiteConfig.Config.ErrorMessage;
 
         # Initialize the Site Object
         $Site = Get-SPSite $SiteUrl
         Write-Host "Site: $Site" -ForegroundColor Green
 
         # Get the Publishing Site based on the SPSite
         $PubSite = New-Object Microsoft.SharePoint.Publishing.PublishingSite($Site)
         Write-Host "Pubsite: $PubSite" -ForegroundColor Green
 
         # Get the SPWeb Object
         $Web = Get-SPWeb $WebUrl
          Write-Host "Web: $Web" -ForegroundColor Green
         
         # Below lines are required to GetPublishingPage Error
         $correctId = $Web.Lists["Pages"].ID
         Write-Host "correctId: $correctId" -ForegroundColor Green
 
         $Web.AllProperties["__PagesListId"] = $correctId.ToString()
 
         $Web.Update()
         $Web.AllProperties["__PublishingFeatureActivated"] = "True"
         $Web.Update()
 
         Write-Host "After web update" 
 
         # Initialize the PublishingWeb based on the SPWeb
         $PubWeb = [Microsoft.SharePoint.Publishing.PublishingWeb]::GetPublishingWeb($Web)
  
         # Get the PageLayouts Installed on the Publishing Site
         $Layouts = $PubSite.GetPageLayouts($False)
 
         foreach($Page in $SiteConfig.Config.Pages.Page)     
         {
        
             # Get our PageLayout
             $PageLayout = $Layouts[$Page.PageLayoutRelativeURL]
 
             $PublishingPage = $PubWeb.GetPublishingPage($WebUrl + "Pages/" + $Page.URL)
             
             Write-Host "Adding the Publishing Page" -ForegroundColor Green 
             # Verify whether the page is already there or not.
             if($PublishingPage -eq $null)
             {
                 # If not, Create a new publishing page.
                 $PublishingPage = $PubWeb.AddPublishingPage($Page.URL, $PageLayout)
             }
 
             if($PublishingPage.ListItem.File.CheckedOutByUser -eq $null)
             {           
                 # Though it is newly created or already there, checkout.
                 $PublishingPage.CheckOut()
             }
 
             # Assign the Title for the Page
             $PublishingPage.Title = $Page.Title
 
             # Update the Page
             $PublishingPage.Update();
 
             Write-Host "Successfully Added the Page" -ForegroundColor Green 
             
             Write-Host "Adding the WebParts into the Page" -ForegroundColor Green 
 
             foreach($WebPart in $Page.WebParts.WebPart)
             {
             
                 # Get the LimitedWEbPartManager
                 $limitedWebPartManager = $PublishingPage.ListItem.File.GetLimitedWebPartManager([System.Web.UI.WebControls.WebParts.PersonalizationScope]::Shared);
 
                 # Initialize the XmlReaderSettings Object which is required for the XmlReader Object
                 $xmlReaderSettings = New-Object System.Xml.XmlReaderSettings
 
                 # Create the XmlReader Object by using the WebPart Definition file and the ReaderSettings Object
                 $xmlReader = [System.Xml.XmlReader]::Create($scriptBase + "" + $WebPart.LocalWebpartPath,$xmlReaderSettings);
 
                 #Add Web Part to catalogs folder and Get the WebPart Definition Object based on the webpart definition xml file     
                 $oWebPartDefinition = $limitedWebPartManager.ImportWebPart($xmlReader,[ref]$ErrorMessage);
 
                 # Add the WebPart to the WebPartManager by specifing the Zone and the Index.
                 $limitedWebPartManager.AddWebPart($oWebPartDefinition,$WebPart.ZoneID,$WebPart.ZoneIndex);
 
             }
 
             Write-Host "WebParts Added Successfully" -ForegroundColor Green
 
             # Check in the Page with Comments
             $PublishingPage.CheckIn($Page.CheckinComment)
         
             # Publish the Page With Comments
             $PublishingPage.ListItem.File.Publish($Page.PublishingComment)
         }
      
     } 
     catch 
     { 
         Write-Host "Custom Exception Happened : " + $Error[0].Exception.Message -ForegroundColor Red  
     } 
 }
 
 try
 {
     $ConfigXmlPath = $scriptBase + "" + "CreatePublishingPages.xml"
 
     Write-Host "Read the Config Values" -ForegroundColor Green 
 
     # Get the Content of the Config Xml
     [Xml]$SiteConfig = Get-Content $ConfigXmlPath  
 
     AddPowerShellSnapin
 
     AddPage
 
     Write-Host "Script Execution Completed Successfully" -ForegroundColor Green 
 }
 catch
 {
     Write-Host "Custom Exception Happened on Main : " + $Error[0].Exception.Message -ForegroundColor Red  
 }


The Configuration XML looks like below.

 <?xml version="1.0" encoding="utf-8"?>
 
 <Config>
 
   <SiteURL>http://MySiteCollection/</SiteURL>
 
   <WebURL>http://SiteCollection/WebURL</WebURL>
 
   <ErrorMessage>Some Exception Occured During the Page Creation Process</ErrorMessage>
 
   <Pages>
 
     <Page>
 
       <Title>Test Page 6</Title>
 
       <URL>TestPage6.aspx</URL>
 
       
       <PageLayoutRelativeURL>/sites/CapMarket/_catalogs/masterpage/MyPageLayout.aspx</PageLayoutRelativeURL>
       
       <CheckinComment>Test Checkin Comment</CheckinComment>
 
       <PublishingComment>Test Publishing Comment</PublishingComment>
       
 
       <WebParts>
 
         
 		<WebPart>
 
           <LocalWebpartPath>MyExported.webpart</LocalWebpartPath>
         
           <ZoneID>zone1</ZoneID>
 
           <ZoneIndex>1</ZoneIndex>
 
         </WebPart>
 
 
       </WebParts>
      
     </Page>
 
   </Pages>
 
 </Config>


The above script will read the values from the config file and create the pages, add the app parts to the publishing pages.

Happy Coding,

Sathish Nadarajan.

Author Info

Sathish Nadarajan
 
Solution Architect
 
Rate this article
 
Sathish is a Microsoft MVP for SharePoint (Office Servers and Services) having 15+ years of experience in Microsoft Technologies. He holds a Masters Degree in Computer Aided Design and Business ...read more
 

Upgrade the Provider Hosted App using PowerShell in SharePoint 2013

Sathish Nadarajan
 
Solution Architect
August 25, 2015
 
Rate this article
 
Views
11314

In this article, let us see how to upgrade an App using PowerShell in SharePoint 2013.

Usually it will be very easy, if we remove the app and re-deploy the same app. We may not many issues on this. But the importance of Upgrade will be

· When we have many App Parts and those App Parts were added on Many Pages.

· In this stage, if we Remove the app, then all the app parts will be removed from the Pages.

· When we install, the app parts will not be getting added automatically.

Hence, in this scenario, we require the App Upgrade. Even this is also quiet straight forward. On theAppManifest.xml, we need to increment the Version Number. For example, by default it would be 1.0.0.0. When you are planning for an upgrade, increment it to something like 2.0.0.0.

Then the script would be

 [System.Reflection.Assembly]::LoadWithPartialName("Microsoft.SharePoint")
 Add-PSSnapin Microsoft.SharePoint.PowerShell
 
 $site = "http://MySiteCollectionURL"
 
 $AppName = "MyApp"
 
 $scriptBase = split-path $SCRIPT:MyInvocation.MyCommand.Path -parent
 Set-Location $scriptBase
 
 write-host $scriptBase
 
 $appPath = $scriptBase + "" + "MyApp.app"
 
 
 $spapp = Import-SPAppPackage -Path $appPath -Site $Web -Source ObjectModel
 
 $appInstance = Get-SPAppInstance -Web $Web | where-object {$_.Title -eq $AppName};
 
 $app = Update-SPAppInstance -Identity $appInstance -App $spapp -Confirm:$false -ErrorAction SilentlyContinue -ErrorVariable err;
 

The script is straight forward right…

Happy Coding,

Sathish Nadarajan.

Author Info

Sathish Nadarajan
 
Solution Architect
 
Rate this article
 
Sathish is a Microsoft MVP for SharePoint (Office Servers and Services) having 15+ years of experience in Microsoft Technologies. He holds a Masters Degree in Computer Aided Design and Business ...read more
 

Leave a comment