In the previous articles, we saw how to add the Content Editor WebPart and Script Editor WebParts, even the custom WebParts as well. In the same manner, in this article, let us see how to add AppParts to Publishing Pages in SharePoint 2013 using PowerShell.
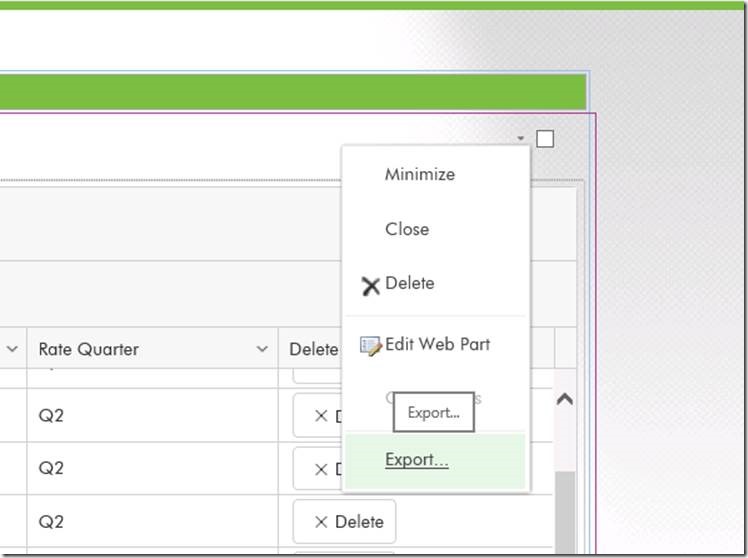
One thing, we need to remember is, we cannot directly exact the WebPart file from the .APP File. Hence, during the development time, before the deployment package, we need to add the AppParts manually to the screen. Then export the WebPart and save the AppParts as .WebPart Files.
Then the exported File with the extension of .WebPart will be packed along with your deployment package.
Now, let us see the below script.
 ##================================================================================================
 ## Description	: Create the publishing pages based onthe XML input
 ## Author		: Sathish Nadarajan
 ## Date			: 07-Aug-2015
 ##================================================================================================

 # ============================================ Setup Input Paths ===========================================================


 $Host.UI.RawUI.WindowTitle = "-- Create Pages --"

 $StartDate = Get-Date
 Write-Host -ForegroundColor White "------------------------------------"
 Write-Host -ForegroundColor White "| Create Publishing Pages |"
 Write-Host -ForegroundColor White "| Started on: $StartDate |"
 Write-Host -ForegroundColor White "------------------------------------"

 $LogTime = Get-Date -Format yyyy-MM-dd_hh-mm
 $LogFile = ".CreatePage-$LogTime.rtf"

 #start-transcript $logfile

 $scriptBase = split-path $SCRIPT:MyInvocation.MyCommand.Path -parent
 Set-Location $scriptBase

 $ErrorActionPreference = "Stop"

 function AddPowerShellSnapin()
 {
     try
     {
         Write-Host "Adding PowerShell Snap-in" -ForegroundColor Green
         # Try to get the PowerShell Snappin.  If not, then adding the PowerShell snappin on the Catch Block
         Get-PSSnapin "Microsoft.SharePoint.PowerShell"
     }
     catch
     {
         if($Error[0].Exception.Message.Contains("No Windows PowerShell snap-ins matching the pattern 'Microsoft.SharePoint.PowerShell' were found"))
         {
             Add-PSSnapin "Microsoft.SharePoint.PowerShell"
         }
     }
     Write-Host "Finished Adding PowerShell Snap-in" -ForegroundColor Green

 }


 function AddPage
 {
     try
     {
         Write-Host "Entering into AddPage Method" -ForegroundColor Green

         # Get the SiteURL
         $SiteUrl = $SiteConfig.Config.SiteURL;

         # Get the WebURL
         $WebUrl = $SiteConfig.Config.WebURL;
         Write-Host "WebUrl : $WebUrl" -ForegroundColor Green

         # Get the Error Message
         $ErrorMessage = $SiteConfig.Config.ErrorMessage;

         # Initialize the Site Object
         $Site = Get-SPSite $SiteUrl
         Write-Host "Site: $Site" -ForegroundColor Green

         # Get the Publishing Site based on the SPSite
         $PubSite = New-Object Microsoft.SharePoint.Publishing.PublishingSite($Site)
         Write-Host "Pubsite: $PubSite" -ForegroundColor Green

         # Get the SPWeb Object
         $Web = Get-SPWeb $WebUrl
          Write-Host "Web: $Web" -ForegroundColor Green

         # Below lines are required to GetPublishingPage Error
         $correctId = $Web.Lists["Pages"].ID
         Write-Host "correctId: $correctId" -ForegroundColor Green

         $Web.AllProperties["__PagesListId"] = $correctId.ToString()

         $Web.Update()
         $Web.AllProperties["__PublishingFeatureActivated"] = "True"
         $Web.Update()

         Write-Host "After web update"

         # Initialize the PublishingWeb based on the SPWeb
         $PubWeb = [Microsoft.SharePoint.Publishing.PublishingWeb]::GetPublishingWeb($Web)

         # Get the PageLayouts Installed on the Publishing Site
         $Layouts = $PubSite.GetPageLayouts($False)

         foreach($Page in $SiteConfig.Config.Pages.Page)
         {

             # Get our PageLayout
             $PageLayout = $Layouts[$Page.PageLayoutRelativeURL]

             $PublishingPage = $PubWeb.GetPublishingPage($WebUrl + "Pages/" + $Page.URL)

             Write-Host "Adding the Publishing Page" -ForegroundColor Green
             # Verify whether the page is already there or not.
             if($PublishingPage -eq $null)
             {
                 # If not, Create a new publishing page.
                 $PublishingPage = $PubWeb.AddPublishingPage($Page.URL, $PageLayout)
             }

             if($PublishingPage.ListItem.File.CheckedOutByUser -eq $null)
             {
                 # Though it is newly created or already there, checkout.
                 $PublishingPage.CheckOut()
             }

             # Assign the Title for the Page
             $PublishingPage.Title = $Page.Title

             # Update the Page
             $PublishingPage.Update();

             Write-Host "Successfully Added the Page" -ForegroundColor Green

             Write-Host "Adding the WebParts into the Page" -ForegroundColor Green

             foreach($WebPart in $Page.WebParts.WebPart)
             {

                 # Get the LimitedWEbPartManager
                 $limitedWebPartManager = $PublishingPage.ListItem.File.GetLimitedWebPartManager([System.Web.UI.WebControls.WebParts.PersonalizationScope]::Shared);

                 # Initialize the XmlReaderSettings Object which is required for the XmlReader Object
                 $xmlReaderSettings = New-Object System.Xml.XmlReaderSettings

                 # Create the XmlReader Object by using the WebPart Definition file and the ReaderSettings Object
                 $xmlReader = [System.Xml.XmlReader]::Create($scriptBase + "" + $WebPart.LocalWebpartPath,$xmlReaderSettings);

                 #Add Web Part to catalogs folder and Get the WebPart Definition Object based on the webpart definition xml file
                 $oWebPartDefinition = $limitedWebPartManager.ImportWebPart($xmlReader,[ref]$ErrorMessage);

                 # Add the WebPart to the WebPartManager by specifing the Zone and the Index.
                 $limitedWebPartManager.AddWebPart($oWebPartDefinition,$WebPart.ZoneID,$WebPart.ZoneIndex);

             }

             Write-Host "WebParts Added Successfully" -ForegroundColor Green

             # Check in the Page with Comments
             $PublishingPage.CheckIn($Page.CheckinComment)

             # Publish the Page With Comments
             $PublishingPage.ListItem.File.Publish($Page.PublishingComment)
         }

     }
     catch
     {
         Write-Host "Custom Exception Happened : " + $Error[0].Exception.Message -ForegroundColor Red
     }
 }

 try
 {
     $ConfigXmlPath = $scriptBase + "" + "CreatePublishingPages.xml"

     Write-Host "Read the Config Values" -ForegroundColor Green

     # Get the Content of the Config Xml
     [Xml]$SiteConfig = Get-Content $ConfigXmlPath

     AddPowerShellSnapin

     AddPage

     Write-Host "Script Execution Completed Successfully" -ForegroundColor Green
 }
 catch
 {
     Write-Host "Custom Exception Happened on Main : " + $Error[0].Exception.Message -ForegroundColor Red
 }
The Configuration XML looks like below.
 <?xml version="1.0" encoding="utf-8"?>

 <Config>

   <SiteURL>http://MySiteCollection/</SiteURL>

   <WebURL>http://SiteCollection/WebURL</WebURL>

   <ErrorMessage>Some Exception Occured During the Page Creation Process</ErrorMessage>

   <Pages>

     <Page>

       <Title>Test Page 6</Title>

       <URL>TestPage6.aspx</URL>


       <PageLayoutRelativeURL>/sites/CapMarket/_catalogs/masterpage/MyPageLayout.aspx</PageLayoutRelativeURL>

       <CheckinComment>Test Checkin Comment</CheckinComment>

       <PublishingComment>Test Publishing Comment</PublishingComment>


       <WebParts>


 		<WebPart>

           <LocalWebpartPath>MyExported.webpart</LocalWebpartPath>

           <ZoneID>zone1</ZoneID>

           <ZoneIndex>1</ZoneIndex>

         </WebPart>


       </WebParts>

     </Page>

   </Pages>

 </Config>
The above script will read the values from the config file and create the pages, add the app parts to the publishing pages.
Happy Coding,
Sathish Nadarajan.


Leave a comment