Introduction to Redux – For Beginners

Ahamed Fazil Buhari
 
Senior Developer
March 12, 2018
 
Rate this article
 
Views
2985

Hello readers,

I am here to share my knowledge on one of the useful JavaScript library that manages your state in the application. If you are already familiar with Angular or React (basic knowledge is also enough) then you can make use of this awesome library which gives great developer experience and produce great UI.

Still you can use the Redux without using Angular or React. But its works well with ReactJS. So, I will give you detailed introduction about Redux in this article and in my upcoming article we will see how we can use this with ReactJS. Ok let’s get into the actual topic. This topic is going to be theoretical, please bear with me 😉

In simple, Redux is managing your state in the application. We heard the term “Managing States” many times, what it actually means. Let me explain with the diagram and then I will explain each key word in Redux.

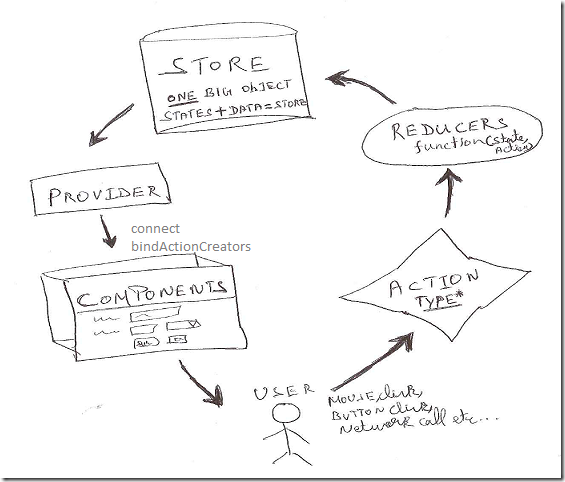
The below flow diagram (strictly unidirectional) gives outlined view of Redux (state) lifecycle. It greatly helps in separating Data and Presentation of your application.


image

STORE: ONLY ONE STORE per application no matter how big the application is. Store contains states and data. State can be anything, as I said before it can be a string, array, object (mostly it could be an object).

PROVIDER: As the name implies, it Provides Store to all the Components like a distributer.

COMPONENTS: It renders UI (what you see on the screen). Once it gets Store (states and data) from the Provider it re-renders the page based on the state change. (Note: application States will become Component props) . Store and the react Component communicate through connect (‘redux’ package) and bindActionCreators(‘react-redux’ package)

USERS: This block is actually not having any technical meaning. It is all about initializing an event (button press, mouse click, mouse hover, network call, timer job – it can be any event which interrupts your application).

ACTION: It is a plain JavaScript object with type property and other properties are completely up to the user, we can define any kind of properties. It is the only source of information for the Store (Note: Each Action must have property called type (good practice to have type value as string))

REDUCER: It is nothing but a simple function with two arguments (state and action) and return new state. This function decides what will be the next state according to the action.

Well, it’s very important to remember above key words in Redux. Especially Store, Action(s), Reducer(s). Here, I just provided basic theoretical definition. In my upcoming article we will see more into this and have technical definition and syntax for these key words.

Happy Coding

Ahamed

Category : React, SharePoint, SPFx

Author Info

Ahamed Fazil Buhari
 
Senior Developer
 
Rate this article
 
Ahamed is a Senior Developer and he has very good experience in the field of Microsoft Technologies, especially SharePoint, Azure, M365, SPFx, .NET and client side scripting - JavaScript, TypeScript, ...read more
 

How to enable withCredentials to flag on XMLHttpRequest in AngularJS for “Access-Control-Allow-Origin”

Ahamed Fazil Buhari
 
Senior Developer
January 9, 2018
 
Rate this article
 
Views
4367

Hi everyone,

In this article we will see how to enable withCredentials config in you Angular project. Before going further let us see the requirement of using withCredentials, in the following link you can find the description of withCredential – https://developer.mozilla.org/en-US/docs/Web/HTTP/CORS#Requests_with_credentials

 angular.module("App", [])
     .controller("Ctrl", function ($scope, $http) {
 
         var URL = "https://mywebapi/api/names";
         var requestHeader = {
             getHeader: {
                 'headers': {
                     'accept': 'application/json;odata=verbose'
                 }
             }
         };
 
         var result = $http.get(URL, requestHeader.getHeader)
             .then(function (response) {
                 var data = JSON.parse(response.data);
                 $scope.values = data
                 console.log(data);
                 return data;
             });
     })
     .config(['$httpProvider', function ($httpProvider) {
         $httpProvider.defaults.withCredentials = true;
     }])
 

Happy Coding

Ahamed

Author Info

Ahamed Fazil Buhari
 
Senior Developer
 
Rate this article
 
Ahamed is a Senior Developer and he has very good experience in the field of Microsoft Technologies, especially SharePoint, Azure, M365, SPFx, .NET and client side scripting - JavaScript, TypeScript, ...read more
 

Upload Multiple Attachments to SharePoint List using Angular

Ahamed Fazil Buhari
 
Senior Developer
December 5, 2017
 
Rate this article
 
Views
5068

Hello everyone,

In this article we will see how to upload multiple attachments in SharePoint List Item using Angular. This is the continuation of my previous article – Remove Attachments on SharePoint List Item using Angular.

Utilities.js

 (function () {
     'use strict';
     var serviceId = 'Utilities';
 
     var Utilities = function () {
 
         var service = this;
         service.spHostUrl = _spPageContextInfo.siteAbsoluteUrl + _spPageContextInfo.webServerRelativeUrl;
 
         return {
             getRequestHeader: getRequestHeader,
             updateRequestHeader: updateRequestHeader,
             deleteRequestHeader: deleteRequestHeader
         };
 
         function getRequestHeader() {
             var getHeader = {
                 'headers': {
                     'accept': 'application/json;odata=verbose'
                 }
             };
             return getHeader;
         }
 
         function updateRequestHeader() {
             var updateHeader = {
                 'headers': {
                     "X-RequestDigest": $("#__REQUESTDIGEST").val(),
                     'content-type': 'application/json;odata=verbose',
                     'accept': 'application/json;odata=verbose',
                     "IF-MATCH": "*",
                     "X-HTTP-Method": "MERGE"
                 }
             };
             return updateHeader;
         }
 
         function deleteRequestHeader() {
             var deleteHeader = {
                 'headers': {
                     "X-RequestDigest": $("#__REQUESTDIGEST").val(),
                     'content-type': 'application/json;odata=verbose',
                     "IF-MATCH": "*"
                 }
             };
             return deleteHeader;
         }
     }
     var module = angular.module("Mainapp");
     module.factory(serviceId, Utilities);
 }());
 

List_Context.js

 (function () {
     'use strict';
     var serviceId = 'List_Context';
 
     var List_Context = function ($http, $q, Utilities) {
 
         return {
             getListData: getListData,
             updateListData: updateListData,
             checkFileExistsAndRemove: checkFileExistsAndRemove,
             uploadFileSP: uploadFileSP,
             getFileBuffer: getFileBuffer,
             deleteFile: deleteFile
         };
 
         function getListData(urlValue) {
             var deferred = $q.defer();
             $http.get(urlValue, Utilities.getRequestHeader())
                         .then(function (response) {
                             deferred.resolve(response.data.d);
                         }, function (error) {
                             deferred.reject(error);
                         });
             return deferred.promise;
         };
 
         function updateListData(listId, itemId, itemData, listName) {
             var deferred = $q.defer();
             var updateURL = _spPageContextInfo.webAbsoluteUrl + "/_api/web/lists/GetById('" + listId + "')/Items" + '(' + itemId + ')';
             var entityFullName = getEntityTypeFullName(listName);
             var item = $.extend({
                 '__metadata': {
                     'type': entityFullName
                 }
             }, itemData);
             var jsonData = JSON.stringify(item);
 
             $http.post(updateURL, jsonData, Utilities.updateRequestHeader())
                         .then(function (response) {
                             deferred.resolve(response.data.d);
                         }, function (error) {
                             deferred.reject(error);
                         });
             return deferred.promise;
         };
 
         function checkFileExistsAndRemove(fileURL) {
             var deferred = $q.defer();
             var fullFileURL = _spPageContextInfo.webAbsoluteUrl + "/_api/web/getFileByServerRelativeUrl('" + fileURL + "')";
             $http.get(fullFileURL, Utilities.getRequestHeader())
                         .then(function (response) {
                             deleteFile(fullFileURL)
                             .then(function (response) {
                                 deferred.resolve(response);
                             });
                         }, function (error) {
                             console.log('File does not exist');
                             deferred.reject(error);
                         });
             return deferred.promise;
         }
 
         function uploadFileSP(listName, itemID, bufferVal, fileName) {
             var urlValue = _spPageContextInfo.webAbsoluteUrl + "/_api/web/lists/GetByTitle('" + listName + "')/items(" + itemID + ")/AttachmentFiles/add(FileName='" + fileName + "')";
 
             $.ajax({
                 url: urlValue,
                 type: "POST",
                 data: bufferVal,
                 async: false,
                 processData: false,
                 headers: {
                     "accept": "application/json;odata=verbose",
                     "X-RequestDigest": document.getElementById("__REQUESTDIGEST").value,
                     "Content-Type": undefined
                 },
                 success: fileSuccess,
                 error: fileError
             });
             function fileSuccess(data) {
                 console.log('File Added Successfully.');
             }
             function fileError(error) {
                 console.log(error.statusText + "nn" + error.responseText);
             }
         }
 
         function getFileBuffer(file) {
             var deferred = $.Deferred();
             var reader = new FileReader();
             reader.onloadend = function (e) {
                 deferred.resolve(e.target.result);
             }
             reader.onerror = function (e) {
                 deferred.reject(e.target.error);
             }
             reader.readAsArrayBuffer(file);
             return deferred.promise();
         }
 
         function deleteFile(fileURL) {
             var deferred = $q.defer();
             $http.delete(fileURL, Utilities.deleteRequestHeader())
                          .then(function (response) {
                              console.log('Deleted the attachment.');
                              deferred.resolve(response);
                          }, function (error) {
                              deferred.reject(error);
                          });
             return deferred.promise;
         }
     };
 
     //Supporting function 
     function getEntityTypeFullName(listName) {
         return "SP.Data." + listName.replace(' ', '_x0020_') + "ListItem";
     }
 
     var module = angular.module("Mainapp");
     module.factory(serviceId, ['$http', '$q', 'Utilities', List_Context])
 }());
 

Main.js

 (function () {
     'use strict';
 
     var controllerId = 'Mycontroller';
     var app = angular.module("Myapp", []);
 
     var Mycontroller = function ($scope, $q, List_Context, Utilities) {
         function SaveData() {
             var updatingVals = {};
             updatingVals['Title'] = "TEST Title";
             var filesAdd = {};
             //Please refer previous article to know how to get attachment value in attachedFile scope variable
             //https://www.sharepointpals.com/post/Get-all-attachments-from-SharePoint-List-Item-using-AngularJS
             filesAdd = $scope.attachedFile;
             var listID = "BF6BCA2E5-12B5-452F-8EA6-B6789AF4CDEB";
             var listItemID = 10;
             var listName = "MyList";
             SP_WaitScreen();
             var promises = [];
             List_Context.updateListData(listID, listItemID, updatingVals, listName)
                     .then(function (value) {
                         //Please refer previous article to see how to get removeFile values - 
                         //https://www.sharepointpals.com/post/How-to-handle-multiple-file-selection-and-validation-on-input-file-type-using-AngularJS
                         angular.forEach($scope.removeFile, function (filePath, key) {
                             promises.push(List_Context.checkFileExistsAndRemove(filePath));
                         });
                         var filesToAdd = {};
                         filesToAdd = $scope.attachedFile;
                         $q.all(promises)
                             .then(function (value) {
                                 AddingValidAttachments(filesToAdd, listName, listItemID);
                             }, function (reason) {
                                 SP_WaitScreen_Close();
                                 window.open(window.parent.location.reload(true), "_parent", "");
                             });
                     }, function (reason) {
                         SP_WaitScreen_Close();
                         window.open(window.parent.location.reload(true), "_parent", "");
                     });
         }
 
         function AddingValidAttachments(allFiles, listName, itemID) {
             var promises = [];
             var newlyAdded = {};
             newlyAdded = allFiles;
             if (newlyAdded.length > 0) {
                 for (var index = newlyAdded.length - 1; index >= 0; index--) {
                     if (newlyAdded[index]._file == undefined) {
                         newlyAdded.splice(index, 1);
                     }
                 }
                 if (newlyAdded.length > 0) {
                     var numberOfFiles = newlyAdded.length;
                     angular.forEach(newlyAdded, function (fileValues, key) {
                         if (numberOfFiles > 0)
                             List_Context.getFileBuffer(fileValues._file)
                                 .then(function (bufferVal) {
                                     List_Context.uploadFileSP(listName, itemID, bufferVal, fileValues._file.name);
                                     numberOfFiles--;
                                     if (numberOfFiles == 0) {
                                         window.open(window.parent.location.reload(true), "_parent", "");
                                     }
                                 });
                     });
                 }
                 else {
                     window.open(window.parent.location.reload(true), "_parent", "");
                 }
             }
             else {
                 window.open(window.parent.location.reload(true), "_parent", "");
             }
         }
 
         //OOTB Wait modal dailog
         function SP_WaitScreen() {
             SP.SOD.executeFunc('sp.js', 'SP.ClientContext', function () {
                 window.parent.eval("window.waitDialog = SP.UI.ModalDialog.showWaitScreenWithNoClose('Working on it...', '');");
             });
         }
         function SP_WaitScreen_Close() {
             if (window.frameElement != null) {
                 if (window.parent.waitDialog != null) {
                     window.parent.waitDialog.close();
                 }
             }
         }
     }
     app.controller(controllerId, Mycontroller);
     app.config(['$compileProvider', function ($compileProvider) {
         $compileProvider.aHrefSanitizationWhitelist(/^s*(https?|file|blob):/);
     }]);
 });
 
 <script type="text/javascript" src="../../../../SiteAssets/js/sppals/Controllers/Main.js"></script>
 
 <!--Services-->
 <script type="text/javascript" src="../../../../SiteAssets/js/sppals/Services/List_Context.js"></script>
 <script type="text/javascript" src="../../../../SiteAssets/js/sppals/Services/Utilities.js"></script>
 <div id="divNew" ng-app="Myapp">
     <ng-form id="EditForm" name="EditForm">
         <div ng-controller="Mycontroller">         
                                 <div>Attach Memo:</div>
                                 <div>
                                     <span id="attach">
                                         <input id="uploadFileID" type="file" ng-file-model="files" />
                                                                                 
                                         <p class="attach-Text" ng-repeat="file in attachedFile">
                                             <a target="_blank" href="{{file.ServerRelativeUrl}}" ng-href="{{file.ServerRelativeUrl}}">{{file.FileName}}</a>                                             
                                             <a title='Click to Remove' ng-click="removeFile(attachedFile, $index)">
                                                 <img class="deleteIcon" src='../../../../SiteAssets/img/Delete_icon.png' />
                                             </a>
                                         </p>                                        
                                     </span>                               
                                 </div>
             <input type="button" id="btnSave" ng-disabled="EditForm.$invalid || SaveButtonValid();" ng-click="SaveButtonClick()" title="Click to Save" value="Save" />
         </div>
     </ng-form>    
 </div>
 

Happy Coding

Ahamed

Author Info

Ahamed Fazil Buhari
 
Senior Developer
 
Rate this article
 
Ahamed is a Senior Developer and he has very good experience in the field of Microsoft Technologies, especially SharePoint, Azure, M365, SPFx, .NET and client side scripting - JavaScript, TypeScript, ...read more
 

Remove Attachments on SharePoint List Item using Angular

Ahamed Fazil Buhari
 
Senior Developer
December 4, 2017
 
Rate this article
 
Views
3805

Hello everyone,

In this article we will see how to delete attachments in SharePoint List Item using Angular. In my previous article we have seen, Get All Attachments From SharePoint List Item Using AngularJS and How To Handle Multiple File Selection And Validation On Input File Type Using AngularJS. Once we get all the files in the variable scope.attachedFile. We cannot upload attachment when we are updating some field in the item. To achieve this, we need to update item in separate and upload or remove file in separate. We can make use of promise $q in angular to upload file in list item once the item has been successfully created or updated.

Here I’ve created separate service for updating list item and uploading attachment in SharePoint list item. The service name is List_Context and Utilities service to get supporting components for CRUD header,

Utilities.js

 (function () {
     'use strict';
     var serviceId = 'Utilities';
 
     var Utilities = function () {
 
         var service = this;
         service.spHostUrl = _spPageContextInfo.siteAbsoluteUrl + _spPageContextInfo.webServerRelativeUrl;
 
         return {
             getRequestHeader: getRequestHeader,
             updateRequestHeader: updateRequestHeader,
             deleteRequestHeader: deleteRequestHeader
         };
 
         function getRequestHeader() {
             var getHeader = {
                 'headers': {
                     'accept': 'application/json;odata=verbose'
                 }
             };
             return getHeader;
         }
 
         function updateRequestHeader() {
             var updateHeader = {
                 'headers': {
                     "X-RequestDigest": $("#__REQUESTDIGEST").val(),
                     'content-type': 'application/json;odata=verbose',
                     'accept': 'application/json;odata=verbose',
                     "IF-MATCH": "*",
                     "X-HTTP-Method": "MERGE"
                 }
             };
             return updateHeader;
         }
 
         function deleteRequestHeader() {
             var deleteHeader = {
                 'headers': {
                     "X-RequestDigest": $("#__REQUESTDIGEST").val(),
                     'content-type': 'application/json;odata=verbose',
                     "IF-MATCH": "*"
                 }
             };
             return deleteHeader;
         }
     }
     var module = angular.module("Mainapp");
     module.factory(serviceId, Utilities);
 }());
 

List_Context.js

 (function () {
     'use strict';
     var serviceId = 'List_Context';
 
     var List_Context = function ($http, $q, Utilities) {
 
         return {
             getListData: getListData,
             updateListData: updateListData,
             checkFileExistsAndRemove: checkFileExistsAndRemove,
             uploadFileSP: uploadFileSP,
             getFileBuffer: getFileBuffer,
             deleteFile: deleteFile
         };
 
         function getListData(urlValue) {
             var deferred = $q.defer();
             $http.get(urlValue, Utilities.getRequestHeader())
                         .then(function (response) {
                             deferred.resolve(response.data.d);
                         }, function (error) {
                             deferred.reject(error);
                         });
             return deferred.promise;
         };
 
         function updateListData(listId, itemId, itemData, listName) {
             var deferred = $q.defer();
             var updateURL = _spPageContextInfo.webAbsoluteUrl + "/_api/web/lists/GetById('" + listId + "')/Items" + '(' + itemId + ')';
             var entityFullName = getEntityTypeFullName(listName);
             var item = $.extend({
                 '__metadata': {
                     'type': entityFullName
                 }
             }, itemData);
             var jsonData = JSON.stringify(item);
 
             $http.post(updateURL, jsonData, Utilities.updateRequestHeader())
                         .then(function (response) {
                             deferred.resolve(response.data.d);
                         }, function (error) {
                             deferred.reject(error);
                         });
             return deferred.promise;
         };
 
         function checkFileExistsAndRemove(fileURL) {
             var deferred = $q.defer();
             var fullFileURL = _spPageContextInfo.webAbsoluteUrl + "/_api/web/getFileByServerRelativeUrl('" + fileURL + "')";
             $http.get(fullFileURL, Utilities.getRequestHeader())
                         .then(function (response) {
                             deleteFile(fullFileURL)
                             .then(function (response) {
                                 deferred.resolve(response);
                             });
                         }, function (error) {
                             console.log('File does not exist');
                             deferred.reject(error);
                         });
             return deferred.promise;
         }
 
         function uploadFileSP(listName, itemID, bufferVal, fileName) {
             var urlValue = _spPageContextInfo.webAbsoluteUrl + "/_api/web/lists/GetByTitle('" + listName + "')/items(" + itemID + ")/AttachmentFiles/add(FileName='" + fileName + "')";
 
             $.ajax({
                 url: urlValue,
                 type: "POST",
                 data: bufferVal,
                 async: false,
                 processData: false,
                 headers: {
                     "accept": "application/json;odata=verbose",
                     "X-RequestDigest": document.getElementById("__REQUESTDIGEST").value,
                     "Content-Type": undefined
                 },
                 success: fileSuccess,
                 error: fileError
             });
             function fileSuccess(data) {
                 console.log('File Added Successfully.');
             }
             function fileError(error) {
                 console.log(error.statusText + "nn" + error.responseText);
             }
         }
 
         function getFileBuffer(file) {
             var deferred = $.Deferred();
             var reader = new FileReader();
             reader.onloadend = function (e) {
                 deferred.resolve(e.target.result);
             }
             reader.onerror = function (e) {
                 deferred.reject(e.target.error);
             }
             reader.readAsArrayBuffer(file);
             return deferred.promise();
         }
 
         function deleteFile(fileURL) {
             var deferred = $q.defer();
             $http.delete(fileURL, Utilities.deleteRequestHeader())
                          .then(function (response) {
                              console.log('Deleted the attachment.');
                              deferred.resolve(response);
                          }, function (error) {
                              deferred.reject(error);
                          });
             return deferred.promise;
         }
     };
 
     //Supporting function 
     function getEntityTypeFullName(listName) {
         return "SP.Data." + listName.replace(' ', '_x0020_') + "ListItem";
     }
 
     var module = angular.module("Mainapp");
     module.factory(serviceId, ['$http', '$q', 'Utilities', List_Context])
 }());
 

Main.js

 (function () {
     'use strict';
 
     var controllerId = 'Mycontroller';
     var app = angular.module("Myapp", []);
 
     var Mycontroller = function ($scope, $q, List_Context, Utilities) {
         function SaveData() {
             var updatingVals = {};
             updatingVals['Title'] = "TEST Title";
             var filesAdd = {};
             //Please refer previous article to know how to get attachment value in attachedFile scope variable
             //https://www.sharepointpals.com/post/Get-all-attachments-from-SharePoint-List-Item-using-AngularJS
             filesAdd = $scope.attachedFile;
             var listID = "BF6BCA2E5-12B5-452F-8EA6-B6789AF4CDEB";
             var listItemID = 10;
             var listName = "MyList";
             SP_WaitScreen();
             var promises = [];
             List_Context.updateListData(listID, listItemID, updatingVals, listName)
                     .then(function (value) {
                         //Please refer previous article to see how to get removeFile values - 
                         //https://www.sharepointpals.com/post/How-to-handle-multiple-file-selection-and-validation-on-input-file-type-using-AngularJS
                         angular.forEach($scope.removeFile, function (filePath, key) {
                             promises.push(List_Context.checkFileExistsAndRemove(filePath));
                         });
                     }, function (reason) {
                         SP_WaitScreen_Close();
                         window.open(window.parent.location.reload(true), "_parent", "");
                     });
         }        
 
         //OOTB Wait modal dailog
         function SP_WaitScreen() {
             SP.SOD.executeFunc('sp.js', 'SP.ClientContext', function () {
                 window.parent.eval("window.waitDialog = SP.UI.ModalDialog.showWaitScreenWithNoClose('Working on it...', '');");
             });
         }
         function SP_WaitScreen_Close() {
             if (window.frameElement != null) {
                 if (window.parent.waitDialog != null) {
                     window.parent.waitDialog.close();
                 }
             }
         }
     }
     app.controller(controllerId, Mycontroller);
     app.config(['$compileProvider', function ($compileProvider) {
         $compileProvider.aHrefSanitizationWhitelist(/^s*(https?|file|blob):/);
     }]);
 });
 
 <script type="text/javascript" src="../../../../SiteAssets/js/Scripts/jquery.min.js"></script>
 <script type="text/javascript" src="../../../../SiteAssets/js/Scripts/jquery.SPServices-2014.02.min.js"></script>
 <script type="text/javascript" src="../../../../SiteAssets/js/Scripts/angular.min.js"></script>
 <script type="text/javascript" src="../../../../SiteAssets/js/sppals/Controllers/Main.js"></script>
 
 <!--Services-->
 <script type="text/javascript" src="../../../../SiteAssets/js/sppals/Services/List_Context.js"></script>
 <script type="text/javascript" src="../../../../SiteAssets/js/sppals/Services/Utilities.js"></script>
 <div id="divNew" ng-app="Myapp">
     <ng-form id="EditForm" name="EditForm">
         <div ng-controller="Mycontroller">         
                                 <div>Attach Memo:</div>
                                 <div>
                                     <span id="attach">
                                         <input id="uploadFileID" type="file" ng-file-model="files" />
                                                                                 
                                         <p class="attach-Text" ng-repeat="file in attachedFile">
                                             <a target="_blank" href="{{file.ServerRelativeUrl}}" ng-href="{{file.ServerRelativeUrl}}">{{file.FileName}}</a>                                             
                                             <a title='Click to Remove' ng-click="removeFile(attachedFile, $index)">
                                                 <img class="deleteIcon" src='../../../../SiteAssets/img/Delete_icon.png' />
                                             </a>
                                         </p>                                        
                                     </span>                               
                                 </div>
             <input type="button" id="btnSave" ng-click="SaveButtonClick()" title="Click to Save" value="Save" />
         </div>
     </ng-form>    
 </div>
 

Happy Coding

Ahamed

Author Info

Ahamed Fazil Buhari
 
Senior Developer
 
Rate this article
 
Ahamed is a Senior Developer and he has very good experience in the field of Microsoft Technologies, especially SharePoint, Azure, M365, SPFx, .NET and client side scripting - JavaScript, TypeScript, ...read more
 

Get all attachments from SharePoint List Item using AngularJS

Ahamed Fazil Buhari
 
Senior Developer
October 11, 2017
 
Rate this article
 
Views
4380

Hello everyone,

This is the continuation of my previous article ‘How to handle multiple file selection and validation on input file type using AngularJS’. In this article we will see how to retrieve multiple files from you SharePoint List Item and show those in custom Form which uses AngularJS.

 <div ng-app="app">
 	<div ng-controller="mycontroller">
 ....
 ...
 <td>Attach Memo:</td>
 <td>
         <span>
          <input type="file" ng-file-model="files" />
          <p ng-show="invalidFileName">Contains invalid character.</p>
          <p ng-show="fileAlreadyExists">The file already exists.</p>
          <p ng-repeat="file in attachedFile">
            <a target="_blank" href="{{file.ServerRelativeUrl}}" ng-href="{{file.ServerRelativeUrl}}">{{file.FileName}}
     </a> 
            <a title='Click to Remove' ng-click="removeFile(attachedFile, $index)">
               <img class="deleteIcon" src='../../../../SiteAssets/img/Delete_icon.png' />
            </a>
          </p>
         </span>
        </td>
 </div>
 </div>
 

The following service which will be used to GetListData from SharePoint using angularjs $http service.

 (function () {
     'use strict';
     var serviceId = 'List_Context';
 
     var List_Context = function ($http, $q) {
 
         return {
             getListData: getListData
         };
 
 var requestHeader = {
             getHeader: {
                 'headers': {
                     'accept': 'application/json;odata=verbose'
                 }
             }
         };
 
         function getListData(urlValue) {
             var deferred = $q.defer();
             $http.get(urlValue, requestHeader.getHeader)
                         .then(function (response) {
                             deferred.resolve(response.data.d);
                         }, function (error) {
                             deferred.reject(error);
                         });
             return deferred.promise;
         };
 
     var module = angular.module("app");
     module.factory(serviceId, ['$http', '$q', List_Context])
 }());
 

In the controller, we need to call getListData function by passing the right URL to get SharePoint list data.

 (function () {
     'use strict';
 
     var controllerId = 'mycontroller';
     var app = angular.module("app", []);
 
     var mycontroller = function ($scope, $q, List_Context) {
 
 	//Here I am getting the Item ID from query string
 var geturlVal = _spPageContextInfo.webAbsoluteUrl + "/_api/web/lists/GetByTitle('List%20Name')" + "/getitembyid(" + GetUrlKeyValue('ID', false) + ")?$expand=AttachmentFiles";
 
 	        //Getting List Item Values
         List_Context.getListData(geturlVal)
                .then(onSuccessPDList, onError);
 
 var onSuccessPDList = function (data) {
      //Attachment Files should be mapped to attachedFile Scope variable
             $scope.attachedFile = $scope.itemVals.AttachmentFiles.results;
         };
 
         var onError = function (reason) {
             console.log('Something went wrong.');
         };
 
         var removeFiles = [];
         //Attachment Remove Button
         $scope.removeFile = function (array, index) {
             removeFiles.push(array[index].ServerRelativeUrl);
             array.splice(index, 1);
         };		
     }
     app.controller(controllerId, mycontroller);
     app.config(['$compileProvider', function ($compileProvider) {
         $compileProvider.aHrefSanitizationWhitelist(/^s*(https?|file|blob):/);
     }]);
 
 }());
 

clip_image001

In this article we have seen how to retrieve all the attachments from SharePoint list item and show that in custom form using Angular. In my upcoming articles we will see how to upload and remove attachments in SharePoint list using Angular.

Happy Coding

Ahamed

Author Info

Ahamed Fazil Buhari
 
Senior Developer
 
Rate this article
 
Ahamed is a Senior Developer and he has very good experience in the field of Microsoft Technologies, especially SharePoint, Azure, M365, SPFx, .NET and client side scripting - JavaScript, TypeScript, ...read more
 

How to handle multiple file selection and validation on input file type using AngularJS

Ahamed Fazil Buhari
 
Senior Developer
October 10, 2017
 
Rate this article
 
Views
10948

Hello everyone,

In this article we will see how to upload multiple files into your form using angularjs form.

 <div ng-app="app">
 	<div ng-controller="mycontroller">
 ....
 ...
 <td>Attach Memo:</td>
 <td>
         <span>
          <input type="file" ng-file-model="files" />
          <p ng-show="invalidFileName">Contains invalid character.</p>
          <p ng-show="fileAlreadyExists">The file already exists.</p>
          <p ng-repeat="file in attachedFile">
            <a target="_blank" href="{{file.ServerRelativeUrl}}" ng-href="{{file.ServerRelativeUrl}}">{{file.FileName}}
     </a> 
            <a title='Click to Remove' ng-click="removeFile(attachedFile, $index)">
               <img class="deleteIcon" src='../../../../SiteAssets/img/Delete_icon.png' />
            </a>
          </p>
         </span>
        </td>
 </div>
 </div>
 

Here we have separate service for File upload and do the validation.

 'use strict'
 
 angular.module('app').directive('ngFileModel', ['$parse', function ($parse, $sce) {
     return {
         restrict: 'A',
         link: function (scope, element, attrs) {
             var model = $parse(attrs.ngFileModel);
             //var isMultiple = attrs.multiple;
             var modelSetter = model.assign;
             var value = '';
             element.bind('change', function () {
                 angular.forEach(element[0].files, function (item) {
                     //To check FileName contains special character
                     if (!(/[#%&*{}[]<>?/|:~]/.test(item.name))) {
                         //To check FileName already exists
                         if (!(scope.attachedFile.filter(function (e) { return e.FileName == item.name; }).length > 0)) {
                             var reader = new FileReader();
                             reader.filename = item.name;
                             var values = {
                                 FileName: item.name,
                                 ServerRelativeUrl: URL.createObjectURL(item), //$sce.trustAsResourceUrl(URL.createObjectURL(item)), 
                                 _file: item,
                                 newlyAdded: true
                             };
                             scope.fileAlreadyExists = false;
                             scope.invalidFileName = false;
                             scope.attachedFile.push(values);
                         }
                         else
                             scope.fileAlreadyExists = true;
                     }
                     else {
                         scope.invalidFileName = true;
                     }
                 });
                 scope.$apply(function () {
                     modelSetter(scope, '');
                 });
             });
         }
     };
 }]);


In the controller,

 (function () {
     'use strict';
 
     var controllerId = 'mycontroller';
     var app = angular.module("app", []);
 
     var mycontroller = function ($scope, $q) {
         var removeFiles = [];
         //Attachment Remove Button
         $scope.removeFile = function (array, index) {
             removeFiles.push(array[index].ServerRelativeUrl);
             array.splice(index, 1);
         };		
     }
     app.controller(controllerId, mycontroller);
     app.config(['$compileProvider', function ($compileProvider) {
         $compileProvider.aHrefSanitizationWhitelist(/^s*(https?|file|blob):/);
     }]);
 
 }());


image

In the upcoming articles we will see how to upload and remove attachments in SharePoint list using AngularJS.

Happy Coding

Ahamed

Author Info

Ahamed Fazil Buhari
 
Senior Developer
 
Rate this article
 
Ahamed is a Senior Developer and he has very good experience in the field of Microsoft Technologies, especially SharePoint, Azure, M365, SPFx, .NET and client side scripting - JavaScript, TypeScript, ...read more
 

Angular Form Validation using ng-form

Ahamed Fazil Buhari
 
Senior Developer
October 9, 2017
 
Rate this article
 
Views
2774

Hi everyone, in this article we will see how to validate your form using ng-form. There are few cases where you cannot use <form> tag in your page, especially if you are developing custom form for SharePoint List. And if you some knowledge on Angular then Angular Validation is made very simple using this form tag, what if you do not have any form tag in your page. To help this kind requirement we can make use of <ng-form>

We can use ng-required in our form and angular will take care of the validation, also we can make submit button enable/disable by checking form valid property ($invalid).

 <div ng-app="app">
     <ng-form id="EditForm" name="EditForm">
         <div ng-controller="mycontroller">
 <input type="text" ID="txtItem" ng- required ="true" ng-model="itemVals.Item" />
 <textarea title="Comments" name="newComment" ng-model="commentVal" cols="150" rows="4" placeholder="Enter Comments..." ng-required="true"></textarea>
 <input type="button" id="btnSave" ng-disabled="EditForm.$invalid" ng-click="SaveButtonClick()" title="Click to Save" value="Save" />
  </div>           
     </ng-form>
 </div>


Happy Coding

Ahamed

Category : Angular

Author Info

Ahamed Fazil Buhari
 
Senior Developer
 
Rate this article
 
Ahamed is a Senior Developer and he has very good experience in the field of Microsoft Technologies, especially SharePoint, Azure, M365, SPFx, .NET and client side scripting - JavaScript, TypeScript, ...read more
 

How to achieve batch editing in Angular JS

Tarun Kumar Chatterjee
 
Net – Technology Specialist
April 6, 2017
 
Rate this article
 
Views
3608

In this article let me go through the design and implementation of batch editing functionalities using angular js only.

Create a new solution named as “AngularBatchEditing”– > ASP.Net MVC4 Web Application — > Select Web API and then OK

Within the Model create Employee class which will have the following properties

 public int Id { get; set; }
         public string Name { get; set; }
         public string Address { get; set; }
         public DateTime? BirthDate { get; set; }
         public int Salary { get; set; }
         public int CountryId { get; set; }
         public Country Country { get; set; }


And in the Country will have the below properties

 public int Id { get; set; }
         public string Name { get; set; }
 

Add an empty WebAPI Controller named as “EmployeeController”

Run the below command to install angular JS to your application

PM> Install-Package angularjs

In one of my earlier article I already explained about to perform CRUD operation using Angular JS with WebAPI. Here also we will be doing the same thing, only difference is on UI part. So, here instead of giving details steps I am focusing on the UI designing part, remaining you can take the reference from the link: https://www.sharepointpals.com/post/How-to-create-a-SPA-MVC-CRUD-application-using-WebAPI-Angular-JS-bootstrap-Entity-framework

Layout view code:

 <!DOCTYPE html>
 <html>
 <head>
     <meta charset="utf-8" />
     <meta name="viewport" content="width=device-width, initial-scale=1.0" />
     <title>Batch Edit Application</title>
         @Styles.Render("~/Content/css")
     <link href="~/Content/batchedit.css" rel="stylesheet" />
 
           @Scripts.Render("~/bundles/modernizr")
           @Scripts.Render("~/bundles/jquery")
           @Scripts.Render("~/bundles/bootstrap")
     <script src="~/Scripts/angular.min.js"></script>
     <script src="scripts/angular-ui/angular-ui-router.js"></script>
     <script src="scripts/angular-resource.min.js"></script>
     <script src="scripts/angular-ui/ui-bootstrap-tpls.min.js"></script>
     <script src="~/Scripts/angular-strap/angular-strap.min.js"></script>
     <script src="~/Scripts/angular-strap/angular-strap.tpl.min.js"></script>
     <script src="~/Scripts/bootstrap-datepicker.js"></script>
     <script src="js/app.js"></script>
     <script src="js/factory.js"></script>
     <script src="js/employeeEditCtrl.js"></script>
     <script src="js/employeeViewCtrl.js"></script>
 </head>
 <body ng-app="employeeApp">
     <div class="navbar navbar-fixed-top">
         <div class="container">
             <div class="navbar-header">
                 <button type="button" class="navbar-toggle" data-toggle="collapse" data-target=".navbar-collapse">
                     <span class="icon-bar"></span>
                     <span class="icon-bar"></span>
                     <span class="icon-bar"></span>
                 </button>
                 @Html.ActionLink("Batch Edit App", "Index", "Home", null, new { @class = "navbar-brand" })
             </div>
             <div class="navbar-collapse collapse">
                 <ul class="nav navbar-nav">
                     <li>@Html.ActionLink("First Approach", "Index", "Home")</li>
                     <li><a ui-sref="edit2">Second Approach</a></li>
                     <li><a ui-sref="view">View Employee</a></li>
                 </ul>
             </div>
             <hr style="margin:0px;" />
         </div>
     </div>
     <div class="container body-content">
         @RenderBody()
         <hr />
         <footer>
             <p>© @DateTime.Now.Year - My ASP.NET Application</p>
         </footer>
     </div>
 
     @RenderSection("scripts", required: false)
 </body>
 </html>
 

Index.cshtml Code:

 <div>
     <div ui-view></div>
 </div>
 

EmployeeEdit.html Code:

Only single clicking on Grid row, textbox will appear to user to edit the data

 <div id="employeeEdit" ng-controller="employeeEditCtrl">
     <div class="row">
         <div class="col-md-12">
             <h2>Simple Batch Editing in AngularJs</h2>
             <hr />
 
             <table id="employeeEditTable" class="table table-bordered batch-edit">
                 <colgroup>
                     <col width="60" />
                     <col width="140" />
                     <col width="300" />
                     <col width="100" />
                     <col width="100" />
                     <col width="100" />
                 </colgroup>
                 <tr>
                     <th>S. No.</th>
                     <th>Name</th>
                     <th>Address</th>
                     <th>Date of Birth</th>
                     <th>Salary</th>
                     <th>Country</th>
                 </tr>
                 <tr ng-repeat="employee in employees">
                     <td>{{$index + 1}}.</td>
                     <td><input type="text" ng-model="employee.Name" /></td>
                     <td><input type="text" ng-model="employee.Address" /></td>
                     <td>
                         <input type="text" ng-model="employee.BirthDate" name="date" bs-datepicker />
                     </td>
                     <td class="text-right">
                         <input type="number" class="text-right" ng-model="employee.Salary" />
                     </td>
                     <td>
                         <select ng-options="c.Name for c in countries" ng-model="employee.Country" 
                             ng-init="setDropDown(employee);" ng-change="employee.CountryId = employee.Country.Id"></select>
                     </td>
                 </tr>
             </table>
         </div>
     </div>
     <div class="row">
         <div class="col-md-12">
             <input type="button" class="btn btn-primary" value="Submit" ng-click="onSubmit();" />
         </div>
     </div>
     <div class="row">
         <div class="col-md-12">
             This page is an example of simple batch edit using angularJs by binding data to controls directly. 
 When you click on submit button, you can directly send the bound data to the server.
         </div>
     </div>
 </div>
 

employeeEdit2.html Code:

Only double clicking on Grid row textbox will appear to user to edit the data

 <div id="employeeEdit2" ng-controller="employeeEditCtrl">
     <div class="row">
         <div class="col-md-12">
             <h2>Batch Editing 2nd Approach</h2>
             <hr />
             Double click to edit
             <table id="employeeEditTable" class="table table-bordered batch-edit2">
                 <colgroup>
                     <col width="60" />
                     <col width="140" />
                     <col width="350" />
                     <col width="100" />
                     <col width="100" />
                     <col width="100" />
                 </colgroup>
                 <tr>
                     <th>S. No.</th>
                     <th>Name</th>
                     <th>Address</th>
                     <th>Date of Birth</th>
                     <th>Salary</th>
                     <th>Country</th>
                 </tr>
                 <tr ng-repeat="employee in employees">
                     <td>{{$index + 1}}.</td>
                     <td>
                         <div ng-show="!employee.edit.Name" ng-dblclick="employee.edit.Name = !employee.edit.Name">{{employee.Name}}</div>
                         <input type="text" ng-show="employee.edit.Name" ng-blur="employee.edit.Name = !employee.edit.Name" ng-model="employee.Name" />
                     </td>
                     <td>
                         <div ng-show="!employee.edit.Address" ng-dblclick="employee.edit.Address = !employee.edit.Address">{{employee.Address}}</div>
                         <input type="text" ng-show="employee.edit.Address" ng-blur="employee.edit.Address = !employee.edit.Address" ng-model="employee.Address" />
                     </td>
                     <td>
                         <div ng-show="!employee.edit.BirthDate" ng-dblclick="employee.edit.BirthDate = !employee.edit.BirthDate">{{employee.BirthDate | date:'dd MMM, yyyy'}}</div>
                         <input type="text" ng-show="employee.edit.BirthDate" ng-blur="employee.edit.BirthDate = !employee.edit.BirthDate" ng-model="employee.BirthDate" name="date" bs-datepicker />
                     </td>
                     <td class="text-right">
                         <div ng-show="!employee.edit.Salary" ng-dblclick="employee.edit.Salary = !employee.edit.Salary">{{employee.Salary | currency}}</div>
                         <input type="number" ng-show="employee.edit.Salary" ng-blur="employee.edit.Salary = !employee.edit.Salary" ng-model="employee.Salary" />
                     </td>
                     <td>
                         <div ng-show="!employee.edit.Country" ng-dblclick="employee.edit.Country = !employee.edit.Country">{{employee.Country.Name}}</div>
                         <select ng-options="c.Name for c in countries" ng-show="employee.edit.Country" ng-blur="employee.edit.Country = !employee.edit.Country" ng-model="employee.Country" ng-init="setDropDown(employee);" ng-change="employee.CountryId = employee.Country.Id"></select>
                     </td>
                 </tr>
             </table>
         </div>
     </div>
     <div class="row">
         <div class="col-md-12">
             <input type="button" class="btn btn-primary" value="Submit" ng-click="onSubmit();" />
         </div>
     </div>
     <div class="row">
         <div class="col-md-12">
             
 If you want edit controls to appear only when you double click (or other event), this approach is suitable for you.
 When you click on submit button, you can directly send the bound data to the server.
         </div>
     </div>
 </div>
 

app.js Code:

 'use strict';
 
 var app = angular.module('employeeApp', ['ui.router', 'ngResource', 'ui.bootstrap', 'mgcrea.ngStrap'])
 
       .config(['$urlRouterProvider', '$stateProvider', function ($urlRouterProvider, $stateProvider) {
           $urlRouterProvider.otherwise('/');
           $stateProvider
             .state('home', {
                 url: '/',
                 templateUrl: 'templates/employeeEdit.html',
                 controller: 'employeeEditCtrl'
             })
             .state('edit2', {
                 url: '/edit2',
                 templateUrl: 'templates/employeeEdit2.html',
                 controller: 'employeeEditCtrl'
             })
             .state('view', {
                 url: '/view',
                 templateUrl: 'templates/viewEmployee.html',
                 controller: 'employeeViewCtrl'
             })
             .state('contact', {
                 url: '/contact',
                 templateUrl: 'contact.html',
                 controller: 'quizCtrl'
             })
       }])
 .config(function ($datepickerProvider) {
     angular.extend($datepickerProvider.defaults, {
         dateFormat: 'dd MMM, yyyy',
         startWeek: 1
     });
 })
 

employeeEditCtrl.js Code:

 app.controller('employeeEditCtrl', ['$scope', '$http', 'employeeFactory', function ($scope, $http, employeeFactory) {
     
     $scope.employees;
     $scope.countries;
 
     getEmployeeData();
     
     function getEmployeeData() {
         employeeFactory.getCountries()
             .success(function (data) {
                 $scope.countries = data;
             })
             .error(function (error) {
                 $scope.status = 'Unable to load country data: ' + error;
                 console.log(error);
             });
 
         employeeFactory.getEmployees()
             .success(function (data) {
                 $scope.employees = data;
                 $scope.employees.forEach(function (emp) {
                     $scope.setDropDown(emp);
                 });
             })
             .error(function (error) {
                 $scope.status = 'Unable to load employee data: ' + error;
                 console.log(error);
             });
 
     }
 
     $scope.setDropDown = function (emp) {
         for (var index in $scope.countries) {
             if ($scope.countries[index].Id == emp.CountryId) {
                 emp.Country = $scope.countries[index];
                 return $scope.countries[index];
             }
         }
     }
 
     $scope.onSubmit = function () {
         var employees = $scope.employees;
         $http.post('api/Employee/Save', employees).success(function (data, status) {
             alert(data);
         });
     }
 }]);


factory.js Code:

 angular
   .module('employeeApp')
   .factory('employeeFactory', ['$http', function ($http) {
       var urlBase = '/api/Employee';
       var employeeFactory = {};
 
       employeeFactory.getEmployees = function () {
           return $http.get(urlBase);
       };
       employeeFactory.getCountries = function () {
           return $http.get(urlBase + '/GetCountry');
       };
 
       return employeeFactory;
   }])


In the EmployeeController, we have below Save method. After editing grid rows and clicking on Submit button, all the employee data with updated values can be captured through method parameter. Then we can do the DB operations with updated Employees data

 [HttpPost]
         [Route("api/Employee/Save")]
         public bool Save(IEnumerable<Employee> employees)
         {
             //Write your code to save your employees to database.            
             return true;
         }
 

Hope this article helps you to design a batch editing grid using angular JS and posting the all Employee data with updated values to WebAPI.

Happy Coding

Tarun Kumar Chatterjee

Author Info

Tarun Kumar Chatterjee
 
Net – Technology Specialist
 
Rate this article
 
Tarun has been working in IT Industry for over 12+ years. He holds a B-tech degree. He is passionate about learning and sharing the tricks and tips in Azure, .Net ...read more
 

How To Enable Target Value and Actual Value In D3 Gauge Chart

Bala Murugan
 
Technology Specialist
January 15, 2017
 
Rate this article
 
Views
13066

This article is all about adding a target marker on a d3 gauge chart. You might have come across various JavaScript chart libraries with gauge charts, out of which, D3 Js is very popular. We also knew that D3 provides angular js directives (NVD3) which enable us to populate charts for Angular Js applications in an easy manner.

But the gauge charts available today comes with option only to show a single value (actual value) as shown below.

clip_image001

In this article we will see, how we can populate the gauge chart with two indicators that is Actual and Target Values like below.

clip_image002

To accomplishing this we have to create the following SVG items and include them to the gauge chart.

1. A SVG Text item to show the Actual value at the centre of the circle instead of the needle.

 actualText = chart.append('text')
                 .attr('id', "Value")
                     .attr("font-size", 16)
                     .attr("text-anchor", "middle")
                     .attr("dy", ".5em")
                     .style("fill", '#0000FF')
                     .attr('class', 'needle').attr('cx', 0).attr('cy', 0).attr('r', radiusValue);
 actualText.text(formatValue(actualValue))

The code above will create a text with actual value which will be rendered at the middle of the gauge chart instead of a needle.

2. A SVG path item (red strip) to move along with the radius to show the target value. To do that we can use the following code to draw it between inner and outer radius of the gauge chart.

 //To Create the path object in the chart
 chart.append('path').attr('class', "arc chart-target");
 
 //To Create attributes to the path(arc3)
 var margin = {
         top: 0,
         right: 0,
         bottom: 0,
         left: 0
     };
 
     var width = el[0][0].offsetWidth - margin.left - margin.right;
     var height = width;
     var radius = Math.min(width, height) / 3;
     var barWidth = 40 * width / 300;
 arc3 = d3.svg.arc().outerRadius(radius - 10).innerRadius(radius - 10 - barWidth)
 
         var next_start1 = totalPercent;
         var arcStartRad = percToRad(next_start1);
         var arcEndRad = arcStartRad + percToRad(targetPerc / 2);
         next_start1 += targetPerc / 2;
 
         arc3.startAngle(arcEndRad - padRad).endAngle(arcEndRad);
 //Adding the created object arc3 to the d3 chart.
 chart.select(".chart-target").attr('d', arc3);

3. Finally a SVG text which will also move along with the radius to show the target value (in this case 50 is the target value). The below code will create the text we want for the target value.

 var targetText = chart.append("text")
 .attr('id', "Value")
 .attr("font-size", 16)
 .attr("text-anchor", "middle")
 .attr("dy", ".5em")
 .style("fill", '#0000FF');
 var thetaRad = percToRad(targetValue / 2);
 var textX = -(self.len + 5) * Math.cos(thetaRad);
 var textY = -(self.len + 5) * Math.sin(thetaRad);
 targetText.text(formatValue(targetValue))
 .attr('transform', "translate(" + textX + "," + textY + ")")

textX and textY values that are mentioned in the above code are the calculated values to place the target text on the outer radius of the chart.

Find the Complete html file code and the JavaScript file code below. Happy coding !!!

HTML FILE

 <!DOCTYPE html>
 <html>
 	<head>
         <title>G C</title>
 		<script src="http://d3js.org/d3.v3.min.js" charset="utf-8"></script>
 		<style type="text/css">
   			.chart-gauge
 			{
 			  width: 400px;
 			  margin: 100px auto  
 			 } 
 			.chart-filled
 			{
 				fill: steelblue;
 			}
 			.chart-empty
 			{
 				fill: #DFDFDF;
 			}
 
             .chart-target
 			{
 				fill: #ff0000;
 			}
 		
 			.needle, .needle-center
 			{
 				fill: #fff;
 			}
 
 			svg {
 			  font: 10px sans-serif;
 			}
 
 		</style>
 
 	</head>
 	<body>
 
 		<div class="chart-gauge"></div>
 		<script type="text/javascript" src="d3_gauge.js"></script>
 		<script type="text/javascript">
 			//setInterval(function(){
 			//    needle.moveTo(Math.random(), Math.random());
             //}, 5000);
             needle.moveTo(0.25, 0.5);
 		</script>
 	</body>
 
 </html>

JAVASCRIPT FILE (d3_gauge.js)

 var needle;
 
 (function () {
     var barWidth, chart, chartInset, degToRad, repaintGauge,
         height, margin, numSections, padRad, percToDeg, percToRad,
         percent, radius, sectionIndx, svg, totalPercent, width,
             targetText, actualText, formatValue, k;
 
     percent = .65;
     numSections = 1;
     sectionPerc = 1 / numSections / 2;
     padRad = 0.025;
     chartInset = 10;
 
     // Orientation of gauge:
     totalPercent = .75;
 
     el = d3.select('.chart-gauge');
 
     margin = {
         top: 0,
         right: 0,
         bottom: 0,
         left: 0
     };
 
     width = el[0][0].offsetWidth - margin.left - margin.right;
     height = width;
     radius = Math.min(width, height) / 3;
     barWidth = 40 * width / 300;
 
 
     /*
       Utility methods 
     */
     percToDeg = function (perc) {
         return perc * 360;
     };
 
     percToRad = function (perc) {
         return degToRad(percToDeg(perc));
     };
 
     degToRad = function (deg) {
         return deg * Math.PI / 180;
     };
 
     // Create SVG element
     svg = el.append('svg').attr('width', width + margin.left + margin.right).attr('height', height + margin.top + margin.bottom);
 
     // Add layer for the panel
     chart = svg.append('g').attr('transform', "translate(" + ((width + margin.left) / 2) + ", " + ((height + margin.top) / 2) + ")");
     chart.append('path').attr('class', "arc chart-filled");
     chart.append('path').attr('class', "arc chart-empty");
     chart.append('path').attr('class', "arc chart-target");
 
     targetText = chart.append("text")
                     .attr('id', "Value")
                     .attr("font-size", 16)
                     .attr("text-anchor", "middle")
                     .attr("dy", ".5em")
                     .style("fill", '#0000FF');
 
     actualText = chart.append('text')
                 .attr('id', "Value")
                     .attr("font-size", 16)
                     .attr("text-anchor", "middle")
                     .attr("dy", ".5em")
                     .style("fill", '#0000FF')
                     .attr('class', 'needle').attr('cx', 0).attr('cy', 0).attr('r', this.radius);
 
 
     formatValue = d3.format('1%');
 
     arc3 = d3.svg.arc().outerRadius(radius - chartInset).innerRadius(radius - chartInset - barWidth)
     arc2 = d3.svg.arc().outerRadius(radius - chartInset).innerRadius(radius - chartInset - barWidth)
     arc1 = d3.svg.arc().outerRadius(radius - chartInset).innerRadius(radius - chartInset - barWidth)
 
     repaintGauge = function (actualPerc, targetPerc) {
         
         var next_start = totalPercent;
         arcStartRad = percToRad(next_start);
         arcEndRad = arcStartRad + percToRad(actualPerc / 2);
         next_start += actualPerc / 2;
 
         arc1.startAngle(arcStartRad).endAngle(arcEndRad);
 
         var next_start1 = totalPercent;
         arcStartRad = percToRad(next_start1);
         arcEndRad = arcStartRad + percToRad(targetPerc / 2);
         next_start1 += targetPerc / 2;
 
         arc3.startAngle(arcEndRad - padRad).endAngle(arcEndRad);


         arcStartRad = percToRad(next_start);
         arcEndRad = arcStartRad + percToRad((1 - actualPerc) / 2);
 
         arc2.startAngle(arcStartRad).endAngle(arcEndRad);
         var fillColor = "#CD6660";
         if (actualPerc >= targetPerc) {
             fillColor = "#94BFF5";
         }
 
         chart.select(".chart-filled").style("fill", fillColor).attr('d', arc1);
         chart.select(".chart-empty").attr('d', arc2);
         chart.select(".chart-target").attr('d', arc3);
 
     }
 
 
     var Needle = (function () {
         /** 
           * Helper function that returns the `d` value
           * for moving the needle
         **/
         var recalcPointerPos = function (perc) {
             var centerX, centerY, leftX, leftY, rightX, rightY, thetaRad, topX, topY;
             thetaRad = percToRad(perc / 2);
             centerX = 0;
             centerY = 0;
             topX = centerX - this.len * Math.cos(thetaRad);
             topY = centerY - this.len * Math.sin(thetaRad);
             leftX = centerX - this.radius * Math.cos(thetaRad - Math.PI / 2);
             leftY = centerY - this.radius * Math.sin(thetaRad - Math.PI / 2);
             rightX = centerX - this.radius * Math.cos(thetaRad + Math.PI / 2);
             rightY = centerY - this.radius * Math.sin(thetaRad + Math.PI / 2);
             return "M " + leftX + " " + leftY + " L " + topX + " " + topY + " L " + rightX + " " + rightY;
         };
 
         function Needle(el) {
             this.el = el;
             this.len = width / 3;
             this.radius = this.len / 6;
         }
 
         Needle.prototype.render = function () {
             return this.el;
         };
 
         Needle.prototype.moveTo = function (perc, perc2) {
             var self,
                 oldValue = this.perc || 0;
 
             this.perc = perc;
             self = this;
 
             // Reset pointer position
             this.el.transition().delay(100).ease('quad').duration(200).select('.needle').tween('reset-progress', function () {
                 return function (percentOfPercent) {
                     var progress = (1 - percentOfPercent) * oldValue;
 
                     repaintGauge(progress, perc2);
                     return d3.select(this).attr('d', recalcPointerPos.call(self, progress));
                 };
             });
 
             this.el.transition().delay(300).ease('bounce').duration(1500).select('.needle').tween('progress', function () {
                 return function (percentOfPercent) {
                     var progress = percentOfPercent * perc;
 
                     repaintGauge(progress, perc2);
 
                     var thetaRad = percToRad(perc2 / 2);
                     var textX = -(self.len + 5) * Math.cos(thetaRad);
                     var textY = -(self.len + 5) * Math.sin(thetaRad);
 
                     actualText.text(formatValue(perc))
                     
 
                     targetText.text(formatValue(perc2))
                     .attr('transform', "translate(" + textX + "," + textY + ")")
 
                     return d3.select(this).attr('d', recalcPointerPos.call(self, progress));
                 };
             });
 
         };
 
         return Needle;
 
     })();
 
     needle = new Needle(chart);
     needle.render();
 
     needle.moveTo(percent);
 
 })();
Author Info

Bala Murugan
 
Technology Specialist
 
Rate this article
 
Bala has been working in IT industry for over 10+ years. He has completed B.Tech in Information Technology. He has hands on experience in developing Asp.net, Angular Js applications. Specialties ...read more
 

How to filter, select and expand SharePoint API using PNP JS Core and Angular Js in a SharePoint AddIn Custom Action

Krishna KV
 
Team Leader, Aspire Systems
January 2, 2017
 
Rate this article
 
Views
17474

In this article, we can have a look at how to perform  filter and expand operation on a SharePoint  look up field using PNP JS Core and Angular Js in a SharePoint AddIn Custom Action. To simulate this scenario , I have created 2 custom lists named Technologies and projects with below fields

Technologies

· Title

Project

· Title

· Technology (Lookup)

· Duration

Creating a SharePoint Hosted APP using angular JS

Add the required angular and PNP Javascript file

App.Service.js

 var app = angular.module('projectApp', []);
 (function () {
     app.service('appService', ['$http','$q',function ($http,$q) {
         function getUrlParamByName(name) {
             name = name.replace(/[[]/, "\[").replace(/[]]/, "\]");
             var regex = new RegExp("[\?&]" + name + "=([^&#]*)");
             var results = regex.exec(location.search);
             return results === null ? "" : decodeURIComponent(results[1].replace(/+/g, " "));
         }
   this.getListByFilterExpand = function (title, filter,expand,select) {
             var d = $q.defer();
             $pnp.sp.crossDomainWeb(appWebUrl, hostWebUrl).lists.getByTitle(title).items.filter(filter).expand(expand).select(select).get().then(function (response) {
                 d.resolve(response);
             });
             return d.promise;
         } 
 }]);
 })();
 

customMenu.ctrl.js

 (function () {
 
     app.controller('customMenuCtrl', ['$scope', 'appService', function ($scope, appService) {
        
         var listTitle = 'Projects';
 
 
 var id = getUrlParamByName('SPListItemId') ?
             getUrlParamByName('SPListItemId') : 1;
 
 appService.getListByFilterExpand(listTitle, 'TechnologyId eq ' + id, 'Technology', 'Id,Title,Technology/Title,Duration').then(function (response) {
                 console.log(response);
                 $scope.projects = response;
             });       
     }]);
 })();

Project.aspx

 <script src="../Scripts/angular-1.5.8.js"></script>
 <script src="../Scripts/fetch.js"></script>
 <script src="../Scripts/es6-promise.min.js"></script>
 <script src="../Scripts/pnp.js"></script>
 <script src="../App/app.service.js"></script>
 <script src="../App/customMenu.ctrl.js.js"></script>
 <asp:Content ContentPlaceHolderID="PlaceHolderMain" runat="server">
     <WebPartPages:AllowFraming ID="AllowFraming" runat="server" />
 
     <div data-ng-app="projectApp">
         <div ng-controller="customMenuCtrl">
             <table class="table table-bordered">
                 <thead>
                     <tr>
                         <td>Project Name</td>
                         <th>Technology</th>
                         <td>Duration (in months)</td>
 
                     </tr>
                 </thead>
                 <tbody>
                     <tr ng-repeat="project in projects">
                         <td>{{project.Title}}</td>
                         <th>{{project.Technology.Title}}</th>
                         <th>{{project.Duration}}</th>
                     </tr>
                 </tbody>
             </table>
         </div>
     </div>
 
 </asp:Content>
 

Run the project

clip_image002

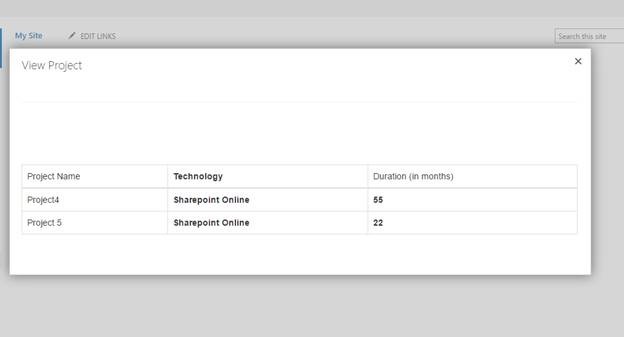
It will display the technology based on ID 1.

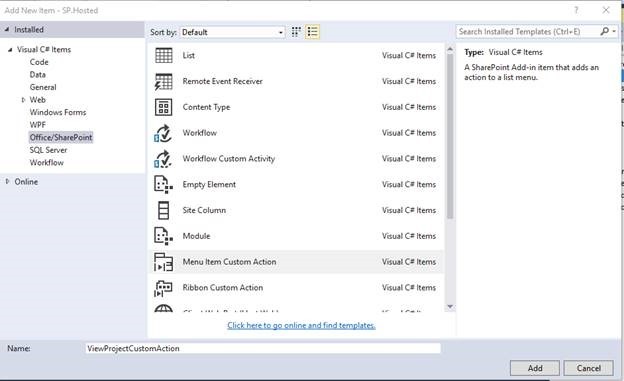
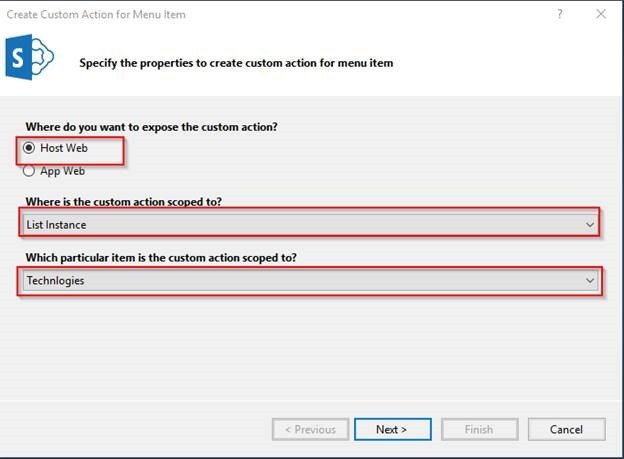
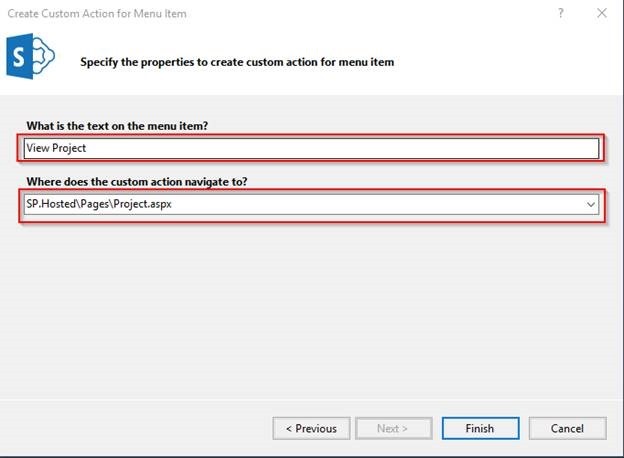
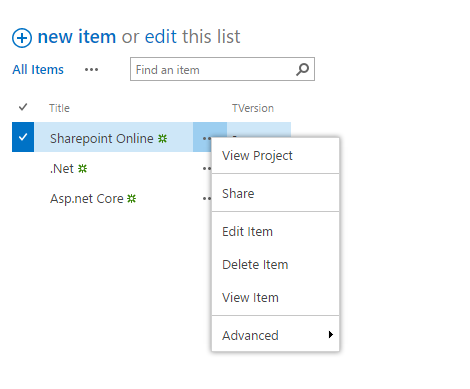
Adding custom action menu to the list Technologies to list the project based on the technologies.

clip_image004

clip_image006

clip_image008

Element.xml

 <?xml version="1.0" encoding="utf-8"?>
 <Elements xmlns="http://schemas.microsoft.com/sharepoint/">
   <CustomAction Id="b71dcf73-c914-44c3-9f2a-41271530058f.ViewProjectCustomAction"
                 RegistrationType="List"
                 RegistrationId="{$ListId:Lists/Technlogies;}"
                 Location="EditControlBlock"
                 Sequence="1"
                 HostWebDialog="true"
                 HostWebDialogHeight="300"
                 HostWebDialogWidth="900"
                 Title="View Project">
     <!-- 
     Update the Url below to the page you want the custom action to use.
     Start the URL with the token ~remoteAppUrl if the page is in the
     associated web project, use ~appWebUrl if page is in the app project.
     -->
     <UrlAction Url="~appWebUrl/Pages/Project.aspx?{StandardTokens}&SPListItemId={ItemId}&SPListId={ListId}" />
   </CustomAction>
 </Elements>
 

This attributes will enable to display the custom action menu URL as a dialog. HostWebDialog="true" HostWebDialogHeight="300" HostWebDialogWidth="900"

clip_image009

clip_image011

Author Info

Krishna KV
 
Team Leader, Aspire Systems
 
Rate this article
 
Krishna K.V has been working in IT Industry for over 7+ years. He holds a Master Degree in Information Technology. He is more interested to learn and share new technologies, ...read more
 

Leave a comment