How to Get the Client Context Using App Access token, by passing Client ID and Client Secret ID using CSOM in SharePoint Office 365

Sathish Nadarajan
 
Solution Architect
November 20, 2016
 
Rate this article
 
Views
26310

In the recent articles, we saw how to get the ClientContext using the UserName and password. In this article, let us see how to create the ClientContext using any of the APP’s ClientID and ClientSecret ID. I know, this may not be necessary in all the scenarios. But let me explain the detailed scenario, why we required this also. That will help the readers to understand the requirement clearly.

We were working on a Migration Project, in which we need to continuously hit the Office 365 site in a very high frequency. At that time, the account which we are using for migration is being throttled by Microsoft. i.e., We cannot use the account for the next 10-20 mins. Hence, we were facing a lot of issues regarding this. (Planning to write a separate article for throttling. Let us see in the upcoming articles regarding the detailed throttling issues). In that case, we were trying with an APP model. i.e., Instead of using a service account, why cant we try with the Installed APP’s context.

With this background, hope we remember, how to create a PHA for Office 365. If not, please have a refresh HERE.

The important parameters to be noted are,

1. ClientID

2. ClientSecretID

3. RealmID

We can get the ClientID and ClientsecretID from the Web.Config of our APPs project.

And the Realm ID is nothing but the tenant ID. The tenant ID can be taken from the app principals.aspx.

https://*******.sharepoint.com/sites/developersite/_layouts/15/appprincipals.aspx

clip_image002

The piece of Code is as follows.

 namespace Console.Office365
 {
     using Microsoft.SharePoint.Client;
     using Newtonsoft.Json.Linq;
     using System;
     using System.Collections.Generic;
     using System.IO;
     using System.Linq;
 
     class Program
     {
         static void Main(string[] args)
         {
             CreateClientContextUsingClientIDandClientSecret();
         }
 
 
         public static void CreateClientContextUsingClientIDandClientSecret()
         {
             Uri webUri = new Uri("https://********.sharepoint.com/sites/developersite");
 
             var SharePointPrincipalId = "00000003-0000-0ff1-ce00-000000000000";
             var token = TokenHelper.GetAppOnlyAccessToken(SharePointPrincipalId, webUri.Authority, null).AccessToken;
 
             var ctx = TokenHelper.GetClientContextWithAccessToken(webUri.ToString(), token);
 
             Web web = ctx.Web;
             ctx.Load(web);
             ctx.Load(web.Lists);
             ctx.ExecuteQueryRetry();
         }
 }
 }
 

And on the APP.Config insert the below entries.

 <appSettings>
   <add key="ClientId" value="********" />
   <add key="ClientSecret" value="***************" />
   <add key="Realm" value="<<The one which we got from appprincipals.aspx>>" />
   </appSettings>
 

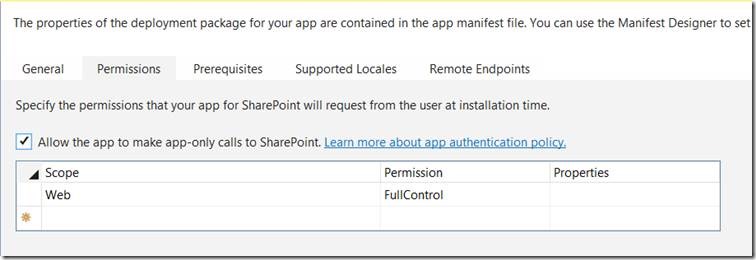
One important thing is, we should enable the APP Only Permission on the APP.

clip_image004

Hope this helps.

Happy Coding,

Sathish Nadarajan.

Author Info

Sathish Nadarajan
 
Solution Architect
 
Rate this article
 
Sathish is a Microsoft MVP for SharePoint (Office Servers and Services) having 15+ years of experience in Microsoft Technologies. He holds a Masters Degree in Computer Aided Design and Business ...read more
 

ClientID and IssuerID – Handy Notes of Provider Hosted Application on SharePoint 2013

Sathish Nadarajan
 
Solution Architect
October 18, 2015
 
Rate this article
 
Views
16007

We had seen a lot about the Provider Hosted Apps long back on the LINK, but even then, there are much handier ways were being identified on our day to day requirement progress.

Now, let us see try to understand what is IssuerID and ClientID.

IssuerID:

This ID is the one which should be included on our Web.Config of the PHA.

The sample Web.Config Entry is as follows.

 <add key="ClientId" value="5067de31-fab5-4240-8a69-65fd674927eb" />
     <add key="ClientSecret" value="U0pDFuzRTq6S5V/NmQ9UTymf/Q+NiztEpQuJZt1C7EI=" />
     <add key="ClientSigningCertificatePath" value="D:MyCert.pfx" />
     <add key="ClientSigningCertificatePassword" value="SamplePassword" />
     <add key="IssuerId" value="11111111-1111-1111-1111-111111111111" />
 

To register this ID, we need a PowerShell Script to be executed.

 cls
 Add-PSSnapin "Microsoft.SharePoint.PowerShell"
 $issuerID = "11111111-1111-1111-1111-111111111111"
 $targetSiteUrl = "http://MySiteCollection/"
 $targetSite = Get-SPSite $targetSiteUrl
 $realm = Get-SPAuthenticationRealm -ServiceContext $targetSite
 $registeredIssuerName = $issuerID + '@' + $realm
 $publicCertificatePath = "D: MyCert.cer"
 $publicCertificate = Get-PfxCertificate $publicCertificatePath
  Write-Host "Create Security token issuer"
 
 $secureTokenIssuer = New-SPTrustedSecurityTokenIssuer -Name $issuerID -RegisteredIssuerName $registeredIssuerName -Certificate $publicCertificate -IsTrustBroker
 $secureTokenIssuer | select *
 $secureTokenIssuer  | select * | Out-File -FilePath "SecureTokenIssuer.txt"
 #Turn off the HTTPS requirement for OAuth during development
 $serviceConfig = Get-SPSecurityTokenServiceConfig
 $serviceConfig.AllowOAuthOverHttp = $true
 $serviceConfig.Update()
 Write-Host "All done..."
 

For a SPFarm, there can be only one certificate and an Issuer ID, which we can use for many Provider Hosted Applications.

ClientID:

The client ID is the one which is unique for every Provider Hosted Applications. And the PowerShell Script to register this ClientID is

 # Registering App principal
 cls
 Add-PSSnapin "Microsoft.SharePoint.PowerShell"
 # set intialization values for new app principal
 
  $appDisplayName = "MyApp"
 $clientID = "a0f73ea5-3e12-4d3a-bce2-fb1988be6676"
 
 $targetSiteUrl = "http://SiteCollectionURL/"
 $targetSite = Get-SPSite $targetSiteUrl
 $realm = Get-SPAuthenticationRealm -ServiceContext $targetSite
 $fullAppPrincipalIdentifier = $clientID + '@' + $realm
 Write-Host "Registering new app principal"
 $registeredAppPrincipal = Register-SPAppPrincipal -NameIdentifier $fullAppPrincipalIdentifier -Site $targetSite.RootWeb -DisplayName $AppDisplayName
 $registeredAppPrincipal | select * | Format-List
 $registeredAppPrincipal | select * | Format-List | Out-File -FilePath "Output.txt"
 Write-Host "Registration Completed"
 

The same can be done by the Site as well.

1. Go to the http://sitecollection/_layouts/15/appregnew.aspx

2. Enter the Values and click on the Generate.

clip_image002

Even to have the ClientID and IssuerID, we need to come to this screen and click on the Generate Button to generate the GUIDs. We should not use any other tools to generate the GUID.

Happy Coding,

Sathish Nadarajan.

Author Info

Sathish Nadarajan
 
Solution Architect
 
Rate this article
 
Sathish is a Microsoft MVP for SharePoint (Office Servers and Services) having 15+ years of experience in Microsoft Technologies. He holds a Masters Degree in Computer Aided Design and Business ...read more
 

Leave a comment