Upload File to SharePoint Office 365 Programmatically using C# CSOM – PNP

Sathish Nadarajan
 
Solution Architect
September 23, 2018
 
Rate this article
 
Views
24481

In the earlier article, we saw how to upload the files using the httpclient and the RestAPI which involves a lot of coding. But in PNP (Patterns and practices), it is made very simple. The below code is very straight forward. The only restriction here is, the size cannot be more than 250 MB approx.. if we want to upload a bigger size files, then we have to discuss with the customer and find an alternate way only.

 namespace Office365.Console
 {
     using Microsoft.SharePoint.Client;
     using Newtonsoft.Json;
     using System;
     using System.Collections.Concurrent;
     using System.IO;
     using System.Net;
     using System.Net.Http;
 
     class Program
     {
         private static ConcurrentDictionary<Uri, RESTFormDigest> FormDigests { get; set; }
 
         static void Main(string[] args)
         {
             Uploadfiles();
             System.Console.WriteLine("Completed");
             System.Console.ReadLine();
         }
 
         static string siteUrl = "https://sppalsmvp.sharepoint.com/sites/DeveloperSite/";
         static string userName = "sathish@********.com";
         static string password = "**********";
 
         public async static void Uploadfiles()
         {
             try
             {
                 OfficeDevPnP.Core.AuthenticationManager authMgr = new OfficeDevPnP.Core.AuthenticationManager();
 
                 using (var ctx = authMgr.GetSharePointOnlineAuthenticatedContextTenant(siteUrl, userName, password))
                 {
                     Web web = ctx.Web;
                     ctx.Load(web);
                     ctx.Load(web.Lists);
                     ctx.ExecuteQueryRetry();
                     List list = web.Lists.GetByTitle("D1");
                     ctx.Load(list);
                     ctx.ExecuteQueryRetry();
                     Folder folder = list.RootFolder.EnsureFolder("Folder1");
                     ctx.Load(folder);
                     ctx.ExecuteQueryRetry();
 
                     Folder folderToUpload = web.GetFolderByServerRelativeUrl(folder.ServerRelativeUrl);
                     folderToUpload.UploadFile("LargeFile.txt", "D:\LargeFile.txt", true);
                     folderToUpload.Update();
                     ctx.Load(folder);
                     ctx.ExecuteQueryRetry();
                     folderToUpload.EnsureProperty(f => f.ServerRelativeUrl);
                     var serverRelativeUrl = folderToUpload.ServerRelativeUrl.TrimEnd('/') + '/' + "LargeFile.txt";


                 }
             }
             catch (Exception ex) {
                 System.Console.WriteLine("Exception occurred : " + ex.Message);
                 System.Console.ReadLine();
             }
         }


     }
 }


Happy Coding,

Sathish Nadarajan.
Author Info

Sathish Nadarajan
 
Solution Architect
 
Rate this article
 
Sathish is a Microsoft MVP for SharePoint (Office Servers and Services) having 15+ years of experience in Microsoft Technologies. He holds a Masters Degree in Computer Aided Design and Business ...read more
 

React Redux Typescript Folder and File Structure for Developers

Ahamed Fazil Buhari
 
Senior Developer
August 21, 2018
 
Rate this article
 
Views
10231

Hello, this is continuation of my previous article on Introduction To Redux – Technical Definitions For Beginners and How to use Redux in React (Typescript) – Adding Important packages. In this article we will see how to setup folder structure for React Redux application especially if we use Typescript.

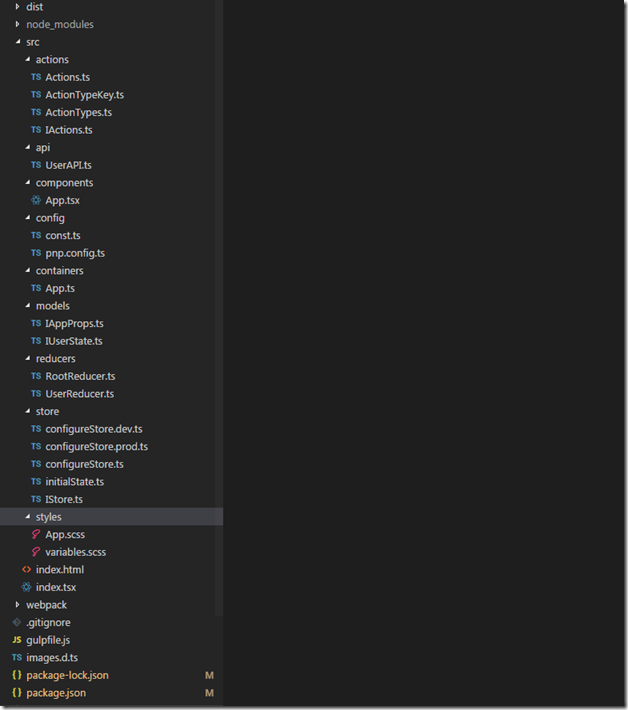
I hope the below folder and file structure will help and make your development easy to understand and easy to work.


image


Let’s give short description on each folders and files that will give more knowledge.

Actions

Action.ts -> It contains functions which return TYPE and PAYLOAD

ActionTypeKey.ts -> This file contains KEY Values which are used as TYPE

ActionTypes.ts-> This exports all the Actions to the other files (especially Reducer)

IActions.ts-> It contains Interfaces which define all the Actions

API

Well, this folder is nothing to do with Redux. It is meant for any api call where you want to make in your application. So this will have functions which are making api calls.

Components

It contains react component where you can have design of your component and other lifecycle methods for your component. File with extension .tsx is used when we want to render, for the functionality we can still use simple .ts file.

Config

Again, this folder is nothing to do with react or redux. I use this folder to have constant values and config settings.

Containers

If our component needs to have connection to redux store, then this is the place where we need to describe mapStateToProps and mapDispatchToProps and by making use of connect we can connect the component to redux store. The good practice is to mention the name of the file same as name of the file in Component folder. So that it’s easy to find which component have connection to redux store

Models

In models we have interfaces of props and states where we define the structure of your props and state.

Reducers

In redux terminology reducers are functions with two parameter (state and action) which return new state. We can have multiple reducer function but in the last we need to merge all together combineReducer

Store

In store we define and configure the Store which can be used across the application, also we can specify initialState which holds initial value of our store.

Styles

Here, for styling I have used SCSS and we can provide our styling and other stuff related to styling like .ico and images can be put in this folder.

Finally, I am using webpack for building the application and gulp for deploying into my SharePoint site. We will talk about this in the future article. Thank you reading J

The template of this project is available in the github -> https://github.com/ahamedfazil/react-redux-ts-sp this has connection to SharePoint using sp-rest-proxy, which is used to access SharePoint resources for development.

Happy Coding

Ahamed

Category : React, SharePoint, SPFx

Author Info

Ahamed Fazil Buhari
 
Senior Developer
 
Rate this article
 
Ahamed is a Senior Developer and he has very good experience in the field of Microsoft Technologies, especially SharePoint, Azure, M365, SPFx, .NET and client side scripting - JavaScript, TypeScript, ...read more
 

Implementing Multi-Threading in SharePoint To Upload Files using CSOM C# – An Insight

Sathish Nadarajan
 
Solution Architect
November 21, 2016
 
Rate this article
 
Views
11221

Recently, I was involved in creation of a tool (EXE) which needs to upload a bunch of files to SharePoint Online Site Collection. Somehow, we can relate that as a kind of Migration. From the Physical drive, I need to upload to a Document Library.

In this requirement, the performance was the most critical factor. Hence, I thought of implementing the Multi-Threading using Client Side Object Model. And thought of sharing with the Community.

The piece of code is straight forward using the namespace System.Threading.Tasks

The below sample code will upload a set of files to SharePoint Document Library in Multi Threaded approach.

 namespace Console.Office365
 {
     using Microsoft.SharePoint.Client;
     using Newtonsoft.Json.Linq;
     using System;
     using System.Collections.Generic;
     using System.IO;
     using System.Linq;
     using System.Threading.Tasks;
 
     class Program
     {
         static void Main(string[] args)
         {
             UploadFilesMultiThread();
         }


         public static void UploadFilesMultiThread()
         {
             string[] filePaths = System.IO.Directory.GetFiles("D:\Temp\UploadFiles");
 
             OfficeDevPnP.Core.AuthenticationManager authMgr = new OfficeDevPnP.Core.AuthenticationManager();
 
             string siteUrl = "https://*********.sharepoint.com/sites/CommunitySite/";
             string userName = "Sathish@*****.onmicrosoft.com";
             string password = "*************";


             var tasks = new List<Task>();
 
             tasks.AddRange(filePaths.Select(filePath =>
             {
                 return Task.Factory.StartNew(() =>
                 {
                     try
                     {
                         using (var ctx = authMgr.GetSharePointOnlineAuthenticatedContextTenant(siteUrl, userName, password))
                         {
                             Web web = ctx.Web;
                             ctx.Load(web);
 
                             List list = web.Lists.GetByTitle("MyDocumentsLibrary");
                             ctx.Load(list);
                             ctx.Load(list.RootFolder);
 
                             ctx.ExecuteQueryRetry();
 
                             if (System.IO.File.Exists(filePath))
                             {
                                 System.Threading.Thread.Sleep(10000);
 
                                 System.Console.ForegroundColor = ConsoleColor.Green;
                                 System.Console.WriteLine("Entered into : " + Path.GetFileName(filePath));
 
 
                                 Folder folder = web.GetFolderByServerRelativeUrl(list.RootFolder.ServerRelativeUrl);
                                 folder.UploadFile(Path.GetFileName(filePath), filePath, true);
 
                                 folder.Update();
 
                                 ctx.Load(folder);
                                 ctx.ExecuteQueryRetry();
 
                             }
                         }
                     }
                     catch (Exception ex)
                     {
                         System.Console.ForegroundColor = ConsoleColor.Red;
                         System.Console.WriteLine(ex.Message);
                     }
                 }, TaskCreationOptions.LongRunning);
             }));
 
 
             Task.WaitAll(tasks.ToArray());
 
             System.Console.WriteLine("Process Completed");
             System.Console.ReadLine();
         }
     }
 
 }
 

Hope this helps.

Happy Coding,

Sathish Nadarajan.

Author Info

Sathish Nadarajan
 
Solution Architect
 
Rate this article
 
Sathish is a Microsoft MVP for SharePoint (Office Servers and Services) having 15+ years of experience in Microsoft Technologies. He holds a Masters Degree in Computer Aided Design and Business ...read more
 

Get the Files with Version Greater than the Given Version Number – SharePoint PowerShell

Sathish Nadarajan
 
Solution Architect
June 2, 2016
 
Rate this article
 
Views
5331

In this article, let us see, how to retrieve the list of Files with Version Greater than the Given Version Number. i.e., on the Config file, I will have some version number and within the WebApplication, the files with greater than the given version needs to be listed on the XML File.

 ######################### this method will return the Files with Greater Version than the Given Input
 
 function GetFilesWithVersionGreaterThanGiven()
 {
     Write-Host "Entered GetFilesWithVersionGreaterThanGiven Method" -ForegroundColor Yellow 
     Add-Content "$ProgressFile" "Entered GetFilesWithVersionGreaterThanGiven Method"
     $script:Progress = "5:Entered"
     
     # Get the WebApplication Object
     $WebApplication = Get-SPWebApplication $Config.Configuration.WebApplication.URL
 
     # Assign the XML Output File Paths
     $FilesWithVersionGreaterThanGiven_XML_Path = $scriptBase + "Reports-$LogTimeFilesWithVersionGreaterThanGiven.xml"
     
     # Create the XML File Tags
     
     $xmlWriter = New-Object System.XMl.XmlTextWriter($FilesWithVersionGreaterThanGiven_XML_Path,$Null)
     $xmlWriter.Formatting = 'Indented'
     $xmlWriter.Indentation = 1
     $XmlWriter.IndentChar = "`t"
     $xmlWriter.WriteStartDocument()
     $xmlWriter.WriteComment('Files List On the WebApplication ' + $WebApplication.DisplayName)
     $xmlWriter.WriteStartElement('WebApplication')
     $xmlWriter.WriteEndElement()
     $xmlWriter.WriteEndDocument()
     $xmlWriter.Flush()
     $xmlWriter.Close()
     
     # Get All SiteCollections within webApplication
     $SiteCollections =  $WebApplication | Get-SPSite -Limit All
     #$SiteCollections =  Get-SPSite "http://ctsc00556722901:5555/sites/TeamSite2/"
     
     # write the output on XML File
     $xmlDoc = [System.Xml.XmlDocument](Get-Content $FilesWithVersionGreaterThanGiven_XML_Path);
     $siteCollectionNode = $xmlDoc.CreateElement("SiteCollections")
     $xmlDoc.SelectSingleNode("//WebApplication").AppendChild($siteCollectionNode)
     $xmlDoc.Save($FilesWithVersionGreaterThanGiven_XML_Path)
     
     # Iterate through the Site Collections
     foreach($SiteCollection in $SiteCollections)
     {
         $siteCollectionName = $SiteCollection | select @{label = "Title";Ex = {$_.rootweb.Title}} 
         
         # write the output on XML File
         
         $xmlDoc = [System.Xml.XmlDocument](Get-Content $FilesWithVersionGreaterThanGiven_XML_Path);
         $siteCollectionNode = $xmlDoc.CreateElement("SiteCollection")
         $xmlDoc.SelectSingleNode("//WebApplication/SiteCollections").AppendChild($siteCollectionNode)
         $siteCollectionNode.SetAttribute("Name", $siteCollectionName.Title)
         
         
         $subSitesNode = $siteCollectionNode.AppendChild($xmlDoc.CreateElement("SubSites"));
         $xmlDoc.Save($FilesWithVersionGreaterThanGiven_XML_Path)
         
         # Get All the Webs
         $Webs = Get-SPWeb -site $SiteCollection -Limit All 
         
         # Iterate through the Webs
         foreach($Web in $Webs)
         {
             # write the output on XML File
             $subSiteNameNode = $subSitesNode.AppendChild($xmlDoc.CreateElement("SubSite"));
             $subSiteNameNode.SetAttribute("Name", $Web.Title)
             $subSiteNameNode.SetAttribute("Url", $Web.Url)
             $subSiteNameNode.SetAttribute("WebID", $Web.Id)
             
             $parentWebTitle = ""
                             
             if($Web.ParentWebID -ne "00000000-0000-0000-0000-000000000000")
             {
                 $parentWeb = $SiteCollection.OpenWeb($Web.ParentWebID)
                 $parentWebTitle = $parentWeb.Title
                 
             }
             else
             {
                 $parentWebTitle = "RootWeb"
             }    
             $subSiteNameNode.SetAttribute("ParentWebName", $parentWebTitle)
             $subSiteNameNode.SetAttribute("ParentWebID", $Web.ParentWebID)
                             
             $FilesNode = $subSiteNameNode.AppendChild($xmlDoc.CreateElement("Files"));
             
             $xmlDoc.Save($FilesWithVersionGreaterThanGiven_XML_Path)
             
             # Iterate through the Lists
             foreach ($list in $Web.Lists) 
             {
                 # validate for Document Library
                 if ($list.BaseType -eq “DocumentLibrary”) 
                 {
                     # Iterate threough the Doc Library Items
                     foreach ($item in $list.Items) 
                     {
                         # Check for the Version
                         if([decimal]$item.File.UIVersionLabel -ge [decimal]$Config.Configuration.FetchFilesAboveTheVersion)
                         {
                             # If Yes, then write the details on the XML Output file
                             
                             $FileNode = $FilesNode.AppendChild($xmlDoc.CreateElement("File"));
                             $FileNode.SetAttribute("Name", $Item.File.Title)
                             $FileNode.SetAttribute("Url", $Item.File.Url)
                             $FileNode.SetAttribute("Version", $item.File.UIVersionLabel)
                             
                             $xmlDoc.Save($FilesWithVersionGreaterThanGiven_XML_Path)
                                                                               
                         }
                     }
                 }
             } 
         }
     }    
     # write the output on XML File
     $xmlDoc.Save($FilesWithVersionGreaterThanGiven_XML_Path)
     
     Write-Host "Completed GetFilesWithVersionGreaterThanGiven Method" -ForegroundColor Yellow 
     Add-Content "$ProgressFile" "Completed GetFilesWithVersionGreaterThanGiven Method"
     $script:Progress = "5:Success"
 }
 ########### End of Method #################
 

The snippet is self-explanatory.

Happy Coding,

Sathish Nadarajan.

Category : PowerShell, SharePoint

Author Info

Sathish Nadarajan
 
Solution Architect
 
Rate this article
 
Sathish is a Microsoft MVP for SharePoint (Office Servers and Services) having 15+ years of experience in Microsoft Technologies. He holds a Masters Degree in Computer Aided Design and Business ...read more
 

Leave a comment