Step by Step Procedure to Add a JS file to all pages in a SPFx Modern Pages using SharePoint Framework Extension

Sathish Nadarajan
 
Solution Architect
May 12, 2018
 
Rate this article
 
Views
24549

There are a lot of purpose for the SharePoint Framework Extension. One among them is to add a JS file on the Modern Pages. Since the modern team site and the communication does not allow us to edit the master pages (at least by the time, I write this article), it is very tough to add a custom JS to the Pages.

In the below example, let us see how to create an extension and add a JS file to the page.

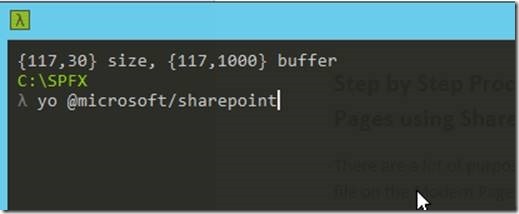
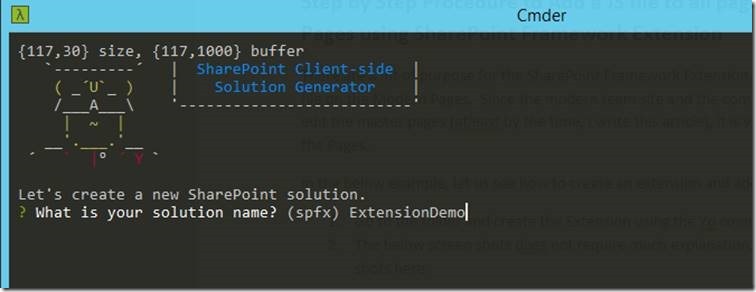
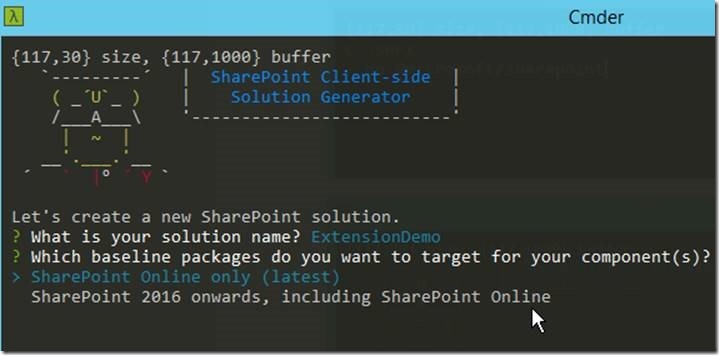
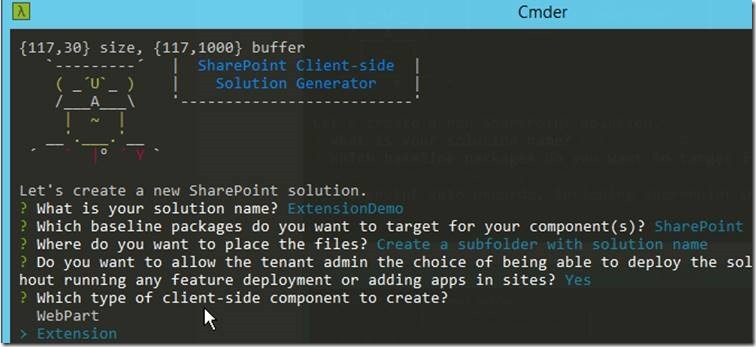
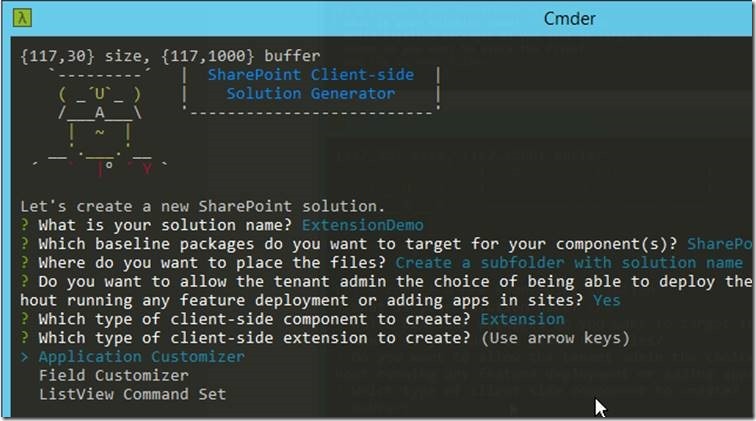
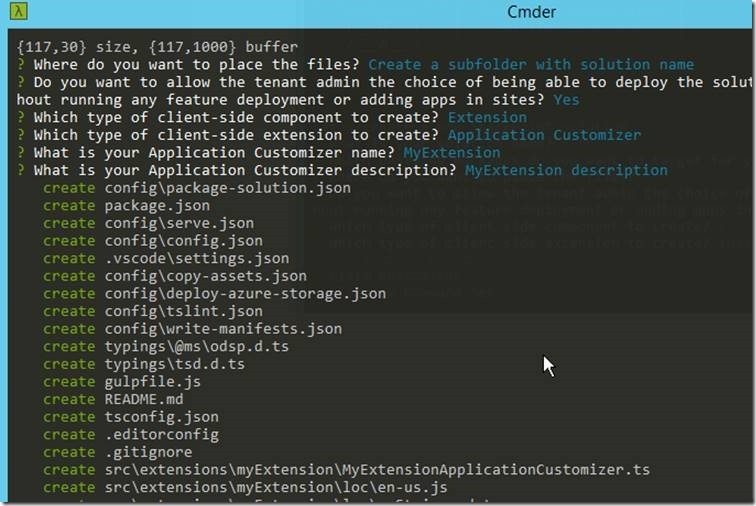
1. Go to the folder and create the Extension using the Yo commands.

2. The below screen shots does not require much explanation. Hence, keeping only the screen shots here.

clip_image002

clip_image004

clip_image006

clip_image008

clip_image010

clip_image012

clip_image014

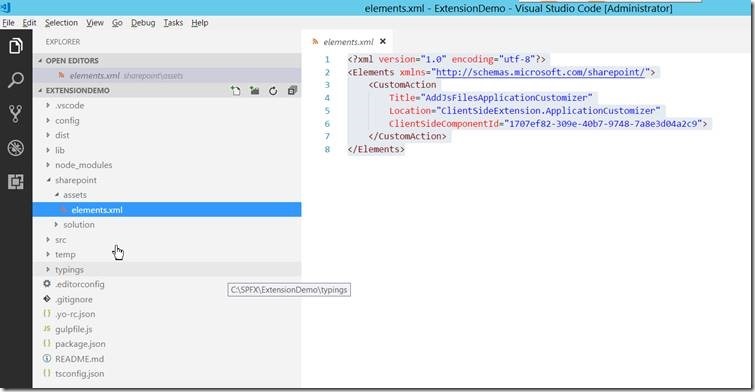
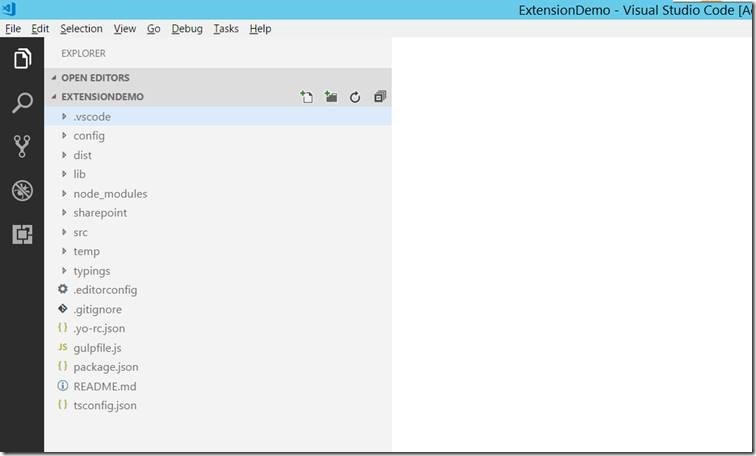
3. Once the extension created, the solution will be as below.

clip_image016

4. Open the Package-solution.json file and add a feature. The complete code will be as below.

 {
   "$schema": "https://dev.office.com/json-schemas/spfx-build/package-solution.schema.json",
   "solution": {
     "name": "extension-demo-client-side-solution",
     "id": "63fc1117-3fc1-45b4-abf6-453240fd78d1",
     "version": "1.0.0.0",
     "includeClientSideAssets": true,
     "features": [
       {
         "title": "MyExtension - Add JS Files.",
         "description": "Deploys a custom action with ClientSideComponentId association",
         "id": "c9fab333-d9e3-402b-aa7f-99d83a898a15",
         "version": "1.0.0.0",
         "assets": {
           "elementManifests": [
             "elements.xml"
           ]
         }
       }
     ]
   },
   "paths": {
     "zippedPackage": "solution/extension-demo.sppkg"
   }
 }
 

5. On the Write-Manifest.json, give the URL of the SharePoint CDN.

 {
   "$schema": "https://dev.office.com/json-schemas/spfx-build/write-manifests.schema.json",
   "cdnBasePath": "/sites/CommunicationSiteTopic/SiteAssets/ExtensionFiles"
 }
 

6. In the SharePoint folder, create a subfolder called assets and create an element.xml

7. The file content will be,

 <?xml version="1.0" encoding="utf-8"?>
 <Elements xmlns="http://schemas.microsoft.com/sharepoint/">
     <CustomAction
         Title="AddJsFilesApplicationCustomizer"
         Location="ClientSideExtension.ApplicationCustomizer"
         ClientSideComponentId="1707ef82-309e-40b7-9748-7a8e3d04a2c9">
     </CustomAction>
 </Elements>
 

8. The ClientsideComponentID is the one which we need to copy from the Extension Manifest.json.

 {
   "$schema": "https://dev.office.com/json-schemas/spfx/client-side-extension-manifest.schema.json",
 
   "id": "1707ef82-309e-40b7-9748-7a8e3d04a2c9",
   "alias": "MyExtensionApplicationCustomizer",
   "componentType": "Extension",
   "extensionType": "ApplicationCustomizer",
 
   // The "*" signifies that the version should be taken from the package.json
   "version": "*",
   "manifestVersion": 2,
 
   // If true, the component can only be installed on sites where Custom Script is allowed.
   // Components that allow authors to embed arbitrary script code should set this to true.
   // https://support.office.com/en-us/article/Turn-scripting-capabilities-on-or-off-1f2c515f-5d7e-448a-9fd7-835da935584f
   "requiresCustomScript": false
 }


9. Edit the MyExtensionApplicationCustomizer.ts file as below.

 import { override } from '@microsoft/decorators';
 import { Log } from '@microsoft/sp-core-library';
 import {
   BaseApplicationCustomizer
 } from '@microsoft/sp-application-base';
 import { Dialog } from '@microsoft/sp-dialog';
 
 import * as strings from 'MyExtensionApplicationCustomizerStrings';
 
 const LOG_SOURCE: string = 'MyExtensionApplicationCustomizer';
 
 /**
  * If your command set uses the ClientSideComponentProperties JSON input,
  * it will be deserialized into the BaseExtension.properties object.
  * You can define an interface to describe it.
  */
 export interface IMyExtensionApplicationCustomizerProperties {
   // This is an example; replace with your own property
   testMessage: string;
 }
 
 /** A Custom Action which can be run during execution of a Client Side Application */
 export default class MyExtensionApplicationCustomizer
   extends BaseApplicationCustomizer<IMyExtensionApplicationCustomizerProperties> {
 
     private _JS: string = "https://*******.sharepoint.com/sites/CommunicationSiteTopic/Shared%20Documents/MyScript.js";
   @override
   public onInit(): Promise<void> {
     
     let articleRedirectScriptTag: HTMLScriptElement = document.createElement("script");
       articleRedirectScriptTag.src = this._JS;
       articleRedirectScriptTag.type = "text/javascript";
       document.body.appendChild(articleRedirectScriptTag);
 
       return Promise.resolve();
   }
 }
 

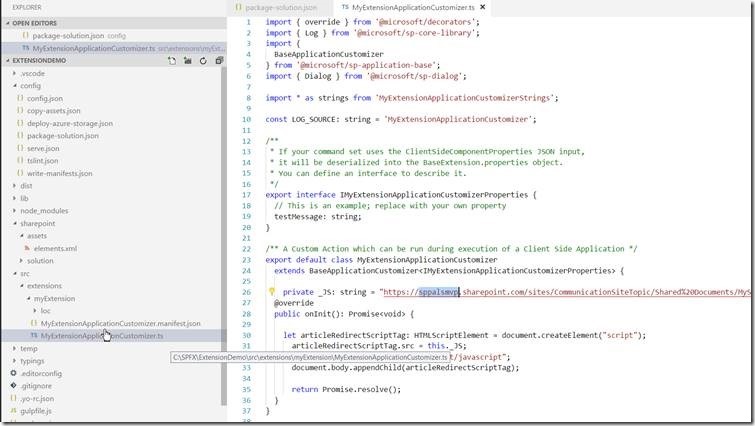
10. The file will look like below.

clip_image018

clip_image020

11. With these changes, let us build the solution and bundle, package, deploy the solution.

12. The commands used are,

a. Gulp build

b. Gulp bundle –ship

c. Gulp package-solution –ship

13. Now, copy the contents inside the temp\deploy folder to the CDN path.

14. Upload the SPPKG file to the Appcatalog site.

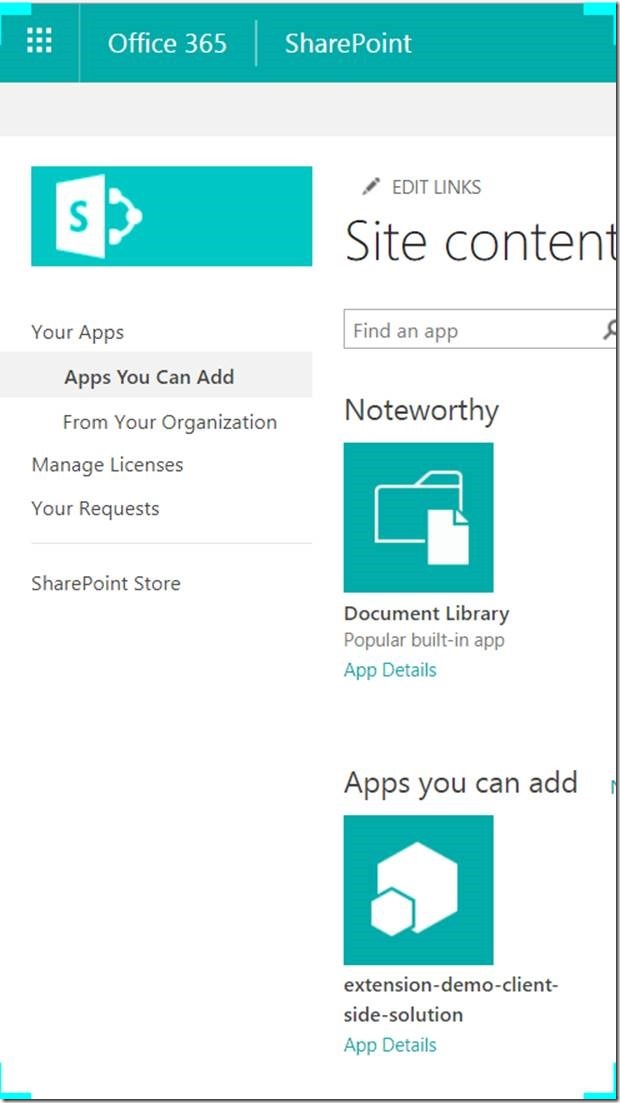
15. Come back to the site, which we want to deploy the APP and add the app.

16. clip_image022

17. It will take few seconds to get added.

18. Once, it got deployed, the MyScript.JS has been added on all the pages.

19. I have written only the alert on the JS file. Hence, when I refresh any page, I will get the alert loaded on the page.

clip_image024

20. The same TS file can be altered to load the JS files only on few pages like below.

 if((document.location.href).toLowerCase().indexOf("home.aspx") >= 0)
     {
 //Add the piece of code to add the HTMLScriptElement to the DOM Element
 }
 

A very straight forward method to add a Custom JS on the page in Modern pages.

DOWNLOAD SOURCE HERE

Happy Coding,

Sathish Nadarajan.
Category : Office 365, SharePoint, SPFx

Author Info

Sathish Nadarajan
 
Solution Architect
 
Rate this article
 
Sathish is a Microsoft MVP for SharePoint (Office Servers and Services) having 15+ years of experience in Microsoft Technologies. He holds a Masters Degree in Computer Aided Design and Business ...read more
 

Provision Master Pages and the other files in SharePoint Office 365 using Patterns and Practice C# CSOM

Sathish Nadarajan
 
Solution Architect
May 11, 2017
 
Rate this article
 
Views
3131

Some time back, we saw how to provision the site columns and content types in an OLD article. But, along with that, we can upload the Master Pages, CSS, JS files to the SharePoint Site as part of provisioning. In this, the same piece of code, with the updated Provisioning XML is shown below.

 using Microsoft.SharePoint.Client;
 using OfficeDevPnP.Core.Framework.Provisioning.Connectors;
 using OfficeDevPnP.Core.Framework.Provisioning.Providers.Xml;
 
 namespace Office365.Console
 {
     class Program
     {
         static void Main(string[] args)
         {
             ProvisionMasterPagesAndJSFiles();
         }
 
         public static void ProvisionMasterPagesAndJSFiles()
         {
             OfficeDevPnP.Core.AuthenticationManager authMgr = new OfficeDevPnP.Core.AuthenticationManager();
 
             string siteUrl = "https://*******.sharepoint.com/sites/communitysite";
             string userName = "Sathish@*********.onmicrosoft.com";
             string password = "************";
 
             string ResourcesDirectory = @"C:SATHISHPRACTICE SOURCE CODESOffice365.ConsoleOffice365.ConsoleResources";
             string ResourcesFile = "ProvisioningTemplate.xml";
 
             using (var clientContext = authMgr.GetSharePointOnlineAuthenticatedContextTenant(siteUrl, userName, password))
             {
                 Web web = clientContext.Web;
                 clientContext.Load(web);
                 clientContext.ExecuteQueryRetry();
 
                 var provisioningProvider = new XMLFileSystemTemplateProvider(ResourcesDirectory, string.Empty);
                 var provisioningTemplate = provisioningProvider.GetTemplate(ResourcesFile);
                 provisioningTemplate.Connector.Parameters[FileConnectorBase.CONNECTIONSTRING] = ResourcesDirectory;
 
                 clientContext.Web.ApplyProvisioningTemplate(provisioningTemplate);
                 clientContext.ExecuteQuery();
             }
         }
     }
 }
 

And the Provisioning Template is

 <?xml version="1.0"?>
 <pnp:ProvisioningTemplate ID="Demo.TeamSite" Version="1" xmlns:pnp="http://schemas.dev.office.com/PnP/2015/12/ProvisioningSchema">
 
    <pnp:Files>
 
     <pnp:File Src="MasterPagesMy.seattle.master" Folder="_catalogs/MasterPage" Overwrite="true" />
      <pnp:File Src="JSFilesJavaScript1.JS" Folder="SiteAssetsJS" Overwrite="true" />
   </pnp:Files>
 
 </pnp:ProvisioningTemplate>
 

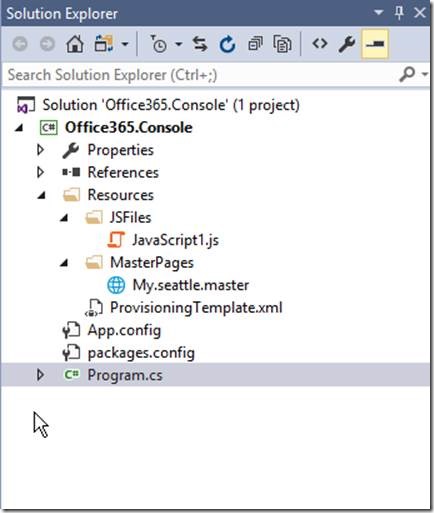
The Solution will be looks like

clip_image002

Happy Coding,

Sathish Nadarajan.
Author Info

Sathish Nadarajan
 
Solution Architect
 
Rate this article
 
Sathish is a Microsoft MVP for SharePoint (Office Servers and Services) having 15+ years of experience in Microsoft Technologies. He holds a Masters Degree in Computer Aided Design and Business ...read more
 

How to add CSR based JS file in JS link in Edit form Webpart in SharePoint office 365

Arunraj Venugopal
 
SharePoint Developer
August 24, 2016
 
Rate this article
 
Views
9237

Let us look at the functionality of CSR client side rendering which is one of the new concepts in SharePoint 2013 online. To change the behavior of view & its appearance, new form, Edit Form and Display Form at runtime, jquery used in the SharePoint 2007 and its later version.

In SharePoint 2013 office 365, we have a concept called Client side rendering and its easy way of debugging code will help to achieve tasks such as changing the behavior of view and form (New, Edit & Display) rendering and Search Result etc.,.

To edit the page, ToolPaneView=2 would be used at the end the url.

In SharePoint online, ToolPaneView=2 won’t work in usual way.

In order to edit the Edit form page, go to Advance setting in the list setting and select the option 1

1. Classic Experience(Select)

2. New experience

3. Default Experience.

Edit form page get loaded with edit mode once Sharepointurl/editform.aspx?ID=2&ToolPaneView=2 is entered in the browser

Prepare a CSR based js file and placed in the asset library. Go to web part properties of Edit form and paste the path of the js file in the JSlink text box

(

function () {

var overrideCtx = {};

overrideCtx.Templates ={};

overrideCtx.Templates.Fields = {

‘Change_x0020_Comments’ : { ‘EditForm’ : Testing } For Reader: “Change_x0020_Comments” is a internal name. Testing is the function name.

};

SPClientTemplates.TemplateManager.RegisterTemplateOverrides(overrideCtx);

}) ();

function Testing(ctx) {

var fieldval = ctx.CurrentItem[ctx.CurrentFieldSchema.Name]; For Reader: It has the reference of comment field, which will be manipulated as per logic

var TestTitle = fieldval.toString().replace(" ", "");

TestTitle=’<textarea rows="25" cols="20" id="Change_x0020_Comments_ab250304-f850-4895-86d3-0a2721427864_$TextField" title="Change Comments" class="ms-long"></textarea>’;

return TestTitle;

}

The code in the box takes reference of the comments field “Change Comments” and replaces the existing value as blank while loading Edit form of sharepoint list

TestTitle=’<textarea rows="25" cols="20" id="Change_x0020_Comments_ab250304-f850-4895-86d3-0a2721427864_$TextField" title="Change Comments" class="ms-long">Here is the value for Comment field</textarea>’;

This function is building up an object, which is then used to register a template override.

(

function () {

var overrideCtx = {};

overrideCtx.Templates ={};

overrideCtx.Templates.Fields = {

‘Change_x0020_Comments’ : { ‘EditForm’ : Testing } For Reader: “Change_x0020_Comments” is a internal name. Testing is the function name.

};

SPClientTemplates.TemplateManager.RegisterTemplateOverrides(overrideCtx);

}) ();

The object takes the following properties:

· View

· Header

· Body

· Footer

· Group

· Item

· Fields

· OnPreRender

· OnPostRender

The CSR code must be the adhere to the following rules

· FieldName – This is the internal name of the field you want to override.

· Scope – This defines when to override the field. The choices are “View”,”DisplayForm”,”EditForm”, and “NewForm”

· Override – The actual override. This can be a HTML string with JavaScript embedded, or a function to be executed. In the former, it should be in the format: “

The code in the box takes reference of the comments field “Change Comments” during the Edit form loading and replace the value blank.

Category : Office 365, SharePoint

Author Info

Arunraj Venugopal
 
SharePoint Developer
 
Rate this article
 
Works as a SharePoint Developer in a CMM Level 5 Company ...read more
 

How to do a KeywordQuery Search using Jquery in SharePoint 2013

Sathish Nadarajan
 
Solution Architect
January 13, 2015
 
Rate this article
 
Views
26327

In this article, let us see how to search the SharePoint content from the JS CSOM using sp.search.js in SharePoint 2013.

In many cases we may require to do a search from the Client Side. (Probably from the Apps). In that case, let us see how to use the various approaches like, Set the Query String, Set the Result Source ID, Set the Sorting Order, Retrieving custom Managed Properties etc.,

The script is self-explanatory. Hence, there nothing much to describe about this.

 function customSearch() 
 { 
 //Create the Context
     var context = SP.ClientContext.get_current(); 
 
 //Create the KeywordQuery Object
     var keywordQuery = new Microsoft.SharePoint.Client.Search.Query.KeywordQuery(context); 
 
 
 //Set the Query here
     keywordQuery.set_queryText("Managed Property :" + "<Value for the Managed Property>" + ""); 
 
 //Add the return columns - custom Managed Properties
     var properties = keywordQuery.get_selectProperties(); 
     properties.add('ContentType'); 
     properties.add('Any Managed Properties'); 
 
 //Set the Result Source ID if any	
     keywordQuery.set_sourceId("XXXXXXXX-XXXX-XXXX-XXXX-XXXXXXXXXXXX"); 
 
 // Set Row Limit
    keywordQuery.set_rowLimit(500);
 
 
 // Set Trim Duplicates to False
 keywordQuery.set_trimDuplicates(false);
 
 // Sorting (Ascending = 0, Descending = 1)
 keywordQuery.set_enableSorting(true);    
 var sortproperties = keywordQuery.get_sortList();
 sortproperties.add("Managed Property name", 0);
 
 //Create Search Executor Object
     var searchExecutor = new Microsoft.SharePoint.Client.Search.Query.SearchExecutor(context); 
 
 //Execute the Query
     this.results = searchExecutor.executeQuery(keywordQuery); 
 
 //Execute the Context
         context.executeQueryAsync(onQueryListSuccess, onQueryFail); 
 
 } 
 
 function onQueryListSuccess() { 
     for (i == 0; i < results.m_value.ResultTables[0].ResultRows.length; i++) { 
         alert(results.m_value.ResultTables[0].ResultRows[i].ContentType) 
     } 
 
 } 
 
 function onQueryFail()
 {
 	alert('Query failed. Error:' + args.get_message());
 }
 

Make sure that you have the reference of the following JQueries on your page.

1. JQuery.1.7.1.js (later versions can also be used)

2. SP.js

3. Sp.Runtime.JS

4. Sp.Search.JS

Happy Coding.

Sathish Nadarajan.

Author Info

Sathish Nadarajan
 
Solution Architect
 
Rate this article
 
Sathish is a Microsoft MVP for SharePoint (Office Servers and Services) having 15+ years of experience in Microsoft Technologies. He holds a Masters Degree in Computer Aided Design and Business ...read more
 

Leave a comment