URL Redirection solution for migration of SharePoint On-Prem sites to Office 365

Senthil Kumaresan
 
SharePoint Consultant
January 13, 2020
 
Rate this article
 
Views
5111

The Background

We had a medium sized SharePoint environment with 2000 sites which includes hierarchical sub sites created and maintained by the IT Department.
There were 8 major departments in the organization which had 8 large Sitecollections with a lot of Subsites created for sub departments within the company.

We planned to migrate all the 2000 sites to SharePoint online. We were planning to migrate all the 8 hierarchical Site collections with 2000 subsites to a Flat structure.

Microsoft has been recommending organizations to redesign the Site structure to a flat structure instead of a Hierarchical structure. We wanted to utilize the Modern Hub and Standalone satellite sites model instead of a large 8 hierarchical site collections with subsites. We planned to migrate each subsite into its own site collection. There are some exceptions that some site collections may have 1 level subsite as they were so tightly built and using features that are inherited from its parent site. So we ended up creating 1500+ site collections which were connected to 8 departmental Hub sites. There were further reorganization into additional hubs based on business needs.

In order to achieve this, we built new departmental Hubs which will act as the home page for each departments within the organization.
To provide a seamless migration experience for end users, we had to redirect each subsite in SharePoint On-Prem to its own site collection in SharePoint online.

URL Redirection With IIS

We identified 4 levels of subsite hierarchy and planned to create IIS URL Redirection rules in the IIS URL Rewrite Module for the SharePoint web sites.

Since there are 1500+ subsites to be redirected, It’s not advisable to create 1500+ rules in a IIS web site. But IIS provides an option to create Rewrite Maps to which you can add a big list of sites to be redirected with a common rule.
You need to create Rewrite Maps and Rules for each level of the hierarchy.

Below is the sample 4 Redirection rules that was created in the IIS Website.

<rewrite>
      <rewriteMaps configSource="RewriteMaps.config" />
      <rules>
        <clear />
         <rule name="Rewrite for SharePointLevel4" enabled="true" stopProcessing="true">
          <match url="([^/]+/[^/]+/[^/]+/[^/]+)(/?.*)" />
          <conditions logicalGrouping="MatchAll" trackAllCaptures="false">
            <add input="{SharePointLevel4:{R:1}}" pattern="(.+)" />
          </conditions>
          <action type="Redirect" url="{C:1}{R:2}" redirectType="Permanent" />
        </rule>
        <rule name="Rewrite for SharePointLevel3" enabled="true" stopProcessing="true">
          <match url="([^/]+/[^/]+/[^/]+)(/?.*)" />
          <conditions logicalGrouping="MatchAll" trackAllCaptures="false">
            <add input="{SharePointLevel3:{R:1}}" pattern="(.+)" />
          </conditions>
          <action type="Redirect" url="{C:1}{R:2}" appendQueryString="true" redirectType="Permanent" />
        </rule>
        <rule name="Rewrite for SharePointLevel2" enabled="true" stopProcessing="true">
          <match url="([^/]+/[^/]+)(/?.*)" />
          <conditions logicalGrouping="MatchAll" trackAllCaptures="false">
            <add input="{SharePointLevel2:{R:1}}" pattern="(.+)" />
          </conditions>
          <action type="Redirect" url="{C:1}{R:2}" appendQueryString="true" redirectType="Permanent" />
        </rule>
        <rule name="Rewrite for SharePointLevel1" enabled="true" stopProcessing="true">
          <match url="([^/]+)(/?.*)" />
          <conditions logicalGrouping="MatchAny" trackAllCaptures="true">
            <add input="{SharePointLevel1:{R:1}}" pattern="(.+)" />
          </conditions>
          <action type="Redirect" url="{C:1}{R:2}" appendQueryString="true" redirectType="Permanent" />
        </rule>
        <rule name="HTTPRedirect" patternSyntax="Wildcard" stopProcessing="true">
          <match url="*" />
          <conditions logicalGrouping="MatchAll" trackAllCaptures="false">
            <add input="{HTTPS}" pattern="off" />
          </conditions>
          <action type="Redirect" url="https://{HTTP_HOST}{REQUEST_URI}" />
        </rule>
      </rules>
    </rewrite>

RewriteMap.config — Below is the sample of rewrite maps that we created for all the 4 levels of subsite hierarchies. You can add as much sites as you want under each levels of hierarchy.

<rewriteMaps>
	<rewriteMap name="SharePointLevel1" >
		<add Key="IT" value="https://contoso.sharepoint.com/sites/IT" />
		<add Key="Finance" value="https:// contoso.sharepoint.com/sites/Finance " />
    </rewriteMap>
    <rewriteMap name="SharePointLevel2" >
		<add Key=" Finance /Connect" value="https:// contoso.sharepoint.com/sites/Fi-Connect" />
		<add Key=" Finance /Tax" value="https:// contoso.sharepoint.com/sites/Fi-Tax" />
    </rewriteMap>
    <rewriteMap name="SharePointLevel3" >
		<add key=" Finance / Tax /Audit" value="https:// contoso.sharepoint.com/sites/FI-Tax-Audit" />
		<add key=" Finance / Tax /GST" value="https:// contoso.sharepoint.com/sites/FI-Tax-GST " />
    </rewriteMap>
     <rewriteMap name="SharePointLevel4" >
		<add key=" Finance /Tax/ Audit /SharedServices" value="https:// contoso.sharepoint.com/sites/FI-Tax-Audit-SharedServices" />
		<add key=" Finance / Tax/Audit /GRA2018 " value="https:// contoso.sharepoint.com/sites/FI-Tax-Audit-GRA2018 " />
    </rewriteMap>
</rewriteMaps>

Once the rules and rewrite maps are created, you will be able to add subsite URLs as per the above example whenever you migrate them to SharePoint online. Users would seamlessly be redirected to the migrated SharePoint online website.
Note : In this approach, you cannot redirect a parent level web site unless you migrate all the subsites of the parent site. If you try to add the parent site to the rewrite maps, then users cannot access your child site which is not migrated. They will be redirected to the parent site. Add a Parent site to Rewritemap only when you have migrated all child sites and added them to the relevant child level rewritemap.
Category : Office 365, OnPremise

Author Info

Senthil Kumaresan
 
SharePoint Consultant
 
Rate this article
 
SharePoint Architect – Consulting on SharePoint Infrastructure, IT Governance and Apps Development. ...read more
 

SharePoint User Account and AD (Active Directory) Group Migration using PowerShell script in SharePoint 2010

Ahamed Fazil Buhari
 
Senior Developer
June 20, 2016
 
Rate this article
 
Views
13248

If the SharePoint site has been migrated from one domain (user@abc.com) to another domain (user@xyz.com) using Content DB backup & restore or any other mode of migration where the contents are migrated but not the user accounts, then we can migrate the User accounts and AD groups using PowerShell script. The below scripts are tested and verified in SharePoint 2010 to SharePoint 2010 migration from one domain (abc.com) to another domain (xyz.com)

About User Accounts:

User account gives the control that who can access the SharePoint site. We can make use of existing domain or network server account which is already available in the environment. For example, if you have your SharePoint site in your ABC organization. Then, your user account would be yourname@abc.com

About Active Directory Group:

First and foremost, let’s see the difference between SharePoint Group and AD Group.

There’s much difference between SharePoint Group and Active Directory Group. In simple, SharePoint groups are something that is handled inside the SharePoint site and it contains collection of users & groups. It is mostly administrated by a SharePoint site owner.

Active Directory groups have a collection of users and groups stored in Active Directory (Domain level). These groups are managed by the AD admin.

SharePoint user accounts and active directory group migration will be accomplished using the below PowerShell scripts.

The following ps command will be executed on the SharePoint application server for each of the migrated users –

 *************************************************************************
 $farm.MigrateUserAccount( $_.oldlogin, $_.newlogin, $_. enforceSidHistory ) 
 
 Oldlogin(string) - A string that contains the old login name.
 Newlogin(string)- A string that contains the new login name	
 enforceSidHistory(Boolean)- true to query Active Directory for the SID history attribute to ensure that the new login name corresponds to the old one; otherwise, false
 *************************************************************************
 

User accounts migration and AD group remapping will be accomplished with step by step approach as outlined below –

Step 1: Extract Users from all the migrated site collections

Following script provides the list of users that are added to the SharePoint site. The script will be executed for all the migrated site collections.

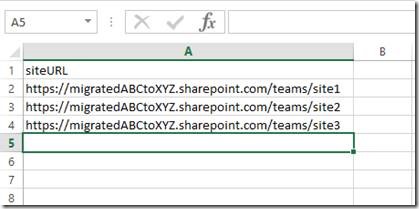
FetchURL.csv should contain the list of SharePoint sites.

clip_image002

 $CSVData = Import-CSV -path "C:FetchURL.csv"
 foreach ($row in $CSVData)  
 {
     $exportlist = @() 
     #Creating SPSite Object 
     $MySiteCollection = new-object Microsoft.SharePoint.SPSite($row.siteURL)
     $MyWeb = $MySiteCollection.openweb()
     #Getting the SP Users available in that site 
     $siteUsers = $MyWeb.SiteUsers
     #Exporting the users into csv file 
     $exportlist = @()
     foreach($user in $siteUsers){
         $obj = New-Object PSObject -Property @{
             “ABCuser”= $user.LoginName
             “XYZuser”=’’
         }
         $exportlist += $obj 
         $DocPath =$row.siteURL.Split("/")
  	  #Saving the csv file into local drive 
         $path = 'C:'+ $DocPath[$DocPath.Length-1]+'.csv'
         $exportlist | Export-Csv -path $path
     }
     $MyWeb.Dispose()
     $MySiteCollection.Dispose()
 } 


Step 2: Update the User Accounts as per the target environment naming convention

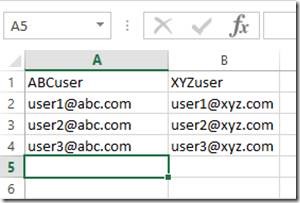
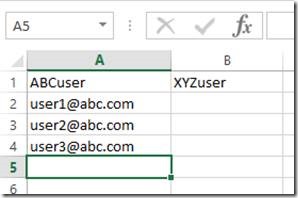
The output csv files from Step 1 will have the user account names available in those sites as shown below,

clip_image004

Update the corresponding user account in XYZuser column. Here, the user account user1@abc.com has its corresponding account in target environment as user1@xyz.com and so on for other accounts.

Finally the csv file will be updated as below,

clip_image006

*************************************************************************

Step 3: Extract AD groups from all the migrated site collections

Following script provides the list of AD groups that are added to the SharePoint site. The script will be executed for all the migrated site collections.

FetchURL.csv should contain the list of SharePoint sites.

 $CSVData = Import-CSV -path "C:FetchURL.csv"
 foreach ($row in $CSVData)  
 { 
     $exportlist = @() 
     #Creating SPSite object
     $MySiteCollection = new-object Microsoft.SharePoint.SPSite($row.siteURL)
     $MyWeb = $MySiteCollection.openweb()
     #Fetching the AD groups available in that SP Site
     $groups = $MyWeb.sitegroups
     #Exporting all the AD groups into csv file
     foreach ($grp in $groups) {
         foreach($user in $grp.Users)
         {
             if ($user.IsDomainGroup -eq $true) {
                 $obj = New-Object PSObject -Property @{
                     “abcGroup”= $user.LoginName
                     "xyzGroup" = ''
                 }
                 $exportlist += $obj 
             }
         }
     }
     $DocPath =$row.siteURL.Split("/")
     #saving the csv file in local drive
     $path = 'C:'+ $DocPath[$DocPath.Length-1]+'_Group.csv'
     $exportlist | Export-Csv -path $path
 }
 $MyWeb.Dispose()
 $MySiteCollection.Dispose() 
 
Step 4: Migrate Users and AD groups into the Target SP farm

The following PowerShell command will be used to migrate all the Users and AD groups from the csv file into the target SP farm

 If ((Get-PSSnapIn -Name Microsoft.SharePoint.PowerShell -ErrorAction SilentlyContinue) -eq $null )
 { 
  Add-PSSnapIn -Name Microsoft.SharePoint.PowerShell
 }
 function MigrateUserOrGroups($migrationType, $csvFile)
 {
    #Getting the SPFarm object
    $farm = Get-SPFarm 
    Write-Host $migrationType
    #Checking whether the user input the type of Migration as Group
    if($migrationType -eq "Group"){
    Import-Csv $csvFile | ForEach-Object{
       Write-Host "Migrating Group" $_. abcGroup "to" $_. xyzGroup -ForegroundColor Green
       $farm.MigrateGroup($_.abcGroup, $_.xyzGroup)      
        }
       }      
     #Checking whether the user input the type of Migration as User
     if($migrationType -eq "User")      {        
         Import-Csv $csvFile | ForEach-Object{
         Write-Host "Migrating User" $_. ABCuser "to" $_. XYZuser -ForegroundColor Green
         $farm.MigrateUserAccount( $_.ABCuser, $_.XYZuser, $false)
         }      
       }
       
    Write-Host "Migration Completed" -ForegroundColor Cyan  
    # $farm.Name
 }
 MigrateUserOrGroups $args[0] $args[1] 


Inputs for the PowerShell script:

For User migration: Open ‘SharePoint 2010 Management Shell’ and Run the following command. ./PowershellfileName.ps1 “User” “<Path of CSV file which has both ABC and XYZ user account details>”

For Group migration: Open SharePoint 2010 Management Shell and Run the following command.

./PowershellfileName.ps1 “Group” “<Path of CSV file which has both ABC and XYZ AD Group details>”

Happy Coding,

Ahamed Buhari

Category : PowerShell, SharePoint

Author Info

Ahamed Fazil Buhari
 
Senior Developer
 
Rate this article
 
Ahamed is a Senior Developer and he has very good experience in the field of Microsoft Technologies, especially SharePoint, Azure, M365, SPFx, .NET and client side scripting - JavaScript, TypeScript, ...read more
 

How to migrate the test cases from an excel to TFS

Tarun Kumar Chatterjee
 
Net – Technology Specialist
February 26, 2016
 
Rate this article
 
Views
18384

In one of my project requirement it was said to upload all the test cases to TFS, I had an excel version. After doing a round of research found a way out of using a free 3rd party tool to achieve the requirement & the tool named is “Test Case Migrator Plus”. Thought of sharing with you if it helps anyone.

I downloaded the exe from: https://tcmimport.codeplex.com/releases/

Let’s see the steps to import the test cases from excel to TFS

Open the TFS and create a folder (not necessary) where you want to upload the test cases (for e.g.Test Plan)

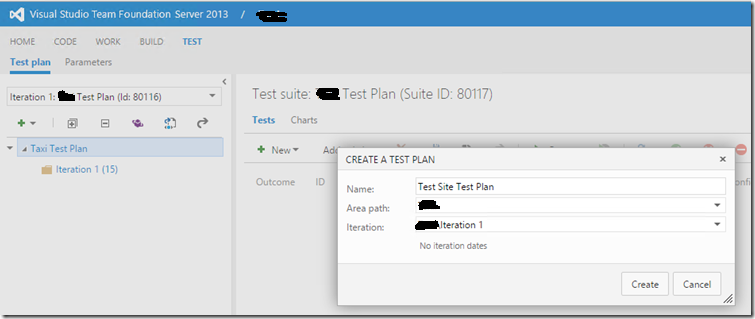
Add a test plan named as “Test Site Test Plan”

clip_image001

Here is the dummy specie of test cases excel sheet I used.

clip_image003

One important field is ‘Path’ which will contain the folder name (or Test Plan name) and the other is ‘Date’.

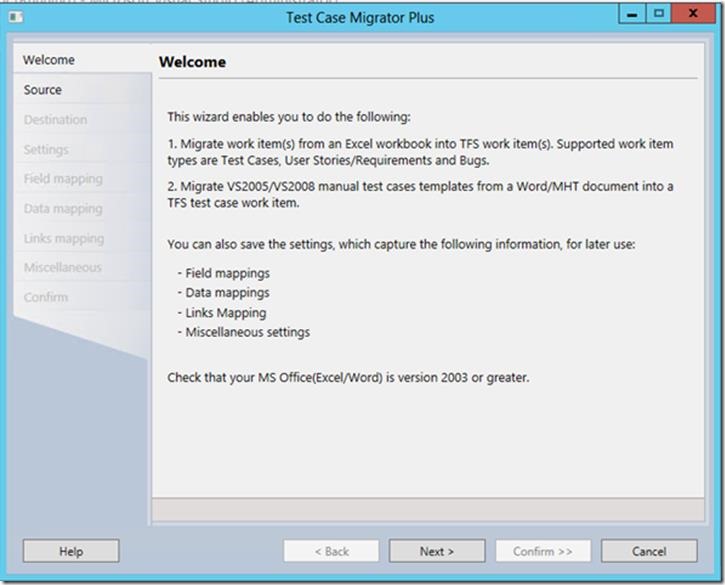
Now in Test Case Migrator Tool and click on next.

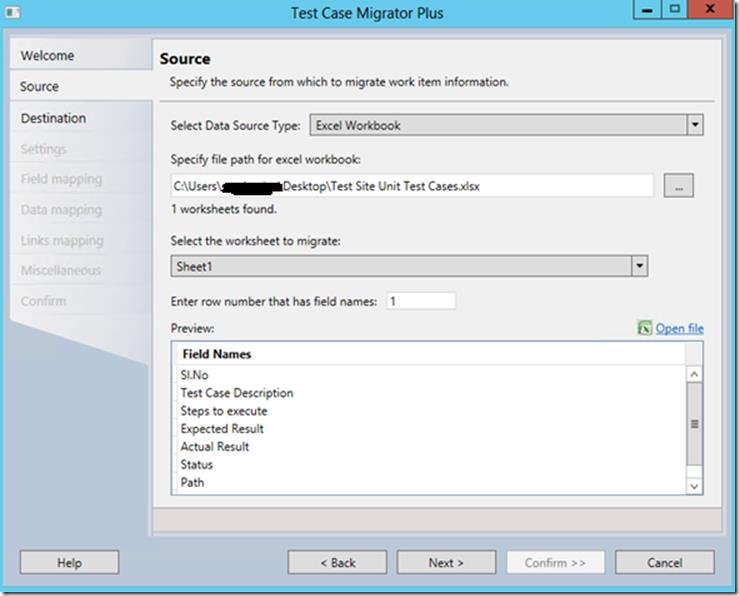
clip_image005

Select the test case excel & next.

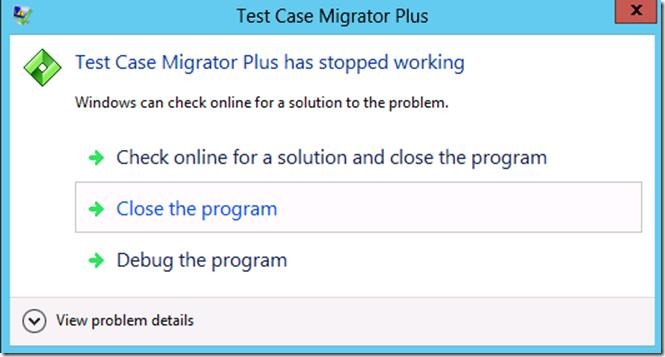
Directly downloaded “TestCaseMigrationPlus” software also was not working in our case, it was throwing below error:

clip_image007

Now as a solution what I did:

Downloaded the source code and apply the patches from: https://tcmimport.codeplex.com/SourceControl/list/patches. Rebuild the application and then import the excel again.

clip_image009

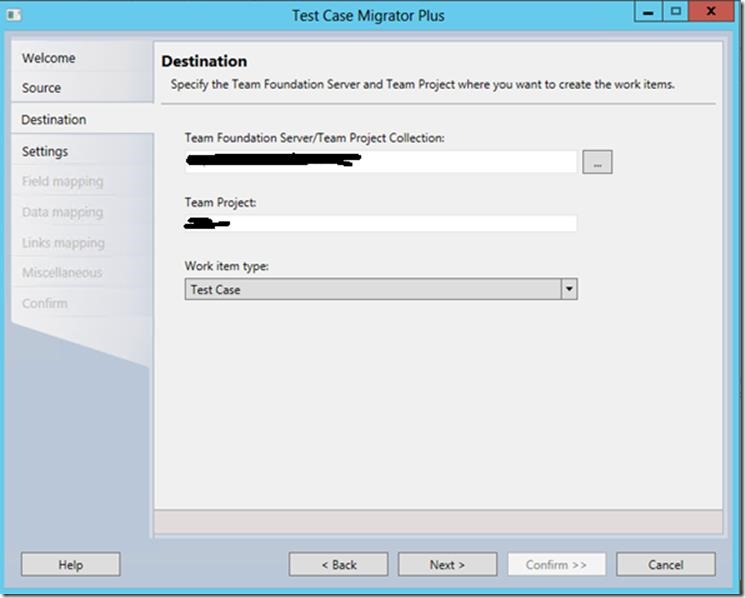
Click on next and confirm at the end and test cases would be uploaded at the TFS URL where you want it.

clip_image011

Click on next.

clip_image013

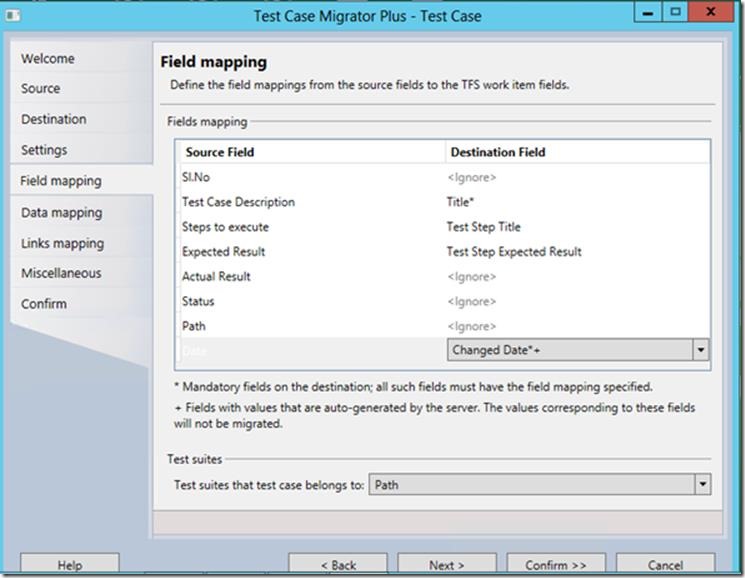
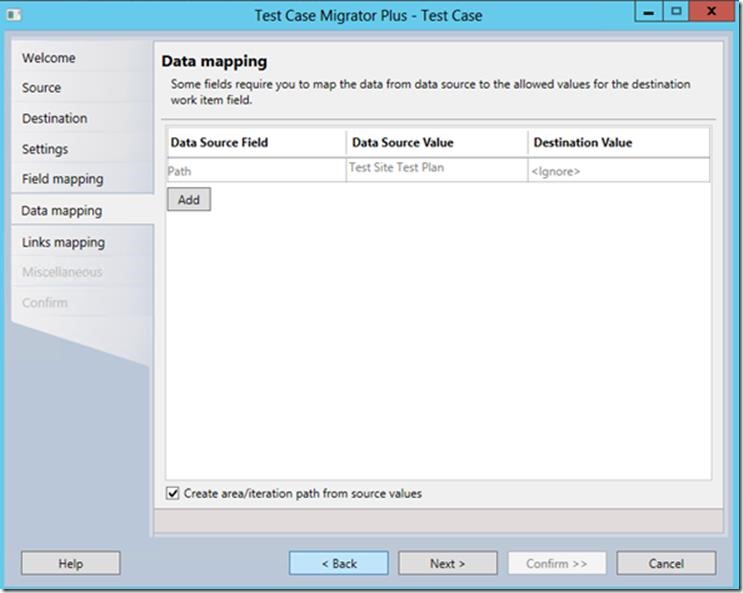
Now mapped the fields accordingly. Please note that it’s not necessary to mapped all the fields but make sure that you mapped the mandatory fields (Title & Changed Date). Also, need to select Test suits as “Path”. You can refer the below screen shot for reference.

clip_image015

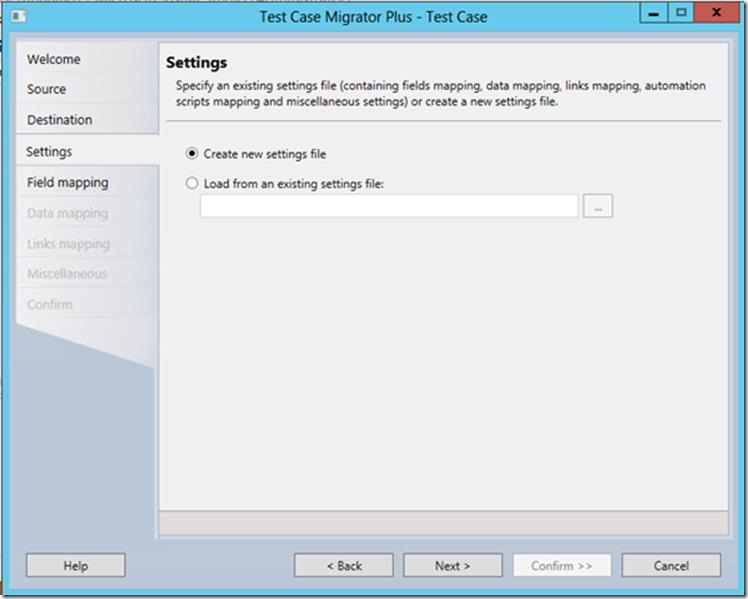
Click on next.

clip_image017

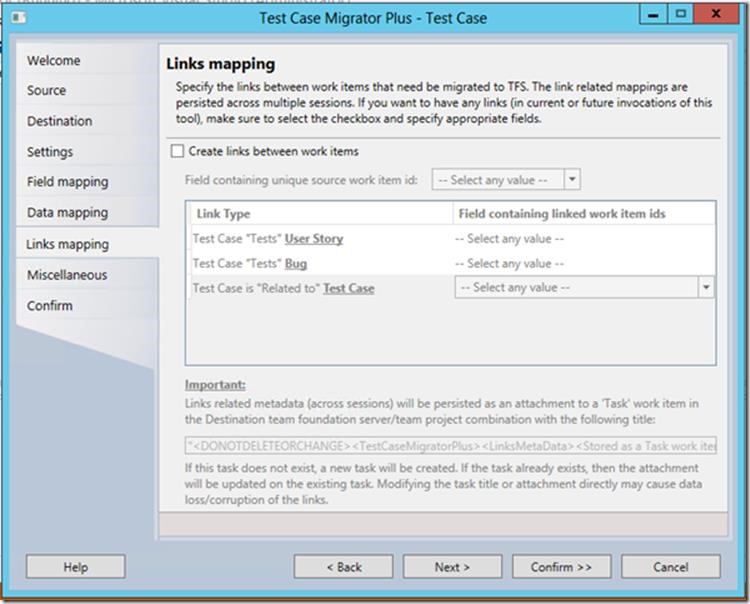
Click on next & unselect Create links between work items.

clip_image019

Click on next.

clip_image021

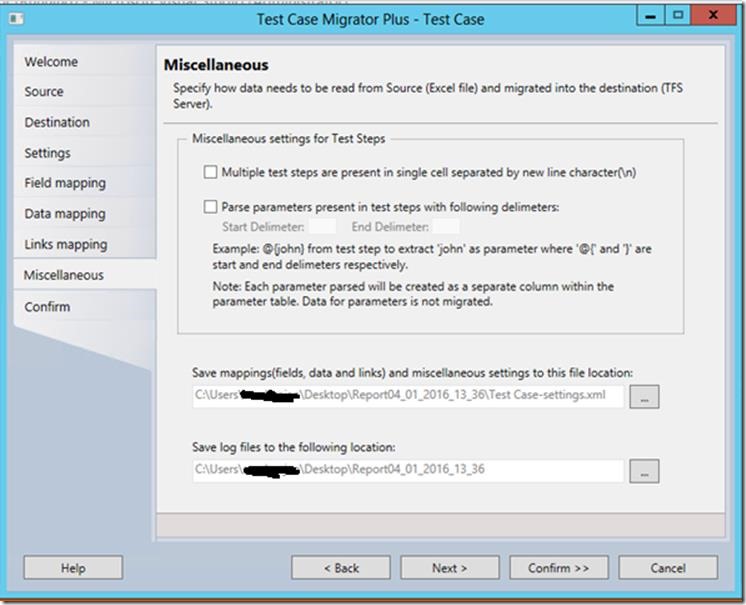
Click on next.

clip_image023

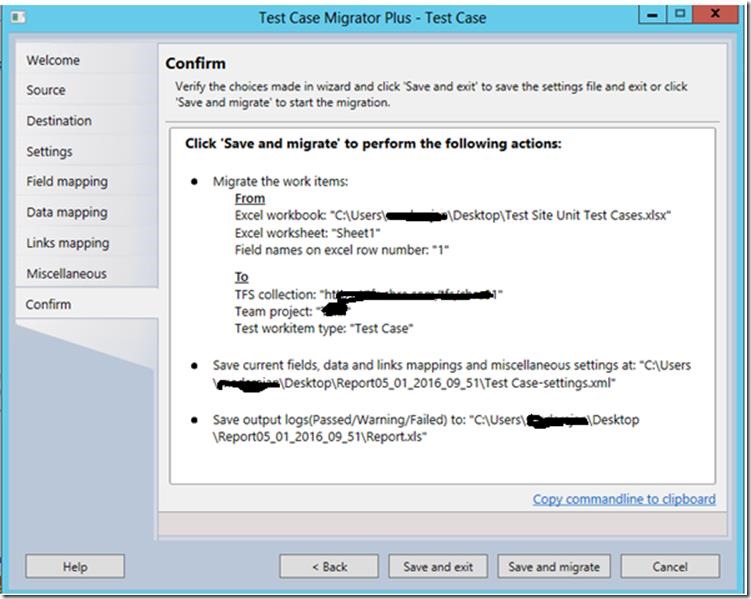
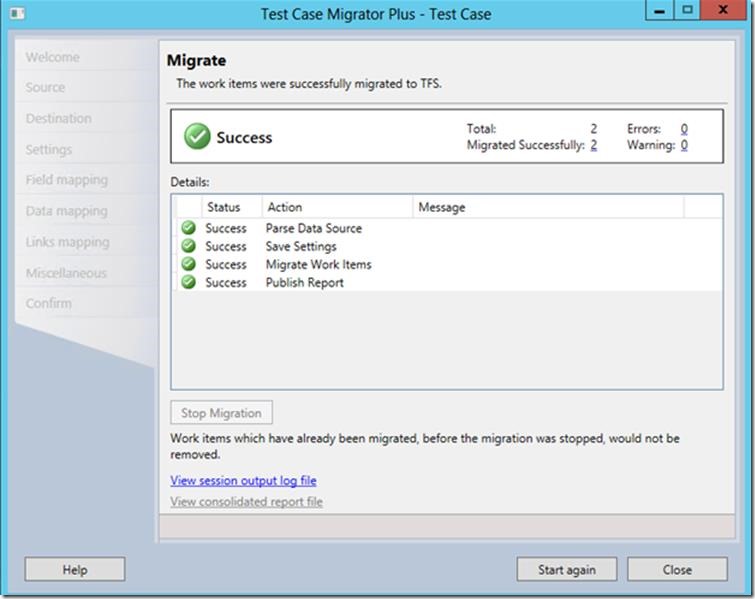
Click on Save and migrate.

clip_image025

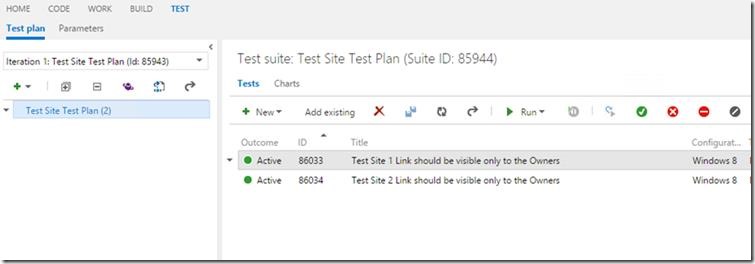
Refresh the TFS link, the test cases will be imported to TFS successfully.

clip_image027

Open any one of the test case & check if the Action & expected result showing the data properly.

clip_image029

To run the test case you will have to right click on test case & run. To make it Pass you will have to select the test case & click on the “Pass test” button.

clip_image031

Hence go to the TFS and check that test cases are uploaded or not. On successful upload repeat the same process for other test cases.


Happy Coding

Tarun Kumar Chatterjee

Category : .Net

Author Info

Tarun Kumar Chatterjee
 
Net – Technology Specialist
 
Rate this article
 
Tarun has been working in IT Industry for over 12+ years. He holds a B-tech degree. He is passionate about learning and sharing the tricks and tips in Azure, .Net ...read more
 

Concluding on the topic of Upgrade/ Migrate from SharePoint 2010 to SharePoint 2013

Senthil Kumaresan
 
SharePoint Consultant
January 20, 2014
 
Rate this article
 
Views
20643

In general, I have covered all possible activities to be performed at a high level for performing the migration from SharePoint 2010 to SharePoint 2013 in my previous articles.

Sl.NoProperty
1Planning for Upgrading from SharePoint 2010 to SharePoint 2013
2Preparing for Migration from SharePoint 2010 to SharePoint 2013
3Activities to be performed before Upgrade
4Steps to be performed during Upgrade
5Post Upgrade steps after migration from SharePoint 2010 to SharePoint 2013
6Concluding migration from SharePoint 2010 to SharePoint 2013 (This Article)

Always perform the test migration in your SIT or Model Office Environment before proceeding to configure the Pre-Production, Production and DR.

Develop an automated PowerShell script especially for building the configuration of the SharePoint Servers. This would be very helpful in building multiple servers within shorter time.

3rd Party Migration tools can helps save time and will be useful only when you have large content with less customizations, Unstructured content which you plan to revamp and redefine, Move external content into SharePoint, Granular migration of content, If your content is business critical and the users are not ready to wait for a smaller period of time in read only mode during the migration as the tools provide greater flexibility in incrementally performing the migration while you do it in a phased manner.

If you have not used Remote Blob Storage, Plan to enable it and migrate content into RBS from your content database after performing the migration as this would help largely in your cost to manage data in SQL Server.

Though migrating in a live environment is not easy and will end up in encountering different level of issues, my idea is to provide a consolidate view of the different set of activities that needs to be performed at various stages of the version upgrade and will definitely help in preparing and planning for the upgrade.

Category : SharePoint

Author Info

Senthil Kumaresan
 
SharePoint Consultant
 
Rate this article
 
SharePoint Architect – Consulting on SharePoint Infrastructure, IT Governance and Apps Development. ...read more
 

Post Upgrade/ Migration steps to migrate from SharePoint 2010 to SharePoint 2013

Senthil Kumaresan
 
SharePoint Consultant
January 19, 2014
 
Rate this article
 
Views
31263

Once you have performed the database attach upgrade in a phased manner or complete an end to end upgrade, you will have to perform additional steps to complete the whole SharePoint migration activity. Though there are lot of articles in the web that describes the steps in detail the below article will help you understand the tasks to be performed post migration.

Sl.NoProperty
1Planning for Upgrading from SharePoint 2010 to SharePoint 2013
2Preparing for Migration from SharePoint 2010 to SharePoint 2013
3Activities to be performed before Upgrade
4Steps to be performed during Upgrade
5Post Upgrade steps after migration from SharePoint 2010 to SharePoint 2013 (This Article)
6Concluding migration from SharePoint 2010 to SharePoint 2013

Features that do not work after upgrade:

There might be an exhaustive list, but I have covered the common ones that happen in any environment

  1. Project Web Access Sites will not work with the SharePoint 2010 experience. They will only work when you upgrade them to SharePoint 2013 experience mode.
  2. Enable settings:

             1. Enable "Workflow Auto Clean Up timer job"

             2. Configure Search service application based on the new search topology defined and run a Full Crawl for all your content sources.

Migrate to SharePoint 2013 UX Mode:
Most of the Site Collections will continue to work with SharePoint 2010 user experience. By default It is not automatically upgraded to SharePoint 2013 user experience while you perform the content database upgrade.

You can later force all the site collections to upgrade to SharePoint 2013 experience (or)

You can allow Site Collection Admins to perform the upgrade using Self Service Site Collection

Prepare a list of site collections that should done by Farm Administrators. This list might include sites that are business critical, Extremely large sites which holds data more than 5 GB of data, Specialized Site Collections (i.e.. Search Center Sites, PWA Sites, etc..) and Sites that are heavily customized using custom site definitions, farm level customization’s etc…

Site Collection Level Setting to exclude specialized Site collection

          -SpSite.AllowSelfServiceUpgrade

          – If set to false. The systems status message will not display the notification. This can be done for the list of site collections that are not allowed to be upgraded by Site Collection Admins

Features that do not work if migrated to SharePoint 2013 UX Mode:

Most of the items that worked in 2010 mode will continue to work after upgrading to 2013, but there are some exceptions to that. Requesting and performing a test with “upgrade evaluation site collection” will help to identify issues with the UI customizations done in the site which I would later explain in this article.

  • Sites that are created with all Workspace templates(Document/Meeting Etc..) will not work if upgraded to SharePoint 2013
  • The CSS and JavaScript’s that override the default SharePoint scripts might not work properly.
  • Fast Search Center sites will work only in SharePoint 2010 experience and cannot be upgraded.

Force All Site Collections to Upgrade to SP 2013 User Experience Mode by Farm Admin:

Perform a backup of the farm before moving on to upgrading the site collection to 2013 user experience mode.

If you need to force all the 2010 site collections to be migrated to 2013 User experience , then you need to use power shell and perform the upgrade – Get-SPSite | Upgrade-SPSite – VersionUpgrade.

Configure Environment to Allow Site Collection Admin to perform Self-Service Site Collection Upgrade:

If you have planned to allow Site Collection Admins to perform the Site Collection upgrade, as a Farm administrator you have the following options below to control the upgrades performed by the site admins.

1. Upgrade Throttle Settings at Content Database Level:

            -SPContentDatabase.ConcurrentSiteUpgradeSessionLimit

            -Maximum no.of concurrent site collection upgrade that can occur in a content database. When limit is exceeded then it is queued to be upgraded

2. Web Application Upgrade Thottle Settings (SPWebApplication.SiteUpgradeThrottleSettings)

Displays information about the below settings

            -SPWebApplication.AppPoolConcurrentUpgradeSessionLimit

            -Maximum no. of concurrent site collection upgrade that can occur in the web application. When limit is exceeded then it is queued to be upgraded. Default is 5 per web server

            -SPwebApplication.UsageStoragelimit

            -Maximum size of a single site collection that can be upgraded within the process. When limit is exceeded then it is queued to be upgraded by timer job later

            -SpWebApplication.SubWebCountLimit

            -Maximum no. of subwebs a single site collection can have for upgrade to occur within the process. When limit is exceeded then it is queued to be upgraded by timer job later          

3. Web Application User Notification Settings:

When a site collections of a web application is available to Site Collection admins for upgrade, the farm admin can setup a status bar to show on all the sites to provide information on performing the upgrade. Also can send reminders to site collection admins to perform the upgrade

            -SpWebApplication.UpgradeMaintenanceLink

            -A link to appear in the maintenance system status message that appear on the top. Through this you can provide information about the upgrade status/Escalation contacts to end users

            -SpWebApplication.UpgradeReminderDelay

             -Time to have the upgrade notification to be available to end users. Default is 30 Days

Steps to perform by Site Collection Admin before upgrading to SharePoint 2013 mode:

  1. Perform a Pre-Upgrade Site Collection Health Check (http://technet.microsoft.com/en-us/library/jj219720.aspx) – Helps to identify the unghosted files.
  2. Optional Step: Request for an Upgrade Evaluation Sites (http://technet.microsoft.com/en-us/library/jj219650.aspx) -A Site Collection Admin can request a evaluation site using the Site Settings page. A "Create Upgrade Evaluation Site Collection" timer job creates a SharePoint 2013 Preview copy of the SharePoint 2010 Site Collection and sends an email to the site collection admin. The site administrator can validate and review all the functions and decide on to upgrade the original site collection. The Site Collection automatically expires in 30 days which is the default. By default, Site Collections more that 100 GB is not allowed to be created. This can be adjusted using the MaxSizeForSelfServiceEvalSiteCreationMB property of the SPWebApplication using Powershell.
  3. Perform a Deferred Site Collection Upgrade – Upgrade the site collection using the option in the Site Settings page.
  4. Review Site Collection Upgraded – Verify the issues that has occurred during the upgrade .A report is generated to show the issues that occurred during the upgrade and is available in Site Collection Upgrade page which is in  Site Settings – under Site Collection Administration (http://technet.microsoft.com/en-us/library/jj219531.aspx)
  5. Troubleshoot Site Collection Upgrade Status – Refer the TechNet article http://technet.microsoft.com/en-us/library/jj219648.aspx

That concludes the upgrade of SharePoint 2010 to SharePoint 2013. Hope you had a better understanding about the various steps involved in performing the upgrade of SharePoint 2010 to SharePoint 2013.

Category : SharePoint

Author Info

Senthil Kumaresan
 
SharePoint Consultant
 
Rate this article
 
SharePoint Architect – Consulting on SharePoint Infrastructure, IT Governance and Apps Development. ...read more
 

Steps to be performed during Upgrade/ Migration from SharePoint 2010 to SharePoint 2013

Senthil Kumaresan
 
SharePoint Consultant
January 16, 2014
 
Rate this article
 
Views
21580

Most important part of performing the upgrade or migration from SharePoint 2010 to SharePoint 2013 is to plan on how and when to perform the actual database upgrade after you have setup the fresh SharePoint 2013 Environment. In this post I will be covering the steps that you should be performing during the change window for the migration.

Sl.NoProperty
1Planning for Upgrading from SharePoint 2010 to SharePoint 2013
2Preparing for Migration from SharePoint 2010 to SharePoint 2013
3Activities to be performed before Upgrade
4Steps to be performed during Upgrade (This Article)
5Post Upgrade steps for migration from SharePoint 2010 to SharePoint 2013
6Concluding migration from SharePoint 2010 to SharePoint 2013

Plan to perform these migration phase wise. If you have very large content and you foresee that you can’t upgrade all of the Web Applications on a weekend, then plan to upgrade 1 Web application per weekend and perform the cutover to end users for every weekend. Subsequently you need to plan for making your search available for the moved content for your other web applications that live in the old farm until the phased migration is complete.

You can first setup the search in SharePoint 2013 environment and then connect your old SharePoint 2010 farm to the search service application and then start the phased migration.

During Upgrade (Follow the below Upgrade Order)

  1. Plan to perform the upgrade on a long weekend considering the actual time to implement, Validation time and the backout time required to roll back in case of a failure.
  2. The plan should be based on the time identified during your test upgrade
  3. Follow the below order of upgrade

1. Perform Services Upgrade First (http://technet.microsoft.com/EN-US/library/jj839719.aspx)

  1. Disable the Web Analytics Service Application in the SharePoint 2010 farm
  2. Backup the databases related to the service application in SharePoint 2010.
  3. Ensure that all service application pools are created in the target farm
  4. Create the relevant service application and proxy in the target farm
  5. Upgrade the relevant service applications by attaching the database and upgrading it based on the information provided in the TechNet Article
  6. Start service instances only after your service is created with upgraded database.

2. Configure Web Application

Connect the service instances by connecting to the proxy groups(Some content databases upgrade may use service instances)

3. Upgrading Content Database:

Before performing a content database upgrade

a. Disable "Workflow Auto Clean Up" timer job to preserve associations and running instances of workflows. After disabling leave an hour time for the running job to complete.

b. Make the database in Read-Only mode.

c. Perform a Copy only Backup and Move the a backup to the new SQL Server 2012

d. Before  upgrading make sure you have not set the database in Read-Only mode in the new SQL Server 2012

Use the Core Commands required for Upgrade (To be done for all content databases)

a. Test-SPContentDatabase (Replacement for Stsadm -PreUpgradeCheck)-

1. Can be performed on a live database during off-peak hours.

2. To find issues, Orphans, Missing features, missing templates/site definitions, missing webparts

3. Site Collection in content database but not in config database sitemap or vice versa

4. Use -ShowRowCounts switch to find out database row size. Helps to find the time required to complete the upgrade.

b. Mount-SpContentDatabase

Attaches content database to a farm and starts upgrading the database. If the upgrade fails, the Upgrade-SpContentDatabase can be used to restart the upgrade process after fixing the issues that caused the failure.

c. Upgrade-SpContentdatabase

1. Used mainly for Build to Build upgrade of content database.

2. For version to version upgrade this can be used to restart the upgrade when there is failure in the upgrade process after executing the Mount-SpContentdatabase.

3. Can be run parallel on different content databases

Perform the Content Database upgrade in parallel using the Mount-SpContentDatabase Command

a. Move the mdf, ldf, ndf files from the old SQL Server to the new SQL Server 2012.

b. Add the databases to the database instance using powershell or SQL Management Studio

c. Use Mount-SpContentDatabase command to attach and Upgrade the database

d. If you encounter failures, review the upgrade log and correct the issues. Once corrected you can use the Upgrade-SpContentDatabase command to re-start the upgrade process.

4. Validate the Upgrade Process http://technet.microsoft.com/en-us/library/cc424972.aspx

Review Errors

  1. Review Upgrade Status Page in Central Administration for Errors and Warnings
  2. Review Upgrade error log files available in  %COMMONPROGRAMFILES%\Microsoft Shared\Web server extensions\15\LOGS
  3. Review Correlation errors in ULS logs during the upgrade period
  4. Review Application Event Logs for possible Errors or Warnings.

a. Application Event logs are sources of finding service account login failures

b. Domain Connectivity Failures

c. Custom Solution Provisioning errors

d. External Service connection failures

c. Server incompatibility between other SharePoint servers due to patch levels of the software’s installed

Solve Issues

  1. First Solve issues that are authentication errors, assembly load errors, process crashes as that would have high impact on the functionalities
  2. Solve issues related to missing server file dependencies and customizations
  3. Solve issues related to content

General Testing

  1. Identify and test sites based on criteria’s like Business critical sites, heavily customized sites, Sites that use Third Party solutions, Specialized site collections (i.e.. Content Type Hub, MySite Host) and Sites that use external connections via BCS, Office Data Connection Files for data.
  2. Validate if all the site features exist and sites created on custom site definitions work
  3. Basic Testing should include creating of Web Applications, Site Collection for SharePoint 2010 Mode and SharePoint 2013 Mode, SubSites based on Site Definitions, Feature activation on both SharePoint 2010 Mode and SharePoint 2013 Mode, Add Web Parts in both modes, Add Pages in both modes, Create Libraries/Lists/Content Types in both modes, Create Workflows in 14 mode, e.t.c….
  4. Try logging in with different authentication providers for your site collections.
  5. Validate User Lookup works in Central admin and any Web application
  6. Ensure that all the Service accounts and App Pool accounts are member of the SPDataAccess Role Account

Finally the Migration is complete and you will have all your web applications in the SharePoint 2013 Environment. There would be no change in the way the UI behaves as your web applications run in SharePoint 2010 mode in the SharePoint 2013 environment. But still you have few more activities to be performed to utilize the full power the new SharePoint 2013 which I will be covering in my next article.

Category : SharePoint

Author Info

Senthil Kumaresan
 
SharePoint Consultant
 
Rate this article
 
SharePoint Architect – Consulting on SharePoint Infrastructure, IT Governance and Apps Development. ...read more
 

How to Create a Site Column in SharePoint 2010

Gopal Muthukrishnan
 
SharePoint Developer
February 19, 2013
 
Rate this article
 
Views
31040

This article describes how to create a site column in SharePoint 2010 by using SharePoint UI, Programmatically, PowerShell and SharePoint Designer. By this, you can choose your own choice to create a Site Column in your environment.

Site column

SharePoint 2010 has a site column entity that allows you to reuse columns across multiple lists.  If you create a new column in custom List, you can use the column in that list alone. Suppose if you create a site column you can use the column in any list or library within your Team Site

1. Create Site Column in SharePoint UI

2. Programmatically create Site column

3. Create Site Column by PowerShell

4. Create Site Column by SharePoint Designer

To create a new site column in a list or library

Step 1:-

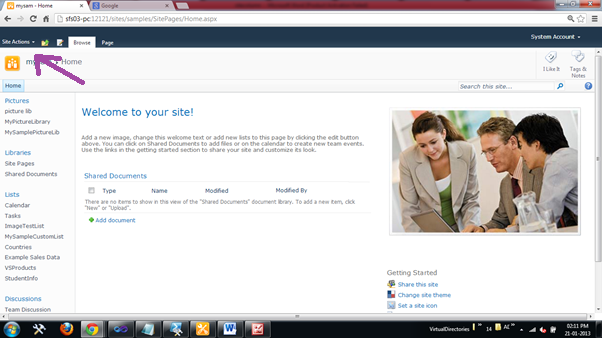
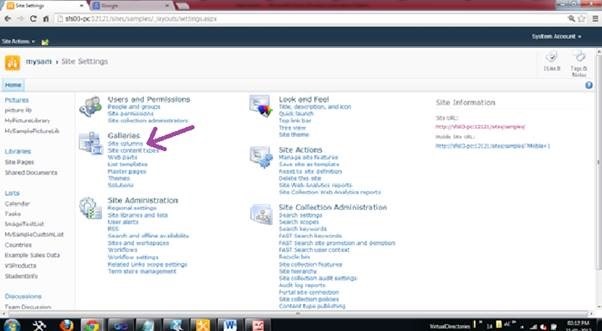
Choose Site Actions

clip_image001

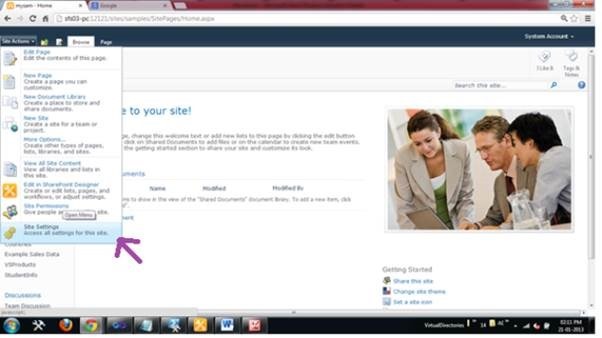
Step 2:-

Click Site Settings from Site Actions from Top Level Site

clip_image003

Step 3:-

Click the Site Columns from Galleries

clip_image005

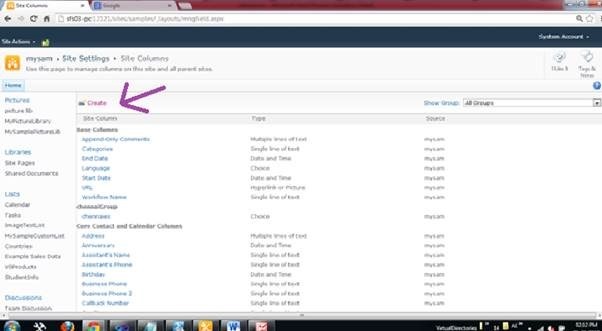
Step 4:-

Click the Create link to create a new column.

 clip_image007

Step 5:-

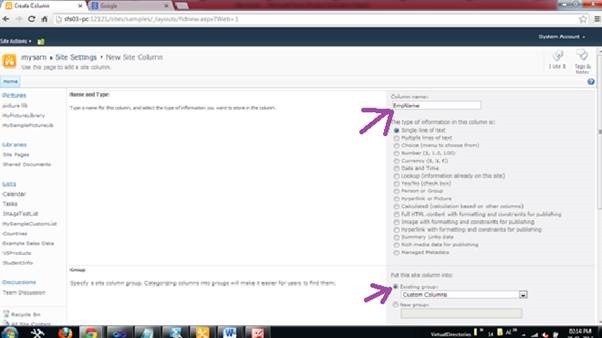
Enter the name for your site column in Column Name field.

Step 6:-

Select the column type by clicking the radio button.

Step 7:

Then Select Custom Column from Existing groups dropdown. This site column must be a member of this group.

clip_image009

Step 8:-

Click OK button. Your site column will be listed in site columns.


Programmatically create Site Column in SharePoint

Adding a New Site Column in SharePoint Site

 SPSecurity.RunWithElevatedPrivileges(delegate()
            {
                using (SPSite site = new SPSite(SPContext.Current.Site.Url))
                {
                    SPWeb web = site.RootWeb;
                    //Create Site Column
                    string SiteColumnName = "India";
                    //Add choice Field "India"
                    if (!web.Fields.ContainsField(SiteColumnName))   
                    {
                        string countryField = web.Fields.Add(SiteColumnName, SPFieldType.Choice, false);
                        //Set the Field Properties
                        SPFieldChoice CityInIndia = (SPFieldChoice)web.Fields.GetField(SiteColumnName);
                        //Set the group for the Site column
                        CityInIndia.Group = "States";    
                        //Add the choices
                        string[] States = new string[] { "TamilNadu", "Kerala", "Andhra Pradesh", "karnataka"};
                        CityInIndia.Choices.AddRange(States);
                        //Set the default value
                        CityInIndia.DefaultValue = "TamilNadu";
                        //Set Fillable value
                        CityInIndia.FillInChoice = true;
                        //Update the field
                        CityInIndia.Update();
 
                    }
                }
            });

Create a New Site column by PowerShell

Code for creating a New site Column through PowerShell Script

 $site = Get-SPSite -Identity "http://sfs03-pc:12121/sites/Samples/"
 $web = $site.RootWeb 
 $fieldXML = '<Field Type="Text"
 Name="EmpName"
 Description="Employee Name Column Info."
 DisplayName="EmpName"
 Group="EmployeeInformation"
 Hidden="FALSE"
 Required="FALSE"
 ShowInDisplayForm="TRUE"
 ShowInEditForm="TRUE"
 ShowInListSettings="TRUE"
 ShowInNewForm="TRUE"></Field>' 
 $web.Fields.AddFieldAsXml($fieldXML)
 $web.Dispose()
 $site.Dispose()

Then check your Gallery you will find the site column in the name of EmpName under the group of EmployeeInformation

Modifying the Existing Site column by PowerShell

Code for Modifying the Existing site Column through PowerShell Script

$site = Get-SPSite -Identity "http://sfs03-pc:12121/sites/Samples/"
$web = $site.RootWeb 
$field=$web.Fields["EmpName"]
$field.Type= "Choice"
$field.Update($true)
$web.Dispose()
$site.Dispose()

Then check your Gallery, EmpName column type will change to Choice type

Create a new site column in Sharepoint Designer

Open your Site in Microsoft SharePoint Designer

Step 1:-

Click Site Columns

clip_image001[4]

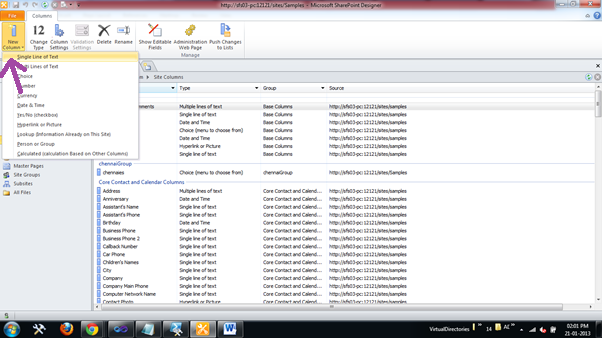
Step 2:-

Click the New Column from file Menu and the choose its Type

clip_image002

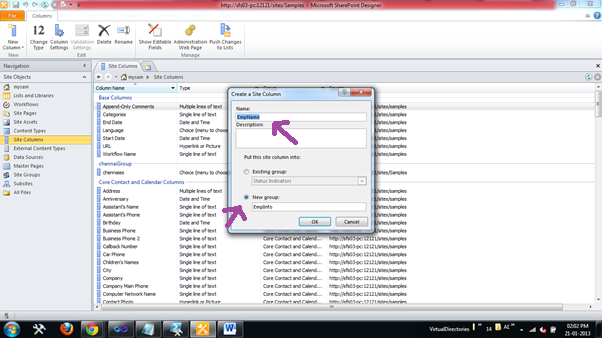
Step 3:-

Enter The Column Name in the TextBox and the Choose group

clip_image003

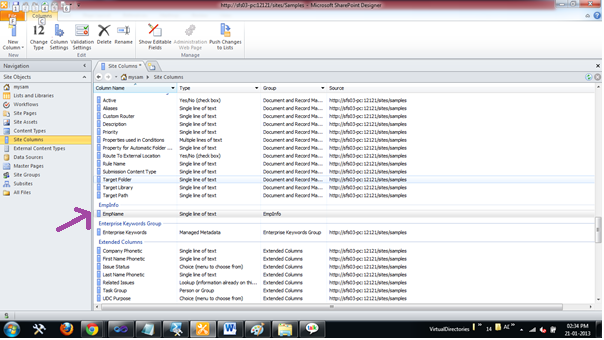
Step 4:-

Click save Button to find your Created SiteColumn

clip_image004

Author Info

Gopal Muthukrishnan
 
SharePoint Developer
 
Rate this article
 
Works as SharePoint Developer in Chennai, India. ...read more
 

Five benefits of migrating to SharePoint 2013 from SharePoint 2010

Avatar
 
SharePoint Consultant
January 7, 2013
 
Rate this article
 
Views
25422

It’s new year (2013) and a fresh start for a lot of us on a lot of fresh initiatives. So here’s wishing you all folks out there a Very Happy and Progressive New Year and good luck with your new initiatives. Starting with this blog I will try sharing my experiences and thoughts with SharePoint 2013 in non-technical terms with the intention of enabling business engineers / system analyst / people wanting to learn SharePoint the non-technical way and SharePoint newbies understand this new version of a versatile and feature heavy platform.

Having fiddled with SharePoint 2013 for a while, SharePoint 2013 could very well be the inflection point of SharePoint as a platform. There are a whole new plethora of features that hopefully excites organisation to move to this platform which I believe has found its maturity model. Five key points that kind of sticks out among the various direct and indirect cost benefits that an organisation could derive by migrating to SharePoint 2013 in no particular order of importance are

1. Search built into the platform

2. Incremental storage for documents

3. Mobile space

4. Social computing

5. User Licensing


image

Let’s explore each one of them in detail.

Search built into the platform now

The advent of SharePoint2013 saw the demise of FAST as a product that’s available separately. With SHAREPOINT 2013 Microsoft has integrated the features that were available in FAST into SharePoint platform itself. For those wanting to know what FAST is, FAST is a super search engine that Microsoft made available for organisation that had loads (typically running into millions of documents and contents) of artifacts to search through and wanted some top end features like people search, visual search, context based search, tunable relevance model to suit individual organisation needs . Microsoft’s own search engine BING users FAST. If FAST search excites you have a look here.

It was good thinking on part of Microsoft to understand the importance of getting the niceties of FAST search to a larger audience and include it as part of the platform itself. This should really jump start an organisation in leveraging on the niceties of search which is the most important and complex feature of SharePoint. Things like thumbnails preview, browsing an entire document in a search result’s preview are now available out of the box making it a really rich set of features that were previously not available to organisations not subscribed to FAST search.

Having said that it still remains that organisations have to tread a fine and difficult path of good discipline and standards to fully reap the benefits of these new features of search in SharePoint 2013. If search enhancements in SharePoint 2013 excites you feel free to read more here.

Mobile Computing

The weakest link for SharePoint 2010 or the Achilles’ heel of SharePoint was its lack of decent support for mobile devices. With mobile computing growing at a bizarre rate and showing no trends of cooling off in the near future it was a shame that SharePoint as a platform was quite weak in the this space. Glad that Microsoft took a hard look at this and have done something noteworthy to talk about.

SharePoint 2013 offers good support for mobile platforms now with facility to render sites depending on the user agent. In other words depending on what device (user agent) is requesting a site, SharePoint 2013 will render a contemporary, classic or full desktop view of a site. The contemporary view is rendered in HTML 5 and is optimised for mobile browsing experience. Of course this requires that the requesting agent is a smart device and also the Mobile browser redirection feature be activated. This feature is by default is not activated.

Another good feature is the push notification. When this feature is activates SharePoint can now send alert notifications to applications on mobile devices that have subscribed to alerts/notifications in a site. Also possible is the ability to send SMS (Short Messaging Service) notifications to mobile devices.

One other exciting feature albeit limited to only being available programmatically is the location feature. SharePoint allows for applications to use geolocation data and thus now becomes aware of user location data and can leverage this on say Bing maps. Geolocation is now a new data type in SharePoint that opens a new flavour of applications on SharePoint. This means with SharePoint 2013 organisations no longer need to make special effort and development robust support for SharePoint. To read more about mobile computing changes to SharePoint visit this place.

Social

Social features in SharePoint 2013 has been enhanced and now has some laudable features. To begin with SharePoint 2013 has a new site template for Community sites. In other words it now allows for a dedicated site that has features built specifically for social communities like discussion threads, allowing for building community members to build reputation based on their contributions to the community, earn badges that indicate the level of reputation a community member carries and a whole lot of other features. What this means for organisation is that with SharePoint 2013 they can launch a fairly feature rich community site and enhance their workplace social computing infrastructure without additional cost. In areas like tagging the experience is similar to twitter and adoption is much easier. To know more about social computing changes in SharePoint 2013 visit here.

User License

Over the last few years having observed  various SharePoint ecosystems, the following seems to be the trend that not every user in an organisation using SharePoint would use all the features of SharePoint (like the case of Microsoft Office, only 20% of the users of Office use 80% of the features the rest use only 20% !). But organisations even though were aware of this fact were constrained to buy either the standard or enterprise user CALs (Client Access License).

Lets illustrate this with an example. Assume that if 50% of the users in an Organisation used the Enterprise edition features of SharePoint and the other half used only the features in standard edition the organisation still had to buy Enterprise license for the entire user base as SP2010 did not allow for mixing of these licenses within a farm (a SharePoint installation is usually called a farm) . The only other option was to set up a separate farm for the Enterprise user base and the standard user base defeating the very purpose of using SharePoint as a collaboration tool and also incurring additional cost for the SharePoint server licenses.

All this changes dramatically with SharePoint 2013 in which Microsoft has re-architected the User License Enforcement capabilities. What this means is now within a single farm organisations can mix licenses and assign users to a license group. So in our example we would have two license groups “Enterprise” and “Standard” and organisation would buy only as many as they need of the Enterprise and Standard licenses. This feature is not turned on by default but needs to be turned on explicitly at the time of installing SharePoint.

A lot of Organisations will lap up this feature and hopefully saving a lot on license cost and budgeting the savings to do more on their SharePoint ecosystem. To have a full immersion of this feature have a read here.

Incremental / Shredded storage for Document storage

Organizations typically start with SharePoint to leverage its Document Management System(DMS) features. SharePoint as a DMS allows for version control, publishing, content management and much more .

Before we start discussing Incremental / Shredded storage let’s have a quick look on how SharePoint stores documents. SharePoint maintains multiple versions of the document and each change to the document creates a new version. Each new version is actually a new complete copy of the document/artifact itself. To illustrate this concept let’s look at an example. Say you have a document of 4 MB size and you edit and save the document twice. SharePoint would have three physical copies with different version numbers. In essence SharePoint would need a minimum of 4 MB * 3 times (we saved three times) 12MB of space. Note that the numbers are for illustrative purposes only. Also by saving three times I mean you would want to have three versions of the document from a version control perspective.

With SharePoint 2013 the way artifacts are stored has changed and is now incremental or shredded. What this means is the document is shredded into pieces and stored as XML and any changes in a new version of the document are captured and only the changes to the document are stored instead of the entire document. This would mean much lesser storage requirements. While storage costs might not be a big part of the budget for a SharePoint farm this new feature does significantly reduce the storage requirements. More detailed information is available here if you want to know more on DMS related changes in SharePoint 2013.

Closing Note

While not all changes mentioned above might lead to a direct and significant cost savings for an organisation albeit it does add to an IT budget “radar blip-able” number. The migration to SharePoint 2013 makes even more sense to organisations that are entitled for an automatic upgrade to SharePoint 2013 as part of their license agreement. This year I expect to see quite a significant part of the organisations running SharePoint 2010 wanting to migrate to SharePoint 2013 considering the huge benefits an organisation could reap. Also, I believe Microsoft has done enough justice to this product for an Organisation’s SharePoint teams to cost justify and show better ROI in migrating to SharePoint 2103.

Having said that the SharePoint 2013 migration project is not without its own set of challenges or pitfalls. Intending to write a separate blog on migration as a logical continuation of this blog next. Feel free to leave your comments and your experiences with SharePoint 2013 in your organistaion.

Category : SharePoint

Author Info

Avatar
 
SharePoint Consultant
 
Rate this article
 
Siva works as a SharePoint Business Consultant and has been working on SharePoint for the last few years. ...read more
 

Leave a comment