Manage SSRS Report Parameter(s) and Report Subscription in SharePoint Integrated Mode – Part 2

Moses
 
SharePoint Consultant
June 15, 2013
 
Rate this article
 
Views
23874


This is continuation of my previous article that dealt with the Smart & Smarter side of Report Parameters in SQL Reporting Services – SharePoint integrated mode. We had already covered the basics in SSRS Report Parameters from Report level & went on with the cascading style of report parameters in SSRS at report level. In this article we’ll cover the Smartest side of Report Parameter & Report Subscription.


Report Parameters – SSRS in SharePoint Integrated Mode

Parameters are used when data needs to be narrowed down. Not all the data source in SSRS support parameters, in such scenario we can use Report Parameters to help users at Report level. These report parameters can be managed after being published based on how it is configured. There are many ways to narrow down, lets categorize it by: Smart, Smarter and Smartest.

For Smart & Smarter mode, please visit this link.


Smartest mode

Report parameters can be passed directly in the URL which could be helpful for non-default parameters. These commands could be categorized to three levels: Report Viewer Web Part commands, Report Server command and HTML Viewer commands. For SharePoint integrated mode, we’ll consider Report Viewer Web Part commands.

In Report Viewer Web Part, following reserved report parameters can be used by prefixing rv: to the parameter names.

  • rv:toolbar

This parameter controls the toolbar display for Report Viewer Web Part. Full is used for complete display of toolbar and this is the default value, Navigation would be used to display only the pagination control in the toolbar or None can be used to hide the toolbar

ex. http://<SharePoint_site>/Reports/_layouts/ReportServer/RSViewerPage.aspx?rv:toolbar=None

  • rv:headerarea

This parameter controls the header display for Report Viewer Web Part. Full is used for complete display of header and this is the default value, BreadCrumbsOnly would be used to display only the bread-crumb navigation control in the toolbar or None can be used to hide the header

ex. http://<SharePoint_site>/Reports/_layouts/ReportServer/RSViewerPage.aspx?rv:headerarea=BreadCrumbsOnly

  • rv:docmapareawidth

This parameter controls the width of parameter area in Report Viewer Web Part. Value should be a non-negative integer and width value will be in pixels

  • rv:docmapmode

This parameter controls the display of document map area in Report Viewer Web Part. Value would be Full (default), Collapsed or Hidden

  • rv:parammode

This parameter controls the display of parameter prompt area in Report Viewer Web Part. Value would be Full (default), Collapsed or Hidden

  • rv:docktoolbar

This parameter controls the display position of toolbar in Report Viewer Web Part. Value would be Top (default) or Bottom

  • rv:toolbaritemsdisplaymode

This parameter controls the items that are displayed in the toolbar of Report Viewer Web Part. Values for this parameter is quite different from others, here we’ll have to sum-up the value of the desired items. For ex. if we need only Refresh & Zoom button, the value would be 8+16 = 24

-1 = All toolbar items

1 = Back button

2 = Text search

4 = Page navigation

8 = Refresh

16 = Zoom

32 = Atom feed

64 = Action button with Print option

128 = Action button with Export option

256 = Action button with Open with Report Builder option

512 = Action button with Subscribe option


Subscriptions – SSRS in SharePoint Integrated Mode

Subscription can be used to deliver reports to SharePoint Document Library or to E-mail or to Shared Folders. On the delivered files few privileges will be missing, like drilldown links. Before enabling subscription, try to render the reports in different format and chose the delivery option that has all your output requirements.

If while delivering thru email, only the notification link is required sans the report, then clear the Include a Link to this report and Show report inside messages checkbox


  • Select the library that has your reports and select the dropdown from the report that requires subscription

clip_image001

  • Select Add Subscription

clip_image002

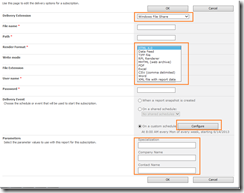
  • For a file to be delivered to a Shared Folder, choose ‘Windows File Share’. Other configurable items are marked in the below diagram

clip_image003

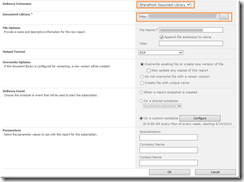
  • For a file to be delivered to a SharePoint Document Library, choose ‘SharePoint Document Library’

clip_image004

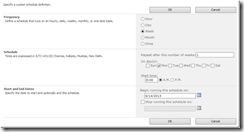
  • To configure the schedule option, click on Configure button & fill the schedule details

clip_image005

  • Parameter values can be configured based on the subscription requirement

clip_image006

This completes our Report Parameters and Subscription model for SQL Reporting Services – SharePoint Integrated Mode.
Category : SharePoint, SQL

Author Info

Moses
 
SharePoint Consultant
 
Rate this article
 
SharePoint Consultant and Subject Matter Expert in SharePoint and Office 365 ...read more
 

Manage SSRS Report Parameter(s) and Report Subscription in SharePoint Integrated Mode – Part 1

Moses
 
SharePoint Consultant
May 30, 2013
 
Rate this article
 
Views
26411


As promised in my previous article, we shall spend next few minutes on few good brownies that are available in SharePoint Integrated Mode SQL Reporting Services 2008  – Report Parameters and Subscription model. Before we start, would like to thank my good old friend Ashok for pushing me to do this article with his honey coated comments in my previous article.


In Part 1 of this series, we’ll delve deep in to Report Parameters by exploring few interesting options.


Report Parameters – SSRS in SharePoint Integrated Mode

Parameters are used when data needs to be narrowed down. Not all the data source in SSRS support parameters, in such scenario we can use Report Parameters to help users at Report level. These report parameters can be managed after being published based on how it is configured. There are many ways to narrow down, lets categorize it by: Smart, Smarter and Smartest.

Smart mode

  • Add Report Parameter Properties in BIDS, which in-turn will display a user prompt at runtime to capture the parameter input

image


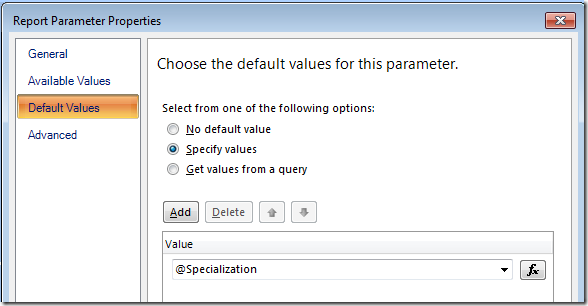
  • Can auto generate the report with predefined input parameters & later user can be allowed to change the input parameter and regenerate the report. This can be achieved by selecting Specify Values or Get Values from a query of Default Values section or by selecting Specify Values in Available Values tab. This mode will be used often in SSRS subscription mode

image


Smarter mode

  • Cascading parameters can be used when multiple query parameters are used. For example, lets consider having Specialization, Company Name and Contact Name, where Contact Name is dependent on Company Name and Company Name dependent on Specialization. In this scenario, when a user selects a value in Report Parameter Specialization, values in Company Name report parameter will be populated based on Specialization selection and values in Contact Name report parameter will be populated based on Company Name selection.

To generate a report with cascading style parameters, follow these steps:

1. Dataset for the report body with three parameters defined

2. Dataset for Specialization with Specialization list column in the query & no parameters defined

3. Dataset for Company Name with Specialization and Company Name in the query and one parameter i.e. Specialization

4. Dataset for Contact Name with Specialization, Company Name and Contact Name in the query with two parameters i.e.Specialization and Company Name

5. Define three parameters in the Report with dependency on the parameters mapped

6. Define the Filters in the report by using the above defined parameters


Dataset for the report body with three parameters defined


For this sample we’ll pick the data from SharePoint list. Have used the Query Designer to design the below query

image

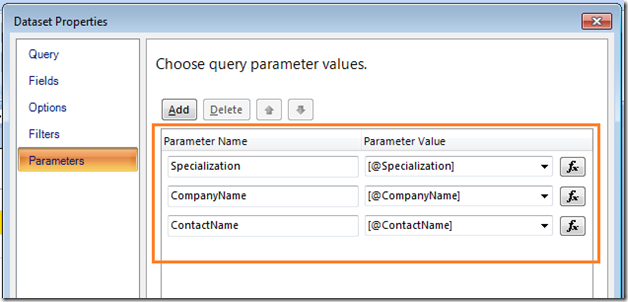
Define three parameters in this dataset

image


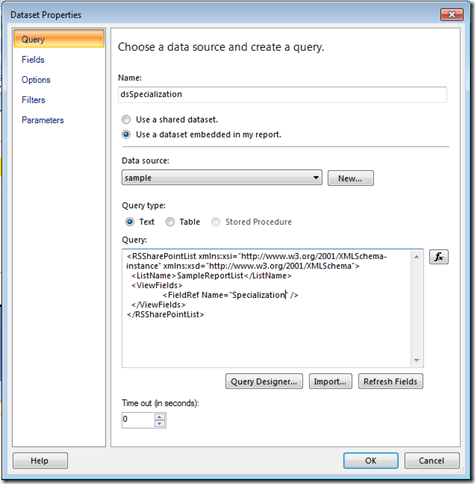
Dataset for Specialization with Specialization list column in the query and no parameters defined

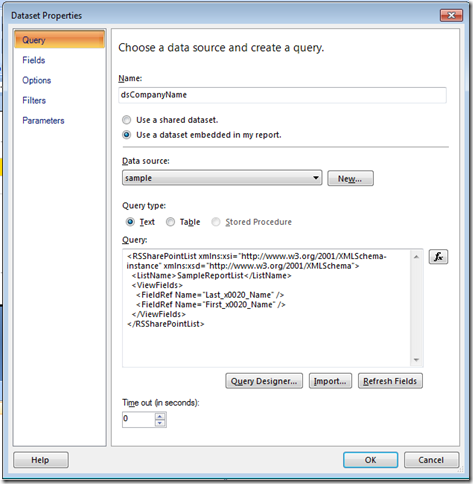
Define the query

image


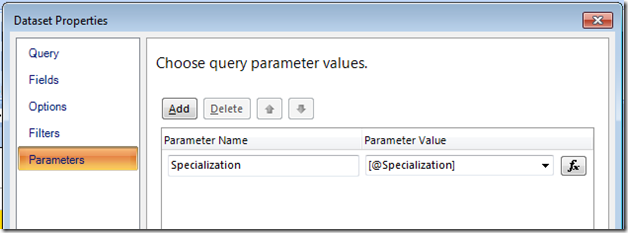
Dataset for Company Name with Specialization and Company Name in the query and one parameter i.e. Specialization

Define the Query

image

Define the Parameter in this dataset

image


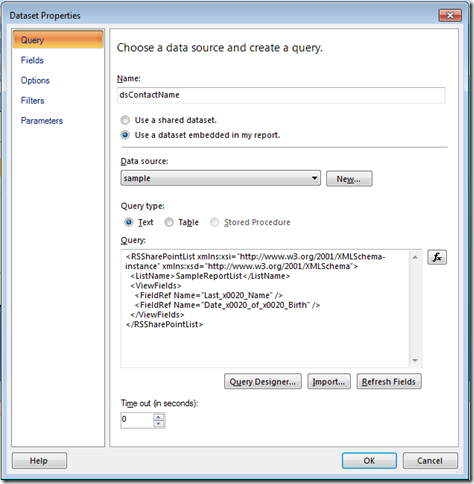
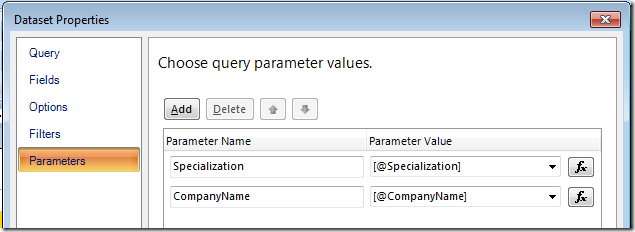
Dataset for Contact Name with Specialization, Company Name and Contact Name in the query with two parameters i.e.Specialization and Company Name

Define the Query

image

Define the Parameter in this dataset

clip_image001


Define three parameters in the Report with dependency on the parameters mapped

· Specialization with no mapping as this is the first level parameter

clip_image001[4]

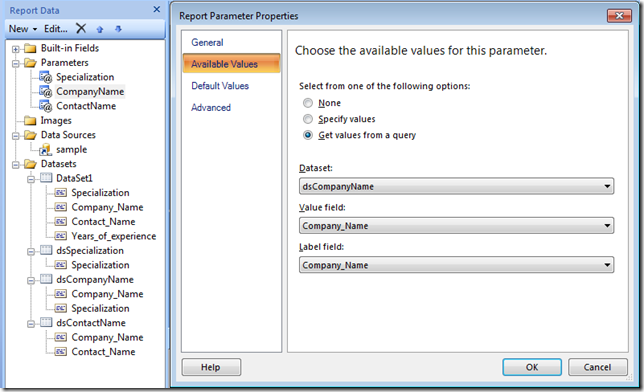
· Company Name with Default Values mapped to Specialization

clip_image002

clip_image003

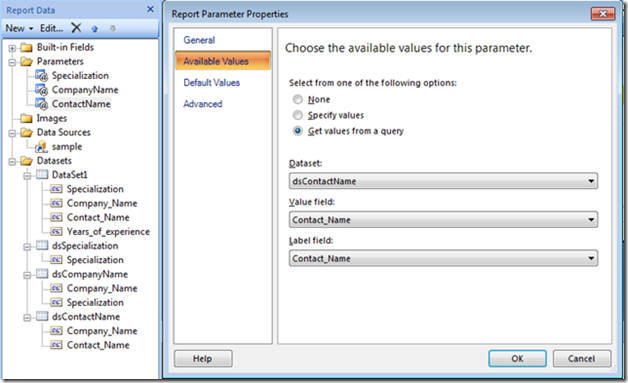
· Contact Name with Default Values mapped to Company Name

image


Define the Filters in the report by using the above defined parameters

clip_image001[6]

Now we are ready to run the report & see how the cascading falls in-place. Specialization filter will have a dropdown with values from dsSpecialization dataset populated and on selecting a value; Company Name will get populated based on Specialization value & same with Contact Name

clip_image002[4]

After choosing values from all three filters, click on View Report. Report will be generated based on the chosen filter values

clip_image003[4]


This completes our Part 1 series, very soon we can dig much deeper & see the Smartest mode of Report Parameters and spent few minutes on Report Subscription.

Category : SharePoint, SQL

Author Info

Moses
 
SharePoint Consultant
 
Rate this article
 
SharePoint Consultant and Subject Matter Expert in SharePoint and Office 365 ...read more
 

A Complete Guide for Installing SQL Server Reporting Services (SSRS) 2008 in SharePoint 2010 Integrated Mode

Moses
 
SharePoint Consultant
January 23, 2013
 
Rate this article
 
Views
16430

This article can be a complete reference for a ground-up approach on installing SQL Server Reporting Service (SSRS) 2008 in SharePoint Integrated mode for SharePoint 2010.

We can make a report server handshake with SharePoint product and use the collaboration and centralized document management features of SharePoint for reports and other Reporting Service content types. This SharePoint integration requires Reporting Services add-in on the SharePoint Web Front Ends.

To start with, download the SharePoint Add-in (rsSharepoint.msi) for SSRS 2008 (http://www.microsoft.com/en-in/download/details.aspx?id=793)

Open the command prompt with ‘Run as administrator’ privilege and run rsSharepoint.msi to start the installation wizard. This wizard would lead you through Welcome page, Software license terms and proceeds by copying the files to SharePoint 2010 folders in %program files%\common files\Microsoft Shared\.

clip_image001[1]

clip_image002[1]

After installing rsSharepoint.msi, let us start configuring SQL Reporting Services

Go to Microsoft SQL Server 2008 R2 à Configuration Tools à Reporting Services Configuration Manager

clip_image003[1]

Web Service URL

Click on Connect, this will display the Reporting Services Configuration Manager window. Click on Web Service URL to configure the IIS depending on the virtual directory name.

clip_image005[1]


Report Server Database

Click on Database, and choose Change Database.

clip_image007[1]

If you already have a report server database, choose the Choose an existing report server database. For this article we will create a new database by selecting Create a new report server database

clip_image009[1]

Type the Server Name, the server where the Report Data needs to reside. Fill the corresponding Authentication Type based on the chosen server.

clip_image011[1]

Click on Next, and give a Database Name. In Report Server Mode, choose SharePoint Integrated Mode. This option would configure the server to store the report files in SharePoint and not in report database.
clip_image013[1]

Click on Next, and select the Authentication Type and it’s corresponding credentials. Authentication Type can also be Windows Authentication

clip_image015[1]

Click on Next and review the data that was entered.

clip_image017[1]

Click on Next and watch the Report Server Database being configured.

clip_image019[1]

SharePoint – Reporting Services Integration

Go to SharePoint 2010 Central Administration à General Application Settings and choose Reporting Service Integration


clip_image021[1]

Copy the Web Service URL from Reporting Services Configuration Manager and paste it in Report Server Web Service URL textbox. In this screen there is an option to activate Reporting Services Feature for all site collections or for specific site collections.

clip_image023[1]

On click of OK, activation confirmation message is displayed.

clip_image025[1]

Integrate Report Server

In General Application Setting page, select Add a Report Server to the Integration. Input the Report Server name and click on OK. This completes the SharePoint integration.

clip_image027[1]

Confirm Report Server Integration Feature Activation

In Site Actions, select Site Settings. In Site Settings page, select Site Collection Features


clip_image029[1]

The status would be Active. This gives a confirmation that the integration was a smooth sail.

clip_image031[1]


Upload RDL & RSDS to SharePoint Document Library

Let us start by creating a new Document Library by selecting Site Actions à More Options. In Create panel, filter by Library and select Document Library. In the textbox at right side, enter the library name.

In Library tab, select Library Settings. Click Advance Settings, select Yes for Allow management of content types and click on Ok.

· Under Content Types section, click on Add from existing site content types.

· In Select site content types from dropdown, select Report Server Content Types.

· Select Report Builder Report and Report Data Source and click on Add.

· Close this screen by clicking on Ok

· Under Content Types section, click on Document in Content Type column.

· In the new screen, Select Delete this content type and accept the confirmation message

· Now click on the newly created Document Library & Upload / Create RSDS & RDL files

From the Document Library, users will be able to manage the data source and RDL files. While publishing the reports from BIDS, RDS files are converted to RSDS files. Uploading RDS files will give error.

Upload can be used after publishing it in SharePoint server. For instance, we can upload the document published in Development Server to QA and Production Server

On selecting the corresponding ECB menu, we will be able to preview the report directly by clicking on it or configure the report or the data source.

clip_image033[1]

clip_image035[1]

And this confirms our SSRS installation.

Shortly I would be releasing articles on Manage Subscriptions and Manage Parameters, few good brownies in SSRS. Till then happy development!!!

Category : SharePoint, SQL

Author Info

Moses
 
SharePoint Consultant
 
Rate this article
 
SharePoint Consultant and Subject Matter Expert in SharePoint and Office 365 ...read more
 

Leave a comment