Azure Cognitive Search for SharePoint Content – Part 2

Ahamed Fazil Buhari
 
Senior Developer
March 26, 2023
 
Rate this article
 
Views
953

This is the continuation of my last article, Azure Cognitive Search for SharePoint Content – Part 1. In this article, we will see how we can create an index and an indexer for the SharePoint content that we have in Azure Cognitive Search.

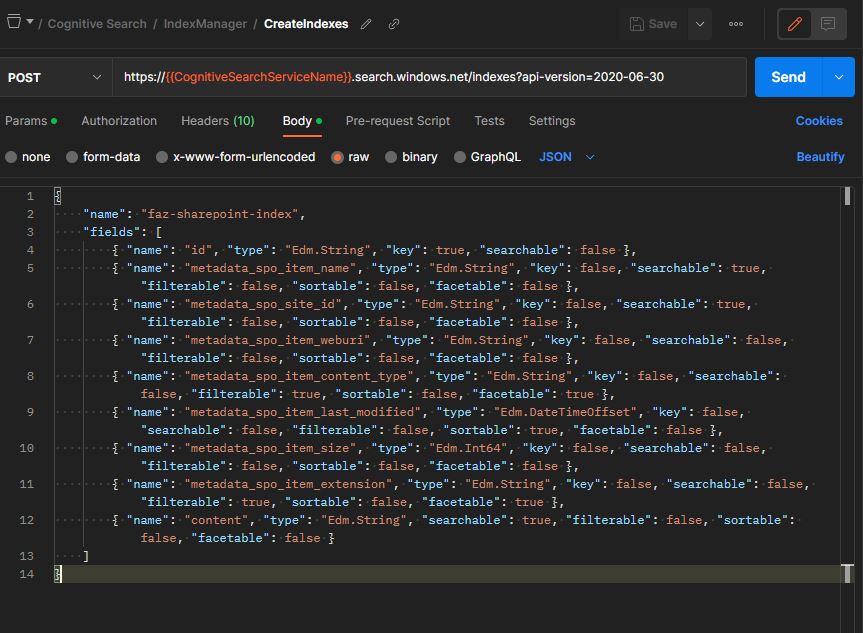
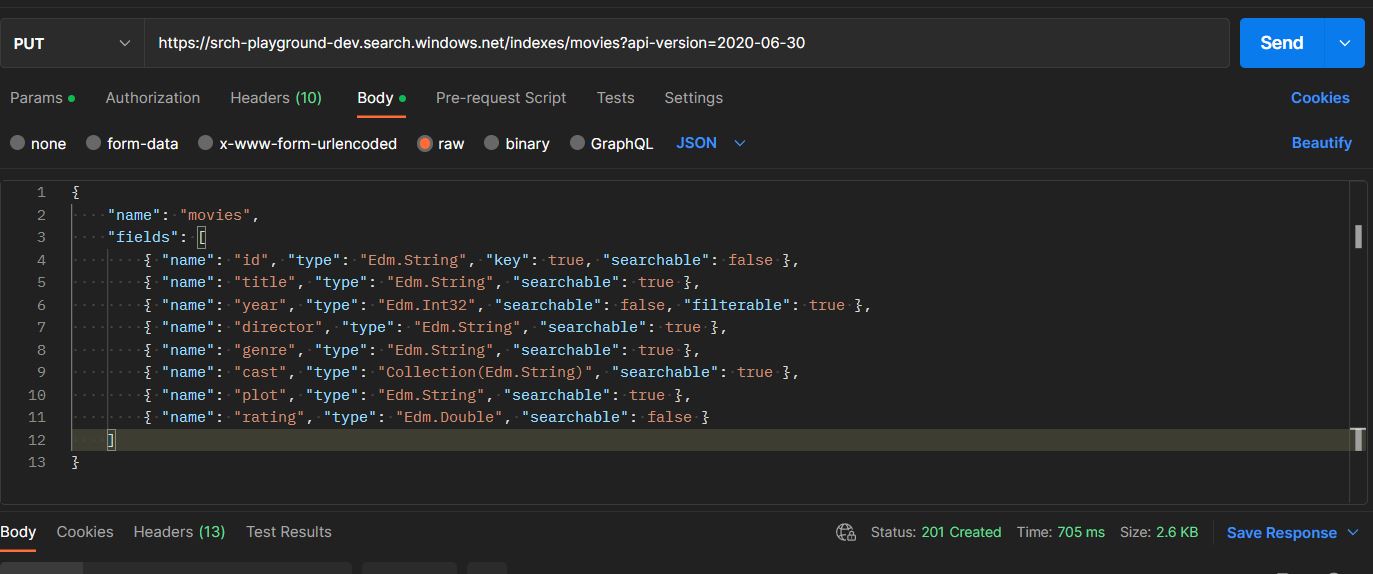
Step 1: Create an index

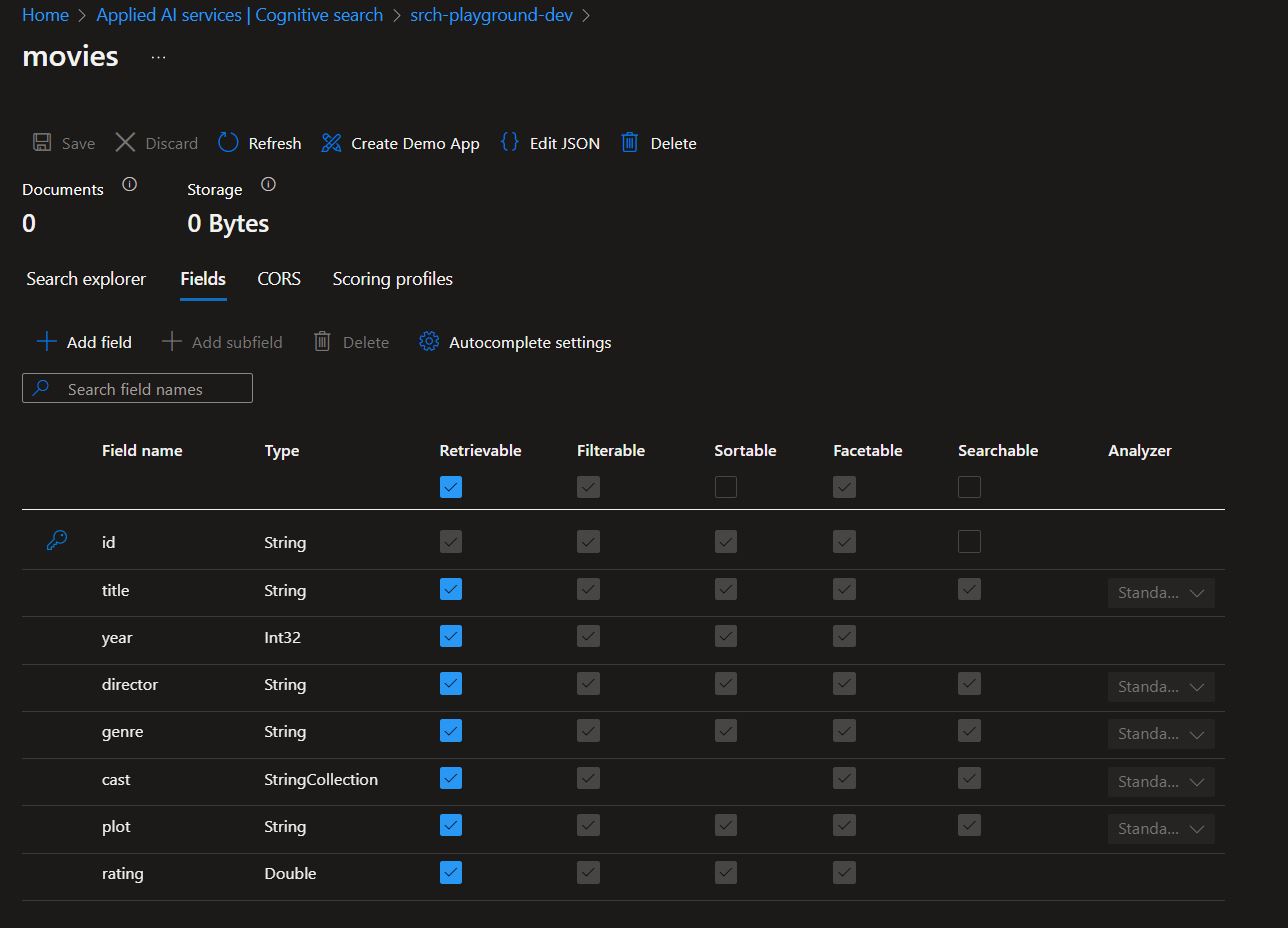
An index is a data structure that includes all the searchable content. It’s a collection of documents that have been analysed, processed, and organized in a way that allows to search and retrieve relevant information.

An indexer is a process that gets data from external data sources and pushes it into an index. It’s accountable for keeping the index up to date with the newest data from the external data sources.

In my previous article, we discussed about How to Manage Azure Cognitive Search Index using REST API

Here you can find the list of metadata that are available for index – https://learn.microsoft.com/en-us/azure/search/search-howto-index-sharepoint-online#indexing-document-metadata

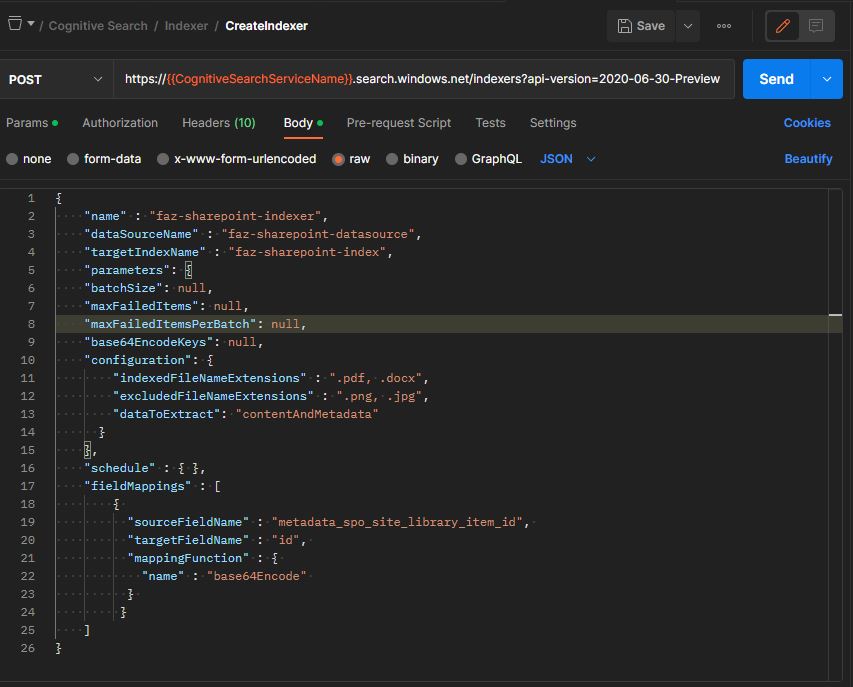
Step 2: Create an indexer

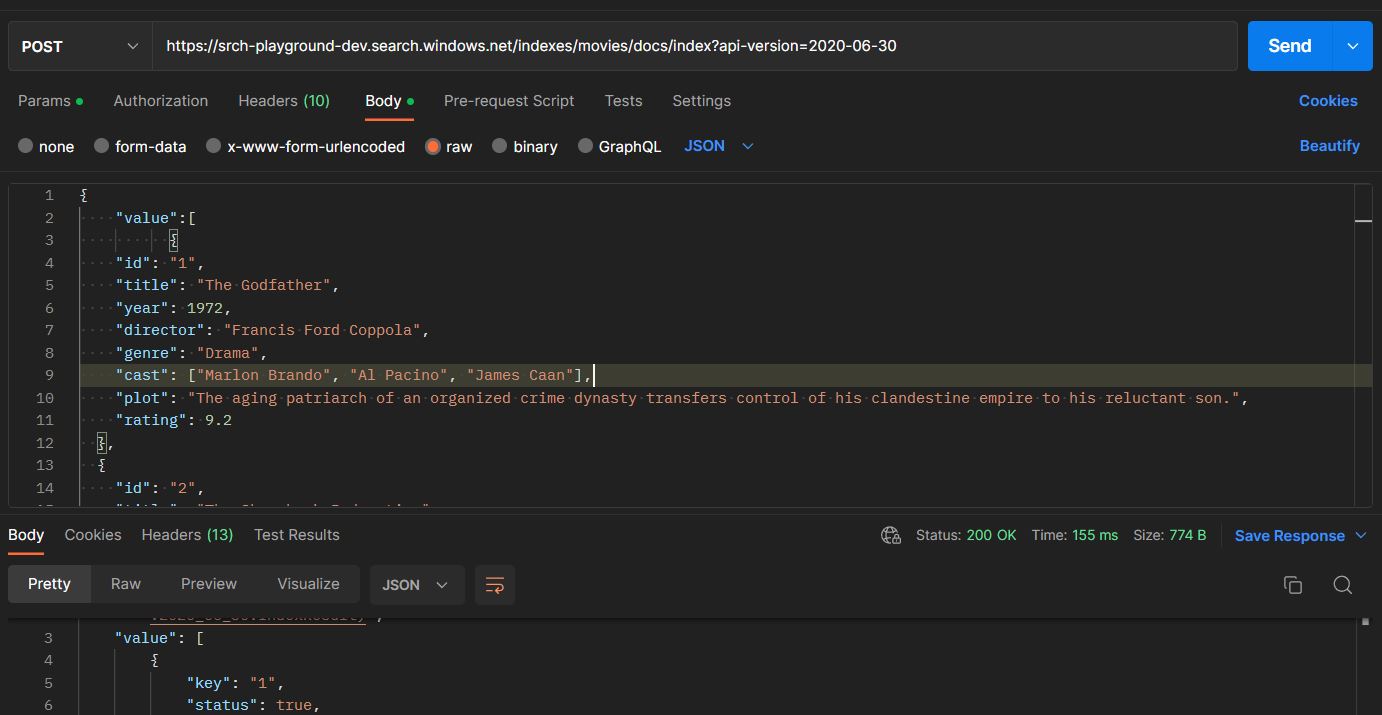
Once the index and data source are created successfully, now we can create indexer which connects both. It can be created using REST API as shown below,


Step 3: Query SharePoint Content

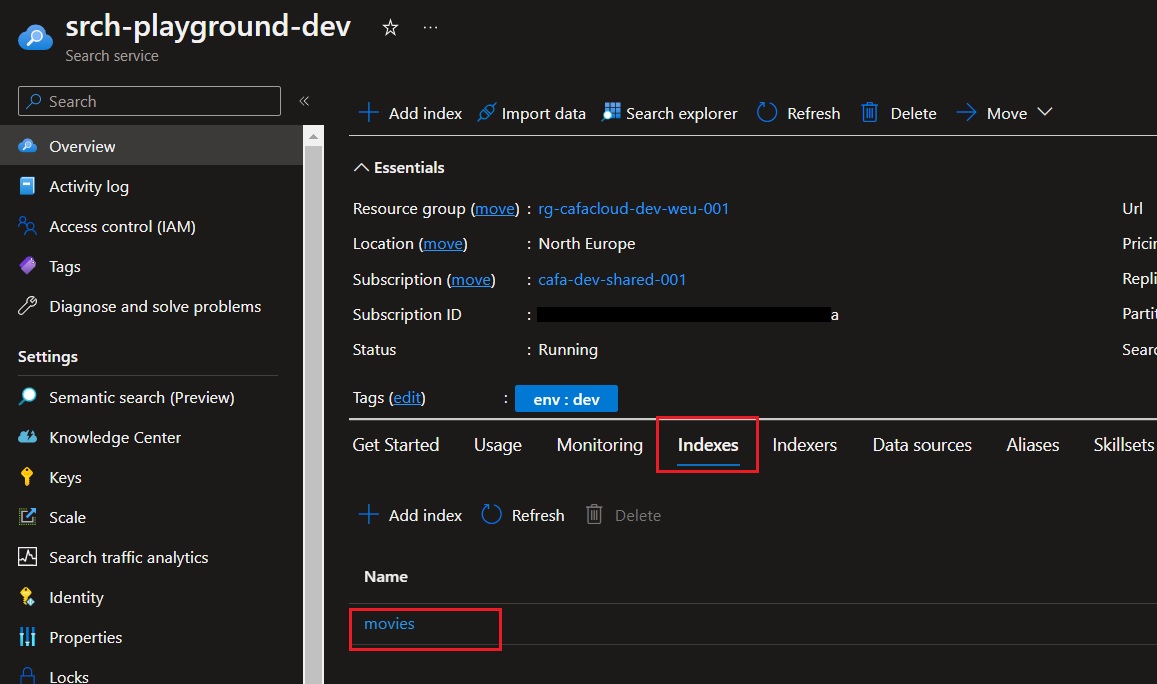
We have finished connecting the SharePoint library with Azure Cognitive Search, and now we can query the SharePoint library content using Azure Cognitive Search. I used the Search Explorer for quick results, and we can already see that the results contain SharePoint library metadata.

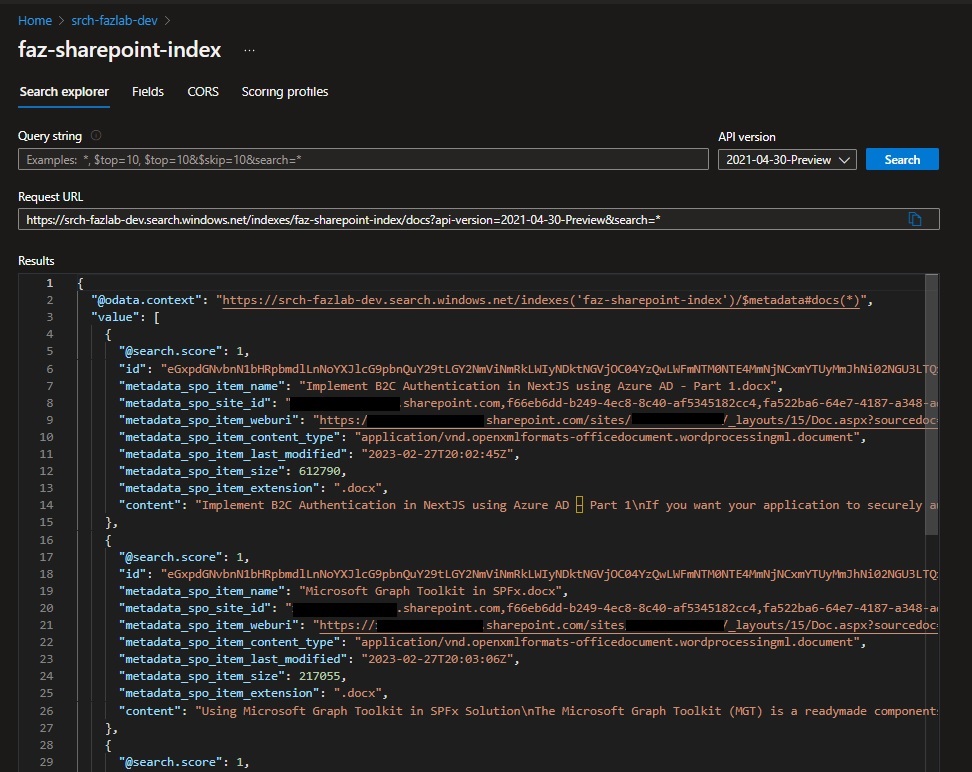
Below, you can see the library content from SharePoint.


In conclusion, Azure Cognitive Search offers a powerful solution for enhancing the search capabilities of SharePoint content. By using advanced techniques like natural language processing and machine learning, organizations can provide more accurate and relevant search results to their users. With easy integration through Azure Cognitive Search API.

We hope this article provided useful insights into how Azure Cognitive Search can enhance the search capabilities of SharePoint content. Thank you for taking the time to read it.

Happy coding,

Fazil

Author Info

Ahamed Fazil Buhari
 
Senior Developer
 
Rate this article
 
Ahamed is a Senior Developer and he has very good experience in the field of Microsoft Technologies, especially SharePoint, Azure, M365, SPFx, .NET and client side scripting - JavaScript, TypeScript, ...read more
 

How to Manage Azure Cognitive Search Index using REST API

Ahamed Fazil Buhari
 
Senior Developer
February 26, 2023
 
Rate this article
 
Views
1116

The Azure Cognitive Search Index is a compelling tool that can be used to configure, create, and manage search indexes. In this article, we will explore how to manage the Azure Cognitive Search Index using the REST API. Additionally, we can use C#, Java, JavaScript, Python, PowerShell, and ARM templates to manage the index, but we will focus on the REST API in this article.

The Azure Cognitive Search Index is a key factor in Azure Cognitive Search, and it enables users to create and manage search indexes for a variety of data types. The index is a set of searchable data that is organized into fields and documents, and it can be queried later.

For demo purpose, I’ve created an Azure Cognitive Search with Free tier.

Prerequisites: Get the URL of your search service and the admin key to call REST API

url: https://<name of service>.search.windows.net

api-key: dxxxxxxx


Create an Index: Create an Index before loading up the data, here I created movies index. And from postman we can create the fields using REST API,

Verb: PUT
URL: https://{service-name}.search.windows.net/indexes/{index-name}?api-version={api-version}

Example: https://srch-playground-dev.search.windows.net/indexes/movies?api-version=2020-06-30

Header: api-key: dxxxxxx, Content-Type: application/json

Its important to mention the API version as query param in the URL, to find more about the versions and its specifications please refer here

And we can check the created index in Search Service under Indexes pivot


Importing documents to the newly created Index: Next step is to add documents into movies index (created in last step) using REST API


Update an Index: To update an index, we need to send a PUT request to the Azure Cognitive Search REST API (just like how we created the index). The request body contains the updated schema of the index. We can modify the field instead of deleting it or if we need to change the type or other properties like Filterable, Sortable.

Since the schema definitions are strongly typed, and existing fields cannot be removed. To make a field filterable or remove a filterable definition for a field, the entire index must be recreated and re-indexed.

Delete an Index: To delete an index, we need to send a DELETE request to the Azure Cognitive Search REST API. Here’s an example request:

https://{service-name}.search.windows.net/indexes/{index-name}?api-version={api-version}

we explored how to manage Azure Cognitive Search Index using REST API. It can help start building powerful search experiences for your applications.


Happy Coding,

Fazil

Author Info

Ahamed Fazil Buhari
 
Senior Developer
 
Rate this article
 
Ahamed is a Senior Developer and he has very good experience in the field of Microsoft Technologies, especially SharePoint, Azure, M365, SPFx, .NET and client side scripting - JavaScript, TypeScript, ...read more
 

Setup Pipeline for SPFx library – PnP Search Extensibility Library

Ahamed Fazil Buhari
 
Senior Developer
April 27, 2021
 
Rate this article
 
Views
1491

If we want to deploy an SPFx webpart or extension which uses SPFx library components, then we need to handle this differently while we need to bundle and package our webpart or extension.

According to MS doc for SPFx Library component, if we want to use the library in other solution (webpart or extension) then we need to do npm link to the root directory of the library solution and run npm link <library-name> in the solution (webpart or extension) that will create symbolic link to the webpart. If we want to handle this build process in a pipeline with a symbolic link then you can refer below YML,

For this blog, let’s take PnP Modern Search v4 as an example. In v4 there is a possibility to make an extensibility library that is used for custom render.

You can download latest PnP Moder Search sppkg from here, select latest release and at the bottom you can find files that contains .sppkg

pnp sppkg

Below you can find the folder structure that’s used to deploy PnP Search Extensibility library in our site,

pnpcustomlibraryfolder

azure-pipeline.yml for the above solution,

trigger:
  branches:
    include:
      - master
      - develop
      - release/*
      - feature/*
steps:
  - checkout: self
  - task: NodeTool@0
    displayName: 'Use Node 10.x'
    inputs:
      versionSpec: 10.x
      checkLatest: true
  #region Install and bundle lib
  - task: Npm@1
    displayName: "npm install search-extensibility"
    inputs:
      command: "install"
      workingDir: "search-extensibility/"

  - task: Gulp@0
    displayName: "Bundle search-extensibility"
    inputs:
      gulpFile: search-extensibility/gulpfile.js
      targets: bundle
      arguments: "--ship"
      workingDirectory: "search-extensibility"

  - script: npm link
    displayName: "npm link"
    workingDirectory: "search-extensibility/"

  - task: Npm@1
    displayName: "npm install search-result-customlibrary"
    inputs:
      command: "install"
      workingDir: "search-result-customlibrary/"
    continueOnError: false

  - script: npm link @pnp/modern-search-extensibility
    displayName: "npm link @pnp/modern-search-extensibility"
    workingDirectory: "search-result-customlibrary/"

  - task: Gulp@0
    displayName: "Bundle project"
    inputs:
      gulpFile: search-result-customlibrary/gulpfile.js
      targets: bundle
      arguments: "--ship"
      workingDirectory: "search-result-customlibrary"

  - task: Gulp@0
    displayName: "Package Solution"
    inputs:
      gulpFile: search-result-customlibrary/gulpfile.js
      targets: "package-solution"
      arguments: "--ship"
      workingDirectory: "search-result-customlibrary"

  - task: CopyFiles@2
    displayName: "Copy Files to drop"
    inputs:
      Contents: |
        search-result-customlibrary/sharepoint/**/*.sppkg
      TargetFolder: "$(Build.ArtifactStagingDirectory)"

  - task: CopyFiles@2
    displayName: 'Copy PnP sppkg to drop'
    inputs:
      Contents: |
        pnp-package/*.sppkg
      TargetFolder: '$(Build.ArtifactStagingDirectory)/sharepoint'

  #endregion

  - task: PublishBuildArtifacts@1
    displayName: 'Publish Artifact: drop'

These are the tasks that will be executed if we run above yml,


And the output of the published files looks from build pipeline will be like this,


Now we successfully generated sppkg’s for our custom library through build pipeline, the next step is to deploy this in release pipeline. The below powershell can be helpful to deploy the solution (please ignore the $env variable and change those according to your need),

try {
    $clientId = $env:SPO_AppID
    $clientSecret = $env:SPO_AppSecret
    $spoUrl = "https://tenantName.sharepoint.com"

    $pnpSearchWebpartFileName = "$(System.ArtifactsDirectory)$(ArtifactAlias)dropsharepointpnp-packagepnp-modern-search-parts-v4.sppkg"
    $pnpSearchExtensibilityFileName = "$(System.ArtifactsDirectory)$(ArtifactAlias)dropsharepointpnp-packagepnp-modern-search-extensibility.sppkg"
    $customSearchLibraryFileName = Get-ChildItem -Path '$(System.ArtifactsDirectory)$(ArtifactAlias)dropsearch-result-customlibrarysharepointsolution' -Recurse | Where-Object { $_.PSIsContainer -eq $false -and $_.Extension -eq '.sppkg' }    

    Write-Host "PnP Connection to $spoUrl" -ForegroundColor Yellow
    Connect-PnPOnline -Url $spoUrl -ClientId $clientId -ClientSecret $clientSecret
    Write-Host "Successfully connected" -ForegroundColor Green

    #region Installing PnP Search WebPart
    Write-Host "Installing PnP Search WebPart" -ForegroundColor Green
    $appMetadata = Add-PnPApp $pnpSearchWebpartFileName -Overwrite -Publish
    $appId = $appMetadata.Id
    Write-Host "Package ID: $appId" 
    Write-Host "Added PnP Search WebPart - DONE" -ForegroundColor Green
    #endregion

    #region Installing PnP Search Extensibility
    Write-Host "Installing PnP Search Extensibility" -ForegroundColor Green
    $appMetadata = Add-PnPApp $pnpSearchExtensibilityFileName -Scope Tenant -Overwrite -Publish -SkipFeatureDeployment
    $appId = $appMetadata.Id
    Write-Host "Package ID: $appId" 
    Write-Host "Added PnP Search Extensibility - DONE" -ForegroundColor Green

    $existingApp = Get-PnPApp -Identity $appId -Scope Tenant
    if ($null -ne $existingApp) {
        write-host "Start: Update-PnPApp -Identity $appId"
        Update-PnPApp -Identity $appId -Scope Tenant
    }
    else {
        write-host "No installed app found"
        write-host "Start Install-PnPApp -Identity $appId"
        Install-PnPApp -Identity $appId -Scope Tenant
    }

    write-host "Publish-PnPApp -Identity $appId"
    Publish-PnPApp -Identity $appId -Scope Tenant
    Write-Host "Installing PnP Search Extensibility - DONE" -ForegroundColor Green
    #endregion

    #region Installing PnP Search Custom Library
    Write-Host "Installing PnP Search Custom Library" -ForegroundColor Green
    $appMetadata = Add-PnPApp $customSearchLibraryFileName.FullName -Scope Tenant -Overwrite -Publish -SkipFeatureDeployment
    $appId = $appMetadata.Id
    Write-Host "Package ID: $appId" 

    $existingApp = Get-PnPApp -Identity $appId -Scope Tenant
    if ($null -ne $existingApp) {
        write-host "Start: Update-PnPApp -Identity $appId -Scope Tenant"
        Update-PnPApp -Identity $appId -Scope Tenant
    }
    else {
        write-host "No installed app found"
        write-host "Start Install-PnPApp -Identity $appId -Scope Tenant"
        Install-PnPApp -Identity $appId -Scope Tenant
    }
    write-host "Publish-PnPApp -Identity $appId"
    Publish-PnPApp -Identity $appId -Scope Tenant
    Write-Host "Installing PnP Search Custom Library - DONE" -ForegroundColor Green
    #endregion
}
catch {
    Write-Host -f Red "Error while installing PnP search webpart & libraries! - " $_.Exception.Message
}

Below is the screenshot from release pipeline,

Happy Coding

Fazil

Author Info

Ahamed Fazil Buhari
 
Senior Developer
 
Rate this article
 
Ahamed is a Senior Developer and he has very good experience in the field of Microsoft Technologies, especially SharePoint, Azure, M365, SPFx, .NET and client side scripting - JavaScript, TypeScript, ...read more
 

Architecture and Components of SharePoint 2013 Search

Ahamed Fazil Buhari
 
Senior Developer
June 24, 2017
 
Rate this article
 
Views
6402

Understanding the Search Architecture of SharePoint 2013 is very much important to develop any SharePoint search based application. There are various components that make up the SharePoint Search Architecture. In the below diagram, we can see components that are highlighted in blue and red. These blue blocks are the components that are pre-built and part of SharePoint search architecture and the red components are the extensibility options available for developers.

image

Crawling Process

The crawling architecture consists of

1. Content Sources – Repository

2. Connectors and Parsers

Content Sources – Repository

Content sources are the types of repositories such as File shares, Profiles, SharePoint, Exchange, Documentum and so on, that we would want to index using SharePoint search.

custom content source at the bottom indicated in red is for an extensibility point for developers. The extensibility point referring to the fact that we can create Business Connectivity Services (BCS) connectors that can connect to any repository.

Business Connectivity Services (BCS) is an important companion in the overall search architecture because it allows us to connect to various content sources.

Connectors and Parsers

Two things are needed for any search engine to do successful search. The first is, it must be able to connect to that repository. The second is it must be able to gain access to the items that are in that repository and look through them for indexing.

For example, if we were crawling a document repository. First we should be able to gain access to that repository, like a file system or a document. And then secondly we have to be able to retrieve the documents that we find there and work our way through them in order to index them. So, that when people run keyword searches. They’ll search the body of the document and all its metadata.

Connector components – are responsible for allowing you access into the repository.

Parser components – are responsible for getting the individual items within the repository and parsing them so that search can index the things that are found there.

Content Process

The content processing architecture is accountable for receiving information from a crawling architecture and then building up the index and managed properties. In the diagram, content pipeline represents the set of components that are managing the metadata that’s coming in from the external repositories.

Content pipeline has an extensibility point which is the web service call out. The web service call out allows us to create a custom web service. The content pipeline feeds the indexing engine, which builds up the index. An extensibility point search schema, has been used for the idea that we can create our own managed properties. To create aliases and set properties for our managed properties. All of this was discussed when we were talking about the Keyword Query Language – KQL (in my previous article).

Query Architecture

The query architecture contains of query engine and query pipeline. The query engine runs queries against the index. And the query pipeline simply represents all the components that process the inputs from the end users that come in to generate those queries.

The search center and the topic pages are out of the box solutions, but they are using the same API extensibility points (REST or CSOM) that use to create custom solutions.

No code solution available at the bottom is about extending the search center. Microsoft has done a great job with this version of search is giving us ways to create powerful search solutions without writing any code and don’t require to open Visual Studio.

Managing SharePoint Search

Search Service Application has been primarily used to manage SharePoint search. You can go to Central Admin -> Manage Service Application -> Search Service Application -> Manage (from Top ribbon)

image

In the Search Administration page, we can access various details on Crawling, Queries and Results and so on.

image


Happy Coding

Ahamed

Category : Search, SharePoint

Author Info

Ahamed Fazil Buhari
 
Senior Developer
 
Rate this article
 
Ahamed is a Senior Developer and he has very good experience in the field of Microsoft Technologies, especially SharePoint, Azure, M365, SPFx, .NET and client side scripting - JavaScript, TypeScript, ...read more
 

Keyword Query Language (KQL) in SharePoint 2013 Search

Ahamed Fazil Buhari
 
Senior Developer
 
Rate this article
 
Views
12402

Hello Everyone, in one of my earlier article we have seen how Crawling and Managed Properties are working in search and how they form the data schema, against which search will query. In this article we can see more about Keyword Query Language.

In SharePoint 2013, there are three different query languages.

1. Keyword Query Language (KQL)

2. FAST Query Language

3. SQL Query (Completely Removed from the SharePoint 2013 product)

Keyword Query Language or KQL is the major query language. if you’ve been using the FAST product in SharePoint 2010, then you may be aware of FAST query language or FQL. The FAST query language is still available in SharePoint 2013, but we don’t need it just because KQL has been given so much supremacy.

Construct Query

To construct a Query, there are several elements that we can use.

· Free Text Search (* Wildcard operator)

· Property Search (AND, OR, NOT, >, <, = etc…)

If we want to blindly search for a word without any restrictions, then we can utilize free text searches. As the name implies, Free text searches are used as the basis of a search. Free text supports the idea of a wildcard operator in SharePoint 2013, so that you can type part of a word like buhari, followed by the *, and then we’ll get hits on everything that begins with buhari, and has whatever characters following it.

image

Property searches are done against Managed Properties, so once the Managed Properties are set up, then they can be used in these property searches and they are powerful. For example, if want to filter only the Title field in SharePoint then we can give the query as follows, Title: “test”. To know more about KQL please refer this msdn.

image

Keyword query language is a very powerful query language that is going to allow us to ask a lot of questions of the search engine. Say for example, I want to search all the SharePoint List Items that has been created by specific owner on specific time. we can achieve this requirement with single line of query

image


ContentClass:”STS_ListItem” Author: “username” LastModifiedTime=05/12/2016

Let’s review this query, we have a set of property Content Class contains STS_ListItem, Author and LastModifiedTime. So, in our case, what we have done is we have three different properties searches here. When you do not specify a Boolean operator, then this property search is an AND. So, we’ve asked for ContentClass AND Author and LastModifiedTime.

ContentClass is available to you out of the box in SharePoint 2013, and it allows you to specify the exact type of thing that you’re looking for. To know more about ContentClass please refer this msdn blog

This KQL can also work in the URL, you can pass the query in the URL and you will get the result. Like shown below,

https://ahamedspsite.com/Pages/My_Search.aspx#k=ContentClass%3A%22STS_ListItem%22%20Author%3A%22ahamed%20fazil%22%20LastModifiedTime%3D05%2F12%2F2016#l=1033


Happy Coding

Ahamed

Category : Search, SharePoint

Author Info

Ahamed Fazil Buhari
 
Senior Developer
 
Rate this article
 
Ahamed is a Senior Developer and he has very good experience in the field of Microsoft Technologies, especially SharePoint, Azure, M365, SPFx, .NET and client side scripting - JavaScript, TypeScript, ...read more
 

Beginners Guide : Crawled and Managed Properties in SharePoint 2013 Search

Ahamed Fazil Buhari
 
Senior Developer
April 23, 2017
 
Rate this article
 
Views
11106

This is a continuation of my Beginners guide “Introduction to SharePoint 2013 Search”. In this article we can have a look at Crawled and Managed properties, which are considered as heart of a Search Based application.

Crawled Properties in Search

Crawled properties are created inside of the search service application when the indexer crawls repositories. When the indexer is crawling the repositories, it discovers fields defined inside that repository. Things like title, author, created, modified date. Those fields are added into the index in the form of crawled properties.

Managed Properties in Search

Managed properties are defined in SharePoint and they are defined against crawled properties. So, the idea is that, a managed property can be mapped to one or more crawled properties. The reason behind this is, when you are indexing multiple repositories, these various repositories may all have a concept of a particular piece of metadata, but use different names for it.

In the below table you can find various Managed properties.

image

Queryable, Refinable, Retrievable, Searchable and Sortable are some of the frequently used properties. These are the properties that determine what this managed property is good for.

In SharePoint 2013, it’s important to note that site columns can now become managed properties automatically and also we can actually re-index a specific list or site, instead of having to crawl the entire farm.

Managed properties can be mapped to crawled properties at

1. Search service application layer, or

2. Site collection level

Managed Properties at Search service application level

The below steps take us to the Managed properties that can be mapped to Crawled properties in Search Service Application.

Step 1: Go to Central Admin -> Manage Service Application

image

Step 2: Look for Search Service Application and click on that.

image

Step 3: In Search Service Application page click on Search Schema which will be available on the left side navigation.

image

Step 4: Search Schema is where we manage the Crawled and Managed properties associated with the search service application.

image

Managed Properties at Site collection level

Step 1: Go to root of the site collection and click on Site Settings.

image

Step 2: Here you can find the Managed properties just like what we have seen at Search service application level.

image

Happy Coding

Ahamed

Category : Search, SharePoint

Author Info

Ahamed Fazil Buhari
 
Senior Developer
 
Rate this article
 
Ahamed is a Senior Developer and he has very good experience in the field of Microsoft Technologies, especially SharePoint, Azure, M365, SPFx, .NET and client side scripting - JavaScript, TypeScript, ...read more
 

Beginners Guide : Introduction to SharePoint Search

Ahamed Fazil Buhari
 
Senior Developer
 
Rate this article
 
Views
2951

Hello everyone, in this article we will look into one of the most important and powerful feature of SharePoint, the SharePoint Search. Search is the one technology within SharePoint that knows where all the data is, it crawls the entire SharePoint farm.

As a developer or a power user, before you start anything with the Search, it is important to know which ‘Version’ of search you are using. The capabilities of search differ by versions. Till SharePoint 2010 we have two different search, FAST search and SharePoint search. In SharePoint 2013, Microsoft has done some awesome job and merged FAST search and SharePoint search, so now we have single search engine.

Still there are various versions of Search namely – Foundation, Standard, Enterprise and SharePoint Online versions of search. Still this all falls under single search engine but only the capabilities differ in each version. In the below image you can find different versions of search and their capabilities.

image

We can create sample Search page by using the (welcome page) search page layout. And it contains nothing but some Search Web parts like Search Box, Search Results, and Refinement

image

The below screen shot is the standard out of the box search center and nothing is customized.

image

It will have some predefined scopes and functionality like we can search in People, Communities, Videos and so on. One of the cool feature is that we can extend the search center to include new scopes as well. By including those new scopes will allow us to create search based applications.

We need to keep 3 important criteria when we are creating Search Based Application –

1. Data access should use out of the box search, because it is the most efficient way to get the data instead of using Queries.

2. Presenting the data in a meaningful way, i.e., it should have some information about the data like, from where it got retrieved, modified, created etc.

3. Easy to operate on those data. User can easily play with the data that is available from Search result.

When we depend on SharePoint Search as our data access technology, it is very important to know about Crawling. The search results are good as the last Crawl.

In SharePoint 2010 we might have been more concerned about this. Because there might have been several minutes gap between incremental crawls. But in SharePoint 2013 with the new continuous crawl capability, we basically can rely on sub one minute data freshness, which really makes the idea of using search as a data access technology possible.

We can see more about Crawl and Managed Properties in my upcoming articles.

Happy Coding

Ahamed

Category : Search, SharePoint

Author Info

Ahamed Fazil Buhari
 
Senior Developer
 
Rate this article
 
Ahamed is a Senior Developer and he has very good experience in the field of Microsoft Technologies, especially SharePoint, Azure, M365, SPFx, .NET and client side scripting - JavaScript, TypeScript, ...read more
 

How to Set a Property Bag Key as an Indexed (Queriable via Search) Programmatically using C# Client Side Object Model (CSOM)

Sathish Nadarajan
 
Solution Architect
March 30, 2017
 
Rate this article
 
Views
2976

Recently in our projects, we are using a lot of Property Bag Values. But in some specific requirement, we were trying to Search the Property Bag from the SharePoint Keyword Query. To do that, we want the Property Bag Key to be Indexed as Queryable. That, we need to do programmatically as part of our Provisioning. Let us see, how to do that. The code is very straight forward.

Basically, we are updating a Property Bag called vti_indexedpropertykeys with the values Encoded.

 namespace Console.Office365
 {
     using Microsoft.SharePoint.Client;
     using OfficeDevPnP.Core;
     using System;
     using System.Linq;
     class Program
     {
         static void Main(string[] args)
         {
             AuthenticationManager authManager = new AuthenticationManager();
             var clientContext = authManager.GetSharePointOnlineAuthenticatedContextTenant("https://***.sharepoint.com/sites/CommunitySite/", "Sathish@******.com", "**********");
             Web web = clientContext.Web;
             clientContext.Load(clientContext.Web);
 
             clientContext.Load(clientContext.Site);
             clientContext.Load(clientContext.Site.RootWeb);
             PropertyValues properties = clientContext.Web.AllProperties;
             clientContext.Load(properties);
             clientContext.ExecuteQuery();
 
             // Get the Existing Property Bag Values from the Indexxed Property Keys
             var oldPropertyBagValue = clientContext.Web.PropertyBagContainsKey("vti_indexedpropertykeys") ? Convert.ToString(properties["vti_indexedpropertykeys"]) : string.Empty;
 
             string[] O365Properties = new string[] { "PropertyBagKey1", "PropertyBagKey2", "PropertyBagKey3"};
             
 
             string newPropertyBagValue = string.Empty;
 
             // Get the New Property Bag Values.  In our case, it is propertybagkey1, propertybagkey2 etc., 
             foreach (var propertiesString in O365Properties)
             {
                 newPropertyBagValue += Convert.ToBase64String(System.Text.Encoding.Unicode.GetBytes(propertiesString)) + "|";
             }
 
             // Add the new values to the existing ones.
             newPropertyBagValue = oldPropertyBagValue + newPropertyBagValue;
 
             // take the Unique Items.  There could be changes that a key can be repeated.  So always using Distinct.
             var distinctNewPropertyBagValue = newPropertyBagValue.Split('|').Distinct().ToArray();
 
             // Update the Property Bag Key
             properties["vti_indexedpropertykeys"] = string.Join("|", distinctNewPropertyBagValue).Trim();
 
 
             web.Update();
             clientContext.Load(web.AllProperties);
             clientContext.ExecuteQuery();
         }
     }
 }
 

Happy Coding,

Sathish Nadarajan.

Author Info

Sathish Nadarajan
 
Solution Architect
 
Rate this article
 
Sathish is a Microsoft MVP for SharePoint (Office Servers and Services) having 15+ years of experience in Microsoft Technologies. He holds a Masters Degree in Computer Aided Design and Business ...read more
 

SharePoint Error : The search application ‘ on server did not finish loading. View the event logs on the affected server for more information.

Sathish Nadarajan
 
Solution Architect
March 6, 2016
 
Rate this article
 
Views
17362

Recently, I came across an issue like, after many days, I Opened the Search Service Application in one of the DEV Server. At that time, a strange home screen, I was getting.

clip_image002

And even, If I go to Content Sources, Crawl Rules etc., everywhere exception is been thrown.

clip_image004

Then after spending some time, found some interesting / easy fix for this.

By Executing the PowerShell Command Psconfig -cmd secureresources the exception was cleared.

clip_image006

The above command took like around 5 mins to complete. I was fingers crossed at that time. But at the end, I was able to see my Search Service Application up and running again.

Happy Coding,

Sathish Nadarajan.

Author Info

Sathish Nadarajan
 
Solution Architect
 
Rate this article
 
Sathish is a Microsoft MVP for SharePoint (Office Servers and Services) having 15+ years of experience in Microsoft Technologies. He holds a Masters Degree in Computer Aided Design and Business ...read more
 

How to do the Batch Search ExecuteQueries in SharePoint 2013 using Client Side Object Model in C#

Sathish Nadarajan
 
Solution Architect
February 26, 2016
 
Rate this article
 
Views
9265

In one of the Older Article, we saw within a WebPart, how to execute the ExecuteQueries in a Server Side Coding. Now, I met with the same kind of requirement, but the difference is, here I am executing this search from a WebAPI. Already, we saw here how to create a basic WebAPI.

Let me share the piece of code, which is straight forward. Am not explaining this method as it is a Static and does not have any other external dependencies.

 private static List<DocTopic> GetTopicDocumentCountBatch(TermCollection docTopicsTermCollection, string locationTermID, ClientContext clientContext)
         {
 //The List of KeywordQuery which will be converted as an Array later
             List<KeywordQuery> keywordQueriesList = new List<KeywordQuery>();
 //The List of QueryID which will be converted as an Array later
             List<string> queryIdsList = new List<string>();
             string contentSiteURL = Convert.ToString(ConfigurationManager.AppSettings["ContentSiteURL"]);
             Dictionary<string, string> docTopicQueryID = new Dictionary<string, string>();
 
 //Framing the Queries
             foreach (Term docTopicTerm in docTopicsTermCollection)
             {
                 KeywordQuery keywordQuery = new KeywordQuery(clientContext);
                 keywordQuery.QueryText = string.Format("(IsDocument:True OR contentclass:STS_ListItem)  Tags:#0{0} GVIDoc:[{1}] SPSiteUrl:" + contentSiteURL + " (ContentTypeId:0x010100458DCE3990BC4C658D4AB1D0CA3B9782* OR ContentTypeId:0x0120D520A808* OR ContentType:GVIarticle)", locationTermID, docTopicTerm.Name); ;
                 keywordQuery.IgnoreSafeQueryPropertiesTemplateUrl = true;
                 keywordQuery.SelectProperties.Add("ContentType");
                 keywordQuery.SelectProperties.Add("ContentTypeId");
                 keywordQuery.SelectProperties.Add("GVIDoc");
                 keywordQuery.SourceId = Guid.NewGuid();
                 keywordQueriesList.Add(keywordQuery);
                 queryIdsList.Add(Convert.ToString(keywordQuery.SourceId));
                 docTopicQueryID.Add(Convert.ToString(keywordQuery.SourceId), docTopicTerm.Name);
             }
 //Convert the KeywordQuery and QueryID into array,
             KeywordQuery[] keywordQueries = keywordQueriesList.ToArray();
             string[] queryIds = queryIdsList.ToArray();
 //Initialize the SearchExecutor
             SearchExecutor searchExecutor = new SearchExecutor(clientContext);
 //Actual use of ExecuteQueries method
             var results = searchExecutor.ExecuteQueries(queryIds, keywordQueries, false);
             clientContext.ExecuteQuery();
 //Iterating the Result Set.
             List<DocTopic> docTopicsList = new List<DocTopic>();
            if (results.Value.Count > 0)
             {
                 foreach (var result in results.Value)
                 {
                     if (result.Value[0].ResultRows.Count() > 0)
                     {
                         DocTopic docTopic = new DocTopic();
 
                         docTopic.Title = Convert.ToString(docTopicQueryID[result.Key]);
                         docTopic.Url = "[" + docTopic.Title + "]";
                         docTopic.TotalCount = result.Value[0].ResultRows.Count();
                         docTopic.VideoCount = Convert.ToString(result.Value[0].ResultRows.SelectMany(m => m).Where(k => k.Key.Equals("ContentTypeId")).Select(m => m.Value).Where(y => y.ToString().Contains("0x0120D520A808")).Count());
                         docTopic.ArticleCount = Convert.ToString(result.Value[0].ResultRows.SelectMany(m => m).Where(k => k.Key.Equals("ContentType")).Select(m => m.Value).Where(y => y.ToString().Contains("GVIarticle")).Count());
                         docTopic.DocumentCount = Convert.ToString(result.Value[0].ResultRows.SelectMany(m => m).Where(k => k.Key.Equals("ContentTypeId")).Select(m => m.Value).Where(y => y.ToString().Contains("0x010100458DCE3990BC4C658D4AB1D0CA3B9782")).Count());
 
                         docTopicsList.Add(docTopic);
                     }
                 }
             }
             return docTopicsList;
 
         }
 

Happy Coding,

Sathish Nadarajan.

Author Info

Sathish Nadarajan
 
Solution Architect
 
Rate this article
 
Sathish is a Microsoft MVP for SharePoint (Office Servers and Services) having 15+ years of experience in Microsoft Technologies. He holds a Masters Degree in Computer Aided Design and Business ...read more
 

Leave a comment