In our previous article, we have seen how to build the SharePoint solution from TFS.
In this article, we will see how to automate the deployment once the build is successful.
What is Continuous Delivery?
Continuous Deployment (CD) is the process to build, test, configure and deploy from a build to a production environment. Multiple testing or staging environments create a Release Pipeline to automate the creation of infrastructure and deployment of a new build. Successive environments support progressively longer-running activities of integration, load, and user acceptance testing. Continuous Integration starts the CD process and the pipeline stages each successive environment the next upon successful completion of tests.
Continuous Delivery may sequence multiple deployment “rings” for progressive exposure (also known as “controlling the blast radius”). Progressive exposure groups users who get to try new releases to monitor their experience in “rings.” The first deployment ring is often a “canary” used to test new versions in production before a broader rollout. CD automates deployment from one ring to the next and may optionally depend on an approval step, in which a decision maker signs off on the changes electronically. CD may create an auditable record of the approval in order to satisfy regulatory procedures or other control objectives.
Deployment Process
Prerequisites
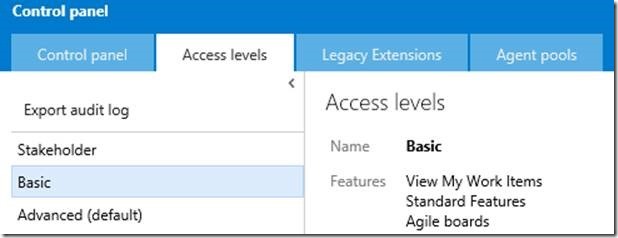
1. Make sure the user account that you’re going to use has permission to create Release Definition. User should be part of Basic or Advanced Group.
2. Enable PSRemoting – PSRemoting Configuration process
Enable PSRemoting will enable SharePoint servers to accept remote call from build servers.
Below are the steps we need to follow to enable PSRemoting.
On the SharePoint server:
- Open the SharePoint Management Shell with elevated administrative permission, by selecting ‘Run as administrator’
- Enable PowerShell remoting by running the following cmdlet: Enable-PSRemoting
- Enable the server to accept credentials using CredSSP: Enable-WSManCredSSP –Role Server
- Raise the PowerShell memory level to 1GB: Set-Item WSMan:\localhost\Shell\MaxMemoryPerShellMB 1024
On the TFS build agent server(s):
ü Open the Windows PowerShell prompt with elevated administrative permission by selecting ‘Run as administrator’
ü If not previously done on this server, set the PowerShell execution policy to allow scripts to be run – at a minimum, the policy must be RemoteSigned:
Set-ExecutionPolicy RemoteSigned
ü Enable the server to pass credentials using CredSSP – replace the sample name with the name of your SharePoint server:
Enable-WSManCredSSP -Role client -DelegateComputer “MySharePointServer” – Note that other permissible values for the DelegateComputer parameter include “*.mydomain.com” and “*”. However, a security best practice would be to limit the credential delegation to as small a scope as possible
Test PowerShell remoting and CredSSP authentication:
- On the TFS build agent server, test remoting by starting a remote session to the SharePoint server: Enter-PSSession -ComputerName “MySharePointServer” A successful test is one where the command prompt location changes to [MySharePointServer]: PS C:\Users\<username>
- Type exit to close the remote session
- Also on the TFS build agent server, test CredSSP authentication with the following cmdlet: Enter-PSSession -ComputerName “MySharePointServer” -Authentication CredSSP –Credential Get-Credential – This will force an authentication prompt to enter a username and password – specify a domain account which has permissions to the SharePoint server. As before, a successful test is one where the location of the command prompt changes.
3. Create Release Definition
Below are the steps to create Release Definition:
1. After successful build, go to Release tab in TFS server and click on Create Release Definition.
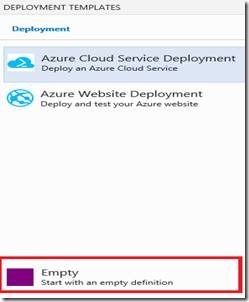
2. Select Empty Definition.
3. Provide Release Name.
4. Click on Link to Build Definition and select the latest build which you want to deploy.
5. We can add environments for Dev, Stg, Prod.
6. First let’s define task for the Dev environment then we can clone the definition to staging and production.
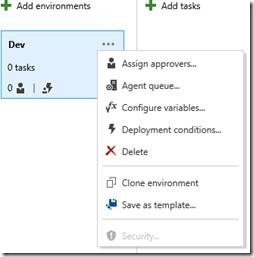
7. Click on (…) near the environment name and in the dropdown you can find below option.
8. Using the above option we can configure pre deployment and post deployment approvals and automate release once build successful.
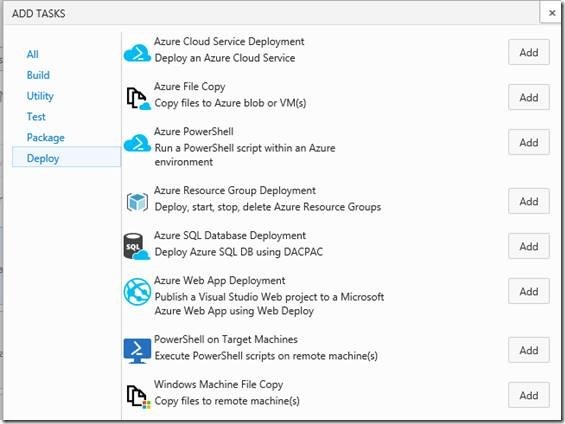
9. In the right side click on “Add Tasks” to define the action.
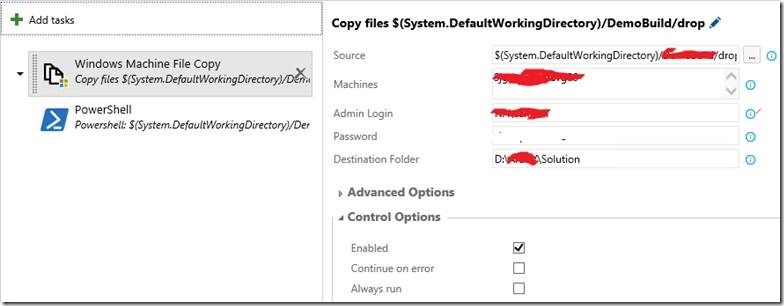
10. Select Windows Machine File Copy and PowerShell option to copy the Artifacts to Destination server. We will be having below Tasks in Release option.
11. In Windows Machine File Copy option provide server details and destination details as mentioned below.
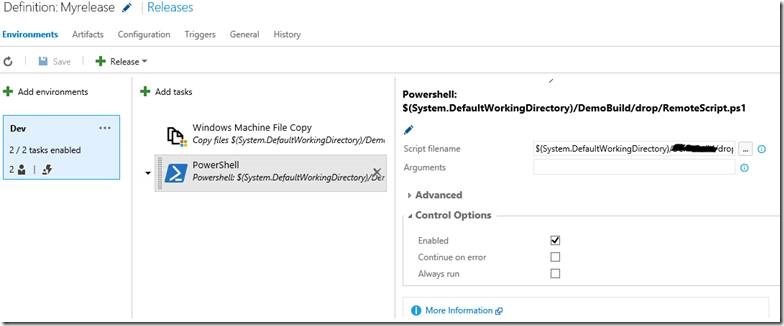
12. To Deploy WSP provide PowerShell script path from TFS in the PowerShell Tasks.
13. Clone the Dev environment and create staging and production and then do the necessary changes.
4. PowerShell scripts
We need two PowerShell script file in the solution folder
1. Scripts file to install/deploy solution in SharePoint. As we are going to run the PS script from windows PowerShell, add below line on top of the script.
if ( (Get-PSSnapin -Name Microsoft.Sharepoint.Powershell -ErrorAction SilentlyContinue) -eq $null )
{
Add-PsSnapin Microsoft.Sharepoint.Powershell
}
2. Scripts file to connect to SharePoint server remotely.
Sample:
New-PSSession -ComputerName “ServereName”;
Enter-PSSession -computername ” ServereName “;
Invoke-Command -computername ” ServereName ” -scriptblock{D: \Solution\WebDeploy.ps1 -solutionNames @(“parameter1”)};
Deployment
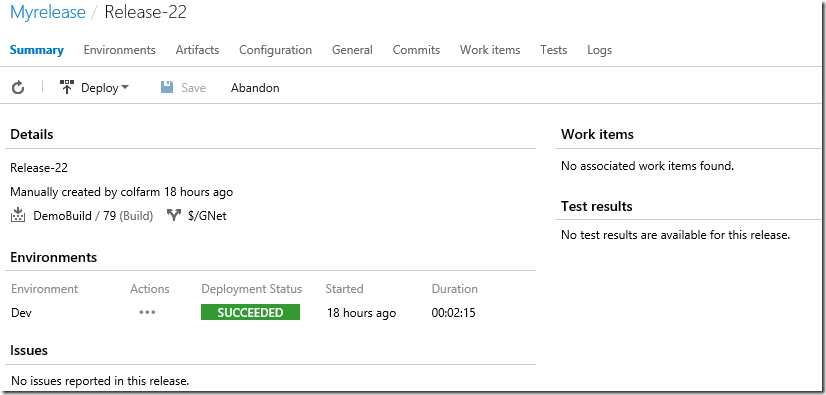
Now, when we run release, it will move all the necessary files to SharePoint server and then deploy the WSP. We will get status as below.
Common Deployment Issues
1. Error:
No artifacts are available in the build. Make sure that the build is publishing an artifact and try again.
Solution:
Need to provide /p:IsPackaging=True in MSBuild Arguments it will create Build Artificates fot the solution, if not solution will be built but it wont create packages
2. Error:
Windows PowerShell is in NonInteractive mode. Read and Prompt functionality is not available.
Solution:
When executing PowerShell script, if we need to remove existing wsp file, it will ask for confirmation, as Windows PowerShell is in NonInteractive mode it throws this error message. To avoid this error add -Confirm:$False; on that particular line.
Eg. Remove-SPSolution visualwebpartproject1.wsp -Confirm:$False;




Leave a comment