Exception – The page you are requesting cannot be served because of the extension configuration. If the page is a script, add a handler. If the file should be downloaded, add a MIME map

Sathish Nadarajan
 
Solution Architect
July 24, 2017
 
Rate this article
 
Views
2740

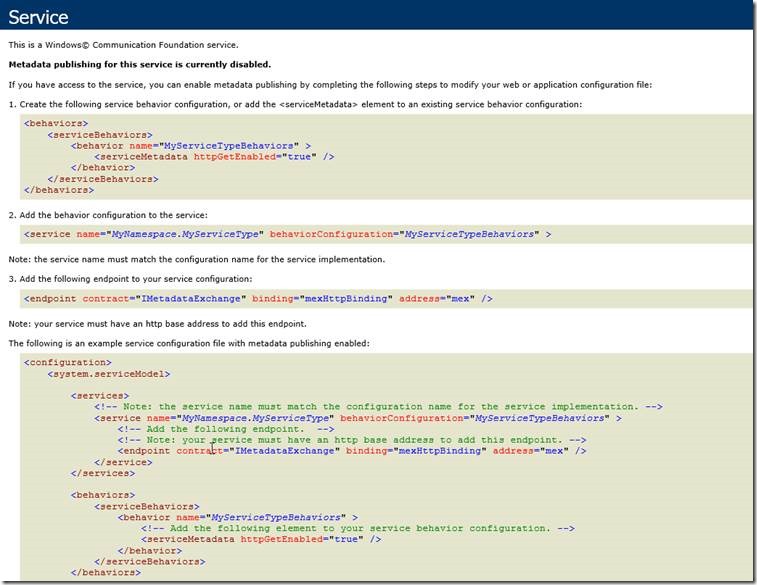
I was writing a Remote Event Receiver and when trying to access, the exception “The page you are requesting cannot be served because of the extension configuration. If the page is a script, add a handler. If the file should be downloaded, add a MIME map” Occurred. Thought of sharing the solution to the community.

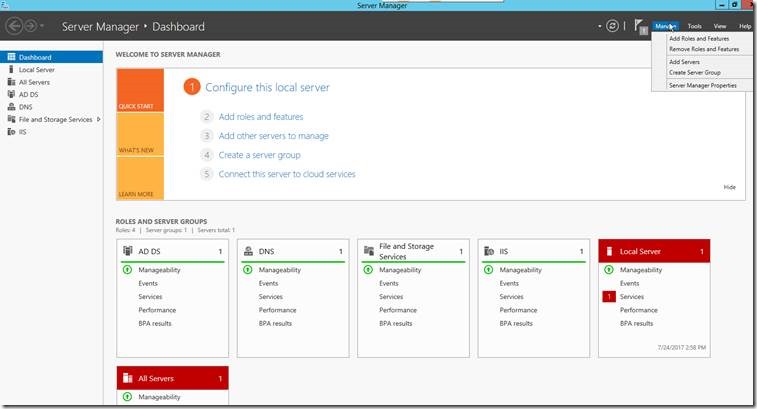
1. Go to Server Manager.

clip_image002

2. Click on Manage -> Add Roles and Features.

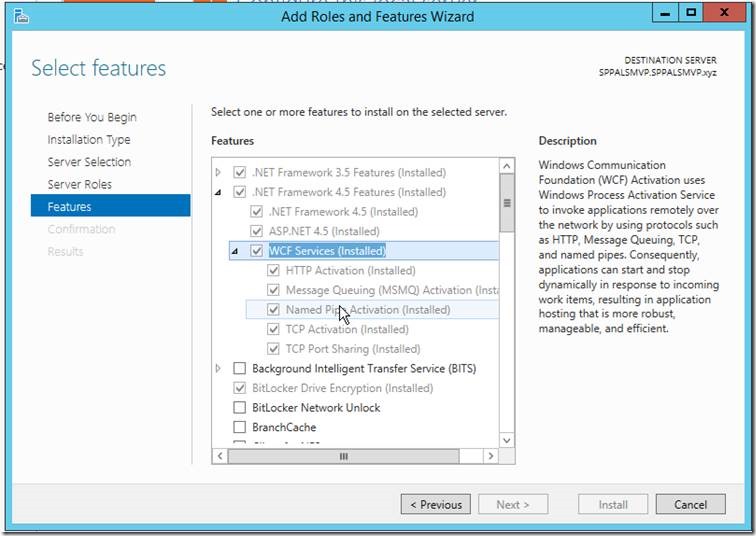
3. On the Features, make sure that all the features under WCF is selected and install.

clip_image004

4. Do an IISReset.

5. Refresh the Service.

clip_image006

Now, the service will be working as expected. Thanks.

Happy Coding,

Sathish Nadarajan.

Category : Exception, IIS

Author Info

Sathish Nadarajan
 
Solution Architect
 
Rate this article
 
Sathish is a Microsoft MVP for SharePoint (Office Servers and Services) having 15+ years of experience in Microsoft Technologies. He holds a Masters Degree in Computer Aided Design and Business ...read more
 

WCF Service Hosting – Windows Service – Part II

Shikha Gupta
 
SharePoint Developer
July 5, 2016
 
Rate this article
 
Views
3570

The previous article was a demonstration of self-hosting a WCF service through console application. In order to see how to create a simple WCF and self-host it through console application click on this LINK.

Now the same WCF service can be hosted through windows service. Windows service is an application running on windows machine. It can start up automatically and does not need user intervention to start it. Advantage of hosting a WCF service through windows service is that we can configure the windows service to start automatically when the computer starts. This makes our WCF service always available to clients to consume even if no one is logged on to that computer.

Let us continue with the previous example in that we first created the class library project and then added a WCF to it. In order to host the WCF we created the console application and added the required configuration in app.config file. In another instance of visual studio we created the client application which will consume this WCF.

So I am continuing with the same project as earlier. We just need to add another host to it and make necessary changes.

1. In the EmployeeClassLibrary Service solution add a new web service project and name it WindowsServiceHost.

2. In EmployeeServiceHost first we have to add two references one of EmployeeClassLibraryService and the other of System.ServiceModel assembly.

3. Add an Application configuration file in WindowsServiceHost .

4. Remove the existing code from app.config file and copy and paste the following code in app.config file. It is same app.config file code as before.

 <?xml version="1.0" encoding="utf-8" ?>
 <configuration>
   <connectionStrings>
     <add name ="EmpCS" connectionString="Data Source=GBRDCSPSDEV05;Initial Catalog=DbEmployee;Integrated Security=True" providerName="System.Data.SqlClient" />
   </connectionStrings>
   <system.serviceModel>
 
     <services>
       <service name="EmployeeClassLibraryService.EmployeeService" behaviorConfiguration="mexBehavior">
         <endpoint address="EmployeeService" binding="netTcpBinding" contract="EmployeeClassLibraryService.IEmployeeService"></endpoint>
         <host>
           <baseAddresses>
             <add baseAddress="http://localhost:8090"/>
             <add baseAddress="net.tcp://localhost:9000"/>
           </baseAddresses>
         </host>
       </service>
     </services>
     <behaviors>
       <serviceBehaviors>
         <behavior name="mexBehavior">
           <serviceMetadata httpGetEnabled="true"/>
         </behavior>
       </serviceBehaviors>
     </behaviors>
   </system.serviceModel>
 </configuration>


5. Rename service1.cs file to EmployeeWindowsService.cs file and click yes on the prompt.

6. Right click on EmployeeWindowsService.cs file and click on view code.

7. In EmployeeWindowsService.cs file include the following namespace

using System.ServiceModel;

8. Create an instance under of ServiceHost class under EmployeeWindowsService class.

ServiceHost host;

9. Under OnStart method copy the following code.

host = new ServiceHost(typeof(EmployeeClassLibraryService.EmployeeService));

host.Open();

10. Under OnStop method copy the following code.

host.Close();

11. Go to EmployeeWindowsService.cs right click on the designer and then click on Add Installer. This will add ProjectInstaller.cs file which will contain ServiceProcessInstaller1 and ServcieInstaller1.

12. Right click on ServiceInstaller1 and click on properties. Give the service name as EmployeeWindowsService and StartType as Automatic.

13. Right click on ServiceProcessInstaller1 and click on properties. Give the Account as LocalSystem and there are other options for it as well which you can give according to your needs.

14. Build the solution.

15. Now the hosting is done we have to install the Employee windows service.

i. In start menu under visual studio tools go o Visual studio command prompt and run that as an administrator.

ii. Copy and paste the following command in the prompt window.

installutil -i D:\POCS\EmployeeClassLibraryService\WindowsServiceHost\bin\Debug\WindowsServiceHost.exe


*Note- the command is installutil -i path of your WindowsServiceHost.exe file. It will be different for you. In order to find it out. Right click on the WindowsServiceHost project and click on Open folder in file explorer and go to bin folder and then debug folder and there you will find WindowsServiceHost.exe


iii. In order to check the EmployeeWindowsService has been installed. In the run window type Services.msc and you will find the EmployeeWindowService. Since the system is not rebooted the service is not started automatically though the start type is automatic so right click on it and click on start.

iv. Now the windows service is started.

16. Now the client has to consume this WCF through windows service hosting. So open the client application and right on the EmployeeService reference and click on update the service reference.

17. Now Run the client application and test both the functionality

Save Employee:

Get Employee:

*Note- After the application is created and you have completed all the task then you might want to remove the Employee Windows Service from the services then run the following command in the comand prompt of visual studio.

installutil –u D:\POCS\EmployeeClassLibraryService\WindowsServiceHost\bin\Debug\WindowsServiceHost.exe

Happy Coding J

Category : Windows

Author Info

Shikha Gupta
 
SharePoint Developer
 
Rate this article
 
Sikha has been working in IT Industry for over 5 years. She holds a B-tech degree. She is passionate about learning and sharing the tricks and tips in .Net , ...read more
 

Hosting a WCF Service Using Windows Service Hosting

Shikha Gupta
 
SharePoint Developer
 
Rate this article
 
Views
3688

We have created the WCF and have done self-hosting and Windows Service hosting and we can host the same WCF through IIS. Hosting through IIS is the most common way to do so. In order to do so follow the following steps and if you want to see how to create the WCF and the client application then click here.

1. Right click on EmployeeClassLibraryService Solution and click on add a website and then select WCF then click on browse to open the solution where you have created the EmployeeClassLibraryService Solution.

2. Once you have that click on open and for this website you can just add EmployeeServiceIISHost to its name.

3. Once you have the EmployeeServiceIIS host in the solution then expand the App_code and delete the IService.cs and Servcie.cs as this is for WCF service but we already have our WCF ready.

4. Right click on the website and click on add reference of EmployeeClassLibraryService project.

5. Rename Service.svc file to EmployeeService.svc and delete the existing code and copy paste the following code. The service attribute basically holds namespace.service name. We have remove the code behind tag because we don’t have the service in app_code folder we have deleted the services which we had in this folder.

<%@ ServiceHost Language="C#" Debug="true" Service="EmployeeClassLibraryService.EmployeeService" %>

6. Open the Web.config file and delete the configuration and copy and paste the following configuration. It is the same piece of code which we had in app.config file for self-hosting or web-service hosting.

 <?xml version="1.0" encoding="utf-8" ?>
 <configuration>
   <connectionStrings>
     <add name ="EmpCS" connectionString="Data Source=PC258762MSSQLSERVER2008;Initial Catalog=DbEmployee;Integrated Security=True" providerName="System.Data.SqlClient" />
   </connectionStrings>
   <system.serviceModel>
 
     <services>
 
       <service name="EmployeeClassLibraryService.EmployeeService" behaviorConfiguration="mexBehavior">
         <endpoint address="EmployeeService" binding="basicHttpBinding" contract="EmployeeClassLibraryService.IEmployeeService"></endpoint>
         <host>
           <baseAddresses>
             <add baseAddress="http://localhost:8090"/>
           </baseAddresses>
         </host>
       </service>
     </services>
     <behaviors>
       <serviceBehaviors>
         <behavior name="mexBehavior">
           <serviceMetadata httpGetEnabled="true"/>
         </behavior>
       </serviceBehaviors>
     </behaviors>
   </system.serviceModel>
 </configuration>
 

7. Build the solution.

8. Now we need to create a virtual directory in IIS. In the run window type intemgr this will open the IIS.

9. Expand Sites and in the default website right click on it and click on add application.

The details Entered is shown below:

AliasEmployeeService
Application Pool.Net v4.5
Physical PathC:\Users\430379\Documents\Visual Studio 2013\Projects\EmployeeClassLibraryService\EmployeeServiceIISHost

10. Once the application is added then right click on it and click on option switch to content view and then on the EmployeeService.svc right click on it and click on Browse.

11. Once you click on the browse button then it should open the following link

http://localhost/EmployeeService/EmployeeService.svc

12. You can also find the link of your wsdl document which might be a bit different in your case something like : http://pc258762.cts.com/EmployeeService/EmployeeService.svc?wsdl

13. Open the Employee Client application which we have created in the previous article. For more information on how to create client application which will consume this WCF click here.

Now in Employee Client Application delete the service reference which was previously added and delete the service reference folder as well.

14. Now add a new Service reference and copy and paste the wsdl document link

http://pc258762.cts.com/EmployeeService/EmployeeService.svc?wsdl and click go this will discover your service give a proper namespace like EmployeeService and click ok.

15. Now Run the client application and test both the functionality

Save Employee:

Get Employee:

We have hosted the WCF in IIS without writing a single line of code for hosting as we had to do in Self hosting or Web Service Hosting. We had our service in the same application but we can even have it in different applications or in App_code folder.

Happy Coding J

Category : Windows

Author Info

Shikha Gupta
 
SharePoint Developer
 
Rate this article
 
Sikha has been working in IT Industry for over 5 years. She holds a B-tech degree. She is passionate about learning and sharing the tricks and tips in .Net , ...read more
 

Create WCF Data Service and expose the data using OData protocol

Tarun Kumar Chatterjee
 
Net – Technology Specialist
June 27, 2016
 
Rate this article
 
Views
8117

WCF Data Service can expose data from any source by using data provider and service uses the OData protocol for communication. Response will return in either Atom or JSON format.

Following set of operation can be done by applying query in url

1. To return the resource in different format

2. Filter the records

3. Read only the required fields

4. Pagination

5. Ordering the records

In this article let’s understand the details implementation on WCF Data Service and OData

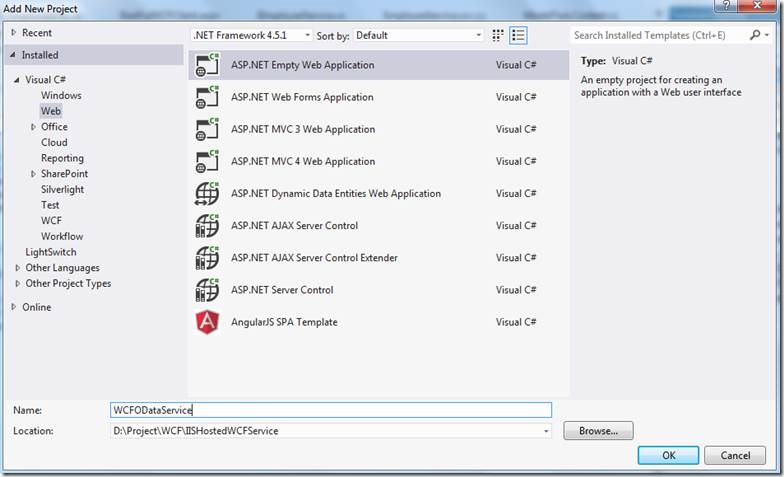
Create an empty web application project by selecting "ASP.NET Empty Web Application".

clip_image002

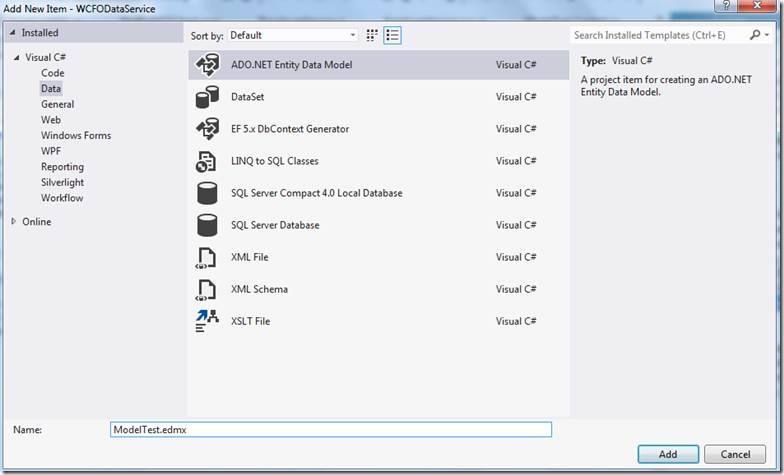
Right click the project and select "Add"->"New Item" and select "ADO.Net Entity Data Model"

clip_image004

Entity Data Model Wizard will appear, select "Generate from Database" and click "Next"

In the Database connection click the "New Connection" button and specify the server name and select "EmployeeDB" database and click "OK"

Click on Next to create Entity Data Model for the "Employee" table and it is exposed as property with name "Employees".

Below is the code of ModelTest.Context.cs

 namespace WCFODataService
 {
     using System;
     using System.Data.Entity;
     using System.Data.Entity.Infrastructure;
     
     public partial class EmployeeDBEntities : DbContext
     {
         public EmployeeDBEntities()
             : base("name=EmployeeDBEntities")
         {
         }
     
         protected override void OnModelCreating(DbModelBuilder modelBuilder)
         {
             throw new UnintentionalCodeFirstException();
         }
     
         public DbSet<Employee> Employees { get; set; }
     }
 }
 

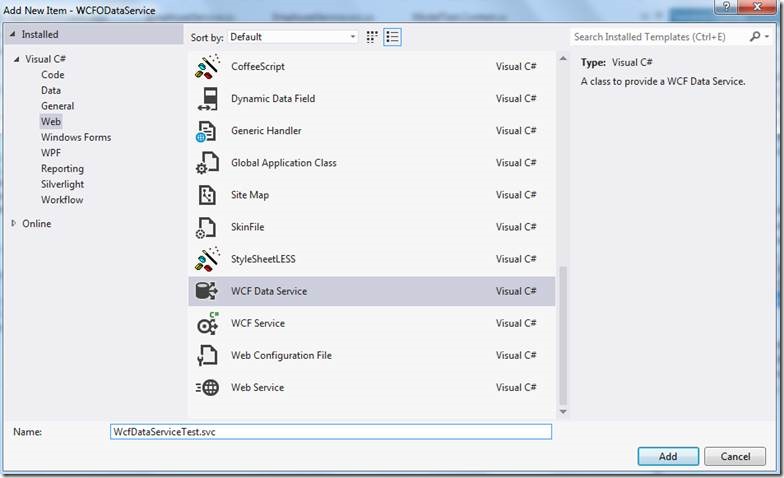
Right click the project select "Add"->"New Item" and select "WCF Data Service"

clip_image006

Below example, I have set the "Read" access to the "Employee" property of the data context. So collection of "Employee" can be read by any one by applying query expression.

 namespace WCFODataService
 {
     
     public class WcfDataServiceTest : DataService<EmployeeDBEntities>
     {       
         public static void InitializeService(DataServiceConfiguration config)
         {            
             config.SetEntitySetAccessRule("Employees", EntitySetRights.AllRead);           
             config.DataServiceBehavior.MaxProtocolVersion = DataServiceProtocolVersion.V3;
         }
         
        
     }
 }
 

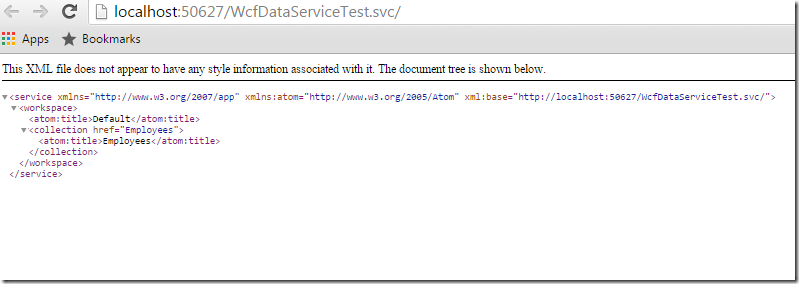
Run the service and you will see the output as shown below.

clip_image007

Enter the URL as mention below to return all the "Employees" resources in form of Atom: http://localhost:50627/WcfDataServiceTest.svc/Employees

clip_image009

Return the Employees in Json format

clip_image011

To filter the Employees by EmployeeId = 2

http://localhost:50627/WcfDataServiceTest.svc/Employees?$filter=EmployeeId%20eq%202

Return top 2 employees sorted with EmployeeId Desc

http://localhost:50627/WcfDataServiceTest.svc/Employees?$orderby=EmployeeId%20desc&$top=2

WCF Data Service, enables the capability of exposing the entity objects as service objects and also the service methods can be invoked directly from the request url. The method of invoking the service method(s) from url is same as like in MVC invoking through url or same as like REST API.

Beside the possible way of invoking from browser, the same url can be treated as WCF Service and can be used to generate a proxy class in the client application by adding through the service reference.

 namespace WCFODataService
 {
     
     public class WcfDataServiceTest : DataService<EmployeeDBEntities>
     {       
         public static void InitializeService(DataServiceConfiguration config)
         {
             config.SetEntitySetAccessRule("*", EntitySetRights.AllRead);
             config.SetServiceOperationAccessRule("GetAllEmployeeDetails", ServiceOperationRights.AllRead);
             config.DataServiceBehavior.MaxProtocolVersion = DataServiceProtocolVersion.V3;
         }
 
         [WebGet]
         public IQueryable<Employee> GetAllEmployeeDetails(string filter)
         {
             return (new List<Employee>()
                     {
                         new Employee() { EmployeeId = 1, DepartmentId = 1, Name  = "Tarun1", CreatedDate=new DateTime(2010,7, 21), Salary=200000},
                         new Employee() { EmployeeId = 2, DepartmentId = 2, Name  = "Tarun2", CreatedDate=new DateTime(2010,7, 22), Salary=100000}
                     }).AsQueryable();
         }
     }
 }  
 

Build and run the service now, URL: http://localhost:50627/WcfDataServiceTest.svc/GetAllEmployeeDetails?filter=’All

clip_image013

Hope this artifact helps you to have some basic idea on OData service and its utilities.

Happy Coding

Tarun Kumar Chatterjee

Category : SharePoint

Author Info

Tarun Kumar Chatterjee
 
Net – Technology Specialist
 
Rate this article
 
Tarun has been working in IT Industry for over 12+ years. He holds a B-tech degree. He is passionate about learning and sharing the tricks and tips in Azure, .Net ...read more
 

How to create RESTful service in WCF and consume

Tarun Kumar Chatterjee
 
Net – Technology Specialist
 
Rate this article
 
Views
5959

In one of my erlier article we have seen about how to create REST WebAPI, here we will be creting the REST service using WCF. Let’s the the detils steps below

Create a WCF Service applicatiuon named as RestFulWCFService

clip_image002[1]

Right click on the solution and add a WCF Service named as EmployeeService

clip_image004[1]

Here is my interface code

 namespace RestFulWCFService
 {
     [ServiceContract()]
     public interface IEmployeeService
     {
         [WebGet(UriTemplate = "Employee", ResponseFormat = WebMessageFormat.Json)]
         [OperationContract]       
         List<Employee> GetAllEmployeeDetails();
 
         [WebGet(UriTemplate = "Employee?id={id}", ResponseFormat = WebMessageFormat.Json)]
         [OperationContract]
         Employee GetEmployee(int Id);
 
         [OperationContract]
         [WebInvoke(Method = "POST", UriTemplate = "EmployeePOST", ResponseFormat = WebMessageFormat.Json, RequestFormat = WebMessageFormat.Json)]
         void AddEmployee(string newEmp);
 
         [OperationContract]
         [WebInvoke(Method = "PUT", UriTemplate = "EmployeePUT", ResponseFormat = WebMessageFormat.Json, RequestFormat = WebMessageFormat.Json)]
         void UpdateEmployee(string newEmp);
 
         [WebInvoke(Method = "DELETE", UriTemplate = "Employee/{empId}", ResponseFormat = WebMessageFormat.Json, RequestFormat = WebMessageFormat.Json)]
         [OperationContract]
         void DeleteEmployee(string empId);
     }
 }
 

Below is my interface implement code

 namespace RestFulWCFService
 {
     [AspNetCompatibilityRequirements(RequirementsMode = AspNetCompatibilityRequirementsMode.Allowed)]
     public  class EmployeeService : IEmployeeService
     {
         public List<Employee> GetAllEmployeeDetails()
         {
             return new EmployeeDAL().EmployeeList;
         }
         public Employee GetEmployee(int id)
         {
             IEnumerable<Employee> empList = new EmployeeDAL().EmployeeList.Where(x => x.EmpId == id);
 
             if (empList != null)
                 return empList.First<Employee>();
             else
                 return null;
         }
         public void AddEmployee(string newEmp)
         {
             var serializer = new JavaScriptSerializer();
             var serializedResult = serializer.Deserialize<List<Employee>>(newEmp);
             new EmployeeDAL().Add(serializedResult[0]);
         }
         public void UpdateEmployee(string updateEmp)
         {
             var serializer = new JavaScriptSerializer();
             var serializedResult = serializer.Deserialize<List<Employee>>(updateEmp);
             new EmployeeDAL().Update(serializedResult[0]);
         }
         public void DeleteEmployee(string empId)
         {
             new EmployeeDAL().Delete(System.Convert.ToInt32(empId));
         }
     }


Below is the EmployeeDAL code

 namespace RestFulWCFService
 {
     public class EmployeeDAL
     {
         
         
         private List< Employee> empList = new List < Employee>()
         {
             new Employee() { EmpId = 1, Fname = "Tarun1", Lname = "Chatterjee1", JoinDate=new DateTime(2010,1, 1), Age=30,Salary=100000,Designation="Software Engineer"},
             new Employee() { EmpId = 2, Fname = "Tarun2", Lname = "Chatterjee2", JoinDate=new DateTime(2011,1,1), Age=31,Salary=200000,Designation="Software Engineer"},    
             new Employee() { EmpId = 3, Fname = "Tarun3", Lname = "Chatterjee3", JoinDate=new DateTime(2012,1,1), Age=32,Salary=300000,Designation="Software Engineer"},  
             new Employee() { EmpId = 4, Fname = "Tarun4", Lname = "Chatterjee4", JoinDate=new DateTime(2013, 1,1), Age=33,Salary=400000,Designation="Software Engineer"},
         };
 
         public List< Employee> EmployeeList
         {
             get
             {
                 return empList;
             }
         }
 
 
         public void Update(Employee updEmployee)
         {
             Employee existing = empList.Find(p => p.EmpId == updEmployee.EmpId);
 
             if (existing == null)
                 throw new KeyNotFoundException("Specified Employee cannot be found");
 
             existing.Fname = updEmployee.Fname;
             existing.Lname = updEmployee.Lname;
             existing.Age = updEmployee.Age;
         }
 
         public void Delete(int empid)
         {
             Employee existing = empList.Find(p => p.EmpId == empid);
             empList.Remove(existing);
         }
         public void Add(Employee newEmployee)
         {
             empList.Add(new Employee
             {
                 EmpId = newEmployee.EmpId,
                 Fname = newEmployee.Fname,
                 Lname = newEmployee.Lname,
                 Age = newEmployee.Age,
                 JoinDate = DateTime.Now,
                 Designation = newEmployee.Designation,
                 Salary = newEmployee.Salary
             });
         }
     }
     [Serializable]
     [DataContract]
     public class Employee
     {
         [DataMember]
         public int EmpId { get; set; }
         [DataMember]
         public string Fname { get; set; }
         [DataMember]
         public string Lname { get; set; }
         [DataMember]
         public DateTime JoinDate { get; set; }
         [DataMember]
         public int Age { get; set; }
         [DataMember]
         public int Salary { get; set; }
         [DataMember]
         public string Designation { get; set; }
     }
 
 }
 

Below is my web.config code

 <?xml version="1.0"?>
 <configuration>
   <appSettings>
     <add key="aspnet:UseTaskFriendlySynchronizationContext" value="true" />
   </appSettings>
   <system.web>
     <compilation debug="true" targetFramework="4.5.1" />
     <httpRuntime targetFramework="4.5.1"/>
   </system.web>
   <system.serviceModel>
     <services>
       <service name="RestFulWCFService.EmployeeService">
         <endpoint address="" behaviorConfiguration="WebBehavior" binding="webHttpBinding" contract="RestFulWCFService.IEmployeeService">          
         </endpoint>
         <endpoint address="mex" binding="mexHttpBinding" contract="IMetadataExchange"/>
       </service>
     </services>
     <behaviors>
       <serviceBehaviors>
         <behavior name="Default">
           <serviceMetadata httpGetEnabled="true" />
         </behavior>
         <behavior name="">
           <serviceMetadata httpGetEnabled="true" />
           <serviceDebug includeExceptionDetailInFaults="false" />
         </behavior>
       </serviceBehaviors>
       <endpointBehaviors>
         <behavior name="WebBehavior">
           <webHttp helpEnabled="true" />
         </behavior>
       </endpointBehaviors>
     </behaviors>
     <serviceHostingEnvironment aspNetCompatibilityEnabled="true"
       multipleSiteBindingsEnabled="false" />
   </system.serviceModel>
   <system.webServer>
     <modules runAllManagedModulesForAllRequests="true"/>    
     <directoryBrowse enabled="true"/>
   </system.webServer>
 </configuration>


Right click on the Solution and Create the virtual directory

clip_image006

Now build the solution and run, the output will be looking like

clip_image008[1]

So, our service is ready now. Now we will be seeing how to consume the service from a console application

Create a Console application and add the service reference to it

clip_image009

Add the below piece of code in Program.cs and run

 WebChannelFactory<IEmployeeService> wcf = new WebChannelFactory<IEmployeeService>(new Uri("http://localhost/RestFulWCFService/EmployeeService.svc"));
             IEmployeeService client = wcf.CreateChannel();
                         
             //Load all the Employee from the server and display
             foreach (Employee emp in client.GetAllEmployeeDetails())
             {
                 Console.WriteLine(string.Format("EmpID:{0}, Name:{1} {2}", emp.EmpId, emp.Fname, emp.Lname));
             }
             Console.ReadLine();


clip_image011

Below is the code to consume the service from web

 function PostEmployee() {            
             var EmpUser = "[{"Age":30,"Designation":"Software Engineer","EmpId":5,"Fname":"Tarun","JoinDate":"1/1/1990","Lname":"Chatterjee","Salary":500000}]";
             
             $.ajax({
                 type: "POST",
                 url: serviceUrl + "/EmployeePOST",
                 data: JSON.stringify(EmpUser),
                 contentType: "application/json; charset=utf-8",
                 dataType: "json",
                 processData: true,
                 success: function (data) {                    
                 },
                 error: function (msg) {
                     JSON.stringify(msg);
                 }
             });
 

Hope this article will help you to understand the basic implementation on WCF REST service and how to consume from Console/Web Application.

Happy Coding

Tarun Kumar Chatterjee

Category : Office 365, SharePoint

Author Info

Tarun Kumar Chatterjee
 
Net – Technology Specialist
 
Rate this article
 
Tarun has been working in IT Industry for over 12+ years. He holds a B-tech degree. He is passionate about learning and sharing the tricks and tips in Azure, .Net ...read more
 

Steps to perform WCF Windows Activation Service hosting

Tarun Kumar Chatterjee
 
Net – Technology Specialist
June 9, 2016
 
Rate this article
 
Views
5594

Hosting WCF in Activation service takes many advantages such as process recycling, isolation, idle time management and common configuration system. WAS hosted service can be created using following steps

· Enable WCF for non-http protocols

· Create WAS hosted service

· Enable different binding to the hosted service

Before Start creating the service we need to configure the system to support WAS. Following are the step to configure WAS.

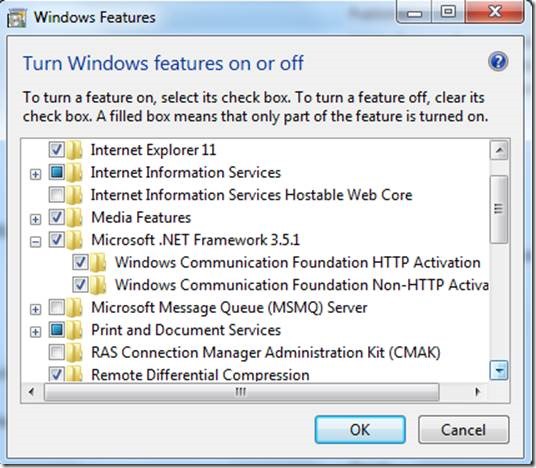
Click Start –> Control Panel –> programs and Features and click ‘Turn Windows Components On or Off’ in left pane.

Expand ‘Microsoft .Net Framework 3.5.1’ and enable "Windows Communication Foundation HTTP Activation" and "Windows Communication Foundation Non- HTTP Activation".

clip_image002

Now we will be creating WAS Hosted Service

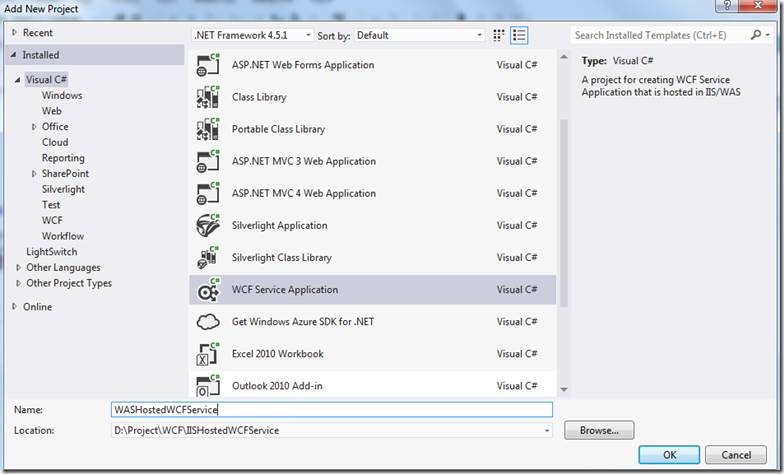
Start the Visual Studio and click File — >New — >Web Site. Select the ‘WCF Service Application’ click OK.

clip_image004

I have created a service named as MyService, which will have an Add method will accept two integer values as input and return the summation of passing parameters value. Interface implementation of the Service is shown below.

Add a WCF service with the following codes

clip_image006

Below is the WASHostedWCFService interface code:

 using System;
 using System.Collections.Generic;
 using System.Linq;
 using System.Runtime.Serialization;
 using System.ServiceModel;
 using System.Text;
 
 namespace WASHostedWCFService
 {    
     [ServiceContract]
     public interface IMyService
     {
         [OperationContract]
         int Add(int num1, int num2);
     }
 }
 
 
 //Below is the interface implement code: 
 using System;
 using System.Collections.Generic;
 using System.Linq;
 using System.Runtime.Serialization;
 using System.ServiceModel;
 using System.Text;
 
 namespace WASHostedWCFService
 {
     public class MyService : IMyService
     {
         public int Add(int num1, int num2)
         {
             return num1 + num2;
         }
     }
 }
 

Here is my web.config code

 <?xml version="1.0"?>
 <configuration>
 
   <appSettings>
     <add key="aspnet:UseTaskFriendlySynchronizationContext" value="true" />
   </appSettings>
   <system.web>
     <compilation debug="true" targetFramework="4.5.1" />
     <httpRuntime targetFramework="4.5.1"/>
   </system.web>
   <system.serviceModel>
     <services>
       <service name="WASHostedWCFService.MyService" behaviorConfiguration="ServiceBehavior">
         <!-- Service Endpoints -->
         <endpoint binding="netTcpBinding" contract="WASHostedWCFService.IMyService" >
         </endpoint>
         <endpoint address="mex" binding="mexTcpBinding" contract="IMetadataExchange"/>
       </service>
     </services>
     
     <behaviors>
       <serviceBehaviors>
         <behavior name="ServiceBehavior">
           <!-- To avoid disclosing metadata information, set the values below to false before deployment -->
           <serviceMetadata httpGetEnabled="true" />
           <!-- To receive exception details in faults for debugging purposes, set the value below to true.  Set to false before deployment to avoid disclosing exception information -->
           <serviceDebug includeExceptionDetailInFaults="false"/>
         </behavior>
       </serviceBehaviors>
     </behaviors>    
   </system.serviceModel>
   <system.webServer>
     <modules runAllManagedModulesForAllRequests="true"/>
     <!--
         To browse web app root directory during debugging, set the value below to true.
         Set to false before deployment to avoid disclosing web app folder information.
       -->
     <directoryBrowse enabled="true"/>
   </system.webServer>
 
 </configuration>
 

To enable different binding to the hosted service, Go to the Start menu -> Programs ->Accessories. Right click on the "Command Prompt" item, and select "Run as administrator" from the context menu.

Execute the following command

appcmd set app "Default Web Site/WASHostedWCFService" /enabledProtocols:http,net.tcp

Output will be shown below

clip_image008

Now the service is ready to use.

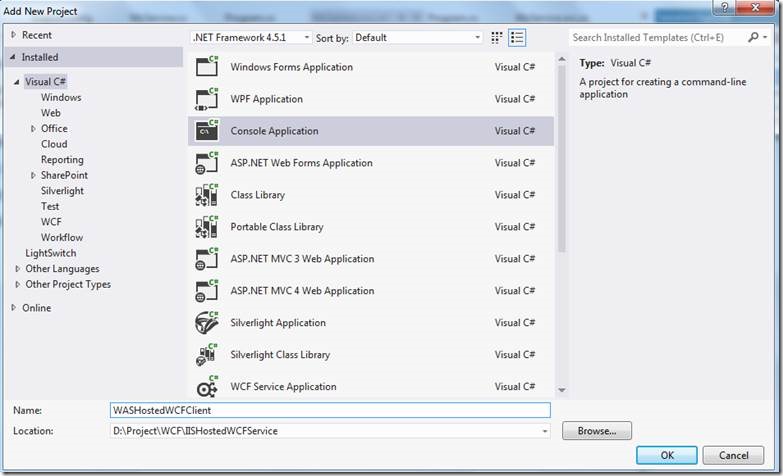
Now we will be creating the client application as shown below and add the reference ‘System.ServiceModel’, this is the core dll for WCF.

clip_image010

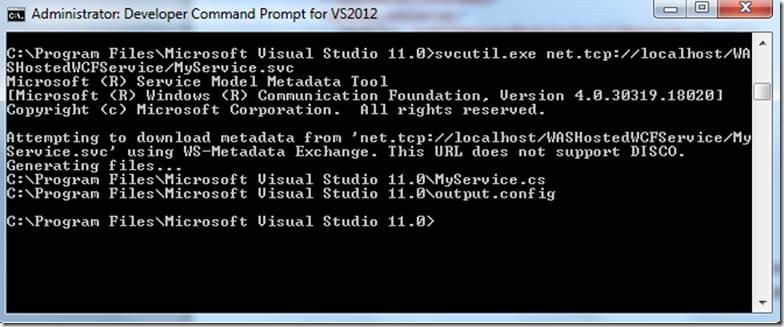
Next we can create the proxy class using service utility and add the proxy class to the client application. Creat the proxy class using Visual Studio Command prompt and execute the command

svcutil.exe net.tcp://localhost/WASHostedWCFService/MyService.svc

clip_image012

Add the generated proxy class and content of output.config file in App.config to WASHostedWCFClient application.

Within the Program.cs add the following code:

 using System;
 using System.Collections.Generic;
 using System.Linq;
 using System.Text;
 using System.Threading.Tasks;
 
 namespace WASHostedWCFClient
 {
     class Program
     {
         static void Main(string[] args)
         {
             MyServiceClient objMyServiceClient = new MyServiceClient();
             Console.WriteLine(objMyServiceClient.Add(2, 3).ToString());
             Console.ReadLine();
         }
     }
 }


Now build and run the client application, it will call the service and return the summation as 5.

clip_image014

Happy Coding

Tarun Kumar Chatterjee

Category : .Net

Author Info

Tarun Kumar Chatterjee
 
Net – Technology Specialist
 
Rate this article
 
Tarun has been working in IT Industry for over 12+ years. He holds a B-tech degree. He is passionate about learning and sharing the tricks and tips in Azure, .Net ...read more
 

Steps to perform WCF IIS hosting

Tarun Kumar Chatterjee
 
Net – Technology Specialist
May 31, 2016
 
Rate this article
 
Views
6093

The main advantage of IIS hosting service is that, it will automatically launch the host process when it gets the first client request. It uses the features of IIS such as process recycling, idle shutdown, process health monitoring and message based activation. The main disadvantage of using IIS is that, it will support only HTTP protocol.

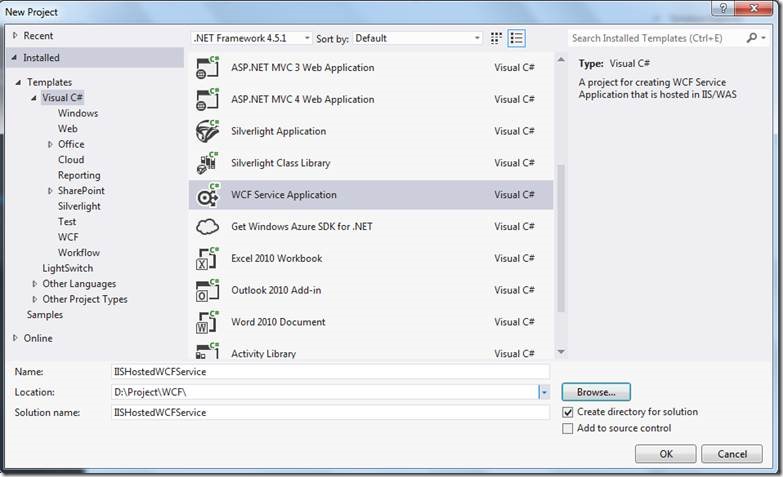
Start the Visual Studio and click File — >New — >Web Site. Select the ‘WCF Service Application’ click OK.

clip_image002

I have created a service named as MyService, which will accept value as input and return as “You entered: value”. Interface and implementation of the Service is shown below.

Add a WCF service with the following codes

clip_image004

Below is the IISHostedWCFService interface code:

 using System;
 using System.Collections.Generic;
 using System.Linq;
 using System.Runtime.Serialization;
 using System.ServiceModel;
 using System.Text;
 
 namespace IISHostedWCFService
 {
     [ServiceContract]
     public interface IMyService
     {
         [OperationContract]
         string GetData(int value);
 
         [OperationContract]
         CompositeType GetDataUsingDataContract(CompositeType composite);
     }
     [DataContract]
     public class CompositeType
     {
         bool boolValue = true;
         string stringValue = "Hello ";
 
         [DataMember]
         public bool BoolValue
         {
             get { return boolValue; }
             set { boolValue = value; }
         }
 
         [DataMember]
         public string StringValue
         {
             get { return stringValue; }
             set { stringValue = value; }
         }
     }
 }
 
 Below is the interface implement code: 
 using System;
 using System.Collections.Generic;
 using System.Linq;
 using System.Runtime.Serialization;
 using System.ServiceModel;
 using System.Text;
 
 namespace IISHostedWCFService
 {    
     public class MyService : IMyService
     {
         public string GetData(int value)
         {
             return string.Format("You entered: {0}", value);
         }
 
         public CompositeType GetDataUsingDataContract(CompositeType composite)
         {
             if (composite == null)
             {
                 throw new ArgumentNullException("composite");
             }
             if (composite.BoolValue)
             {
                 composite.StringValue += "Suffix";
             }
             return composite;
         }
     }
 }


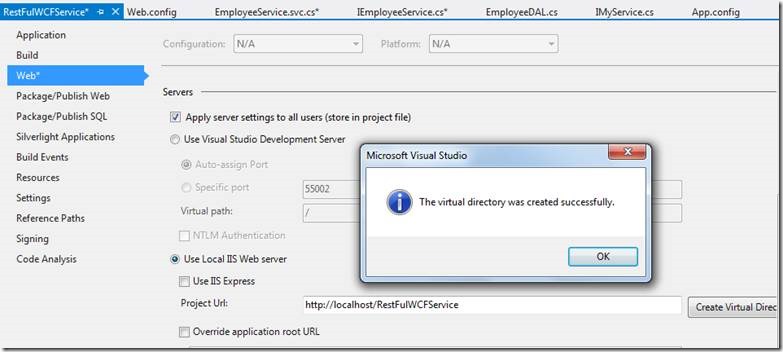
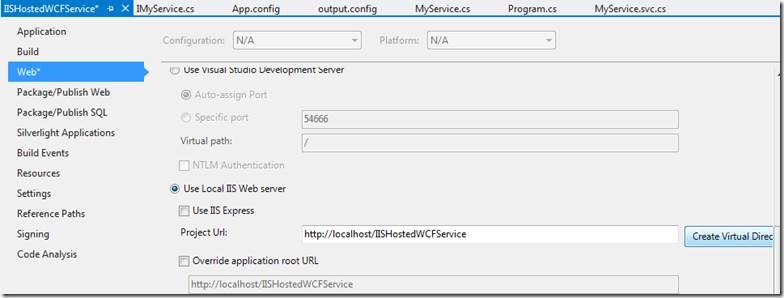
Right click on IISHostedWCFService and go to Properties. Go to Web, Select “Use Local IIS Web Server”, set the project URL properly and then click on Create Virtual Directory. It will be successfully created the virtual directory in IIS.

clip_image006

Here is my web.config code

 <?xml version="1.0"?>
 <configuration>
   <appSettings>
     <add key="aspnet:UseTaskFriendlySynchronizationContext" value="true" />
   </appSettings>
   <system.web>
     <compilation debug="true" targetFramework="4.5.1" />
     <httpRuntime targetFramework="4.5.1"/>
   </system.web>
   <system.serviceModel>    
     <services>
       <service name="IISHostedWCFService.MyService">
 	    <endpoint address="http://localhost/IISHostedWCFService/MyService.svc" binding="wsHttpBinding" contract="IISHostedWCFService.IMyService">
 	    <identity>
 	    <dns value="localhost"/>
 	    </identity>
 	    </endpoint>
 	    <endpoint address="mex" binding="mexHttpBinding" contract="IMetadataExchange"/>
    </service>
     </services>
     <behaviors>
       <serviceBehaviors>
         <behavior>          
           <serviceMetadata httpGetEnabled="true" httpsGetEnabled="true" />          
           <serviceDebug includeExceptionDetailInFaults="false"/>
         </behavior>
       </serviceBehaviors>
     </behaviors>    
   </system.serviceModel>
   <system.webServer>
     <modules runAllManagedModulesForAllRequests="true"/>    
     <directoryBrowse enabled="true"/>
   </system.webServer>
 </configuration>


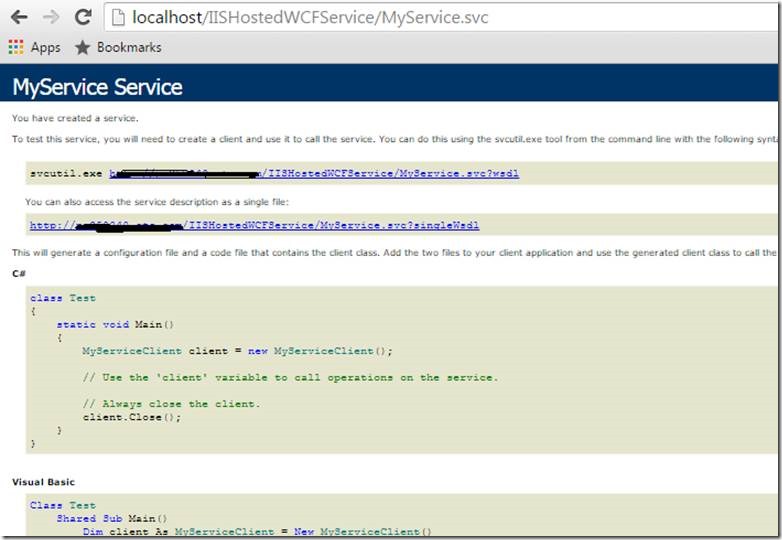
Now my service is ready, build it and browse

clip_image008

If we open the WSDL link it will show you the WSDL xml content properly.

To host the service, let’s add another client console application within the solution named as “IISHostedWCFClient”

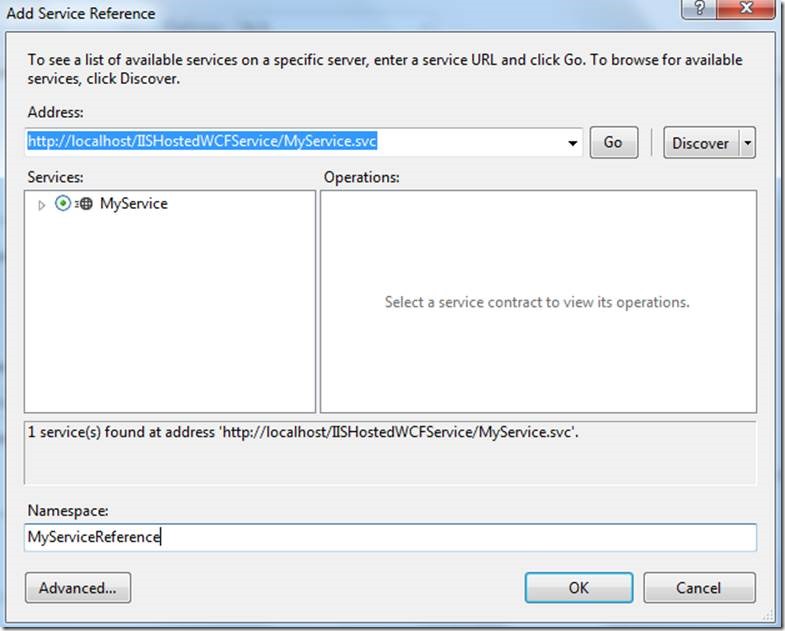
Within the console application add service reference named as “MyServiceReference” and using the Address http://localhost/IISHostedWCFService/MyService.svc

clip_image010

Within the Program.cs add the following code:

 static void Main(string[] args)
         {
              MyServiceReference.MyServiceClient client = new MyServiceReference.MyServiceClient();
              Console.WriteLine("Client calling the service...");             
              Console.WriteLine(client.GetData(5));
              Console.ReadLine();
 
         }  


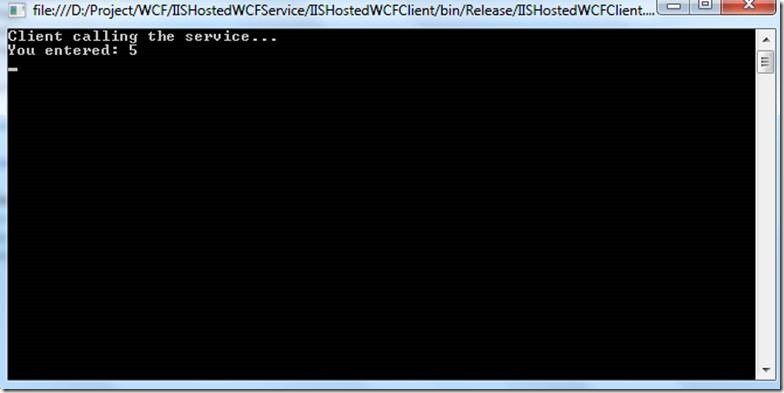
Now run the console application, it will pass the value 5 to service and display the result as:

clip_image012

Happy Coding

Tarun Kumar Chatterjee

Category : .Net

Author Info

Tarun Kumar Chatterjee
 
Net – Technology Specialist
 
Rate this article
 
Tarun has been working in IT Industry for over 12+ years. He holds a B-tech degree. He is passionate about learning and sharing the tricks and tips in Azure, .Net ...read more
 

Windows communication foundation (WCF)

Shikha Gupta
 
SharePoint Developer
April 19, 2016
 
Rate this article
 
Views
5307

It is a Microsoft platform for implementing distributed and interoperable applications. WCF is very useful for implementing services for different clients if they are using different type of application with different protocol and different messaging format. This article will help you to create a basic WCF which will display the data from the data and save the data in the database and host that WCF and asp.net client web application will consume the WCF.

1. Create a database and use it for that run the following commands.

create database DbEmployee

use DbEmployee

2. Create a table.

create table tblEmployee

(

EmployeeId int identity primary key,

Name varchar(50),

Salary int

)

3. Insert data into the table.

insert into tblEmployee values(‘Shikha’,1000)

insert into tblEmployee values(‘Tarun’,2000)

insert into tblEmployee values (‘Sathish’,3000)

4. Create a proc which retrives data based on the id

Create Proc getEmployeeByID

@Id int

as

begin

select EmployeeId,Name,Salary

from tblEmployee

where EmployeeId=@Id

end

5. If you want to execute the proc you can run

exec getEmployeeByID 1

6. Create a Proc which saves the employee data into EmployeeTable

Create proc SaveEmployee

@Name varchar(50),

@Sal varchar(50)

as

begin

insert tblEmployee(Name,Salary)

values(@Name,@Sal)

end

7. If you want to execute the proc you can run this will add a new row to your table.

exec SaveEmployee 4, ‘abc’, 10000

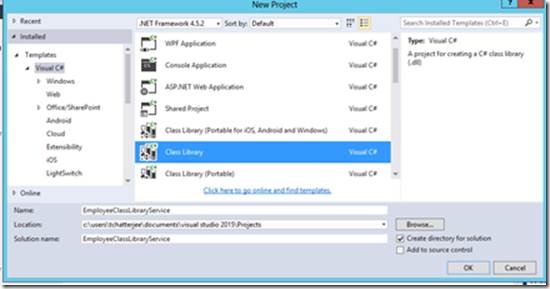
8. Open visual studio and create a class library with the name EmployeeClassLibraryService
clip_image002

9. Rename the class 1 to Employee Class and paste the below code in Employee class.

public int EmployeeId { get; set; }

public string Name { get; set; }

public int Salary { get; set; }

10. Delete the existing app.config file and we are goin to add a new app.config file later in the host project.

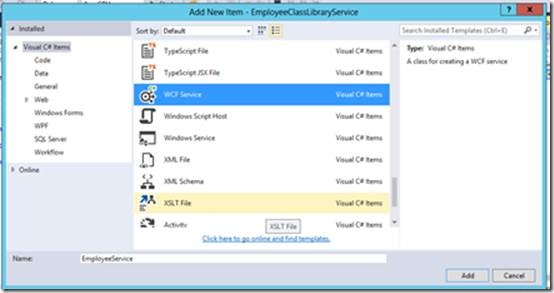
11. Add a WCF Service and name it as Employee Service.

Explanation:- This will add a Interface IEmployeeService.cs and a class EmployeeService.cs to the class library project. The Interface will be decorated with the service contract and this turns the interface to a WCF Service. The methods under this would be decorated with operation contract which makes the methods available as a part of service to the client. If we want to create a method under WCF service and don’t want it to make availalbe to the client then don’t decorated with operation contarct attribute.
clip_image004

12. Remove the existing operation contract and copy paste the following code in IEmployee Service interface.

Expalantion:- Here we are defining two methods first GetEmployee which will retrived the data from the database depending on the ID entered. Second method SaveEmployee will save the data inside the database and the id field will be automatically incremented depending on the last id generated. These methods will be implemeted by the EmployeeService class.

[OperationContract]

Employee GetEmployee(int id);

[OperationContract]

void SaveEmployee(Employee emp);

13. First add the reference of System.Configuration file to the project.
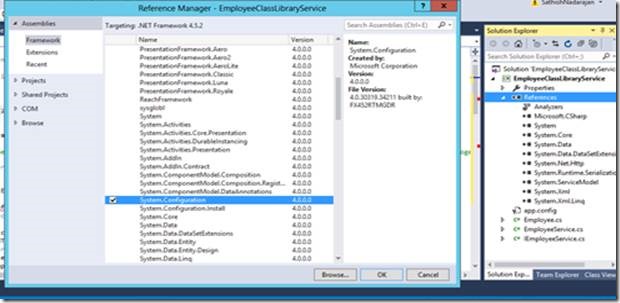
clip_image006

Go to EmployeeService.cs and add the following namespace.

using System.Data;

using System.Data.SqlClient;

using System.Configuration;

Implement the methods defined in the interface copy and paste following code inside them.

 public Employee GetEmployee(int id)
         {
             string cs = ConfigurationManager.ConnectionStrings["EmpCS"].ConnectionString;
             using (SqlConnection con = new SqlConnection(cs))
             {
                 SqlCommand cmd = new SqlCommand("getEmployeeByID", con);
                 cmd.CommandType = CommandType.StoredProcedure;
                 SqlParameter parameter = new SqlParameter("@Id", id);
                 cmd.Parameters.Add(parameter);
                 Employee emp = new Employee();
                 cmd.Connection = con;
                 con.Open();
                 SqlDataReader reader = cmd.ExecuteReader();
                 while (reader.Read())
                 {
                     emp.EmployeeId = Convert.ToInt32(reader["EmployeeId"]);
                     emp.Name = reader["Name"].ToString();
                     emp.Salary = Convert.ToInt32(reader["Salary"]);
                 }
 
                 return emp;
             }
         }
 
         public void SaveEmployee(Employee emp)
         {
             string cs = ConfigurationManager.ConnectionStrings["EmpCS"].ConnectionString;
             using (SqlConnection con = new SqlConnection(cs))
             {
                 SqlCommand cmd = new SqlCommand("SaveEmployee", con);
                 cmd.CommandType = CommandType.StoredProcedure;
                 SqlParameter parameterName = new SqlParameter
                 {
                     ParameterName = "@Name",
                     Value = emp.Name
                 };
                 cmd.Parameters.Add(parameterName);
                 SqlParameter parameterSal = new SqlParameter
                 {
                     ParameterName = "@Sal",
                     Value = emp.Salary
                 };
                 cmd.Parameters.Add(parameterSal);
                 con.Open();
                 cmd.ExecuteNonQuery();
             }
 
         }
 

*Note: This connection string ["EmpCS"] is not defined as of now and will be defined later in app.config file.

14. Now the WCF is created and we have to host this WCF service for that add a new console application to the solution and name it as EmployeeServiceHost
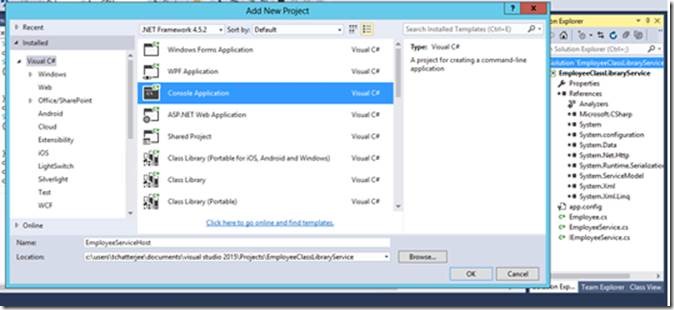
clip_image008

15. Add an Application configuration file in EmployeeServiceHost .
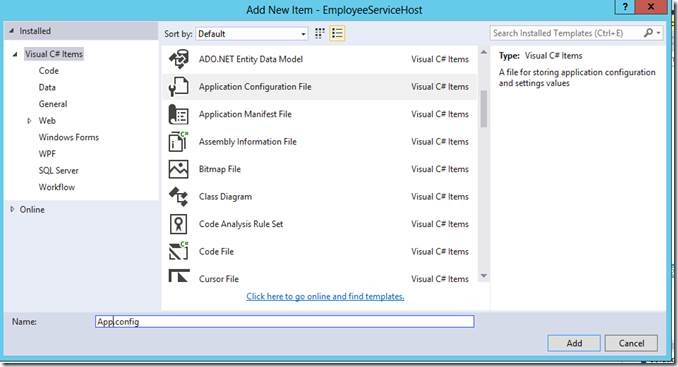
clip_image010

16. Remove the existing code from app.config file and copy and paste the following code in app.config file.

Expalnation:-

i. Connection string will connect this application to the database.

ii. Define the service name

iii. The endpoint is one of the main feature depending on the no of client we need to define that many endpoint. It has three things first is address specifies where your service is available and this is the relative address. Second is binding , there are lots of binding available in WCF but for now we are using basic HTTP binding and third is the contract is the service which tells the client what are the operations available in the service. In contract we add the namespace.interfacename.

iv. Base address which is available under host and this only contains the wsdl document which is created by the service. It will be used later in the client application to invoke the service.

v. Service behaviour which allows the service to exchange meta data and we have to make serviceMetadata httpGetEnabled="true" in order to allow it. This behaviour name should be define in service tag under behaviour configuration attribute.

vi.

 <?xml version="1.0" encoding="utf-8" ?>
 <configuration>
   <connectionStrings>
     <add name ="EmpCS" connectionString="Data Source=GBRDCSPSDEV05;Initial Catalog=DbEmployee;Integrated Security=True" providerName="System.Data.SqlClient" />
   </connectionStrings>
   <system.serviceModel>
 
     <services>
       <service name="EmployeeClassLibraryService.EmployeeService" behaviorConfiguration="mexBehavior">
         <endpoint address="EmployeeService" binding="basicHttpBinding" contract="EmployeeClassLibraryService.IEmployeeService"></endpoint>
         <host>
           <baseAddresses>
             <add baseAddress="http://localhost:8090"/>
           </baseAddresses>
         </host>
       </service>
     </services>
     <behaviors>
       <serviceBehaviors>
         <behavior name="mexBehavior">
           <serviceMetadata httpGetEnabled="true"/>
         </behavior>
       </serviceBehaviors>
     </behaviors>
   </system.serviceModel>
 </configuration>
 

17. In EmployeeServiceHost first we have to add two references one of EmployeeClassLibraryService and the other of System.ServiceModel assembly.
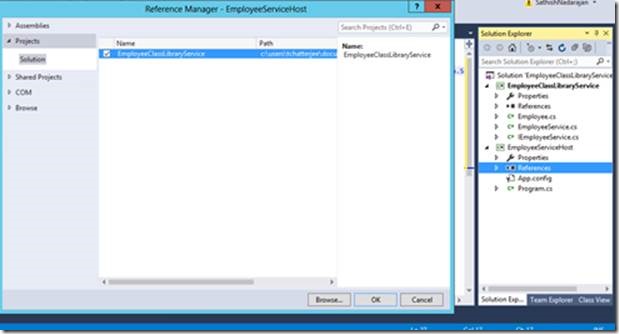
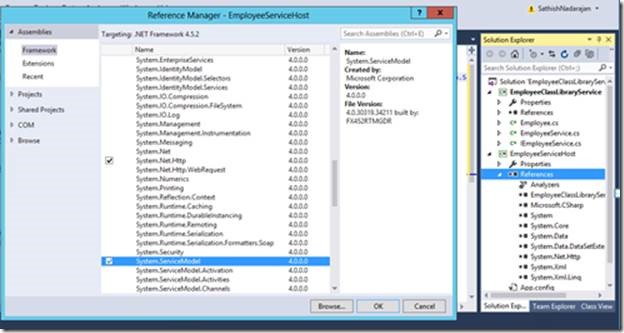
clip_image012

clip_image014

Include the following namespace in Program.cs file.

using System.ServiceModel;

Add the following code in main method of the program.cs file which will host the service.

 using (ServiceHost host = new ServiceHost(typeof(EmployeeClassLibraryService.EmployeeService)))
             {
                 host.Open();
                 Console.WriteLine("Host Started : " + DateTime.Now.ToString());
                 Console.ReadLine();
             }


18. Make the EmployeeServiceHost as the start up project and run the application and you would get the following screen.
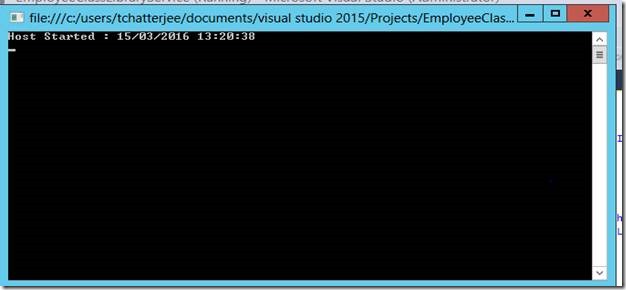
clip_image016

vii. So the host is created and if you want to see your wsdl document then click the link (http://localhost:8090/?wsdl) but make sure while viewing the wsdl your host should be running the only you can see your wsdl document.

Now the WCF and its hosting are done now we have to create a client application which will consume this WCF service. In our case the client is a Web Application.

1. Open another instance of visual studio and create an empty web application with the name EmployeeClient
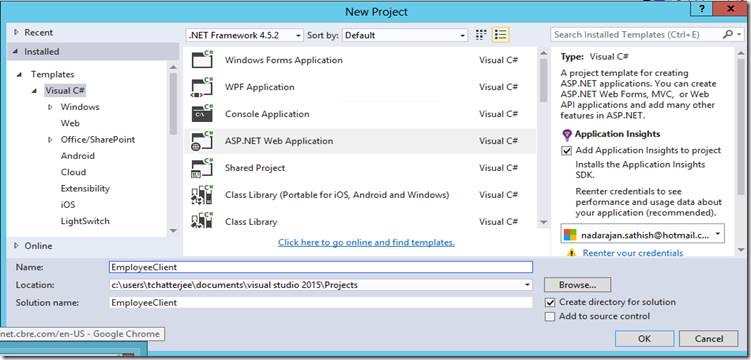
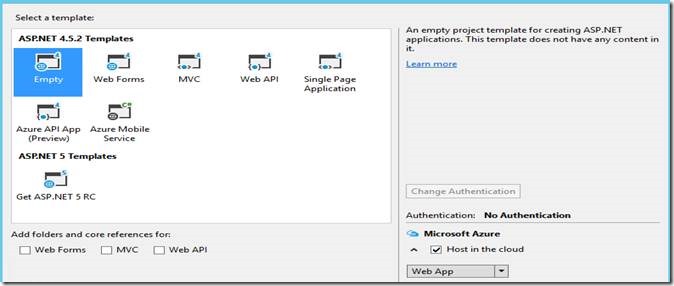
clip_image018

clip_image020

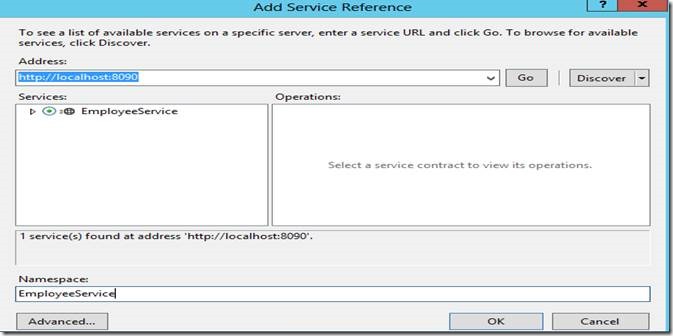
2. Add a Service Reference to the client application and specify the base url (http://localhost:8090) of your WCF Service and click go and you would see your service and give a proper namespace name as well. This will automatically add the binding configuration in the web.config file of client application.
clip_image022

3. Add a Web Form and name it EmployyeForm.aspx

4. Now we have to add the controls so copy and paste the following code for that or you can drag and drop the controls as well.

 <table class="auto-style1">
 <tr>
                 <td class="auto-style2">Name</td>
                 <td class="auto-style3">
                     <asp:TextBox ID="NameTxtBox" runat="server"></asp:TextBox>
                 </td>
             </tr>
             <tr>
                 <td class="auto-style2">Salary</td>
                 <td class="auto-style3">
                     <asp:TextBox ID="SalTxtBox" runat="server"></asp:TextBox>
                 </td>
             </tr>
             <tr>
                 <td colspan="2">
 asp:Button ID="SubmitBtn" runat="server" Text="Save Employee" OnClick="SubmitBtn_Click" />
                 </td>
             </tr>
             <tr>
                 <td class="auto-style3">
                     <asp:Button ID="GetBtn" runat="server" Text="Get Employee By ID" OnClick="GetBtn_Click" />
                 </td>
                 <td class="auto-style3">
                     ID: <asp:TextBox ID="IDTxtBox" runat="server"></asp:TextBox>
                      </td>
             </tr>
 </table>
 <p>
 <asp:Label ID="MsgLabel" runat="server" Font-Bold="True" Font-Size="XX-Large"></asp:Label>
 </p>
 

After copying the code or if you want to drag and drop the controls the screen should look like below:

clip_image024

5. Now copy the below code in SaveEmployee button click event which will take the values from the control and save it in the database.

 protected void SubmitBtn_Click(object sender, EventArgs e)
         {
             EmployeeService.EmployeeServiceClient client = new EmployeeService.EmployeeServiceClient();
             EmployeeService.Employee emp = new EmployeeService.Employee();
             emp.Name = NameTxtBox.Text;
             emp.Salary = Convert.ToInt32(SalTxtBox.Text);
             client.SaveEmployee(emp);
             MsgLabel.Text = "Employee Saved";
         }
 

6. Copy the below code in GetEmployeeById button click event which will take the id and depending on that it will display the value.

 protected void GetBtn_Click(object sender, EventArgs e)
         {
             EmployeeService.EmployeeServiceClient client = new EmployeeService.EmployeeServiceClient();
             EmployeeService.Employee emp = client.GetEmployee(Convert.ToInt32(IDTxtBox.Text));
             NameTxtBox.Text = emp.Name;
             SalTxtBox.Text = emp.Salary.ToString();
             MsgLabel.Text = "Employee Retreived";
         }
 

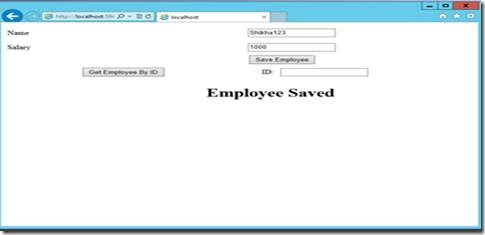
Now Run the client application and test both the functionality

Save Employee:
clip_image026

Get Employee:

clip_image028

Category : Windows

Author Info

Shikha Gupta
 
SharePoint Developer
 
Rate this article
 
Sikha has been working in IT Industry for over 5 years. She holds a B-tech degree. She is passionate about learning and sharing the tricks and tips in .Net , ...read more
 

Making a REST Call to a Custom WCF Service from SharePoint 2013 Provider Hosted Application

Sathish Nadarajan
 
Solution Architect
June 19, 2013
 
Rate this article
 
Views
24083

This article explains you how to make a REST call to a custom WCF service from a SharePoint 2013 Provider Hosted Application. In the previous Article, we saw how to create the WCF Service and test them from the browser. Now, let us have a look, how to invoke the service from our Provider Hosted Application and get some useful information from the Service.

To recall, our service has been created and by calling the url,

https://MyServer/Sites/SiteCollection/_layouts/15/SharePoint.WCFService.Sample/Services/SampleService.svc/SampleServiceCall(test)

From the browser, we should be able to get the output as,

 <?xml version="1.0"?>
 <SampleServiceCallResponse xmlns="http://tempuri.org/">
   <SampleServiceCallResult>Success</SampleServiceCallResult>
 </SampleServiceCallResponse>

In the browser.

With this, let go to our Provider Hosted Application. Hope we had seen, enough information regarding the provider hosted application in our previous articles.

 //Button Click Event
 protected void btnSample_OnClick(object sender, EventArgs e)
 {
     string SPHostUrl = Request.QueryString["SPHostUrl"];
     string strAccessToken;
             
             
     try
     {
 
         TokenHelper.TrustAllCertificates();
                 
         Uri hostWeb = new Uri(SPHostUrl);
 //Trying to get the Accesstoken from the CustomTokenHelper Class.  The //CustomTokenHelperClass is attached with this Article.
         strAccessToken = TokenHelper.GetS2SClientContextWithClaimsIdentity(hostWeb,
             HttpContext.Current.User,
             TokenHelper.IdentityClaimType.SMTP, TokenHelper.ClaimProviderType.SAML, true);
         //For Ace Scenario, we will be using the IdentityClaimType.UPN.  We are using SMTP for TEst Purpose
 
         SampleServiceCall(strAccessToken);
 
     }
     catch (Exception ex)
     {
         Response.Write(ex.Message);
     }
 }
 
 public void SampleServiceCall (string AccessToken)
 {
             
     string strUri = “https://MyServer/Sites/SiteCollection/_layouts/15/SharePoint.WCFService.Sample/Services/SampleService.svc/SampleServiceCall(test)“
 
     Uri uri = new Uri(strUri);
     HttpWebRequest request = (HttpWebRequest)WebRequest.Create(uri);
     request.Credentials = CredentialCache.DefaultCredentials;
     request.Accept = "application/atom+xml";
     request.Headers.Add("Authorization", "Bearer " + AccessToken);
 
     HttpWebResponse response = (HttpWebResponse)request.GetResponse();
 
 
     StreamReader reader = new StreamReader(response.GetResponseStream());
     XDocument doc = XDocument.Load(reader);
 
 
     Response.Write(doc.Root.Value.ToString());
 }

From the Provider Hosted Application, say for example, we are going to call REST service on a button click.

To get the AccessToken, we are using the CustomTokenHelper class which was downloaded from Steve Peschka’s Article. The method GetS2SClientContextWithClaimsIdentity will return the ClientContext by Default. But we need to overload the method to return the AccessToken. The overloaded method can be something like,

 public static string GetS2SClientContextWithClaimsIdentity(
             Uri targetApplicationUri,
             System.Security.Principal.IPrincipal UserPrincipal,
             IdentityClaimType UserIdentityClaimType,
             ClaimProviderType IdentityClaimProviderType, bool AccessToken)
 {
     //get the identity claim info first
     TokenHelper.ClaimsUserIdClaim id = RetrieveIdentityForSamlClaimsUser(UserPrincipal, UserIdentityClaimType);
 
     string realm = string.IsNullOrEmpty(Realm) ? GetRealmFromTargetUrl(targetApplicationUri) : Realm;
 
     JsonWebTokenClaim[] claims = UserPrincipal != null ? GetClaimsWithClaimsIdentity(UserPrincipal, UserIdentityClaimType, id, IdentityClaimProviderType) : null;
 
     string accessToken = GetS2SClaimsAccessTokenWithClaims(targetApplicationUri.Authority, realm, claims, id.ClaimsIdClaimType, id.ClaimsIdClaimValue);
 
     return accessToken;
 }

The CustomClaimsToken helper class is attached with this article. Hope all of you remember how to use the tokenhelper class from the previous articles.

Download SourceCode

Author Info

Sathish Nadarajan
 
Solution Architect
 
Rate this article
 
Sathish is a Microsoft MVP for SharePoint (Office Servers and Services) having 15+ years of experience in Microsoft Technologies. He holds a Masters Degree in Computer Aided Design and Business ...read more
 

Step by Step Procedures to create a WCF Service Application for SharePoint 2013

Sathish Nadarajan
 
Solution Architect
 
Rate this article
 
Views
67899

This article describes about the creation of a WCF Service and deploying it into the SharePoint 2013 environment. WCF Services plays a major role in SharePoint 2013 Apps based development model by acting as a bridge between SharePoint Client Object Modal and SharePoint Client Object Modal

Since Server Side Object model is not available for SharePoint App , any operation or business requirement in a SharePoint App has to be performed with Client Side Object Model (Microsoft.SharePoint.Client Namespace) only . But this namespace may not be enough to cater all the requirements which we expect in our Provider Hosted Application. At that time, what we can do is, we can create some WCF Service and Deploy them on the SharePoint Farm. From our Provider Hosted Application, we can invoke this service as REST calls. By doing so, we are violating the concept of App Development Model. But in certain requirements, there is no other way. Say for example, the SocialRatingManager. There is no CSOM equivalent class for SocialRatingManager class.

Let us see the step by step procedure to create the WCF Service in SharePoint 2013

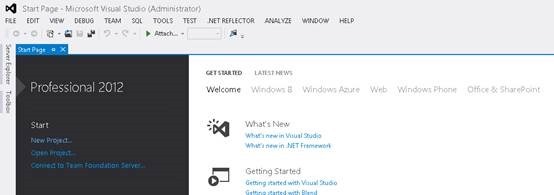
1. Open Visual Studio as Administrator

2. Click New Project.

clip_image002

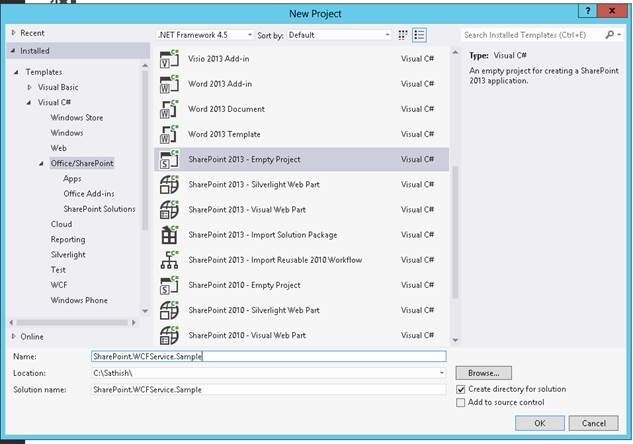
3. Select Empty SharePoint 2013 Solution.

clip_image004

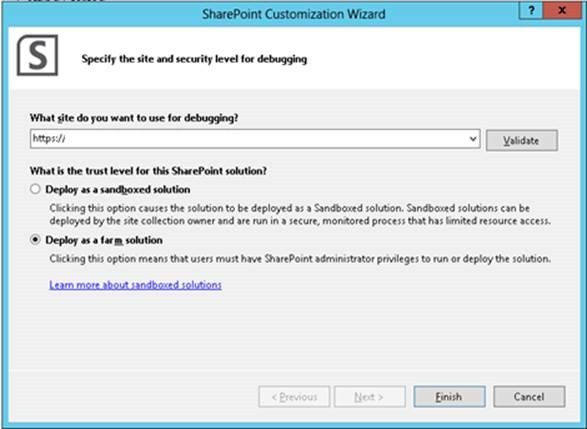
4. Enter the URL of a Site Collection and select Farm Solution.

clip_image006

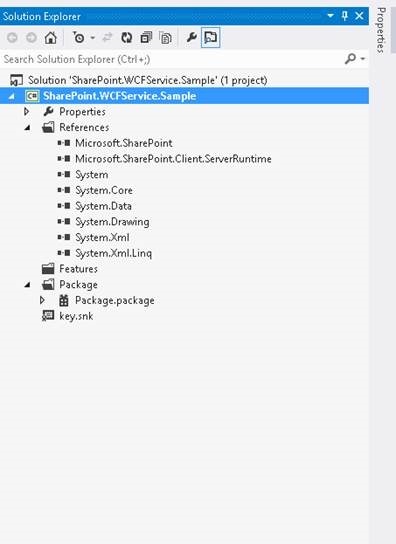
5. The solution will looks like this.

clip_image008

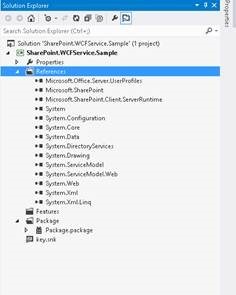
6. Add the following References on the Add Reference.

a. Microsoft.Office.Server.UserProfiles

b. Microsoft.SharePoint

c. Microsoft.SharePoint.Clieint.ServerRuntime

d. System.ServiceModel

e. System.ServiceModel.Web

f. System.DirectoryServices

g. System.Configuration

7. Hence the solution will looks like

clip_image010

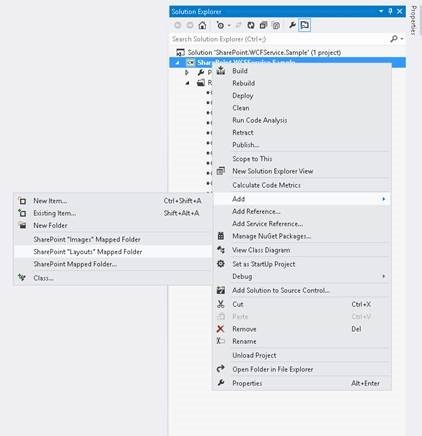
8. Add Layouts folder to the solution.

clip_image012

9. Make the Appropriate folder structure as shown in figure.

clip_image013

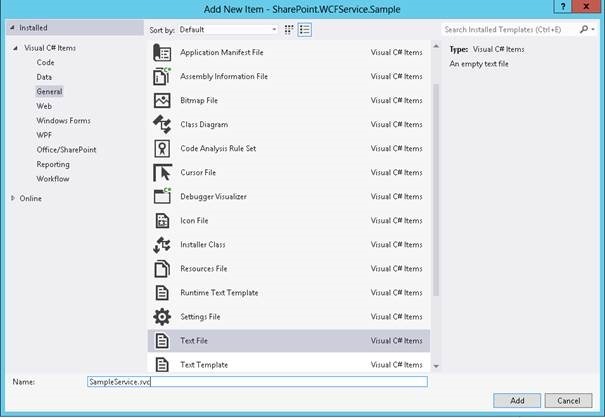
10. Since we cannot add a svc file directly, add a text file and rename it to .SVC

clip_image015

11. Open the SVC file and place the following code on it.

<%@ServiceHost   language= "C#"   Factory= "Microsoft.SharePoint.Client.Services.MultipleBaseAddressDataServiceHostFactory, Microsoft.SharePoint.Client.ServerRuntime, Version=15.0.0.0, Culture=neutral, PublicKeyToken=71e9bce111e9429c"   Service= "SharePoint.WCFService.Sample.Code.SampleService" %>

12. Create a folder called ‘Code’ and create 2 files. ISampleService.cs and SampleService.cs

13. Open the ISampleService.cs and add the following using Tags and Modify the Class as below.

using System.ServiceModel;  using System.ServiceModel.Web;    [ServiceContract]  public interface ISampleService  {   [OperationContract]   [WebInvoke(Method = "GET",   ResponseFormat = WebMessageFormat.Xml,   BodyStyle = WebMessageBodyStyle.Wrapped,   UriTemplate = "SampleServiceCall({SampleValue})")]   string SampleServiceCall(string SampleValue);  }

14. Now, we have our interface ready. Now open the SampleService.cs file which is going to implement the Interface described above.

15. Modify the class as shown below.

  using System;  using System.Collections.Generic;  using System.Linq;  using System.Text;  using System.Threading.Tasks;  using System.ServiceModel;  using System.ServiceModel.Web;  using System.ServiceModel.Activation;    using Microsoft.Office.Server.Social;  using Microsoft.Office.Server.UserProfiles;  using Microsoft.Office.Server.Microfeed;  using Microsoft.SharePoint;  using Microsoft.Office.Server.ReputationModel;  using Microsoft.Office.Server.SocialData;    using System.Configuration;    using System.Security.Principal;  using System.Web;  using Microsoft.Web.Hosting.Administration;    namespace SharePoint.WCFService.Sample.Code  {   [AspNetCompatibilityRequirements(RequirementsMode = AspNetCompatibilityRequirementsMode.Allowed)]   public sealed class SampleService : ISampleService   {     public string SampleServiceCall(string SampleValue)   {   return "Success";   }     }  }

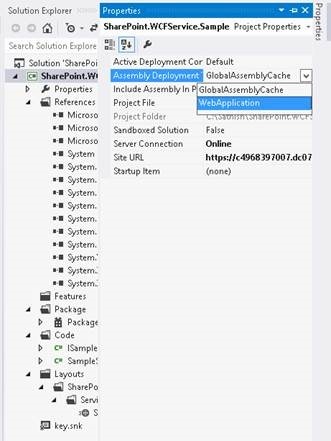
16. Select the Project and go to Properties. Modify the Deployment Target Property as WebApplication.

clip_image017

17. Modify the SiteURL to the webAppliaction url appropriately.

18. Deploy the solution and test from the Browser by giving the following url.

https://MyServer/Sites/SiteCollection/_layouts/15/SharePoint.WCFService.Sample/Services/SampleService.svc/SampleServiceCall(test)

19. We will get the response as below.

  <?xml version="1.0"?>  <SampleServiceCallResponse xmlns="http://tempuri.org/">   <SampleServiceCallResult>Success</SampleServiceCallResult>  </SampleServiceCallResponse>

With this simple steps, we are able to create our Service and deploy them on our SharePoint farm. The service application may be very simple. But from the Provider Hosted Application, if you are not able to achieve any functionality, then immediately think on the Service Applications. Happy Coding.

Download SourceCode

Author Info

Sathish Nadarajan
 
Solution Architect
 
Rate this article
 
Sathish is a Microsoft MVP for SharePoint (Office Servers and Services) having 15+ years of experience in Microsoft Technologies. He holds a Masters Degree in Computer Aided Design and Business ...read more
 

Leave a comment