How to Create a basic web service

Shikha Gupta
 
SharePoint Developer
April 20, 2016
 
Rate this article
 
Views
4496

It is the service provided over the web from one application to the other and helps one application to read and consume data from the other application. This article will help you to create a basic web service which will display the data from the data and save the data in the database.

1. Create a database and use it for that run the following commands.

create database DbEmployee

use DbEmployee

2. Create a table.

create table tblEmployee

(

EmployeeId int identity primary key,

Name varchar(50),

Salary int

)

3. Insert data into the table.

insert into tblEmployee values(‘Shikha’,1000)

insert into tblEmployee values(‘Tarun’,2000)

insert into tblEmployee values (‘Sathish’,3000)

4. Create a proc which retrives data based on the id

Create Proc getEmployeeByID

@Id int

as

begin

select EmployeeId,Name,Salary

from tblEmployee

where EmployeeId=@Id

end

5. If you want to execute the proc you can run

exec getEmployeeByID 1

6. Create a Proc which saves the employee data into EmployeeTable

Create proc SaveEmployee

@Name varchar(50),

@Sal varchar(50)

as

begin

insert tblEmployee(Name,Salary)

values(@Name,@Sal)

end

7. If you want to execute the proc you can run this will add a new row to your table.

exec SaveEmployee 4, ‘abc’, 10000

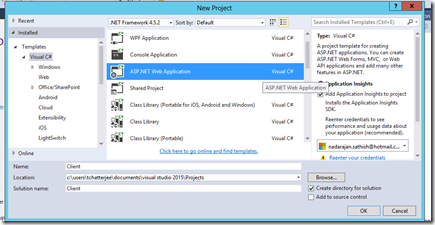
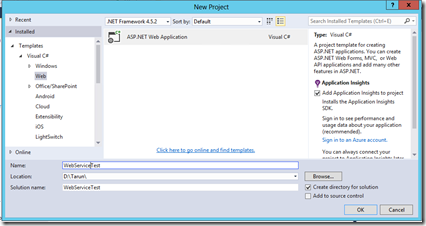
8. Open a visual studio and take a Asp.Net Web Applications.

image

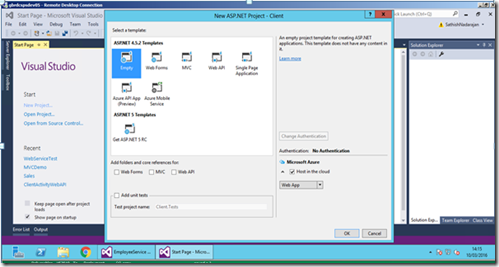
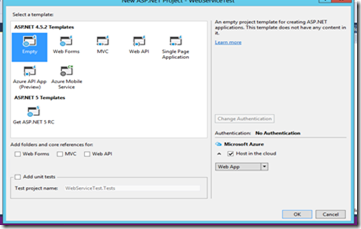
9. Select the empty template.

image

10. Open the web.config file and paste the following code after closing tag of system.web for establish the connection to the dataset created above.

<connectionStrings>

<add name ="EmpDBCS" connectionString="data source = GBRDCSPSDEV05; Initial Catalog=DbEmployee;Integrated Security =True" providerName="System.Data.SqlClient" />

</connectionStrings>

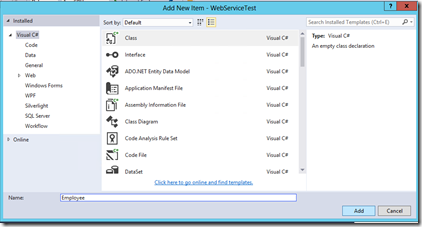
11. Add a class name Employee

image

12. Copy and paste the following code in Employee class.

public int EmployeeId { get; set; }

public string Name { get; set; }

public int Salary { get; set; }

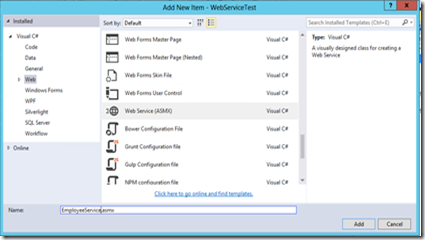
13. Add a Webservice which would be available under web in the installed templates and name it as EmployeeService.asmx.

image

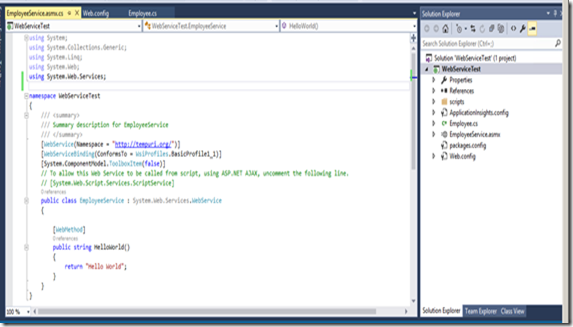
The following could would be generated after adding the webservice.

Explanation: – This webservice is nothing but a class and this class is decorated with WebService attribute which tells that this class is a web service and the namespace attribute under is differentiate one web service from other in the real world. The methods under this are decorated with webmethod in order to expose the method to the client and if we don’t want to expose it to client then we don’t have to decorate it with web method attribute.

image

14. Include the following classes.


using System.Data;

using System.Data.SqlClient;

using System.Configuration;

15. Delete the hello world web method and we will create two web methods one getEmployeeByID method and other Save Employee and the code for creating it is given below:

[WebMethod]

public Employee GetEmployeeById(int Id)

{

string cs = ConfigurationManager.ConnectionStrings["EmpCS"].ConnectionString;

using (SqlConnection con = new SqlConnection(cs))

{

SqlCommand cmd = new SqlCommand("getEmployeeByID", con);

cmd.CommandType = CommandType.StoredProcedure;

SqlParameter parameter = new SqlParameter("@Id", Id);

cmd.Parameters.Add(parameter);

Employee emp = new Employee();

cmd.Connection = con;

con.Open();

SqlDataReader reader = cmd.ExecuteReader();

while (reader.Read())

{

emp.EmployeeId = Convert.ToInt32(reader["EmployeeId"]);

emp.Name = reader["Name"].ToString();

emp.Salary = Convert.ToInt32(reader["Salary"]);

}

return emp;

}

}

[WebMethod]

public void SaveEmployee(Employee emp)

{

using (SqlConnection con = new SqlConnection(cs))

{

SqlCommand cmd = new SqlCommand("SaveEmployee", con);

cmd.CommandType = CommandType.StoredProcedure;

SqlParameter ParameterName = new SqlParameter

{

ParameterName = "@Name",

Value = emp.Name

};

cmd.Parameters.Add(ParameterName);

SqlParameter ParameterSal = new SqlParameter

{

ParameterName="@Sal",

Value=emp.Salary

};

cmd.Parameters.Add(ParameterSal);

con.Open();

cmd.ExecuteNonQuery();

}

}

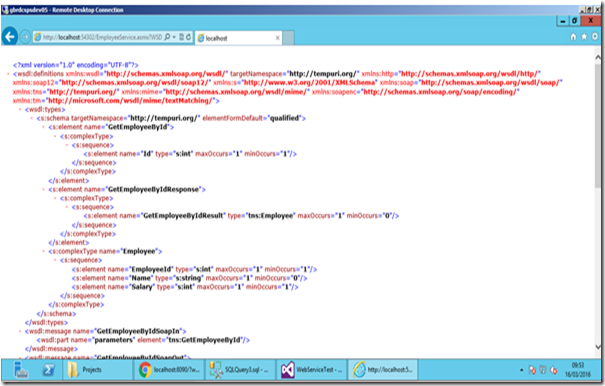
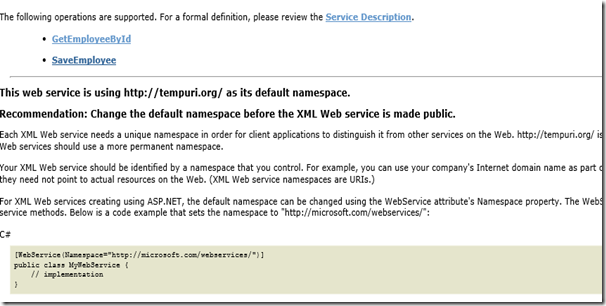
16. Open the EmployeeService.asmx. in browser and you would see your GetEmployeeById method, Save Employee method and service description link, click on service description link and it will take you to the wsdl document (http://localhost:54302/EmployeeService.asmx?WSDL) which is used by the client to generate the proxy class and consume this web service. Make a note of this wsdl url as later it will be used while creating the client application

image

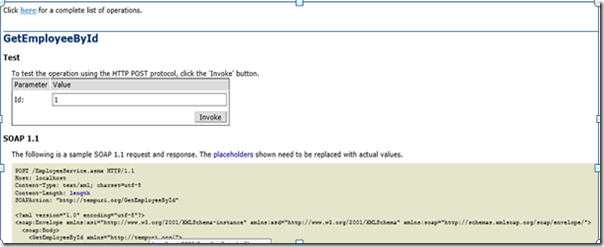
17. Now go back to the previous screen and click on GetEmployeeById method.

image

Once you click on GetEmployeeById method you could pass the id and click on invoke

image

This will give you the following result:

image

Now the web service is created and we can invoke the method as well and wsdl document is also generated so we have to create a client application which will consume this web service.

1. Create another project in this solution and take an empty .net web application

image

image

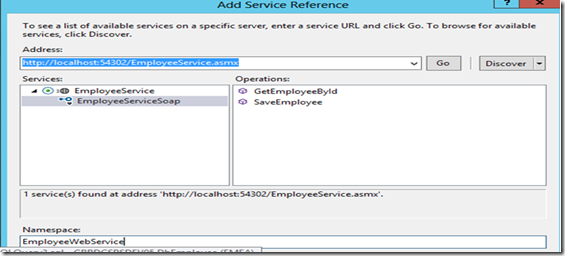
2. Right click on the references of client application and add a service reference in the address specify the wsdl url (http://localhost:54302/EmployeeService.asmx) and click go and you would see your web service and give a proper namespace name as well. This should generate the proxy class.

image

3. Add a Web Form and name it EmployyeForm.aspx

4. Now we have to add the controls so copy and paste the following code for that or you can drag and drop the controls as well.

<table class="auto-style1">

<tr>

<td class="auto-style2">Name</td>

<td class="auto-style3">

<asp:TextBox ID="NameTxtBox" runat="server"></asp:TextBox>

</td>

</tr>

<tr>

<td class="auto-style2">Salary</td>

<td class="auto-style3">

<asp:TextBox ID="SalTxtBox" runat="server"></asp:TextBox>

</td>

</tr>

<tr>

<td colspan="2">

asp:Button ID="SubmitBtn" runat="server" Text="Save Employee" OnClick="SubmitBtn_Click" />

</td>

</tr>

<tr>

<td class="auto-style3">

<asp:Button ID="GetBtn" runat="server" Text="Get Employee By ID" OnClick="GetBtn_Click" />

</td>

<td class="auto-style3">

ID: <asp:TextBox ID="IDTxtBox" runat="server"></asp:TextBox>

&nbsp;</td>

</tr>

</table>

<p>

<asp:Label ID="MsgLabel" runat="server" Font-Bold="True" Font-Size="XX-Large"></asp:Label>

</p>

After copying the code or if you want to drag and drop the controls the screen should look like below:

image

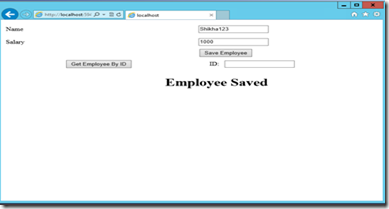
5. Now copy the below code in SaveEmployee button click event which will take the values from the control and save it in the database.

protected void SubmitBtn_Click(object sender, EventArgs e)

{

EmployeeWebService.EmployeeServiceSoapClient client = new EmployeeWebService.EmployeeServiceSoapClient();

EmployeeWebService.Employee emp = new EmployeeWebService.Employee();

emp.Name = NameTxtBox.Text;

emp.Salary = Convert.ToInt32(SalTxtBox.Text);

client.SaveEmployee(emp);

MsgLabel.Text = "Employee Saved";

}

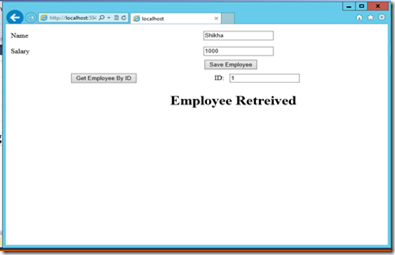
6. Copy the below code in GetEmployeeById button click event which will take the id and depending on that it will display the value.

protected void GetBtn_Click(object sender, EventArgs e)

{

EmployeeWebService.EmployeeServiceSoapClient client = new EmployeeWebService.EmployeeServiceSoapClient();

EmployeeWebService.Employee emp = client.GetEmployeeById(Convert.ToInt32(IDTxtBox.Text));

NameTxtBox.Text = emp.Name;

SalTxtBox.Text = emp.Salary.ToString();

MsgLabel.Text = "Employee Retreived";

}

Now view the Employee WebFrom in browser and test both of the functionality.


Save Employee:

image

Get Employee:

image

This is how we create a basic web service and make the asp .net client consume it.

But there are lots of limitations with Web Service like if the same service is needed by two different clients but the protocol and message format used are different. Then we will have to create the same service in two different ways as the protocol and message format used are different. So to overcome this we have WCF. The next article will be on WCF.
Category : Windows

Author Info

Shikha Gupta
 
SharePoint Developer
 
Rate this article
 
Sikha has been working in IT Industry for over 5 years. She holds a B-tech degree. She is passionate about learning and sharing the tricks and tips in .Net , ...read more
 

Making a REST Call to a Custom WCF Service from SharePoint 2013 Provider Hosted Application

Sathish Nadarajan
 
Solution Architect
June 19, 2013
 
Rate this article
 
Views
24080

This article explains you how to make a REST call to a custom WCF service from a SharePoint 2013 Provider Hosted Application. In the previous Article, we saw how to create the WCF Service and test them from the browser. Now, let us have a look, how to invoke the service from our Provider Hosted Application and get some useful information from the Service.

To recall, our service has been created and by calling the url,

https://MyServer/Sites/SiteCollection/_layouts/15/SharePoint.WCFService.Sample/Services/SampleService.svc/SampleServiceCall(test)

From the browser, we should be able to get the output as,

 <?xml version="1.0"?>
 <SampleServiceCallResponse xmlns="http://tempuri.org/">
   <SampleServiceCallResult>Success</SampleServiceCallResult>
 </SampleServiceCallResponse>

In the browser.

With this, let go to our Provider Hosted Application. Hope we had seen, enough information regarding the provider hosted application in our previous articles.

 //Button Click Event
 protected void btnSample_OnClick(object sender, EventArgs e)
 {
     string SPHostUrl = Request.QueryString["SPHostUrl"];
     string strAccessToken;
             
             
     try
     {
 
         TokenHelper.TrustAllCertificates();
                 
         Uri hostWeb = new Uri(SPHostUrl);
 //Trying to get the Accesstoken from the CustomTokenHelper Class.  The //CustomTokenHelperClass is attached with this Article.
         strAccessToken = TokenHelper.GetS2SClientContextWithClaimsIdentity(hostWeb,
             HttpContext.Current.User,
             TokenHelper.IdentityClaimType.SMTP, TokenHelper.ClaimProviderType.SAML, true);
         //For Ace Scenario, we will be using the IdentityClaimType.UPN.  We are using SMTP for TEst Purpose
 
         SampleServiceCall(strAccessToken);
 
     }
     catch (Exception ex)
     {
         Response.Write(ex.Message);
     }
 }
 
 public void SampleServiceCall (string AccessToken)
 {
             
     string strUri = “https://MyServer/Sites/SiteCollection/_layouts/15/SharePoint.WCFService.Sample/Services/SampleService.svc/SampleServiceCall(test)“
 
     Uri uri = new Uri(strUri);
     HttpWebRequest request = (HttpWebRequest)WebRequest.Create(uri);
     request.Credentials = CredentialCache.DefaultCredentials;
     request.Accept = "application/atom+xml";
     request.Headers.Add("Authorization", "Bearer " + AccessToken);
 
     HttpWebResponse response = (HttpWebResponse)request.GetResponse();
 
 
     StreamReader reader = new StreamReader(response.GetResponseStream());
     XDocument doc = XDocument.Load(reader);
 
 
     Response.Write(doc.Root.Value.ToString());
 }

From the Provider Hosted Application, say for example, we are going to call REST service on a button click.

To get the AccessToken, we are using the CustomTokenHelper class which was downloaded from Steve Peschka’s Article. The method GetS2SClientContextWithClaimsIdentity will return the ClientContext by Default. But we need to overload the method to return the AccessToken. The overloaded method can be something like,

 public static string GetS2SClientContextWithClaimsIdentity(
             Uri targetApplicationUri,
             System.Security.Principal.IPrincipal UserPrincipal,
             IdentityClaimType UserIdentityClaimType,
             ClaimProviderType IdentityClaimProviderType, bool AccessToken)
 {
     //get the identity claim info first
     TokenHelper.ClaimsUserIdClaim id = RetrieveIdentityForSamlClaimsUser(UserPrincipal, UserIdentityClaimType);
 
     string realm = string.IsNullOrEmpty(Realm) ? GetRealmFromTargetUrl(targetApplicationUri) : Realm;
 
     JsonWebTokenClaim[] claims = UserPrincipal != null ? GetClaimsWithClaimsIdentity(UserPrincipal, UserIdentityClaimType, id, IdentityClaimProviderType) : null;
 
     string accessToken = GetS2SClaimsAccessTokenWithClaims(targetApplicationUri.Authority, realm, claims, id.ClaimsIdClaimType, id.ClaimsIdClaimValue);
 
     return accessToken;
 }

The CustomClaimsToken helper class is attached with this article. Hope all of you remember how to use the tokenhelper class from the previous articles.

Download SourceCode

Author Info

Sathish Nadarajan
 
Solution Architect
 
Rate this article
 
Sathish is a Microsoft MVP for SharePoint (Office Servers and Services) having 15+ years of experience in Microsoft Technologies. He holds a Masters Degree in Computer Aided Design and Business ...read more
 

Step by Step Procedures to create a WCF Service Application for SharePoint 2013

Sathish Nadarajan
 
Solution Architect
 
Rate this article
 
Views
67895

This article describes about the creation of a WCF Service and deploying it into the SharePoint 2013 environment. WCF Services plays a major role in SharePoint 2013 Apps based development model by acting as a bridge between SharePoint Client Object Modal and SharePoint Client Object Modal

Since Server Side Object model is not available for SharePoint App , any operation or business requirement in a SharePoint App has to be performed with Client Side Object Model (Microsoft.SharePoint.Client Namespace) only . But this namespace may not be enough to cater all the requirements which we expect in our Provider Hosted Application. At that time, what we can do is, we can create some WCF Service and Deploy them on the SharePoint Farm. From our Provider Hosted Application, we can invoke this service as REST calls. By doing so, we are violating the concept of App Development Model. But in certain requirements, there is no other way. Say for example, the SocialRatingManager. There is no CSOM equivalent class for SocialRatingManager class.

Let us see the step by step procedure to create the WCF Service in SharePoint 2013

1. Open Visual Studio as Administrator

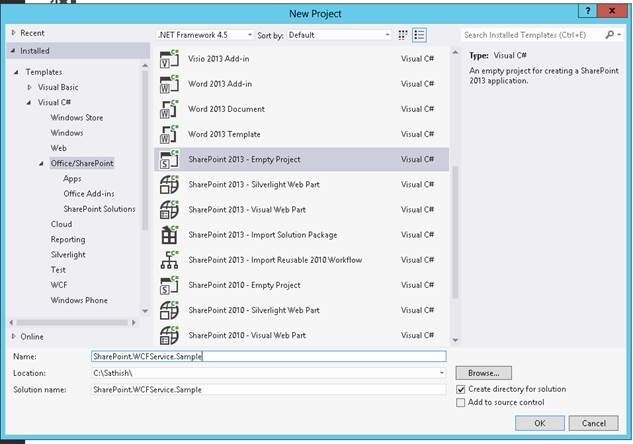
2. Click New Project.

clip_image002

3. Select Empty SharePoint 2013 Solution.

clip_image004

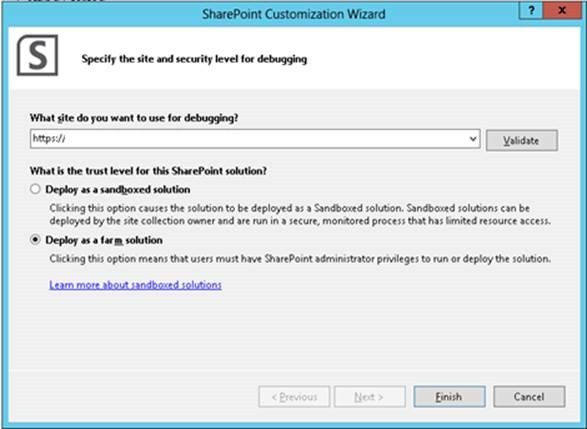
4. Enter the URL of a Site Collection and select Farm Solution.

clip_image006

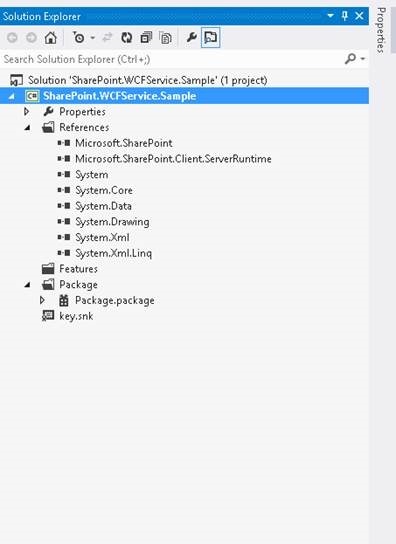
5. The solution will looks like this.

clip_image008

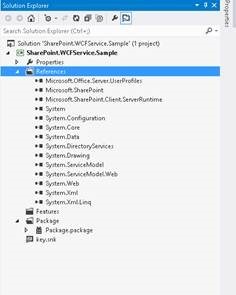
6. Add the following References on the Add Reference.

a. Microsoft.Office.Server.UserProfiles

b. Microsoft.SharePoint

c. Microsoft.SharePoint.Clieint.ServerRuntime

d. System.ServiceModel

e. System.ServiceModel.Web

f. System.DirectoryServices

g. System.Configuration

7. Hence the solution will looks like

clip_image010

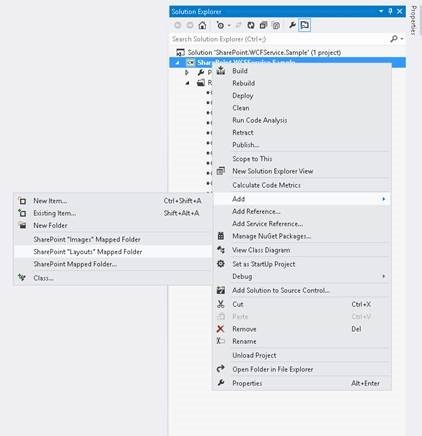
8. Add Layouts folder to the solution.

clip_image012

9. Make the Appropriate folder structure as shown in figure.

clip_image013

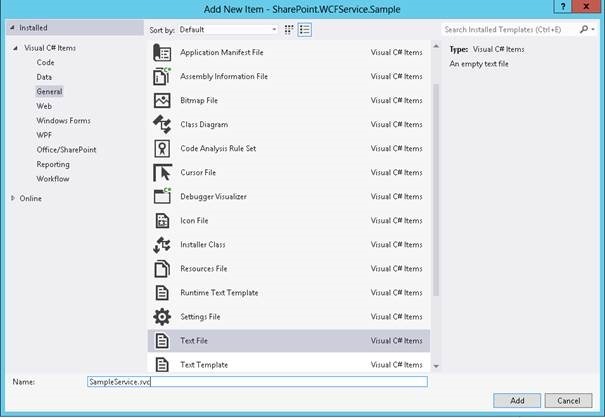
10. Since we cannot add a svc file directly, add a text file and rename it to .SVC

clip_image015

11. Open the SVC file and place the following code on it.

<%@ServiceHost   language= "C#"   Factory= "Microsoft.SharePoint.Client.Services.MultipleBaseAddressDataServiceHostFactory, Microsoft.SharePoint.Client.ServerRuntime, Version=15.0.0.0, Culture=neutral, PublicKeyToken=71e9bce111e9429c"   Service= "SharePoint.WCFService.Sample.Code.SampleService" %>

12. Create a folder called ‘Code’ and create 2 files. ISampleService.cs and SampleService.cs

13. Open the ISampleService.cs and add the following using Tags and Modify the Class as below.

using System.ServiceModel;  using System.ServiceModel.Web;    [ServiceContract]  public interface ISampleService  {   [OperationContract]   [WebInvoke(Method = "GET",   ResponseFormat = WebMessageFormat.Xml,   BodyStyle = WebMessageBodyStyle.Wrapped,   UriTemplate = "SampleServiceCall({SampleValue})")]   string SampleServiceCall(string SampleValue);  }

14. Now, we have our interface ready. Now open the SampleService.cs file which is going to implement the Interface described above.

15. Modify the class as shown below.

  using System;  using System.Collections.Generic;  using System.Linq;  using System.Text;  using System.Threading.Tasks;  using System.ServiceModel;  using System.ServiceModel.Web;  using System.ServiceModel.Activation;    using Microsoft.Office.Server.Social;  using Microsoft.Office.Server.UserProfiles;  using Microsoft.Office.Server.Microfeed;  using Microsoft.SharePoint;  using Microsoft.Office.Server.ReputationModel;  using Microsoft.Office.Server.SocialData;    using System.Configuration;    using System.Security.Principal;  using System.Web;  using Microsoft.Web.Hosting.Administration;    namespace SharePoint.WCFService.Sample.Code  {   [AspNetCompatibilityRequirements(RequirementsMode = AspNetCompatibilityRequirementsMode.Allowed)]   public sealed class SampleService : ISampleService   {     public string SampleServiceCall(string SampleValue)   {   return "Success";   }     }  }

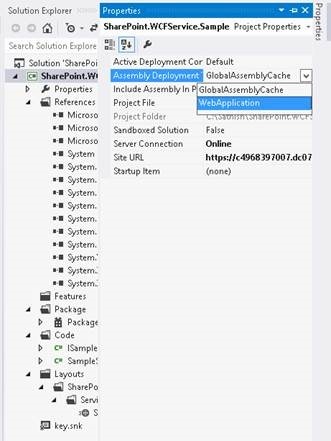
16. Select the Project and go to Properties. Modify the Deployment Target Property as WebApplication.

clip_image017

17. Modify the SiteURL to the webAppliaction url appropriately.

18. Deploy the solution and test from the Browser by giving the following url.

https://MyServer/Sites/SiteCollection/_layouts/15/SharePoint.WCFService.Sample/Services/SampleService.svc/SampleServiceCall(test)

19. We will get the response as below.

  <?xml version="1.0"?>  <SampleServiceCallResponse xmlns="http://tempuri.org/">   <SampleServiceCallResult>Success</SampleServiceCallResult>  </SampleServiceCallResponse>

With this simple steps, we are able to create our Service and deploy them on our SharePoint farm. The service application may be very simple. But from the Provider Hosted Application, if you are not able to achieve any functionality, then immediately think on the Service Applications. Happy Coding.

Download SourceCode

Author Info

Sathish Nadarajan
 
Solution Architect
 
Rate this article
 
Sathish is a Microsoft MVP for SharePoint (Office Servers and Services) having 15+ years of experience in Microsoft Technologies. He holds a Masters Degree in Computer Aided Design and Business ...read more
 

How to communicate with Country Web Services using Soap Protocol in SharePoint 2010

Mohamed Sithik
 
SharePoint Consultant
February 27, 2013
 
Rate this article
 
Views
11211

In this Article I have demonstrated how to interact with Country Web Services and get their corresponding GMT Time while the Country dropdown is selected. This is achieved by using Soap Protocol in SharePoint 2010.

Step 1:

Create a new project from the Visual Studio and add Visual Web Part to it.

Step 2:

Paste the below code inside the Page

 <table>
     <tr>
 <td>
    <asp:Label ID="LblCountryName" runat="server" Text="CountryName" 
         Font-Size="Small"></asp:Label>
 </td>
 <td>
 <asp:DropDownList ID="DdlCountryName" runat="server" AutoPostBack=true 
         onselectedindexchanged="DdlCountryName_SelectedIndexChanged" 
         Font-Size="Small" ></asp:DropDownList>
 </td>
 </tr>
     <tr>
 <td>
    <asp:Label ID="LblGmtTime" runat="server" Text="GMT Time" Font-Size="Small"></asp:Label>
 </td>
 <td>
 <asp:Label ID="LblGMT" runat="server" Font-Size="Small"></asp:Label>
 </td>
     </tr>
 </table>

Step 3:

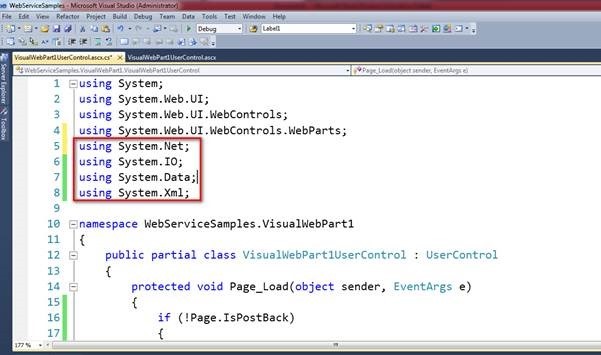
Go ahead to the coding page and add following Namespace to your project

clip_image002

Step 4:

Use the below code in your project

 protected void Page_Load(object sender, EventArgs e)
 {
 if (!Page.IsPostBack)
 {
 GetCountryName();
 }
 }
 public void GetCountryName()
 {
 string soap =
 @"<?xml version=""1.0"" encoding=""utf-8""?>
 <soap:Envelope xmlns:xsi=""http://www.w3.org/2001/XMLSchema-instance"" 
 xmlns:xsd=""http://www.w3.org/2001/XMLSchema"" 
 xmlns:soap=""http://schemas.xmlsoap.org/soap/envelope/"">
 <soap:Body>
 <GetCountriesResponse xmlns=""http://www.webserviceX.NET"">
 <GetCountriesResult>string</GetCountriesResult>
 </GetCountriesResponse>
 </soap:Body>
 </soap:Envelope>";
 string URLString = "http://www.webservicex.net/country.asmx?op=GetCountries";
 HttpWebRequest req = (HttpWebRequest)WebRequest.Create(URLString);
 IWebProxy proxy = req.Proxy;
 WebProxy myProxy = new WebProxy();
 myProxy.Credentials = new NetworkCredential("[domainusername]", "[Password]");
 myProxy.BypassProxyOnLocal = true;
 req.Proxy = myProxy;
 req.Headers.Add("SOAPAction", ""http://www.webserviceX.NET/GetCountries"");
 req.ContentType = "text/xml;charset="utf-8"";
 req.Accept = "text/xml";
 req.Method = "POST";
 using (Stream stm = req.GetRequestStream())
 {
 using (StreamWriter stmw = new StreamWriter(stm))
 {
 stmw.Write(soap);
 }
 }
 WebResponse response = req.GetResponse();
 Stream responseStream = response.GetResponseStream();
 StreamReader readStream = new StreamReader(response.GetResponseStream());
 DataSet ds = new DataSet();
 ds.ReadXml(response.GetResponseStream());
 string datas = ds.Tables[1].Rows[0].ItemArray[0].ToString();
 XmlDocument doc = new XmlDocument();
 doc.LoadXml(string.Format(datas));
 DataSet Ds = new DataSet();
 XmlNodeReader xmlread = new XmlNodeReader(doc);
 Ds.ReadXml(xmlread);
 DdlCountryName.DataTextField = "Name";
 DdlCountryName.DataSource = Ds;
 DdlCountryName.DataBind();
 }
 public void GetGmtTimebyCountry(string CountryName)
 {
 string soap =
 @"<?xml version=""1.0"" encoding=""utf-8""?>
 <soap:Envelope xmlns:xsi=""http://www.w3.org/2001/XMLSchema-instance"" 
 xmlns:xsd=""http://www.w3.org/2001/XMLSchema"" 
 xmlns:soap=""http://schemas.xmlsoap.org/soap/envelope/"">
 <soap:Body>
 <GetGMTbyCountry xmlns=""http://www.webserviceX.NET"">
 <CountryName>"+CountryName+"</CountryName></GetGMTbyCountry></soap:Body></soap:Envelope>";
 string URLString = "http://www.webservicex.net/country.asmx?op=GetGMTbyCountry";
 HttpWebRequest req = (HttpWebRequest)WebRequest.Create(URLString);
 IWebProxy proxy = req.Proxy;
 WebProxy myProxy = new WebProxy();
 myProxy.Credentials = new NetworkCredential("[domainusername]", "[Password]");
 myProxy.BypassProxyOnLocal = true;
 req.Proxy = myProxy;
 req.Headers.Add("SOAPAction", ""http://www.webserviceX.NET/GetGMTbyCountry"");
 req.ContentType = "text/xml;charset="utf-8"";
 req.Accept = "text/xml";
 req.Method = "POST";
 using (Stream stm = req.GetRequestStream())
 {
 using (StreamWriter stmw = new StreamWriter(stm))
 {
 stmw.Write(soap);
 }
 }
 WebResponse response = req.GetResponse();
 Stream responseStream = response.GetResponseStream();
 StreamReader readStream = new StreamReader(response.GetResponseStream());
 string TestingValue = readStream.ReadToEnd();
 XmlDocument doc = new XmlDocument();
 doc.LoadXml(TestingValue);
 DataSet Ds = new DataSet();
 XmlNodeReader xmlread = new XmlNodeReader(doc);
 Ds.ReadXml(xmlread);
 string gmtdatas = Ds.Tables[1].Rows[0].ItemArray[0].ToString();
 XmlDocument doc1 = new XmlDocument();
 doc1.LoadXml(gmtdatas);
 DataSet Ds1 = new DataSet();
 XmlNodeReader xmlread1 = new XmlNodeReader(doc1);
 Ds1.ReadXml(xmlread1);
 LblGMT.Text = Ds1.Tables[0].Rows[0].ItemArray[0].ToString();
 }
 protected void DdlCountryName_SelectedIndexChanged(object sender, EventArgs e)
 {
 string CountryName = DdlCountryName.SelectedItem.ToString();
 GetGmtTimebyCountry(CountryName);
 }

Step 5:

Deploy and Run the project.

clip_image004

Author Info

Mohamed Sithik
 
SharePoint Consultant
 
Rate this article
 
SharePoint Consultant based out Chennai, India. ...read more
 

Leave a comment