I am writing this post from my experiences “As on Today” about the evergreen platforms O365 and Azure which may change in the future.
I had a situation where my organization was planning to avoid users from directly creating the O365 Groups as part of our O365 Governance Strategy.
So, we had planned to automate the creation of O365 groups using a workflow or service for our internal customers based on request and approval process.
Finally, I ended with the Idea of creating a remote workflow app to automate the O365 Group Creation.
The Content in the post is not specific to a workflow implementation and can be used in any remote app to create the O365 Groups.
A remote app which runs external to O365 can be any one of the below
1. Standalone Asp.net or client side app using frameworks like React or AngularJS.
2. Workflow running on an environment external to O365.
3. Console/background job running in a Non-Microsoft platform
O365 groups can be created using Graph Api. I hope this has been explained in numerous articles on how Graph Api it could be used to perform operations on most of O365 objects. (https://graph.microsoft.io).
To create an O365 group or to perform any other operations using the Graph Api, you should register the remote app in the Azure AD connected to the O365 Portal and provide the required permissions for the remote app.
Below are the steps required to create an Office365 Group from a Remote App.
1. Register the APP in Azure AD
2. Get Company Administrator Authorization Consent for the App
3. Get Access Token using the App ID and App Secret
4. Create a O365 Group or perform operations using Graph Api with Authorization Token
Step 1: Register the App in Azure AD
To communicate with any of the Microsoft services such as Graph Api you may have to register an app in Azure AD.
Use any of the below link to Register the app in Azure AD connected to your O365 Portal. Sign in with your O365 account
https://apps.dev.microsoft.com – App Registration Portal
https://portal.azure.com – New Portal for Admins
https://manage.windowsazure.com – Classic Portal for Admins
1. From the App Registration Portal, Click on Register an App.
2. Provide a Name for your app
3. Note the Application ID of the App which will be used further.
4. Create an Application Secret by “Generate a new Password” button. Make sure you copy the Password and store it as you cannot retrieve once you move out of the screen. This secret will never expire and you can also generate a password if you would like it to expire a year or 2 from the Azure Portal.
5. Click on Add Platform to add “Web” Platform. Add a dummy Redirect URI which is not required for service app scenario.
6. Add the required permissions for the Microsoft Graph.
There are 2 types of permissions. Application and Delegated Permissions.
We only need to specify Application permissions as we are not going to have the code performing any operation on behalf of the user.
7. Selected Group.ReadWriteAll Application permissions for my app to create groups.
8. Save the Changes.
Understanding Grant Flows in OAuth 2.0
The key challenge here is to authenticate the Rest call from your remote app using OAuth without an O365 account.
Azure supports all 4 different access grant types in OAuth model for applications.
1. Authorization Code Grant Flow
For Apps (Native or Web Apps) that run-on servers and require user to be authenticated to create a O365 group and Apps that have outsourced the authentication to Azure AD can use Authorization Code Grant Flow.
2. Implicit Code Grant Flow
For Apps that are browser based like Single page applications built using Client Side Frameworks like AngularJS, ReactJs. This Require user to sign in to Azure and get the access token to further call Graph Api from the Browser.
3. Resource Owner Password Credentials Grant Flow
This can be used in a windows application/service which is on the Azure domain with or without user logged in. This is least used which allows resource owners to send their Username and password over http and opens a Potential Security Risk.
4. Client Credential Grant Flow
The Client Credential flow is primarily used when the remote app which works as background job/services without user intervention.
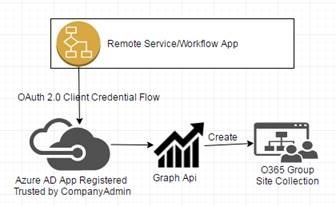
I chose the Client Credential flow as I planned to use a workflow to create the O365 group from my On-Prem SharePoint environment So, there will be no user authentication and no account will be used to perform the call to graph Api from the workflow.
Client Credential Flow
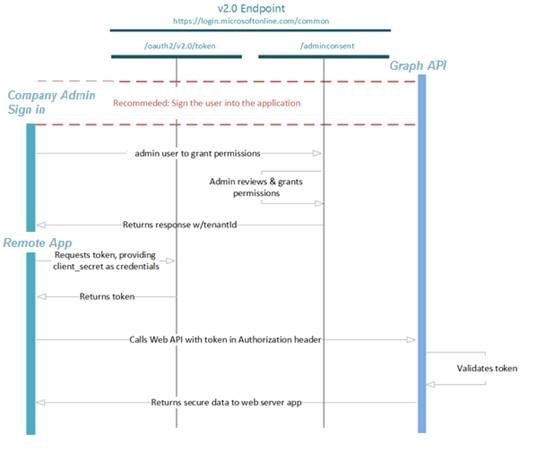
Step 2: Get Company Administrator Authorization Consent for the App
Build the below URL and provide the URL to your company administrator of the Azure/O365 Portal.
In the above Url, replace the below values with the values you got while registering the application in Azure.
<TenantID/Common> – If you have a single tenant use the tenant Id of your O365 portal or if you have a multi-tenant specify “Common” instead of the tenant id.
<Application ID> – Use the App ID of the app you registered in the Azure Portal.
<redirect_Uri> – This is not required for Client Credentials flow. You can use the same dummy redirect Uri which was created during Azure App Registration. This is only used in Authorization Code Grant Flow and Implicit Grant Flow
The Company Administrator should authenticate to the URL to provide a one-time consent on granting the permissions required for the app to perform operations on the Azure/O365 tenant using the Graph Api.
Step 3. Request an Access token from OAuth Token Endpoint.
Once the consent is given by the company administrator, you can now use any of the Azure Active Directory Authentication Libraries(ADAL) depending upon the type of remote app you develop to authenticate against the Azure and perform the Graph Api operations. Please refer here for ADAL Libraries https://azure.microsoft.com/en-in/documentation/articles/active-directory-authentication-libraries/
Under the hood, these libraries Support all the 4 OAuth grant flows, from Requesting, Caching and managing the access tokens for your application to use. The ADAL libraries encapsulates the calls to the OAuth endpoints so developers do not need to worry about authorization, acquiring and managing access tokens
Since I used a Workflow, I could not use any of these ADAL libraries and had to make a direct call to these OAuth Token endpoint to acquire an access token.
An access token which is a Base64 Encoded string of a JWT (JSON Web Token) is required to be sent along with a HTTP call to the Graph Api as an Authorization Header to create the O365 group.
I had to perform a REST call to the OAuth Token Endpoint to get an access token
Build the Rest URL using the below format to get the access token.
 POST
 URL :
 https://login.windows.net/<TenantID/Common>/oauth2/token

 Request Header :
 Content-Type: application/x-www-form-urlencoded

 Request Body:
 grant_type=client_credentials
 &client_id=<App Id from App Registration>
 &client_secret=<App Secret from App Registration>
 &resource=https://graph.microsoft.com

 Response:
 {
   "token_type": "Bearer",
   "expires_in": "3599",
   "scope": "User.Read",
   "expires_on": "1449685363",
   "not_before": "1449681463",
   "resource": "https://graph.microsoft.com",
   "access_token": "<access token>"
 }
Step 4: Create a O365 Group or perform operations using Graph Api with Access Token
Once you have the Access Token from the Response content of the previous request, you can create a O365 Group using the Graph Api from your remote/workflow app.
For Creating the O365 Group, you can refer the link here at Graph Api documentation(http://graph.microsoft.io/en-us/docs/api-reference/v1.0/api/group_post_groups)
 POST
 Url:
 https://graph.microsoft.com/v1.0/groups

 Request Headers:
 Authorization: Bearer <access token>
 Content-type: application/json
 Content-length: 244

 Request Body:

 {
   "description": "My O365 Group,
   "displayName": "O365 Test Group",
   "groupTypes": [
     "Unified"
   ],
   "mailEnabled": true,
   "mailNickname": "O365TestGroup",
   "securityEnabled": false
 }
With that I conclude the topic of O365 group creation in an automated way from a Service or workflow app.


Leave a comment