In this article, let us see how to create a Custom Ribbon Action on the Libraries/List on SharePoint 2013. On click, we can see, how to call a Javascript method.
Before get in to the steps, let us see, how we want and what we are going to achieve on this article. The output is somewhat like,
Now, let us see by step by step.
1. Open the visual studio 2012 as run as administrator.
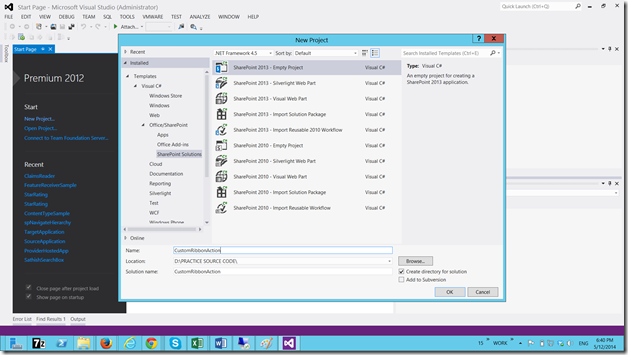
2. Create an Empty SharePoint Project.
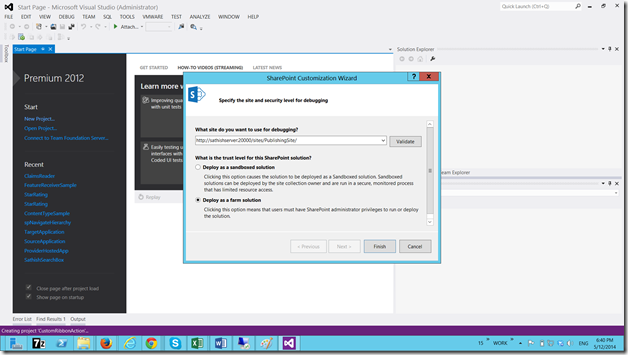
4. Select a Farm Solution.
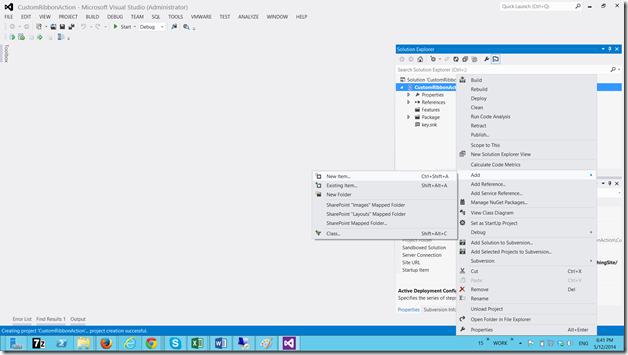
6. Add New Item to the solution.
8. Add a Module. Name it as CustomRibbonActionModule.
9. By default, it will have a sample.txt. Now delete that txt file, since we don’t require that.
10. And modify the Elements.xml as below.
 <?xml version="1.0" encoding="utf-8"?>
 <Elements xmlns="http://schemas.microsoft.com/sharepoint/">

   <CustomAction
     Description="CustomActionDescription"
     Id="CustomActionID"
     Location="CommandUI.Ribbon">
     <CommandUIExtension>
       <CommandUIDefinitions>
         <CommandUIDefinition
           Location="Ribbon.Library.Groups._children">
           <Group
             Id="CustomActionGroupID"
             Sequence="80"
             Description="CustomActionGroupDescription"
             Title="CustomActionTitle"
             Template="Ribbon.Templates.Flexible2">
             <Controls Id="CustomActionControlsID">
               <Button
                 Id="CustomActionButtonID"
                 Command="CustomActionButtonCommand"
                Image32by32="_layouts/15/images/placeholder32x32.png"
                 LabelText="CustomActionButtonLabelText"
                 TemplateAlias="o2"
                 Sequence="10"/>
             </Controls>
           </Group>
         </CommandUIDefinition>
         <CommandUIDefinition
           Location="Ribbon.Library.Scaling._children">
           <MaxSize
             Id="CustomRibbonActionsOneMaxSize"
             Sequence="15"
             GroupId="CustomActionGroupID"
             Size="LargeLarge"/>
         </CommandUIDefinition>
       </CommandUIDefinitions>
       <CommandUIHandlers>
         <CommandUIHandler
           Command="CustomActionButtonCommand"
           CommandAction="javascript:alert('Test');"/>
       </CommandUIHandlers>
     </CommandUIExtension>
   </CustomAction>

 </Elements>
The above XML is self explanatory I guess. The most important things on the XML are
1. Location – “Ribbon.Library.Groups._children”.
2. TemplateAlias – “o2”.
To know more about the Locations, please refer to the MSDN articles
· http://msdn.microsoft.com/en-us/library/office/ee537543(v=office.15).aspx
· http://msdn.microsoft.com/en-us/library/office/bb802730(v=office.15).aspx
In the same above XML, if we want to call a Javascript method instead of an alert, the CommandUIHandlers will become like this.
 <CommandUIHandlers>
         <CommandUIHandler
           Command="CustomActionButtonCommand"
           CommandAction="javascript:SayHello();
 function SayHello() {
 alert('Hello');
 }"/>
       </CommandUIHandlers>
     </CommandUIExtension>
In the next Article, let us see how to insert a piece of content on click of a ribbon button into your content area on a Publishing Site.
Happy Coding.
Sathish Nadarajan.


Leave a comment