How to use MSAL in Next.js to authenticate users in Azure AD

Ahamed Fazil Buhari
 
Senior Developer
December 20, 2022
 
Rate this article
 
Views
8675

Take advantage of MSAL to authenticate your users in nextjs application. Developers can effortlessly add authentication to their applications by providing libraries for handling the authentication flow and securely storing user credentials. Follow the below steps to authenticate users in a Nextjs application using MSAL. (Code to this sample is available in github and the link is provided at the end of this post.)

Step 1: Create nextjs application with npx command, (by the time I write this article, next.js 13 is the latest)

npx create-next-app@latest --typescript

Step 2: Add the following dependencies,

npm install @azure/msal-react @azure/msal-browser

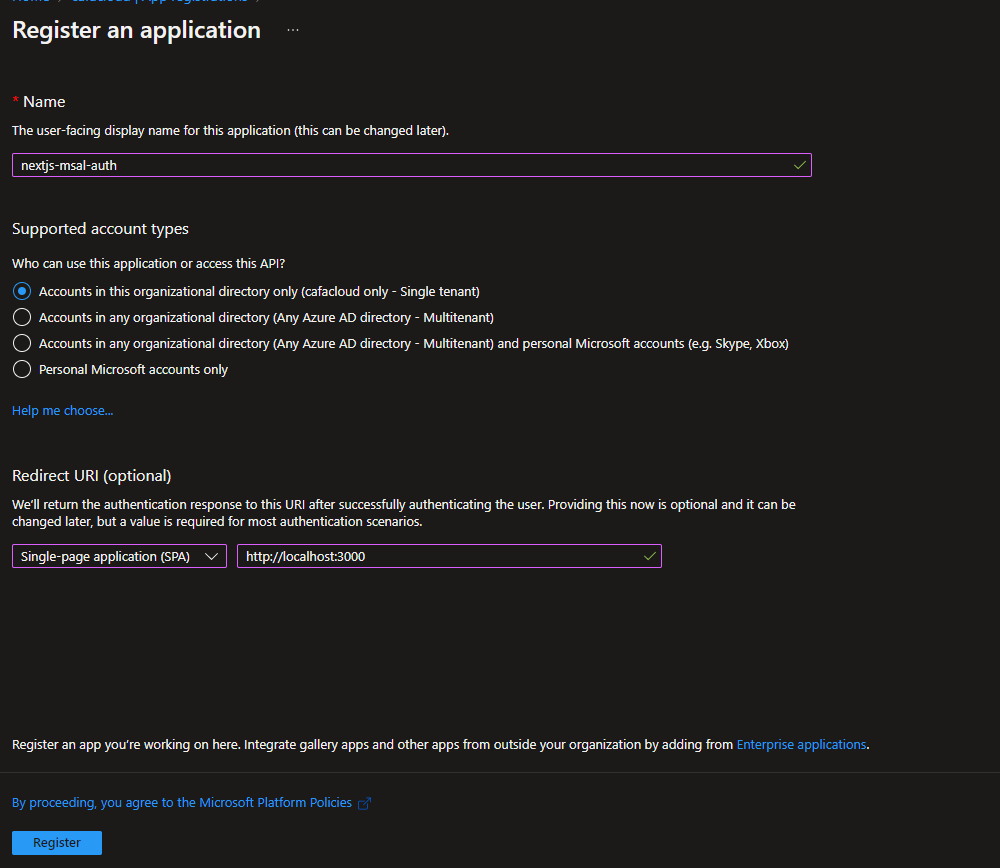
Step 3: Create and register azure application for your application. To do this, go to Azure portal and in Azure Active Directory select “App registrations”, then provide the name and account types (as show in the below screenshot), for this example I provided redirect URI as localhost:3000 and this can be later changed.


Step 4: Initialize PublicClientApplication with Application configuration options and it is important to have this instantiated outside the component so that we do not want to instantiate every time.

export const msalConfig = {
    auth: {
        clientId: "<application(client)-id>",
        authority: "https://login.microsoftonline.com/<tenant-id> ",
        redirectUri: "/",
        postLogoutRedirectUri: "/"
    }
};

Step 5: Wrap all the components and pages in msal provider so that it can access authentication state using the msal react context.

It is recommended to wrap most or all your components in the MsalProvider component and it’s best to render the MsalProvider as close to the root as possible.

In nextjs application _app is a special file, and it is a top-level component that is rendered on every page of the app. The _app component is used to initialize things that needs to be available on every page, such as global styles or data stores. It is also the place where we can add global event listeners, perform authentication checks, or modify the document head.

Step 6: Create simple login button and in the onclick event call loginRedirect with optional RedirectRequest (available in LogIn.tsx file in the github repo).

Step 7: Create msal js event and it gets triggered for various event types like LOGIN_SUCCESS, LOGOUT_FAILURE, LOGIN_SUCCESS and so on, the list can be found here. In our case, we need to set active user account when user successfully logged in in the public client application state.

And the final output looks as below,


The whole code is available in the following github repo and please make sure to update client id (generated in step 3) & your tenant id in authConfig.ts file.


Happy Coding,

Fazil


Author Info

Ahamed Fazil Buhari
 
Senior Developer
 
Rate this article
 
Ahamed is a Senior Developer and he has very good experience in the field of Microsoft Technologies, especially SharePoint, Azure, M365, SPFx, .NET and client side scripting - JavaScript, TypeScript, ...read more
 

Automate O365 Group creation using Graph Api from a Remote Service/Workflow App using OAuth 2.0 Client Credentials Flow

Senthil Kumaresan
 
SharePoint Consultant
October 20, 2016
 
Rate this article
 
Views
6564

I am writing this post from my experiences “As on Today” about the evergreen platforms O365 and Azure which may change in the future.

I had a situation where my organization was planning to avoid users from directly creating the O365 Groups as part of our O365 Governance Strategy.

So, we had planned to automate the creation of O365 groups using a workflow or service for our internal customers based on request and approval process.

Finally, I ended with the Idea of creating a remote workflow app to automate the O365 Group Creation.

The Content in the post is not specific to a workflow implementation and can be used in any remote app to create the O365 Groups.


A remote app which runs external to O365 can be any one of the below

1. Standalone Asp.net or client side app using frameworks like React or AngularJS.

2. Workflow running on an environment external to O365.

3. Console/background job running in a Non-Microsoft platform

O365 groups can be created using Graph Api. I hope this has been explained in numerous articles on how Graph Api it could be used to perform operations on most of O365 objects. (https://graph.microsoft.io).
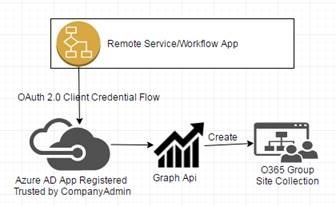
clip_image002

To create an O365 group or to perform any other operations using the Graph Api, you should register the remote app in the Azure AD connected to the O365 Portal and provide the required permissions for the remote app.

Below are the steps required to create an Office365 Group from a Remote App.

1. Register the APP in Azure AD

2. Get Company Administrator Authorization Consent for the App

3. Get Access Token using the App ID and App Secret

4. Create a O365 Group or perform operations using Graph Api with Authorization Token

Step 1: Register the App in Azure AD

To communicate with any of the Microsoft services such as Graph Api you may have to register an app in Azure AD.

Use any of the below link to Register the app in Azure AD connected to your O365 Portal. Sign in with your O365 account

https://apps.dev.microsoft.com – App Registration Portal

https://portal.azure.com – New Portal for Admins

https://manage.windowsazure.com – Classic Portal for Admins

1. From the App Registration Portal, Click on Register an App.

2. Provide a Name for your app

3. Note the Application ID of the App which will be used further.

4. Create an Application Secret by “Generate a new Password” button. Make sure you copy the Password and store it as you cannot retrieve once you move out of the screen. This secret will never expire and you can also generate a password if you would like it to expire a year or 2 from the Azure Portal.

5. Click on Add Platform to add “Web” Platform. Add a dummy Redirect URI which is not required for service app scenario.

6. Add the required permissions for the Microsoft Graph.

There are 2 types of permissions. Application and Delegated Permissions.

We only need to specify Application permissions as we are not going to have the code performing any operation on behalf of the user.

7. Selected Group.ReadWriteAll Application permissions for my app to create groups.

8. Save the Changes.

Understanding Grant Flows in OAuth 2.0

The key challenge here is to authenticate the Rest call from your remote app using OAuth without an O365 account.

Azure supports all 4 different access grant types in OAuth model for applications.

1. Authorization Code Grant Flow

For Apps (Native or Web Apps) that run-on servers and require user to be authenticated to create a O365 group and Apps that have outsourced the authentication to Azure AD can use Authorization Code Grant Flow.

2. Implicit Code Grant Flow

For Apps that are browser based like Single page applications built using Client Side Frameworks like AngularJS, ReactJs. This Require user to sign in to Azure and get the access token to further call Graph Api from the Browser.

3. Resource Owner Password Credentials Grant Flow

This can be used in a windows application/service which is on the Azure domain with or without user logged in. This is least used which allows resource owners to send their Username and password over http and opens a Potential Security Risk.

4. Client Credential Grant Flow

The Client Credential flow is primarily used when the remote app which works as background job/services without user intervention.

I chose the Client Credential flow as I planned to use a workflow to create the O365 group from my On-Prem SharePoint environment So, there will be no user authentication and no account will be used to perform the call to graph Api from the workflow.

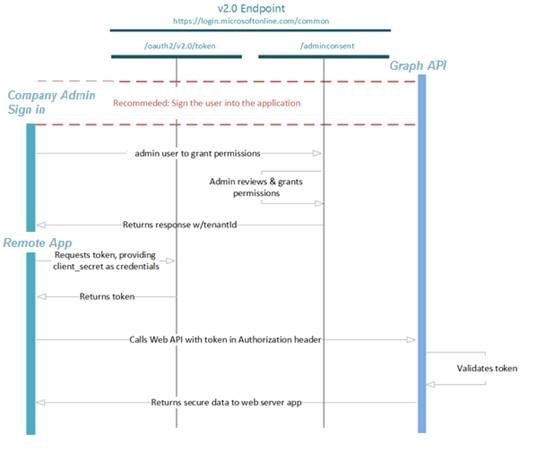
Client Credential Flow
clip_image004

Step 2: Get Company Administrator Authorization Consent for the App

Build the below URL and provide the URL to your company administrator of the Azure/O365 Portal.

https://login.microsoftonline.com/<TenantID/Common>/adminconsent?client_id=<Application ID>&state=12345&redirect_uri=<redirect_Uri>

In the above Url, replace the below values with the values you got while registering the application in Azure.

<TenantID/Common> – If you have a single tenant use the tenant Id of your O365 portal or if you have a multi-tenant specify “Common” instead of the tenant id.

<Application ID> – Use the App ID of the app you registered in the Azure Portal.

<redirect_Uri> – This is not required for Client Credentials flow. You can use the same dummy redirect Uri which was created during Azure App Registration. This is only used in Authorization Code Grant Flow and Implicit Grant Flow

The Company Administrator should authenticate to the URL to provide a one-time consent on granting the permissions required for the app to perform operations on the Azure/O365 tenant using the Graph Api.


Step 3. Request an Access token from OAuth Token Endpoint.

Once the consent is given by the company administrator, you can now use any of the Azure Active Directory Authentication Libraries(ADAL) depending upon the type of remote app you develop to authenticate against the Azure and perform the Graph Api operations. Please refer here for ADAL Libraries https://azure.microsoft.com/en-in/documentation/articles/active-directory-authentication-libraries/

Under the hood, these libraries Support all the 4 OAuth grant flows, from Requesting, Caching and managing the access tokens for your application to use. The ADAL libraries encapsulates the calls to the OAuth endpoints so developers do not need to worry about authorization, acquiring and managing access tokens

Since I used a Workflow, I could not use any of these ADAL libraries and had to make a direct call to these OAuth Token endpoint to acquire an access token.

An access token which is a Base64 Encoded string of a JWT (JSON Web Token) is required to be sent along with a HTTP call to the Graph Api as an Authorization Header to create the O365 group.

I had to perform a REST call to the OAuth Token Endpoint to get an access token

Build the Rest URL using the below format to get the access token.

 POST
 URL : 
 https://login.windows.net/<TenantID/Common>/oauth2/token
 
 Request Header : 
 Content-Type: application/x-www-form-urlencoded
 
 Request Body:
 grant_type=client_credentials
 &client_id=<App Id from App Registration>
 &client_secret=<App Secret from App Registration>
 &resource=https://graph.microsoft.com
 
 Response:
 { 
   "token_type": "Bearer",
   "expires_in": "3599",
   "scope": "User.Read",
   "expires_on": "1449685363",
   "not_before": "1449681463",
   "resource": "https://graph.microsoft.com",
   "access_token": "<access token>"
 }
 

Step 4: Create a O365 Group or perform operations using Graph Api with Access Token

Once you have the Access Token from the Response content of the previous request, you can create a O365 Group using the Graph Api from your remote/workflow app.

For Creating the O365 Group, you can refer the link here at Graph Api documentation(http://graph.microsoft.io/en-us/docs/api-reference/v1.0/api/group_post_groups)

 POST 
 Url:
 https://graph.microsoft.com/v1.0/groups
 
 Request Headers:
 Authorization: Bearer <access token>
 Content-type: application/json
 Content-length: 244
 
 Request Body:
 
 {
   "description": "My O365 Group,
   "displayName": "O365 Test Group",
   "groupTypes": [
     "Unified"
   ],
   "mailEnabled": true,
   "mailNickname": "O365TestGroup",
   "securityEnabled": false
 }
 

With that I conclude the topic of O365 group creation in an automated way from a Service or workflow app.
Author Info

Senthil Kumaresan
 
SharePoint Consultant
 
Rate this article
 
SharePoint Architect – Consulting on SharePoint Infrastructure, IT Governance and Apps Development. ...read more
 

SharePoint Online Authentication Options – Part 2

Sriram Varadarajan
 
Solution Architect
 
Rate this article
 
Views
3464

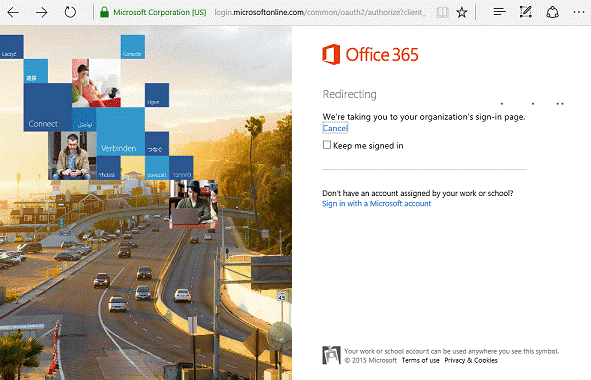
Let’s talk more on Federation model and also on the modern authentication for SharePoint online  now. In the case of federated environment, once you sign with your organization account to SharePoint online and if your account is federated, Web client redirects the request from login.microsoft.com to On-premises ADFS/other 3rd party federation engine.

clip_image002

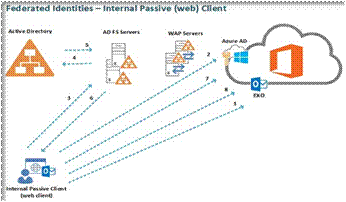
The Azure AD authentication endpoint will detect if the particular account is federated if so, does another redirection to the internal federation service (which can be either ADFS or anything) Federation service requires the client to authenticate. Once authenticated, federation services will retrieve the necessary claims related information from Active Directory and provide the web client with a token holding the claims about the user. The client will present the token to Azure AD and after successful authentication, the web client will be redirected back to Microsoftonline.com.

clip_image004

To understand more on how user profile synchronization works, please refer

Now let’s see what is modern authentication is all about:

Though this has got nothing to do in SharePoint online, this is mainly for office 365 Apps.

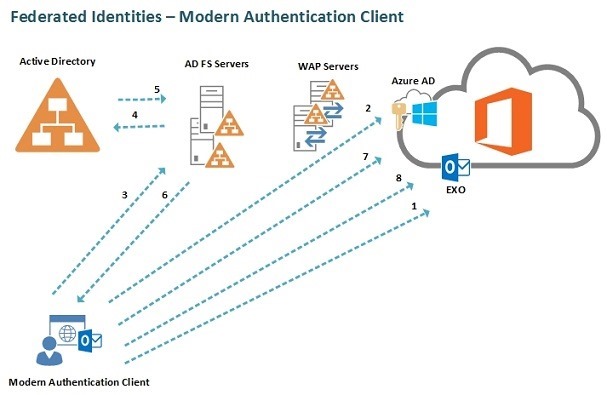
Modern authentication brings Active Directory Authentication Library (ADAL)-based sign-in to Office client apps across platforms. This enables sign-in features such as Multi-Factor Authentication (MFA), SAML-based third-party Identity Providers with Office client applications, smart card and certificate-based authentication, and it removes the need for Outlook to use the basic authentication protocol.

By enabling ADAL for Office client applications, they will use an in-application browser control to render the Azure AD sign in experience in the same fashion as browser-based Office 365 clients like the Outlook on the Web (OotW). ADAL based OAuth authentication works for federated as well as non-federated scenarios.

clip_image005

To know more on session timeout for office 365 services please refer (this might differ based on our organization internal federation system setting)

Category : Office 365, SharePoint

Author Info

Sriram Varadarajan
 
Solution Architect
 
Rate this article
 
Sriram is a Technology Evangelist with 15+ years experience in Microsoft Technologies. He is an enterprise architect working for large pharmaceutical organization which has presence globally with largest Microsoft implementation ...read more
 

SharePoint Online Authentication Options – Part 1

Sriram Varadarajan
 
Solution Architect
October 16, 2016
 
Rate this article
 
Views
9518

I ended up spending too many hours in demystifying how SharePoint online works in a federated environment but apparently I didn’t get many details, though I got few but it wasn’t in one location. I thought let me put all the information I collected here.

Let’s start with some basic; As we all know SharePoint online is a SAAS offering (Software As A Service) and for user to consume this service their account should be present somewhere for the system to authenticate them.

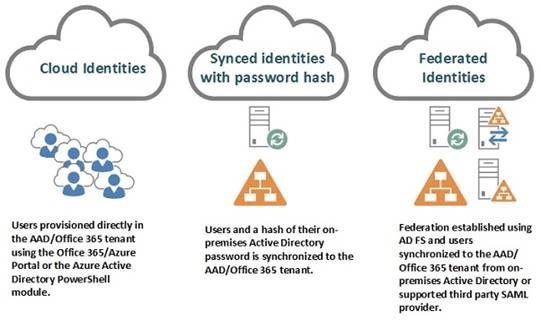
As of now we have got 3 identity models:

clip_image002

Let’s see in detail about each one of them at a very high level:

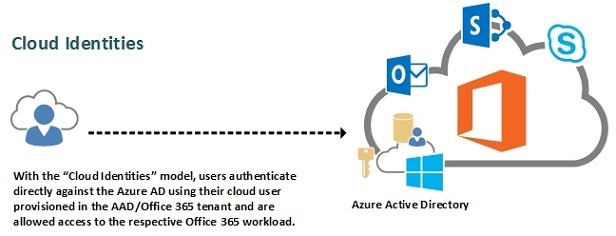
Cloud Identities:

To put it simple, these are the account which gets created in cloud.

Go to https://portal.office.com/adminportal/home#/users

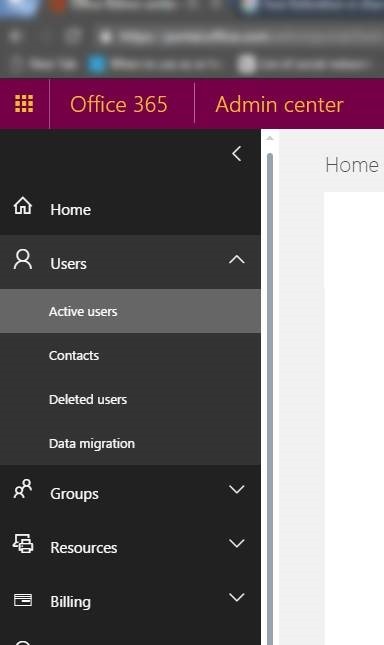
Click Users Tab in the left side navigation and select ACTIVE users in it

clip_image004

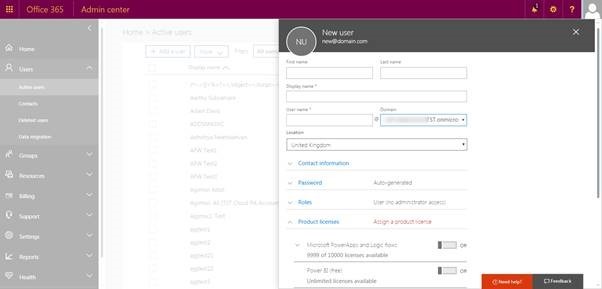
Click ADD user in the right side:

clip_image006

You will see the list of domain associated for your tenant under Domain Drop down and in that, one of domain would like something like this YOURTENANTNAME.Onmicrosoft.com

clip_image008

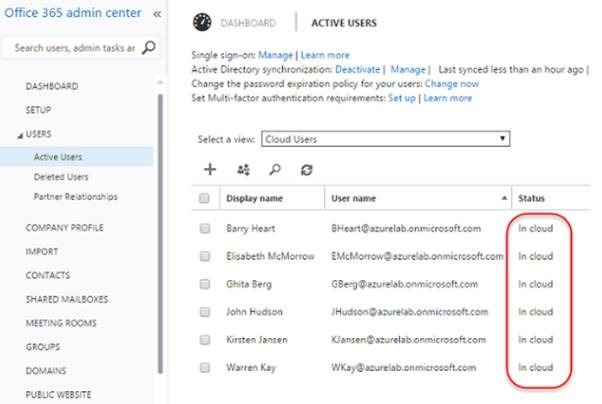
Create an account with this Domain been selected, eventually you will see that those users created with this domain will be showed as CLOUD account in the active user’s page

clip_image010

The major benefit of the cloud identity model is that you do not need to make any changes or deploy any new servers in the on-premises infrastructure.

clip_image011

Synchronized Identities:

The second identity model is synchronized identities, where the existing users in the on-premises Active Directory are synchronized to the AAD/Office 365 tenant using a directory synchronization tool.

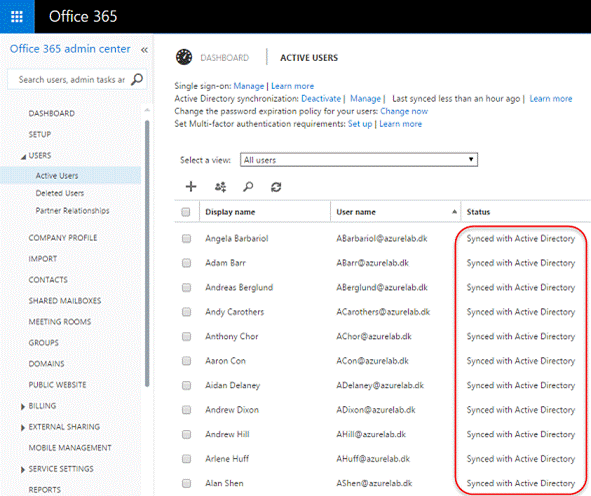
In this case any account created in on-prem would get synced with Office 365 and any account that syncs like this would look like this in ACTIVE users page.

clip_image013

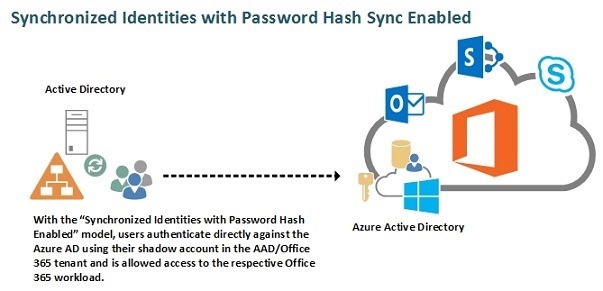
The major benefit of using this identity model over the cloud identities is that users will be provisioned automatically using the directory synchronization tool and will be able to use the same set of credentials as they already use in their on-premises Active Directory resulting in not a “single sign-on” but “same sign-on” scenario where the user object and passwords are managed in the on-premises Active Directory. In a “same sign-on” scenario, the end user will, as mentioned, be able to use his existing credentials but needs to authenticate when accessing an Office 365 workload.

clip_image014

it’s important to note that the end user passwords will not be stored in the AAD/Office 365 tenant. It will be a hash of a hash of the on-premises Active Directory password that will be stored there and the password itself cannot be retrieved through the hash of the hash of the password by a malicious user.

Let’s talk more on Federation model and also on the modern authentication in the next blog post.

Category : Office 365, SharePoint

Author Info

Sriram Varadarajan
 
Solution Architect
 
Rate this article
 
Sriram is a Technology Evangelist with 15+ years experience in Microsoft Technologies. He is an enterprise architect working for large pharmaceutical organization which has presence globally with largest Microsoft implementation ...read more
 

Using SharePoint authentication token in Azure Web jobs

Krishna KV
 
Team Leader, Aspire Systems
August 21, 2016
 
Rate this article
 
Views
10231

In my previous article (https://www.sharepointpals.com/post/Scheduling-SharePoint-Online-Tasks-With-Azure-Web-Jobs) on azure job execution, I used the Sharepoint credentials for the list operation. In this article we can have a look on how we can authenticate with oauth. With oauth the users can authorize to provide the token instead of credentials (username and password). The token can grant access to a specific site or list.

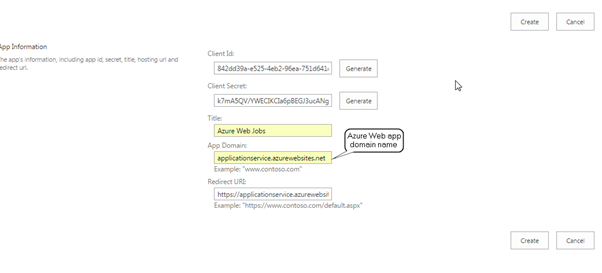
To create a client id and secret key, we can use the _layouts/15/appregnew.aspx

Http://site.sharepoint.com/sites/dev/_layouts/15/appregnew.aspx

image

Copy the client id and secret key to consume from a console application.

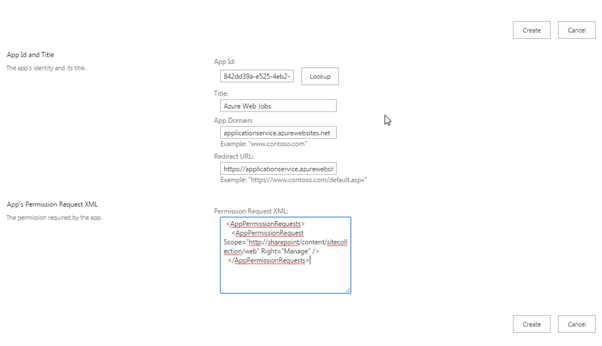
We need to provide the access for the app through the url /_layouts/15/AppInv.aspx

Http://site.sharepoint.com/sites/dev/_layouts/15/AppInv.aspx

1. Provide the client id (created through appregnew.aspx) in the app id textbox and click lookup button to retrieve the app details.

2. Include the permission in the permission request XML textarea

 <AppPermissionRequests AllowAppOnlyPolicy="true">
     <AppPermissionRequest Scope="http://sharepoint/content/sitecollection" Right="FullControl" />    
  </AppPermissionRequests>

AllowAppOnlyPolicy: The permission is granted to the app are taken into the account, the user permission will be ignored. We are using the console application so that users will not be available, it will use the app permission to do so.

image

image

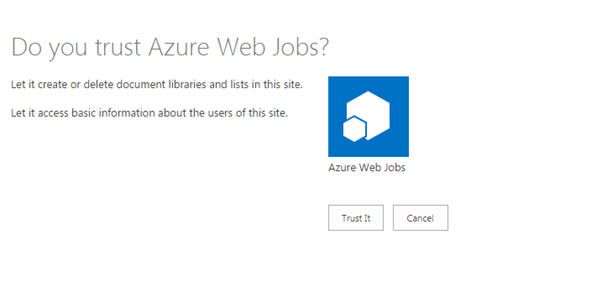
Trust the app.

Create the project using a console application.

Include the package using nuget package manager.

image

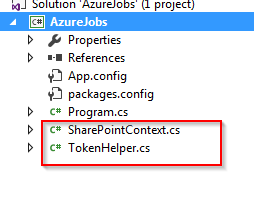
This will generate two cs file which helps us for the tokenizer.

image

App.config

Include the sharepoint site url , client id and client secret which we got using appregnew.aspx.

 <appSettings>
     <add key="siteURL" value="https://siteurl "/>
     <add key="ClientId" value="…"/>
     <add key="ClientSecret" value="…"/>
 

Program.cs

 class Program
     {
         static void Main(string[] args)
         {          
             Uri siteUri = new Uri(ConfigurationManager.AppSettings["siteURL"]);
             string realm = TokenHelper.GetRealmFromTargetUrl(siteUri);
             string accessToken = TokenHelper.GetAppOnlyAccessToken(
                 TokenHelper.SharePointPrincipal,
                 siteUri.Authority, realm).AccessToken;
 
             using (var clientContext =
                 TokenHelper.GetClientContextWithAccessToken(
                     siteUri.ToString(), accessToken))
             {
                 List lst = clientContext.Web.Lists.GetByTitle("Interview");
 
                 CamlQuery camlQuery = new CamlQuery
                 {
                     ViewXml = @"<View><Query><Where><IsNull><FieldRef Name='Status' /></IsNull></Where></View></Query>"
                 };
                 ListItemCollection listItems = lst.GetItems(camlQuery);
                 clientContext.Load(listItems);
                 clientContext.ExecuteQuery();
 
                 foreach (ListItem item in listItems)
                 {
                     item["Status"] = "Completed";
                     item["DBUpdateOn"] = DateTime.Now;
                     item.Update();
                 }
                 clientContext.ExecuteQuery();
             }
             Console.ReadLine();
 
         }
 
     }

Publish your azure jobs to azure.

Category : Azure

Author Info

Krishna KV
 
Team Leader, Aspire Systems
 
Rate this article
 
Krishna K.V has been working in IT Industry for over 7+ years. He holds a Master Degree in Information Technology. He is more interested to learn and share new technologies, ...read more
 

How to Add more than One SharePoint 2013 WebApplication to a SPTrustedIdentityTokenIssuer on ADFS using PowerShell

Sathish Nadarajan
 
Solution Architect
December 12, 2013
 
Rate this article
 
Views
40556

In the previous posts, we saw that how to make ADFS as an Authentication Provider for our SharePoint 2013 WebApplication. But later, I faced an issue that, the Certificate which we are exporting from the ADFS Server and Creating an IssuerID and TrustedIdentityTokenIssuer cannot be changed for other WebApplications. I.e., We cannot create more than one TrustedIdentityTokenIssuer on the SharePoint Environment using the Same Certificate from the ADFS Server. At this point, there is no other option, I could find, how can I export a second certificate from the ADFS Server.

Hence, in the meanwhile, I came to a conclusion that, use the Existing TrustedIdentityTokenIssuer for the new WebApplication also. At that time, if you could see, the script to create the TrustedIdentityTokenIssuer is as follows.


 Add-PSSnapin "Microsoft.SharePoint.PowerShell"
 
 #Import a token signing certificate by using Windows PowerShell
 
 
 $root = New-Object System.Security.Cryptography.X509Certificates.X509Certificate2("C:CertsSathishADFSCert.cer")
 
 
 New-SPTrustedRootAuthority -Name "Sathish Seven Token Signing Cert Parent" -Certificate $root
 
 $cert = New-Object System.Security.Cryptography.X509Certificates.X509Certificate2("C:CertsSathishADFSCert.cer ")
 
 New-SPTrustedRootAuthority -Name "Sathish Seven Token Signing Cert" -Certificate $cert


 $realm = "urn:sharepoint:MyWebApplicationURL"
 
 
 $signInURL = "https://MyADFSServerURL/adfs/ls"
 
 
 #create an identity claim(email) mapping
 
 
 $map = New-SPClaimTypeMapping -IncomingClaimType "http://schemas.xmlsoap.org/ws/2005/05/identity/claims/emailaddress" -IncomingClaimTypeDisplayName "EmailAddress" -SameAsIncoming 
 
 
 #create an identity claim(UPN) mapping
 
 
 $upnClaimMap = New-SPClaimTypeMapping -IncomingClaimType "http://schemas.xmlsoap.org/ws/2005/05/identity/claims/upn" -IncomingClaimTypeDisplayName "UPN" -SameAsIncoming 
 
 
 #create an identity claim(Role) mapping
 
 
 $RoleClaimmap = New-SPClaimTypeMapping -IncomingClaimType "http://schemas.microsoft.com/ws/2008/06/identity/claims/role" -IncomingClaimTypeDisplayName "Role" –SameAsIncoming 
 
 
 #creating a Trustedidentity Token Issuer
 
 
 #$ap = New-SPTrustedIdentityTokenIssuer -Name “Sathish Five Claims Provider” -Description “Sathish Identity Token Issuer” -realm $realm -ImportTrustCertificate $cert -ClaimsMappings $map,$upnClaimMap,$RoleClaimmap -SignInUrl $signInURL -IdentifierClaim $map.InputClaimType
 

Here the Parameter realm is attached with a particular WebApplication. What we need to do is, Add our new WebApplication URL too as a ProviderRealm. Basically, the ProviderRealm is a Set of URL Collection. There we can add more than one WebApplication URL. The pattern should “urn:sharePoint:WebApplicationURL”. The PowerShell Script to achieve this is

 Add-PSSnapin "Microsoft.SharePoint.PowerShell"
 
 $sts = Get-SPTrustedIdentityTokenIssuer | where {$_.Name -eq " Sathish Five Claims Provider "}
 
 $uri = new-object System.Uri("https://MyNewWEbApplicationURL")
 
 $uri
 
 $sts.ProviderRealms.Add($uri, "urn:sharepoint:MyNewWebApplicationURL")
 
 $sts.Update();
 
 $sts 
 

To Consolidate the above steps,

1. To make a WebApplication as a ADFS Authenticated one, we need a https enabled WebApplication. We discussed about that in this article.

2. Add the WebApplication to the RelyingParty Trust on the ADFS Server. We discussed about that in this article and here.

3. Add the WebApplicationURL to the ProviderRealms Collection of the TrustedIdentityTokenIssuer object.

4. Update and do an IISReset of the SharePoint Server. (All the front ends).

5. Change the Authentication Providers of the WEbApplication on the CentralAdministration to Claims Aware and Select the corresponding TrustedIdentityTokenIssuer.

6. Try logging in to the New WebApplication.

That’s it. We are done. Thus, we can add any number of web applications to a single TrustedIdentityTokenIssuer.

Happy Coding.

Sathish Nadarajan.

Author Info

Sathish Nadarajan
 
Solution Architect
 
Rate this article
 
Sathish is a Microsoft MVP for SharePoint (Office Servers and Services) having 15+ years of experience in Microsoft Technologies. He holds a Masters Degree in Computer Aided Design and Business ...read more
 

Leave a comment