How to restore SharePoint mysites from database backup

Tarun Kumar Chatterjee
 
Net – Technology Specialist
June 9, 2016
 
Rate this article
 
Views
8437

In one of our project suddenly Active directory was messed up because of some network issue and SharePoint user profile synch service was not able reach to Active Directory. All the users got the email notification that within 14 days all the mysites will be deleted. It became nightmare to us as it was supported by our team only & we could not say to take the manual backup individually as because user used to keep their personal information like mail backup (PST) etc. in their own mysite & so the size was also huge. It happened because of my site clean-up timer job deleting the profile if it does not find in active directory.  While deleting the profile it will also delete the manual entered personal information like note, photo and links etc. Though the active directory was available after 2 hrs but my site clean-up timer job marked all the mysites deleted flag as true, so there were no option we found to avoid the mysites deletion, even disable clean-up timer job also not worked.

After a very hard try we found an ultimate solution i.e. to take the database backup and restore the mysites after 14 days of mysites deletion. Thought of sharing with you with the details if it helps anyone. Let see the steps we followed

We can verify restorable count by running the query in sharepoint database

select * from SharePoint_Content_MySites.dbo.SiteDeletion where Restorable = 1

Before the clean-up timer job automatically delete all the mysites ,we took the below database backup and restore in a test environment rather in production environment, as because we should not touch the live box SharePoint database.

· SharePoint_SA_User_Profiles

· SharePoint_SA_User_Profiles_Sync

· SharePoint_SA_Social_Data

· SharePoint_Content_MySites

After 14 days while all the mysites are deleted we did follow the below steps

· On the Start screen, click SharePoint 2013 Central Administration.

· If SharePoint 2013 Central Administration is not on the Start screen:

Right-click Computer, clicks all apps, and then clicks SharePoint 2013 Central Administration.

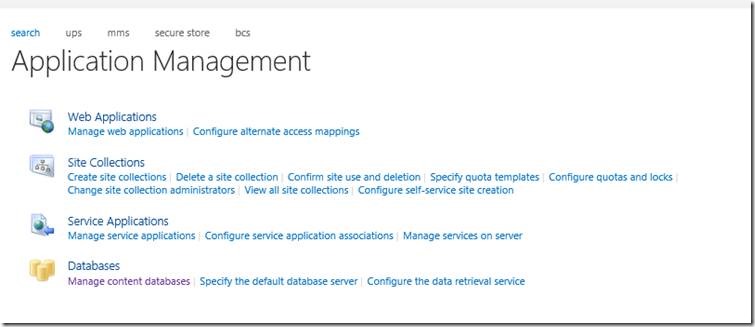
· Go to Application Management and Manage Content Database

clip_image002

· Change the Webapplication where we have the Mysites

clip_image004

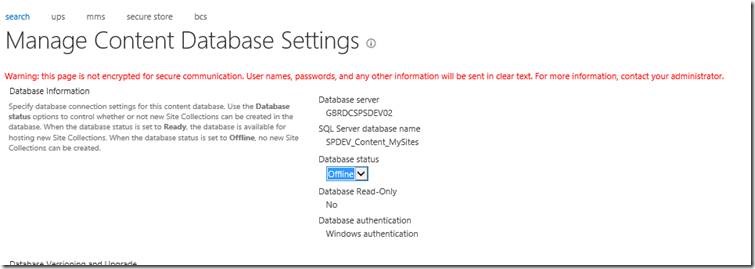
· Make the existing pointed database as Offline

clip_image006

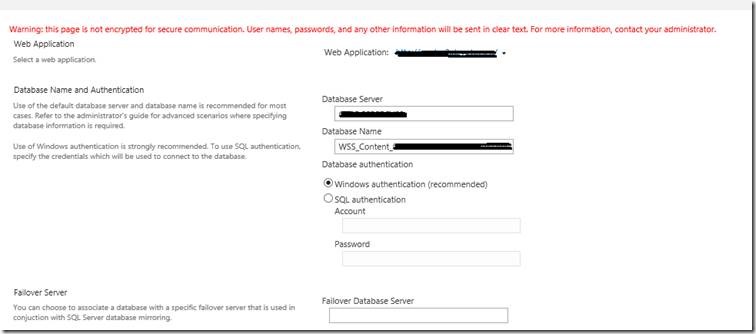
· Now Click on Add Content Database

clip_image008

· Point the restored SharePoint_Content_MySites database and Click on ok.

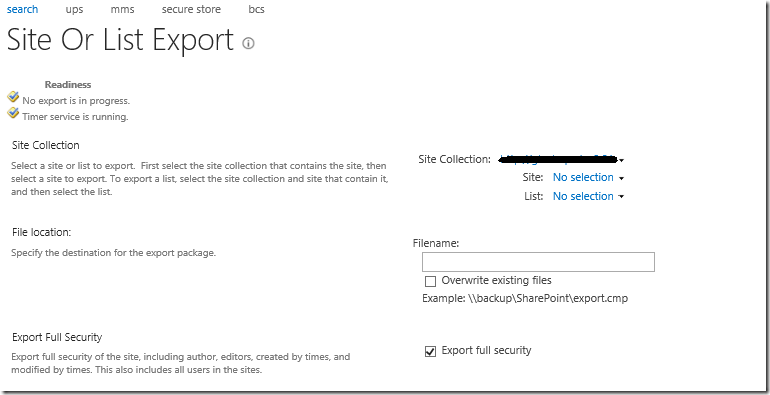
· Go to Backup and Restore, click on Export to Site or List

clip_image010

· Change the Site Collection, select the mysite under the Site section, provide the Exported shared file path ( The file name should have cmp extension) & then click on Start Export

clip_image011

It will take some times to create the backup, will get the notfication as soon as the backup is being completed. It will generate a cmp backup file as well as a log file.

We can also export the cmp file by using the below powershell commands

 Export-SPWeb http://sharepoint.com/mysites/personal/tkumarch1 –Path "C:Mysites_exporttkumarch1_export.cmp"
 Export-SPWeb http://sharepoint.com/mysites/personal/tkumarch2 –Path "C:Mysites_exporttkumarch2_export.cmp"
 

To restore the backup we need to run the below powershell commands in production enviornment

 import-SPWeb http://sharepoint.com/mysites/personal/tkumarch1 –Path "C:Mysites_exporttkumarch1_export.cmp"
 import-SPWeb http://sharepoint.com/mysites/personal/tkumarch2 –Path "C:Mysites_exporttkumarch2_export.cmp"
 

We need to repeat the export and import for all the individual mysites which are deleted.

After all the imports are done we need to make the current content database as offline and previous pointed content database as online in test environment. That’s all, we are all set, cheers!!!

Happy coding

Tarun Kumar Chatterjee
Category : SharePoint

Author Info

Tarun Kumar Chatterjee
 
Net – Technology Specialist
 
Rate this article
 
Tarun has been working in IT Industry for over 12+ years. He holds a B-tech degree. He is passionate about learning and sharing the tricks and tips in Azure, .Net ...read more
 

How to Backup and Deploy the Farm Solutions in SharePoint 2013 Using PowerShell

Sathish Nadarajan
 
Solution Architect
December 1, 2015
 
Rate this article
 
Views
9629

In one of the Previous article, already we saw this snippet. But, I thought of refining it, much more a better version, so that it can be used on any project without any major modification. Conceptually, they are one and the same. The only thing, which I am adding here is,

1. Backup the WSPs before doing the deployment. If the WSP is going to be deployed for the first time, it will not stop our execution.

2. Write-the progress along with the seconds during the deployment and retraction.

3. Get the Environmental variables as an argument during the deployment.

4. Creating twoFolders WSPs and WSPBackups, so that more than one WSP can be deployed in a shot.

5. After deploying, clear the blob cache. That’s it.

The script looks like below.

 Add-PSSnapin "Microsoft.SharePoint.PowerShell"
 #Read arguement and store environment URL
 if($args[0] -eq 'DEV') {
 $WebApplicationUrl="https://DEVWebApplication/"
 }
 elseif ($args[0] -eq ‘UAT') {
 $WebApplicationUrl="https://UAT"
 }
 elseif ($args[0] -eq 'QA') {
 $WebApplicationUrl="https://QA/"
 }
  elseif ($args[0] -eq PROD) {
 $WebApplicationUrl="https://PROD/"
 }
 
 else {
 Write-Host -f Yellow "Environment not specified - please pass appropriate environment to deploy"
 exit
 }
 clear-host
  
 sleep 10
 
 $ErrorActionPreference = "Stop"
 $path = get-location
 $farm = Get-SPFarm
 
 #Define Path to New WSPs
 $wspfolderpath = "$pathWSPs"
 $WSPs = @()
 
 # Define Names of WSPs in Package
 foreach($filename in Get-ChildItem $wspFolderPath)
 {$script:WSPs += $filename}
 
 #Backup WSPs
 
 foreach ($WSPtoBackup in $WSPs) {
     try{
     $file = $farm.Solutions.Item("$WSPtoBackup").SolutionFile
     $file.SaveAs("$pathWSPBackups$WSPtoBackup")
     write-host "$WSPtoBackup has been backed up."
     }
     catch{
     write-host -f Red "The solution:"
     write-host "$WSPtoBackup"
     write-host -f Red "Cannot not be backed up. It is not installed or found in the farm."
     }
 }
 function wait4timer($solutionName) 
 {    
     $solution = Get-SPSolution | where-object {$_.Name -eq $solutionName}    
     if ($solution -ne $null)     
     {        
         $solutionseconds = 0
         #Write-Host "Waiting to finish soultion timer job" -ForegroundColor Green      
         while ($solution.JobExists -eq $true )          
         {               
             write-progress -activity "Waiting to finish timer job" -status "$solutionseconds Seconds Elapsed"          
             sleep 1
             $solutionseconds++            
         }                
         Write-Host "Finished the timer job in $solutionseconds seconds" -ForegroundColor Green  
             }
 } 
 
 function DeployWSP 
 {      
     try
     {
         Write-Host "WebApplication  URL : $WebApplicationUrl" -ForegroundColor Green 
 
         # Get the Solution Node
         foreach($Solution in $WSPs)     
         {
             $wspName = $Solution.Name
             Write-Host "Solution Name : $wspName" -ForegroundColor Green 
 
             # Get the Path of the Solution
             $wspfullpath = "$wspFolderPath$solution"
 
             Write-Host "Getting the Installed Solutions" -ForegroundColor Green 
             # Try to get the Installed Solutions on the Farm.
             $InstalledSolution = Get-SPSolution | Where-Object Name -eq $wspName
         
             # Verify whether the Solution is installed on the Target Web Application
             if($InstalledSolution -ne $null)
             {
                 if($InstalledSolution.Deployed)
                 {
                     Write-Host "Uninstall the Solution from All WebApplications" -ForegroundColor Green 
 
                     wait4timer($wspName)  
 
                     # Solution is installed in atleast one WebApplication


                     try{
                         Uninstall-SPSolution $wspName -AllWebApplications -confirm:$false
                     }
                     catch{
                         $ErrorMessage = $_.Exception.Message
                         if ($ErrorMessage.StartsWith("This solution contains no resources scoped for a Web application"))
                         {
                             Uninstall-SPSolution $wspName  -confirm:$false
                         }
                         else 
                         {
                             write-host "Failed to uninstall $wspname"
                             write-host $ErrorMessage
                         }
                     }


                     # Wait till the Timer jobs to Complete
                     wait4timer($wspName)   
 
                     Write-Host "Remove the Solution from the Farm" -ForegroundColor Green 
                     # Remove the Solution from the Farm
                    
                     Remove-SPSolution $wspName -Confirm:$false 
 
                     sleep 3
                 }
                 else
                 {
                     Write-Host "Remove the Solution from the Farm" -ForegroundColor Green 
 
                     wait4timer($wspName) 
 
                     # Solution not deployed on any of the Web Application.  Go ahead and Remove the Solution from the Farm
           
                     Remove-SPSolution $wspName -Confirm:$false 
 
                     sleep 3
                 }
             }
 
             wait4timer($wspName) 
 
             Write-Host "Add the Solution from the Farm" -ForegroundColor Green 
             # Add Solution to the Farm
          
             Add-SPSolution -LiteralPath "$wspFullPath"
             
             Write-Host "Deploy the Solution" -ForegroundColor Green 
             # Install Solution to the WebApplication
             try{
                 foreach($destwa in $WebApplicationUrl) 
                 {
                     install-spsolution -Identity $wspName -GACDeployment:$true -Force:$true -webapplication:$destwa
                     wait4timer($wspName)
                 }
             }
             catch{
                 $ErrorMessage = $_.Exception.Message
                 if ($ErrorMessage.StartsWith("This solution contains no resources scoped for a Web application"))
                 {
                   install-spsolution -Identity $wspName -GACDeployment:$true -Force:$true
                 }
                 else 
                 {
                   write-host "Failed to deploy $wspname"
                   write-host $ErrorMessage
                 }
             }
             
         
             # Let the Timer Jobs get finishes       
             wait4timer($wspName)    
 
             Write-Host "Successfully Deployed to the WebApplication" -ForegroundColor Green 
             #iisreset
         
         }
          
     }
     catch
     {
         Write-Host "Exception Occuerd on DeployWSP : " $Error[0].Exception.Message -ForegroundColor Red  
     }
 }
 
 
 try
 {
     DeployWSP
     iisreset
     foreach($WebApp in Get-spwebapplication)
     { 
     [Microsoft.SharePoint.Publishing.PublishingCache]::FlushBlobCache($webApp)
     Write-Host "Flushed the BLOB cache for:" $webApp
     }
     Write-Host "Script Execution Completed Successfully" -ForegroundColor Green 
 }
 catch
 {
     Write-Host "Custom Exception Happened on Main : " + $Error[0].Exception.Message -ForegroundColor Red  
 }


Happy Coding,

Sathish Nadarajan.

Author Info

Sathish Nadarajan
 
Solution Architect
 
Rate this article
 
Sathish is a Microsoft MVP for SharePoint (Office Servers and Services) having 15+ years of experience in Microsoft Technologies. He holds a Masters Degree in Computer Aided Design and Business ...read more
 

Windows Server 2012 – How to Create System Restore Point Using Windows Server Backup feature

Sathish Nadarajan
 
Solution Architect
October 10, 2013
 
Rate this article
 
Views
189743

In this article, let us see, how to create a system restore points in windows server 2012 by using Windows Server Backup Feature. This will explain how to create a Backup and Restore the backup if anything goes wrong with our environment.

Most of the time, we will be thinking to take a backup of any source code, before doing any changes on it. (Thinking of a small dev environment without any version control system). In the same manner, we created our environment with a lot of effort. i.e., installation of the Server, SharePoint, SQL, Visual Studio etc., Everything is working fine now. But, being a developer, we will be definitely modifying some of the settings. That may cause our environment to not work as expected. Definitely this situation, almost all of us would have faced. To overcome, this situation, there are some features called, Restore Points. This you can find in Windows 7 and Windows 8 on the Properties Tab itself.

But in case of Windows Server 2008 R2 and Windows Server 2012, there is no feature called Restore Points. But there is another powerful feature, called “Windows Server Backup Feature”.

By using this, we can schedule a periodic backups, create a single backup, restore any point to the current state etc.,

In this article, let us see how to enable and use this feature. Let us go step by step as usual.

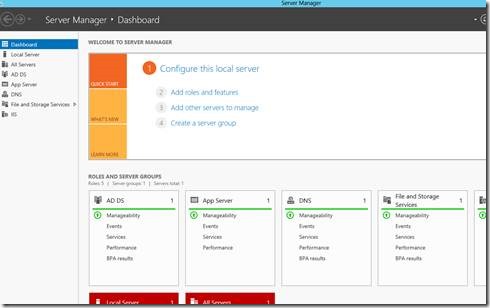
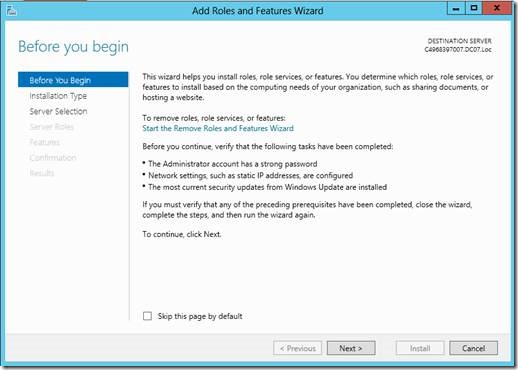
1. Go To Server Manager.

clip_image002

2. Click on Next.

clip_image004

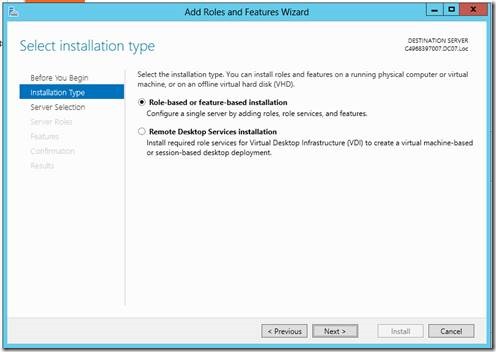
3. Select Role-based or Feature based installation and click Next.

clip_image006

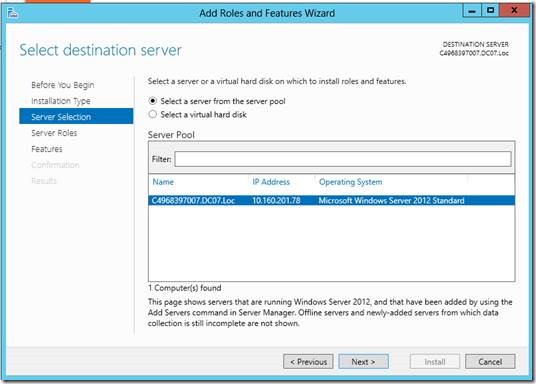
4. Select the Server and Click Next.

clip_image008

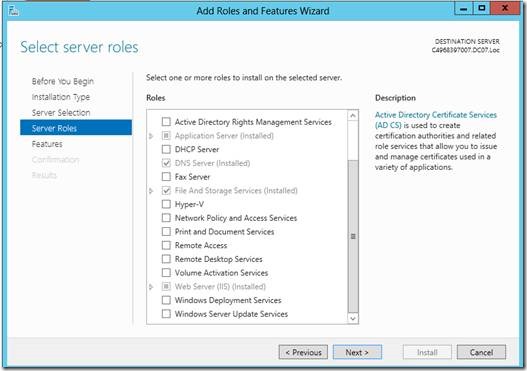
5. The default roles will be selected. Don’t bother about them and click next.

clip_image010

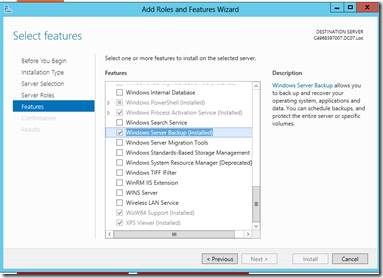
6. On the Features Wizard, Select the Windows Server Backup Feature and click Install.

clip_image012

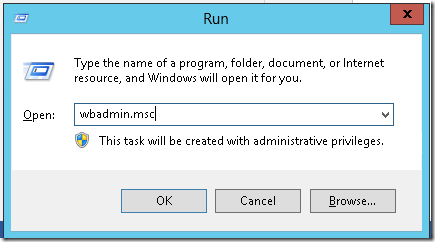
7. Once, the installation completes, do a restart of the server and execute the below exe from the Run.

clip_image013

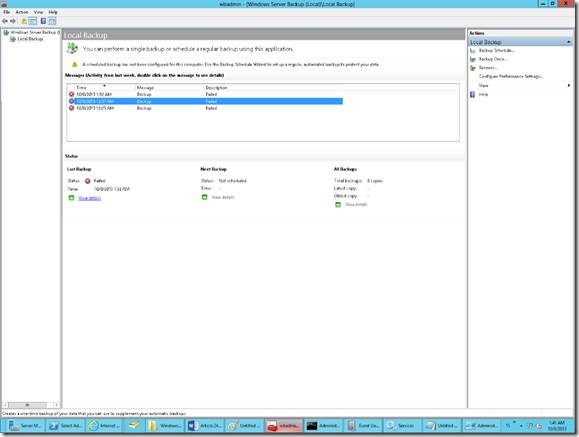
8. The following wizard will appear.

clip_image015

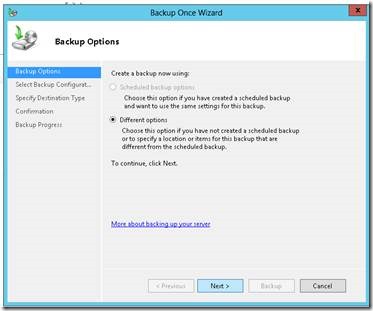
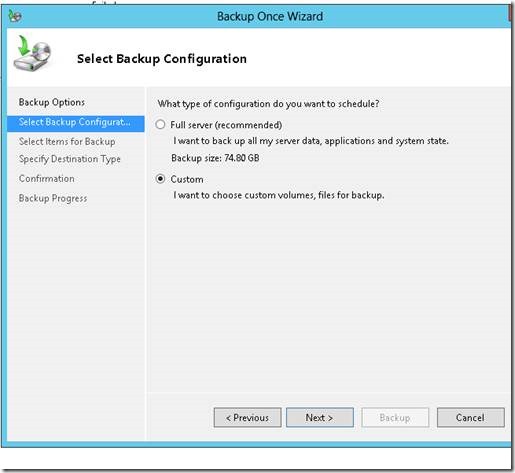
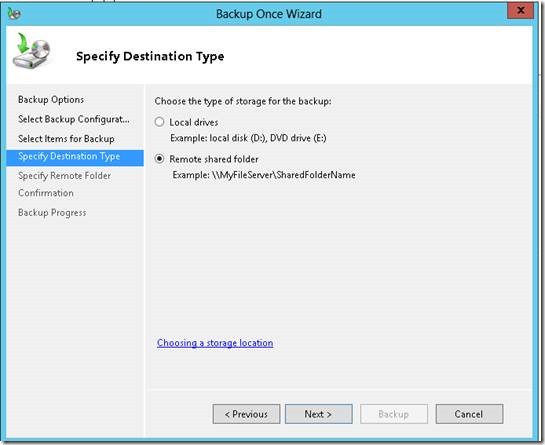
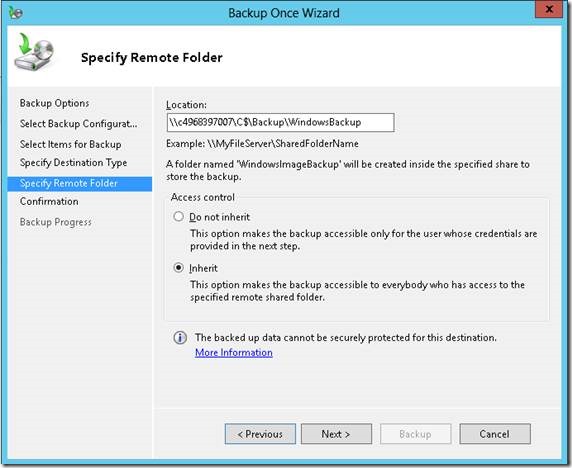
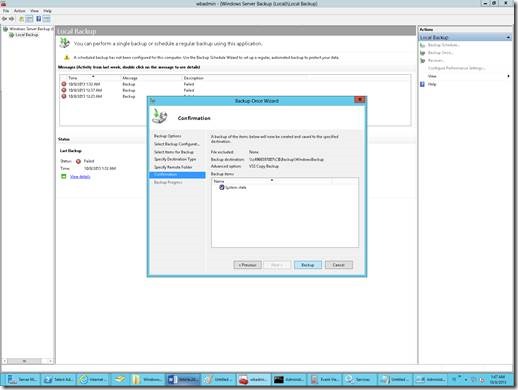
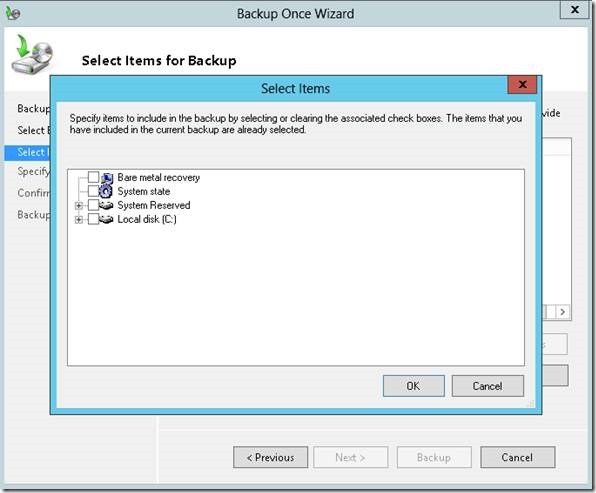
9. On the Right Panel, you will find various options like Backup Schedule, Backup Once, Recover etc., they are self-explanatory as the name explains. Now, let us go with a Backup Once option. For this wizard, I request you to follow the screen shots as there is no explanation required for them.

clip_image017

clip_image019

clip_image021

clip_image023

clip_image025

clip_image027

Now, After the Backup, the System Restore Point will be Created.

Issues faced while creating a Backup.

1. Backup failed to complete. A Volume Shadow Copy Service Operation failed. Please check "VSS" and "SPP" application event logs for more information. Detailed error: The operation ended before completion.

Looking into the EventVWR, the detailed exception was like

The backup operation that started at ‘‎2013‎-‎10‎-‎08T07:37:24.827000000Z’ has failed because the Volume Shadow Copy Service operation to create a shadow copy of the volumes being backed up failed with following error code ‘0x807800A1’. Please review the event details for a solution, and then rerun the backup operation once the issue is resolved.

To resolve this, I had a look into the below link and got out.

http://blogs.technet.com/b/sbs/archive/2011/07/06/potential-issues-after-installing-sharepoint-foundation-2010-sp1.aspx

2. System Writer not found.

This is one of the important exception, which I got struck for 2 days and after a long time, I found a useful link about this. There are already a lot of discussions are going on around this.

And moreover, a recent patch for this from Microsoft can be downloaded from here.

http://support.microsoft.com/kb/2807849/en-us.

Install the hotfix and do a restart. System writer will be listed on your system. To confirm, run the command prompt as administrator and type “vssadmin list writers”.

3. Make sure that, the VSS Service is running.

Probably, that’s all about this. Please do let me know, if you feel that something has been missed.

Now, we feel a little bit safe that at any point of time, at any crash, we can always restore to a perfect system Restore Point. Happy Computing….

Category : Configuration, Windows

Author Info

Sathish Nadarajan
 
Solution Architect
 
Rate this article
 
Sathish is a Microsoft MVP for SharePoint (Office Servers and Services) having 15+ years of experience in Microsoft Technologies. He holds a Masters Degree in Computer Aided Design and Business ...read more
 

Leave a comment