Azure Search Service – Create an Azure Search Indexer programmatically – C# Programmatically

Sathish Nadarajan
 
Solution Architect
February 26, 2019
 
Rate this article
 
Views
1243

In the earlier article, we saw how to create a Search Index Programmatically. Now, as a continuation, let us see how to create an Indexer.

Creating an Indexer involves all the three prerequisites.

1. Skillset

2. DataSource – Refer Here

3. Index – Refer Here

Among the above three, we have seen how to create a data source and index in the earlier articles. But the skillset is not straight forward. The easiest approach which I would take up is, do the reverse engineering. By referring the earlier article, how to import data and create an indexer through the console and export the Indexer JSON and then by using that JSON, we can create our Indexer.

Because, the SkillSet is going to be an one time activity. We can create the SkillSet Manually.

The code to export the Indexer is using the REST API call.

 namespace CallRestAPI.Console
 {
     using RestSharp;
 
     class Program
     {
         static void Main(string[] args)
         {
 
             string str = System.DateTime.Today.AddDays(-1).ToString("ddMMM").ToLower();
             
             // Create a RestClient
             var client = new RestClient("https://SEARCHSERVICENAME.search.windows.net/indexers/INDEXERNAME?api-version=2017-11-11-Preview");
             // Define the HTTP Method
             var request = new RestRequest(Method.GET);
 
             //Add the headers
             request.AddHeader("api-key", "APPLICATIONKEY");
             request.AddHeader("Content-Type", "application/json");
             //Add the Body Parameter
             request.AddParameter("undefined", "BODY", ParameterType.RequestBody);
             
             //Execute the Call
             IRestResponse response = client.Execute(request);


         }
     }
 }
 

By updating the SearchServiceName, IndexerName and the Application Key, the response we will get as a JSON object.

The structure of the JSON object is referring to the Indexer which we created manually.

 {
   "@odata.context": "https://SEARCHSERVICE.search.windows.net/$metadata#indexers/$entity",
   "@odata.etag": ""0x8D63405849585AF"",
   "name": "INDEXERNAME",
   "description": "",
   "dataSourceName": "DATASOURCE",
   "skillsetName": "SKILLSETNAME",
   "targetIndexName": "INDEXNAME",
   "schedule": {
     "interval": "PT1H",
     "startTime": "0001-01-01T00:00:00Z"
   },
   "parameters": {
     "batchSize": null,
     "maxFailedItems": 500,
     "maxFailedItemsPerBatch": 500,
     "base64EncodeKeys": false,
     "configuration": {
       "dataToExtract": "contentAndMetadata",
       "imageAction": "generateNormalizedImages"
     }
   },
   "fieldMappings": [
     {
       "sourceFieldName": "metadata_storage_path",
       "targetFieldName": "metadata_storage_path",
       "mappingFunction": {
         "name": "base64Encode",
         "parameters": null
       }
     }
   ],
   "outputFieldMappings": [
     {
       "sourceFieldName": "/document/merged_content",
       "targetFieldName": "merged_content",
       "mappingFunction": null
     },
     {
       "sourceFieldName": "/document/normalized_images/*/imageTags/*/name",
       "targetFieldName": "imageTags",
       "mappingFunction": null
     },
     {
       "sourceFieldName": "/document/normalized_images/*/imageCaption",
       "targetFieldName": "imageCaption",
       "mappingFunction": null
     }
   ],
   "disabled": null
 }


The above JSON file is a sample file. By using this JSON file, and updating the parameters like, IndexerName, DataSourceName, we can create a new indexer. The piece of code to create that is as follows.

 string indexerName = “myindexer";
                     string indexerJsonPath = Path.Combine(Path.GetDirectoryName(Assembly.GetExecutingAssembly().Location), “indexer.json");
 
                     JObject o1 = JObject.Parse(System.IO.File.ReadAllText(indexerJsonPath));
 
                     o1.Root["name"] =  "indexer";
                     o1.Root["dataSourceName"] =  "datasource";
                     o1.Root["targetIndexName"] =  "index";
 
                     var client = new RestClient(string.Format("https://{0}.search.windows.net/indexers?api-version=2017-11-11-Preview", this.ClientConnection.ClientConnectionDefinition.SearchServiceName));
                     var request = new RestRequest(Method.POST);
                     request.AddHeader("api-key", “Applicationkey”);
                     request.AddHeader("Content-Type", "application/json");
                     request.AddParameter("undefined", o1, ParameterType.RequestBody);
                     IRestResponse response = client.Execute(request);


The above code is straight forward. We are reading the text from the JSON File, update the properties with appropriate name, then create the Indexer by calling the web API using RestSharp. To Use the RestSharp for the easy access to the web api, please refer here.

Happy Coding,

Sathish Nadarajan.

Category : Azure, Search

Author Info

Sathish Nadarajan
 
Solution Architect
 
Rate this article
 
Sathish is a Microsoft MVP for SharePoint (Office Servers and Services) having 15+ years of experience in Microsoft Technologies. He holds a Masters Degree in Computer Aided Design and Business ...read more
 

Azure Search Service – Create an Azure Search Index programmatically – C# Programmatically

Sathish Nadarajan
 
Solution Architect
February 22, 2019
 
Rate this article
 
Views
1427

In the earlier article, we saw how to create a Data Source Programmatically. Now, as a continuation, let us see how to create an Index.

The code to create an index is straight forward.

 namespace CS.Help.Console
 {
     using Microsoft.Azure.Search;
     using Microsoft.Azure.Search.Models;
     using Microsoft.WindowsAzure.Storage;
     using Microsoft.WindowsAzure.Storage.Blob;
     using System.Linq;
 
     class Program
     {
         static void Main(string[] args)
         {
             CreateIndex();
 
             
         }
 
         private static void CreateIndex()
         {
             string searchServiceName = "Search Service Name";
             string searchQueryApiKey = "API Key";
             SearchServiceClient serviceClient = new SearchServiceClient(searchServiceName, new SearchCredentials(searchQueryApiKey));
 
             string indexName = "myindex";
             var definition = new Index()
             {
                 Name = indexName,
                 Fields = FieldBuilder.BuildForType<BlobDocuments>()
             };
 
             Index index = serviceClient.Indexes.CreateOrUpdate(definition);
 
         }
 
          
     }
 }
 

Happy Coding,

Sathish Nadarajan.

Category : Azure, Search

Author Info

Sathish Nadarajan
 
Solution Architect
 
Rate this article
 
Sathish is a Microsoft MVP for SharePoint (Office Servers and Services) having 15+ years of experience in Microsoft Technologies. He holds a Masters Degree in Computer Aided Design and Business ...read more
 

Azure Search Service – Create a Data Source programmatically – C# Programmatically

Sathish Nadarajan
 
Solution Architect
February 14, 2019
 
Rate this article
 
Views
2448

Sometime back, we saw the entire process of Creating and using the Azure Search Service through the portal here. I would suggest to go through that article before further proceeding. This article, can be considered as the follow up. The same activities, let us do through programmatically.

Now, the Objective is to create the Index and do a query against that Index. Already to Query against the index has been covered in one of the earlier article.

Here, we will see how to Create a Data Source for the Search Indexer. To create an Indexer, we require the below items in sequence.

1. SkillSet

2. DataSource

3. Index

4. Indexer.

We will see them in sequence in the upcoming Articles. In this article, let us focus only on the creation of data source.

1. To Create a Data Source, as usual I have created a console application.

2. Add the below NuGet Package. “Microsoft.Azure.Search”

3. Go to the Azure Portal and make a note of the below items. Provided, I assume that, we have created a Azure Search Service and a Blob Storage and a Container in the Blob Storage.

4. Make a Note of the

a. Search Service Name

b. Search Query API Key – Make a note of either the primary or secondary admin keys. Both should work.

c. Blob Storage Connection string. To get this, go to the blob storage and the Access Keys as shown below.

d. Container Name. If we want only a folder inside the container, make a note of that as well.

5. Now, we got all the required parameters. With these parameters, the below code will create the Azure Search Service DataSource.

 namespace CS.Help.Console
 {
     using Microsoft.Azure.Search;
     using Microsoft.Azure.Search.Models;
 
     class Program
     {
         static void Main(string[] args)
         {
             CreateDataSource();
 
             System.Console.ReadLine();
         }
 
         private static void CreateDataSource()
         {
             //Assign the Search Service Name
             string searchServiceName = "SEARCH SERVICE NAME";
             string searchQueryApiKey = "KEY WHICH WE GOT FROM THE AZURE PORTAL";
 
             string dataSourceName = "DATASOURCE NAME";
 
             SearchServiceClient serviceClient = new SearchServiceClient(searchServiceName, new SearchCredentials(searchQueryApiKey));
 
             bool isDataSourceExists = serviceClient.DataSources.Exists(dataSourceName);
 
             if (!isDataSourceExists)
             {
                 string storageConnectionString = "CONNECTION STRING WHICH WE GOT FROM THE PORTAL";
                 var ds = DataSource.AzureBlobStorage(dataSourceName, storageConnectionString, "palsbsearchcontainer");
                 DataSource dataSource = serviceClient.DataSources.CreateOrUpdate(ds);
                 System.Console.WriteLine("Data Source Created Successfully");
             }
             else
             {
                 System.Console.WriteLine("Data Source Already Exists");
             }
         }
     }
 }
 

6. After the execution, the data source will be created as below.

Happy Coding,

Sathish Nadarajan.

Author Info

Sathish Nadarajan
 
Solution Architect
 
Rate this article
 
Sathish is a Microsoft MVP for SharePoint (Office Servers and Services) having 15+ years of experience in Microsoft Technologies. He holds a Masters Degree in Computer Aided Design and Business ...read more
 

Step By Step Procedure To Create (Provision) Office 365 Groups Programmatically Using C# And Microsoft Graph

Sathish Nadarajan
 
Solution Architect
January 10, 2019
 
Rate this article
 
Views
3368

In this article, let us see how to create a Office 365 Programmatically using C# and the Graph. Let us see the step by step procedures asusual.

1. Create the Azure Active Directory Application. For that, login to the Azure portal corresponding to our Office 365 tenant. Click on the App Registrations.

2. Click on “New application registration”

3. Create an App by providing proper Name and Type as below.


4. Make note of the Application ID from the below screen. We will be using this later on the code below.

5. Click on the Settings -> Required Permissions and grant the access to Microsoft Graph component.

6. After adding the Microsoft Graph, Grant Permissions

7. Now, click on the Keys and Generate the ClientSecret Key.

8. Copy the Key value, as we cannot retrieve this Key later once we move out of this page. Make a note of this Key as well.

9. So, we have the ClientID, ClientsecretKey, UserName, password of our O365 tenant. With the above details, the below code will create the Office 365 group and the corresponding Team Site.

10. In the below piece of code, I have used the RestSharp to make the API Call. Please refer here for the RestSharp implementation.

 public static void CreateOffice365GroupWithGraph()
          {
              List<KeyValuePair<string, string>> vals = new List<KeyValuePair<string, string>>();
   
              string userName = "sathish@sppals.com";
              string password = "****";
              string tenantName = "sppalsmvp.onmicrosoft.com";
              string authString = "https://login.microsoftonline.com/" + tenantName;
              string resource = "https://graph.microsoft.com";
   
              try
              {
                  AuthenticationContext authenticationContext = new AuthenticationContext(authString, false);
   
                  string clientId = "***********";
                  string clientSecret = "**********";
   
                  string url = string.Format("https://login.windows.net/{0}/oauth2/token", tenantName);
   
                  var client = new RestClient("https://login.windows.net/sppalsmvp.onmicrosoft.com/oauth2/token");
                  var request = new RestRequest(Method.POST);
   
                  request.AddHeader("Postman-Token", "93283b8f-f6f9-426d-9250-4a5000b05bbb");
                  request.AddHeader("cache-control", "no-cache");
                  request.AddHeader("content-type", "multipart/form-data; boundary=----WebKitFormBoundary7MA4YWxkTrZu0gW");
                  request.AddParameter(string.Format("multipart/form-data; boundary=----WebKitFormBoundary7MA4YWxkTrZu0gW", "------WebKitFormBoundary7MA4YWxkTrZu0gWrnContent-Disposition: form-data; name="grant_type"rnrnpasswordrn------WebKitFormBoundary7MA4YWxkTrZu0gWrnContent-Disposition: form-data; name="username"rnrn{0}rn------WebKitFormBoundary7MA4YWxkTrZu0gWrnContent-Disposition: form-data; name="password"rnrn{1}rn------WebKitFormBoundary7MA4YWxkTrZu0gWrnContent-Disposition: form-data; name="client_id"rnrn{2}rn------WebKitFormBoundary7MA4YWxkTrZu0gWrnContent-Disposition: form-data; name="client_secret"rnrn{3}rn------WebKitFormBoundary7MA4YWxkTrZu0gWrnContent-Disposition: form-data; name="resource"rnrnhttps://graph.microsoft.comrn------WebKitFormBoundary7MA4YWxkTrZu0gW--",userName, password,clientId, clientSecret), ParameterType.RequestBody);
   
                  IRestResponse response = client.Execute(request);
   
                  var jo = JObject.Parse(response.Content);
   
                  string accessToken = Convert.ToString(jo["access_token"]);
   
                  Stream groupLogoStream = new FileStream("C:\Users\sathish\Downloads\MyLogo.png",
                                  FileMode.Open, FileAccess.Read);
   
                  var group = UnifiedGroupsUtility.CreateUnifiedGroup("DemoGroup", "DemoGroup Created through Program",
                                  "TelenetGroup", accessToken, groupLogo: groupLogoStream);
   
              }
              catch (Exception ex)
              {
                  System.Console.WriteLine("Exception occurred : " + ex.Message);
                  System.Console.ReadLine();
              }
          }

Happy Coding,

Sathish Nadarajan.

Author Info

Sathish Nadarajan
 
Solution Architect
 
Rate this article
 
Sathish is a Microsoft MVP for SharePoint (Office Servers and Services) having 15+ years of experience in Microsoft Technologies. He holds a Masters Degree in Computer Aided Design and Business ...read more
 

How to Create Discussions List Reply to a topic and Reply to a Reply Programmatically using C# Patterns and Practice (PNP)

Sathish Nadarajan
 
Solution Architect
November 13, 2018
 
Rate this article
 
Views
2870

Usually in the discussion list, we will start a topic and a lot of replies will be given by the users and sometimes, there could be a chance that a reply to reply also. In this article, let us see how to create

1. Reply to a Topic

2. Reply to a Reply.

The current scenario will be useful, while creating any sort of tools which will create a bunch of discussion items from the legacy application to the sharepoint.

Reply to a Topic

 public static void CreateReplyToATopic()
         {
             try
             {
                 OfficeDevPnP.Core.AuthenticationManager authMgr = new OfficeDevPnP.Core.AuthenticationManager();
 
                 using (var ctx = authMgr.GetSharePointOnlineAuthenticatedContextTenant(siteUrl, userName, password))
                 {
                     Web web = ctx.Web;
                     ctx.Load(web);
                     ctx.Load(web.Lists);
                     ctx.ExecuteQueryRetry();
                     List list = web.Lists.GetByTitle("Discussions List");
                     ctx.Load(list);
                     ctx.ExecuteQueryRetry();
                     ListItem topicItem = list.GetItemById(1);
                     ctx.Load(topicItem);
                     ctx.ExecuteQuery();
 
                     var replyItem = Microsoft.SharePoint.Client.Utilities.Utility.CreateNewDiscussionReply(ctx, topicItem);
                     replyItem.Update();
                     replyItem["Title"] = "Test Reply";
                     replyItem["Body"] = "Test body Content";
                     replyItem.Update();
                     ctx.ExecuteQuery();
                 }
             }
             catch (Exception ex)
             {
                 System.Console.WriteLine("Exception occurred : " + ex.Message);
                 System.Console.ReadLine();
             }
         }


Reply to a Reply

To Create a reply to a reply, the same above code will be fine. But, the only thing is, change the topicItem to replyItem of the appropriate reply.

 var replyItem = Microsoft.SharePoint.Client.Utilities.Utility.CreateNewDiscussionReply(ctx, topicItem);


Happy Coding,

Sathish Nadarajan.

Category : Office 365, SharePoint

Author Info

Sathish Nadarajan
 
Solution Architect
 
Rate this article
 
Sathish is a Microsoft MVP for SharePoint (Office Servers and Services) having 15+ years of experience in Microsoft Technologies. He holds a Masters Degree in Computer Aided Design and Business ...read more
 

How to Create Discussions List Topics Programmatically using C# Patterns and Practice (PNP)

Sathish Nadarajan
 
Solution Architect
November 9, 2018
 
Rate this article
 
Views
2117

In this article, let us see how to create the topics in a discussion list programmatically using C# Patterns and Practice.

By Using PNP, it is very simple and straight forward to create the discussion topic. The below code is self-explanatory.

 public static void CreateDiscussion()
         {
             try
             {
                 OfficeDevPnP.Core.AuthenticationManager authMgr = new OfficeDevPnP.Core.AuthenticationManager();
 
                 using (var ctx = authMgr.GetSharePointOnlineAuthenticatedContextTenant(siteUrl, userName, password))
                 {
                     Web web = ctx.Web;
                     ctx.Load(web);
                     ctx.Load(web.Lists);
                     ctx.ExecuteQueryRetry();
                     List list = web.Lists.GetByTitle("Discussions List");
                     ctx.Load(list);
                     ctx.ExecuteQueryRetry();
 
                     var topicItem = Microsoft.SharePoint.Client.Utilities.Utility.CreateNewDiscussion(ctx, list, "Test Discussion created by Code");
                     topicItem.Update();
 
                     ctx.ExecuteQuery();
                 }
             }
             catch (Exception ex)
             {
                 System.Console.WriteLine("Exception occurred : " + ex.Message);
                 System.Console.ReadLine();
             }
         }
 

The above code will create the topic as below.

clip_image002

We can later update the topic properties as such it is a simple list item.

Happy Coding,

Sathish Nadarajan.

Author Info

Sathish Nadarajan
 
Solution Architect
 
Rate this article
 
Sathish is a Microsoft MVP for SharePoint (Office Servers and Services) having 15+ years of experience in Microsoft Technologies. He holds a Masters Degree in Computer Aided Design and Business ...read more
 

Step by Step Procedure to create Nested Flow – Microsoft Flow

Sathish Nadarajan
 
Solution Architect
November 2, 2018
 
Rate this article
 
Views
5584

Almost all the customers are using the Microsoft Flow intensively nowadays for basic functionalities. But there are certain limitations with the Flow till now. Please refer to the link for the limitations before planning for the Flow.

Recently, I was facing a workflow which has more than 300 actions in that. I was about to convert the steps to the equivalent Flow actions. But, because of the restriction (A flow can have only 250 actions), I cannot exactly convert the same. As a workaround, Microsoft itself, suggesting to go with the Nested Flows. i.e., Consuming a flow within a Flow. Hence, the flows which goes beyond 250 actions can be splitted to separate flows and can be consumed as methods. (Not exactly as methods, but I am referring them as methods).

Let me create two flows. One is the parent flow and the second one as Child Flow.

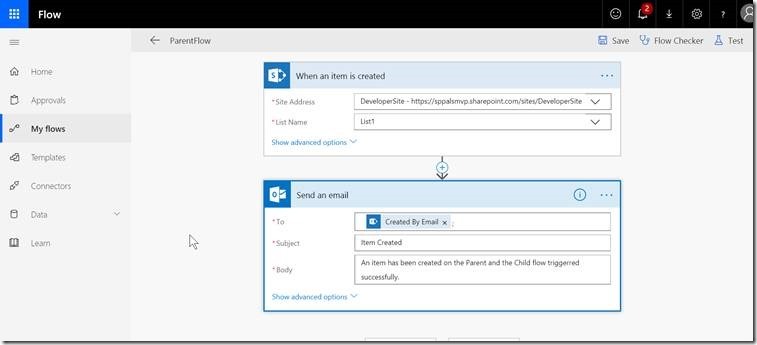
1. I have created a ParentFlow as shown below.

clip_image002

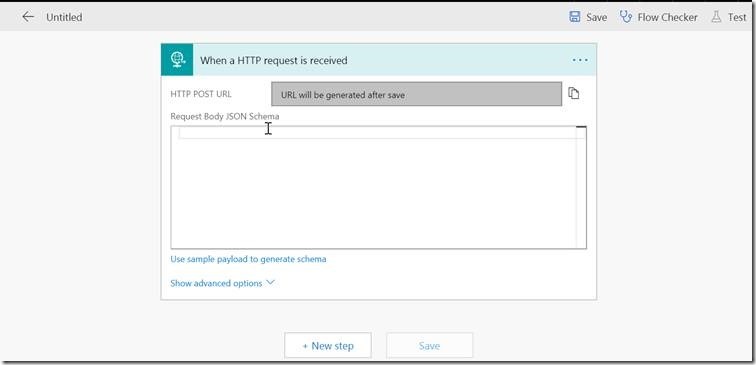
2. Now, let us create a Child Flow. The trigger is, a request.

clip_image004

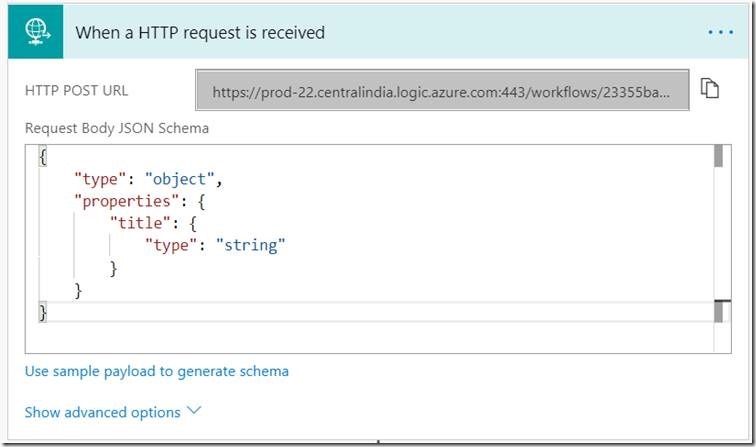
3. In my case, I am going to receive only the title of the list item from the Parent flow. Hence, on the Child flow, Request Action, the JSON object will be something like below.

clip_image006

4. Now, the consumer should pass the json object “title”.

5. The simple Child flow looks as below.

clip_image008

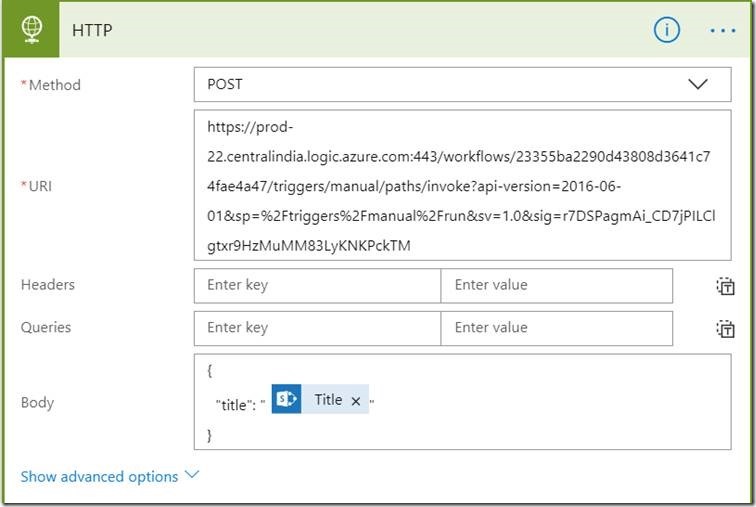
6. Now, the parent flow, is been introduced with a HTTP action.

clip_image010

7. The HTTP action, is passing the URL, POST method and the body json object as below.

clip_image012

8. Once, we save the Child method, we will get the URL. We can copy that, and paste it here.

9. Now, when I create an Item on the list List1, the parent flow triggers and it consumes the child flow and the child flow creates an item on another list and the control comes back to the parent flow. The parent flow, then sends an email.

10. By this way, we can construct any bigger flows.

Happy Coding,

Sathish Nadarajan.

Category : Microsoft Flow

Author Info

Sathish Nadarajan
 
Solution Architect
 
Rate this article
 
Sathish is a Microsoft MVP for SharePoint (Office Servers and Services) having 15+ years of experience in Microsoft Technologies. He holds a Masters Degree in Computer Aided Design and Business ...read more
 

Create and Debug Azure Function using Visual Studio 2017 – Part 1

Ahamed Fazil Buhari
 
Senior Developer
October 30, 2018
 
Rate this article
 
Views
2133

Hello Everyone,

In this article we will see how to create Azure function from VS 2017, its necessary to have basic knowledge on Azure Function before getting deep into this article. And I split this article into two parts since it involves many steps.

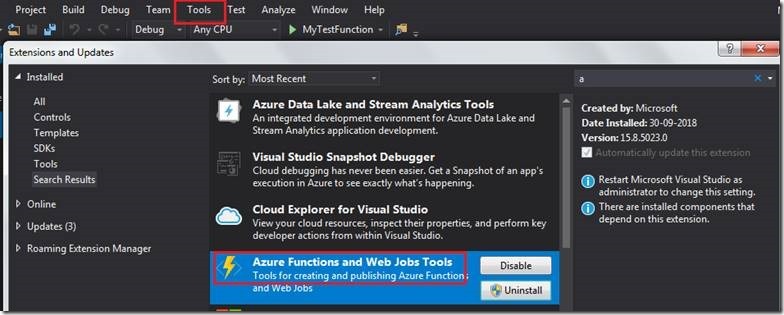
Before creating Azure Function from VS, it’s necessary to install couple of package to create and debug azure function, for debugging we need Azure CLI to be installed in your local machine. You can download Azure CLI from here and I installed Azure extension which helps in creating and publishing Azure Function. You can go to Extensions and Updates window from Tools in top menu bar.

clip_image002

If you are using VS 2015 and it doesn’t have Azure Function extension then you can refer this link to get Azure Function project in VS 2015. Ok, let’s get into the topic,

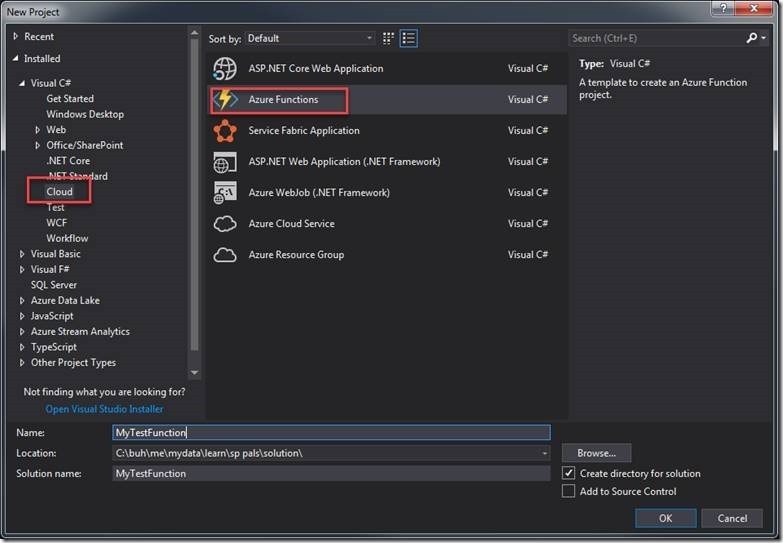
Step 1: Open VS 2017 and just like normal project creation, click on New -> Azure Function (under Cloud).

clip_image004

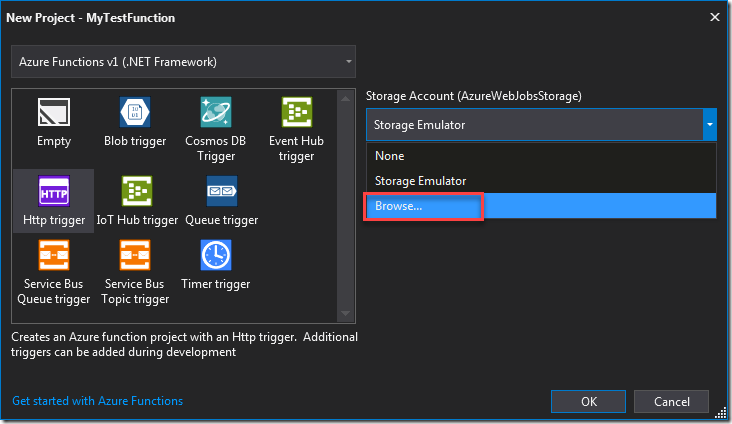
Step 2: Assigning Storage Account. I do have my own VisualStudio Enterprise subscription and Azure account. So I refer to my Azure storage account, if you don’t have storage account then you can go ahead with Storage Emulator(The Microsoft Azure storage emulator provides a local environment that emulates the Azure Blob, Queue, and Table services for development purposes – ref Microsoft) .

clip_image005

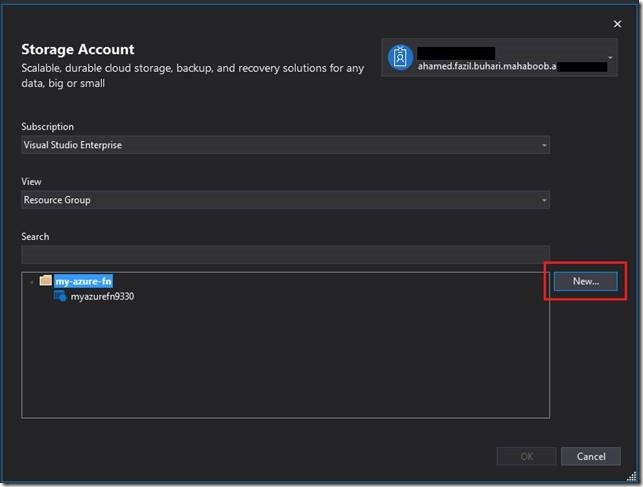
Step 3: I have resource group my-azure-fn and azure storage account as myazurefn99330 which was created already from azure portal. You can skip step 4 if you don’t want to create Azure Storage Account. (I don’t want to create another storage account because I already have one. Also it’s better to create azure storage account from https://portal.azure than creating from VS.)

)clip_image007

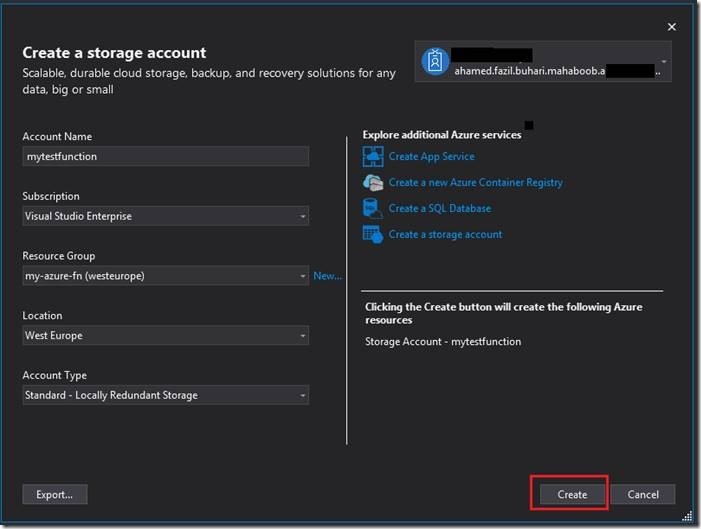
Step 4: In Create a Storage Account dialog, we need to provide name of the account name subscription, resource group, location(near to your geographic location) and Account Type( it is important because it decides your storage account durability and replication of data for high availability – this will take separate topic, so I provided Microsoft link to know more about Azure Storage Account Type ). Click on Create, it will take few minutes to create storage account in Azure.

clip_image009

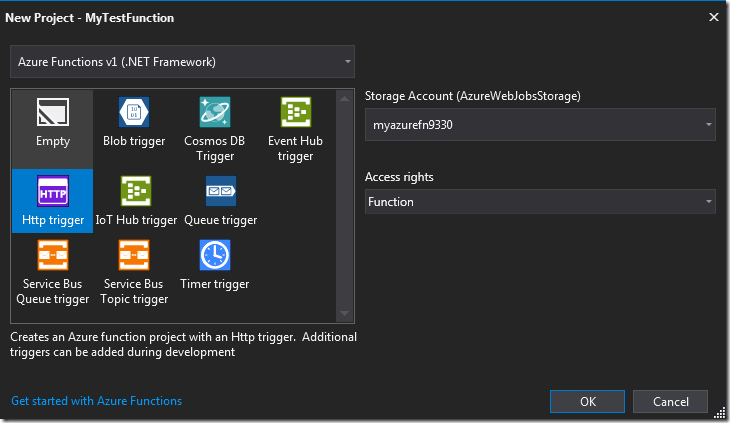
Step 5: Access rights option is to set authentication rights to access your azure function, usually it will be authenticated using key value. If you do not want any authentication then anonyms (not good for production) should be selected.

clip_image010

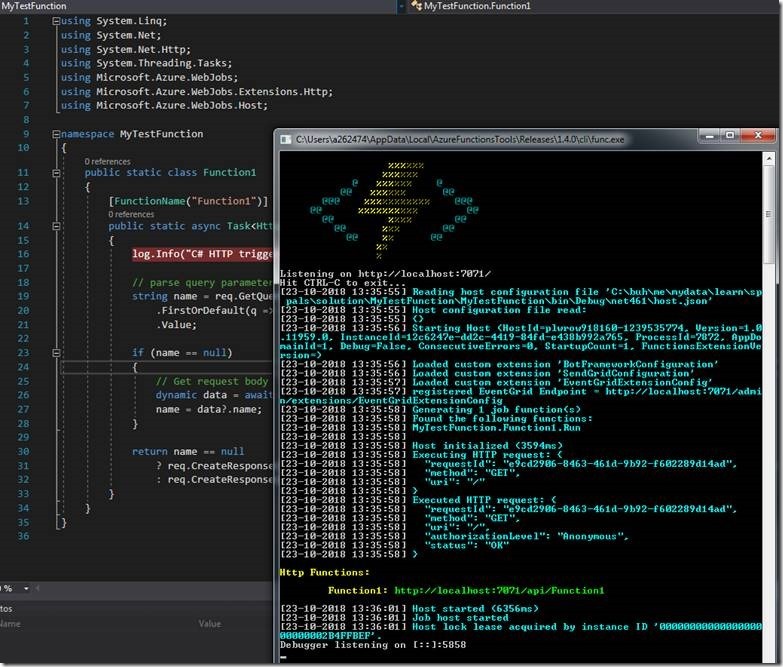
Step 6: Select Http trigger as template and click on OK. It will create class file, to check whether it works fine, keep a debug pointer and press F5. Azure CLI will open automatically and it will listen through localhost.

clip_image012

And when we access the localhost:7071 from the browser, it will call the Azure function, because our azure function is waiting for Http trigger,

clip_image013

In the next article we will see how to publish Azure Function from VS2017, to be continued…

Happy Coding

Ahamed

Author Info

Ahamed Fazil Buhari
 
Senior Developer
 
Rate this article
 
Ahamed is a Senior Developer and he has very good experience in the field of Microsoft Technologies, especially SharePoint, Azure, M365, SPFx, .NET and client side scripting - JavaScript, TypeScript, ...read more
 

Step by Step procedure to Create a Custom Action for Delete Button on SharePoint List Form Ribbon using JavaScript

Sriram
 
Technology Specialist
August 21, 2018
 
Rate this article
 
Views
5328

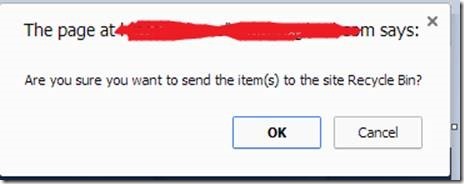
Recently I came up with requirement to change delete action’s confirmation message. Are you sure you want to send the item(s) to the Recycle Bin? to Are you sure you want to Cancel the Request? Also when clicking on the Delete icon, it should not delete the item; instead it should update the status of the item.

clip_image002

I have followed below approch to solve this problem.

Replace the ‘Delete Item’ button on the Ribbon bar with a copied ‘Delete Item’ button and then use ECMAScript and Sharepoint Client Object Model to remove the item and implement business logics.

Below are the steps to impelemet above functionality.

  1. Create 2 JS files for ViewForm and Edit Form,
  2. In the JS file under document.ready place the below code.


 $(document).ready(function(){
 //for view form
 var button = document.getElementById("Ribbon.ListForm.Display.Manage.DeleteItem-Medium");
 if (button != null) {
     var $button = $(button);
     var html = $button.html();
     $button.after("<div id='deleteIcon' OnMouseOver='ApplyCSSFunction()'><a style='cursor:pointer;'>" + html + "</a></div>").hide().next().click(function (e) {
 		DeleteCurrentItem();
     });
     $(".ms-cui-ctl-mediumlabel:eq(3)").css("vertical-align","top");
 	$(".ms-cui-ctl-mediumlabel:eq(3)").css("margin-left","4px");
 $('.ms-cui-ctl-mediumlabel:eq(3)').text("Cancel Request");
 	}
 
 $("#deleteIcon").mouseleave(function() {
  	  $("#deleteIcon").css("border-style","none");
         });
 });


  1. Write your business logic in DeleteCurrentItem() method.


 function DeleteCurrentItem()
 {
 $("#deleteIcon").css("border-style","none");
 var deleteConfirm = confirm("Are you sure you want to cancel this request?");
 if(deleteConfirm)
 {
  var deleteItemID=getParameterByName('ID');
  DeleteItem(deleteItemID);
 }
 }


  1. We need to change the highlighted line on the above code to make it work in Edit form.

View Form:

var button = document.getElementById(“Ribbon.ListForm.Display.Manage.DeleteItem-Medium”);

Edit Form:

var button = document.getElementById(“Ribbon.ListForm.Edit.Actions.DeleteItem-Large”);

Output:

clip_image004

Author Info

Sriram
 
Technology Specialist
 
Rate this article
 
Sriram T has been working in IT industry for over 6 years He holds Bachelor's degree in Computer Science Engineering. Sriram write articles and blogs related to SharePoint 2013, SharePoint ...read more
 

How to Create a Modern Pages Programmatically in SharePoint Office 365 using Patterns and Practice (OfficeDevPNP)

Sathish Nadarajan
 
Solution Architect
May 2, 2018
 
Rate this article
 
Views
6983

In the earlier article, we saw how to create the modern site programmatically. As a follow up, we need to create the pages and add the desired webparts based on the requirement.

The below piece of code, will create the pages and add the default webparts on it.

 static void Main(string[] args)
         {
             string siteUrl = "https://*****.sharepoint.com/Sites/DemoCommunicationSite";
             string userName = "sathish@****.onmicrosoft.com";
             string password = "***";


             OfficeDevPnP.Core.AuthenticationManager authMgr = new OfficeDevPnP.Core.AuthenticationManager();
 
             #region O365
             using (var ctx = authMgr.GetSharePointOnlineAuthenticatedContextTenant(siteUrl, userName, password))
             {
                 Web web = ctx.Web;
                 ctx.Load(web.Lists);
                 ctx.Load(web, w => w.SupportedUILanguageIds);
                 ctx.Load(web);
 
                 ctx.ExecuteQueryRetry();
 //Create the Page
 var page2 = ctx.Web.AddClientSidePage("PageWithSections.aspx", true);
                 page2.AddSection(CanvasSectionTemplate.ThreeColumn, 5);
                 //page2.AddSection(CanvasSectionTemplate.TwoColumn, 10);
                 page2.Save();
 
 // Initialize the WEbpart
                 ClientSideWebPart videoEmbedWp = page2.InstantiateDefaultWebPart(DefaultClientSideWebParts.VideoEmbed);
 
 //The below are the sample video webpart properties which I have given.  We can add any OOB webpart like this.
                 videoEmbedWp.Properties["videoSource"] = "https://sppalsmvp.sharepoint.com/portals/hub/_layouts/15/PointPublishing.aspx?app=video&p=p&chid=d54ed63d-6577-4aa8-ab90-b07215dfa55b&vid=b60cb3f6-7873-4caa-a83b-ec035c472e74";
                 videoEmbedWp.Properties["captionText"] = "My video";
                 videoEmbedWp.Properties["showInfo"] = false;
                 videoEmbedWp.Properties["embedCode"] = "<iframe width=853 height=480 src='https://sppalsmvp.sharepoint.com/portals/hub/_layouts/15/PointPublishing.aspx?app=video&p=p&chid=d54ed63d-6577-4aa8-ab90-b07215dfa55b&vid=b60cb3f6-7873-4caa-a83b-ec035c472e74&width=853&height=480&autoPlay=false&showInfo=true' allowfullscreen></iframe>";
                 videoEmbedWp.Title = "Associated video";
 
 //Get the section
                 CanvasSection section = page2.Sections[1];
 //Add the webpart to the section
                 page2.AddControl(videoEmbedWp, section.Columns[1], 0);
                 page2.Save();
 }
 }
 

Happy Coding,

Sathish Nadarajan.

Category : Programmatically

Author Info

Sathish Nadarajan
 
Solution Architect
 
Rate this article
 
Sathish is a Microsoft MVP for SharePoint (Office Servers and Services) having 15+ years of experience in Microsoft Technologies. He holds a Masters Degree in Computer Aided Design and Business ...read more
 

Leave a comment