In this article, I have explained how Microsoft Graph API works; then how to create an app to consume Microsoft Graph API in your web applications, mobile apps, and web API. Then, we will also discuss how to fetch access token to consume Graph API data from your applications.
Microsoft Graph API
Microsoft Graph API allows the data to interact with millions of users in the cloud.
Using Microsoft Graph API, you are able to create applications for your organization with single Graph API endpoints.
Endpoint URL : http://graph.microsoft.com
Use of Microsoft Graph API
- Create, manage, and view Office 365 calendar events and also find your meeting times.
- Access information for the relevant people from Office 365 users.
Getting Started with Graph API
- Register your application from Microsoft apps registration portal
- Authenticate the user to fetch the access token through OAuth Protocol
- Consume the data using Microsoft Graph API
- Run the application.
Let’s discuss how to fetch the access token based on the user.
Navigate to the app registration portal https://apps.dev.microsoft.com
Log in to your tenant account.
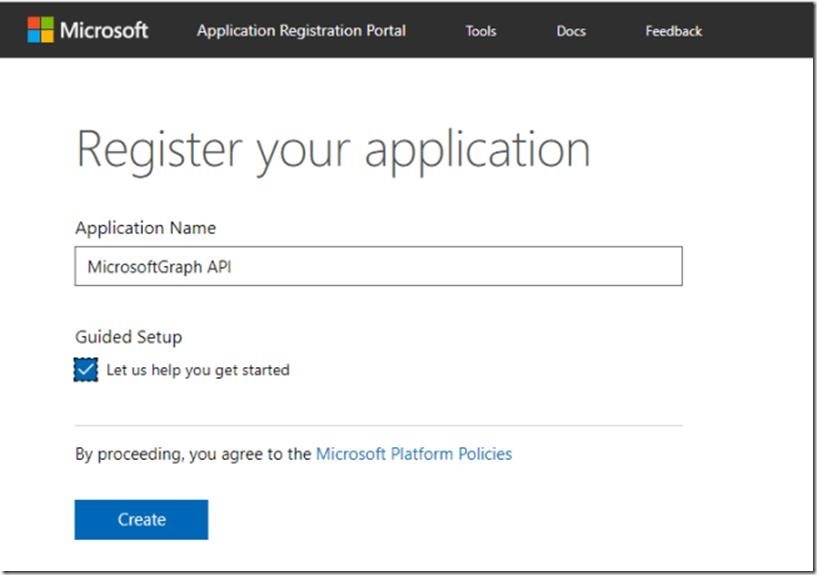
Click “Add an app” button to register your app.
Provide the Application Name and click Create.
After successful creation of the app, it shows what kind of application is going to consume the data from Microsoft Graph API.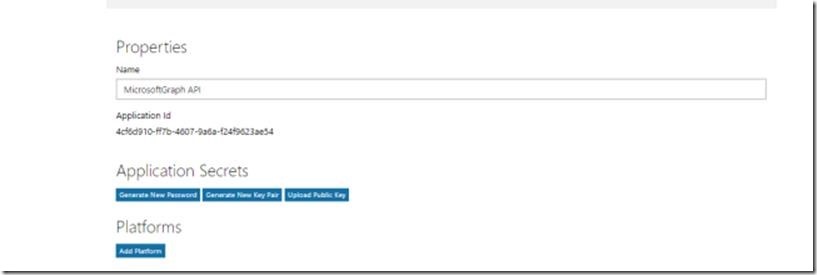
Copy the unique Application Id later used in an API to fetch access token.
Generate the application secrets to authenticate the app.

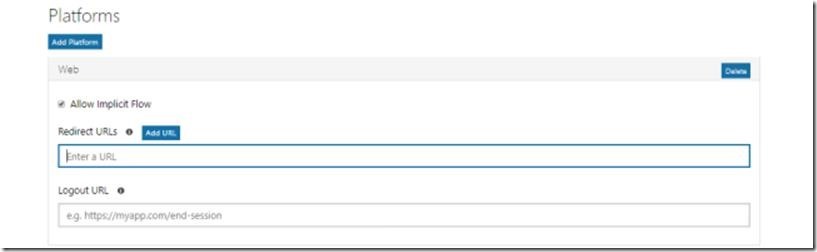
In a Platform for web-based applications, use “WEB Platform” for Web API; you can choose “WEB API Platform” and for mobile based applications use “Native Platform”.
Now, I have chosen “Web platform” to play with SharePoint.
Provide the redirect URL for the application.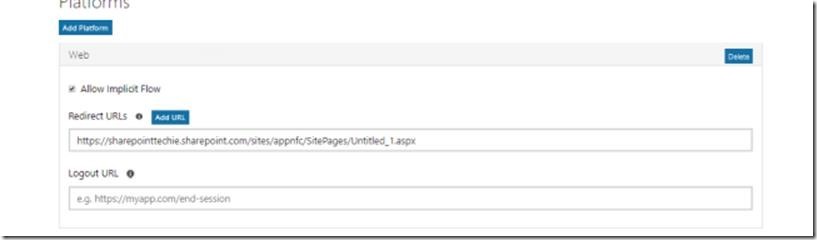
The “Allow implicit flow” allows the option to enable the Open Id to connect hybrid and implicit flows. The hybrid flow enables the user to receive sign-in info for obtaining the access token.
Click “Save” to complete the App registration.

Fetch Access Token
- Host : https://login.microsoftonline.com
- POST: /{tenant}/common/oauth2/v2.0/token
- Content Type: application/x-www-form-urlencoded
- Client ID: *****************
- Client Secret: ********************
- grant_type: client_credentials
Tenant: The directory you want to request permission from (for ex; contoso.onmicrosoft.com).
Client ID: The unique Id generated from the app registration portal
Client Secret: The password generated from the app registration portal.
Scope: http://graph.microsoft.com/.default. This applies all the application permissions to the app.
grant_type: It will be client_credentials
Code
 <script src="https://ajax.googleapis.com/ajax/libs/jquery/1.11.1/jquery.min.js"></script>

 <script type="text/javascript">
     $(document).ready(function() {
         requestToken();
     });

     var token;

 	    function requestToken() {

 	        $.ajax({
 	            "async": true,
 	            "crossDomain": true,
 	            "url": "https://cors-anywhere.herokuapp.com/https://login.microsoftonline.com/sharepointtechie.onmicrosoft.com/oauth2/v2.0/token", // Pass your tenant name instead of sharepointtechie
 	            "method": "POST",
 	            "headers": {
 	                "content-type": "application/x-www-form-urlencoded"
 	            },
 	            "data": {
 	                "grant_type": "client_credentials",
 	                "client_id ": "8baf0301-27df-44b1-b4fe-7911b9a918de", //Provide your app id
 	                "client_secret": "**********", //Provide your client secret genereated from your app
 	                "scope ": "https://graph.microsoft.com/.default"
 	            },
 	            success: function(response) {
 	                console.log(response);
 	                token = response.access_token;
 	                document.getElementById('content').innerHTML = token;
 	            }

 	        })
 	    }
 	</script>
 	<p id="content"></p>
Open SharePoint site -> Add a content editor webpart -> link the HTML file; it contains the above script -> Click OK.
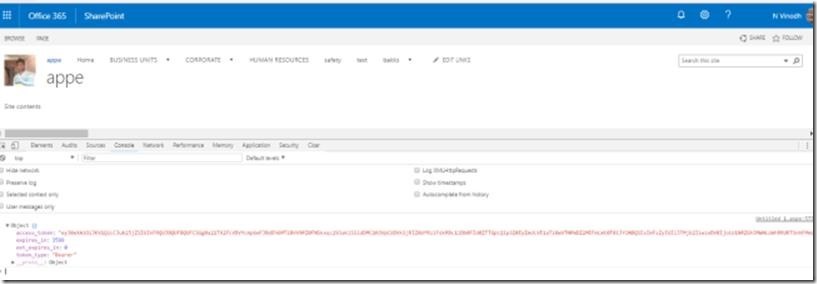
Here is the result in the console window. Now, we have successfully fetched the access token.
In my next article, let’s see how to fetch users, groups, calendar events and a lot more stuff using Microsoft Graph API.
Happy SharePointing!

Leave a comment