How to Publish and Deploy PowerPoint Add-In

Sathish Nadarajan
 
Solution Architect
January 22, 2021
 
Rate this article
 
Views
1673

We saw the creation of PowerPoint Add-In in the earlier article.  As a continuation, in this article, let us see how to Publish and Deploy the Add-In to various users.

There are many ways, we can do the deployment.  But basically, as I mentioned in the earlier article, there are two components which we need to be focused on.  The Web and the Add-In Manifest.xml.

First, the Web needs to be deployed in any of the public website or in Azure Service Application.

Then the publish the App as well.  While doing this, provide the URL of the AppWeb.  Then distribute this XML file to the end users.  We will see them step by step below.

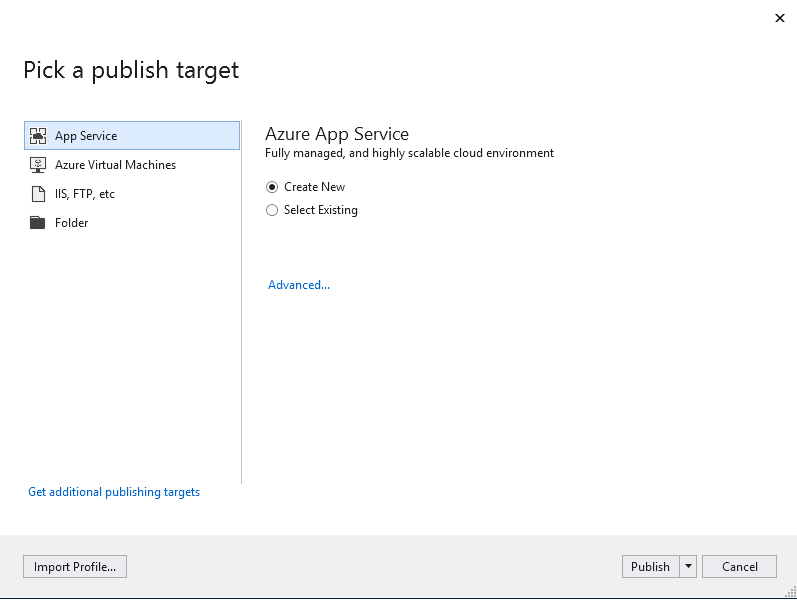
  1. Publish the App Web to Azure. Doesn’t require much explanation.  Please refer to the below screen shots.


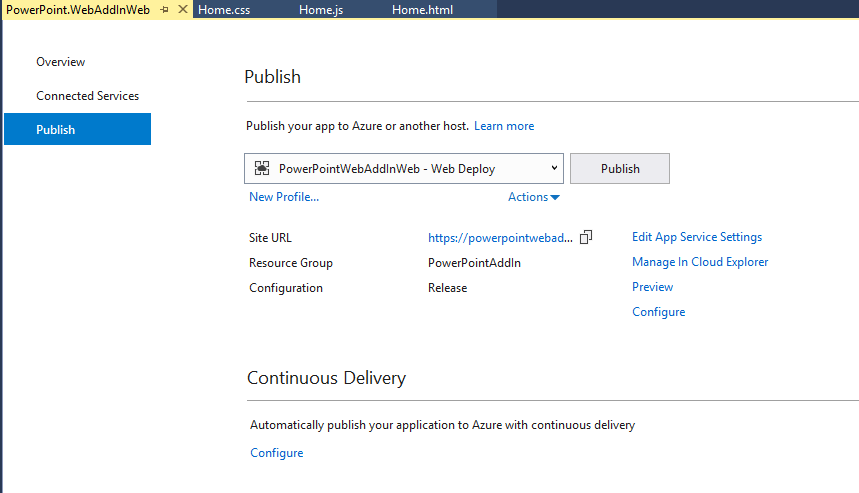
  1. Once the App Web is deployed, ensure that you are able to access your files using the URL. And give the App Service anonymous permission based on your requirement.  This URL will be helpful for us when we publish the App Project.
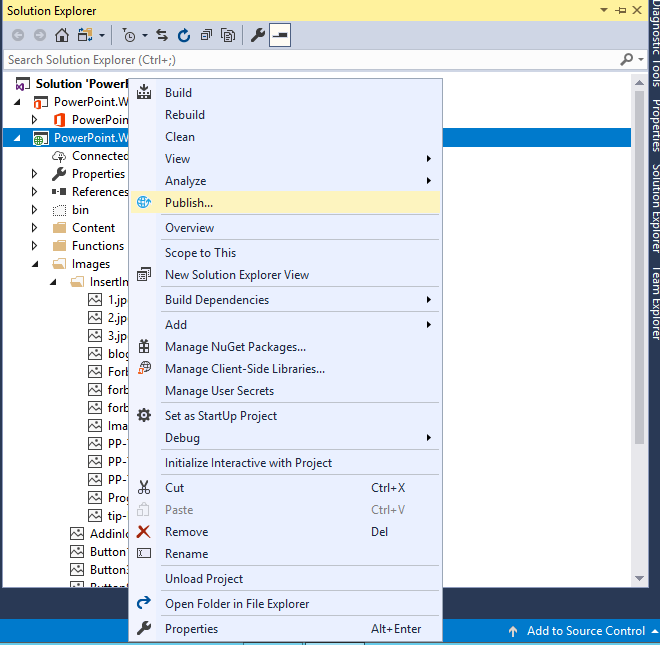
  2. Right Click on the App Project and click Publish.

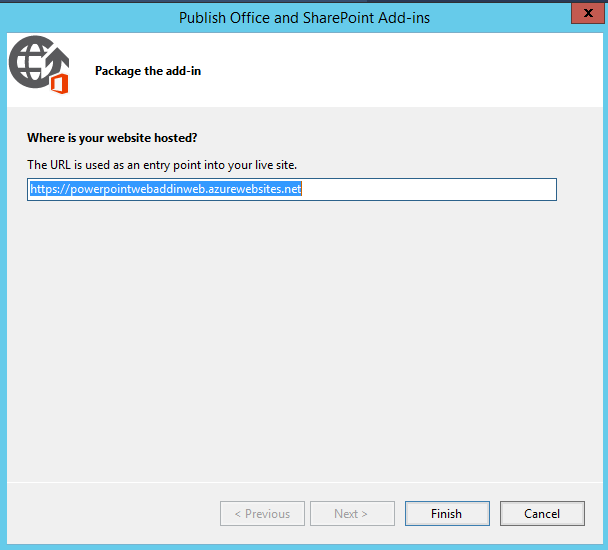
4. Once, the Publish is success, then the Manifest.XML will be generated.

5. This XML is the distributable to other users. There are many ways to do this.  Its better explained in the below article. https://docs.microsoft.com/en-us/office/dev/add-ins/publish/publish

6. I tried the SharePoint Catalog (For Windows) and the Side Loading (for Mac) for the testing.


SharePoint Catalog:

  1. Open the AppCatalog and upload the Manifest.XML to the “AddIns for Office” Section.
  2. Login to PowerPoint with the Same tenant user.
  3. Open the PowerPoint.
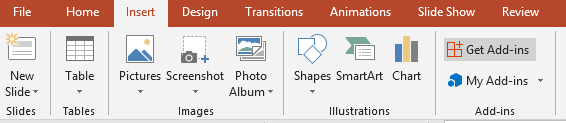
  4. Click on the Insert Tab -> Get AddIns

  1. On the Popup, go to the My Organization Tab, we should be able to see the Uploaded AddIn.
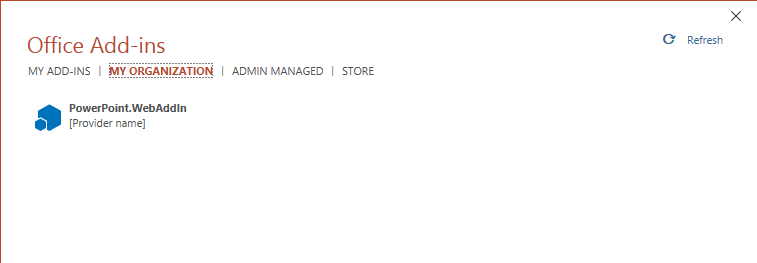
  1. Select that.
  2. It will start appearing on the Ribbon.


Side Loading for Mac:

  1. Open the path /Users/<username>/Library/Containers/com.microsoft.Powerpoint/Data/Documents/wef
  2. If we don’t see the wef folder, then create
  3. Upload the XML file in the path.
  4. Restart the PowerPoint
  5. We should be able to see the Add-In appearing on the Ribbon.

Request the readers to go through the above mentioned link for further information.


Happy Coding,

Sathish Nadarajan.


Author Info

Sathish Nadarajan
 
Solution Architect
 
Rate this article
 
Sathish is a Microsoft MVP for SharePoint (Office Servers and Services) having 15+ years of experience in Microsoft Technologies. He holds a Masters Degree in Computer Aided Design and Business ...read more
 

Step by Step Procedure to Package and deploy your SPFx solution

Manimekalai
 
Technology Specialist
August 6, 2018
 
Rate this article
 
Views
8633


In this article, let us see how to package and deploy the SPFx solution by step by step procedures.


  • Navigate to Config folder on your SPFx web part Solution
  • Click on write-manifests.json
  • Update “cdnBasePath” in write-manifests.json
  • Open Node.js in command prompt
  • Navigate to your web part folder path in the command prompt
    • Eg: C:\Users\Test
  • Use the below command to bundle your webpart files
    • gulp bundle –ship // generate assets (js, css, etc) for deployment to CDN
  • Use the below command to package the solutions
    • gulp package-solution –ship // package ready for shipment –ship is just temporary during dev preview
  • Now navigate to the local folder path

clip_image002

· Upload files in /temp/deploy to CDN location (If CDN location not specified in the web part manifest file, it will refer from app catalog site assets library by default)

clip_image004

  • Go to app catalog à Click on App for SharePoint

clip_image006

  • Upload app package at /SharePoint/solution to app catalog (Refer Screenshot)

clip_image008

· Now go to any of your SharePoint site and add the app from site content.

  • To test the App, create a blank page and add the app to the page.
Category : Office 365, SharePoint, SPFx

Author Info

Manimekalai
 
Technology Specialist
 
Rate this article
 
Having 6 years of experience in design and development of SharePoint applications, Mani has expertise in developing applications using Office 365, SharePoint 2013 & 2010, SPFX, SP Designer Workflows, Visual ...read more
 

How to Deploy Multidimensional Data Cube using Visual Studio Business Intelligence Settings

Ahamed Fazil Buhari
 
Senior Developer
November 20, 2016
 
Rate this article
 
Views
4366

In this article we are going to see, How to deploy Multidimensional Data Cube. This article is continuation of my previous articles, please refer my previous articles to get better knowledge on this. I’ve downloaded the sample Multidimensional Data from the CodePlex. (AdventureWorks Multidimensional Models SQL Server 2012).

1. Open the downloaded zip file and select the Standard folder and extract it.

clip_image002

2. Open up the standard folder and double click on AdventureWorksDW2012Multidimensional-SE, please make sure you have Visual Studio in your machine,

clip_image004

3. We need to select Business Intelligence Settings in our default environment settings.

clip_image006

4. Now we have our cube loaded, so let’s go ahead and check for the Data Source file. Here it is name as Adventure Works DW.ds and double click on that

clip_image008

5. Select the Impersonation Information tab, here we’re going to specify the account that is going to be used to pull the data from our database. I’ve using service account here,

clip_image010

6. Now we’re going to select the AdventureWorksMulidimensional-SE Project and right click on that and then select Process.

clip_image012

7. It would ask for ‘Would you like to build and deploy the project first?’ if we’re loading this cube from somewhere else

clip_image014

8. Now the Process Database window will open and click on Run button.

clip_image015

9. It would take time to run the process, our cube has been deployed once the process is completed successfully.

clip_image017

Happy Coding

Ahamed

Category : Visual Studio

Author Info

Ahamed Fazil Buhari
 
Senior Developer
 
Rate this article
 
Ahamed is a Senior Developer and he has very good experience in the field of Microsoft Technologies, especially SharePoint, Azure, M365, SPFx, .NET and client side scripting - JavaScript, TypeScript, ...read more
 

How to Deploy Provider Hosted Apps (Add-Ins) by App Stapling in SharePoint Office 365

Sathish Nadarajan
 
Solution Architect
October 12, 2016
 
Rate this article
 
Views
5910

In the earlier articles, we saw how to deploy APPs programmatically. In this Article, as a continuation, let us see how to make an APP available for all the Existing Sites in the SharePoint Tenant and even the new sites which will be created in future will also have this APP. This concept is known as APP Stapling. Even this also have its own limitations.

The major limitation is, the APP Installed and Un Installed Events will not be triggered. As an output, this cannot be directly used for remote event receivers. We can use this for remote event receivers with some sort of work around. But they are logical implementation. Now, in this article, let us focus on the Technical implementation alone.

Now, I am focusing on how to implement App Stapling alone. The Pros and Cons of APP Stapling can be read from many sources.

In simple words, instead of deploying the APP in any Site Collection, we are going to deploy the APP on the APP Catalog Site itself. In Office 365, APP Catalog is a special site collection, on which the APPS will be uploaded and will be available to deploy on all the site collections within the tenant.

With this brief introduction, let us see how to do this.

1. Prepare the APP Package.

2. Login to the APP Catalog Site Collection.

3. In my case, it is https://******.sharepoint.com/sites/AppCatalog

4. Click on “APPs for SharePoint”

clip_image002

5. Upload the APP.

clip_image004

6. Go to Site Contents.

7. Click on Add an APP

clip_image006

8. The Uploaded APP will be listed on the page.

clip_image008

9. Add the APP.

10. Trust it.

clip_image010

11. Now, the APP got Installed.

clip_image011

12. Click on the Eclipse.

13. Select the Deployment.

clip_image013

14. We will be seeing the Manage APP Deployments Screen.

clip_image015

15. clip_image017

16. On which Select the Criteria. In my case, I wanted to deploy this APP on All the Community Sites. Hence, I chose the Community Sites on the Site Templates and Click OK.

17. clip_image019

18. Prompted with Trust again. Click Trust.

clip_image021

19. Now, let me go back to my Community Site. The app will be listed on the Site Contents.

20. clip_image023

21. This will be deployed, even if we create a new Community Site also.

Hope this is useful for the developers who are dealing with a huge number of sites in their tenant.

Happy Coding,

Sathish Nadarajan.

Author Info

Sathish Nadarajan
 
Solution Architect
 
Rate this article
 
Sathish is a Microsoft MVP for SharePoint (Office Servers and Services) having 15+ years of experience in Microsoft Technologies. He holds a Masters Degree in Computer Aided Design and Business ...read more
 

How to Deploy Provider Hosted Apps (Add-Ins) programmatically using CSOM in SharePoint Office 365 by Activating Developer Site Feature

Sathish Nadarajan
 
Solution Architect
October 11, 2016
 
Rate this article
 
Views
7306

ArticleEarlierIn the earlier Article, we saw how to install an APP by activating the Side Loading Feature. In the same manner, let us see how to deploy the app by activating the Developer Site Feature.

Usually, this method will not be accepted by most of the Clients, because activating the developer feature will not be suitable on the Production environment as most of the production environments will be of team, publishing, Community Sites.

But even, let us know, how the thing can be achieved. The code is very straight forward.

 namespace Console.Office365
 {
     using Microsoft.SharePoint.Client;
     using Newtonsoft.Json.Linq;
     using System;
     using System.Collections.Generic;
     using System.IO;
     using System.Linq;
 
     class Program
     {
         static void Main(string[] args)
         {
             DeployAPPDeveloperFeature();
         }
 
         public static void DeployAPPDeveloperFeature()
         {
             OfficeDevPnP.Core.AuthenticationManager authMgr = new OfficeDevPnP.Core.AuthenticationManager();
 
             string userName = "*******@*****.onmicrosoft.com";
             string password = "********";
             string siteUrl = "https://*******.sharepoint.com/sites/CommunitySite/";
 
             using (var clientContext = authMgr.GetSharePointOnlineAuthenticatedContextTenant(siteUrl, userName, password))
             {
                 Web web = clientContext.Web;
                 clientContext.Load(web);
                 clientContext.ExecuteQueryRetry();
 
                 var appInstance = Deploy(clientContext, "D:\PRACTICE SOURCE CODE\PNP\Office365.PHA.OnPrem.APP\Office365.PHA.OnPrem.APP\bin\Debug\app.publish\1.0.0.0\Office365.PHA.OnPrem.APP.app");
                 if (appInstance != null && appInstance.Status == AppInstanceStatus.Initialized)
                 {
                     System.Console.WriteLine("App was installed.");
                 }
             }
         }
 
         public static AppInstance Deploy(ClientContext context, string appFullPath)
         {
             EnsureDeveloperFeature(context);
             using (var packageStream = System.IO.File.OpenRead(appFullPath))
             {
                 var appInstance = context.Web.LoadAndInstallApp(packageStream);
                 context.Load(appInstance);
                 context.ExecuteQuery();
                 return appInstance;
             }
         }
 
 
         /// <summary>
         /// Ensure Developer Feature 
         /// </summary>
         /// <param name="ctx"></param>
         private static void EnsureDeveloperFeature(ClientContext ctx)
         {
             var result = ctx.LoadQuery(ctx.Site.Features.Where(f => f.DefinitionId == DeveloperFeatureId));
             ctx.ExecuteQuery();
             if (result.Any()) return;
             var feature = ctx.Site.Features.Add(DeveloperFeatureId, true, FeatureDefinitionScope.None);
             ctx.ExecuteQuery();
         }
 
 
         private static readonly Guid DeveloperFeatureId = new Guid("e374875e-06b6-11e0-b0fa-57f5dfd72085");
 
 
     }
 
 }


In this approach also, we will be facing the TRUST issue similar to the earlier post. But, even then, there is another alternative approach is there. “APP Stapling”. Let us see what is APP Stapling in the upcoming article.

Happy Coding,

Sathish Nadarajan.

Author Info

Sathish Nadarajan
 
Solution Architect
 
Rate this article
 
Sathish is a Microsoft MVP for SharePoint (Office Servers and Services) having 15+ years of experience in Microsoft Technologies. He holds a Masters Degree in Computer Aided Design and Business ...read more
 

How to Deploy Provider Hosted Apps (Add-Ins) programmatically using CSOM in SharePoint Office 365 by Activating Side Loading Feature

Sathish Nadarajan
 
Solution Architect
October 10, 2016
 
Rate this article
 
Views
6967

In the recent days, nobody wants to do any manual changes on the site. Almost every customer wants the deployment to be automated, so that it will be easy for them to maintain in future. Considering this, even the APP Development and deployment needs to be automated. There are several ways the APP can be deployed programmatically. Let us have a look of them one by one.

First, as the topic says, let us see how to Deploy APP by Activating the Side Loading Feature.

Before moving on to the Code, let us see what Side Loading is. As per MSDN, the explanation for side loading is as follows.

App side loading, from a SharePoint context, is the ability to install a SharePoint app directly into a site to explicitly bypass the regular governance controls of SharePoint.

i.e., in a Non Developer Site, if we try to deploy the APP programmatically, it will throw an exception. For that, either we need to activate the Developer Feature or loosen the security. Loosen the Security is nothing but, Activating the Side Loading Feature. This, we need to do for fraction of Seconds. i.e., I am activating the Side Loading Feature, Install the APP and immediately de-activate the Side Loading Feature.

Now, let us focus on code. The code is straight forward.

 namespace Console.Office365
 {
     using Microsoft.SharePoint.Client;
     using Newtonsoft.Json.Linq;
     using System;
     using System.Collections.Generic;
     using System.IO;
 
     class Program
     {
         static void Main(string[] args)
         {
             DeployAPPSideLoading();
         }
 
         public static void DeployAPPSideLoading()
         {
             OfficeDevPnP.Core.AuthenticationManager authMgr = new OfficeDevPnP.Core.AuthenticationManager();
 
             string userName = "*********@*****.onmicrosoft.com";
             string password = "*******";
             string siteUrl = "https://*******.sharepoint.com/sites/CommunitySite/";
 
             using (var clientContext = authMgr.GetSharePointOnlineAuthenticatedContextTenant(siteUrl, userName, password))
             {
                 Web web = clientContext.Web;
                 Site site = clientContext.Site;
                 clientContext.Load(web);
                 clientContext.Load(site);
                 clientContext.ExecuteQueryRetry();
 
                 site.ActivateFeature(new Guid("AE3A1339-61F5-4f8f-81A7-ABD2DA956A7D"));
 
                 string[] appFiles = Directory.GetFiles("D:\PRACTICE SOURCE CODE\PNP\Office365.PHA.OnPrem.APP\Office365.PHA.OnPrem.APP\bin\Debug\app.publish\1.0.0.0", "*.app"); ;
 
                 foreach (var appFile in appFiles)
                 {
                     var appstream = System.IO.File.OpenRead(appFile);
                     AppInstance app = web.LoadAndInstallApp(appstream);
                     clientContext.Load(app);
                     clientContext.ExecuteQueryRetry();
                 }
 
                 site.DeactivateFeature(new Guid("AE3A1339-61F5-4f8f-81A7-ABD2DA956A7D"));
             }
         }
 
     }
 
 }
 

The very big draw-back in this approach is, as we are bye-passing the regular TRUST approach, the APP will not have permission to make any calls with SharePoint unless, we specifically Trust the APP.

Let me explain in detail. I have added my APP to the Site. In the View Lists, it will be shown as below.

clip_image002

On Click of the APP, I am expecting the Web Title to be displayed on the PHA.

But, while clicking the APP, I will get Access Denied Exception.

clip_image004

To overcome this, we need to manually trust the APP.

1. Go back to View Lists.

2. Click on Permissions.

clip_image006

3. Click on Trust HERE Hyperlink.

clip_image008

4. Now, launch the APP again.

5. We will get the Community Site as Web Title.

clip_image010

This will be very much useful, when we do the Deployments for many sites at a time. Let us see the remaining approaches on the upcoming articles.

Happy Coding,

Sathish Nadarajan.

Author Info

Sathish Nadarajan
 
Solution Architect
 
Rate this article
 
Sathish is a Microsoft MVP for SharePoint (Office Servers and Services) having 15+ years of experience in Microsoft Technologies. He holds a Masters Degree in Computer Aided Design and Business ...read more
 

How to Deploy the SandBox Solutions in SharePoint 2013 Using PowerShell

Sathish Nadarajan
 
Solution Architect
December 6, 2015
 
Rate this article
 
Views
9591

In the earlier article, we saw how to deploy the Farm Solution. In the same manner, there are certain changes required for the SandBox Solution. Let us have a look at them as well.

 ##================================================================================================
 ## Description	: To do the below two items.
     #1. Deploy the SandBox Solutions
 ## Author		: Sathish Nadarajan
 ## Date			: 20-Nov-2015
 ##================================================================================================
 
 ##============================================ Setup Input Paths ===========================================================
 
 cls
  
 $Host.UI.RawUI.WindowTitle = "-- Deploy the SandBox Solutions into Site Collection --"
 
 $StartDate = Get-Date
 Write-Host -ForegroundColor White "------------------------------------"
 Write-Host -ForegroundColor White "| Deploy the SandBox Solutions into Site Collection |"
 Write-Host -ForegroundColor White "| Started on: $StartDate |"
 Write-Host -ForegroundColor White "------------------------------------"
 
 $LogTime = Get-Date -Format yyyy-MM-dd_hh-mm
 $LogFile = ".DeploySandBoxSolution-$LogTime.rtf"
 
 #start-transcript $logfile
 
 $scriptBase = split-path $SCRIPT:MyInvocation.MyCommand.Path -parent
 Set-Location $scriptBase
 
 $ErrorActionPreference = "Stop"
 
 function AddPowerShellSnapin()
 {
     try
     {
         Write-Host "Adding PowerShell Snap-in" -ForegroundColor Green
         # Try to get the PowerShell Snappin.  If not, then adding the PowerShell snappin on the Catch Block
         Get-PSSnapin "Microsoft.SharePoint.PowerShell" 
     }
     catch
     {
         if($Error[0].Exception.Message.Contains("No Windows PowerShell snap-ins matching the pattern 'Microsoft.SharePoint.PowerShell' were found"))
         {
             Add-PSSnapin "Microsoft.SharePoint.PowerShell"
         }
     }
     Write-Host "Finished Adding PowerShell Snap-in" -ForegroundColor Green
 }


  function WaitForTimerJobToFinish([string] $solutionName){
 	$jobname = "*solution-deployment*$solutionName*"
 	$job = Get-SpTimerJob | ?{ $_.Name -like $jobname }
 	if($job -eq $null){
 		write-host "timer job not found"
 	}
 	else {
 		$jobfullname = $job.Name
 		write-host -NoNewLine "waiting to finish job $jobfullname.."
 		while((Get-SPTimerJob $jobfullname) -ne $null){
 			write-host -NoNewLine .
 			Start-Sleep -Seconds 2
 		}
 		write-host "=|="
 	}
 }
 
 function Add-SandboxSolution([System.Xml.XmlElement]$solutionXml,[string]$solutionsFolder , [bool]$includeFeatures , [string]$siteurl) {
 Write-Host "deploying a sandbox solution $($solutionXml.Name) to $($siteurl)"
 	if($solutionsFolder -eq $null){
 		Write-Host "No solutions folder defined"
 		return
 	}
 	$path = $global:currPath + $solutionsFolder + "" + $solutionXml.Name + ".wsp"
 	$url = $solutionXml.Target
 	if($url -eq "this"){
 		$url = $global:thisUrl
 	}
 	if($url -eq "root"){
 		$url = $global:thisIISUrl
 		$includeFeatures = $true
 	}	
 	if($url -eq "site"){
 		$url = $siteurl
 	}	
 	
 	if($solutionXml.Sandbox -eq "True"){
 		Write-Host "deploying to target $($url)"
 	if($solutionXml.Name.length -gt 0){
 		$solutionFileName = $solutionXml.Name + ".wsp"
 		$solutionFileOldName = $solutionXml.OldName + ".wsp"
 		$solution = Get-SPUserSolution -Identity $solutionFileName -Site $url   -ErrorAction SilentlyContinue	
 		if($solutionXml.OldName -ne $null){
 			$oldsolution = Get-SPUserSolution -Identity $solutionFileOldName -Site $url   -ErrorAction SilentlyContinue	
 			write-host "Found solution $($oldsolution.Name) Guid = $($oldsolution.SolutionId) status = $($oldsolution.Status)"
 		}
 		if($solution -ne $null){
 			write-host "Found solution $($solution.Name) Guid = $($solution.SolutionId)  status = $($solution.Status)"	
 			if(($solutionXml.RemoveIfExists -eq "True") -or ($solutionXml.Upgrade -eq "False") ){	
 				Write-Host "removing sandbox solution "
 				Remove-SPUserSolution -Identity $solutionFileName -Site $url
 			}
 		}
 		Write-Host "adding sandbox solution from $($path)"
 		Add-SPUserSolution -LiteralPath $path -Site $url
 		
 		$solution = Get-SPUserSolution -Identity $solutionFileName -Site $url  
 		write-host "Successfully added solution $($solution.Name) Guid = $($solution.SolutionId)"
 	
 		if($solution -ne $null){
 			if($solutionXml.Target -ne $null){
 				if($solutionXml.Upgrade -eq "True"){		
 					if($oldsolution -ne $null){
 						write-host "Upgrading from solution $($solution.OldName) to $($solution.Name)"
 						Update-SPUserSolution -Identity $solutionFileOldName -ToSolution $solutionFileName -Site $url 
 					}
 					else{
 						write-host "COuld not open previous solution $($solution.OldName) "
 					}
 				}
 				else{
 					Write-Host "installing sandbox solution to $($url)"
 					Install-SPUserSolution -Identity $solution.Name -Site $url
 					WaitForTimerJobToFinish $solution.Name
 					if($includeFeatures -eq $true -and $url -ne $null){
 						$solutionXml.Features.Feature | ForEach-Object {
 							write-host "activating sandbox feature $($_.Name) in $($url)"
 							$x = Enable-SPFeature -Identity $_.Name -url $url -Force
 						}
 					}
 				}
 			}
 			else{
 					Write-Host "solution target not specified"
 			}
 		}
 	}
 	else{
 		if($includeFeatures -eq $true -and $url -ne $null){
 			$solutionXml.Features.Feature | ForEach-Object {
 				Add-Feature $_  $url
 			}
 		}
 	}
 	write-host "Finished deploying solution"
 	}
 	else{
 	write-host "Not a sandbox solution"
 	}
 }
 
 
 try
 {
     [void][System.Reflection.Assembly]::LoadWithPartialName("Microsoft.Sharepoint")
     [void][System.Reflection.Assembly]::LoadWithPartialName("Microsoft.Sharepoint.Administration")
 
     $ConfigXmlPath = $scriptBase + "..ConfigXMLDeployConfiguration.xml"
     Write-Host "Read the Config Values" -ForegroundColor Green 
     [Xml]$Config = Get-Content $ConfigXmlPath  
     
     AddPowerShellSnapin
 
     $solutionPath = $scriptBase + "..SandBoxSolutions"
 
     $Config.Configuration.Solutions.Solution | Where-Object {$_.Sandbox -eq "True" } | ForEach-Object{
 	Add-SandboxSolution $_ $solutionPath $false $Config.Configuration.PublishingSite.URL
 
  }
 
 }
 catch
 {
     Write-Host "Custom Exception Happened on Main : " + $Error[0].Exception.Message -ForegroundColor Red  
 }
 

And the config file as below.

 <Configuration EnvironmentName="Dev5">
   <PublishingSite URL="http://spdev5.dev.cbre.eu/sites/CTSSchema" />
   <Solutions>
       <Solution Name="MYWSPName" Target="site" Sandbox="True"  RemoveIfExists="True" Upgrade="False" OldName=" MYWSPName "/>
     </Solutions>
   
    
 </Configuration>


Happy Coding,

Sathish Nadarajan.

Author Info

Sathish Nadarajan
 
Solution Architect
 
Rate this article
 
Sathish is a Microsoft MVP for SharePoint (Office Servers and Services) having 15+ years of experience in Microsoft Technologies. He holds a Masters Degree in Computer Aided Design and Business ...read more
 

How to Backup and Deploy the Farm Solutions in SharePoint 2013 Using PowerShell

Sathish Nadarajan
 
Solution Architect
December 1, 2015
 
Rate this article
 
Views
9631

In one of the Previous article, already we saw this snippet. But, I thought of refining it, much more a better version, so that it can be used on any project without any major modification. Conceptually, they are one and the same. The only thing, which I am adding here is,

1. Backup the WSPs before doing the deployment. If the WSP is going to be deployed for the first time, it will not stop our execution.

2. Write-the progress along with the seconds during the deployment and retraction.

3. Get the Environmental variables as an argument during the deployment.

4. Creating twoFolders WSPs and WSPBackups, so that more than one WSP can be deployed in a shot.

5. After deploying, clear the blob cache. That’s it.

The script looks like below.

 Add-PSSnapin "Microsoft.SharePoint.PowerShell"
 #Read arguement and store environment URL
 if($args[0] -eq 'DEV') {
 $WebApplicationUrl="https://DEVWebApplication/"
 }
 elseif ($args[0] -eq ‘UAT') {
 $WebApplicationUrl="https://UAT"
 }
 elseif ($args[0] -eq 'QA') {
 $WebApplicationUrl="https://QA/"
 }
  elseif ($args[0] -eq PROD) {
 $WebApplicationUrl="https://PROD/"
 }
 
 else {
 Write-Host -f Yellow "Environment not specified - please pass appropriate environment to deploy"
 exit
 }
 clear-host
  
 sleep 10
 
 $ErrorActionPreference = "Stop"
 $path = get-location
 $farm = Get-SPFarm
 
 #Define Path to New WSPs
 $wspfolderpath = "$pathWSPs"
 $WSPs = @()
 
 # Define Names of WSPs in Package
 foreach($filename in Get-ChildItem $wspFolderPath)
 {$script:WSPs += $filename}
 
 #Backup WSPs
 
 foreach ($WSPtoBackup in $WSPs) {
     try{
     $file = $farm.Solutions.Item("$WSPtoBackup").SolutionFile
     $file.SaveAs("$pathWSPBackups$WSPtoBackup")
     write-host "$WSPtoBackup has been backed up."
     }
     catch{
     write-host -f Red "The solution:"
     write-host "$WSPtoBackup"
     write-host -f Red "Cannot not be backed up. It is not installed or found in the farm."
     }
 }
 function wait4timer($solutionName) 
 {    
     $solution = Get-SPSolution | where-object {$_.Name -eq $solutionName}    
     if ($solution -ne $null)     
     {        
         $solutionseconds = 0
         #Write-Host "Waiting to finish soultion timer job" -ForegroundColor Green      
         while ($solution.JobExists -eq $true )          
         {               
             write-progress -activity "Waiting to finish timer job" -status "$solutionseconds Seconds Elapsed"          
             sleep 1
             $solutionseconds++            
         }                
         Write-Host "Finished the timer job in $solutionseconds seconds" -ForegroundColor Green  
             }
 } 
 
 function DeployWSP 
 {      
     try
     {
         Write-Host "WebApplication  URL : $WebApplicationUrl" -ForegroundColor Green 
 
         # Get the Solution Node
         foreach($Solution in $WSPs)     
         {
             $wspName = $Solution.Name
             Write-Host "Solution Name : $wspName" -ForegroundColor Green 
 
             # Get the Path of the Solution
             $wspfullpath = "$wspFolderPath$solution"
 
             Write-Host "Getting the Installed Solutions" -ForegroundColor Green 
             # Try to get the Installed Solutions on the Farm.
             $InstalledSolution = Get-SPSolution | Where-Object Name -eq $wspName
         
             # Verify whether the Solution is installed on the Target Web Application
             if($InstalledSolution -ne $null)
             {
                 if($InstalledSolution.Deployed)
                 {
                     Write-Host "Uninstall the Solution from All WebApplications" -ForegroundColor Green 
 
                     wait4timer($wspName)  
 
                     # Solution is installed in atleast one WebApplication


                     try{
                         Uninstall-SPSolution $wspName -AllWebApplications -confirm:$false
                     }
                     catch{
                         $ErrorMessage = $_.Exception.Message
                         if ($ErrorMessage.StartsWith("This solution contains no resources scoped for a Web application"))
                         {
                             Uninstall-SPSolution $wspName  -confirm:$false
                         }
                         else 
                         {
                             write-host "Failed to uninstall $wspname"
                             write-host $ErrorMessage
                         }
                     }


                     # Wait till the Timer jobs to Complete
                     wait4timer($wspName)   
 
                     Write-Host "Remove the Solution from the Farm" -ForegroundColor Green 
                     # Remove the Solution from the Farm
                    
                     Remove-SPSolution $wspName -Confirm:$false 
 
                     sleep 3
                 }
                 else
                 {
                     Write-Host "Remove the Solution from the Farm" -ForegroundColor Green 
 
                     wait4timer($wspName) 
 
                     # Solution not deployed on any of the Web Application.  Go ahead and Remove the Solution from the Farm
           
                     Remove-SPSolution $wspName -Confirm:$false 
 
                     sleep 3
                 }
             }
 
             wait4timer($wspName) 
 
             Write-Host "Add the Solution from the Farm" -ForegroundColor Green 
             # Add Solution to the Farm
          
             Add-SPSolution -LiteralPath "$wspFullPath"
             
             Write-Host "Deploy the Solution" -ForegroundColor Green 
             # Install Solution to the WebApplication
             try{
                 foreach($destwa in $WebApplicationUrl) 
                 {
                     install-spsolution -Identity $wspName -GACDeployment:$true -Force:$true -webapplication:$destwa
                     wait4timer($wspName)
                 }
             }
             catch{
                 $ErrorMessage = $_.Exception.Message
                 if ($ErrorMessage.StartsWith("This solution contains no resources scoped for a Web application"))
                 {
                   install-spsolution -Identity $wspName -GACDeployment:$true -Force:$true
                 }
                 else 
                 {
                   write-host "Failed to deploy $wspname"
                   write-host $ErrorMessage
                 }
             }
             
         
             # Let the Timer Jobs get finishes       
             wait4timer($wspName)    
 
             Write-Host "Successfully Deployed to the WebApplication" -ForegroundColor Green 
             #iisreset
         
         }
          
     }
     catch
     {
         Write-Host "Exception Occuerd on DeployWSP : " $Error[0].Exception.Message -ForegroundColor Red  
     }
 }
 
 
 try
 {
     DeployWSP
     iisreset
     foreach($WebApp in Get-spwebapplication)
     { 
     [Microsoft.SharePoint.Publishing.PublishingCache]::FlushBlobCache($webApp)
     Write-Host "Flushed the BLOB cache for:" $webApp
     }
     Write-Host "Script Execution Completed Successfully" -ForegroundColor Green 
 }
 catch
 {
     Write-Host "Custom Exception Happened on Main : " + $Error[0].Exception.Message -ForegroundColor Red  
 }


Happy Coding,

Sathish Nadarajan.

Author Info

Sathish Nadarajan
 
Solution Architect
 
Rate this article
 
Sathish is a Microsoft MVP for SharePoint (Office Servers and Services) having 15+ years of experience in Microsoft Technologies. He holds a Masters Degree in Computer Aided Design and Business ...read more
 

Deploy WebParts, User Controls WSP in SharePoint 2013

Sathish Nadarajan
 
Solution Architect
March 20, 2015
 
Rate this article
 
Views
8929

In the previous articles, Deploy PowerShell Script and Add Config Entries, we saw how to deploy the WSPs in a Web Application Level, Global Level etc.,

In the second one which we discussed, the WSP can be deployed only to the Web Application. The reason behind this is, very simple. But wanted to share with the community.

Basically, the WebParts needs to put an entry on the Web.Config files as safe control. If we try to deploy this WSP globally, then all the web applications on the farm will be modified with the safe control tag on their corresponding web.config files. To avoid this, by default, Microsoft restricts us to deploy the webparts WSPs globally.

The reason for pointing this is, we should not spend much time to digging this in future.

Happy Coding.

Sathish Nadarajan.

Category : SharePoint

Author Info

Sathish Nadarajan
 
Solution Architect
 
Rate this article
 
Sathish is a Microsoft MVP for SharePoint (Office Servers and Services) having 15+ years of experience in Microsoft Technologies. He holds a Masters Degree in Computer Aided Design and Business ...read more
 

Leave a comment