How to Disable/Enable User Alerts in SharePoint Office 365 using CSOM PowerShell

Sathish Nadarajan
 
Solution Architect
February 13, 2018
 
Rate this article
 
Views
6153

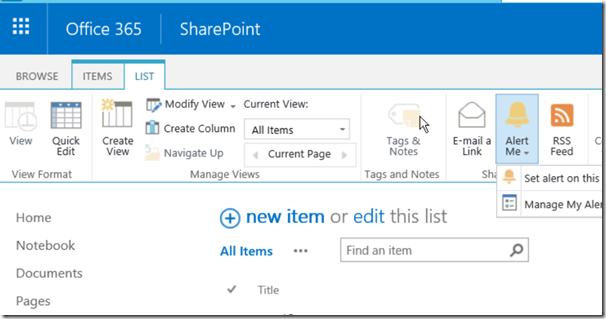
Any list will be having a “alert me” functionality and the user they themselves can create alerts like, whenever a new document is created/updated an email/sms will be triggered for those users.


image


During the Migration, if these alerts were enabled, then while doing a bulk upload, the end users will be getting a huge number of mails. Hence, we need to disable the alerts, not deleting the alerts. For that, there is no direct option on the screen, but Powershell does that.

 cls
 
 Import-Module   'C:SATHISHPRACTICE SOURCE CODESOffice365.ConsolepackagesMicrosoft.SharePointOnline.CSOM.16.1.6420.1200libnet45Microsoft.SharePoint.Client.dll'
 Import-Module   'C:SATHISHPRACTICE SOURCE CODESOffice365.ConsolepackagesMicrosoft.SharePointOnline.CSOM.16.1.6420.1200libnet45Microsoft.SharePoint.Client.Runtime.dll'
 
 
 #Mysite URL
 $site = 'https://**********.sharepoint.com/sites/TeamSite/'
 
 #Admin User Principal Name
 $admin = 'sathish@********.OnMicrosoft.Com'
 
 #Get Password as secure String
 $password = Read-Host 'Enter Password' -AsSecureString
 
 #Get the Client Context and Bind the Site Collection
 $context = New-Object Microsoft.SharePoint.Client.ClientContext($site)
 
 #Authenticate
 $credentials = New-Object Microsoft.SharePoint.Client.SharePointOnlineCredentials($admin , $password)
 $context.Credentials = $credentials
 
 
 $context.Load($context.Web)
 $context.Load($context.Web.Alerts)
 
 $context.ExecuteQuery()
 
 foreach($alert in $context.Web.Alerts)
 {
     if($alert.Status -eq 'On')
     {
 #The below will enable the Alert
 # $alert.Status = 'On' 
 
 #The below will disable the Alert
         $alert.Status = 'Off'
         $alert.UpdateAlert()
         $context.Load($alert)
         $context.ExecuteQuery()
     }
     Write-Host $alert.Title + "-" + $alert.Status
 }
 
 Write-Host $context.Web.Alerts.Count 
 

Happy Coding,

Sathish Nadarajan.
Author Info

Sathish Nadarajan
 
Solution Architect
 
Rate this article
 
Sathish is a Microsoft MVP for SharePoint (Office Servers and Services) having 15+ years of experience in Microsoft Technologies. He holds a Masters Degree in Computer Aided Design and Business ...read more
 

How to Enable Multi Language Settings in a SharePoint Office 365 Site Programmatically Using C# Client Site Object Model (CSOM)

Sathish Nadarajan
 
Solution Architect
July 7, 2017
 
Rate this article
 
Views
4293

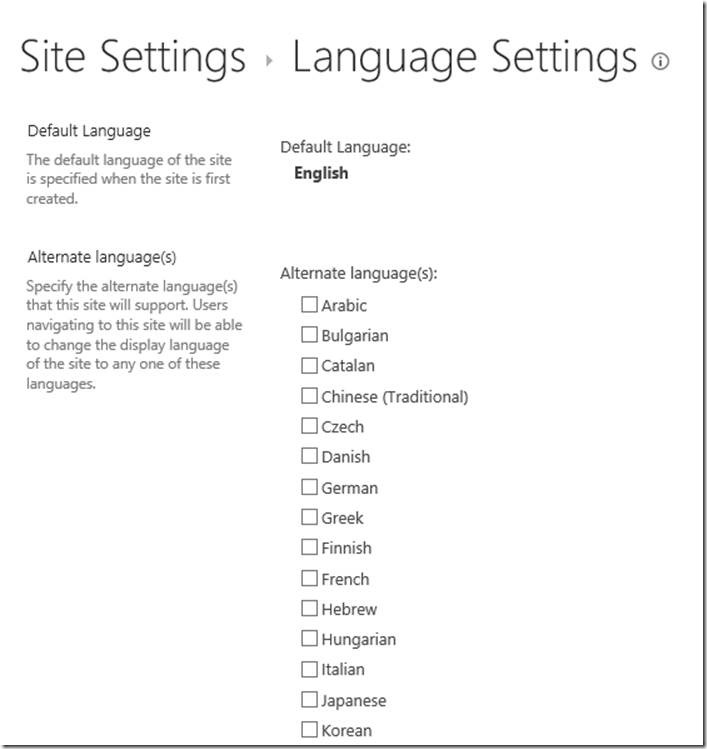
As I said earlier articles, during the deployment we need to do a series of actions. As part of that, let us see, how to enable the multi-language settings and select the languages.

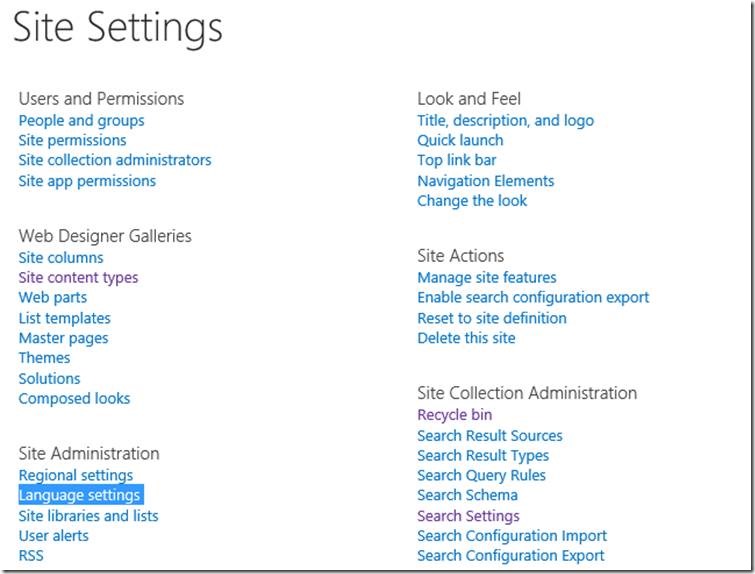
The settings in the screen is available on the Site Settings.

clip_image002

clip_image004

Now, let us see the code, which will enable and select few languages as alternate languages.

 using Microsoft.SharePoint.Client;
 
 namespace Office365.Console
 {
     class Program
     {
         static void Main(string[] args)
         {
             ConfigureSearchCentreURL();
         }
 
         public static void ConfigureSearchCentreURL()
         {
             OfficeDevPnP.Core.AuthenticationManager authMgr = new OfficeDevPnP.Core.AuthenticationManager();
 
             string sourceSiteUrl = "https://******.sharepoint.com/sites/communitysite";
             
             string userName = "Sathish@******.onmicrosoft.com";
             string password = "******";
 
             var clientContext = authMgr.GetSharePointOnlineAuthenticatedContextTenant(sourceSiteUrl, userName, password);
 
             Web web = clientContext.Web;
             clientContext.Load(web);
 
             web.IsMultilingual = true;
             web.AddSupportedUILanguage(1033); // English
             web.AddSupportedUILanguage(1031); // German
             web.AddSupportedUILanguage(1036); // French
             web.AddSupportedUILanguage(1046); // Portugese (Brazil)
             web.AddSupportedUILanguage(1049); // Russian
             web.AddSupportedUILanguage(2052); // Chinese (Simplified)
             web.AddSupportedUILanguage(3082); // Spanish
 
             web.Update();
 
             clientContext.ExecuteQuery();
         }
 
     }
 }
 

Happy Coding,

Sathish Nadarajan.

Author Info

Sathish Nadarajan
 
Solution Architect
 
Rate this article
 
Sathish is a Microsoft MVP for SharePoint (Office Servers and Services) having 15+ years of experience in Microsoft Technologies. He holds a Masters Degree in Computer Aided Design and Business ...read more
 

How to Enable Enterprise Metadata and Keywords Settings in SharePoint Office 365 Lists Programmatically using CSOM C#

Sathish Nadarajan
 
Solution Architect
January 5, 2017
 
Rate this article
 
Views
5787

In this article, let us see how to enable Enterprise Metadata and Keywords Settings in SharePoint Office 365 Lists Programmatically using CSOM C#

To do that Manually, we need to go to the List settings, click on the below highlighted link as shown in the figure.


image


Select the Check Box.


image


The New column called “Enterprise Keywords” will be added to the list.

To do this through program, we need to do the reverse way. If we Add the column “Enterprise Keywords”, then the “Enterprise Keywords” settings will be enabled automatically.

Hence, the code to add the field to the list is as follows.

 namespace Sathish.Demo
 {
     using Microsoft.SharePoint.Client;
     using System;
 
     class Program
     {
         static void Main(string[] args)
         {
             EnableEnterpriseKeywords();
         }
 
         public static void EnableEnterpriseKeywords()
         {
             OfficeDevPnP.Core.AuthenticationManager authMgr = new OfficeDevPnP.Core.AuthenticationManager();
             
             string siteUrl = "https://*******.sharepoint.com/sites/CommunitySite";
             string userName = "Sathish@******";
             string password = "******************";
 
             using (var clientContext = authMgr.GetSharePointOnlineAuthenticatedContextTenant(siteUrl, userName, password))
             {
                 try
                 {
                     Web web = clientContext.Web;
                     
                     clientContext.Load(web);
                     clientContext.Load(web.Lists);
                     clientContext.ExecuteQuery();
 
                     List list = web.Lists.GetByTitle("Documents");
 
                     if (!list.FieldExistsByName("Enterprise Keywords"))
                     {
                         var field = clientContext.Site.RootWeb.Fields.GetByInternalNameOrTitle("Enterprise Keywords");
                         list.Fields.Add(field);
                         clientContext.Load(list);
                     }


                     clientContext.ExecuteQuery();
 
                 }
                 catch (Exception ex)
                 {
                     System.Console.ForegroundColor = ConsoleColor.Red;
                     System.Console.WriteLine("Exception Occured : " + ex.Message);
                     System.IO.File.AppendAllText("C:\Temp\Exception.txt", ex.Message + " - " + siteUrl + Environment.NewLine);
                 }
             }
 
             System.Console.WriteLine("Completed....");
             System.Console.WriteLine("Press Any Key to Exit ....");
             System.Console.ReadLine();
         }
     }
 }
 

The output will be like this.


image


Happy Coding,

Sathish Nadarajan.
Author Info

Sathish Nadarajan
 
Solution Architect
 
Rate this article
 
Sathish is a Microsoft MVP for SharePoint (Office Servers and Services) having 15+ years of experience in Microsoft Technologies. He holds a Masters Degree in Computer Aided Design and Business ...read more
 

How to Enable Major, Minor Versioning in SharePoint Office 365 Lists programmatically using CSOM C#

Sathish Nadarajan
 
Solution Architect
January 4, 2017
 
Rate this article
 
Views
3916

In the earlier article, We saw how to enable Moderation. In the same manner, we need to enable the major and minor versioning in SharePoint Office 365 Lists Programmatically using CSOM C#.

The code is straight forward.

 namespace Sathish.Demo
 {
     using Microsoft.SharePoint.Client;
     using System;
 
     class Program
     {
         static void Main(string[] args)
         {
             EnableModeration();
         }
 
         public static void EnableModeration()
         {
             OfficeDevPnP.Core.AuthenticationManager authMgr = new OfficeDevPnP.Core.AuthenticationManager();
             
             string siteUrl = "xxx";
             string userName = "xxx";
             string password = "xxx";
 
             using (var clientContext = authMgr.GetSharePointOnlineAuthenticatedContextTenant(siteUrl, userName, password))
             {
                 try
                 {
                     Web web = clientContext.Web;
                     
                     clientContext.Load(web);
                     clientContext.Load(web.Lists);
                     clientContext.ExecuteQuery();
 
                     List list = web.Lists.GetByTitle("D10");
 
                     list.UpdateListVersioning(true, false, true);                    list.Update();
 
                     clientContext.ExecuteQuery();
 
                 }
                 catch (Exception ex)
                 {
                     System.Console.ForegroundColor = ConsoleColor.Red;
                     System.Console.WriteLine("Exception Occured : " + ex.Message);
                     System.IO.File.AppendAllText("C:\Temp\Exception.txt", ex.Message + " - " + siteUrl + Environment.NewLine);
                 }
             }
 
             System.Console.WriteLine("Completed....");
             System.Console.WriteLine("Press Any Key to Exit ....");
             System.Console.ReadLine();
         }
     }
 }


The parameters for the UpdateList Versioning is also very straight forward.

Happy Coding,

Sathish Nadarajan.
Author Info

Sathish Nadarajan
 
Solution Architect
 
Rate this article
 
Sathish is a Microsoft MVP for SharePoint (Office Servers and Services) having 15+ years of experience in Microsoft Technologies. He holds a Masters Degree in Computer Aided Design and Business ...read more
 

How to Enable / Disable Moderation in SharePoint Office 365 Lists Programmatically using Client Side Object Model (CSOM) C#

Sathish Nadarajan
 
Solution Architect
 
Rate this article
 
Views
5679

In this article, let us see how to Enable / Disable Content Approval (Moderation) in SharePoint Lists using CSOM.

Recently I met with a requirement that, whenever a List is being created, a Remote Event Receiver will get triggered. Based on the List Template, we need to do some basic works on the remove event receiver. Out of that, one thing is Enable / disable the Content approval.


image


The code is straight forward.

 namespace Sathish.Demo
 {
     using Microsoft.SharePoint.Client;
     using System;
 
     class Program
     {
         static void Main(string[] args)
         {
             EnableModeration();
         }
 
         public static void EnableModeration()
         {
             OfficeDevPnP.Core.AuthenticationManager authMgr = new OfficeDevPnP.Core.AuthenticationManager();
             
             string siteUrl = "https://*******.sharepoint.com/sites/CommunitySite";
             string userName = "Sathish@******.com";
             string password = "***************";
 
             using (var clientContext = authMgr.GetSharePointOnlineAuthenticatedContextTenant(siteUrl, userName, password))
             {
                 try
                 {
                     Web web = clientContext.Web;
                     
                     clientContext.Load(web);
                     clientContext.Load(web.Lists);
                     clientContext.ExecuteQuery();
 
                     List list = web.Lists.GetByTitle("D10");
 
                     list.EnableModeration = false;
                     list.Update();
 
                     clientContext.ExecuteQuery();
 
                 }
                 catch (Exception ex)
                 {
                     System.Console.ForegroundColor = ConsoleColor.Red;
                     System.Console.WriteLine("Exception Occured : " + ex.Message);
                     System.IO.File.AppendAllText("C:\Temp\Exception.txt", ex.Message + " - " + siteUrl + Environment.NewLine);
                 }
             }
 
             System.Console.WriteLine("Completed....");
             System.Console.WriteLine("Press Any Key to Exit ....");
             System.Console.ReadLine();
         }
     }
 }
 

Happy Coding,

Sathish Nadarajan.
Author Info

Sathish Nadarajan
 
Solution Architect
 
Rate this article
 
Sathish is a Microsoft MVP for SharePoint (Office Servers and Services) having 15+ years of experience in Microsoft Technologies. He holds a Masters Degree in Computer Aided Design and Business ...read more
 

How to Enable Yammer for SharePoint Office 365

Sathish Nadarajan
 
Solution Architect
August 12, 2016
 
Rate this article
 
Views
4193

In the recent years, Microsoft is leveraging Yammer into the next level. By default, when we purchase a SharePoint Office 365 licence, we are getting a Yammer as well. This clearly shows that going forward, Microsoft is planning to keep Yammer as its one stop shop for the collaboration portal.

As a first step, let us see, how to enable the Yammer on our SharePoint O365 Environment.

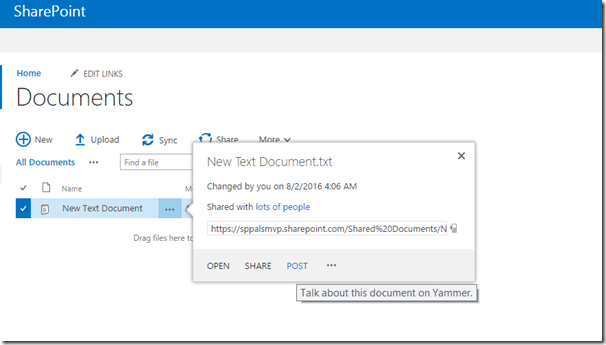
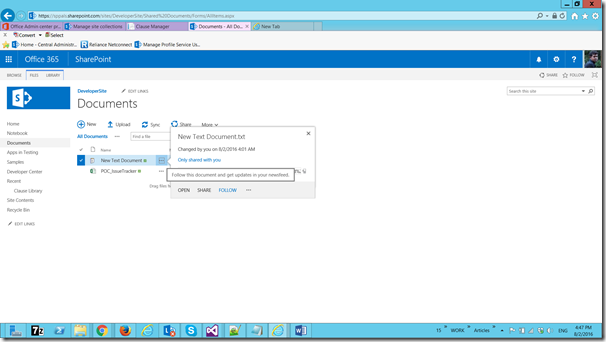
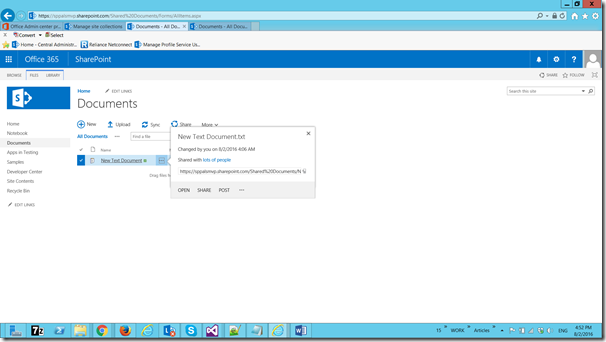
By default, when we upload a document, we can see the Follow Option in SharePoint O365.

image

But, when the Yammer is enabled, this Follow will be replaced with POST.

image

Now, let us see What change needs to be done for this.

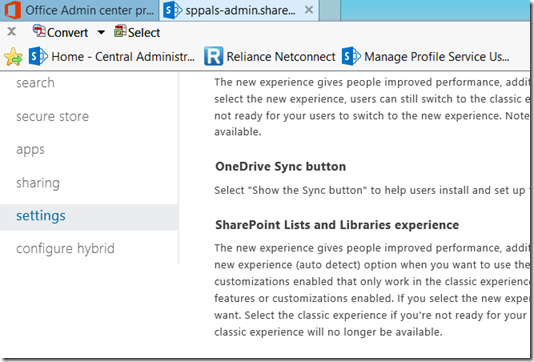
Go to the Admin Centre of SharePoint Online. In my case it is https://sppalsmvp-admin.sharepoint.com/

Click on Settings.


image


Scroll down to see the option Enterprise Social Collaboration.

image

By default, it will be “Use SharePoint Newsfeed”.

Change that to “Use Yammer.com Server”.

image

Click on OK. Wait for some time. After the background timer jobs executed, the options on the Site will get change. Note : The change will not reflect immediately.

Now, let us go back to the site and see the document.

We will get the POST Link.

image

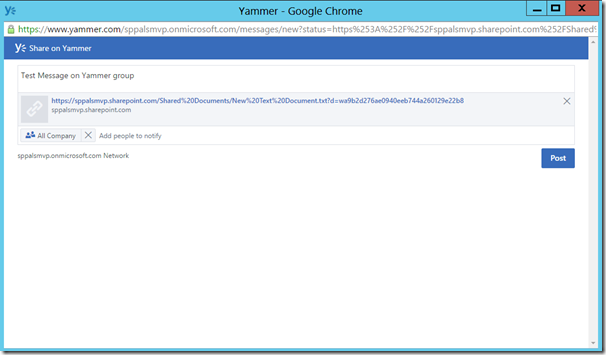
On click that, we will get a popup window with a text box to type the comments.


image


If we closely watch the URL, the Yammer Account URL will be,

https://yammer.com/<<tenantname>>.onmicrosoft.com

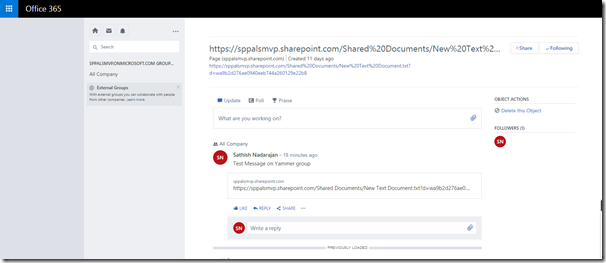
We can directly login to the Yammer site and see the posted message, post new messages, create new groups etc.,


image


Happy Coding,

Sathish Nadarajan.

Author Info

Sathish Nadarajan
 
Solution Architect
 
Rate this article
 
Sathish is a Microsoft MVP for SharePoint (Office Servers and Services) having 15+ years of experience in Microsoft Technologies. He holds a Masters Degree in Computer Aided Design and Business ...read more
 

How to Enable Session State in SharePoint 2013 Development Environment

Sathish Nadarajan
 
Solution Architect
May 26, 2015
 
Rate this article
 
Views
28847

In one of the MSDN Blog, a clear explanation about the SharePoint Context Class and the new methods used in Visual Studio 2013 to retrieve the Client Context. If we have a close look at the methods, then we could see that, Session has been used for storing and retrieving the context objects.

By default the session state will not be enabled on the SharePoint Development Environment. To make our Provider Hosted App work properly, we need to enable the Session State.

For that, we need to make the changes on both the web.config of the SharePoint Site as well as your Provider Hosted App’s web.config.

Let us see the changes. They are very simple.

<system.web>

<pages enableSessionState="true" />

</system.web>

After doing this, one important thing is, on the SharePoint Farm level, we need to enable the session. For that, execute the below PowerShell Script.

Enable-SPSessionStateService -DefaultProvision

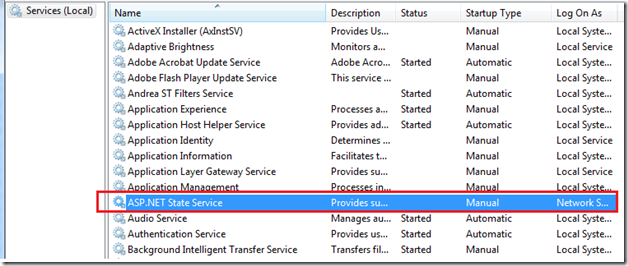
And make sure the below Service is running.

image

Happy Coding,

Sathish Nadarajan.

Category : SharePoint

Author Info

Sathish Nadarajan
 
Solution Architect
 
Rate this article
 
Sathish is a Microsoft MVP for SharePoint (Office Servers and Services) having 15+ years of experience in Microsoft Technologies. He holds a Masters Degree in Computer Aided Design and Business ...read more
 

Leave a comment