SPFx Exception – gulp bundle – The build failed because a task wrote output to stderr

Sathish Nadarajan
 
Solution Architect
July 7, 2020
 
Rate this article
 
Views
7288

Problem Statement:
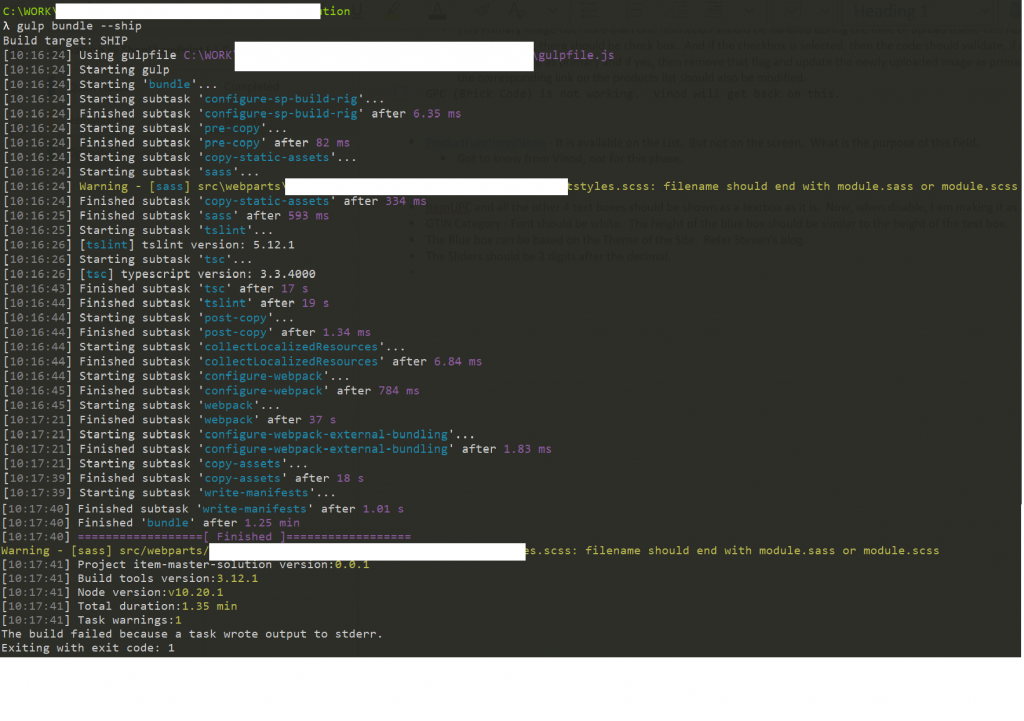
Recently when I was doing a gulp bundle –ship after making a lot of changes (specifically introduced a new custom scss file), I received the exception that

The build failed because a task wrote output to stderr

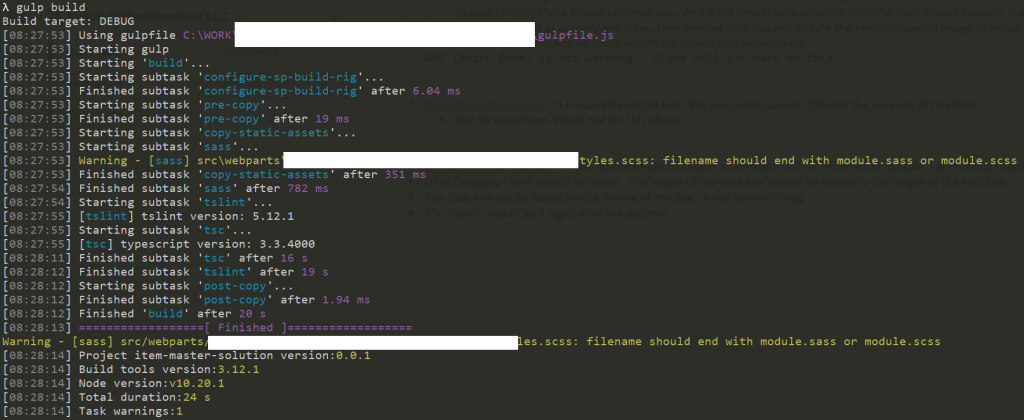
The exception on the cmder was as below. And the bundle was not created, so that I couldn’t proceed with the package-solution as well.

Then, when tried to do the gulp build, I could see a specific warning. The warning is something like

filename should end with module.sass or module.scss

Solution/Workaround:

Now, either we need to fix the warning or find a workaround for this. The fix is to rename the file as <>.module.scss, so that the SPFx will not overridden. But considering the timeline, the workaround could be, add the below line to the gulpfule.js.

build.addSuppression(`Warning – [sass] src/webparts/…/…/ctstyles.scss: filename should end with module.sass or module.scss`);

The complete gulpfile.js will be as shown below.

'use strict';
const gulp = require('gulp');
const build = require('@microsoft/sp-build-web');

build.addSuppression(`Warning - [sass] The local CSS class 'ms-Grid' is not camelCase and will not be type-safe.`);

build.addSuppression(`Warning - [sass] src/webparts/../Productstyles.scss: filename should end with module.sass or module.scss`);

build.configureWebpack.mergeConfig({
    additionalConfiguration: (generatedConfiguration) => {
        if (build.getConfig().production) {
            var basePath = build.writeManifests.taskConfig.cdnBasePath;
            if (!basePath.endsWith('/')) {
                basePath += '/';
            }
            generatedConfiguration.output.publicPath = basePath;
        }
        else {
            generatedConfiguration.output.publicPath = "/dist/";
        }
        return generatedConfiguration;
    }
});
build.initialize(require('gulp'));

Now, we haven’t actually fixed the exception, but for the time being, we suppressed the warning and proceeded to take the build and package the solution.

Happy Coding
Sathish Nadarajan

Category : Office 365, SharePoint, SPFx

Author Info

Sathish Nadarajan
 
Solution Architect
 
Rate this article
 
Sathish is a Microsoft MVP for SharePoint (Office Servers and Services) having 15+ years of experience in Microsoft Technologies. He holds a Masters Degree in Computer Aided Design and Business ...read more
 

SPFx Exception – operation not permitted, open ‘C:\Work\webpart.json’

Sathish Nadarajan
 
Solution Architect
June 25, 2020
 
Rate this article
 
Views
610

Problem Statement:

I was using the Extension “Azure Repos” extension to connect with the TFVC from my Visual Studio Code to Checkin/Checkout the Code. Some crash occurred and I was unable to connect with the TFVC. Then, I removed my workspace and connected to the workspace again. The issue with the TFVC got resolved. But a new thing came in to picture.
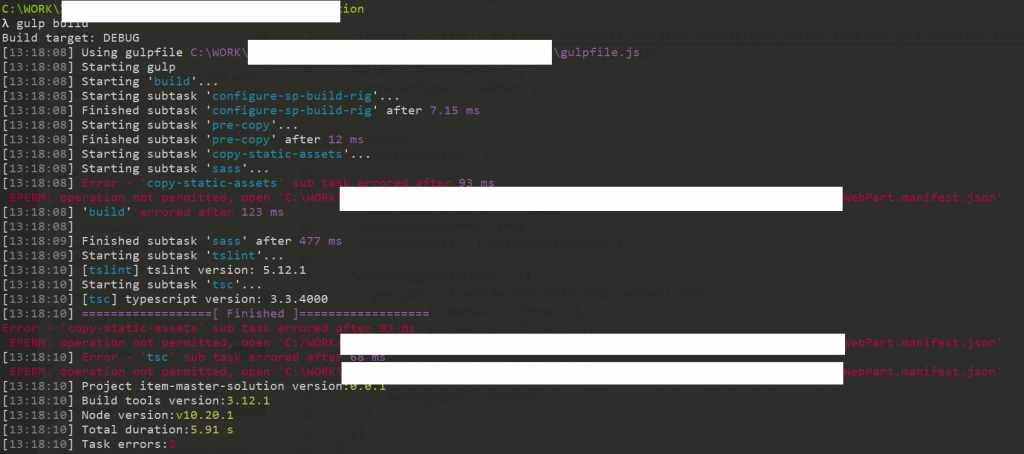
When I try to Build the application using “gulp build”, I started receiving the below exception.

Operation not permitted Open <>

Solution/Workaround:

The solution for this is very simple. Right click the folder and uncheck the Read Only. That solved my problem. The issue was, when I recreate the workspace, the files which existed already were became readonly. We need to uncheck that to start updating/build/deploy.

Hope this simple step will reduce someone’s search.

Happy Coding
Sathish Nadarajan

Author Info

Sathish Nadarajan
 
Solution Architect
 
Rate this article
 
Sathish is a Microsoft MVP for SharePoint (Office Servers and Services) having 15+ years of experience in Microsoft Technologies. He holds a Masters Degree in Computer Aided Design and Business ...read more
 

Exception: An Active Directory Domain Controller (AD DC) for the domain “**” could not be contacted

Sathish Nadarajan
 
Solution Architect
September 17, 2018
 
Rate this article
 
Views
4902

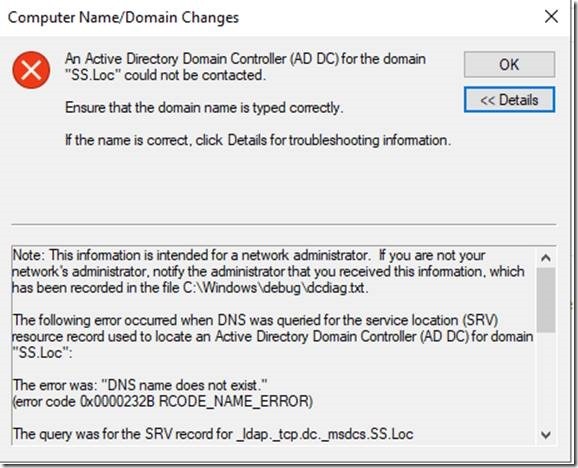
Hope we remember, in the previous article, we installed a Windows Server 2019 Server and was thinking to install the SP 2019 on it. Before doing that, I wanted to add the newly created VM to the existing Domain Controller. While doing that, I got an exception as “An Active Directory Domain Controller (AD DC) for the domain “” could not be contacted”. Hence, wanted to share that work around to that exception.

Steps to be followed to Add the VM to the Domain Controller:

1. Login to the Guest VM.

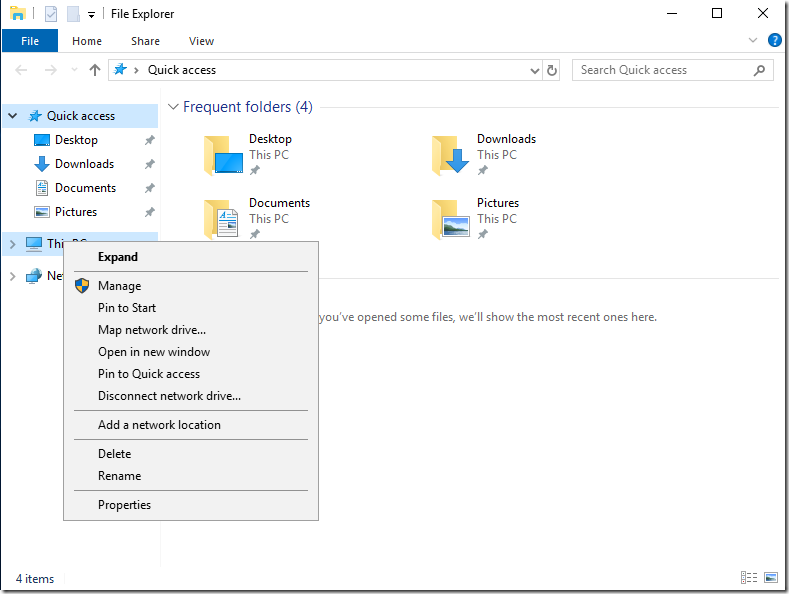
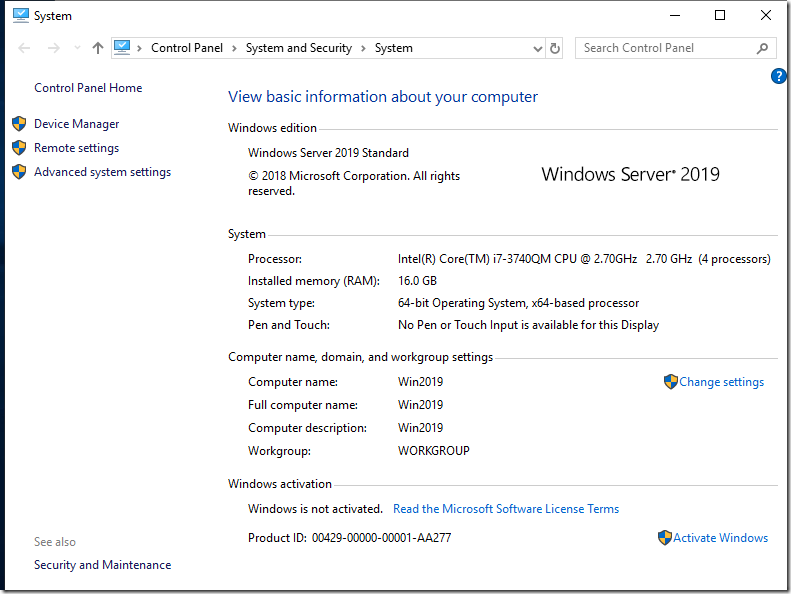
2. Go to the My Computer properties.

clip_image001

3. Click on the Change Settings of the Computer Name, domain, workgroup.

clip_image002

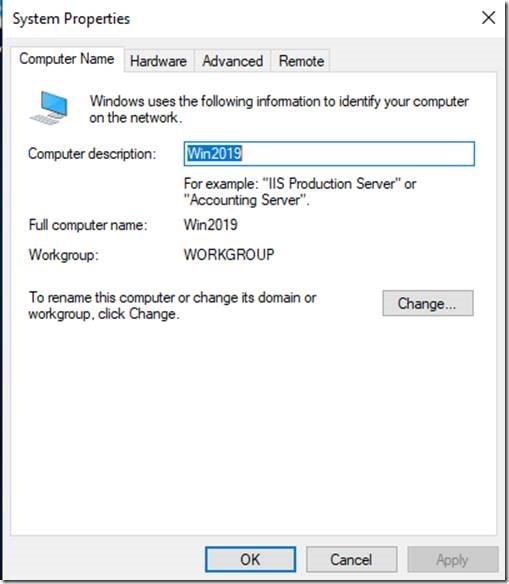
4. Click on the Change settings.

clip_image004

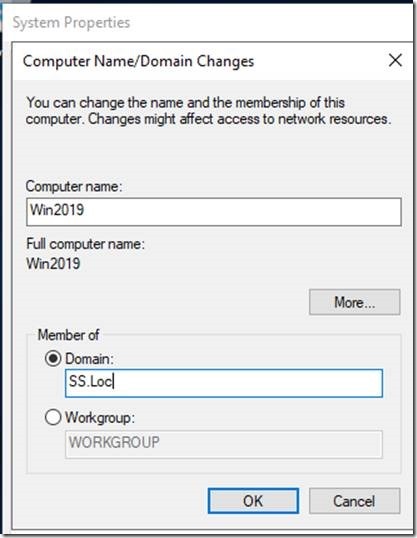
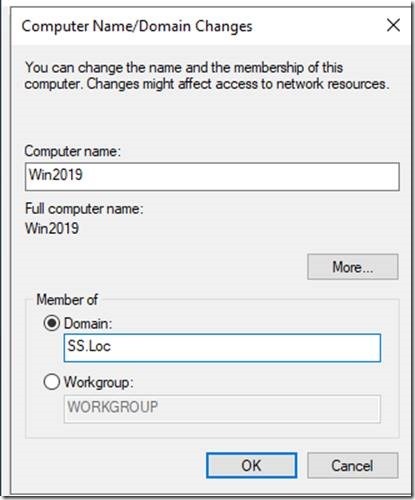
5. Click on Change and Enter the Domain Name.

clip_image006

6. Click OK, we will get the exception as shown below.

clip_image008

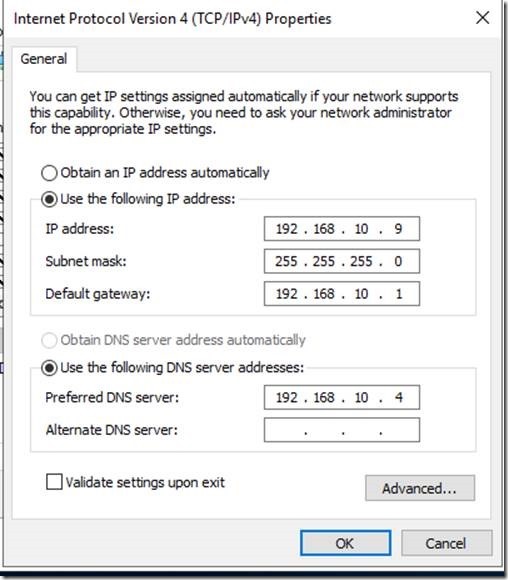
The work around is, we need to ensure the DNS Server on the Guest VM. For that, go to the Host Server and note the DNS IP Address.

In the HOST SERVER, note the below IP address.

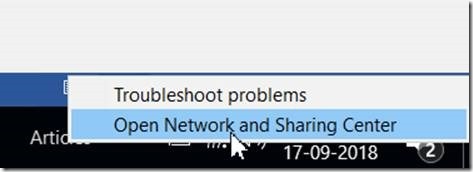
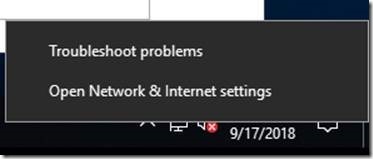
1. Go to the network settings.

clip_image010

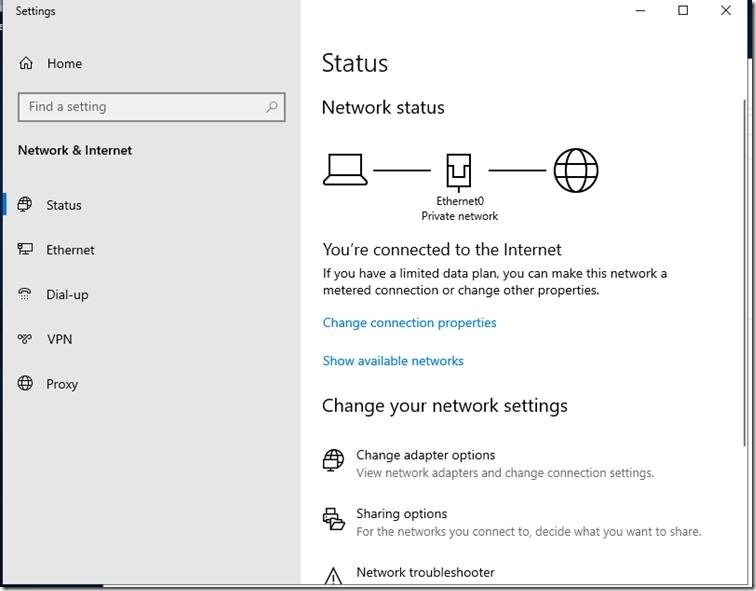
2. Click on “Change adapter settings”

clip_image012

3. Click on the network appropriately.

clip_image014

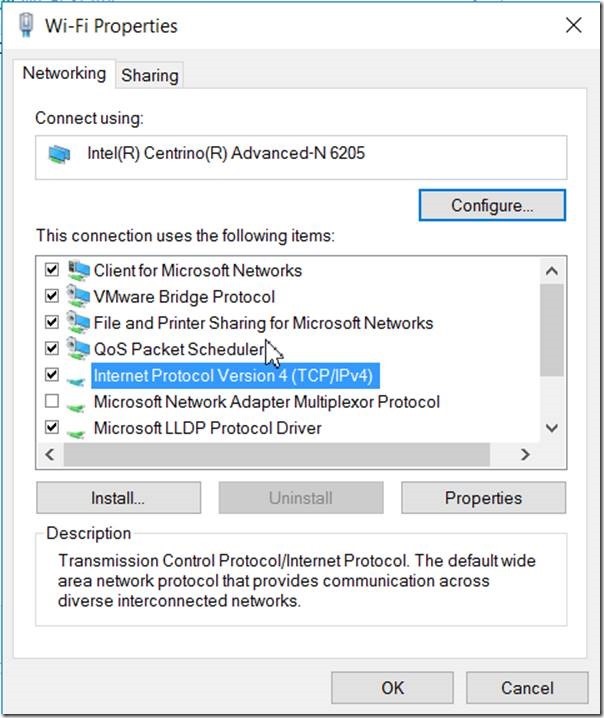
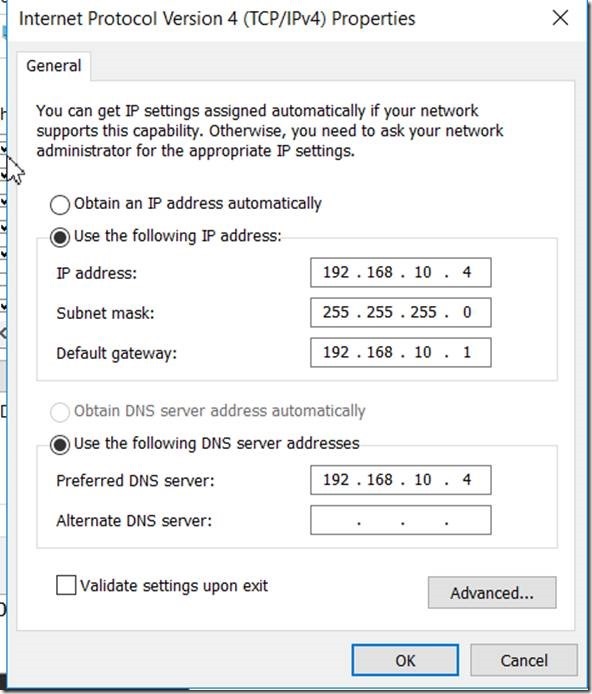
4. Make a note of the below IP Address. In my case, the DNS IP is 192.168.10.4.

clip_image016

Now, login to the Host VM. Repeat the same process as mentioned above.

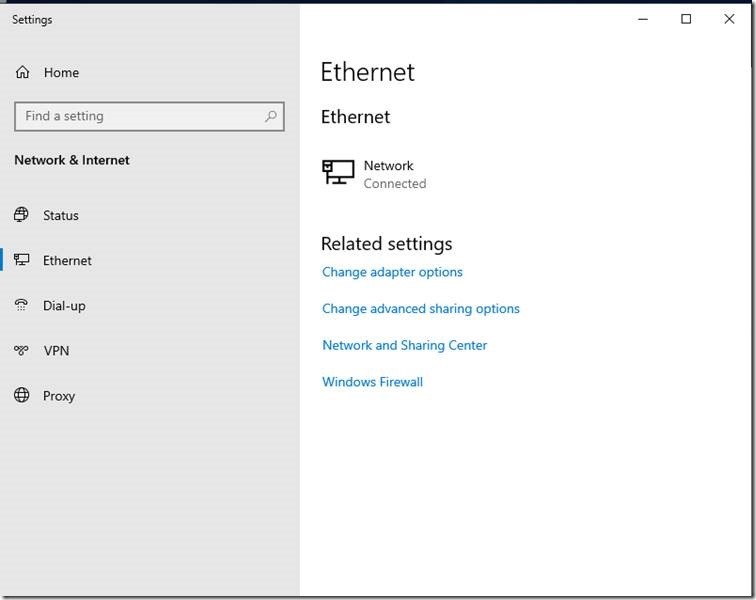
1. In Windows Server 2019, the UI looks a bit different.

clip_image018

clip_image020

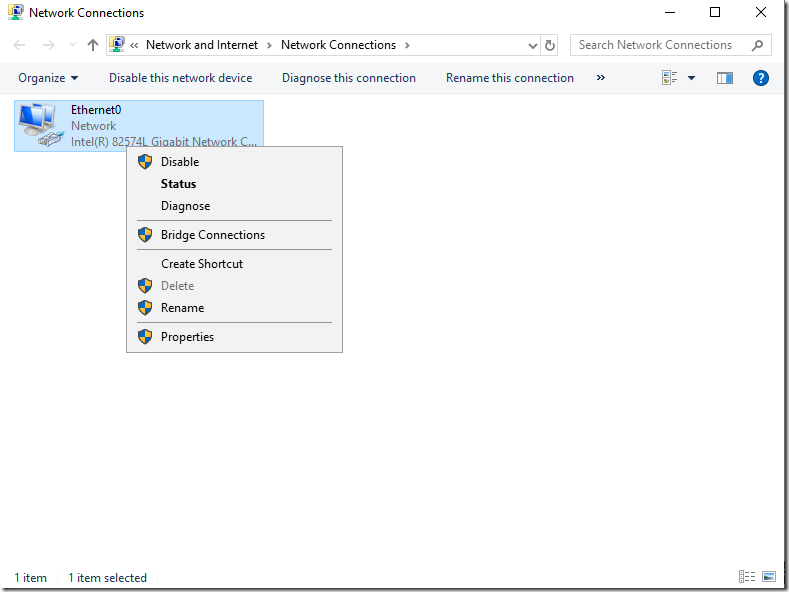
2. Click on “Ethernet” and click on the “Change adaptor settings”

clip_image022

3. Right click and go to the properties.

clip_image023

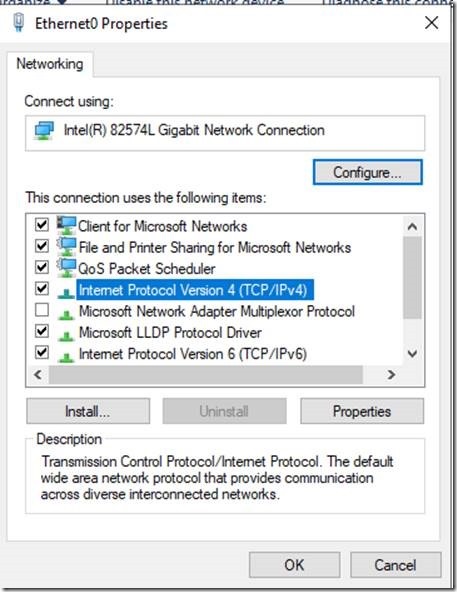
4. Select the IPv4 properties.

clip_image025

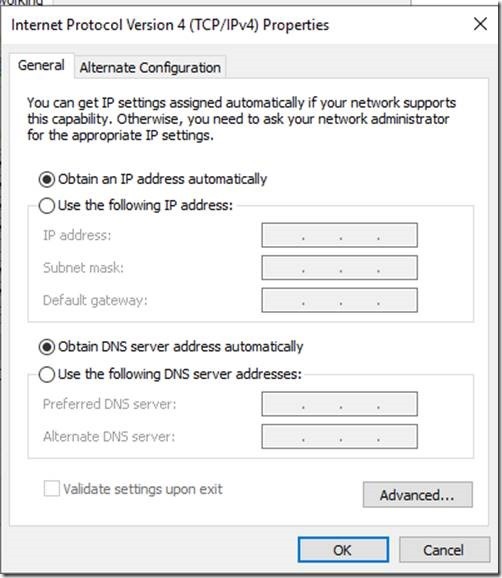
5. We can see the IP Address and the DNS Servers are empty and obtain automatically.

clip_image027

6. Now, update the details as below.

clip_image029

7. Click on OK.

8. Now, go back to the computer properties and change the domain.

clip_image031

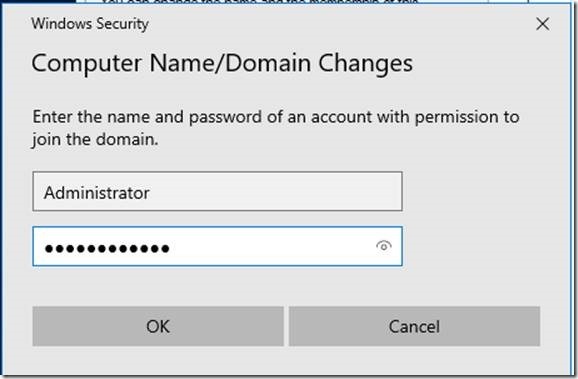
9. It will ask for the Domain Admin User name and password.

clip_image033

10. Click OK.

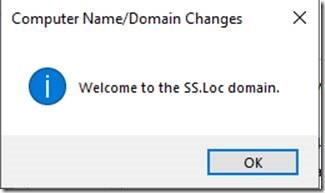
11. It will take few minutes to get added.

clip_image035

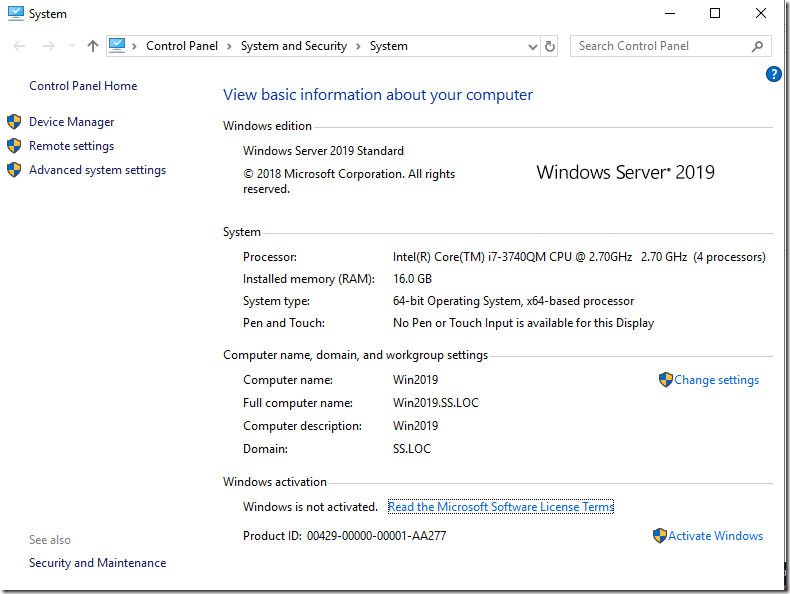
12. Now, after the restart, let us go back to the computer properties and have a look on the domain name.

clip_image036

With this, we know, how to add the host VM to the DNS Server.

Happy Coding,

Sathish Nadarajan.

Author Info

Sathish Nadarajan
 
Solution Architect
 
Rate this article
 
Sathish is a Microsoft MVP for SharePoint (Office Servers and Services) having 15+ years of experience in Microsoft Technologies. He holds a Masters Degree in Computer Aided Design and Business ...read more
 

XMLHttpRequest cannot load http://Site/api/. No ‘Access-Control-Allow-Origin’ header is present on the requested resource. Origin ‘http://MyCallingSite’ is therefore not allowed access. SharePoint 2013 Error

Sathish Nadarajan
 
Solution Architect
July 6, 2015
 
Rate this article
 
Views
18932

In the previous articles, Creating WebApi, and Calling WebApi, we saw how to create a WebAPI and how to call them from the Javascript.

But, not all the browsers accepts this type of calling. For me, it works like charm in Internet Explorer. But in Chrome, this method does not work. I faced with an exception like No ‘Access-Control-Allow-Origin’. This is something the browser restricts to call the API from different domain.

The purpose of creating an API itself comes under a question at this point. Here, either we can make the API to adopt the CORS rules. There are quite a lot of articles around this.

But in my scenario, instead of passing the JSON Object, we can pass back the JSONP and this is much simpler too.

To pass the JSONP object back, the below steps can be followed.

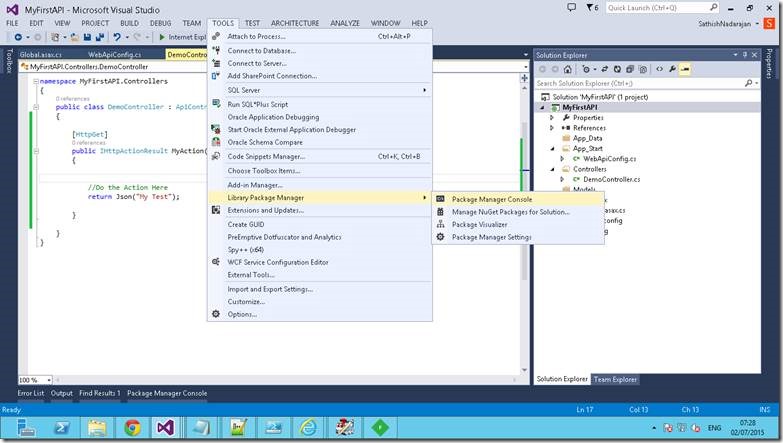
1. In the Visual Studio Open the Package Manager Console.

clip_image002

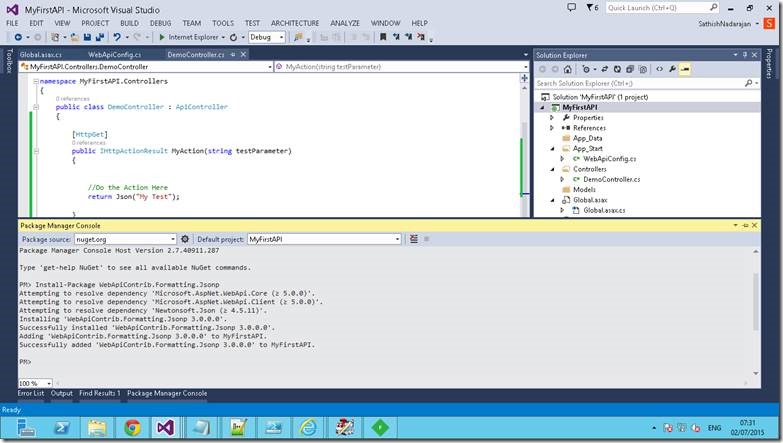
2. The console will be opened. On that type

Install-Package WebApiContrib.Formatting.Jsonp

3. We will get the success message as below.

clip_image004

4. Add a Class under “App_Start” as FormatterConfig.cs

 using Newtonsoft.Json;
 using Newtonsoft.Json.Converters;
 using Newtonsoft.Json.Serialization;
 using System;
 using System.Collections.Generic;
 using System.IO;
 using System.Linq;
 using System.Net;
 using System.Net.Http;
 using System.Net.Http.Formatting;
 using System.Net.Http.Headers;
 using System.Threading.Tasks;
 using System.Web;
 using WebApiContrib.Formatting.Jsonp;
 
 namespace MyFirstAPI
 {
     public class JsonpFormatter : JsonMediaTypeFormatter
     {
 
         public JsonpFormatter()
         {
             SupportedMediaTypes.Add(new MediaTypeHeaderValue("application/json"));
             SupportedMediaTypes.Add(new MediaTypeHeaderValue("text/javascript"));
 
             JsonpParameterName = "callback";
         }
 
         /// <summary>
         ///  Name of the query string parameter to look for
         ///  the jsonp function name
         /// </summary>
         public string JsonpParameterName { get; set; }
 
         /// <summary>
         /// Captured name of the Jsonp function that the JSON call
         /// is wrapped in. Set in GetPerRequestFormatter Instance
         /// </summary>
         private string JsonpCallbackFunction;
 
 
         public override bool CanWriteType(Type type)
         {
             return true;
         }
 
         /// <summary>
         /// Override this method to capture the Request object
         /// </summary>
         /// <param name="type"></param>
         /// <param name="request"></param>
         /// <param name="mediaType"></param>
         /// <returns></returns>
         public override MediaTypeFormatter GetPerRequestFormatterInstance(Type type, System.Net.Http.HttpRequestMessage request, MediaTypeHeaderValue mediaType)
         {
             var formatter = new JsonpFormatter()
             {
                 JsonpCallbackFunction = GetJsonCallbackFunction(request)
             };
 
             // this doesn't work unfortunately
             //formatter.SerializerSettings = GlobalConfiguration.Configuration.Formatters.JsonFormatter.SerializerSettings;
 
             // You have to reapply any JSON.NET default serializer Customizations here    
             formatter.SerializerSettings.Converters.Add(new StringEnumConverter());
             formatter.SerializerSettings.Formatting = Newtonsoft.Json.Formatting.Indented;
 
             return formatter;
         }
 
 
         public override Task WriteToStreamAsync(Type type, object value,
                                         Stream stream,
                                         HttpContent content,
                                         TransportContext transportContext)
         {
             if (string.IsNullOrEmpty(JsonpCallbackFunction))
                 return base.WriteToStreamAsync(type, value, stream, content, transportContext);
 
             StreamWriter writer = null;
 
             // write the pre-amble
             try
             {
                 writer = new StreamWriter(stream);
                 writer.Write(JsonpCallbackFunction + "(");
                 writer.Flush();
             }
             catch (Exception ex)
             {
                 try
                 {
                     if (writer != null)
                         writer.Dispose();
                 }
                 catch { }
 
                 var tcs = new TaskCompletionSource<object>();
                 tcs.SetException(ex);
                 return tcs.Task;
             }
 
             return base.WriteToStreamAsync(type, value, stream, content, transportContext)
                        .ContinueWith(innerTask =>
                        {
                            if (innerTask.Status == TaskStatus.RanToCompletion)
                            {
                                writer.Write(")");
                                writer.Flush();
                            }
 
                        }, TaskContinuationOptions.ExecuteSynchronously)
                         .ContinueWith(innerTask =>
                         {
                             writer.Dispose();
                             return innerTask;
 
                         }, TaskContinuationOptions.ExecuteSynchronously)
                         .Unwrap();
         }
 
         /// <summary>
         /// Retrieves the Jsonp Callback function
         /// from the query string
         /// </summary>
         /// <returns></returns>
         private string GetJsonCallbackFunction(HttpRequestMessage request)
         {
             if (request.Method != HttpMethod.Get)
                 return null;
 
             var query = HttpUtility.ParseQueryString(request.RequestUri.Query);
             var queryVal = query[this.JsonpParameterName];
 
             if (string.IsNullOrEmpty(queryVal))
                 return null;
 
             return queryVal;
         }
     }
 }
 

5. The class, I have included in the Source code at the bottom of this post.

6. On the Global.asax.cs, under Application_start method, add this line.

 GlobalConfiguration.Configuration.Formatters.Insert(0, new JsonpMediaTypeFormatter(new JsonMediaTypeFormatter()));

7. The Demo Controller class will be something like below.

 [HttpGet]
         public string MyAction(string testParameter)
         {
 
 
             //Do the Action Here
             return "My Test";
 
         }
 

8. Now, execute this by clicking the F5.

9. From the Chrome, execute the below line of code.

 try{
 			 $.getJSON("http://localhost:38447/api/demo/MyAction/test?callback=?",
              function (Data) {
               alert(Data);
              })
              .fail(
              function (jqXHR, textStatus, err) {
              alert('Fail ' + err);
              });
 			 }catch(err)
 			 {
 			 
 			 }
 

10. That’s it. Now, we will get the “My Test” string as a JSONP object. Now, we are good to process this.

11. This is a very simple way of communicating with our WebAPI from our SharePoint Client Object Code.

Happy Coding,

Sathish Nadarajan.

Category : JavaScript, SharePoint

Author Info

Sathish Nadarajan
 
Solution Architect
 
Rate this article
 
Sathish is a Microsoft MVP for SharePoint (Office Servers and Services) having 15+ years of experience in Microsoft Technologies. He holds a Masters Degree in Computer Aided Design and Business ...read more
 

How to Use Try Catch Finally and Error Handling in PowerShell

Sathish Nadarajan
 
Solution Architect
December 27, 2013
 
Rate this article
 
Views
43255

All of us know that as long as we are into SharePoint 2013, we will be in need to write PowerShell scripts then and there. For small scripts, we will be writing in a traditional manner. But when we plan to write a bigger one, with some complex logics and all, then we require Try Catch Finally block for sure. Here I am NOT planning to explain about the Try Catch Finally block. But, let us have a look, how to use them in PowerShell.

A general syntax, which everyone would have come across in PowerShell world is

 -ErrorAction SilentlyContinue

This is the one which is an important enemy to the Try Catch in PowerShell. Because, when this particular statement got executed, then the exception will not be caught. It will proceed SILENTLY. In some of the scenarios we may require this.  I agree with that. But in most cases, we require our exception to be caught.

To make our exceptions to be caught in the catch block, we need to specify it explicitly by executing the below statement at the beginning of our script.

 $ErrorActionPreference = "Stop"

Then the remaining code would be the same. For example, let us have a look, how a particular script will looks like with proper Try Catch and Finally Blocks.

 $ErrorActionPreference = "Stop"
 
 try
 {
     Write-Host "Adding PowerShell Snap-in" -ForegroundColor Green
     # Try to get the PowerShell Snappin.  If not, then adding the PowerShell snappin on the Catch Block
     Get-PSSnapin "Microsoft.SharePoint.PowerShell" 
 }
 catch
 {
     if($Error[0].Exception.Message.Contains("No Windows PowerShell snap-ins matching the pattern 'Microsoft.SharePoint.PowerShell' were found"))
     {
         Add-PSSnapin "Microsoft.SharePoint.PowerShell"
     }
 }
 Write-Host "Finished Adding PowerShell Snap-in" -ForegroundColor Green 
 

If I didn’t give the Statement ErrorActionPreference, then the catch block will never get executed.

The ENUM values for the above mentioned parameter are

1. Continue

2. Ignore

3. Inquire

4. SilentlyContinue

5. Stop

I don’t think there is much explanation required as we can get what exactly they will do by looking on the terms itself.

With the above understanding, let us see a little bit deep into the exception types on PowerShell scripting.

Basically the Errors are classified as 2 types on PowerShell.

1. Terminating Errors

2. Non-Terminating Errors

Terminating Errors

They are the errors which will be caught by the default catch block, without doing anything extra. That is, there is no need of explicitly set the ErrorActionPreference Parameter for these type of errors.

Non-Terminating Errors

Usually, these type of errors, will not be caught by the catch block. For example,

 $ConfigXmlPath = "C:SathishConfig. xml"
 # Get the Content of the Config Xml
  [Xml]$SiteConfig = Get-Content $ConfigXmlPath  
 

In the above line, I am trying to read the content of the Config File. If the config file, doesn’t present, ,this will not be caught in catch by default unless until, we choose Stop Action.

Switching between Terminating and Non Terminating

Actually, we can make any kind of statement into a terminating and a non-terminating one by using the –ErrorAction Switch. Let us take the above script itself for our example. The above script is a Non-Terminating type as I mentioned. To make it as terminating, we can give

[Xml]$SiteConfig = Get-Content $ConfigXmlPath -ErrorAction Stop

Now, this statement will caught by the Catch block.

Let us try to make everything as a Terminating Exception. That is what absolutely required for every developer. We need all the exceptions should be caught. To make that, always place the below piece on top of all the scripts which we are writing.

 $ErrorActionPreference = "Stop"

Handling the Catch Block:

Now, we saw how to catch our exceptions. Now, we need to know, how to handle those exceptions, and we should respond for the exceptions right.

 catch
 {
     if($Error[0].Exception.Message.Contains("No Windows PowerShell snap-ins matching the pattern 'Microsoft.SharePoint.PowerShell' were found"))
     {
         Add-PSSnapin "Microsoft.SharePoint.PowerShell"
     }
 }
 

On the above example, I am verifying, the Exception Message. By default, the $Error is a variable, which will hold all our errors. Out of that, the array of 0 is nothing but the latest exception happened. Then the exception class as usual we know about them.

In the same manner, we can catch our exceptions with

 catch
 {
         $ErrorMessage = $_.Exception.Message
     $FailedItem = $_.Exception.ItemName
 
 }
 

also.


Finally:

Finally we came to the Finally Block 🙂 .  This as usual with any other programming language, will get executed, irrespective of try or catch block.  Usually, we will be using this finally to dispose our objects.


Happy Coding.

Sathish Nadarajan.
Author Info

Sathish Nadarajan
 
Solution Architect
 
Rate this article
 
Sathish is a Microsoft MVP for SharePoint (Office Servers and Services) having 15+ years of experience in Microsoft Technologies. He holds a Masters Degree in Computer Aided Design and Business ...read more
 

Error while Creating Web Application through Central Administration

Sathish Nadarajan
 
Solution Architect
September 16, 2013
 
Rate this article
 
Views
26207


The article explains about an exception, which I was facing and I thought of sharing this information with the SharePoint society. 

While writing the previous article regarding the various types of creating web applications, I was attempted to create a second web application unknowingly on the same port. i.e., on 443 itself, I tried creating the second web application also. It took a long time than the usual for the creation and after a while, I was seeing the below screen.

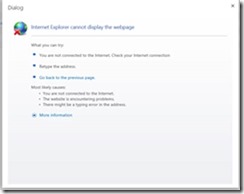
clip_image002

i.e., the page will be shown with “Internet Explorer cannot display the webpage” with the title called “Dialog”. This was a very strange one. I was verifying the ULS logs and I couldn’t find any relevant message regarding this. Then, when I refresh the ManageWebApplications page, I was able to see the web application created and listed on it. The corresponding content database and the IIS Website were also created.


Then when I tried creating SiteCollections on this web application, everything was smooth. But only thing is that site collection will not be able to open. I tried creating multiple web applications and site collections. But no luck.


Then the resolution for this, I could see is, this is because of the Application Pool whose “Idle time out property” is by default True. Since, the web application creation process takes a long time, the application pool stops working. We need to change this property. Let us have a look in to it.

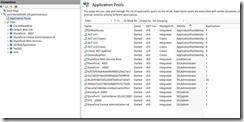
1. Go to IIS

clip_image004

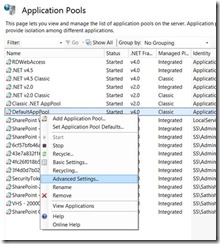
2. Select the DefaultAppPool and Go to the Advanced settings.

clip_image006

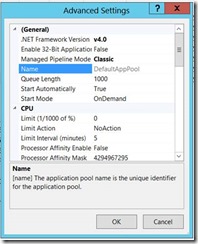
3. We will be prompted with the below popup.

clip_image008

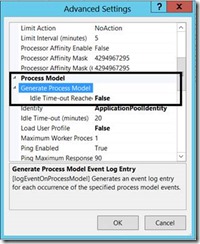
4. Under the “Process Model” category, Select the “Generate Process Model”, Idle time out reached property would be by default “True”.

5. Make it to “False”.

clip_image010

6. Reset the IIS.

7. Come back to Central Administration and try creating. Now it is getting created and works as expected.


And one more option to create the Web Application and Site collection if this also not works is by using the power shell script. That will be faster than the Central Administration and works fine even if you doesn’t want to make any changes on the IIS.

New-SPWebApplication -Name "MyWebApplication" -ApplicationPool "SharePoint-20003" -ApplicationPoolAccount "SS\Sathish" -URL "https://SathishServer.ss.loc:20003" -AuthenticationProvider $ap -SecureSocketsLayer

#Get-SPWebTemplate

$template = Get-SPWebTemplate "DEV#0"

$template

New-SPSite -Url "https://SathishServer.ss.loc:20003/Sites/DeveloperSite" -OwnerAlias "SS\Administrator" -Template $template


Hope this will help a lot by the time of creating web application. Happy sharepointing.

Category : SharePoint

Author Info

Sathish Nadarajan
 
Solution Architect
 
Rate this article
 
Sathish is a Microsoft MVP for SharePoint (Office Servers and Services) having 15+ years of experience in Microsoft Technologies. He holds a Masters Degree in Computer Aided Design and Business ...read more
 

Leave a comment