How to Create View in SharePoint Office 365 Programmatically using Patterns and Practices PNP

Sathish Nadarajan
 
Solution Architect
September 15, 2017
 
Rate this article
 
Views
3479

A small code snippet to create View for a List or document library in SharePoint Office 365 using Patterns and Practices Programmatically.

1. Create a List called “Test List”

2. In that list, I have added two columns called Column1, Column2.

3. Now, I am going to create two Views

a. All Items Test

b. Created by Me

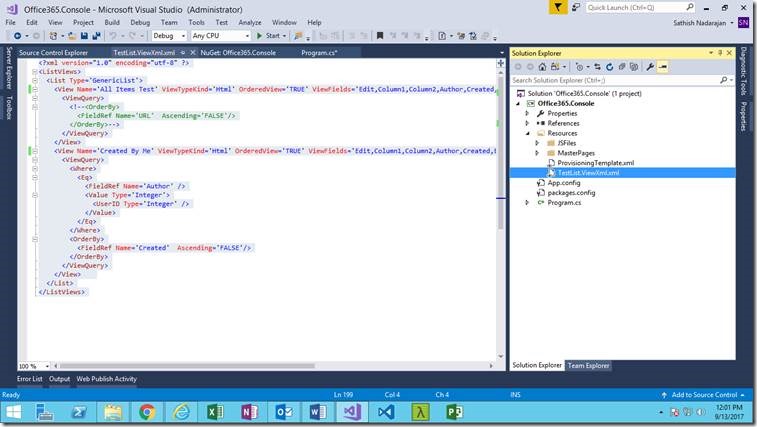
4. The XML for the views with the filter option, columns to be displayed etc., will be as below.

 <?xml version="1.0" encoding="utf-8" ?>
 <ListViews>
   <List Type='GenericList'>
     <View Name='All Items Test' ViewTypeKind='Html' OrderedView='TRUE' ViewFields='Edit,Column1,Column2,Author,Created,Editor,Modified' RowLimit='30' DefaultView='TRUE'>
       <ViewQuery>
         <!--<OrderBy>
           <FieldRef Name='URL'  Ascending='FALSE'/>
         </OrderBy>-->
       </ViewQuery>
     </View>
     <View Name='Created By Me' ViewTypeKind='Html' OrderedView='TRUE' ViewFields='Edit,Column1,Column2,Author,Created,Editor,Modified' RowLimit='30' DefaultView='FALSE'>
       <ViewQuery>
         <Where>
           <Eq>
             <FieldRef Name='Author' />
             <Value Type='Integer'>
               <UserID Type='Integer' />
             </Value>
           </Eq>
         </Where>
         <OrderBy>
           <FieldRef Name='Created'  Ascending='FALSE'/>
         </OrderBy>
       </ViewQuery>
     </View>   
   </List>
 </ListViews>
 

Now, the C# code to create both the views are as below.

 using Microsoft.SharePoint.Client;
 using System;
 using System.Collections.Generic;
 using System.IO;
 using System.Reflection;
 
 namespace Office365.Console
 {
     class Program
     {
         static void Main(string[] args)
         {
             CreateView();
         }
 
         private static string testLists_Views = string.Empty;
         public static string TestLists_Views
         {
             get
             {
                 if (string.IsNullOrEmpty(testLists_Views))
                 {
                     using (var stream = Assembly.GetAssembly(typeof(Program)).GetManifestResourceStream("Office365.Console.Resources.TestList.ViewXml.xml"))
                     {
                         using (var reader = new StreamReader(stream))
                         {
                             testLists_Views = reader.ReadToEnd();
                         }
                     }
                 }
 
                 return testLists_Views;
             }
         }
 
         public static void CreateView()
         {
             OfficeDevPnP.Core.AuthenticationManager authMgr = new OfficeDevPnP.Core.AuthenticationManager();


             string siteUrl = "https://********.sharepoint.com/sites/DeveloperSite/";
              
             string userName = "sathish@********.onmicrosoft.com";
             string password = "**************";
 
             
             using (var clientContext = authMgr.GetSharePointOnlineAuthenticatedContextTenant(siteUrl, userName, password))
             {
                 try
                 {
                     Site site = clientContext.Site;
                     Web web = clientContext.Web;
                     PropertyValues properties = clientContext.Web.AllProperties;
 
                     clientContext.Load(site);
                     clientContext.Load(web);
                     clientContext.Load(web.Lists);
                     clientContext.Load(properties);
                     clientContext.ExecuteQuery();
 
                     List list = web.Lists.GetByTitle("Test List");
                     clientContext.Load(list);
                     clientContext.ExecuteQuery();
 
 
                     list.CreateViewsFromXMLString(TestLists_Views);
                     clientContext.Load(list.Views);
                     clientContext.ExecuteQuery();
                 }
                 catch (Exception ex)
                 {
                     System.Console.ForegroundColor = ConsoleColor.Red;
                     System.Console.WriteLine("Exception Occured : " + ex.Message);
                     System.IO.File.AppendAllText("C:\Temp\Exception.txt", ex.Message + " - " + siteUrl + Environment.NewLine);
                 }
 
 
             }
 
 
             System.Console.WriteLine("Completed....");
             System.Console.WriteLine("Press Any Key to Exit ....");
             System.Console.ReadLine();
         }


     }
 }
 

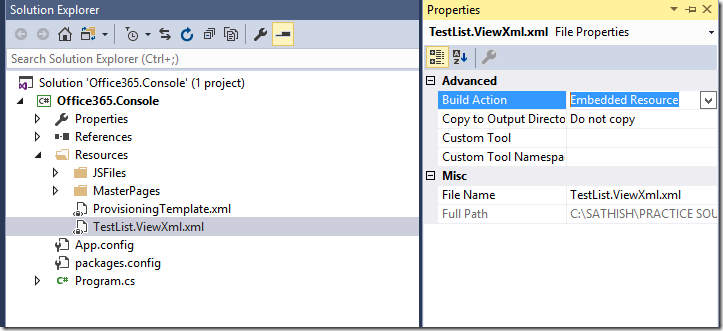
The solution structure will be as below.

clip_image002

The XML, I made it as “Embedded Resource”, so that, the deliverable should not contain this XML.

This is not necessary. But based on our requirement, we can choose this.

clip_image003

Happy Coding,

Sathish Nadarajan.

Author Info

Sathish Nadarajan
 
Solution Architect
 
Rate this article
 
Sathish is a Microsoft MVP for SharePoint (Office Servers and Services) having 15+ years of experience in Microsoft Technologies. He holds a Masters Degree in Computer Aided Design and Business ...read more
 

Configure List/Library Settings for Information Rights Management – SharePoint 2013

Sathish Nadarajan
 
Solution Architect
April 21, 2015
 
Rate this article
 
Views
11645

In this article, let us see, how to configure the Information Rights Management for a List / Library in SharePoint 2013.

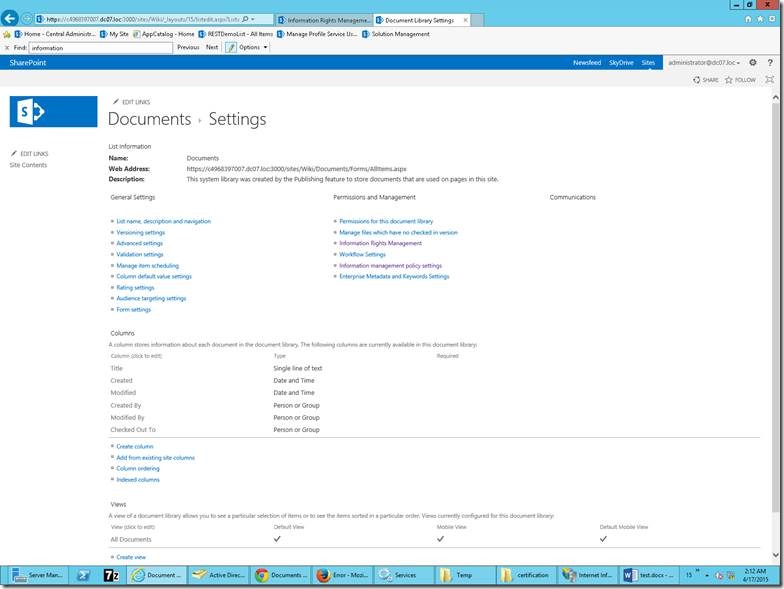
1. Go to the List Settings

clip_image002

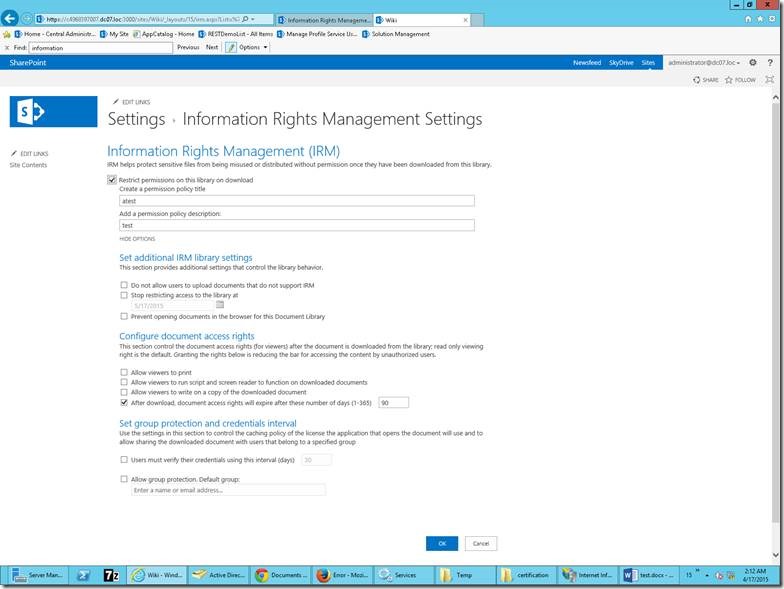
2. Under “Permissions and Management” Section, Click on the “Information Rights Management”

clip_image004

3. Give appropriate options and Click OK.

Note:

If the Information Rights Management link does not appear, IRM might not be enabled for your site. Contact your server administrator to see if it is possible to enable IRM for your site. The Information Rights Management link does not appear for picture libraries.

Happy Coding,

Sathish Nadarajan.

Category : SharePoint

Author Info

Sathish Nadarajan
 
Solution Architect
 
Rate this article
 
Sathish is a Microsoft MVP for SharePoint (Office Servers and Services) having 15+ years of experience in Microsoft Technologies. He holds a Masters Degree in Computer Aided Design and Business ...read more
 

How to Add Custom Ribbon Action on List/Libraries in SharePoint 2013

Sathish Nadarajan
 
Solution Architect
May 12, 2014
 
Rate this article
 
Views
39818

In this article, let us see how to create a Custom Ribbon Action on the Libraries/List on SharePoint 2013. On click, we can see, how to call a Javascript method.

Before get in to the steps, let us see, how we want and what we are going to achieve on this article. The output is somewhat like,

image

Now, let us see by step by step.

1. Open the visual studio 2012 as run as administrator.

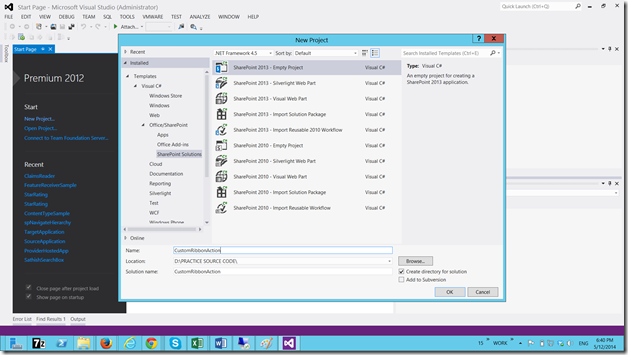
2. Create an Empty SharePoint Project.

3.image

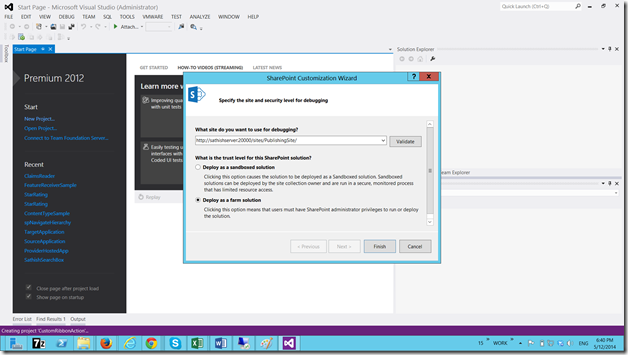
4. Select a Farm Solution.

5.image

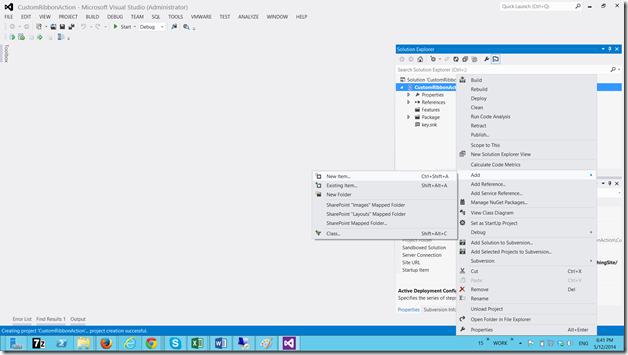
6. Add New Item to the solution.

7.image

8. Add a Module. Name it as CustomRibbonActionModule.

9. By default, it will have a sample.txt. Now delete that txt file, since we don’t require that.

10. And modify the Elements.xml as below.

 <?xml version="1.0" encoding="utf-8"?>
 <Elements xmlns="http://schemas.microsoft.com/sharepoint/">
 
   <CustomAction
     Description="CustomActionDescription"
     Id="CustomActionID"
     Location="CommandUI.Ribbon">
     <CommandUIExtension>
       <CommandUIDefinitions>
         <CommandUIDefinition
           Location="Ribbon.Library.Groups._children">
           <Group
             Id="CustomActionGroupID"
             Sequence="80"
             Description="CustomActionGroupDescription"
             Title="CustomActionTitle"
             Template="Ribbon.Templates.Flexible2">
             <Controls Id="CustomActionControlsID">
               <Button
                 Id="CustomActionButtonID"
                 Command="CustomActionButtonCommand"
                Image32by32="_layouts/15/images/placeholder32x32.png"
                 LabelText="CustomActionButtonLabelText"
                 TemplateAlias="o2"
                 Sequence="10"/>
             </Controls>
           </Group>
         </CommandUIDefinition>
         <CommandUIDefinition
           Location="Ribbon.Library.Scaling._children">
           <MaxSize
             Id="CustomRibbonActionsOneMaxSize"
             Sequence="15"
             GroupId="CustomActionGroupID"
             Size="LargeLarge"/>
         </CommandUIDefinition>
       </CommandUIDefinitions>
       <CommandUIHandlers>
         <CommandUIHandler
           Command="CustomActionButtonCommand"
           CommandAction="javascript:alert('Test');"/>
       </CommandUIHandlers>
     </CommandUIExtension>
   </CustomAction>
 
 </Elements>
 

The above XML is self explanatory I guess. The most important things on the XML are

1. Location – “Ribbon.Library.Groups._children”.

2. TemplateAlias – “o2”.

To know more about the Locations, please refer to the MSDN articles

· http://msdn.microsoft.com/en-us/library/office/ee537543(v=office.15).aspx

· http://msdn.microsoft.com/en-us/library/office/bb802730(v=office.15).aspx

In the same above XML, if we want to call a Javascript method instead of an alert, the CommandUIHandlers will become like this.

 <CommandUIHandlers>
         <CommandUIHandler
           Command="CustomActionButtonCommand"
           CommandAction="javascript:SayHello(); 
 function SayHello() { 
 alert('Hello'); 
 }"/>
       </CommandUIHandlers>
     </CommandUIExtension>
 

In the next Article, let us see how to insert a piece of content on click of a ribbon button into your content area on a Publishing Site.

Happy Coding.

Sathish Nadarajan.

Author Info

Sathish Nadarajan
 
Solution Architect
 
Rate this article
 
Sathish is a Microsoft MVP for SharePoint (Office Servers and Services) having 15+ years of experience in Microsoft Technologies. He holds a Masters Degree in Computer Aided Design and Business ...read more
 

Leave a comment