Use Certificate to connect to SharePoint from Azure DevOps Pipeline

Ahamed Fazil Buhari
 
Senior Developer
November 16, 2022
 
Rate this article
 
Views
1571

Authentication is important thing to consider when we think of automating deployment or any task that needs to access SharePoint from CI/CD pipeline. In this article we will see how we can authenticate to SharePoint using certificate through PnP PowerShell.

I already have an Azure App with necessary permission (in my case – SharePoint, Permission Name: AllSites.FullControl – Type: Application) to access my SharePoint sites.

We need a certificate that we can upload in our Azure App and .pfx file (personal exchange information) that needs to be uploaded to Azure DevOps which acts as a private key for the certificate.

Generate Certificate

PnP PowerShell provides a cmdlet that can generate both .pfx and .cer files, – https://pnp.github.io/powershell/cmdlets/New-PnPAzureCertificate.html

New-PnPAzureCertificate


With the above commands it generated two files – .cer and .pfx. We need both the files, where .cer file should be uploaded to Azure App and .pfx file should be added to Azure DevOps secure file,  and its explained in detail as follows,

Upload .cer file to Azure App and .pfx file to Azure DevOps

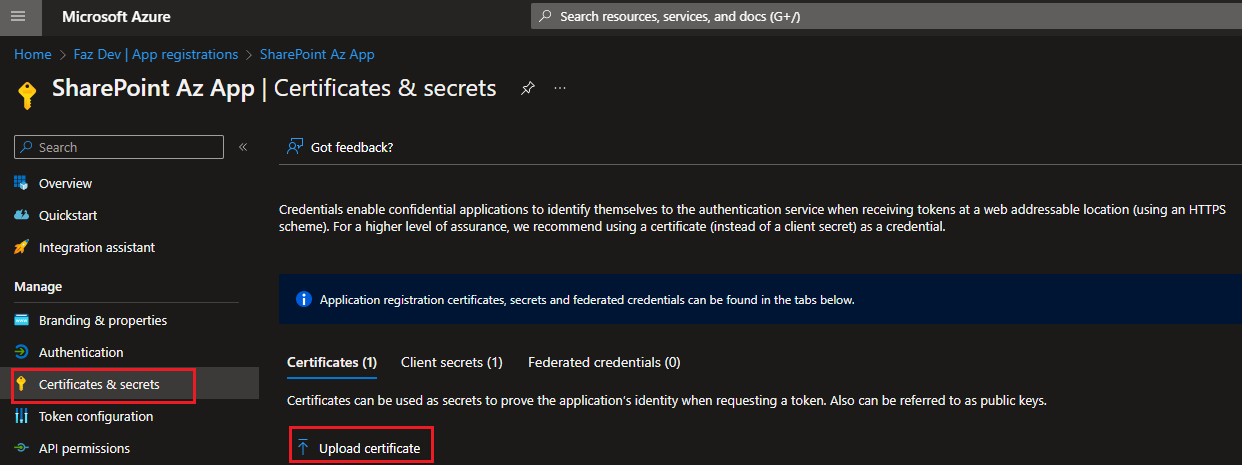
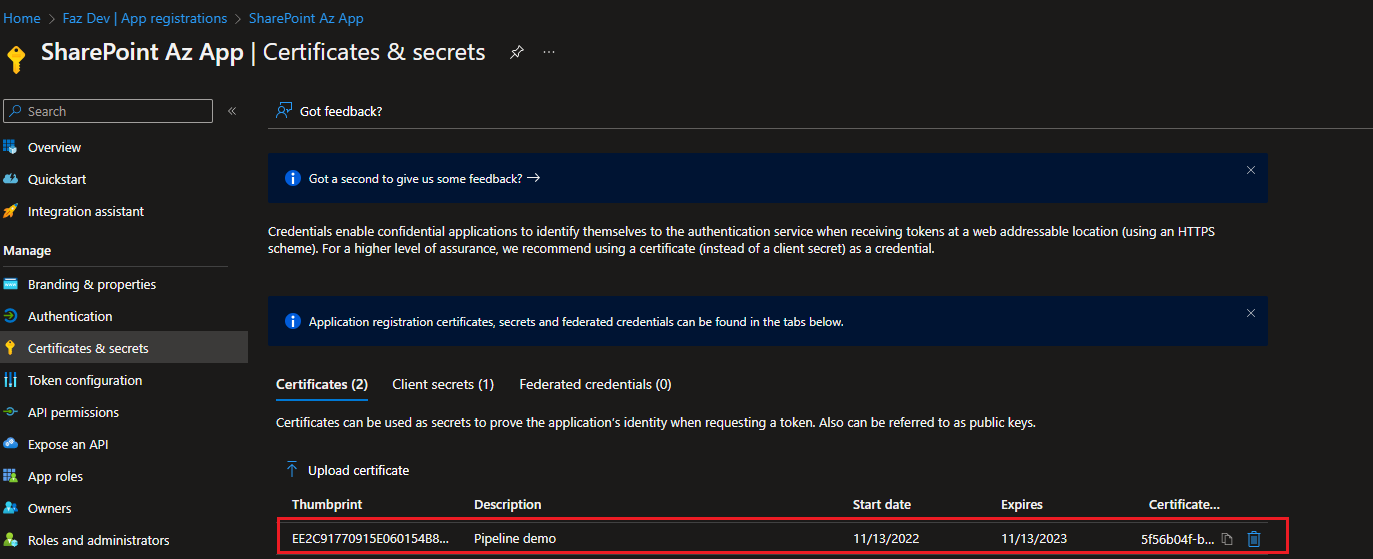
In the above section we generated .cer file and the file needs to be uploaded into Azure App as shown in below screenshots


In Azure DevOps under Pipelines section, select Library. In the library we can have variable groups, and secure files. We need to keep our .pfx file some where secure in Azure DevOps, so we can upload it here.


Connect to SharePoint in Azure DevOps Release Pipeline

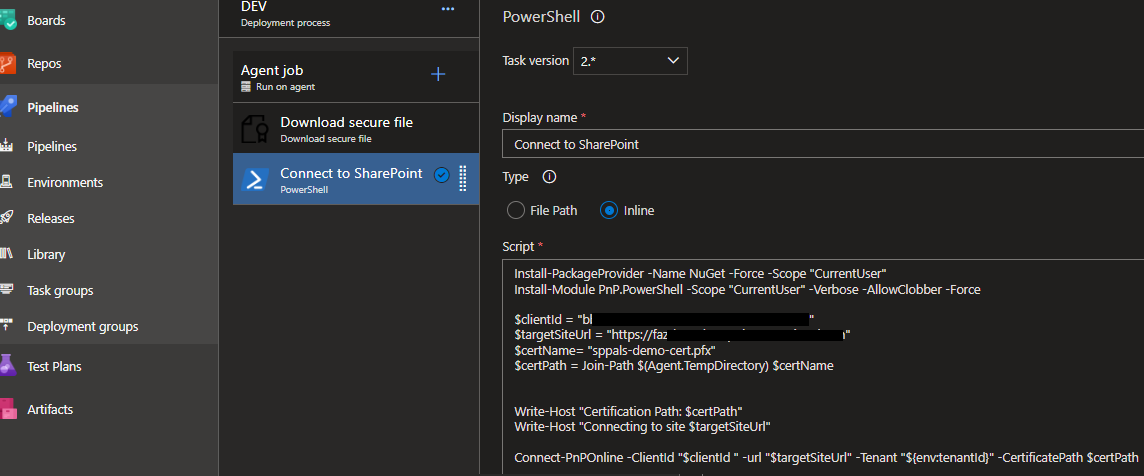
Here I am connecting to SharePoint from Release pipeline by having couple of tasks. We can use “Download secure file” task from Microsoft to download our .pfx file from library and then its followed by a PowerShell task where we can have PnP command to connect to SharePoint using certification path, as shown below.


Connect-PnPOnline -ClientId "" -Url "" -Tenant "" -CertificationPath ""

In the PowerShell, we need to provide clientId (Azure App Id), SharePoint site URL, tenant Id and .pfx file path. Now you can access SharePoint by using certification in your pipeline 🙂


Happy Coding

Fazil

Author Info

Ahamed Fazil Buhari
 
Senior Developer
 
Rate this article
 
Ahamed is a Senior Developer and he has very good experience in the field of Microsoft Technologies, especially SharePoint, Azure, M365, SPFx, .NET and client side scripting - JavaScript, TypeScript, ...read more
 

SharePoint Modern Site – Using Multiple Languages and Translate Page Programmatically using CSOM C# and PNP Core Context

Sathish Nadarajan
 
Solution Architect
November 22, 2021
 
Rate this article
 
Views
1348

I was trying to translate the pages created in one Site Collection to other languages and there is a simplest way of doing this using the PNP Core Context.  This is not available in the PNP Framework Context I hope.  (again, this is my opinion as I couldn’t find a way).

Basically, we need to enable the languages and even this can be done through programmatically while provisioning the sites.  But in my case, I have the site already.  Hence, I was about to do this manually through the site settings itself.

Go to the Site Settings and Language settings.  Select the Additional Languages and Click on Save.


Let me create a new page.

Created a page

Click on the Translation of the page.

On Click of the button, a new page will get created inside the es folder.


When we wanted to do this for a migrated site, which may have few thousands of pages, doing this is impossible and the migration tools will also not be able to do this.  In that case, writing a small utility to create the translation pages is very useful and effective.

As part of the earlier article, create the context.

Then, the below code will do the translation.

using (var scope = host.Services.CreateScope())

            {

                var pnpContextFactory = scope.ServiceProvider.GetRequiredService<IPnPContextFactory>();

                using (var context = await pnpContextFactory.CreateAsync("DemoSite"))

                {

                    var page = (await context.Web.GetPagesAsync("DemoPage")).FirstOrDefault();

                    await page.TranslatePagesAsync();

                }

            }

The above piece will do the same which we did manually earlier.  Hope this is simple and a good use case.


Happy Coding

Sathish Nadarajan

Author Info

Sathish Nadarajan
 
Solution Architect
 
Rate this article
 
Sathish is a Microsoft MVP for SharePoint (Office Servers and Services) having 15+ years of experience in Microsoft Technologies. He holds a Masters Degree in Computer Aided Design and Business ...read more
 

.Net Core Console Application for SharePoint Online using PNPCore library Interactive Login

Sathish Nadarajan
 
Solution Architect
October 16, 2021
 
Rate this article
 
Views
11605

In Many cases, we may need a Console application to do some sort of maintenance or any patch work to be done on the SharePoint Environment.

To connect with the SharePoint, we usually use the SharePointPNPCoreOnline Nuget package. But now, it is deprecated. Instead, we can use either PNP.Framework or PNP.Core.

PNP.Framework can be used from a .Net Framework application.

PNP.Core can be used from a .Net Core application.

In this application, let us see the steps to create the application step by step.

1. Open VS 2019 and create a new project.


2. Select the Framework as .Net 5.0


3. Open the NuGet Manager.


4. The below one is deprecated.


5. Install the PnP.Core


6. Install PnP.Core.Auth


7. After installing, the Program.cs will looks as below.

using Microsoft.Extensions.Configuration;
using Microsoft.Extensions.DependencyInjection;
using Microsoft.Extensions.Hosting;
using Microsoft.Extensions.Logging;
using PnP.Core.Services;

using System;
using System.Linq;
using System.Threading.Tasks;

namespace DotNet.Core.Console
{
class Program
{
public static async Task Main(string[] args)
{
var host = Host.CreateDefaultBuilder()

.ConfigureLogging((hostingContext, logging) =>
{
logging.AddEventSourceLogger();
logging.AddConsole();
})
.ConfigureServices((hostingContext, services) =>
{
// Read the custom configuration from the appsettings..json file
var customSettings = new CustomSettings();
hostingContext.Configuration.Bind("CustomSettings", customSettings);

// Add the PnP Core SDK services
services.AddPnPCore(options => {

options.PnPContext.GraphFirst = true;

options.Sites.Add("DemoSite",
new PnP.Core.Services.Builder.Configuration.PnPCoreSiteOptions
{
SiteUrl = customSettings.DemoSiteUrl

});
});

services.AddPnPCoreAuthentication(
options =>
{
options.Credentials.Configurations.Add("interactive",
new PnP.Core.Auth.Services.Builder.Configuration.PnPCoreAuthenticationCredentialConfigurationOptions
{
ClientId = customSettings.ClientId,
TenantId = customSettings.TenantId,
Interactive = new PnP.Core.Auth.Services.Builder.Configuration.PnPCoreAuthenticationInteractiveOptions
{
RedirectUri = customSettings.RedirectUri
}
});

options.Credentials.Configurations.Add("credentials",
new PnP.Core.Auth.Services.Builder.Configuration.PnPCoreAuthenticationCredentialConfigurationOptions
{
ClientId = customSettings.ClientId,
TenantId = customSettings.TenantId,
Interactive = new PnP.Core.Auth.Services.Builder.Configuration.PnPCoreAuthenticationInteractiveOptions
{
RedirectUri = customSettings.RedirectUri
},
//},
//CredentialManager = new PnP.Core.Auth.Services.Builder.Configuration.PnPCoreAuthenticationCredentialManagerOptions
//{
// CredentialManagerName = customSettings.CredentialManager
//}

});

// Configure the default authentication provider
options.Credentials.DefaultConfiguration = "interactive";

// Map the site defined in AddPnPCore with the
// Authentication Provider configured in this action
options.Sites.Add("DemoSite",
new PnP.Core.Auth.Services.Builder.Configuration.PnPCoreAuthenticationSiteOptions
{
AuthenticationProviderName = "interactive"
});
});
})
// Let the builder know we're running in a console
.UseConsoleLifetime()
// Add services to the container
.Build();

await host.StartAsync();

using (var scope = host.Services.CreateScope())
{
var pnpContextFactory = scope.ServiceProvider.GetRequiredService();

using (var context = await pnpContextFactory.CreateAsync("DemoSite"))
{
//Use the context to do the operations.

}
}

host.Dispose();
}
}
}

8. Appsettings.json will be as below.

{
"key": "generic",
"CustomSettings": {
"ClientId": "2ab1db09-3a59-48bc-*******-******",
"TenantId": "61943e96-b3a9-49dd-*****-*****",
"DemoSiteUrl": "https://sppalsmvp.sharepoint.com/sites/MySiteCollection/",
"DemoSubSiteUrl": "https://sppalsmvp.sharepoint.com/sites/MySiteCollection/",
"CredentialManager": "sppalsmvp",
"RedirectUri": "http://localhost",
"UserPrincipalName": "sathish@sppals.com",
"Password": "*****"
},
"Logging": {
"LogLevel": {
"Default": "Information"
}
}
}

9. Csproj as below

<Project Sdk="Microsoft.NET.Sdk">


<PropertyGroup>

<OutputType>Exe</OutputType>

<TargetFramework>net5.0</TargetFramework>


</PropertyGroup>


<ItemGroup>

<PackageReference Include="Microsoft.Extensions.Hosting" Version="5.0.0" />

<PackageReference Include="PnP.Core" Version="1.4.0" />

<PackageReference Include="PnP.Core.Auth" Version="1.4.0" />

</ItemGroup>


<ItemGroup>

<None Update="appsettings.json">

<CopyToOutputDirectory>Always</CopyToOutputDirectory>

</None>

</ItemGroup>


</Project>


10. When we execute this, the interactive login will be popped up.


With this, the .Net Core Console application is ready to work with SharePoint tenant.  We can do our activities with this PNPCoreContext object.


There are many other ways of authentication and getting the client context.  In this article, I have demonstrated the Interactive Login and the Client Credentials method.  In the upcoming articles, let us see how to get the context using user name and password, Azure Certificates etc.,


Happy Coding
Sathish Nadarajan

Author Info

Sathish Nadarajan
 
Solution Architect
 
Rate this article
 
Sathish is a Microsoft MVP for SharePoint (Office Servers and Services) having 15+ years of experience in Microsoft Technologies. He holds a Masters Degree in Computer Aided Design and Business ...read more
 

NodeJS – Get the List of Site Collections in my Office 365 Tenant by PNP JS Search Query

Sathish Nadarajan
 
Solution Architect
October 12, 2021
 
Rate this article
 
Views
518

In the earlier articles, we saw how to get the context of SharePoint from the Node application. As part of that, let us see, how to get the list of site collections in my office 365 tenant.

The Index.ts will be as below.

import express, { Application, ErrorRequestHandler, Request, response, Response } from 'express';
import NodeFetchClient from 'node-pnp-js';
import * as pnp from 'sp-pnp-js';

const app: Application = express();
const PORT = process.env.PORT || 2000;

let url = "https://sppalsmvp.sharepoint.com/sites/MySiteCollection/";
let credentialOptions = {
    username: 'sathish@sppals.com',
    password: '****'
};

app.get("/", async (req: Request, res: Response): Promise<void> => {


    pnp.setup({
        sp: {
            fetchClientFactory: () => {
                return new NodeFetchClient(credentialOptions, url);
            }
        }
    });

    pnp.sp.search({
        Querytext: "contentclass:STS_Site", SelectProperties: ["Title","SPWebUrl", "SPSiteUrl", "WebTemplate"], RowLimit: 500, TrimDuplicates: false
    }).then((r) => {

        r.PrimarySearchResults.forEach((value) => {
            console.log(`${value.Title} - ${value.SPWebUrl} - ${value.WebTemplate}`);
       });

        res.send('success');
        
    }).catch(e=>{
       res.status(500).send(e); 
    });

});

app.use(function (err: any, req: Request, res: Response, next: ErrorCallback) {
    res.status(err.status || 500);
    res.send(err);
});

app.listen(PORT, (): void => {
    console.log(`Server Running here https://localhost:${PORT}`);
});

Happy Coding
Sathish Nadarajan

Author Info

Sathish Nadarajan
 
Solution Architect
 
Rate this article
 
Sathish is a Microsoft MVP for SharePoint (Office Servers and Services) having 15+ years of experience in Microsoft Technologies. He holds a Masters Degree in Computer Aided Design and Business ...read more
 

NodeJS – Get SharePoint PnP-Core Client Context using UserName and Password and access SharePoint Objects from Node Application

Sathish Nadarajan
 
Solution Architect
October 11, 2021
 
Rate this article
 
Views
997

In the earlier article, we saw how to setup a NodeJS application and start the development. As a continuation, let us see, how to create the SharePoint Context and access the SharePoint Sites.

The intention is to access the SharePoint objects and do some functionality from a Node JS application. i.e., a Separate standalone application which will do some action on our SharePoint Tenant.

To get the SharePoint Client Context, install the node-pnp-js and sp-pnp-js.

Let us take the earlier application itself for this continuation.

Install the following node modules.

npm install node-pnp-js –save
npm install sp-pnp-js –save
npm install pnp-auth –save
npm install @pnp/logging @pnp/common @pnp/odata @pnp/sp –save

Update the Index.ts file as below.

import express, { Application, ErrorRequestHandler, Request, response, Response } from 'express';
import NodeFetchClient from 'node-pnp-js';
import * as pnp from 'sp-pnp-js';


const app: Application = express();
const PORT = process.env.PORT || 2000;

let url = "https://sppalsmvp.sharepoint.com/sites/MySiteCollection/";
let credentialOptions = {
    username: 'sathish@sppals.com',
    password: '*******'
};

app.get("/", async (req: Request, res: Response): Promise<void> => {


    pnp.setup({
        sp: {
            fetchClientFactory: () => {
                return new NodeFetchClient(credentialOptions, url);
            }
        }
    });

    try {
        let list = await pnp.sp.web.lists.getByTitle('TempList').get();
        console.log(list);
        res.send(list);
    }
    catch (error) {
        res.send(error);
    }

});

app.use(function (err: any, req: Request, res: Response, next: ErrorCallback) {
    res.status(err.status || 500);
    res.send(err);
});

app.listen(PORT, (): void => {
    console.log(`Server Running here https://localhost:${PORT}`);
});

Then on the command prompt, execute npm run dev to run the server.

If we browse, then the output will be as below.

Download the Source HERE

Happy Coding
Sathish Nadarajan

Author Info

Sathish Nadarajan
 
Solution Architect
 
Rate this article
 
Sathish is a Microsoft MVP for SharePoint (Office Servers and Services) having 15+ years of experience in Microsoft Technologies. He holds a Masters Degree in Computer Aided Design and Business ...read more
 

CSOM – Get the Pages modified after a time stamp by C# CSOM – SharePoint Online

Sathish Nadarajan
 
Solution Architect
October 7, 2021
 
Rate this article
 
Views
1299

In one of the requirements, got to retrieve the files which are modified after a specific time stamp. As part of that, created a CAML Query and thought of sharing with the community with the usecase.

One thing, just wanted to highlight is, the below code uses pnpFramework to get the context. As the earlier PNPCoreOnline is deprecated. Please search for pnpframework on the Nuget Manager.

public static void GetPagesByTimeStamp()
        {
            System.IO.File.AppendAllText(logFilePath, "Started.." + Environment.NewLine + Environment.NewLine);

            string siteUrl = ConfigurationManager.AppSettings["siteUrl"];
            string userName = ConfigurationManager.AppSettings["userName"];
            string password = ConfigurationManager.AppSettings["password"];
            string timestamp = ConfigurationManager.AppSettings["timestamp"];

            try
            {
                using (var ctx = new PnPClientContext(siteUrl))
                {
                    ctx.Credentials = new SharePointOnlineCredentials(userName, password.ToSecureString());
                    //Get the web from the current context
                    Web web = ctx.Web;
                    ctx.Load(web);
                    ctx.Load(web.Lists);
                    ctx.ExecuteQueryRetry();

                    //Get the Pages Library
                    var pages = ctx.Web.Lists.GetByTitle("Site Pages");
                    ctx.Load(pages);

                    //
                    
                    string datetime = Convert.ToDateTime(timestamp).ToString("yyyy-MM-ddTHH:mm:ssZ");
                    //Get all Items inside the Pages Library
                    CamlQuery camlQuery = new CamlQuery();
                    camlQuery.ViewXml = @"<View Scope='Recursive'>
                                             <Query>
                                                <Where>
                                                    <Gt>
                                                        <FieldRef Name='Modified'/>
                                                        <Value IncludeTimeValue='TRUE' Type='DateTime'>" + datetime + "</Value>" + 
                                                    @"</Gt>
                                                </Where>
                                                <OrderBy>
                                                    <FieldRef Name='Modified' Ascending = 'true' />
                                                </OrderBy>
                                            </Query>
                                         </View>";
                    ListItemCollection listItems = pages.GetItems(camlQuery);
                    ctx.Load(listItems);
                    ctx.ExecuteQuery();

                    List<Page> lstPages = new List<Page>();

                    foreach (var listItem in listItems)
                    {
                        System.Console.WriteLine(listItem["Title"]);
                        Page p = new Page();
                        p.Id = Convert.ToInt32(listItem["ID"]);
                        p.Name = Convert.ToString(listItem["Title"]);

                        lstPages.Add(p);


                    }


                    TextWriter txtWriter = new StreamWriter(ConfigurationManager.AppSettings["LogFilePath"] + "Pages.csv");

                    using (CsvWriter writer = new CsvWriter(txtWriter, new CsvHelper.Configuration.CsvConfiguration(System.Globalization.CultureInfo.InvariantCulture)))
                    {
                        writer.WriteRecords(lstPages);

                        writer.Flush();

                    }


                }
            }
            catch (Exception ex)
            {
                System.Console.WriteLine("Exception occurred : " + ex.Message);
                System.Console.ReadLine();
            }
        }

The above code is self explanatory and doesn’t require much explanation I guess.


Happy Coding
Sathish Nadarajan

Author Info

Sathish Nadarajan
 
Solution Architect
 
Rate this article
 
Sathish is a Microsoft MVP for SharePoint (Office Servers and Services) having 15+ years of experience in Microsoft Technologies. He holds a Masters Degree in Computer Aided Design and Business ...read more
 

NodeJS – Step by Step Procedure to Setup and Create a NodeJS application and use TypeScript as a Programming Language

Sathish Nadarajan
 
Solution Architect
October 1, 2021
 
Rate this article
 
Views
1011

All of us are familiar about the popularity and the power of Node JS. By default the NodeJS application will have the start page as a JS file and predominantly it is meant for the JavaScript. But, when I wanted to create a Node WebSite, which is going to interact with SharePoint Online using PNPJS, I was in a situation that, TypeScript is more friendlier than JS for any PNP and SharePoint Online coding.

Hence, wanted to explore, how to create or use Typescript within the Node JS application and make the DEV environment a bit faster and cleaner.

In this article, let us see the steps to create a NodeJS application and use typescript as a Programming Language on it.

1. Install Node LTS from the below path.

https://nodejs.org/en/download/


2. Ensure that the Node is installed properly by typing “node -v”. This will give the version of the node installed.

3. Create a folder with the app name – C:\NodeApps\DemoNodeJSWithTypeScript
4. Open the command prompt.

5. Create a solution using “npm init”.

6. The command will create the package.json file.


Package.json

{
"name": "demonodejswithtypescript",
"version": "1.0.0",
"description": "",
"main": "index.js",
"scripts": {
"test": "echo "Error: no test specified" && exit 1"
},
"author": "",
"license": "ISC"
}

7. Install TypeScript using the command npm install -g typescript

8. Ensure the version of typescript by tsc –version

9. We need to create the config file for the TypeScript. Tscofig.json.
a. We can create this by running the command “tsc –init”.


10. Now, the tsconfig.json has been created. Have a look on the site, for more information about the tsconfig.
11. Update the tsconfig as below.

{
"compilerOptions": {
/* Visit https://aka.ms/tsconfig.json to read more about this file */
"target": "es6", /* Set the JavaScript language version for emitted JavaScript and include compatible library declarations. */
"module": "commonjs", /* Specify what module code is generated. */
"rootDir": "./src", /* Specify the root folder within your source files. */
"moduleResolution": "node", /* Specify how TypeScript looks up a file from a given module specifier. */
"outDir": "./dist", /* Specify an output folder for all emitted files. */
"esModuleInterop": true, /* Emit additional JavaScript to ease support for importing CommonJS modules. This enables `allowSyntheticDefaultImports` for type compatibility. */
"forceConsistentCasingInFileNames": true, /* Ensure that casing is correct in imports. */
"strict": true, /* Enable all strict type-checking options. */
"skipLibCheck": true /* Skip type checking all .d.ts files. */
},
"exclude": [
"./node_modules"
]
}

12. Create the folders SRC and DIST as updated above on the tsconfig.json file. The folder structure will looks as below.


13. Create a file called index.ts inside the src folder.
14. Write some TS code here.

function sum (num1:number, num2:number){
return num1 + num2;
}
console.log(sum(8,4))

15. Now, install the typescript compiler npm install -D typescript

16. Now run tsc ;- this will create the corresponding index.js on the outdir dist folder.

17. Now, the solution and the index.js will be shown as below.


18. Now execute “node dist/index.js” to run the application.


19. Install ts-node by “npm install -D ts-node
a. Ts-node allows us to point to a Typescript file. It will run .ts, compile it and run it with Node.js for us.
20. Update the config file as below.

{
"name": "demonodejswithtypescript",
"version": "1.0.0",
"description": "",
"main": "index.js",
"scripts": {
"test": "echo "Error: no test specified" && exit 1",
"start": "ts-node ./src/index.ts"
},
"author": "",
"license": "ISC",
"devDependencies": {
"ts-node": "^10.2.1",
"typescript": "^4.4.3"
}
}

21. Now we can execute by using “npm start” itself. This will automatically trigger the index.ts file.
22. Then install the below packages for various purposes.

Npm install express
Npm install -D @types/node
Npm install -D @types/express


23. Update the index.ts as below.

import express, { Application, ErrorRequestHandler, Request, response, Response } from 'express';

const app: Application = express();
const PORT = process.env.PORT || 2000;

app.get("/", async (req: Request, res: Response): Promise => {

res.send("Hello Typescript with Node.js!")

});

app.use(function (err: any, req: Request, res: Response, next: ErrorCallback) {
res.status(err.status || 500);
res.send(err);
});

app.listen(PORT, (): void => {
console.log(`Server Running here https://localhost:${PORT}`);
});

24. Now run “npm start


25. Browse the page http://localhost:2000


26. The next step is to continuously monitor the TS files changes, so that the npm server should automatically refresh. For that, I prefer to go with Nodemon.

27. Npm install -D nodemon

28. Update the package.json with the script parameter dev. The final package.json will looks like below.

{
"name": "demonodejswithtypescript",
"version": "1.0.0",
"description": "",
"main": "index.js",
"scripts": {
"test": "echo "Error: no test specified" && exit 1",
"start": "ts-node ./src/index.ts",
"dev": "nodemon ./src/index.ts"
},
"author": "",
"license": "ISC",
"devDependencies": {
"@types/express": "^4.17.13",
"@types/node": "^16.10.2",
"ts-node": "^10.2.1",
"typescript": "^4.4.3"
},
"dependencies": {
"express": "^4.17.1"
}
}

29. Now we can use the command “npm run dev

Though it’s a bit lengthy, this will be useful for someone who wants to develop a Node application with TypeScript. Especially the stand alone application for the SharePoint Online. Yes, this is a start and the objective is to use this application with PNPJS to interact with SharePoint Online sites in the upcoming articles. Stay Tuned!!!

Download the Source HERE

Happy Coding
Sathish Nadarajan

Author Info

Sathish Nadarajan
 
Solution Architect
 
Rate this article
 
Sathish is a Microsoft MVP for SharePoint (Office Servers and Services) having 15+ years of experience in Microsoft Technologies. He holds a Masters Degree in Computer Aided Design and Business ...read more
 

Congratulations Sathish For Your Sixer !!!

Ashok Raja
 
Solutions Architect
September 6, 2021
 
Rate this article
 
Views
215

Congratulations Sathish on receiving the MVP Award for the 6th time in a row. It looks like yesterday when you received your first MVP Award. Year after year you have been showing the same level of commitment and you really deserve this.

It’s been a remarkable journey over the period of time. Proud to see you grow in all aspects of life. Wishing you all the best Sathish 🙂

Category : General

Author Info

Ashok Raja
 
Solutions Architect
 
Rate this article
 
I am Ashok Raja, Share Point Consultant and Architect based out of Chennai, India. ...read more
 

Refreshing JavaScript – Calling an Async method within Map method in Typescript – SPFx

Sathish Nadarajan
 
Solution Architect
August 27, 2021
 
Rate this article
 
Views
1117

Recently faced an issue. I need to iterate a list of items and need to call an Async method. But the map needs to wait until the last async method is been returned. Usually what happens is, since the method is async, after the first value, it goes beyond the map method and returns. For that, we must write the method with async and Promise All. The pseudo method is as below.

public getTasks = async (Id: number): Promise<any> => {
    try {
      let tasksListItems = await sp.web.lists.getByTitle('Tasks').items.expand('AssignedTo').select('*', 'AssignedTo/Title', 'AssignedTo/EMail', 'AssignedTo/Name').filter(`ProjectID eq ${Id} `).get();

      let taskIds = [];
      taskIds = await Promise.all(tasksListItems.map(async item => {
        return {
          key: item.Id,
          text: item.AssignedTo1.Title,
          taskTitle: item.Title,
          isMember: await graphDataProvider.isMemberOfOffice365Group(item.AssignedTo.Name.split('|')[2], await this.getCurrentUserPrinciple())
        }
      }));
      return taskIds.filter(task => task.isMember);
    }
   catch (error) {
      return null;
    }
  }

Points to be considered.
1. The method should be declared as async method.
2. The map should be surrounded with await Promise.all()
3. Within the map method, we can very well call the async method using the await keyword.

Happy Coding
Sathish Nadarajan

Author Info

Sathish Nadarajan
 
Solution Architect
 
Rate this article
 
Sathish is a Microsoft MVP for SharePoint (Office Servers and Services) having 15+ years of experience in Microsoft Technologies. He holds a Masters Degree in Computer Aided Design and Business ...read more
 

How to Find the User belongs to an Office 365 Group using Graph API in SharePoint Online – SPFx (SharePoint Framework)

Sathish Nadarajan
 
Solution Architect
August 25, 2021
 
Rate this article
 
Views
2044

In this article, let us see whether the logged in user (or any user) belongs to a particular Office 365 Group member/owner or not. The below class is self-explanatory.

GraphDataProvider.ts

//Import the necessary modules.
import { WebPartContext } from "@microsoft/sp-webpart-base";
import validator from 'validator';
import IGraphDataProvider from "./IGraphDataProvider";
import customLogger from '../../../common/services/CustomLogger';

export class GraphDataProvider implements IGraphDataProvider {

    public context: WebPartContext;

    public setup(context: WebPartContext): void {
        this.context = context;
    }

    public isMemberOfOffice365Group = async (groupId: string, userPrinciple: string): Promise<boolean> => {
        try {
            let isMember = false;

            if (validator.isUUID(groupId)) {
                let membersAndOwners = await this.getMembersOfGroup(groupId);
                membersAndOwners = membersAndOwners.map(user => { return user.toLowerCase() })
                isMember = membersAndOwners.indexOf(userPrinciple.toLowerCase()) != -1 ? true : false;
            }
            else {
                isMember = groupId.toLowerCase() == userPrinciple.toLowerCase() ? true : false;
            }
            return isMember;
        } catch (error) {

 
            return false;
        }

    }

    private getMembersOfGroup = async (groupID: string): Promise<string[]> => {
        try {
 

            let membersAndOwners: string[] = [];

            let client = await this.context.msGraphClientFactory.getClient();

            let groupmembers = await client.api(`/groups/${groupID}`).expand('members').get();
            let groupowners = await client.api(`/groups/${groupID}`).expand('owners').get();

            if (groupmembers.members) {
                groupmembers.members.forEach(member => {
                    membersAndOwners.push(member.userPrincipalName);
                })
            }
            if (groupowners.owners) {
                groupowners.owners.forEach(owner => {
                    membersAndOwners.push(owner.userPrincipalName);
                })
            }
            return membersAndOwners;
        }
        catch (error) {
 
            return null;
        }

    }
}

const graphDataProvider = new GraphDataProvider();
export default graphDataProvider;

IGraphDataProvider.ts

export default interface IGraphDataProvider {
    isMemberOfOffice365Group  (groupId: string, userPrinciple: string): Promise<boolean> ;
}

And on the Consumption Component,

import graphDataProvider from '../../services/GraphDataProvider';

let isMember = await graphDataProvider.isMemberOfOffice365Group(Group, currentUserPrinciple)

Happy Coding
Sathish Nadarajan

Author Info

Sathish Nadarajan
 
Solution Architect
 
Rate this article
 
Sathish is a Microsoft MVP for SharePoint (Office Servers and Services) having 15+ years of experience in Microsoft Technologies. He holds a Masters Degree in Computer Aided Design and Business ...read more
 

Leave a comment