How to Insert Google Charts Image into PDF using iTextSharp in SharePoint

Ahamed Fazil Buhari
 
Senior Developer
August 28, 2016
 
Rate this article
 
Views
11239

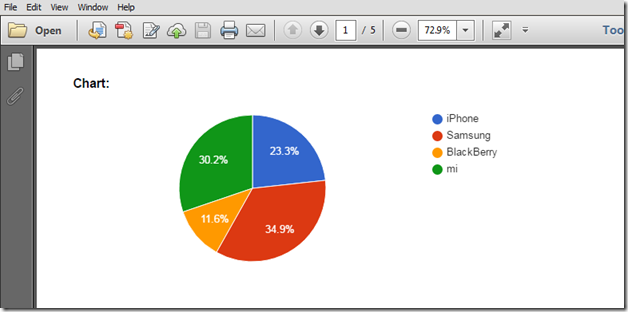
Hello everyone, in this article we’re going to look step by step approach to insert Google Chart into PDF. Here, the idea is to get the ImageURI from the printed google chart using JavaScript and append that Image into our newly created PDF file.

You can refer these articles Generate PDF report using iTextSharp (.NET PDF library) in SharePoint Environment and Google Chart in SharePoint – to get an idea about Google Chart and iTextSharp dll to Generate PDF in SharePoint.

Google Chart provide the function getImageURI() and by using JavaScript we’ll get the PNG Image of a chart. Pass this image/png data into our server side code and convert this into Base64 format and finally we can easily convert this Base64 data into .NET Image object which can be later inserted into the PDF file using iTextSharp.

Note: getImageURI() function currently works for core charts and geocharts. You can refer Google Chart – official website to know more about Printing PNG Charts

Let me explain about the process in step by step procedure,

Step 1: Convert Google Chart into Image URI using chart.getImageURI();

Here, I’ve created the Visual Web Part and inside the ascx controller Pie Chart to show the data. I consider that you the knowledge to create the Google, so I show only the code that needs to be added for PNG Chart.

 <script type="text/javascript" language="javascript">
     // script to create Google Chart, leaving it to the reader
     var chart = new google.charts.Bar(document.getElementById("Piechart_Phone"));
     var imgURI_Phone = “”;
     // Wait for the chart to finish drawing before calling the getImageURI() method.
       google.visualization.events.addListener(chart, 'ready', function () {
         imgURI_Phone = chart.getImageURI();        
         document.getElementById('<%=hdImgSrcChart.ClientID %>').value = imgURI_Phone;
       });    
     
     chart.draw(data, options);    
   
 </script>
 
 <asp:HiddenField ID="hdImgSrcChart" runat="server" />
 <div id='chart_content_div' style='top: 0; left: 0; position: absolute; visibility: hidden;
     width: 100% !important; height: 100% !important;'>
     <div id='Piechart_Phone' style='width: 650px; height: 600px; top: 0; left: 0;'>
     </div>
 </div>
 

Once we get the PNG data from client side scripting, we are passing its value to server side code using HiddenField element as shown above. getImageURI will return the value something like this,

Step 2: Convert ImageURI to Base64 data and change it to .NET Image object

In the server side code, add the below code script inside your <WebPartController>.cs file.

 string imgSrc = this.hdImgSrcChart.Value;
        string base64Data = "";
        //Create .NET Image object, please make sure it is not iTextSharp Image object
        System.Drawing.Image chartImage = null;
 
        if ((!string.IsNullOrEmpty(imgSrc)) && (imgSrc != "undefined"))
        {
        	base64Data = Regex.Match(imgSrc, @"data:image/(?<type>.+?),(?<data>.+)").Groups["data"].Value;
               chartImage = Base64ToImage(base64Data);
        }
 
 
 //Function to Convert Base64 to Image obj
 public static System.Drawing.Image Base64ToImage(string base64String)
 {
 // Convert base 64 string to byte[]
        byte[] imageBytes = Convert.FromBase64String(base64String);
        // Convert byte[] to Image
        using (var ms = new MemoryStream(imageBytes, 0, imageBytes.Length))
        {
        	System.Drawing.Image image = System.Drawing.Image.FromStream(ms, true);
               return image;
  	}
 }
 

Step 3: Create an iTextSharp Image object

In Step 2, we generated the .NET Image object from base64 data. The below code snippet is continuation of the above step. In this we are adding the Image into PDF.

 if (chartImage != null)
      	{                        
 table = GetTables.GoogleChartInPDF(chartImage, 600, 350, "Chart:");
 //Add this table into main table, create new cell in the main table and add //chart image
        PdfPCell colMaintable = new PdfPCell(table);
               colMaintable.Border = Rectangle.NO_BORDER;
               colMaintable.BorderWidth = 0;
               allTable.AddCell(colMaintable);
        }
 
 //Function to Insert Google Chart Image into PDF
 public static PdfPTable GoogleChartInPDF(System.Drawing.Image GC_Image, float widthPixel, float heightPixel, string chartTitle)
         {
 	     // Create new PDF table for Google Chart
             PdfPTable table = new PdfPTable(1);
             table.DefaultCell.BorderWidth = 0;
             table.DefaultCell.PaddingTop = 15;
             table.DefaultCell.PaddingBottom = 15;            
 
             if (GC_Image != null)
             {
 		  //Insert the Image only if the GV_Image is available               
                 PdfPTable imgdataTable = new PdfPTable(1);
                 imgdataTable.TotalWidth = 100;
                 imgdataTable.PaddingTop = 15;
 			
 		  //Adding Title
                 PdfPCell ImgCol = new PdfPCell(new Phrase(chartTitle,14));
                 imgdataTable.AddCell(ImgCol);
 
 //Create iTextSharp.text.Image reference and assign .NET Image obj
              iTextSharp.text.Image orgChartImg = iTextSharp.text.Image.GetInstance(GC_Image, System.Drawing.Imaging.ImageFormat.Jpeg);
                 if (orgChartImg.Height > orgChartImg.Width)
                 {                    
                     float percentage = 0.0f;
                     percentage = heightPixel / orgChartImg.Height;
                     orgChartImg.ScalePercent(percentage * 100);
                 }
                 else
                 {                    
                     float percentage = 0.0f;
                     percentage = widthPixel / orgChartImg.Width;
                     orgChartImg.ScalePercent(percentage * 100);
                 }
                 
                 PdfPCell rowImgData = new PdfPCell(orgChartImg);                
                 rowImgData.BorderWidth = 0;
                 imgdataTable.AddCell(rowImgData);
 		  
 		  //Appending Data into Main Table
                 table.AddCell(imgdataTable);
             }
             return table;
         }
     }


The above code is self-explained through comments. Here I’ve show the approach to insert Google Chart Image to iTextSharp PDF Table. For creating PDF file from scratch and download that PDF into your local, please refer this Generate PDF report using iTextSharp (.NET PDF library) in SharePoint Environment.

Output:


image

Happy Coding

Ahamed

Author Info

Ahamed Fazil Buhari
 
Senior Developer
 
Rate this article
 
Ahamed is a Senior Developer and he has very good experience in the field of Microsoft Technologies, especially SharePoint, Azure, M365, SPFx, .NET and client side scripting - JavaScript, TypeScript, ...read more
 

Using jquery.magnific-popup.min.js to highlight the Images in SharePoint 2013

Sathish Nadarajan
 
Solution Architect
November 2, 2014
 
Rate this article
 
Views
13634

In some of the situations, we may require to enlarge the Image on our Site to make it more visible for the End User. In my situation, I had a screen (ApplicationPage) on which a grid contains the Images. On click of the Images, the images should enlarge on the screen.

Let us see, how to implement this functionality using jquery.magnific-popup.min.js.

1. Open the visual Studio.

2. Add an application Page.

3. Add reference to the jquery-1.9.0.min.js, jquery.magnific-popup.min.js, jquery-ui-1.9.2.custom.js.

4. There is a CSS file given by the Magific Popup team itself. Refer that also. magnific-popup.css

5. All the above files are attached in the download section.

6. Hence, the reference on the page are as follows.

 <SharePoint:ScriptLink ID="ScriptLink7" runat="Server" Localizable="false" Name="~SiteCollection/Style Library/JS/jquery-1.9.0.min.js" Language="javascript" />
     <SharePoint:ScriptLink ID="ScriptLink13" runat="Server" Localizable="false" Name="~SiteCollection/Style Library/JS/jquery.magnific-popup.min.js" Language="javascript" />
     <SharePoint:ScriptLink ID="ScriptLink97" runat="Server" Localizable="false" Name="~SiteCollection/Style Library/JS/jquery-ui-1.9.2.custom.js" Language="javascript" />
 
     <SharePoint:CssRegistration ID="CssRegistration3" Name="<% $SPUrl:~SiteCollection/Style Library/CSS/magnific-popup.css %>" After="corev4.css" runat="server" />
 

7. Now, on the document.ready, we need to wrap the Image tags with an Anchor tag, so that on click of the image, we can trigger an event.

 $(document).ready(function ($) {
              
 
             var arraysOfIds = $('#Images img').map(function () {
 
                 this.setAttribute("class", "image-popup-no-margins");
                 $(this).wrap("<a class="image-popup-no-margins"  href="" + this.src + ""></a>");
                 return this.src;
 
             }).get();


             $('.image-popup-no-margins').magnificPopup({
                 type: 'image',
                 closeOnContentClick: true,
                 closeBtnInside: false,
                 fixedContentPos: true,
                 mainClass: 'mfp-no-margins mfp-with-zoom', // class to remove default margin from left and right side
                 image: {
                     verticalFit: true
                 },
                 zoom: {
                     enabled: true,
                     duration: 300 // don't foget to change the duration also in CSS
                 }
             });
 
              
         });
 

8. On the ASPX, the div and tags will looks like

 <div id="Images">
             <asp:GridView ID="gvImage" EmptyDataText="No records Found" CssClass="gridImage" runat="server" AutoGenerateColumns="false" ShowHeaderWhenEmpty="true">
             </asp:GridView>
         </div>
 

9. On the Page Load (Server Side), write the logic to bind the Images on the grid.

10. Find the attached sample to see the C# code.

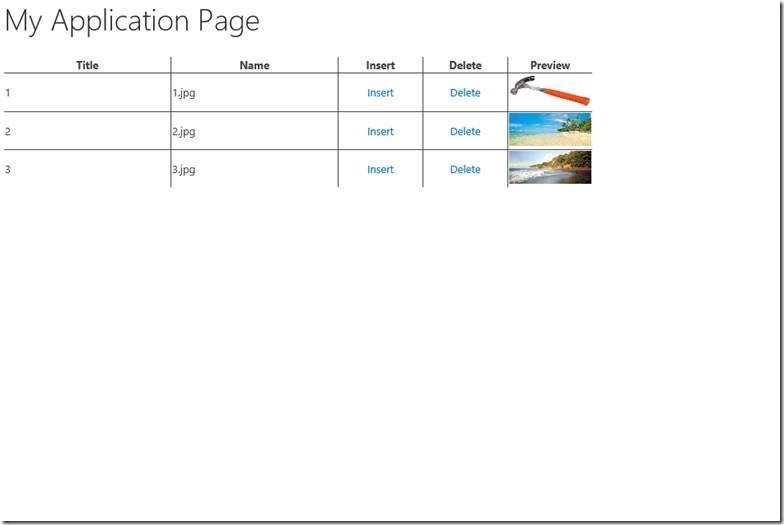
11. The screen will looks like this.

clip_image002

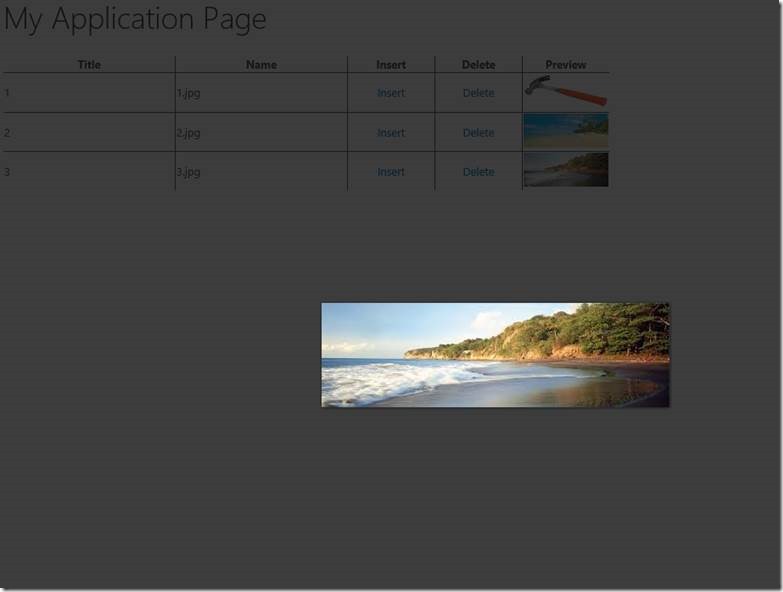
On click of the Images,

clip_image004

This Plugin contains so many other properties as well. I am leaving the rest to the readers. Hope this is a very simple way of implementing this functionality.

Download the Source HERE

Happy Coding.

Sathish Nadarajan.

Author Info

Sathish Nadarajan
 
Solution Architect
 
Rate this article
 
Sathish is a Microsoft MVP for SharePoint (Office Servers and Services) having 15+ years of experience in Microsoft Technologies. He holds a Masters Degree in Computer Aided Design and Business ...read more
 

How to get Image URL from PublishingPageImage field in a SharePoint 2013 or 2010 Sandbox Solution

Ashok Raja
 
Solutions Architect
March 19, 2013
 
Rate this article
 
Views
2422

The conventional SharePoint 2013 or 2010 farm solution model accepts ImageFieldValue for parsing Publishing Image tag. But this approach does not work out for Sandboxed solution. Although usage of ImageFieldvalue does not throw any error during build and deployment ,it will throw and error on execution. To overcome this issue use the below code to extract the Image URL from PublishingPageImage field

Sandboxed Solution

 private string GetPublishingPageImageURL(SPListItem item)
 {
     try
     {
         string ImgTag = item.GetFormattedValue("PublishingPageImage");
         return String.IsNullOrEmpty(ImgTag) ? "#" : XElement.Parse(ImgTag + "</img>").Attribute("src").Value;
     }
     catch
     {
         return "#";
     }
 }

Conventional Method by referring Microsoft.SharePoint.Publishing.Fields namespace

 private string GetPublishingPageImageURL(SPListItem item)
 {
     try
     {
         ImageFieldValue pageImage = item["PublishingPageImage"] as ImageFieldValue;
         return string.IsNullOrEmpty(pageImage.ImageUrl) ? "#" : pageImage.ImageUrl;
     }
     catch  
     {
         return "#";
     }
 }
Category : Tips

Author Info

Ashok Raja
 
Solutions Architect
 
Rate this article
 
I am Ashok Raja, Share Point Consultant and Architect based out of Chennai, India. ...read more
 

Leave a comment