Let us see how to add new custom property to a Visual WebPart in SharePoint 2013 and set a default value to it. Also we can see how to set a drop down as an input parameter for a custom property.
In SharePoint 2013, the basic architecture of Visual WebPart is totally different when compared to SharePoint 2010. In SharePoint 2010, there would be a WebPart class and a UserControl Class in a Visual WebPart. The associated UserControl (.ascx) file will be loaded during execution in WebPart class through CreateChildControl Method. Since two different classes are involved, the properties created in WebPart class has to be passed to UserControl Class to make use of those values during execution. But in SharePoint 2013 Visual WebPart, no separate UserControl class is created for the .ascx file and only WebPart class is available. The controls that are placed in ascx file are automatically converted in to c# code and placed in a file with a name [Name of Web Part].ascx.g.cs. This is a partial class of the original WebPart class that is inherited from “System.Web.UI.WebControls.WebParts.WebPart” class and created in the name of Visual WebPart. Since there is no UserConrol class is involved, the approach to create a custom property is simple and straight forward in SharePoint 2013 when compared to SharePoint 2010.
Follow the below steps to create a custom property
1. Create a new SharePoint 2013 SharePoint Project
2. Add a Visual WebPart to that project
3. Create a new Text Property by adding the below code in the .ascx.cs file of Visual WebPart. The below code creates new custom property by Name TextProperty1
 [WebBrowsable(true),
 WebDisplayName("Text Input"),
 WebDescription("This Accepts text Input"),
 Personalizable(PersonalizationScope.Shared),
 Category("My Category")]
 public string TextProperty1 { get; set; }
To create a Custom property with dropdown values, create a new property based on an enumerator. For this sample I have created a new enumerator inside the same Visual WebPart class with the name “MyEnum” with two values, “Option1” and “Option2”
 public enum MyEnum
 {
     Option1,
     Option2
 }

 [WebBrowsable(true),
 WebDisplayName("Dropdown Input"),
 WebDescription("This Accepts My Enum"),
 Personalizable(PersonalizationScope.Shared),
 Category("My Category")]
 public MyEnum EnumProperty1 { get; set; }
Now let us see what these attributes means.
WebBrowsable attribute enables the property to be displayed in edit mode of WebPart. If set to false, this property won’t be available for the users to change the property by editing the WebPart
WebDisplayName attribute is the user friendly display name for this property
WebDescription attribute acts as a tool tip for WebDisplayName attribute
Personalizable attribute accepts PersonalizationScope enumerator as an input. This enumerator has two options one is Shared and another one is User. If this attribute is set as Shared, the changes to this property will be available to all users. If this attribute is set to User, then changed property value will be available only for that user alone.
Category attribute is used to display this property under a specified group
There is an another attribute called as Default Value attribute, this can be used to set a default value for this property. Unfortunately this property doesn’t seems to work properly. The below section provides an alternative approach for setting default value.
To set default value to the custom property edit the .webpart file of the webpart and include the custom properties to the properties node. This .webpart file is a XML file which controls the behaviour of the WebPart. By default this file contains two properties named as Title and Description. Values of these properties can be changed to provide a meaning full name and description to a WebPart, instead of having the standard values assigned to these properties.
 <?xml version="1.0" encoding="utf-8"?>
 <webParts>
   <webPart xmlns="http://schemas.microsoft.com/WebPart/v3">
     <metaData>
       <type name="SharePointProject1.VisualWebPart1.VisualWebPart1, $SharePoint.Project.AssemblyFullName$" />
       <importErrorMessage>$Resources:core,ImportErrorMessage;</importErrorMessage>
     </metaData>
     <data>
       <properties>
         <property name="Title" type="string">SharePointProject1 - VisualWebPart1</property>
         <property name="Description" type="string">My Visual Web Part</property>
         <property name="TextProperty1" type="string">My Custom Property Value</property>
         <property name="EnumProperty1" type="SharePointProject1.VisualWebPart1.VisualWebPart1+MyEnum, $SharePoint.Project.AssemblyFullName$">Option2</property>
       </properties>
     </data>
   </webPart>
 </webParts>
The enum property requires a special approach and it requires the full name of the enum and the assembly name to identify the enumerator.
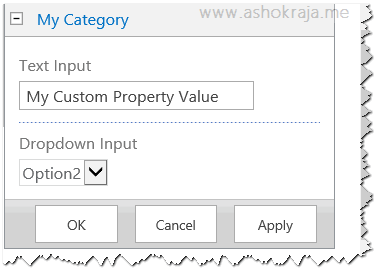
Build and deploy the WebPart and add it to a page and edit the WebPart. This brings you the property Window, which can be used to provide input values for the WebPart properties

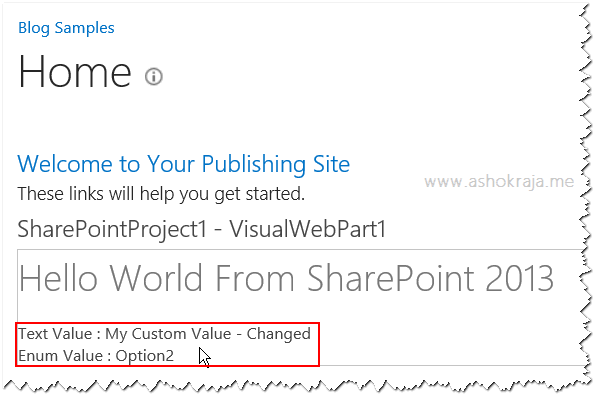
To Access the assigned properties in code, I have added two literal controls in the .ascx file of WebPart and assigned the values of the properties to those variables inside the page load method. The below is the final outcome of WebPart
Related Articles
1. How to create custom properties for a SharePoint 2013 Client WebPart

Leave a comment