How to Configure PerformancePoint Services to use Secure Store in SharePoint 2013

Ahamed Fazil Buhari
 
Senior Developer
January 10, 2017
 
Rate this article
 
Views
4128

Hello everyone, in continuation to the last article on configuration of Performance Point Service, now we are going to configure PerformancePoint services to use the Secure Store. It means we’re going to create a new Target Application then register it with our PerformancePoint Services and give it the proper credentials and then configure SQL Server and create a new Role in our Analysis Services so that our PerformancePoint Services can access data from it.

Please follow the below steps to configure PerformancePoint Service to use Secure Store

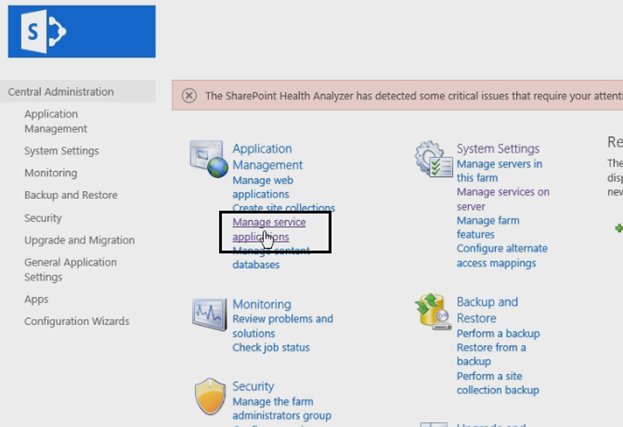
Step 1: Go to Central Admin and click on Manage service applications.

image

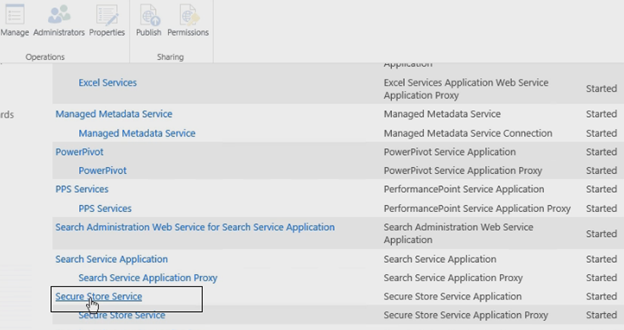
Step 2: In Manage Service Application page, go and open up the Secure Store Service (to know more about configuration of Secure Store Service – please refer here.

image

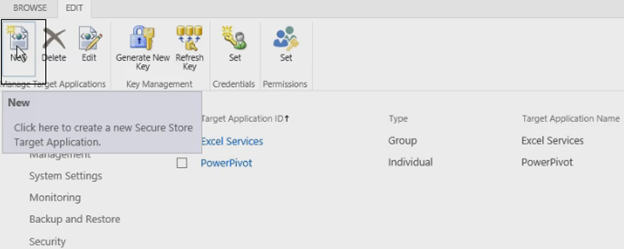
Step 3: in Secure Store Services page, click on New in top ribbon.

image

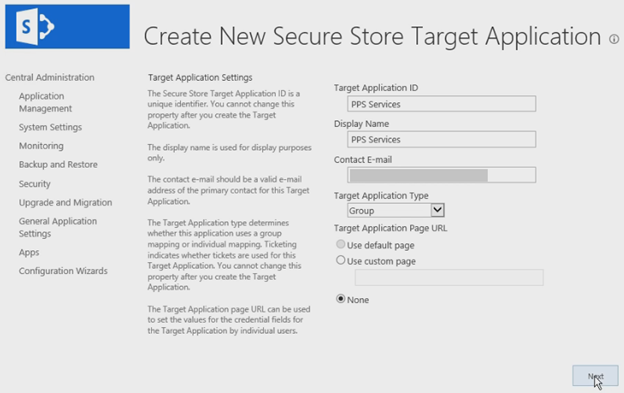
Step 4: In Create New Secure Store Target Application page, provide the Target Application ID, Display name, Contact E-mail and Target Application Type as “Group” (Please refer this msdn site to know more about Target Application Type). Click on Next.

image

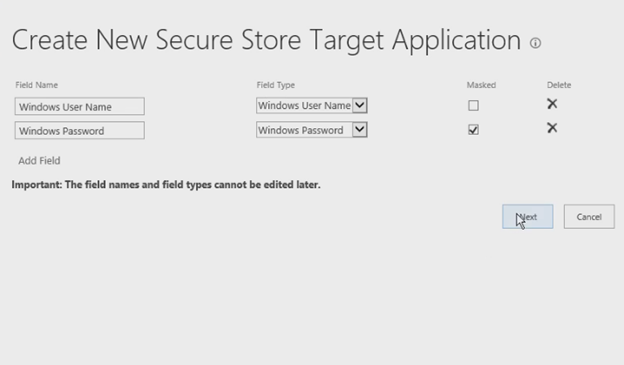
Step 5: Everything looks fine in the next window so please go ahead and click on Next.

image

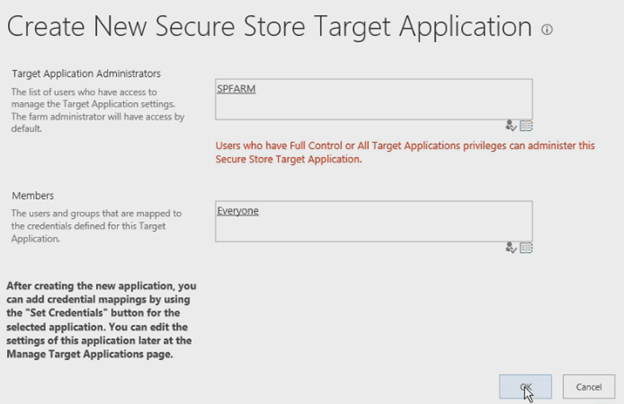
Step 6: Now, we have to give Target Application Administrator so we are going to use the FARM account and in Members people picker field, we want everyone to be able to use it, so here I’ve selected Everyone security group. Click on OK

image

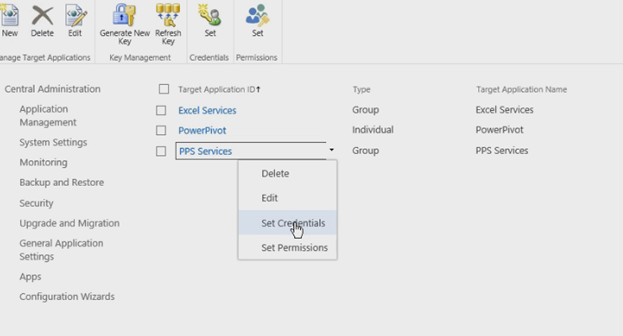
Step 7: PerformancePoint Services has been created in our Secure Store. Don’t forget to set the credentials.

image

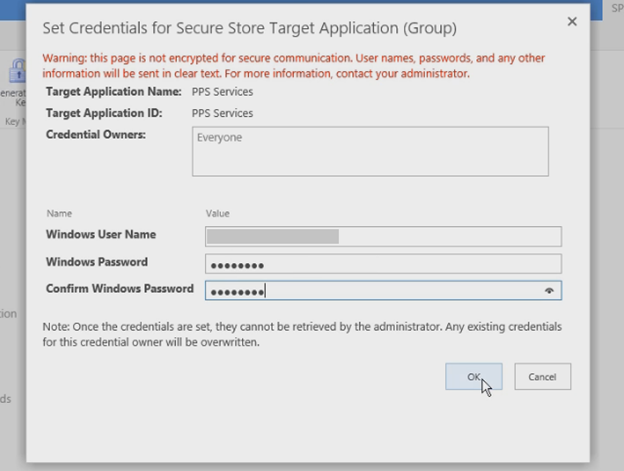
Step 8: Here I’ve used a service account which I use for Business Intelligence services but in your environment you may wish to go ahead, depending upon your organizational policies and procedures, you may want to go ahead with separate account for this.

image

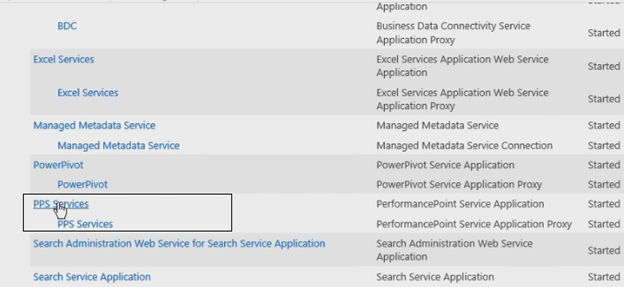
Step 9: Now go to Application Management -> Manage service application (under Service Applications) and click on PerformancePoint Service application which we created in my last article.

image

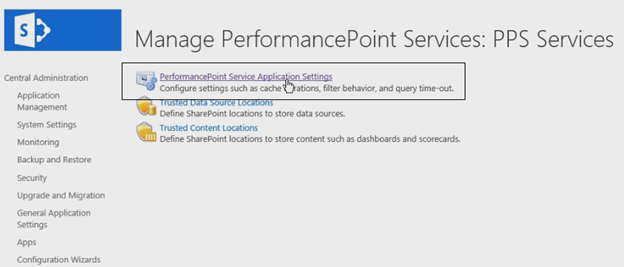
Step 10: In Manage PerformancePoint Services click on PerformancePoint Service Application Settings.

image


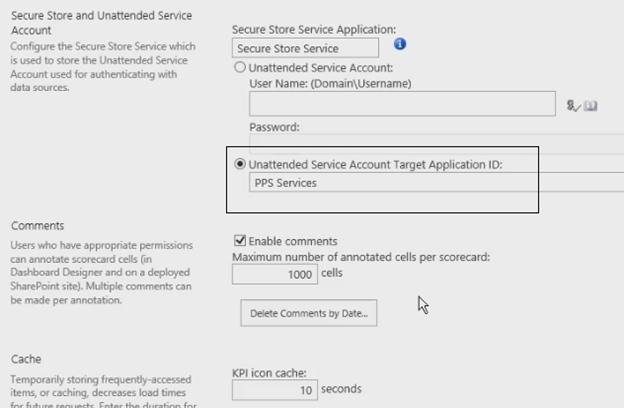
Step 11: Here we can have two choices. We can create a new Unattended Service Account or give the Target Application that we already created, that’s exactly what we’re going to do. Give the Target Application ID which we created in Step 4 and click on OK

image

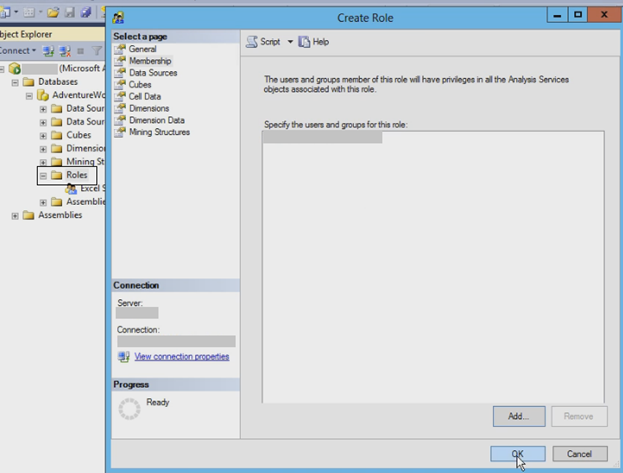
Make sure that, you have created New Role in SQL Server for the account which you used in Step 8. Add New Role.

image

We’re done with creating New Role for PerformancePoint Service. That’s it, Performance Point Service is successfully configured to use Secure Store.

Happy Coding

Ahamed

Category : SharePoint

Author Info

Ahamed Fazil Buhari
 
Senior Developer
 
Rate this article
 
Ahamed is a Senior Developer and he has very good experience in the field of Microsoft Technologies, especially SharePoint, Azure, M365, SPFx, .NET and client side scripting - JavaScript, TypeScript, ...read more
 

Configuration of Performance Point Services in SharePoint 2013

Ahamed Fazil Buhari
 
Senior Developer
 
Rate this article
 
Views
5668

In this article we are going to see, How to Configure PerformancePoint Services in SharePoint 2013. Before going into configuration, let me give you some idea about PerformancePoint. Well, PerformancePoint is all about creating dashboards. We can create charts, filters, scorecards, KPIs (Key Performance Indicator) and all kinds of business analytics tools.

In order to get the PerformancePoint Services up and running, we need to install two things – ADOMD.NET version 10 and ADOMD.NET version 11. You can download this both by clicking on their respective names.

To check which version of ADOMD.NET version has installed on your server, go to C:\Program Files\Microsoft.NET\ and you can find the folder name with their versions. You can download and install the missing version.

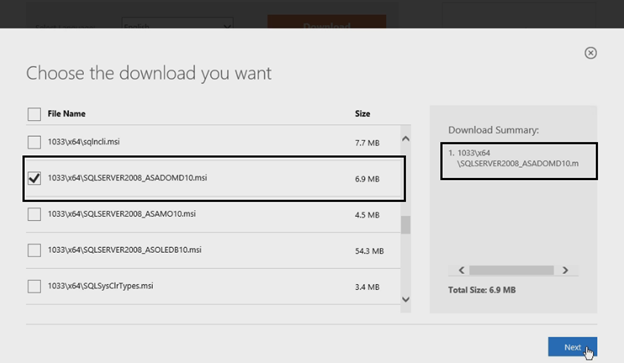
When you click on the download button it will ask you to choose which files you want to download. Just scroll down until you find “SQLSERVER2008_ASADOMD10.msi” 64-bit for version 10 and “SQL_AS_ADOMD.msi” for version 11. For example, here I’m trying to download version 10.

image

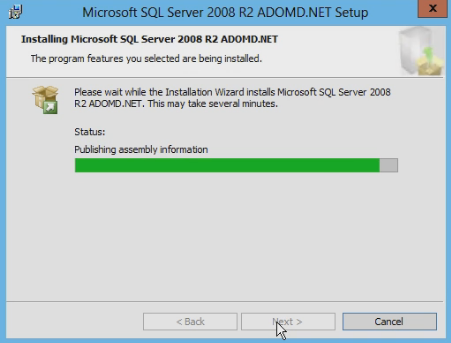
Click on Next and it will download the file. Finally, run and install the downloaded file.

image

We have to grant our Application Pool Service Account access to our SharePoint Content Database. So, for that open up the SharePoint 2013 Management Shell, remember to run as Administrator and run this two simple line,

$webApp = Get-SPWebApplication http://ahamedSP.devsite.com

$webApp.GrantAccessToProcessIdentity("devsite\sp_serviceacc")

Now let’s get into the core part of this article i.e. Configuration of PerformancePoint Services. Please follow the below steps for that,

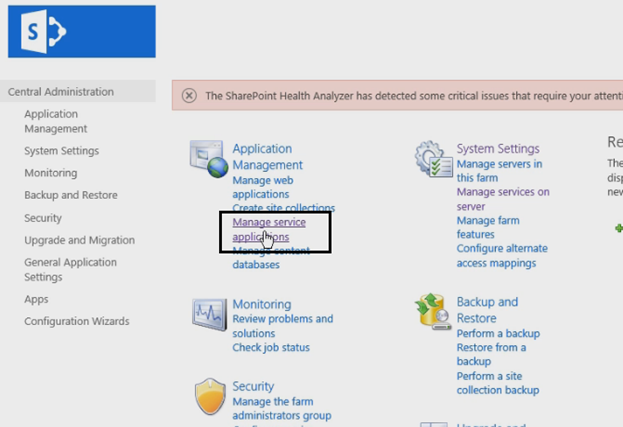
Step 1: Go to Central Admin and click on Manage service applications.

image

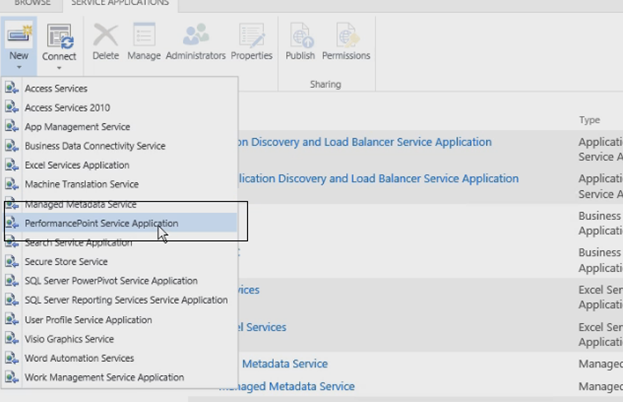
Step 2: Click on New and select PerformancePoint Service application.

image

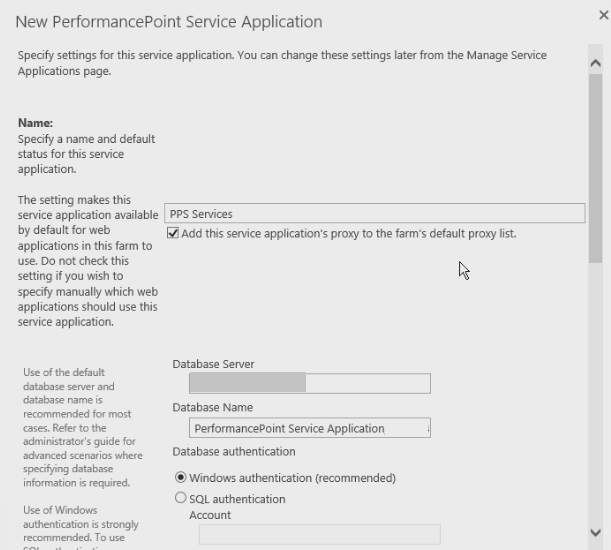
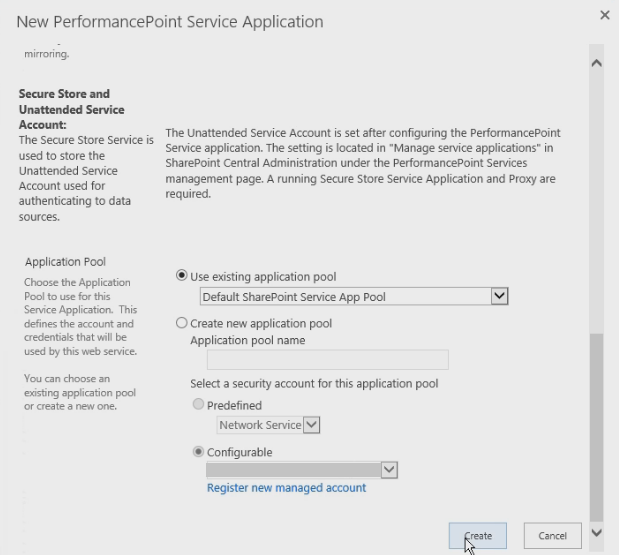
Step 3: In New PerformancePoint Service application window – provide the Name of the service application, Database server, and Database name.

image

Here, I’ve used an existing application pool but you may need to create a new application pool as per your requirement. Click on Create.

image

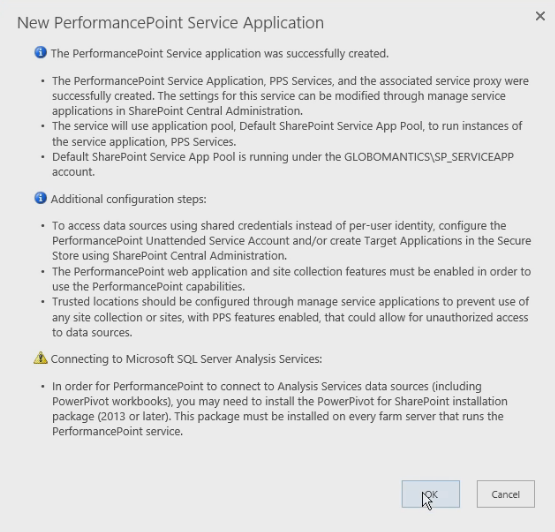
Step 4: You will get a message as shown in the below screenshot and you can notice the warning message “Connecting to Microsoft SQL Server Analysis Services:” no need to worry about this because in one of my previous article I’ve explained on PowerPivot Configuration. So this is just a warning letting us know that we need to do that, but you can simply avoid this warning message if you have done that PowerPivot Configuration already.

image

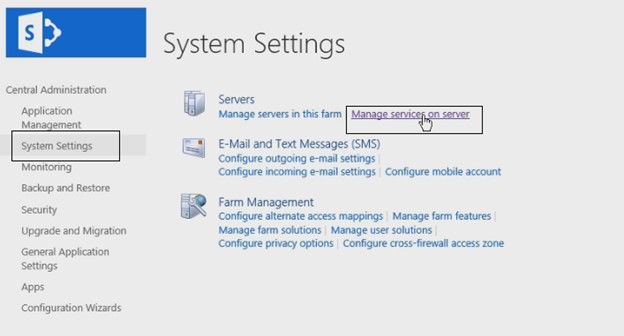
Step 5: Go to System Settings -> Manage Services on Server.

image


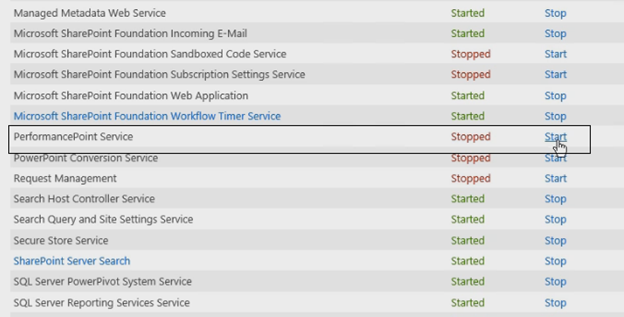
Search for PerformancePoint Service and click on Start if it is not started.

image


Alright we’re good and the next thing we need to do is go ahead and configure our PerformancePoint Service to use the Secure Store. We can see that in my upcoming article. Thank you for reading

Happy Coding

Ahamed

Category : SharePoint

Author Info

Ahamed Fazil Buhari
 
Senior Developer
 
Rate this article
 
Ahamed is a Senior Developer and he has very good experience in the field of Microsoft Technologies, especially SharePoint, Azure, M365, SPFx, .NET and client side scripting - JavaScript, TypeScript, ...read more
 

PORT configuration required to access IAAS / PAAS SQL remotely using SQL management studio

Sriram Varadarajan
 
Solution Architect
September 10, 2016
 
Rate this article
 
Views
4398

This article on port configuration for remote access of IaaS or PaaS SQL in Azure using SQL Management studio  is in continuation to our previous article on setting up SQL in IAAS

PORT configuration in AZURE SQL (IAAS)

Once you have the VM set up, every time you can’t get into the server to perform your day to day activity in SQL, you would expect to connect SQL (IAAS) from your SQL Management studio (installed in your local machine)

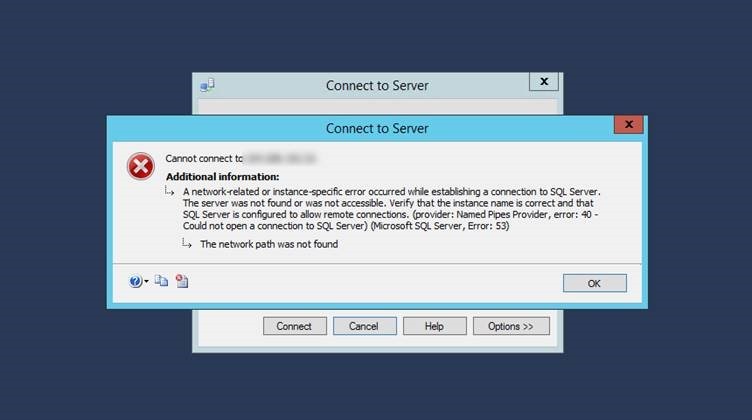
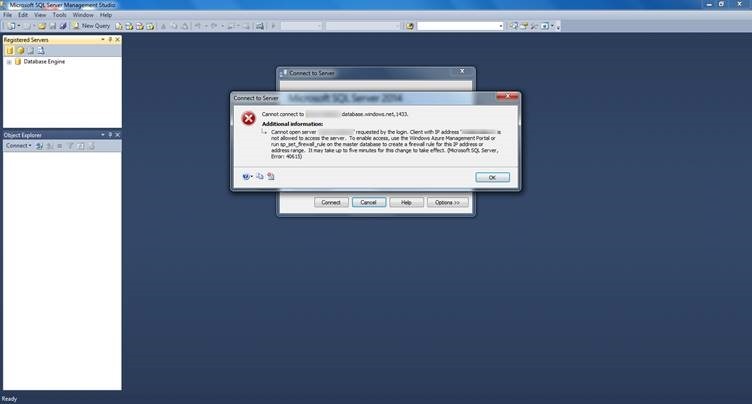
Without making any FIREWALL changes in VM, If you’re trying to connect to SQL (IAAS) from your SQL management studio, you would end up getting the below error.

Initial error:

clip_image002

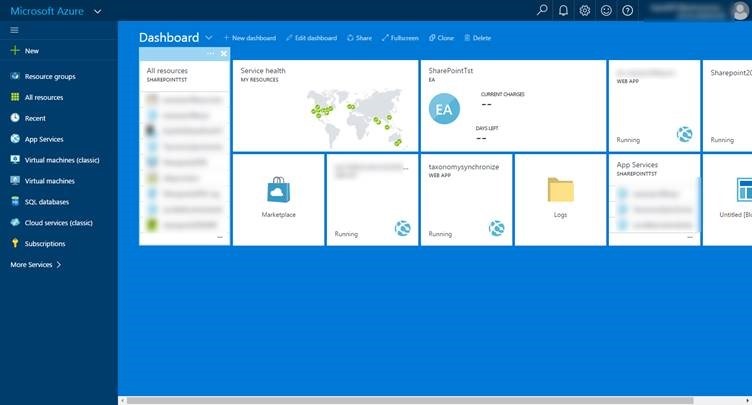
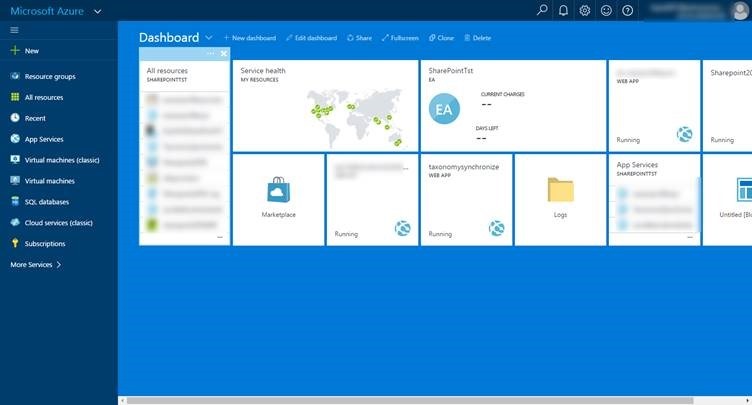
Here is what you need to do to get this working; login to PORTAL.AZURE.COM

clip_image004

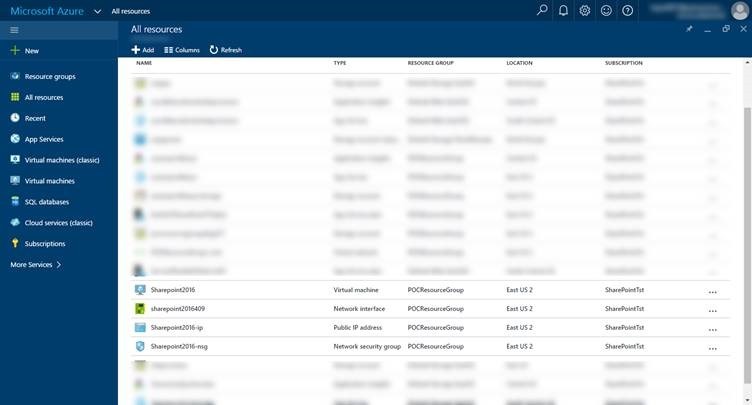
Go to ALL resources and look for .NSG file of your machine, in our case we need to look for SharePoint 2016 NSG which is our machine name.

clip_image006

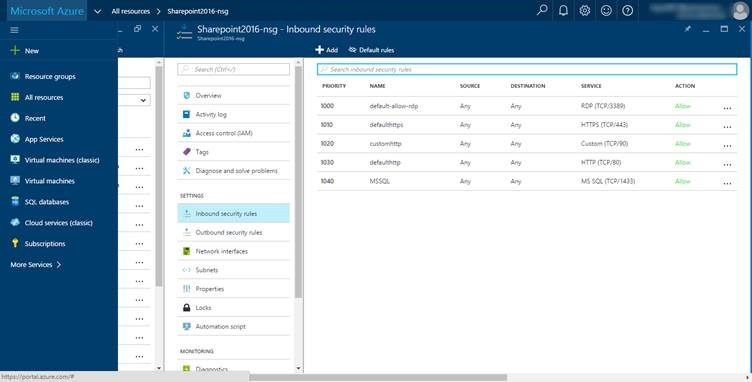
Select SharePoint 2016 NSG file and select inbound security rules in it

clip_image008

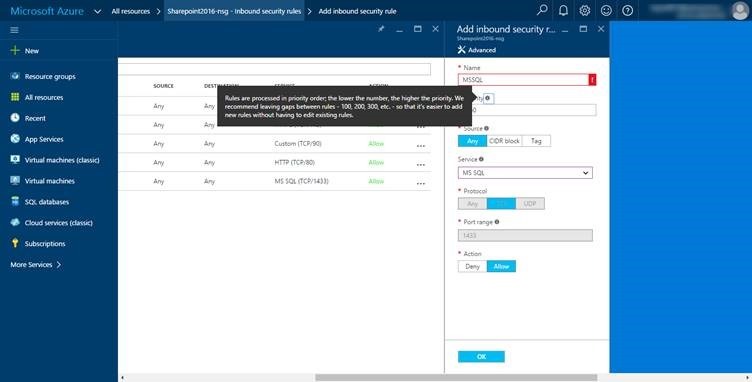
Click ADD provide the name and select the right service and in this case do select MS SQL

clip_image010

And port would be automatically get added based on your service selection.

Now you should be able to access SQL from your machine.

Note: This also depends on your organization firewall setting, if you’re in open network for example (from home) you should be able to access SQL seamlessly.

Now let’s see how to access PAAS SQL from outside

A related kind of setting needs to be set in PAAS as well to access SQL (PAAS) from SQL management Studio (from your local machine)

When you try to access, AZURE SQL (PAAS) from your SQL management studio (2014), you would end up seeing the below error

clip_image012

Here is what you need to do to get this working; login to PORTAL.AZURE.COM

clip_image013

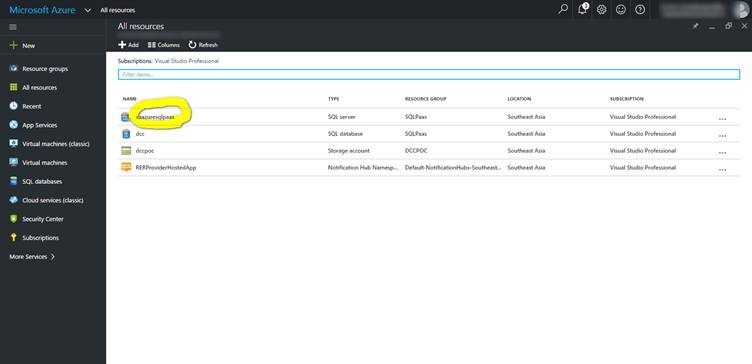
Go to ALL resources and look for the SQL Server (BYB you might have created a SQL Server (logical Server) for creating a PAAS SQL)

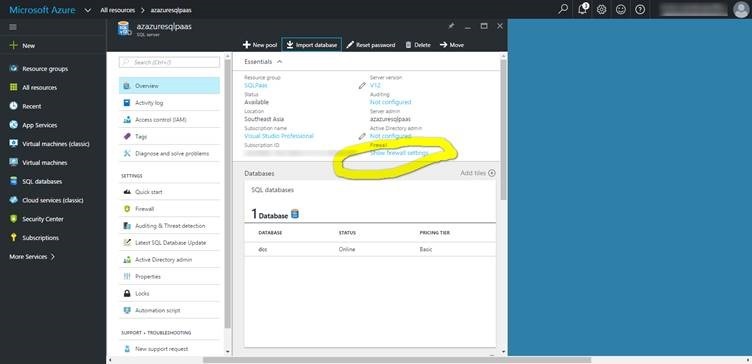
clip_image015

Select the SQL instance and click FIREWALL settings;

clip_image017

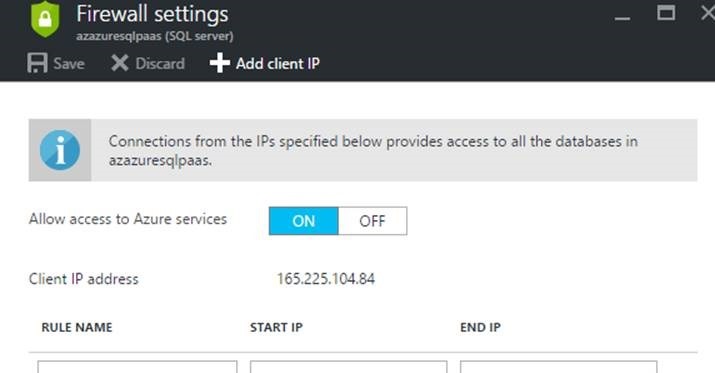
Click ADD CLIENT IP

clip_image019

And provide the IP which was shown in the SQL management studio (error) and click SAVE.

NOTE: You can also give range of IP’s if you want. Wait for 5 to 10 minutes to get this refreshed.

Go back to SQL management studio, you should be able to connect now.

Note: This also depends on your organization firewall setting, if you’re in open network for example (from home) you should be able to access SQL seamlessly.

Category : SQL

Author Info

Sriram Varadarajan
 
Solution Architect
 
Rate this article
 
Sriram is a Technology Evangelist with 15+ years experience in Microsoft Technologies. He is an enterprise architect working for large pharmaceutical organization which has presence globally with largest Microsoft implementation ...read more
 

How to Read the values from Config File – PowerShell

Sathish Nadarajan
 
Solution Architect
May 14, 2016
 
Rate this article
 
Views
15174

Almost in all the PowerShell Scripts, either we will be reading the configuration values from CSV File or an XML file. Let us Keep the code clean to read the value from the XML File.

 function LoadConfigXML()
 {
     $Progress = "0:Entered"
     Write-Host "Entered into LoadConfigXML Method" -ForegroundColor Yellow 
     Add-Content "$ProgressFile" "Entered into LoadConfigXML Method"
     
     $ConfigXmlPath = $scriptBase + "Configuration.xml"
     
     [Xml]$Config = Get-Content $ConfigXmlPath  
     
     Write-Host "Finished LoadConfigXML Method" -ForegroundColor Green 
     Add-Content "$ProgressFile" "Finished LoadConfigXML Method"
     
     return $Config
     
     $Progress = "0:Success"
 }


From the main thread, we can call the below line.

# Load the Configuration File

$Config = LoadConfigXML

In the next article, let us see, how to segregate the PS1 files into small files and load them on the main file.

Happy Coding,

Sathish Nadarajan.

Category : PowerShell

Author Info

Sathish Nadarajan
 
Solution Architect
 
Rate this article
 
Sathish is a Microsoft MVP for SharePoint (Office Servers and Services) having 15+ years of experience in Microsoft Technologies. He holds a Masters Degree in Computer Aided Design and Business ...read more
 

How to Configure the Active Directory Rights Management Service in Windows Server 2012

Sathish Nadarajan
 
Solution Architect
April 17, 2015
 
Rate this article
 
Views
13419

In this section, let us see how to configure the AD RMS (Active Directory Rights Management Service) in Windows Server 2012.

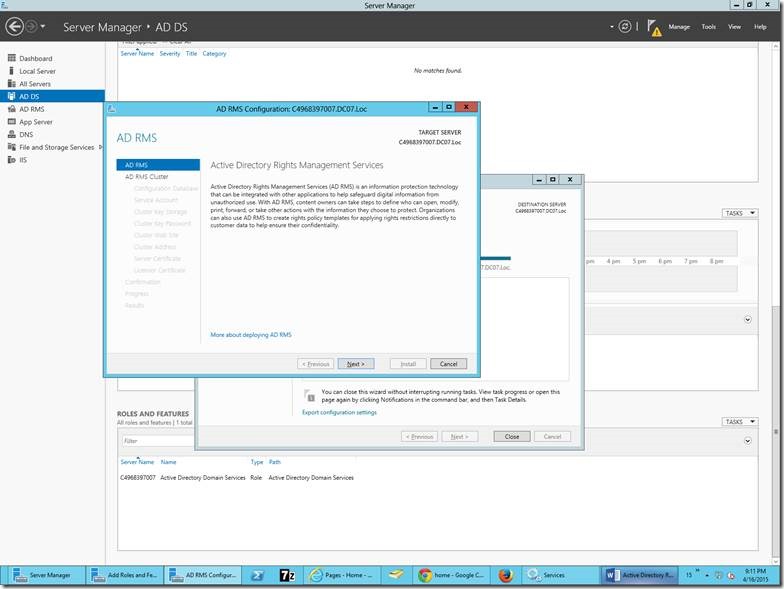
1. As we saw on the last article, to install the Role and Feature, at the end, there will be a link to open the Configuration Module. On Click of that link, the below screen will be opened.

clip_image002

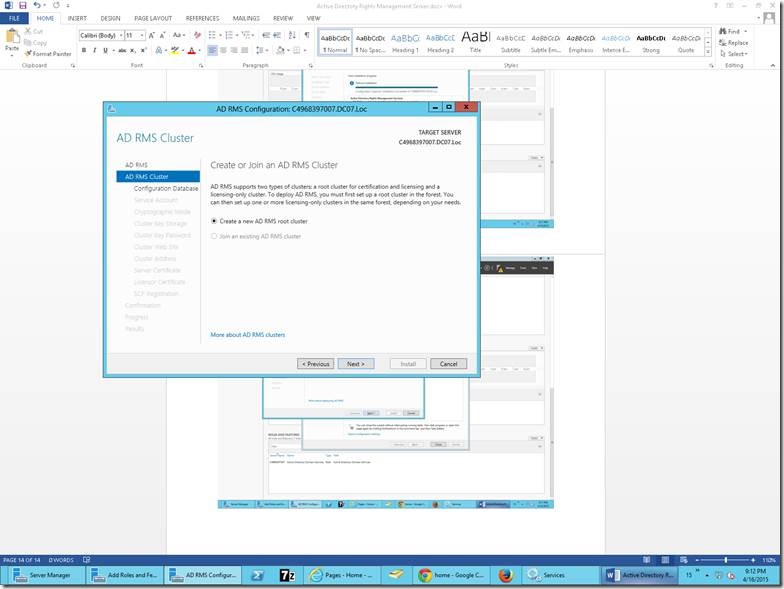
2. Select the option “Create a new AD RMS root Cluster”

clip_image004

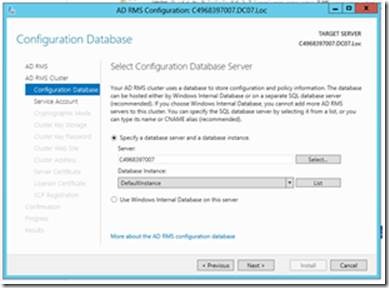
3. Select a Server and the DB Instance. In my case, I have given the server name and the Default DB Instance

clip_image006

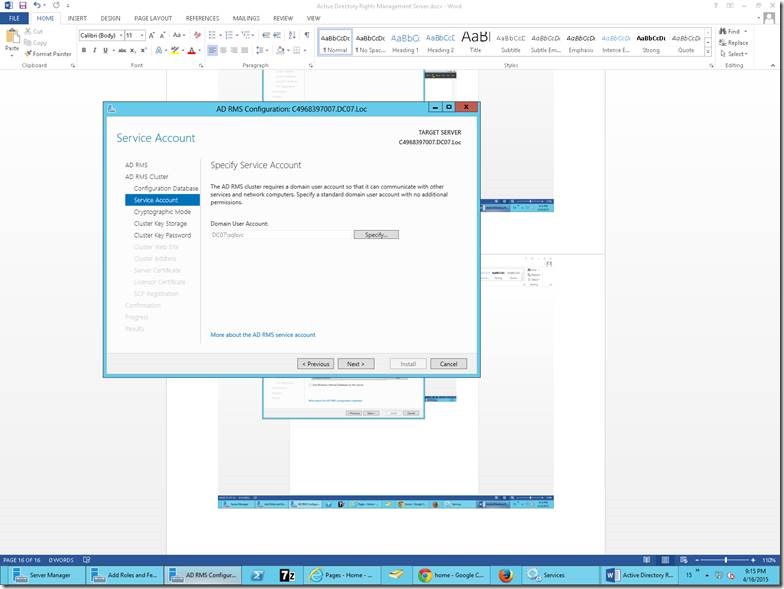
4. Specify the Service Account. This is the account by which the Active Directory Rights Management Service will be running on the Service.msc console. This account, we cannot give the same account which we are using to install. In my case, I have given an account called SQLSVC which has all the rights over the DB and a part of my domain admin as well.

clip_image008

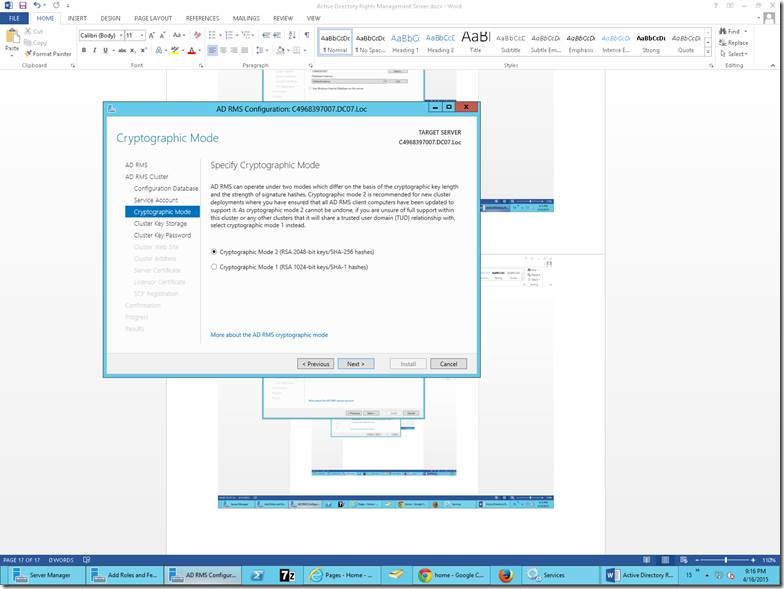
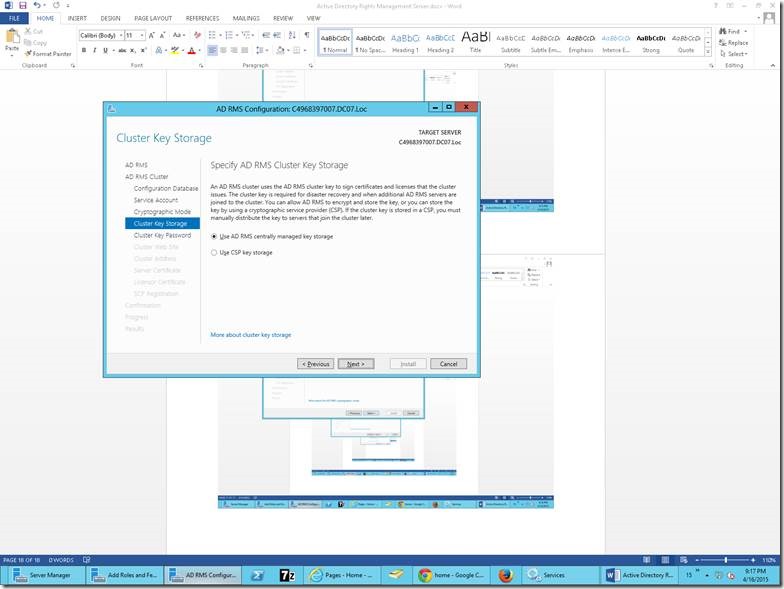
5. Select the default options on the consecutive screens.

clip_image010

clip_image012

6. Give the Password and keep the password safe. As this should be used later and cannot be retrieved by any more.

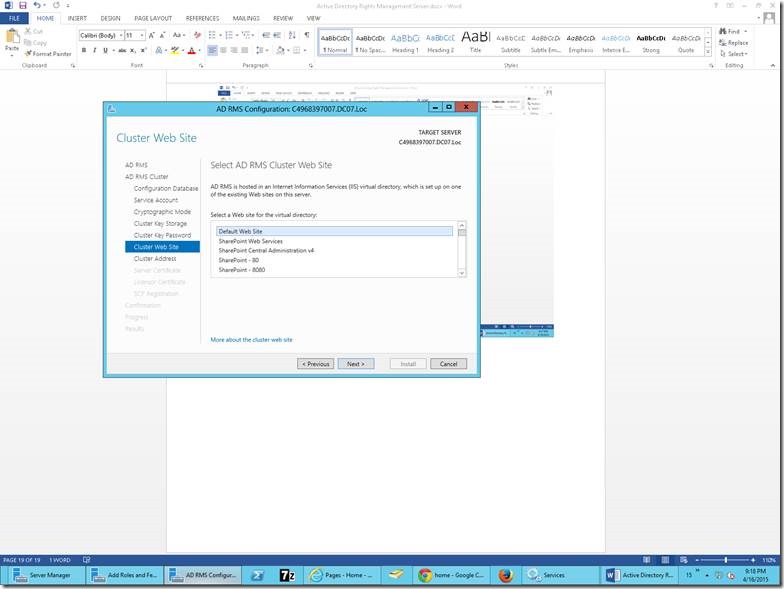
7. Select the Default website as my virtual directory.

clip_image014

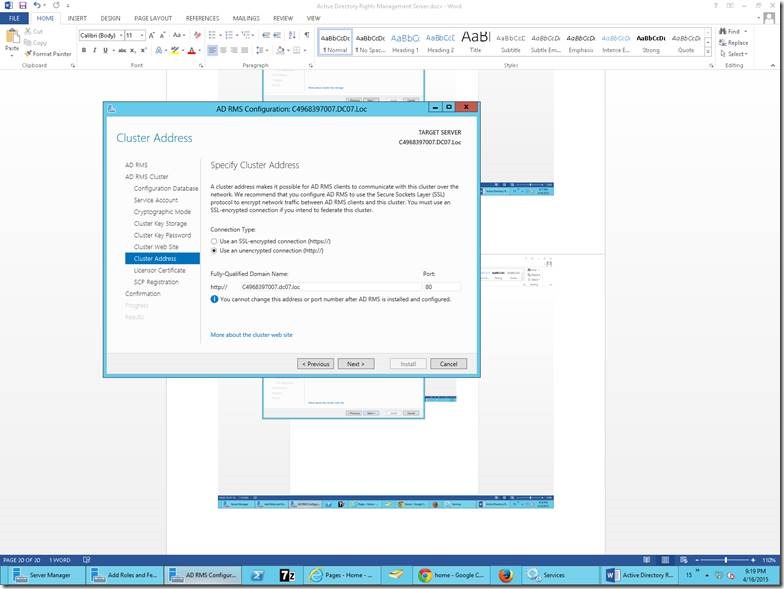
8. Select a Protocol. Either you can go with HTTPS or HTTP. In my case, I am going with HTTP.

clip_image016

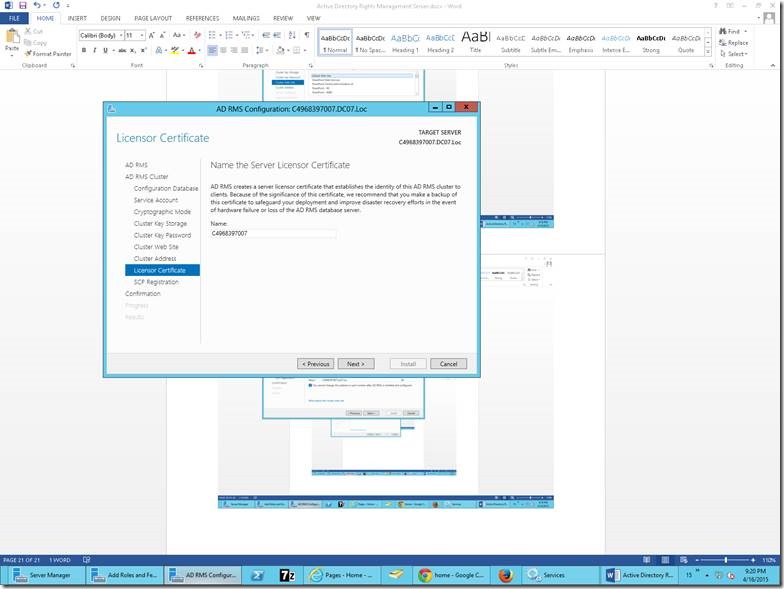
9. Give the Name of your server.

clip_image018

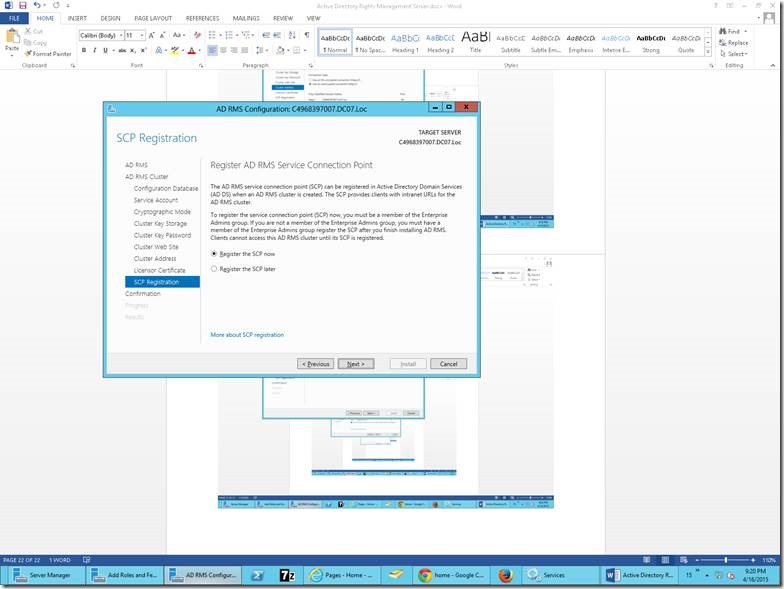
10. Register the SCP Now. (Service Connection Point)

clip_image020

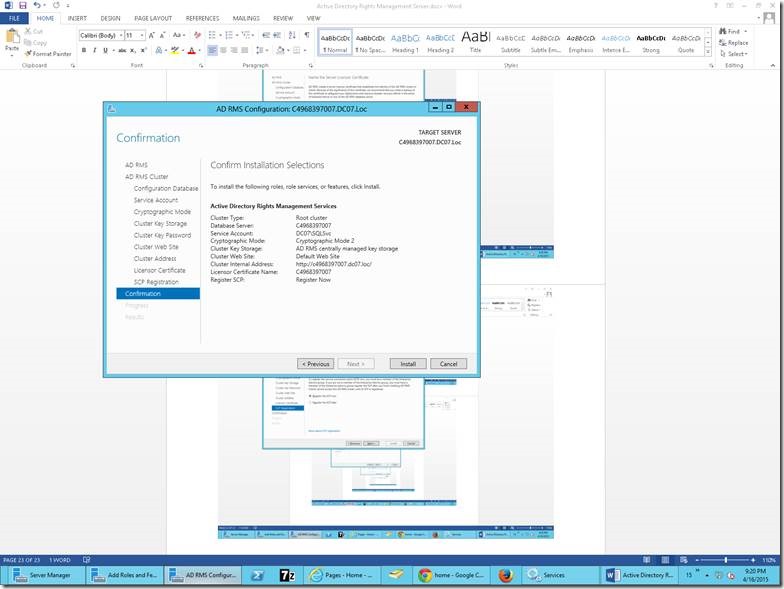
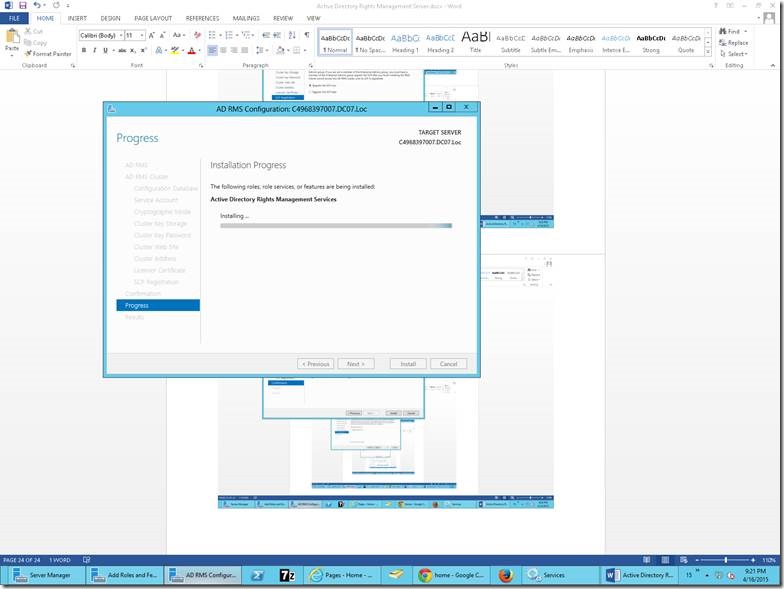
11. Click on the Install.

clip_image022

12. This will progress for 30 to 60 mins.

clip_image024

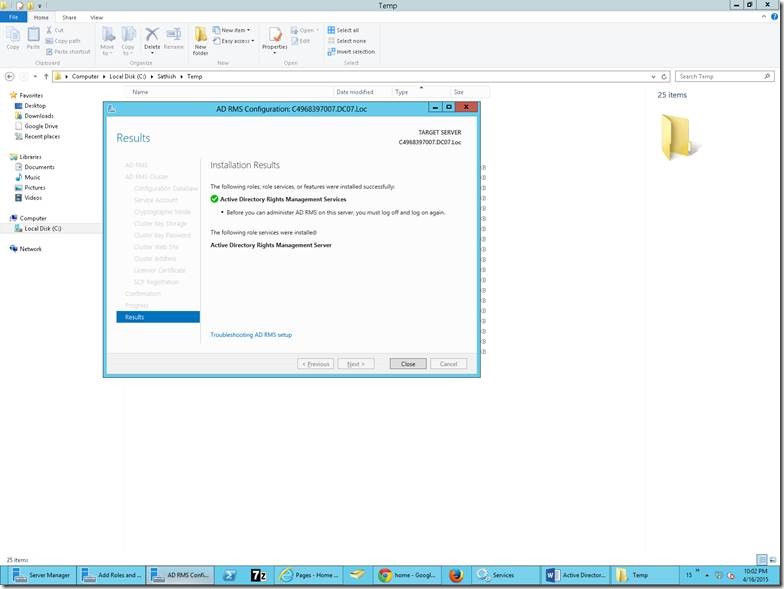
13. Once, the installation completes, we can close the screen.

clip_image026

14. Do a Reboot without fail, to make sure that all our changes are reflecting on the server.

Happy Coding,

Sathish Nadarajan.

Category : Windows

Author Info

Sathish Nadarajan
 
Solution Architect
 
Rate this article
 
Sathish is a Microsoft MVP for SharePoint (Office Servers and Services) having 15+ years of experience in Microsoft Technologies. He holds a Masters Degree in Computer Aided Design and Business ...read more
 

How to Configure DNS for App Development Model in SharePoint 2013

Sathish Nadarajan
 
Solution Architect
March 28, 2015
 
Rate this article
 
Views
19599

In the previous article, we saw the preparatory steps for the App Development Environment. But on that, we did not see, how to configure the DNS as a Domain/Subdomain. Let us have a look on that now.

The most important change in SharePoint 2013 for developers is the introduction of SharePoint apps. An app for SharePoint is a small and isolated application that provides a specific bit of functionality. Apps have their own, isolated URLs, which are separate from the URLs of the sites where the app is being deployed to and where the app is being used.

In order to provide isolated apps run in their own domain, instead of in the same domain name as your farm. Using a different domain name for apps helps prevent cross-site scripting between apps and SharePoint sites.
Each installation of an app has its own unique URL within the app domain.

The app’s URL is based on a template “http://[app prefix][app hash].[app domain]/[relative site url]/[app name]. When you add an app to a site, a substite called appweb is created to host the app content.

Because apps run in their own app domain , The farm admin will have to configure Domain Name Services (DNS) in the environment in order to be able to host apps. There is a page on TechNet that describes how to setup you DNS.

The Fam administrator can choose whether he want’s your app domain to be a subdomain of the domain that hosts the SharePoint environment (option B), or whether you want to create a completely new domain for your apps (option A).

Creating a new domain specifically to host your apps in is a bit more secure, but it also requires a little bit more configuration. The below sub section describe both approaches.

Option A: Create a new domain to host Apps

Go to “Start” menu in sharePoint 2013 Server.

Click on “Administrative Tools”

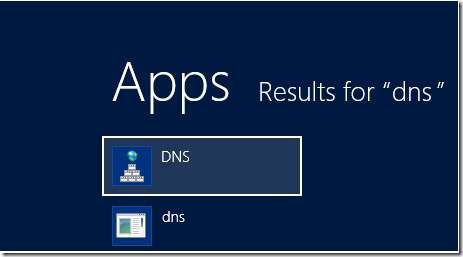
Select “DNS

clip_image001

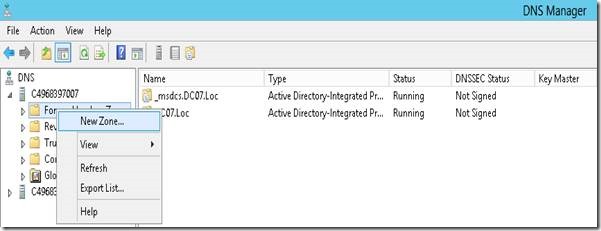
Right click “Forward Lookup Zones” and select “New Zone…”

clip_image003

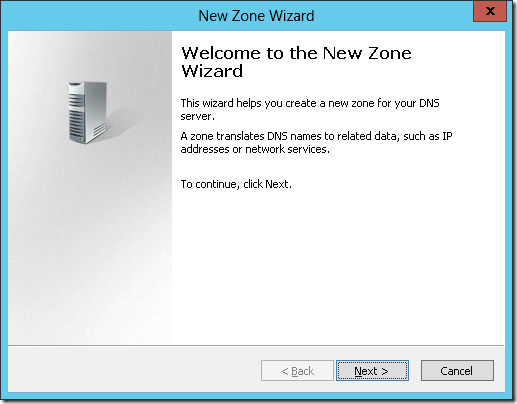
Click “Next”

clip_image004

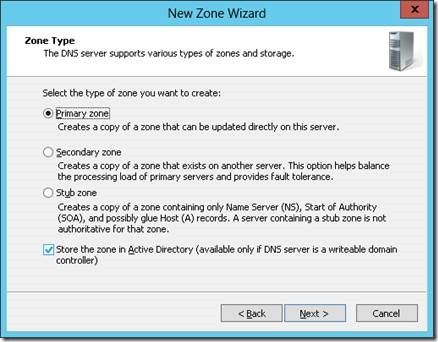
Keep the default and click “Next” again

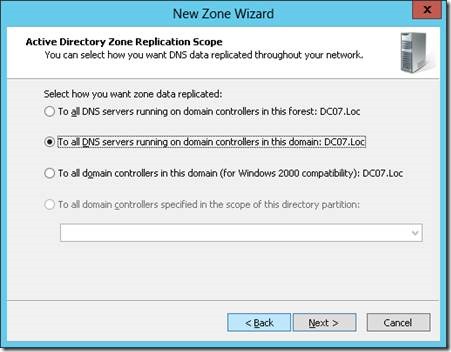
In most cases, especially your development server will be in it’s own domain you can use the default on the next tab again and can just click “Next”

clip_image006

clip_image008

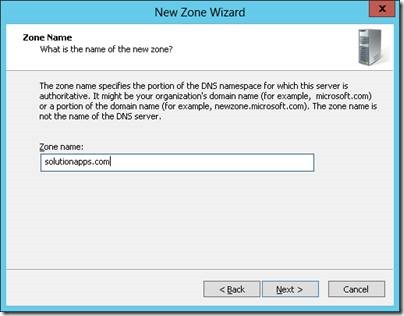
You now have to specify a zone name. It’s up to you what you choose here. My domain name is “solutions.com” and for our POC app domain. We will use “solutionapps.com”

clip_image010

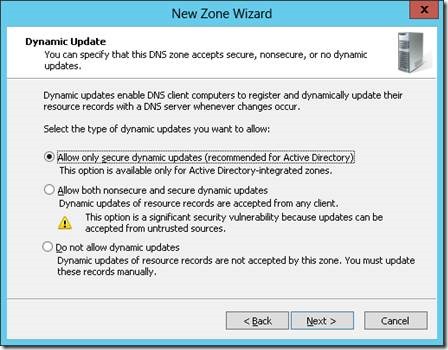
Click “Next”

clip_image012

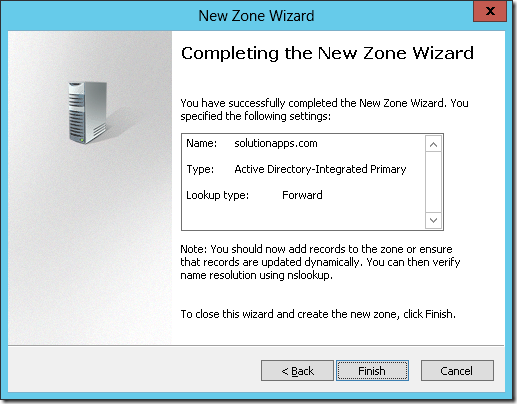
Click “Finish” button to complete the New Zone wizard.

clip_image013

clip_image015

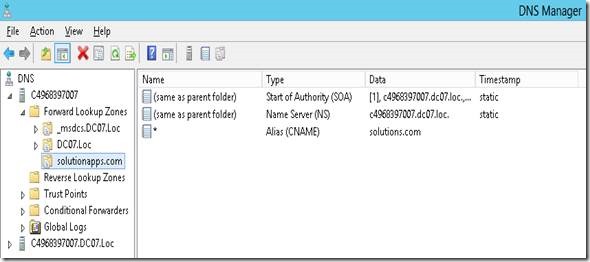
Right click on your new zone and select “New Alias (CNAME)…”

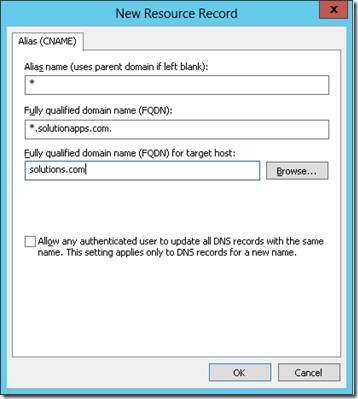
Fill in a * for “Alias name (uses parent domain if left blank)”

clip_image017

Click “Browse”

Double click on your server name

Double click “Forward Lookup Zones”

Double click the domain of your SharePoint environment. In my case this is “solutions.com”.

Select “(Same as parent folder)” and click “OK”

Click “OK”.

Note that selecting the FQDN of the domain in here will only work in single server scenarios. If you are using more than one server you should be pointing to the DNS record of the web server in here. This is either the DNS A record for the web server, or the DNS record of the primary cluster address for NLB environments.

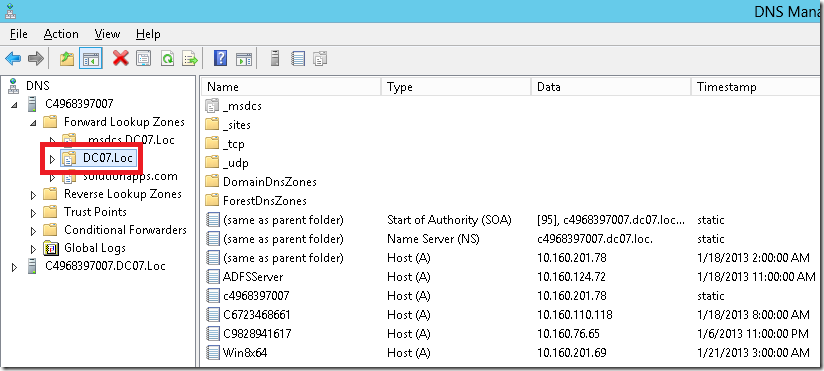
Option B: Create a sub domain to host Apps

Go to “Start”

Click on “Administrative Tools”

Select “DNS”

clip_image001[1]

clip_image018

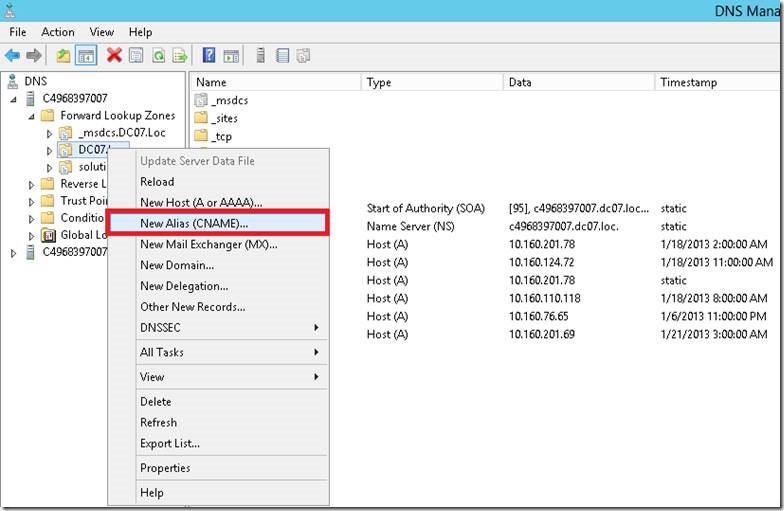
Right click on the name of your domain and select “New Alias (CNAME)…”

clip_image020

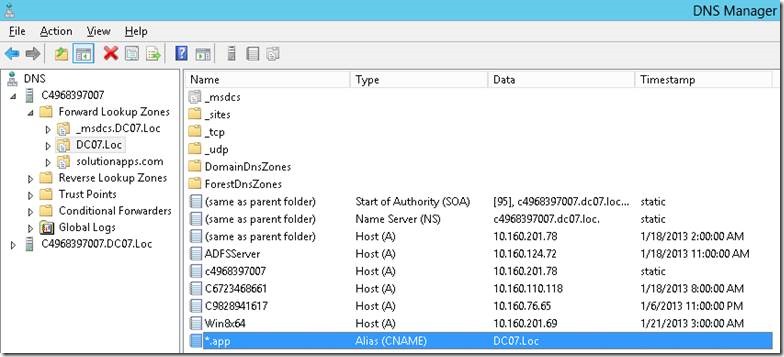
Fill in “*.app” for “Alias name (uses parent domain if left blank)”

Click “Browse”

Double click on your server name

Double click “Forward Lookup Zones”

Double click the domain of your SharePoint environment. In our case this is “DC07.Loc”

Select “(Same as parent folder)” and click “OK”

Click “OK”

clip_image022

Note that selecting the FQDN of the domain in here will only work in single server scenarios. If you are using more than one server you should be pointing to the DNS record of the web server in here. This is either the DNS A record for the web server, or the DNS record of the primary cluster address for NLB environments.

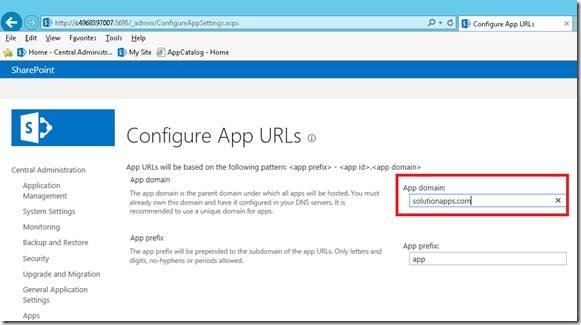
Configuring App Domain

Go to Central Administration

Click on “Apps” in the left side navigation

Click “Configure App URLs”

Fill in the URL of the app domain that you configured.

If you choose to use Option A the url will be something like “solutionapps.com”, if you choose to use Option B it will look like dc07.loc.

Fill in an app prefix. This can be anything you like, although it is best to keep this short. we used “app” for our POC

Click OK.

clip_image024


Happy Coding

Sathish Nadarajan

Author Info

Sathish Nadarajan
 
Solution Architect
 
Rate this article
 
Sathish is a Microsoft MVP for SharePoint (Office Servers and Services) having 15+ years of experience in Microsoft Technologies. He holds a Masters Degree in Computer Aided Design and Business ...read more
 

Installing and Configuring Office Web Apps for SharePoint 2013

Sathish Nadarajan
 
Solution Architect
June 2, 2014
 
Rate this article
 
Views
34951

In this article, let us see how to install and configure Office Web Apps for SharePoint 2013.

Office Web Apps Server – It is used to open the Office Applications, which is stored inside the SharePoint Server on the Browser itself. i.e., within an iFrame on a Layouts Page. This will be very much useful, if the end user doesn’t have Office Applications installed on his machine.

Prerequisites For Office Web App Server

1. The first point is, don’t install the Office Web Apps Server on the machine on which the SharePoint 2013 has been installed.

2. The minimum Software requirement is

a. Windows Server 2008 R2 With Service Pack 1 (or)

b. Windows Server 2012.

3. There is no specific Hardware requirement is specified. If the machine is capable enough to install the above mentioned OS s then it is enough.

Versions of Office Web Apps Server

There are 2 flavors of Installers

1. Free Version which can be downloaded from the Microsoft Download Center. Click here to download. This version is used to view only. i.e., the End user cannot edit the document within the SharePoint.

2. Licensed Version – Which allows the users to check out, edit and check-in to the SharePoint.

With the above background information, let us see how to Install and Configure Office Web Apps.

In my case, I used Windows Server 2012 as the WACServer. (WACServer is nothing but the machine on which we are going to install the Office Web Apps)

The Steps are as follows.

1. Download the Img file and install the Apps on the Windows Server 2012 Machine.

2. Make sure the following services are running. For that, execute the following command on PowerShell. (Open the PowerShell ISE as Administrator)

 Add-WindowsFeature Web-Server,Web-Mgmt-Tools,Web-Mgmt-Console,Web-WebServer,Web-Common-Http,Web-Default-Doc,Web-Static-Content,
 Web-Performance,Web-Stat-Compression,Web-Dyn-Compression,Web-Security,Web-Filtering,Web-Windows-Auth,Web-App-Dev,Web-Net-Ext45,
 Web-Asp-Net45,Web-ISAPI-Ext,Web-ISAPI-Filter,Web-Includes,InkandHandwritingServices
 

3. This will get executed without any problem.

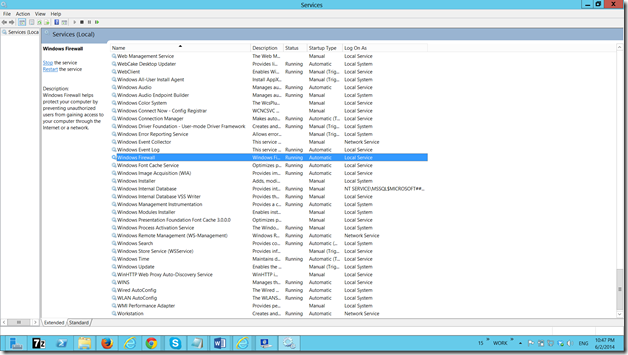
4. Then the next step would be Make sure that the Windows Firewall Services are running. To verify that, you can go to Services.msc and verify.
image

5. Now, we need to make a decision. I.e., Whether we are going to have a HTTP app or a HTTPS App. I would suggest always go with HTTPS.

6. For HTTPS Sites, we require a Self Signed Certificate. Please refer here. In our case, I named the certificate as OfficeWebAppCertificate.

7. Once the certificate has been created, execute the below command.

 New-OfficeWebAppsFarm -Verbose -InternalUrl https://C6723468661 -ExternalUrl https://C6723468661.DC07.Loc -CertificateName OfficeWebAppCertificate -ClipartEnabled -TranslationEnable

8. C6723468661 – This is the machine on which I am installing the Office Web Apps. This is a cloudshare machine and the domain is DC07.Loc

9. With this, we are done with the WACServer.

10. To verify whether the installations are correct, open the browser and enter the URL

http:// C6723468661.dc07.loc/hosting/discovery

a.image
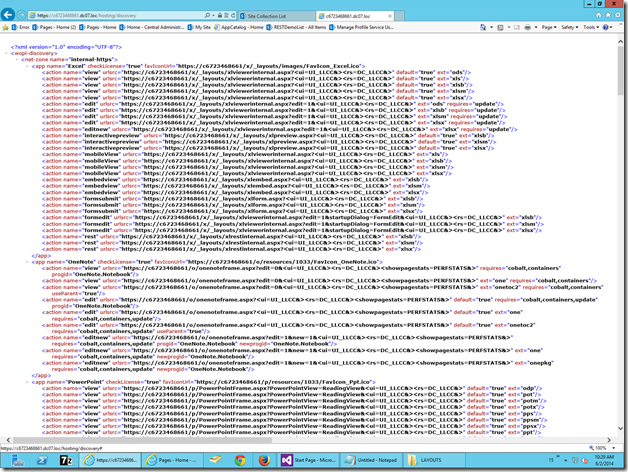
11. I think this is so simple right. Let us see the steps to be done on the SharePoint Server Now.

12. I came back to my SharePoint Server and going to execute the following command.

 New-SPWOPIBinding -ServerName C6723468661.DC07.Loc

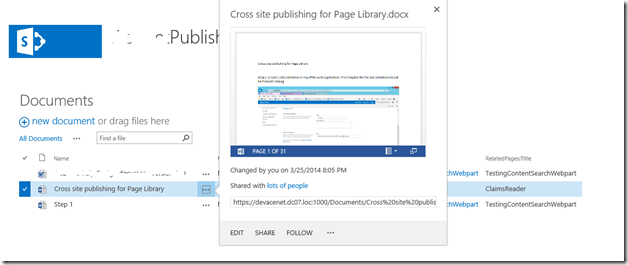
13. That’s it. We are done with the SharePoint Server too. Now, if you go to the Documents Library and hover any of the document, then the popup should come and on which the document will be displayed.

The screen shot would be,
image

The installation and configuration steps may be very simple. But the following are the exceptions and the solution for them while doing the configuration steps. They are the key points which I wanted to make a note of.

Exception 1:

something is preventing us from opening the workbook. it might be blocked for security reasons

Solution :

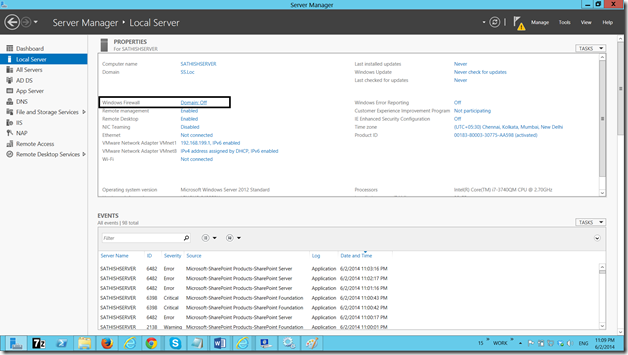
Make sure that the Firewall of the WACSever is not blocking. For that, better we can Turn Off the FireWall Settings.

To do that, we can go to the Server Manager and Change the settings.
image

Exception 2:

While trying to execute the New-SPWOPIBinding, I am not able to reach the WACServer. I was keep on getting the exception like

WARNING: The Server did not respond. Trying again (attempt 1 of 5)

Solution:

After struggling for more than an hour, I found that there something needs to be done on the Local Security Policy.

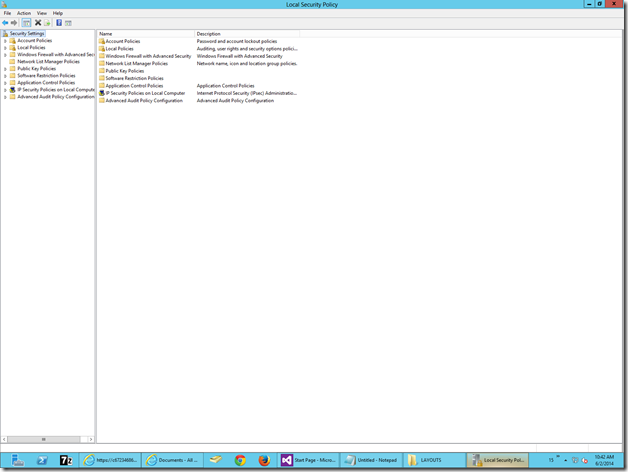
a. On the SharePoint Server, go to Local Security Policy. For that, Press Windows+Q and type “Local Security Policy”.

b. The following window will Open.
image

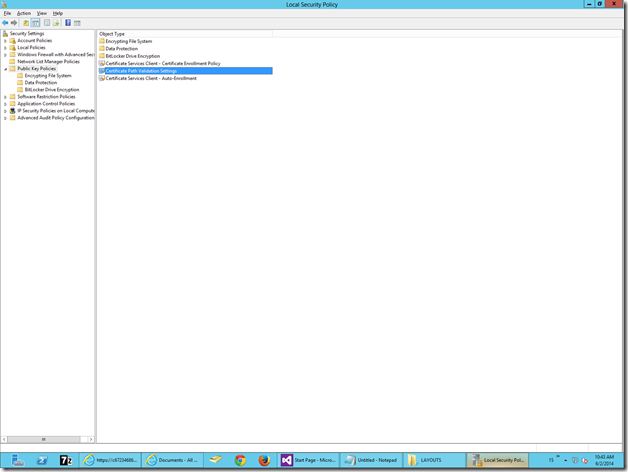
c. On which go to the Public Key Policies.
image

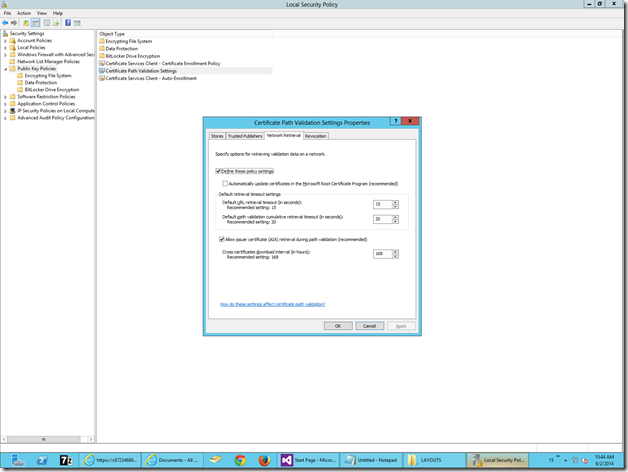
d. Select the Certificate Path Validation Settings. On the Network Retrieval Tab, make sure that the following check boxes were selected.
image

e. Do a Re-Start of the SharePoint Server.

f. That’s it. The exception gone.

Exception 3:

sorry there was a problem and we can’t open this document office web apps 2013

Solution :

a. Open the WACServer and open the SharePoint URL

b. You will be seeing the Certificate Error on the Browser.

c. Click the Certificate and Install the Certificate under the Trusted Root.

d. Restart the IE.

Observation with Content Search WebPart.

The Office Web Apps Server opens the documents in Browser from the AllItems.aspx as well as the Search Results Page. But when I try opening from a content Search WebPart, it is not able to open in the Browser. That I am working for a workaround. Let us see, If I get any workaround, will post to the community.

Thanks for the patience and hope this makes your installation easy.

Happy Coding.

Sathish Nadarajan.
Author Info

Sathish Nadarajan
 
Solution Architect
 
Rate this article
 
Sathish is a Microsoft MVP for SharePoint (Office Servers and Services) having 15+ years of experience in Microsoft Technologies. He holds a Masters Degree in Computer Aided Design and Business ...read more
 

Leave a comment